Certificate
- Is recommended to follow and read the overview about openNAC solution.
- To deploy an openNAC technologies is required to understand and follow network requirements.
- As soon as you have deployed the openNAC is recommended to select the proper use case that fits with you requirements.
- Selecting the use case, an scenario must be configured to covert as much as possible customer needs.
This page shows which steps are required to configure UNAC certificate based on.
1. DEFINITION
This scenario allows to authenticate the assets connected to your corporate network using a certificate.
2. MECHANISMS (How does it work?)
Using AAA (Authentication, Authorization and Accounting)approach openNAC can perform a Network Access Control.
- When the host is connected to a network device interface (ND), the ND asks if the host has supplicant. If the host has supplicant, it’s sends authentication data of the supplicant.
- The network device sends authentication package for openNAC Core. Then openNAC executes the authentication and authorization process, answering to network device if the host has allowed access and, in addition, the corresponding vlan defined in the policy.
- Network device fixes the port in the vlan received by openNAC.
- The host ask for DHCP and continues with the normal process of accessing the network.
3. DASHBOARD (How do we display the information?)
For each authenticated device that connects to the network, openNAC displays the following information.

4. DEPLOYMENT (Do it yourself)
The following is a light guide to deploy visibility 802.1x mode based on basic lab.
4.1 REQUIREMENTS
- openNAC Core.
- Network device 802.1x (switch, ap..) in the following scenario will be used Cisco switch with IOS 12.2.55 or higher.
- openNAC Analytics. (Graphic Output)
- Client PC, in the following scenario will be used Windows 10.
4.2 SCENARIO ARCHITECTURE
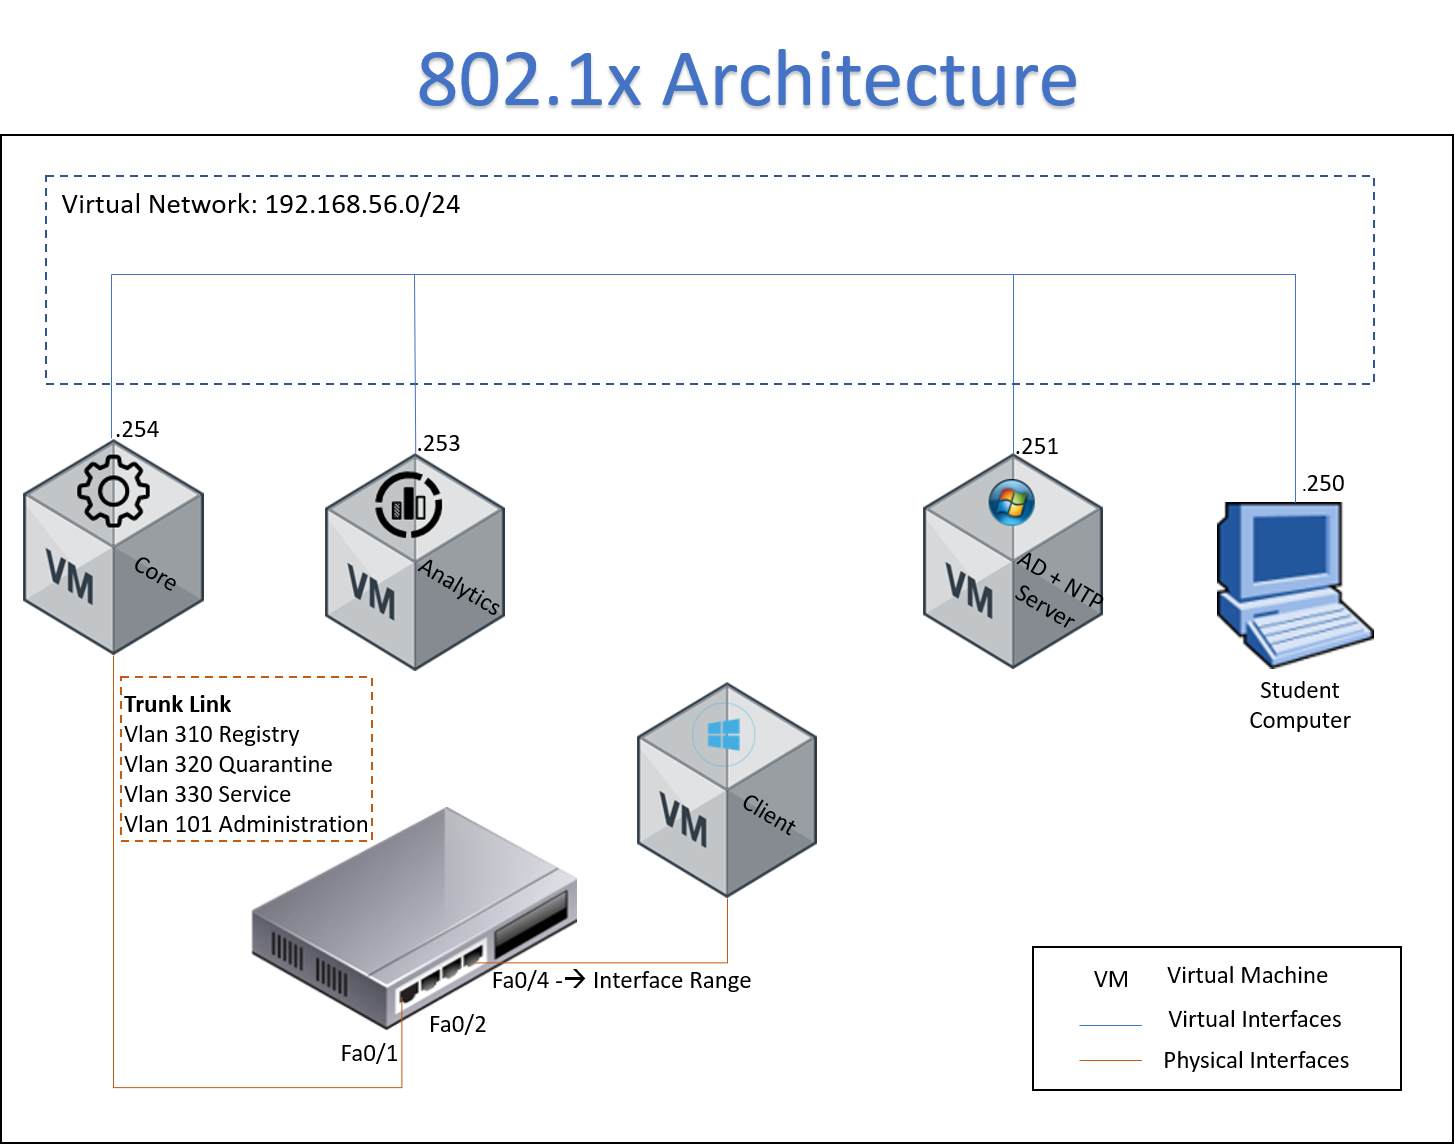

- The client is connected to switch and start the process for network access
- The switch send an authentication request to host
- The host send the response with user credentials, in this case we are using an AD server as a user credentials repository
- The switch send the radius access request to ON Core.
- ON Core re-send the access request to AD Server
- AD Server response with a radius access challenge to ON Core
- ON Core re-send the challenge to Switch
- The Switch send a EAP-Request to host
- The host send an EAP-Response to Switch
4. SETTINGS
On Switch
The following link contains the required configuration on switch for visibility use case.
Basic 802.1x Cisco Switch Configuration
On Core
FreeRadius certificates
When you deploy an openNAC server from an OVA, probably you have the FreeRadius certificates expired, and “eapol_test” will fail.
Renewal of certificates
You can follow the next steps to renew the certificates in testing mode and take care when you use it to production mode. We have followed the /etc/raddb/certs/README indications.
- First of all, go to the certificates folder and remove the old test certificates and the certificate’s counters:
Remove certs in folder or execute the “destroycerts make” command:
cd /etc/raddb/certs
rm -f *.pem *.der *.csr *.crt *.key *.p12 serial* index.txt*

make destroycerts

Note
In case you only want regenerate one specific kind of certificate, you have to remove the indicated CRT and KEY files, and modify the property “unique_subject = no” inside index.txt.attr file, to allow rewrite an existing subject.
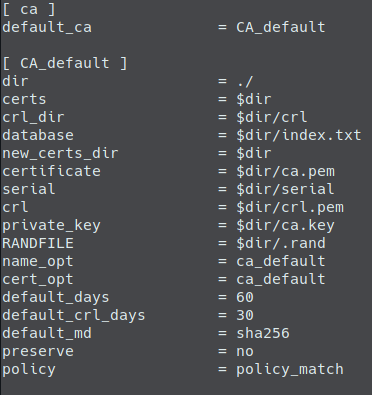
Define the “default_days” property in each CNF files (ca, server or client), to indicate the validity of the certificates. By default, 60 days is configured. If you want, you can modify the information related with organization and passwords.
vim <file>.cnf
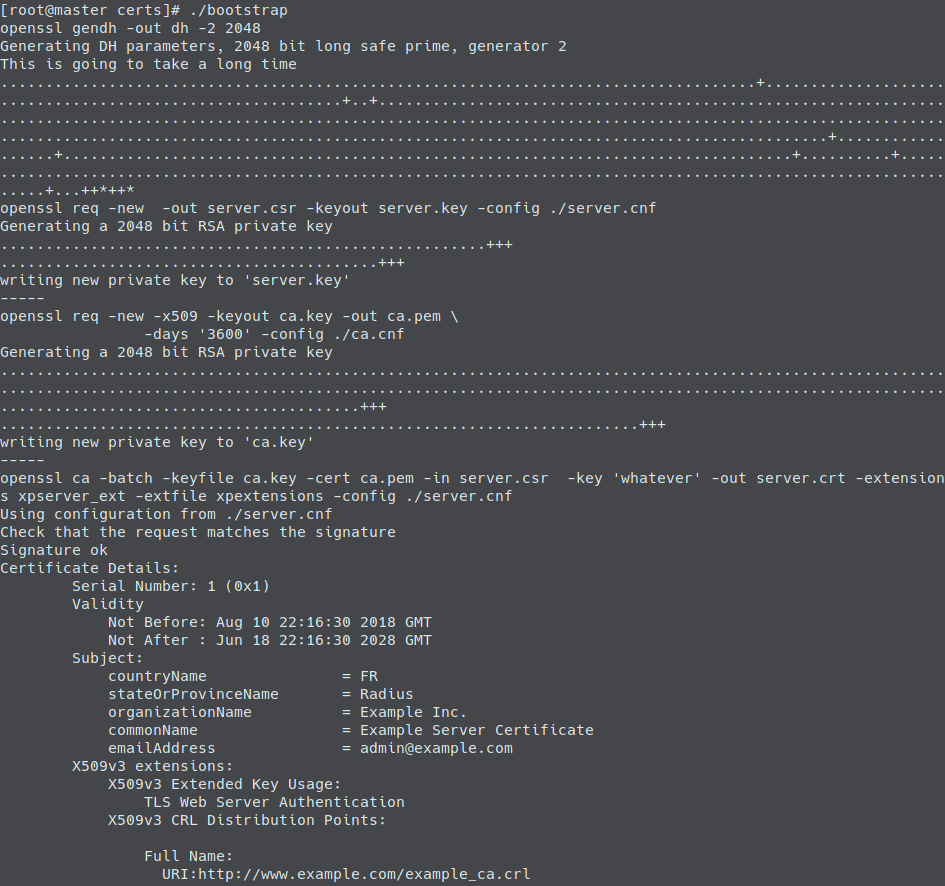
Execute bootstrap file, to generate the CA and server certificates:
cd /etc/raddb/certs
./bootstrap
To generate client certificates, you have to indicate a unique emailAddress and commonName in client.cnf file, and generate the certificate with the next command:
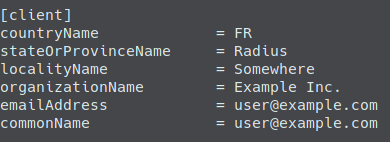
make client
cp client.p12 `grep emailAddress client.cnf | grep '@' | sed 's/.*=//;s/^ *//'`.p12
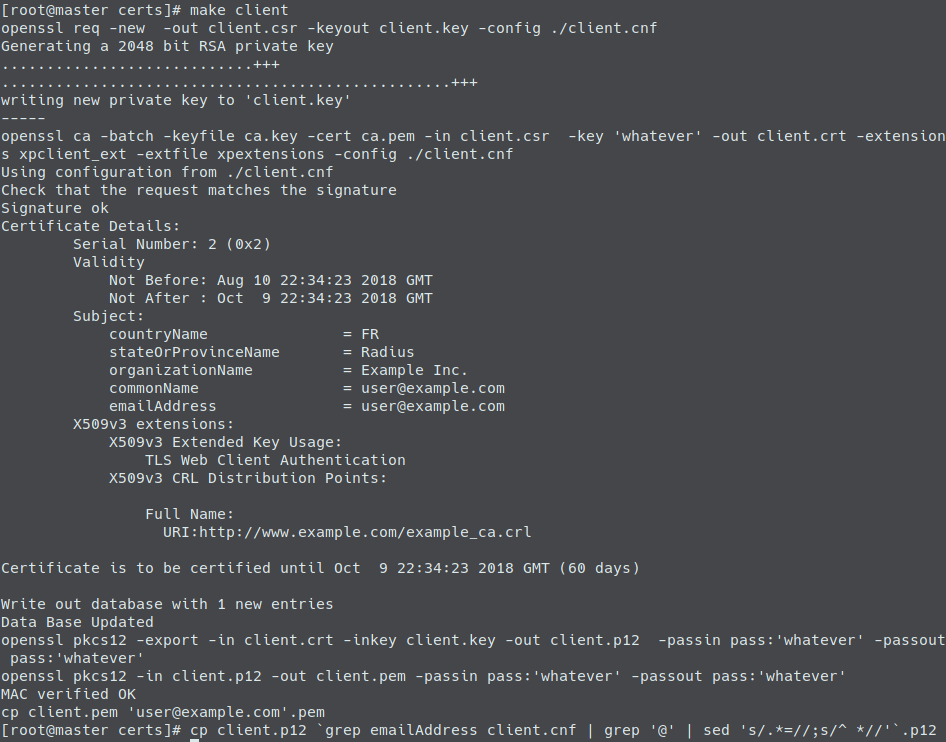
Note
A copy of the PEM file is generated with the emailAddress name, but is highly recommended copy the P12 file to preserve it with the same format, due to Windows clients can import this file using the system wizard.
Finally, provide to all new files the right ownership and restart radius server:
chown root:radiusd *
service radiusd restart

Use an external CA certificate
In case you have your own CA certificate, you can use it with FreeRADIUS.
Like in section before, you have to remove the old test certificates information:
cd /etc/raddb/certs
make destroycerts
- Modify in server.cnf file, all the properties you consider, taking special care in the following list:
- Default_days
- Input_password
- Output_password
- CountryName
- StateOrProvinceName
- LocalityName
- OrganizationName
Note
Server properties (countryName, stateOrProvinceName, localityName and organizationName) have to match with CA certificate values.
Modify the private_key_password property from tls section, in the /etc/raddb/eap.conf and /etc/raddb/modules/inner-eap files, with the output_password value previously indicated.
Generate the CSR request file, for server certificate:
make server.csr
Send the generated server.csr file to your certificate authority, in order to obtain the certificate. Remember include the XP extensions for use with Microsoft Windows.
Note
If you have to create the server certificate, using your CA certificate and OpenSSL, you could use this commands:
cat >xpext.txt<<EOF
[ xpserver_ext]
extendedKeyUsage = 1.3.6.1.5.5.7.3.1
EOF
PASSWORD_CA=`grep output_password ca.cnf | sed 's/.*=//;s/^ *//'`
openssl ca -batch -keyfile ca.key -cert ca.pem -in server.csr  -key ${PASSWORD_CA} -out server.crt -extensions xpserver_ext -extfile xpext.txt -config ./server.cnf
You have to receive the server.crt file from Certificate Authority, and copy in /etc/raddb/certs directory. Then you can generate the server.pem file, with the following commands:
PASSWORD_SERVER=`grep output_password server.cnf | sed 's/.*=//;s/^ *//'`
openssl pkcs12 -export -in server.crt -inkey server.key -out server.p12  -passin pass:${PASSWORD_SERVER} -passout pass:${PASSWORD_SERVER}
openssl pkcs12 -in server.p12 -out server.pem -passin pass:${PASSWORD_SERVER} -passout pass:${PASSWORD_SERVER}
From Certificate Authority, you have to get the public certificate, for example the ca.pem file, and copy it in /etc/raddb/certs directory, to be used by FreeRADIUS for check the client certificates.
Prepare the dh and random files:
make dh
make random
Finally, provide to all new files the right ownership and restart radius server:
chown root:radiusd *
service radiusd restart
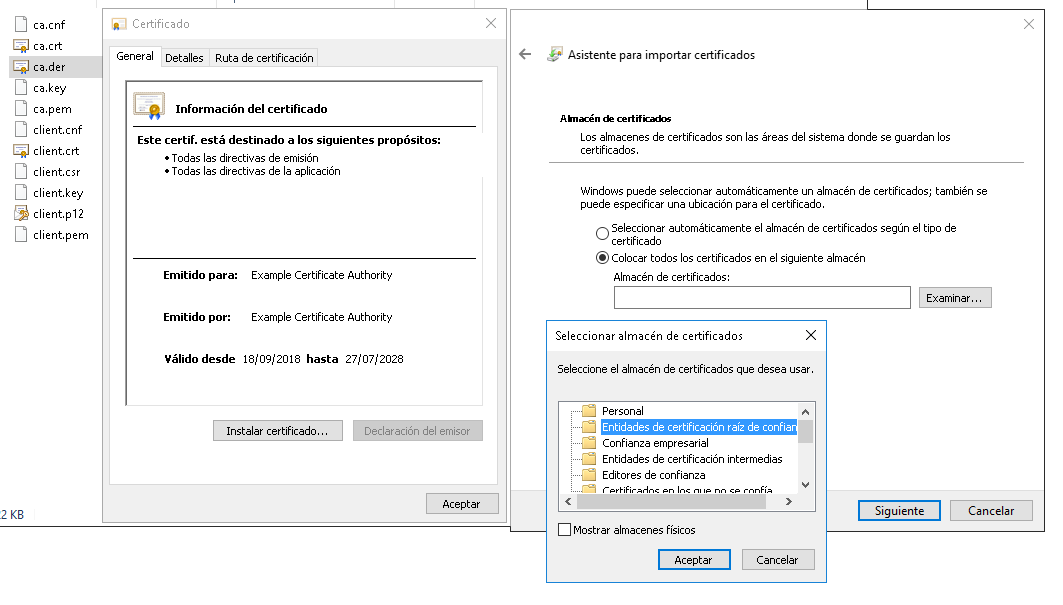
Install CA certificate on Windows
In order to avoid deselect the option “Validate server certificate” in “Protected EAP Properties” as is shown in step 4 on [[Setup8021x_clients|Setup 802.1x clients]] document, you can install the CA certificate in the Windows client, and enable this like a “Trusted Root Certification Authority”, following these steps:
From the Windows client you have to access to the ca.der file or copy on it.
Double click on this file, open the certificate properties and you can install certificate from it using “Certificate Import Wizard”. In this wizard, you have to specify the “Certificate store” as “Trusted Root Certification Authorities”.
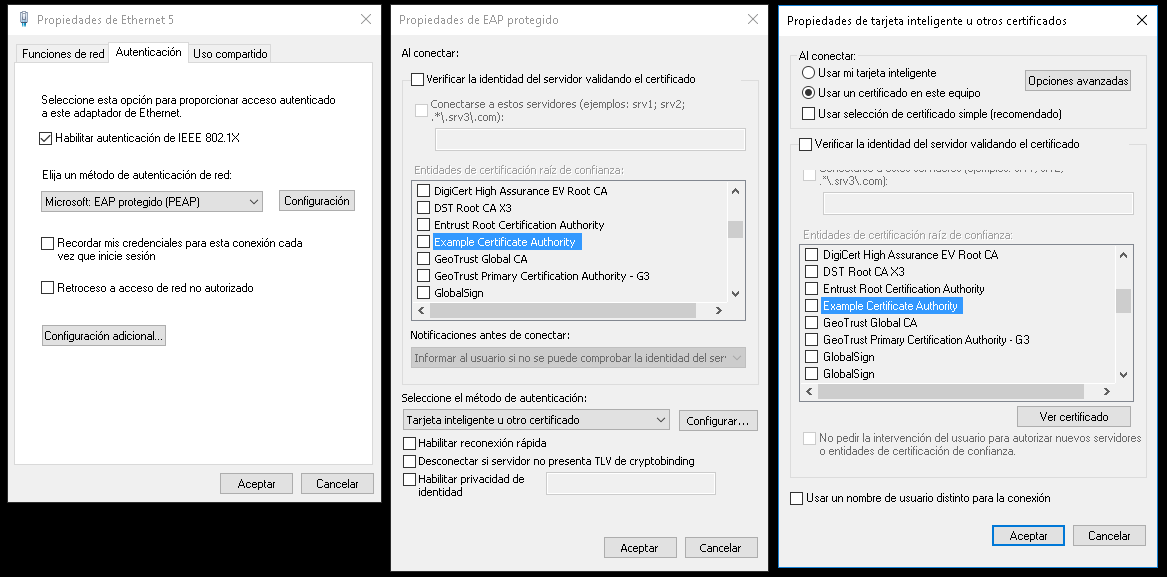
Once installed, you can modify the 802.1x connection indicating “Validate server certificate”, deselect “Connect to these servers” (or specify the list of possible servers) and select the imported CA as a trusted root certification authority. In case you don’t select the new trusted root CA, a window will appear the first time user connect to validate this CA.
Note
You can find more information of how to configure 802.1x connection on 801.X Clients Configuration.
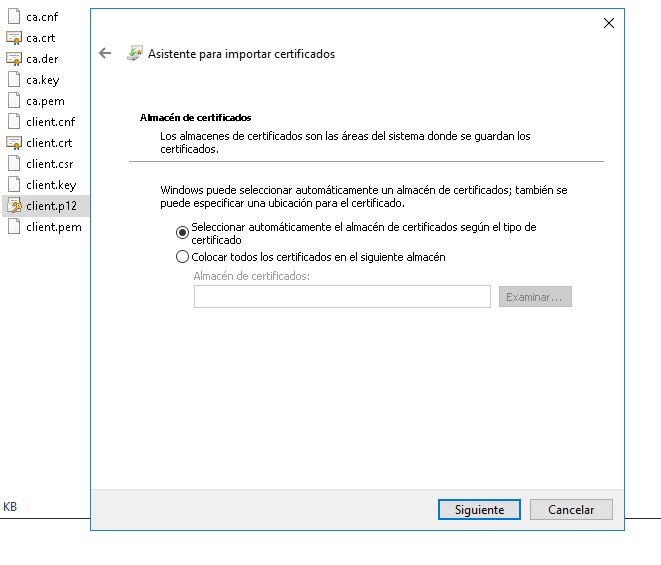
Use client certificate on Windows
To use a client certificate with 802.1x connections on Windows machine, you have to import the certificate and configure the 802.1x connection to use it.
First of all, you have to access to the client.p12 file, and with double click on it, the “Certificate Import Wizard” is opened. Introduce the password used when the certificate was created (output_password in client.cnf file) and not select the option “Enable strong private key protection”. Finally, store it in “Personal” folder or “Automatically select the certificate store based on the type of certificate”.
Note
If you select the option “Enable strong private key protection”, the certificate can not be used by Windows to establish the connection.
Once installed, in the 802.1x connection properties, you can specify “Smart Card or other Certificate” as “Network authentication method” in order to use “Protected EAP”, and configure these properties: Select the option “Use a certificate on this computer”. If you have installed the CA certificate, you can leave the “Validate server certificate” selected, how is defined in previous section. Depending on the commonName specified in the client certificate, you have to allow change this value as user name when connection is established, selecting “Use a different user name for the connection”.
Note
With this configuration, [[Statement_of_Health_(SoH)|Statement of Health (SoH)]] doesn’t work. It could be resolved deploying some changes on FreeRadius server and using PEAP with certificate in order to use MSCHAP.
4.4 TESTING
Turn on the client VM, use the 802.1x configured interface on switch to connect the host.
Is important to capture the IP address, using it openNAC will run the plugin over each know asset which match with the previous configured policy.
Access control can be done validating the user identity, at first point with user credentials from local or remote repository, using 802.1x protocol.
MAC, IP address, user group can be verified for each hit on the define policy access rule.
Also in the first console screen the authentication hits by method should be reflected.

4.5 TROUBLESHOOTING
- Please perform a basic review Basic Check
- To perform a debug of authentication proces you can verify the link Radius Troubleshooting
- To some issues related with endpoint configuration please 802.1 Windows Client issues