802.1X Clients Configuration
Windows 7
Configuration
- Step 1:
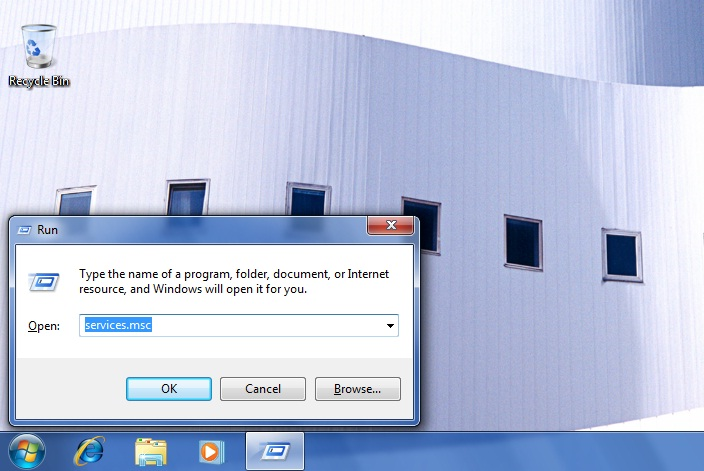
It is necessary to check if the PC client has the authentication parameters.
Execute the “Windows +R” command and run “services.msc”.
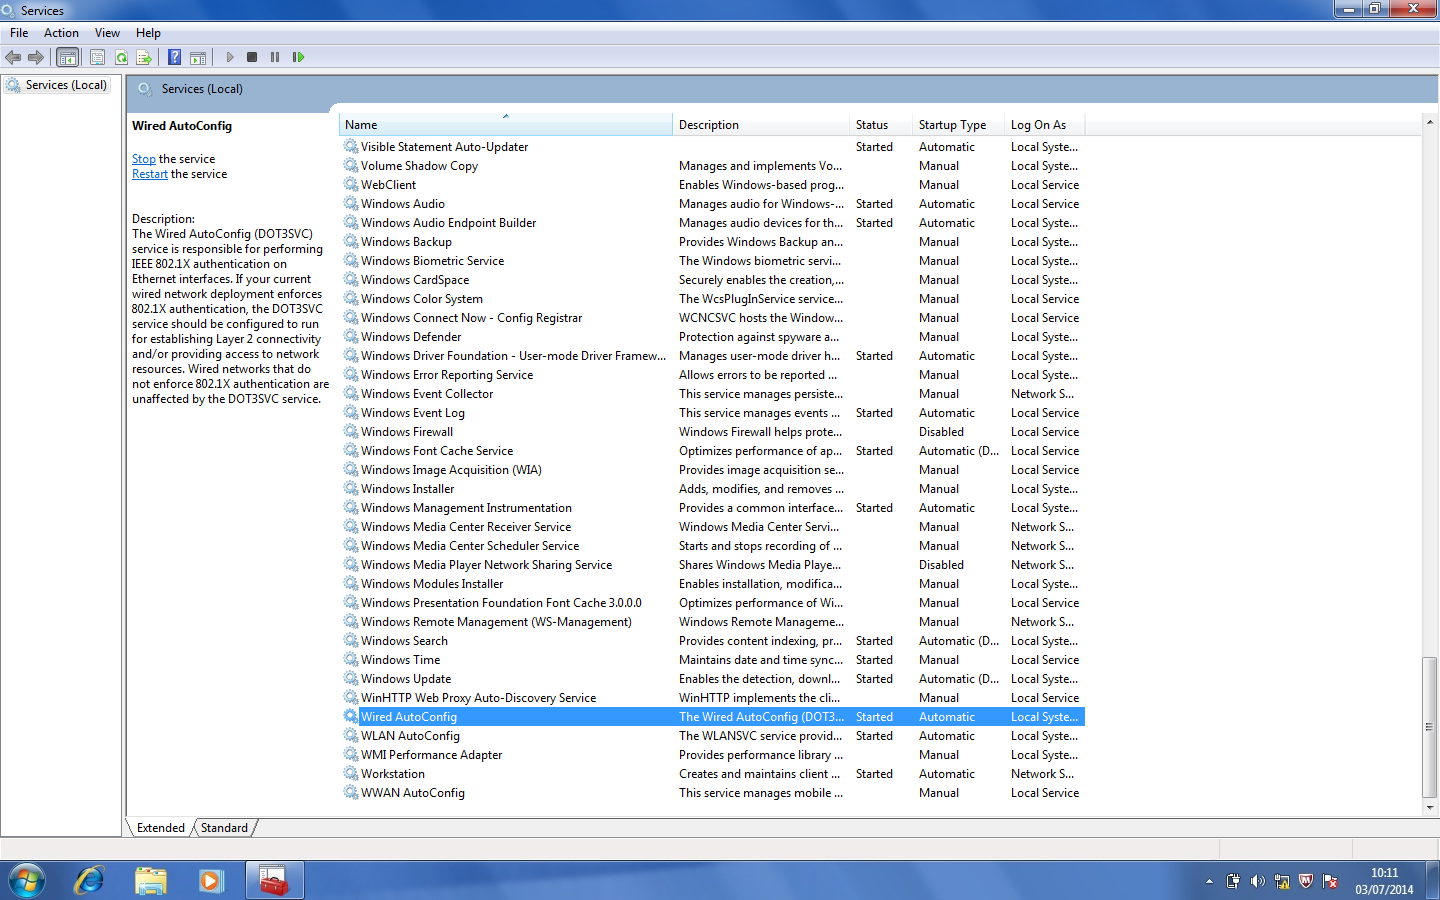
- Step 2:
At the services config window it is necessary to find the the service Wired AutoConfig and active it.
Note
If windows clients is configured in other language please find out the service (Wired Autoconfig) in your O.S language. • Spanish: Configuración automática de redes cableadas • Portuguese: Configuração Automática com Fio
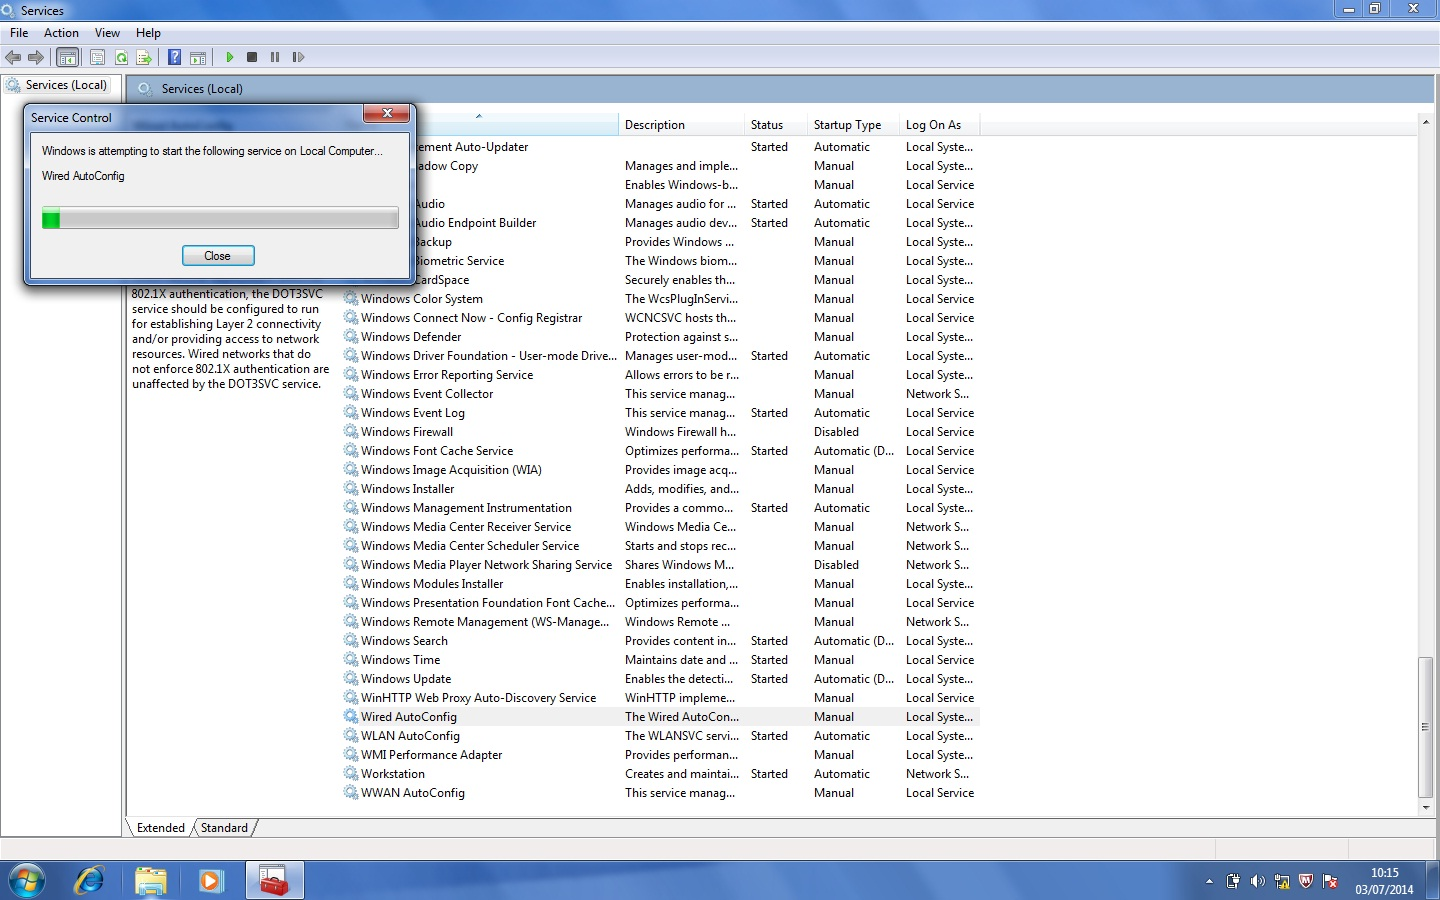
Set as automatic start service.
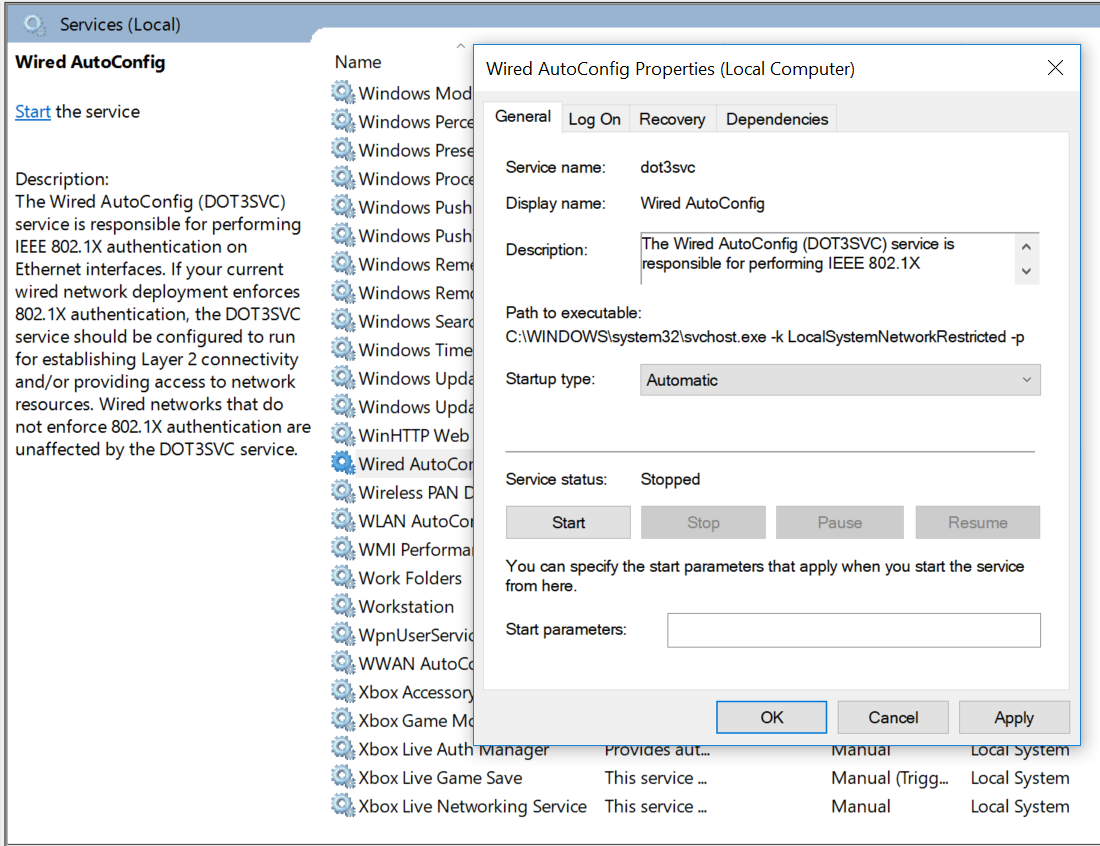
Start the service.
- Step 3:
Go to the properties of the wired connection and activate the 802.1x authentication.

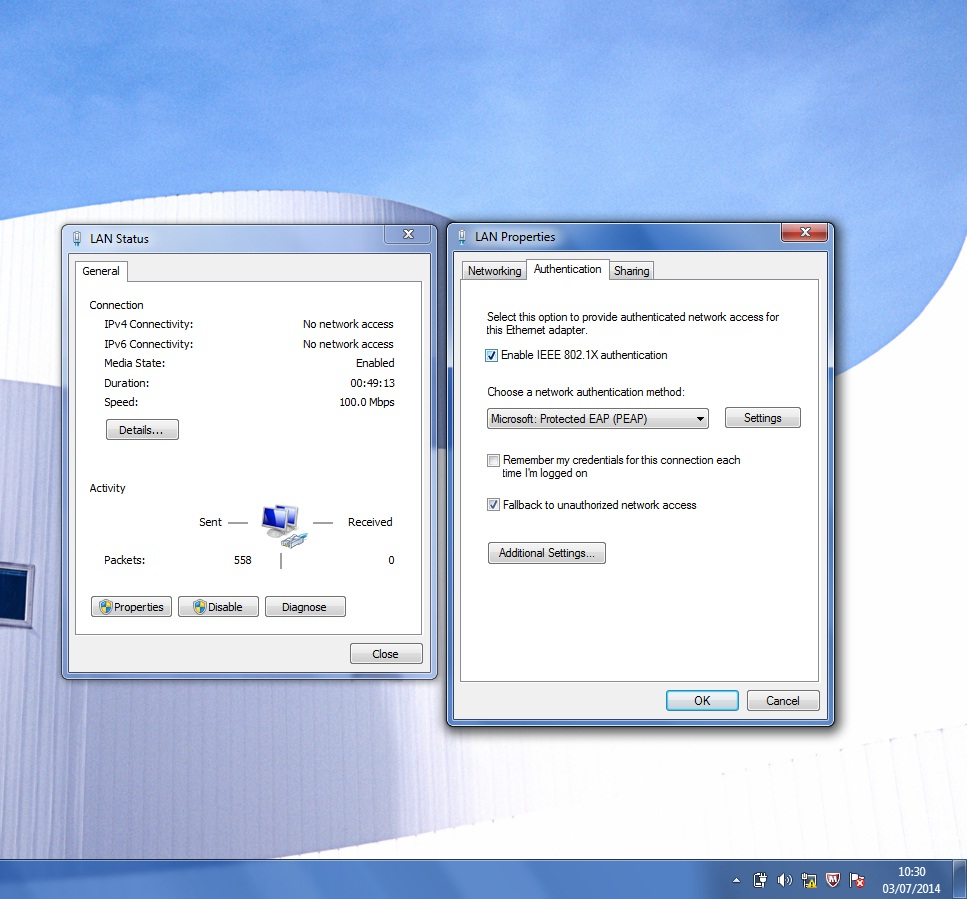
Note
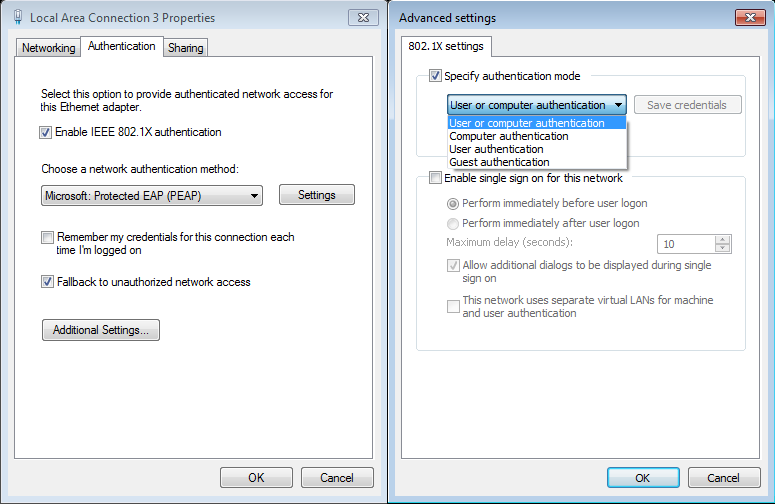
In “Additional Settings”, you can configure the authentication mode.
The common mode is “User or computer authentication”, because it uses computer authentication (also known as host authentication) when user is not connected, and then when user starts session, an user authentication is sent.
- Step 4:
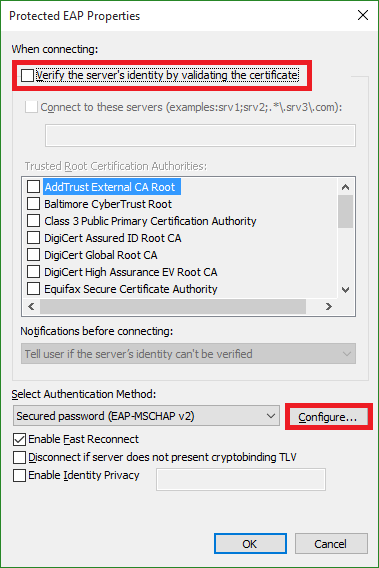
Choose the authentication method “Microsoft: Protected EAP (PEAP)”, in order to provide user authentication. If you would use certificate authentication, you have to choose “Microsoft: Smart Card or other certificate”.
Then go to the “Settings”
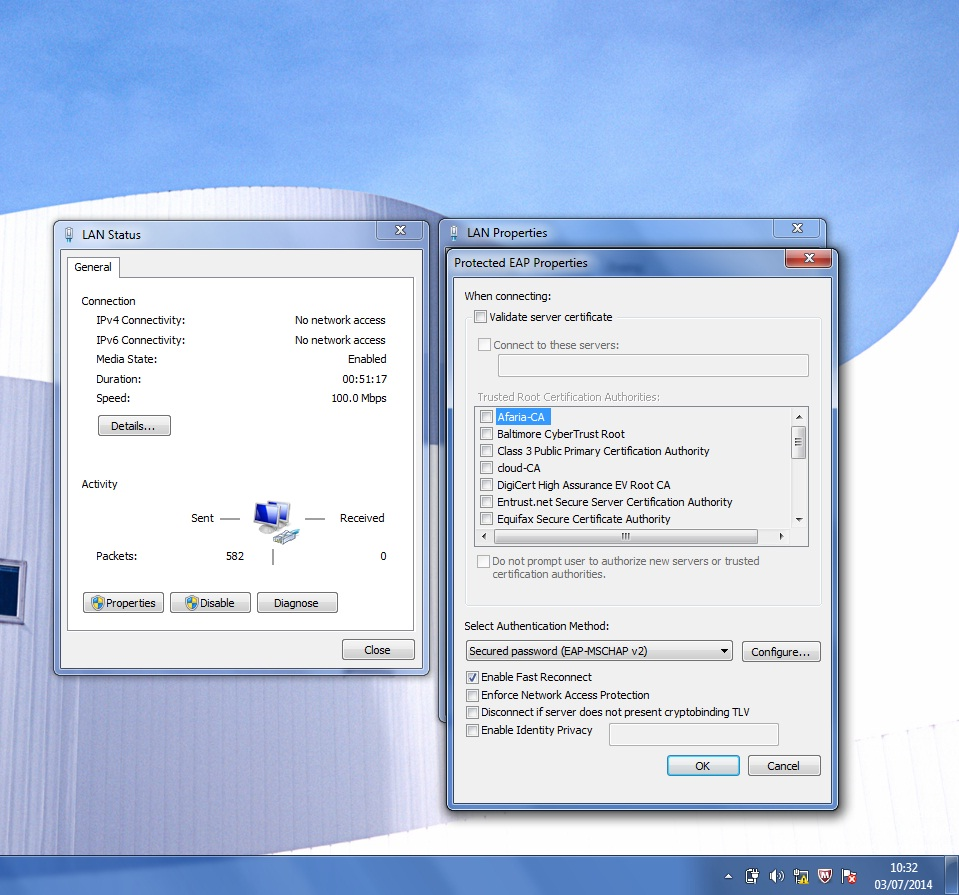
Deselect the option “Validate server certificate”, in test mode, to avoid validate the server certificate. In real environment, this option have to be selected and the “Trusted Root Certification Authority” who has generated the server certificate selected too. This “Trusted Root Certificate Authority” has to be loaded previously using the Certificate Authority (CA) public key.
Another interesting option is the “Enable Fast Reconnect”, because it offers a fast reconnection process when the initial connection has been done.
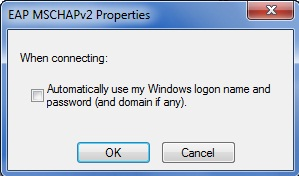
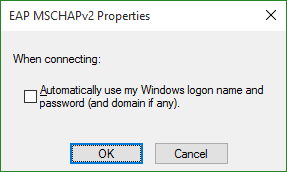
Click on the button “Configure…” and make sure in the dialog box that opens, the option “Automatically use my logon name and password (and domain if any)” is unchecked, when you want to be asked for the user credentials. In an Active Directory managed environment, with Domain hosts, this option is selected and then the same user credentials used to login the computer are sent without user intervention.
- Step 5:
Attach the network cable into the PC and wait for the message in the lower right corner of the screen requesting additional information.
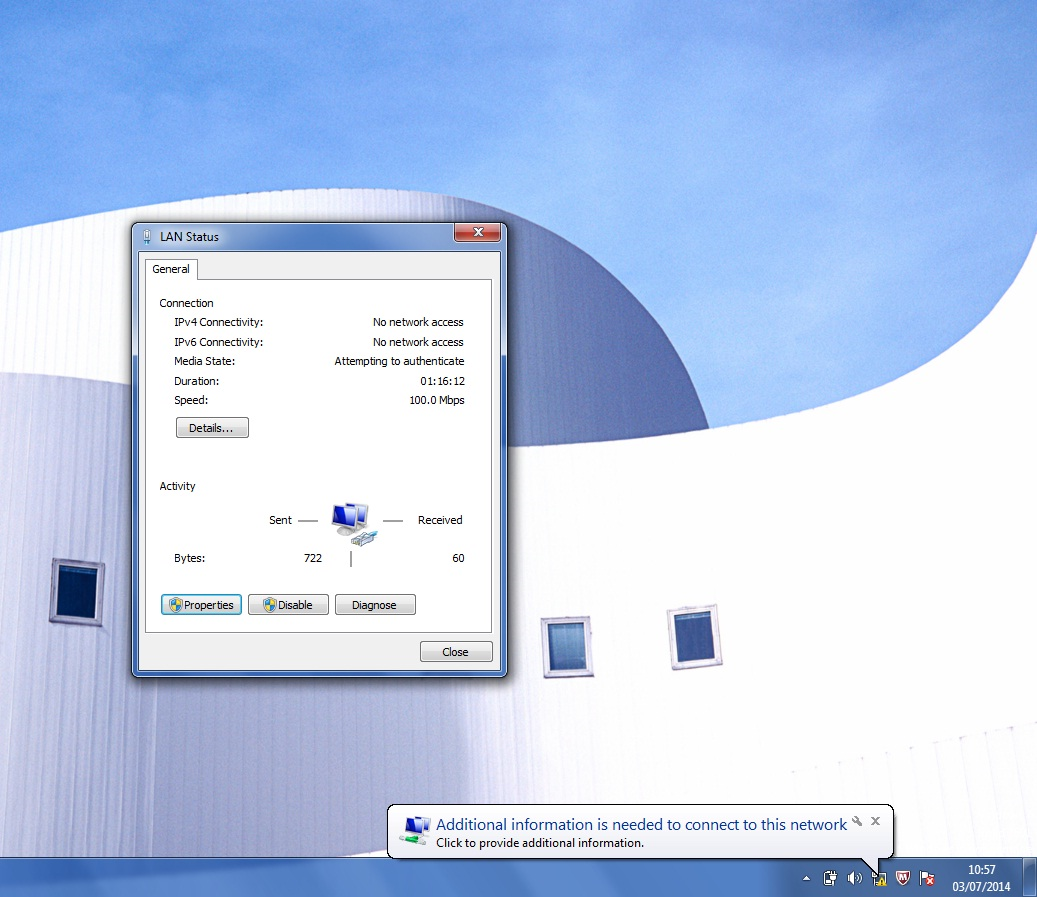
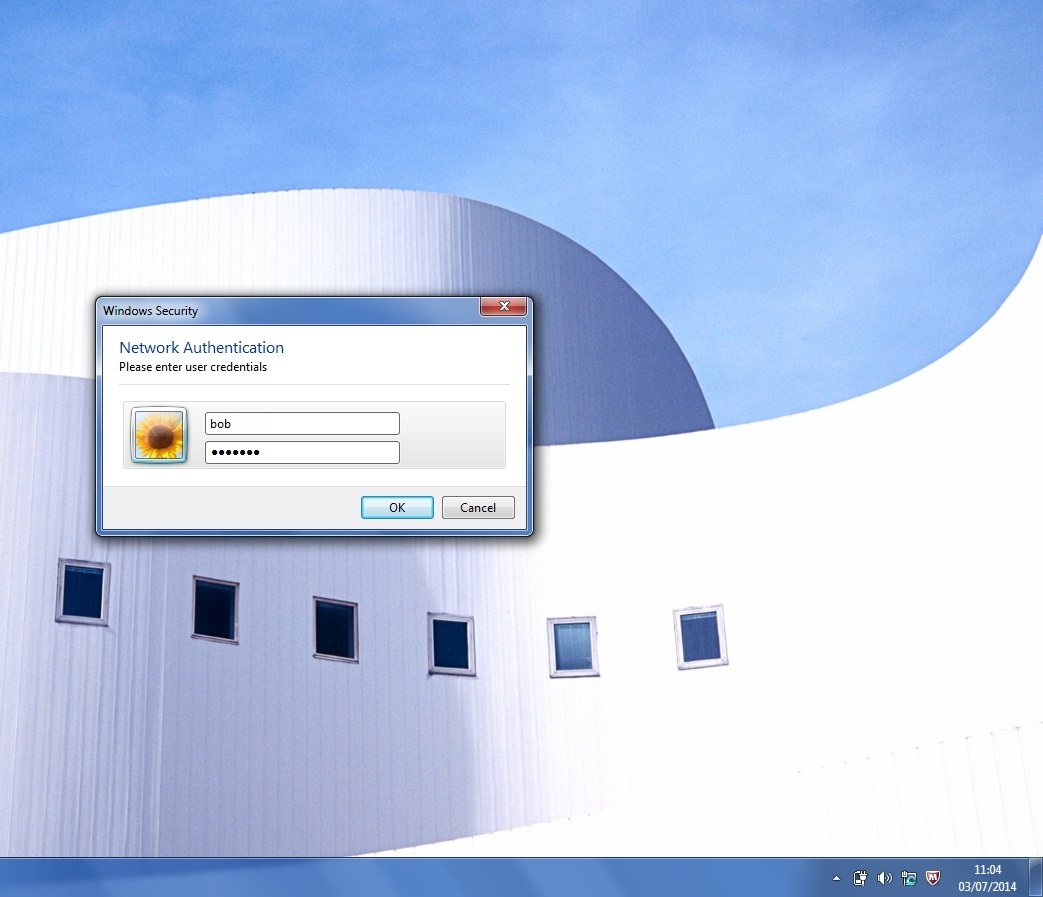
- Step 6:
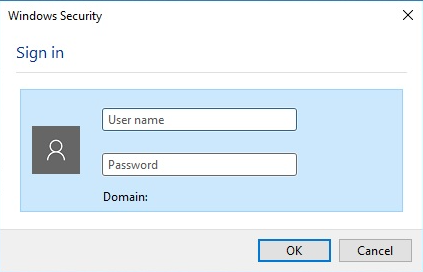
Click on a message and enter the username and password information

- Step 7:
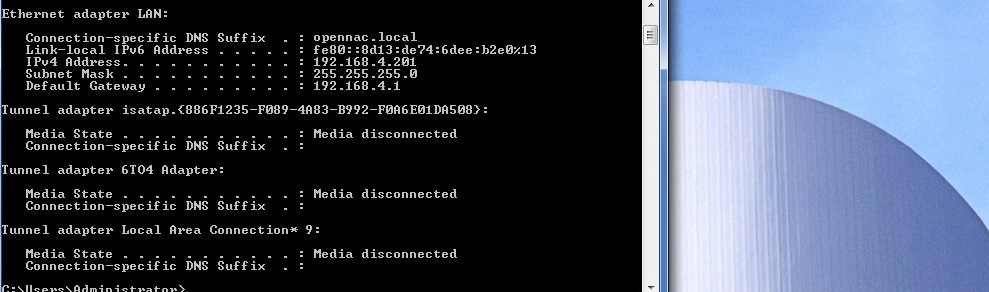
After the success of the authentication process you will receive an appropriate ip address according to vlan assignment configuration.
For information related know issues of windows client configuration. Windows 802.1x Know Issues.
Windows 10
Wired interface configuration
- Step 1:
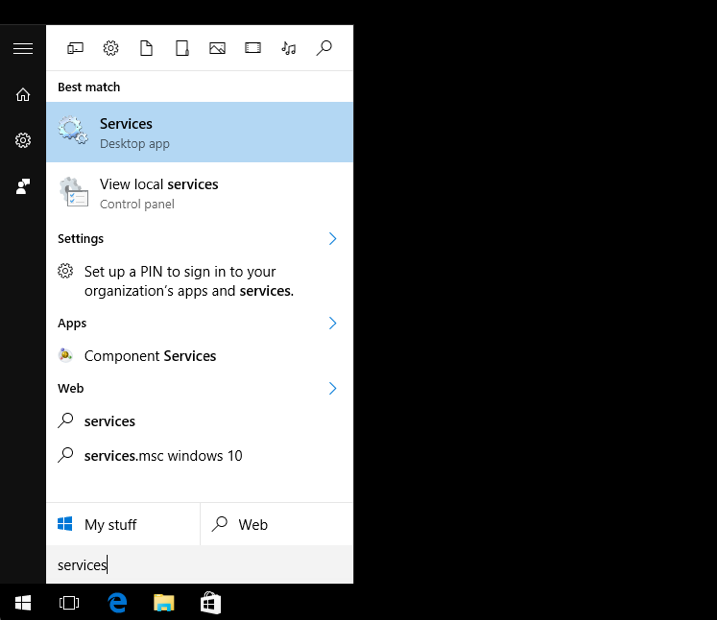
It is necessary to check if the PC client has the authentication parameters.
Execute the “services.msc” from the search box in Windows Start menu.
Follow the steps 2,3 and 4 for Windows 7 Configuration.
- Step 5:
Attach the network cable into the PC and wait for the dialog box requesting username and password to be authenticated.
- Step 6:
After the success of the authentication process you will receive an appropriate ip address according to the service vlan.
Wireless interface configuration
To enable 802.1x on a wireless interface, you need to create a new SSID as described below:
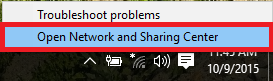
- Step 1:
From the desktop, right-click on the wireless icon on the bottom right corner of your desktop. Select Open Network and Sharing Center.
- Step 2:
In the Network and Sharing Center, select Setup a new connection or network.

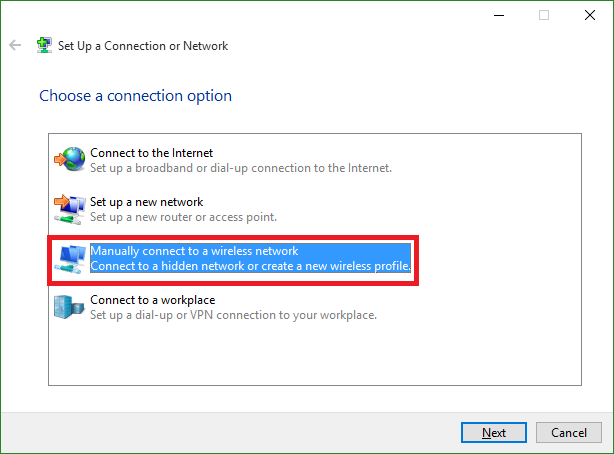
- Step 3:
Select Manually connect to a new network.
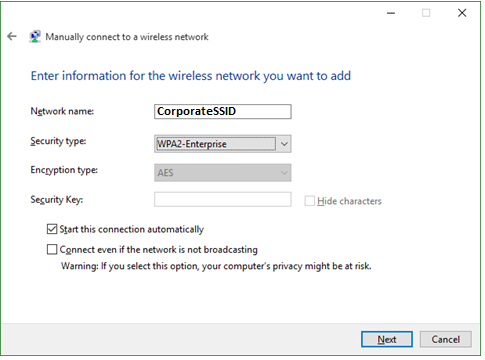
- Step 4:
- Enter the information for the SSID wireless network as shown below and click Next.
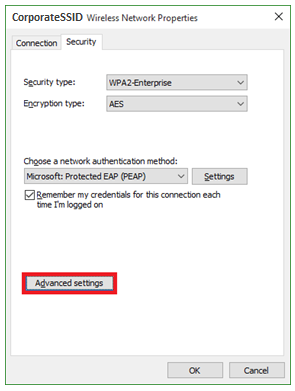
- Network Name: CorporateSSID Security Type: WPA2-Enterprise Encryption Type: AES
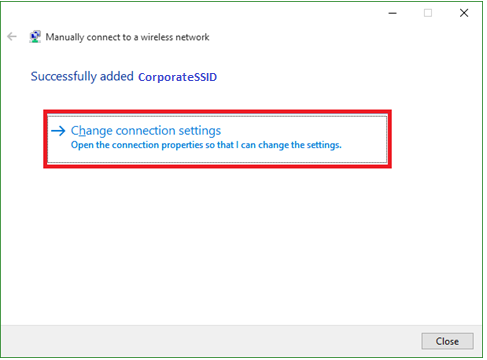
- Step 5:
Click the Change connection settings box.
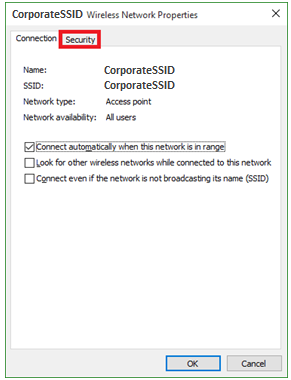
- Step 6:
Click on the Security Tab on the top of the window.
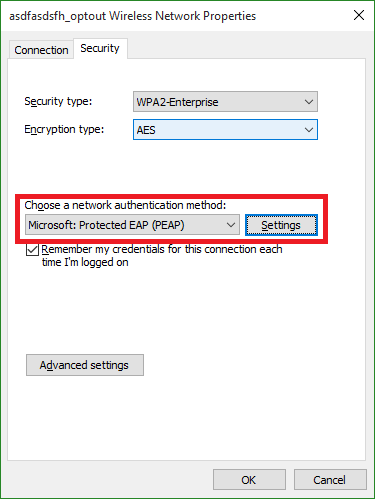
- Step 7:
Change the Choose a network authentication method to be Microsoft: Protected EAP (PEAP) and choose Settings.
- Step 8:
Uncheck the Validate server certificate box and click Configure.
- Step 9:
Uncheck the Automatically use my Windows logon name and password (and domain if any) box, and click OK.
- Step 10: Click OK again.
- Step 11: Click the Advanced Settings button.
- Step 12:
On the 802.1x settings tab check the Specify authentication mode and set the mode to User Authentication.
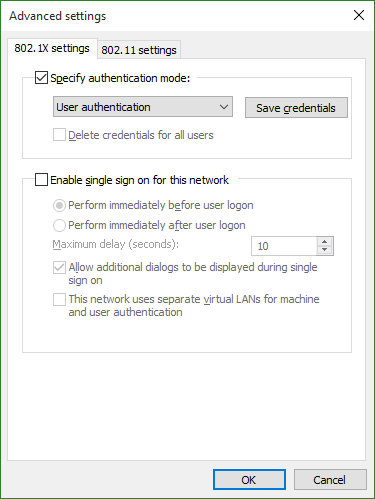
- Step 13: Click OK and Close the settings window.
- Step 14: Left click on the wireless symbol on the bottom right hand corner to bring up the Networks menu.
- Step 15: Select and connect to CorporateSSID.
- Step 16: A prompt should appear to sign in. Type your credentials.
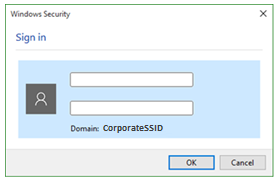
You should now be connected to the CorporateSSID network.
User Certificate Configuration
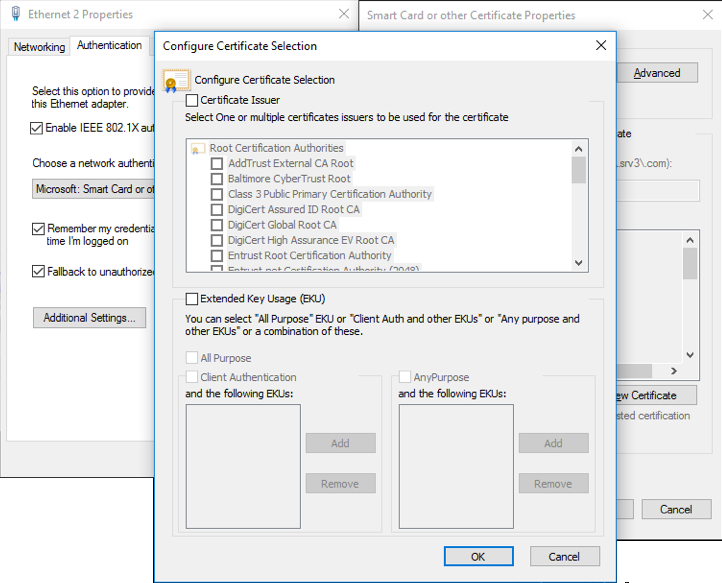
In case you want use a user certificate instead of user credentials, you can configure the “Microsoft: Smart Card or other certificate” authentication method, and then enter in “Settings” options to indicate the desired options.
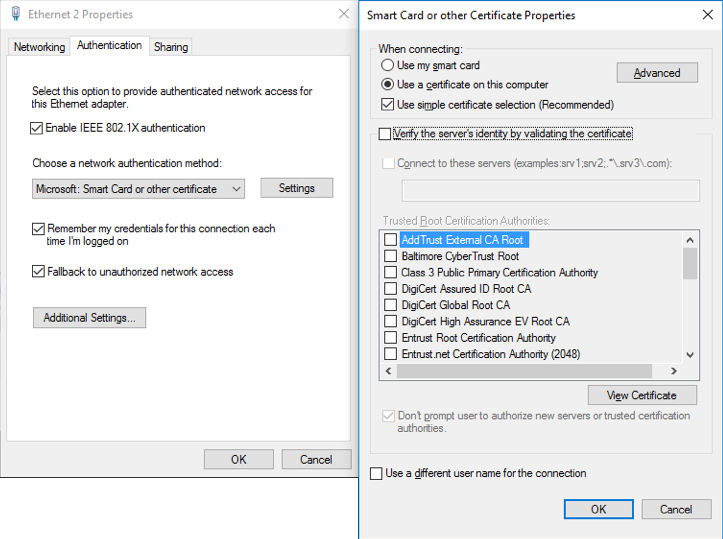
The main options are equivalent to PEAP authentication, so deselect the option “Verify the server’s identity by validating the certificate”, in test mode, to avoid validate the server certificate, but enable it, selecting the corresponding “Trusted Root Certification Authority”, in real environment, how is explained in Step 4 of main Configuration.
It is advisable to check the option “Use a different user name for the connection” so that a selection windows appears.
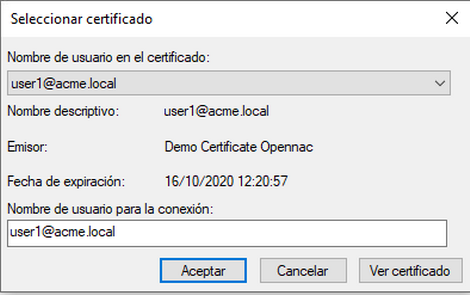
It is important to note that the name field for authentication is the user and domain that we have configured. Otherwise, an 802.1x User authentication would be attempted.
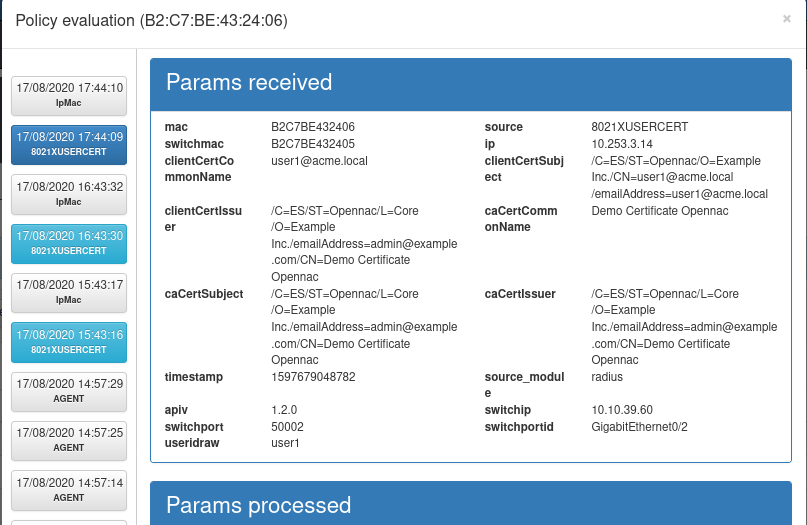
To verify that it works properly we can check in the policy flow that the source is 802.1x Certificate
If you want apply some filters in certificates selection, you can configure it in the “Advanced” section
For information related know issues of windows client configuration. Windows 802.1x Know Issues.
MAC OS X Yosemite
802.1x client configuration in mac os x is really straight forward as its supported by default.
Configuration
- Step 1:
Open Launchpad and go to System Preferences > Network >
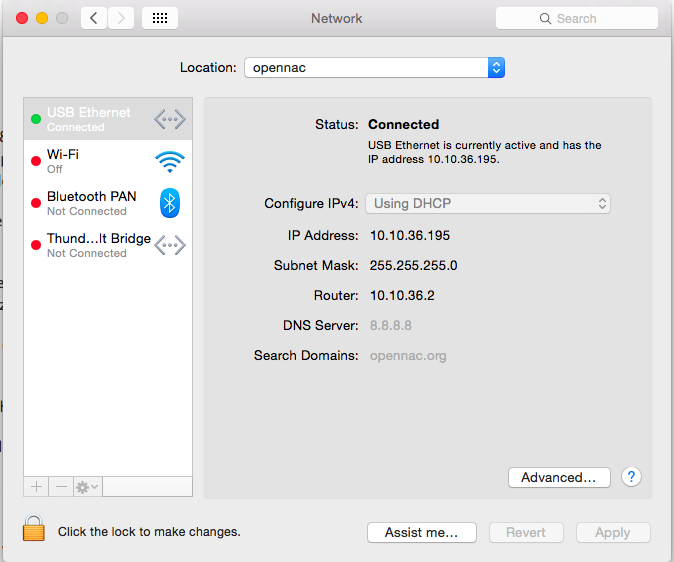
- Step 2:
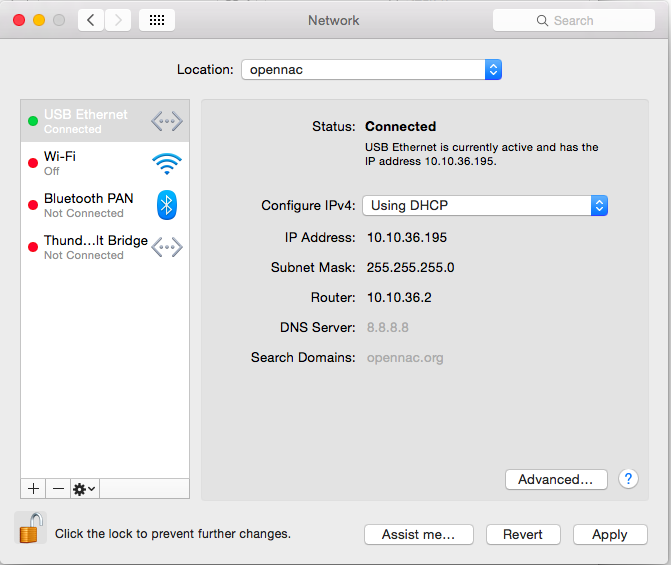
If you need to create a new connection profile click on the safe to allow changes in the configuration and click on the advanced button
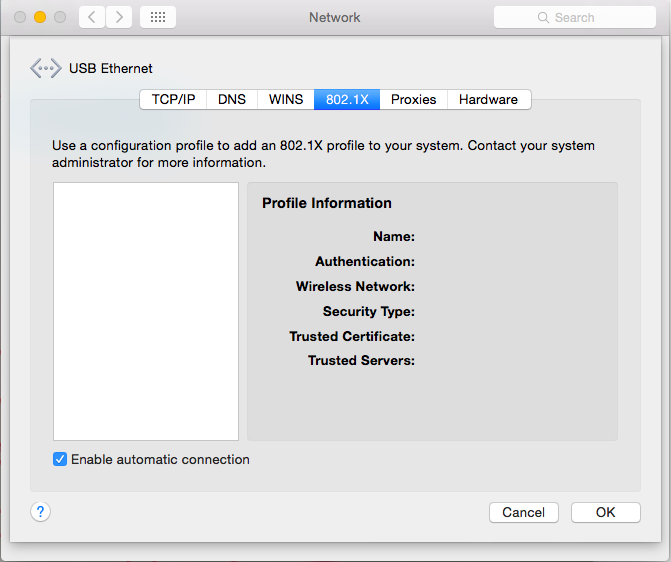
- Step 3:
Click on the 802.1x tab and check that the option “Enable automatic connection” is enabled. Click on ok and then on apply.
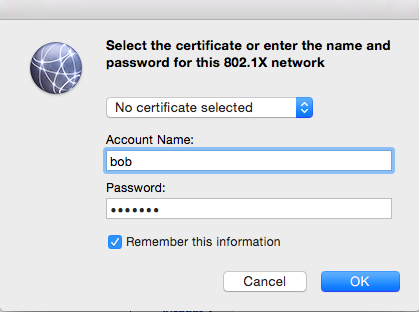
- Step 4:
If you are connected to a switch port that is 802.1x enabled an authentication window will appear asking for a user and password. Those credential will vary on your case depending on the User Data Source configured in openNAC. On this example the user is local.
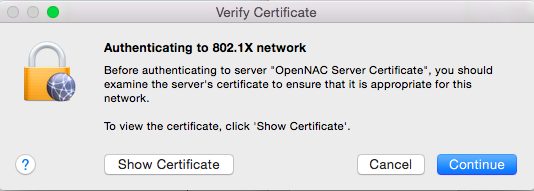
- Step 5:
A warning will appear to check the validity of the radius cert. If you follow the wizzard just click on continue.
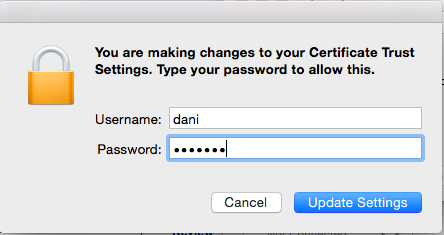
- Step 6:
Enter your operating system credentials to add the certificate to the certificate trust repository.
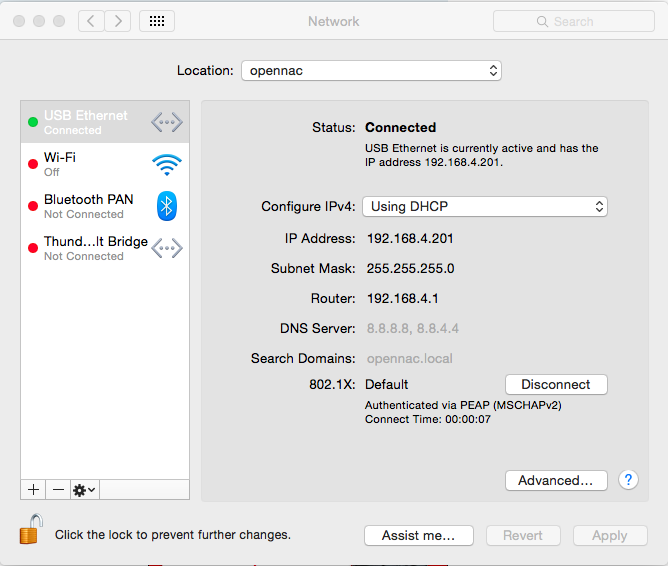
- Step 7:
If your credentials are valid verify you are connected to the network.
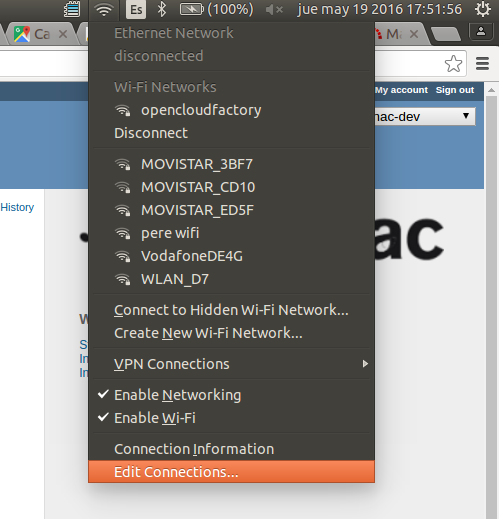
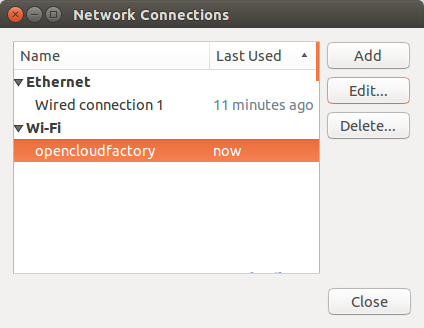
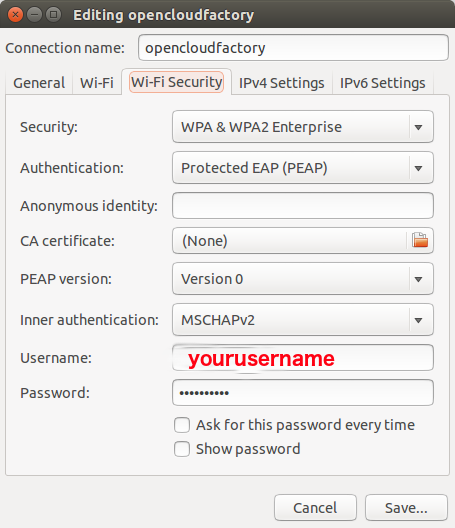
Ubuntu 14.04 LTS Linux
Centos 6 By CLI
For configure supplicant user in Centos 6, please follow the next steps:
- Step 1
Install “wpa_supplicant” packet
yum install wpa_supplicant
- Step 2
Edit the file wpa_supplicant.conf into directory /etc/wpa_supplicant/ using the credentials needed. Enter in insert mode using i
vim /etc/wpa_supplicant/wpa_supplicant.conf
ctrl_interface=/var/run/wpa_supplicant
ctrl_interface_group=wheel
network={
        key_mgmt=IEEE8021X
        eap=PEAP
        identity="alice"
        password="openNAC"
        phase2="autheap=MSCHAPV2"
}
- Step 3
For working test propose, execute the supplicant using the next command
wpa_supplicant -i eth0 -c /etc/wpa_supplicant/wpa_supplicant.conf -Dwired -d
- Step 4
After test the supplicant, configure the automatic execution for this service
chkconfig wpa_supplicant on
- Step 5
Edit the file wpa_supplicant into directory /etc/sysconfig/ with the configuration needed to perform an automatic execution. Enter in insert mode using i
INTERFACES="-ieth0"
DRIVERS="-Dwired"