Switch Configuration
Assumptions Switch
Throughout this configuration example we use the following assumptions for our network infrastructure:
ON Core is fully configured with FreeRADIUS running (if you want 802.1X or MAC Auth)
openNAC IP address: 192.168.1.5
- Normal VLAN: 1
- Registration VLAN: 2
- Isolation VLAN: 3
- MAC Detection VLAN: 4
- Guest VLAN: 5
- VoIP, Voice VLAN: 100
- use SNMP v2c
- SNMP Read community: public
- SNMP Write community: private
- SNMP Trap community: public
- RADIUS Secret: Testing123
3COM
SuperStack 3 Switch 4200 and 4500
openNAC supports these 3Com switches without VoIP using one trap type:
- linkUp/linkDown
- Port Security (with static MACs)
Note
Don’t forget to update the startup config!
linkUp / linkDown only
Global config settings:
snmp-agent
snmp-agent target-host trap address udp-domain 192.168.1.5 params securityname public
snmp-agent trap enable standard linkup linkdown
On each interface:
port access vlan 4
In Port Security
Global config settings:
snmp-agent
snmp-agent target-host trap address udp-domain 192.168.1.5 params securityname public
snmp-agent trap enable
port-security enable
port-security trap addresslearned
port-security trap intrusion
On each interface:
port access vlan 4
port-security max-mac-count 1
port-security port-mode secure
port-security intrusion-mode blockmac
undo enable snmp trap updown
In MAC Auth
Voice vlan : 6
Normal vlan : 1
Registration vlan : 2
Isolation vlan : 3
Global config settings:
lldp enable
lldp timer tx-interval 5
lldp compliance cdp
lldp compliance cdp
port-security enable
MAC-authentication domain openNAC
radius scheme system
radius scheme openNAC
 server-type extended
 primary authentication 192.168.1.5
 primary accounting 192.168.1.5
 key authentication Testing123
 key accounting cipher Testing123
 user-name-format without-domain
domain openNAC
 authentication radius-scheme openNAC
 accounting radius-scheme openNAC
 vlan-assignment-mode string
 accounting optional
domain system
voice vlan mac-address f4ea-6700-0000 mask ffff-ff00-0000 description Cisco IP Phone
undo voice vlan security enable
voice vlan 6 enable
On each interface with VoIP:
interface Ethernet1/0/1
stp edged-port enable
lldp compliance admin-status cdp txrx
port link-type hybrid
port hybrid vlan 6 tagged
port hybrid vlan 1 2 3 untagged
undo voice vlan mode auto
voice vlan enable
port-security max-mac-count 3
port-security port-mode mac-authentication
port-security intrusion-mode blockmac
undo enable snmp trap updown
E4800G
openNAC supports these 3Com switches with the following techniques:
- 802.1X with MAC Authentication fallback
- linkUp/linkDown (not recommended)
Voice over IP support was not explicitly tested during implementation however it does not mean that it won’t work.
Note
Don’t forget to update the startup config!
linkUp / linkDown only
Global config settings:
snmp-agent
snmp-agent target-host trap address udp-domain 192.168.1.5 params securityname public
snmp-agent trap enable standard linkup linkdown
On each interface:
port access vlan 4
802.1X with MAC Authentication fallback
Global config settings:
system-view
radius scheme openNAC
        primary authentication 192.168.1.5 1812
        primary accounting 192.168.1.5 1812
        key authentication Testing123
        user-name-format without-domain
        quit
domain opennac.local
        authentication default radius-scheme openNAC
        authorization default radius-scheme openNAC
        quit
domain default enable opennac.local
dot1x authentication-method eap
port-security enable
quit
If your management authentication on your switch is default, applying the configuration above will have your authentication switch to a RADIUS based one with ON Core as the authentication server. It is almost certain that you do not want that!
Below, we will just create a local password for vty accesses (telnet) and nothing on the console. In order to avoid locking yourself out, make sure to verify your configuration!
system-view
user-interface aux 0
        authentication-mode none
user-interface vty 0 4
        user privilege level 3
        set authentication password simple Testing123
quit
quit
On each interface:
system-view
interface gigabitEthernet 1/0/xx
        port-security port-mode mac-else-userlogin-secure-ext
        # userlogin-secure-or-mac-ext could be used below instead
        # see the Switch_4200G's documentation for a discussion about it
        undo enable snmp trap updown
        quit
quit
where xx stands for the interface index.
E5500G and Switch 4200G
openNAC supports these 3Com switches with the following techniques:
- 802.1X with MAC Authentication fallback
- linkUp/linkDown (not recommended)
Voice over IP support was not explicitly tested during implementation however it does not mean that it won’t work.
Note
Don’t forget to update the startup config !
linkUp / linkDown only
Global config settings:
snmp-agent
snmp-agent target-host trap address udp-domain 192.168.1.5 params
securityname public
snmp-agent trap enable standard linkup linkdown
On each interface:
port access vlan 4
802.1X with MAC Authentication fallback
Global config settings:
system-view
radius scheme openNAC
        server-type standard
        primary authentication 192.168.1.5 1812
        primary accounting 192.168.1.5 1812
        accounting optional
        key authentication Testing123
        user-name-format without-domain
        quit
domain opennac.local
         radius-scheme openNAC
         vlan-assignment-mode string
         quit
   domain default enable opennac.local
   dot1x authentication-method eap
   port-security enable
quit
If your management authentication on your switch is default, applying the configuration above will have your authentication switch to a RADIUS based one with ON Core as the authentication server. It is almost certain that you do not want that!
Below, we will just create a local password for vty accesses (telnet) and nothing on the console. In order to avoid locking yourself out, make sure to verify your configuration!
system-view
   user-interface aux 0
         authentication-mode none
  user-interface vty 0 4
        user privilege level 3
        set authentication password simple Testing123
  quit
quit
On each interface:
system-view
  interface gigabitEthernet 1/0/xx
        port-security port-mode mac-else-userlogin-secure-ext
        # userlogin-secure-or-mac-ext could be used below instead
        # see the Switch_4200G's documentation for a discussion about it
        undo enable snmp trap updown
        quit
quit
where xx stands for the interface index
802.1x Configuration 3COM 3CR17254-91 - 3COM 3CRS45G-24-91+++
Global Configuration
radius scheme openNAC
server-type standard
primary authentication <IP radius server> 1812
primary accounting <IP radius server> 1812
accounting optional
key authentication <Pre shared key>
user-name-format without-domain // Use to authenticate by default without insert the domain in user name.
quit
To authentications with included domain into username “user@domain”
domain <name.domain>
radius-scheme <scheme-name>
vlan-assignment-mode string
quit
domain default enable <name.domain>
dot1x authentication-method eap
port-security enable
Port Configuration
interface GigabitEthernet1/0/1
dot1x port-method portbased
dot1x
Alcatel
OS6250 - OS6450
openNAC supports this switch using 802.1X, Mac authentication and also supports VoIP.
Global configuration
First define any VLAN that you want to use on the switch.
vlan 2
vlan 5
vlan 20
vlan 100
Next, configure the RADIUS server to be ON Core
aaa radius-server "openNAC" host 10.243.24.2 key Testing123     retransmit 3 timeout 2
\ auth-port 1812 acct-port 1813 nas-port ifindex
aaa accounting 802.1x "openNAC"
aaa accounting mac "openNAC"
aaa authentication mac openNAC
aaa authentication 802.1X openNAC
You now need to configure a user profile (equivalent of a role) that will determine which VLAN is assigned to the device. In this case the profile names are unreg, employee and guest.
aaa user-network-profile name unreg vlan 2
aaa user-network-profile name guest vlan 5
aaa user-network-profile name employee vlan 20
Next, configure the switch in openNAC. In the case of this example, the uplink is port 1/1.
- Ensure that is allowed to authenticate
- Ensure is registered on CMDB
- Ensure that have appropiate shared secret key.
- Enruse that type of authentication (802.1x) is allowed and Vlans assigned.
First, make sure you followed the steps above in Global configuration
You will need to configure the ports you want to do authentication on.
vlan port mobile 1/2
vlan port 1/2 802.1X enable
802.1X 1/2 non-supplicant policy authentication pass group-mobility default-vlan fail block
802.1x 1/2 supplicant policy authentication pass group-mobility default-vlan fail block
MAC Authentication
First, make sure you followed the steps above in Global configuration and 802.1X
Next configure the interface to bypass 802.1X authentication
802.1X 1/2 supplicant bypass enable
VoIP
openNAC supports VoIP on Alcatel by having multiple devices using multiple untagged VLANs on the same port.
First configure the user profile for voice. In this example it is only isolating it on another VLAN but any user profile attributes can be added to the profile.
aaa user-network-profile name voice vlan 3
Next, make sure you enable VoIP VLANS openNAC .
Alcatel switches can work in a working o certified mode.
show running-directory
- If the swith is working in certified mode you can´t save the config, for then you have to reboot in that way:
reload working no rollback-timeout
- As soon as you are in a working mode, is possible to modify the config from running-config
copy running-config working
- Finally, already is possible to copy working to certified:
copy working certified
Dynamic ACL
Example:
- Permit access for one IP to port 80
qos enable
policy service http destination tcp port 80
policy service group allowports http
policy network group openNACServer 10.10.36.91 mask 255.255.255.255
policy condition "Destination openNACServer HTTP" destination network group openNACServer service group allowports
policy condition "Other" source ip any destination ip any
policy action Deny disposition deny
policy action Permit
policy rule "Allow openNACServer HTTP" precedence 200 condition "Destination openNACServer HTTP" action Permit
policy rule "Deny Other" precedence 100 condition "Other" action Deny no default-list
policy list policyListACL from cli type unp enable rules "Allow openNACServer HTTP" "Deny Other"
aaa user-network-profile name pruebaACL vlan 1 policy-list-name policyListACL
The qos apply command apply the the policy changes made over ACL´s, in case doesn’t apply.
qos port 1/5 trusted
qos apply
- To test the radius authentication
aaa test-radius-server rad1 type authentication user user1 password openNAC
Example Dynamic ACL
- Deny access for one IP and permit the others
qos enable
policy network group Office 10.10.36.0 mask 255.255.255.0
policy network group Forti 10.10.36.254 mask 255.255.255.255
policy condition "Office-Forti" source network group Office destination network group Forti
policy condition "Other" source ip any destination ip any
policy action Deny disposition deny
policy action Permit
policy rule "Deny Office-Forti" precedence 200 condition "Office-Forti" action Deny
policy rule "Allow Other" precedence 100 condition "Other" action Permit
policy list policyListACL from cli type unp enable rules "Deny Office-Forti" "Allow Other"
aaa user-network-profile name pruebaACL vlan 1 policy-list-name policyListACL
The qos apply command apply the the policy changes made over ACL´s, in case doesn’t apply.
qos port 1/5 trusted
qos apply
- To test the radius authentication
aaa test-radius-server rad1 type authentication user user1 password openNAC
OS6860
openNAC supports this switch using 802.1X, Mac authentication and also supports VoIP.
Note
This documentation is made for Alcatel OS 8.1+. Lower versions do not support this configuration. Global configuration
First define any VLAN that you want to use on the switch.
vlan 2 admin-state enable
vlan 5 admin-state enable
vlan 20 admin-state enable
vlan 100 admin-state enable
Next, configure the RADIUS server to be ON Core
aaa radius-server "openNAC" host 192.168.1.5 key Testing123
aaa device-authentication mac openNAC
aaa device-authentication 802.1X openNAC
You now need to configure an edge profile (equivalent of a role) that will determine which VLAN is assigned to the device. In this case the profile names are unreg, employee and guest.
unp edge-profile unreg
unp edge-profile unreg redirect enable
unp edge-profile unreg authentication-flag enable
unp vlan-mapping edge-profile unreg vlan 2
unp edge-profile guest
unp edge-profile guest redirect enable
unp edge-profile guest authentication-flag enable
unp vlan-mapping edge-profile guest vlan 5
unp edge-profile employee
unp edge-profile employee redirect enable
unp edge-profile employee authentication-flag enable
unp vlan-mapping edge-profile employee vlan 20
Note
Make sure you enable the redirect on all your roles as the access reevaluation will not work without it. Next, configure the switch in openNAC. In the case of this example, the uplink is port 1/1/1.
- You have to include the IP to allow authentication in RADIUS, Preshared secret key, and define type of authentication at policies, and assign Vlans if required.
First, make sure you followed the steps above in Global configuration
You will need to create an edge template and apply it on the ports you want to do authentication on.
unp edge-template on_mab
unp edge-template on_mab mac-authentication enable
unp edge-template on_mab classification enable
unp port 1/1/2 port-type edge
unp port 1/1/2 edge-template on_mab
802.1X
First, make sure you followed the steps above in Global configuration
You will need to create an edge template and apply it on the ports you want to do authentication on.
unp edge-template on_dot1x
unp edge-template on_dot1x 802.1X-authentication enable
unp edge-template on_dot1x mac-authentication enable
unp edge-template on_dot1x 802.1X-authentication failure-policy mac-authentication
unp port 1/1/2 port-type edge
unp port 1/1/2 edge-template on_dot1x
VoIP
openNAC supports VoIP on Alcatel by having multiple devices using multiple untagged VLANs on the same port.
First configure the edge profile for voice. In this example it is only isolating it on another VLAN but any edge profile attributes can be added to the profile.
unp edge-profile voice
unp edge-profile voice redirect enable
unp edge-profile voice authentication-flag enable
unp vlan-mapping edge-profile voice vlan 100


Next, make sure you enable VoIP in the switch configuration in openNAC and configure the voiceRole.
[192.168.1.10]
VoIPEnabled=Y
voiceRole=voice
Allied Telesis
Model: X230 Software: AW+ Version 5.3.1
- Port base authentication
- Mac base authentication
- Trap snmp
Global config settings:
awplus(config)#radius-server host <opennac-IP> key <preSharedKey>
awplus(config)#aaa authentication dot1x default group radius
awplus(config)#dot1x eap forward
On each interface:
awplus#configure terminal
awplus(config)#interface port <port-number>

Note: for port range use #interface <initport-endport>

awplus(config-if)#dot1x port-control auto
awplus(config-if)#auth host-mode multi-supplicant
awplus(config-if)#auth max-supplicant 2
awplus(config-if)#auth-mac enable
awplus(config-if)#auth critical -->  the interface becomes force-authorized in case all Radius servers become unavailable.
awplus(config-if)#snmp trap link-status enterprise
SNMP Traps Basic Configuration:
In case we want to use SNMP for visibility, we need to active snmp on the switch.
Setup SNMP v2c configuration
awplus(config)#snmp-server community <ReadCommunity> ro
awplus(config)#snmp-server community <WriteCommunity> rw
awplus(config)#snmp-server host <IP-openNAC> traps version 2c <WriteCommunity>
Setup SNMP v3 configuration
SNMP v3 can be configured with 3 different modes:
Auth: This method provides only authentication based on the HMAC-MD5 or HMAC-SHA algorithms and no encryption.
awplus(config)#snmp-server group opennac auth read <ReadCommunity> write <WriteCommunity>
awplus(config)#snmp-server user <User-name> <Group-name> auth [md5|sha] <preSharedKeyAuth>
Noauth: No authentication and no encryption
awplus(config)#snmp-server group opennac noauth read <ReadCommunity> write <WriteCommunity>
awplus(config)#snmp-server user <User-name> <Group-name>
Priv: This method provides authentication based on the HMAC-MD5 or HMAC-SHA algorithms. In addition to authentication, provides DES and AES encryption. “preSharedKeyAuth” is the keyword to authenticate, and “preSharedKeyPriv” as the encryption keyword.
awplus(config)#snmp-server group opennac priv read <ReadCommunity> write <WriteCommunity>
awplus(config)#snmp-server user <User-name> <Group-name> auth [md5|sha] <preSharedKeyAuth> priv [aes|des] <preSharedKeyPriv>
Aruba
Model: Aruba 2930F. Software: ArubaOS accredited release WC.16.04.0014
Global config settings:
radius-server host <IP Core> encrypted-key "<radius_psk>"
radius-server host <IP Core> time-window 0
radius-server dead-time 5
radius-server host <IP Core> dyn-authorization
radius-server dyn-autz-port <Default Port number: 3799>

aaa server-group radius "OPENNAC" host <IP Core>
aaa accounting network stop-only radius server-group "OPENNAC"
aaa authentication port-access eap-radius server-group "OPENNAC"
aaa authentication mac-based chap-radius server-group "OPENNAC"
On each interface:
aaa port-access authenticator <PortNumber>
aaa port-access authenticator <PortNumber> auth-vid 952
aaa port-access authenticator <PortNumber> client-limit 2
aaa port-access authenticator active
aaa port-access supplicant <PortNumber>
aaa port-access mac-based <PortNumber>
aaa port-access mac-based <PortNumber> addr-limit 2
Critical VLAN (untagged)
This feature is available with ArubaOS 16.07
For clients sending untagged traffic, if the RADIUS server is unreachable, the client is placed in a Critical VLAN. There are two ways to configure a Critical Data VLAN:
- Directly assigning the VLAN using the command:
aaa port-access <port> critical-auth datavlan <VLAN-ID>.
- Assign a user-role containing untagged VLAN as critical-role using the command:
aaa port-access <port> critical-auth user-role <ROLE-NAME>.
SNMP Traps Basic Configuration
In case we want to use SNMP for visibility, we need to active snmp on the switch.
In global configuration mode
snmp-server host <ip opennac> community public
snmp-server community private unrestricted
snmp-server community public restricted
Configuring MAC Table
snmp-server enable traps mac-count-notify
snmp-server enable traps mac-notify mac-move
Configuring access ports
snmp-server enable traps link-change <ports_number or all>
Configuring SNMP v3
To activate SNMP v3 in a Aruba, several modes can be configured. Into this section we will describe the configuration you need for three of them.
AuthPriv: This method provides authentication based on the HMAC-MD5 or HMAC-SHA algorithms.
snmpv3 enable
snmpv3 group managerpriv user <username> sec-model ver3
snmpv3 user <username> auth [md5|sha] <preSharedKeyPriv-string> priv [des|aes] <preSharedKeyPriv-string>
AuthNoPriv: This method provides authentication based on the Hashed Message Authentication Code (HMAC)-MD5 or HMAC-SHA algorithms. “preSharedKeyAuth” is the keyword to authenticate. There is not encryption in this method.
snmpv3 enable
snmpv3 group managerauth user <username> sec-model ver3
snmpv3 user <username> auth sha/md5 <preSharedKeyPriv-string>
NoAuthNoPriv: This method provides no authentication and privacy.
snmpv3 enable
snmpv3 group operatornoauth user <username> sec-model ver3
snmpv3 user <username>
The next step is to configure traps receptors with minimum privilege (recommended).
ip authorized-managers <snmpServer_ip> <snmpServerip_mask> access operator access-method snmp
snmpv3 notify <notify_name> tagvalue <tag_name>
snmpv3 targetaddress [<ipv4-addr|ipv6-addr>] <name>
snmpv3 params <params_name> user <user_name>
Avaya
Avaya bought Nortel’s wired networks assets. So Avaya switches are, in effect, re-branded Nortels. See Nortel section of this document for configuration instructions.
- 802.1X with MAC Authentication Bypass and VoIP
Note
The configuration below requires an ntp server. We use the openNAC server as the NTP server but any other one will do. If you want to use the openNAC server for NTP, make sure you install the appropriate service and open port 123 in iptables.conf at openNAC directory.
Global config settings:
sntp server primary address 192.168.1.5
sntp enable
radius server host 192.168.1.5 acct-enable
radius server host key Testing123
radius server host key Testing123 used-by eapol
radius server host key Testing123 used-by non-eapol
radius dynamic-server client 192.168.1.5
radius dynamic-server client 192.168.1.5 secret Testing123
radius dynamic-server client 192.168.1.5 enable
radius dynamic-server client 192.168.1.5 process-change-of-auth-requests
radius dynamic-server client 192.168.1.5 process-disconnect-requests
vlan create 2,3,4,5 type port
vlan create 100 type port voice-vlan
vlan name 2 "Reg"
vlan name 3 "Isol"
vlan name 4 "Detect"
vlan name 5 "Guest"
vlan name 100 "Voice"
Uplink configuration:
vlan ports 24 tagging tagAll
vlan configcontrol autopvid
eapol multihost allow-non-eap-enable
eapol multihost radius-non-eap-enable
eapol multihost non-eap-phone-enable
eapol multihost use-radius-assigned-vlan
eapol multihost non-eap-use-radius-assigned-vlan
eapol multihost eap-packet-mode unicast
eapol multihost non-eap-reauthentication-enable
eapol multihost adac-non-eap-enable
no eapol multihost non-eap-pwd-fmt ip-addr
no eapol multihost non-eap-pwd-fmt port-number
eapol multihost voip-vlan 1 enable vid 100
adac voice-vlan 100
adac uplink-port 24
adac op-mode tagged-frames
adac enable
qos if-group name TrustedLinks class trusted
qos if-assign port ALL name TrustedLinks
Port 1 configuration:
interface FastEthernet ALL
vlan ports 1 tagging tagAll
vlan members 2,3,4,5 1
vlan ports 1 pvid 2
eapol multihost port 1 enable eap-mac-max 8 allow-non-eap-enable non-eap-mac-max 8 radius-non-eap-enable use-radius-assigned-vlan non-eap-use-radius-assigned-vlan eap-packet-mode unicast adac-non-eap-enable
eapol port 1 status auto traffic-control in re-authentication enable
eapol port 1 radius-dynamic-server enable
lldp port 1 vendor-specific avaya dot1q-framing tagged
no adac detection port 1 mac
adac port 1 tagged-frames-tagging tag-all
adac port 1 enable
spanning-tree port 1 learning fast
CISCO
SNMP Traps Basic Configuration
If we want to use SNMP for visibility, we need to config the following on the switch.
Note
Only recommended if 802.1x is not available on that network device.
In global configuration mode:
snmp-server enable traps mac-notification change move threshold
snmp-server host 192.168.101.254 version 2c public
Configuring MAC Table
mac address-table notification change interval 0
mac address-table notification change
mac address-table aging-time 3600
For configure the interfaces that will send trap mac notification. In interface configuration mode:
Configuring access ports
interface range fast 0/4-8
snmp trap mac-notification change added
snmp trap mac-notification change removed
Configuring SNMP v3
To activate SNMP v3 in a Cisco must be created the group and user that use to access.
AuthPriv
This method provides authentication based on the HMAC-MD5 or HMAC-SHA algorithms. In addition to authentication, provides DES 56-bit encryption based on the Cipher Block Chaining (CBC)-DES (DES-56) standard. “preSharedKeyAuth” is the keyword to authenticate (it must have a maximum of 64 characters), and “preSharedKeyPriv” as the encryption keyword (it must have maximum 64 characters).
configure terminal
 snmp-server group [Group-name] v3 priv write [v1default]
 snmp-server user [User-name] [Group-name] v3 auth [md5|sha] [preSharedKeyAuth-string] priv des [preSharedKeyPriv-string]
end
AuthNoPriv
This method provides authentication based on the Hashed Message Authentication Code (HMAC)-MD5 or HMAC-SHA algorithms. “preSharedKeyAuth” is the keyword to authenticate (it must have a maximum of 64 characters). There is not encryption in this method.
configure terminal
 snmp-server group [Group-name] v3 auth write [v1default]
 snmp-server user [User-name] [Group-name] v3 auth [md5|sha] [preSharedKeyAuth-string]
end
NoAuthNoPriv
This method uses a username match for authentication. There is not encryption in this method.
configure terminal
 snmp-server group [Group-name] v3 noauth write [v1default]
 snmp-server user [User-name] [Group-name] v3
end
Port SPAN Configuration
Select the interface to be use as span port.
In global configuration mode:
Select the source interface range to be listen by Span port, then select destination span port.
monitor session 1 source interface Fa0/3 - 8
monitor session 1 destination interface Fa0/2 encapsulation replicate
Note
Local SPAN and RSPAN destination ports behave differently regarding VLAN tagging and encapsulation:
For local SPAN, if the encapsulation replicate keywords are specified for the destination port, these packets appear with the original encapsulation (untagged, ILS, or IEEE 802.1Q). If these keywords are not specified, packets appear in the untagged format. Therefore, the output of a local SPAN session with encapsulation replicate enabled can contain a mixture of untagged, ISL, or IEEE 802.1Q-tagged packets.
For RSPAN, the original VLAN ID is lost because it is overwritten by the RSPAN VLAN identification. Therefore, all packets appear on the destination port as untagged.
RSPAN (Remote SPAN) feature allows traffic that is sourced from a switch to be mirrored to a remote switch within a layer 2 network over trunk ports. To accomplish this you will have to configure the destination VLAN across the entire path between the switches.
RSPAN config:
- Source Switch
In global configuration mode:
vlan <VLAN Number>
 remote span
 exit
monitor session <session_number> source interface fa0/<port_number>
monitor session <session_number> destination remote vlan <VLAN Number>
- Destination Switch
In global configuration mode:
vlan <VLAN Number>
 remote span
 exit
monitor session <session_number> source remote vlan <VLAN Number> *The session number must be different from the source switch*
monitor session <session_number> destination interface fa0/<port_number>
openNAC supports Cisco switches with VoIP using three different trap types:
- linkUp/linkDown
- MAC Notification
- Port Security (with static MACs)
You also need to make sure that lldp or cdp notification is configured on all ports that will handle VoIP.
On some recent models, we can also use more secure and robust features like:
- MAC Authentication (Cisco’s MAC Authentication Bypass or MAB)
- 802.1X (Multi-Host or Multi-Domain)
Depending of the switch model, we recommend the use of the most secure and reliable feature first. In other words, you should consider the following order:
- 802.1X/MAB
- Port-Security
- linkUp/linkDown
802.1x Basic Configuration+++
The first step on switch is configure the AAA authentication details, use the core IP address that can access from switch.
aaa new-model
aaa authentication login default local
aaa authentication dot1x default group radius
aaa authorization exec default local
aaa authorization network default group radius
aaa accounting dot1x default start-stop group radius
To define the radius servers, we need to type the following. Remind that you have to include a line with the IP of each one of your CORE servers.
radius-server host <ON Core_1 IP> auth-port 1812 acct-port 1813 test username monitor idle-time 5 key <key>
...
radius-server host <ON Core_n IP> auth-port 1812 acct-port 1813 test username monitor idle-time 5 key <key>
If we want to use CoA for the Toggle Port functionality, we need to configure the following lines. Remind that you have to include a line with the IP of each one of your CORE servers. This key can be defined at the Configuration vars > NetDev “Default CoA password”
aaa server radius dynamic-author
client <ON Core_1 IP> server-key <key>
...
client <ON Core_n IP> server-key <key>
port 3799
We need additional configuration, such as ip device tracking and dot1x system-auth-control (enables IEEE 802.1x authentication globally on the switch).
ip device tracking
dot1x system-auth-control
Also, if our Cisco IOS version is below 15.2(1)E, we need the vsa commands. After the mentioned version, this commands are defaults.
radius-server vsa send accounting
radius-server vsa send authentication
For each port to use 802.1x authentication set the 802.1x details
Set the interface range where 802.1x will be enable and set details as follows
interface range fastethernet 0/x - 0/y
switchport access vlan <VLAN NUMBER>
switchport mode access
authentication host-mode multi-domain
authentication order dot1x mab
authentication port-control auto
authentication periodic
authentication event server dead action authorize vlan <CRITICAL_VLAN>
authentication event server alive action reinitialize
mab
dot1x pae authenticator
dot1x timeout tx-period 2
dot1x max-req 3
spanning-tree portfast
EAP-FAST authentication Support
openNAC supports Cisco NEAT through EAP-MD5, EAP-FAST, EAP-GTC and EAP-MSCHAPv2 authentication methods. Upon successful authentication against openNAC, the authenticator switch will give trunk access to the supplicant switch.
Here is an official Cisco guide, from which the following configuration derives: https://www.cisco.com/c/en/us/support/docs/lan-switching/8021x/116681-config-neat-cise-00.html
The following configuration example contains required changes to be applied on both authenticator and supplicant switches to provide EAP-FAST authentication against openNAC.
Authenticator
Global settings:
aaa group server radius openNAC
 server 192.168.1.5 auth-port 1812 acct-port 1813
aaa authentication dot1x default group openNAC
aaa authorization network default group openNAC
cisp enable
Uplink configuration:
interface FastEthernet0/20
 switchport mode access
 authentication port-control auto
 dot1x pae authenticator


Supplicant
Global settings (replace username and password):
cisp enable
eap profile EAP_PRO
 method fast
dot1x credentials EAP_PRO
 username changeit
 password 7 ciphered_changeit
! Password must be changed
!
dot1x supplicant force-multicast
Uplink settings:
interface GigabitEthernet1/0/24
 switchport mode trunk
 dot1x pae supplicant
 dot1x credentials EAP_PRO
 dot1x supplicant eap profile EAP_PRO
2900XL / 3500XL Series
SNMP | linkUP/linkDown
Global config settings:
snmp-server community public RO
snmp-server community private RW
snmp-server enable traps snmp linkdown linkup
snmp-server enable traps mac-notification
snmp-server host 192.168.1.5 trap version 2c public snmp mac-notification
mac-address-table notification interval 0
mac-address-table notification
mac-address-table aging-time 3600
On each interface without VoIP:
switchport mode access switchport access vlan 4 snmp trap mac-notification added
On each interface with VoIP:
switchport trunk encapsulation dot1q
switchport trunk native vlan 4
switchport mode trunk
switchport voice vlan 100
snmp trap mac-notification added
snmp trap mac-notification removed
2950
Those switches are now supported using 802.1X for networks with or without VoIP. You can also use port-security with static MAC address but we can not secure a MAC on the data VLAN specifically so enable it if there is no VoIP, use linkUp/linkDown and MAC notification otherwise.So on setup that needs to handle VoIP with this switch, go with a 802.1X configuration.
802.1X
Note
Make sure that you have a local account, because enabling 802.1X or MAB will ask for a username and password on the next login. Global config settings:
ip device tracking
dot1x system-auth-control
AAA configuration:
aaa new-model
aaa group server radius openNAC
 server 192.168.1.5 auth-port 1812 acct-port 1813
aaa authentication login default local
aaa authentication dot1x default group openNAC
aaa authorization network default group openNAC
RADIUS server configuration:
radius-server host 192.168.1.5 auth-port 1812 acct-port 1813 timeout 2
key Testing123
radius-server vsa send authentication
On each interface without VoIP:
switchport access vlan 4
switchport mode access
dot1x port-control auto
dot1x host-mode multi-host
dot1x reauthentication
On each interface with VoIP:
switchport access vlan 4
switchport mode access
switchport voice vlan 100
dot1x port-control auto
dot1x host-mode multi-host
dot1x reauthentication
Port-Security
Note
With port-security, if no MAC is connected on ports when activating port-security, we need to secure bogus MAC addresses on ports in order for the switch to send a trap when a new MAC appears on a port. On the other hand, if a MAC is actually connected when you enable port security, you must secure this MAC rather than the bogus one. Otherwise this MAC will lose its connectivity instantly.
Global config settings without VoIP:
snmp-server enable traps port-security
snmp-server enable traps port-security trap-rate 1
snmp-server host 192.168.1.5 version 2c public port-security
On each interface without VoIP:
switchport mode access
switchport access vlan 4
switchport port-security
switchport port-security violation restrict
switchport port-security mac-address 0200.0000.00xx
where xx stands for the interface ifIndex.
Note
ifIndex mapping Use the following templates for interface IfIndex in bogus MAC addresses (0200.0000.00xx): Fa0/1, …, Fa0/48 ⇒ 1, …, 48 Gi0/1, Gi0/2 ⇒ 49, 50
Global config settings with VoIP:
snmp-server community public RO
snmp-server community private RW
snmp-server enable traps snmp linkdown linkup
snmp-server enable traps mac-notification
snmp-server host 192.168.1.5 trap version 2c public snmp mac-notification
mac-address-table notification interval 0
mac-address-table notification
mac-address-table aging-time 3600
On each interface with VoIP:
switchport voice vlan 100
switchport access vlan 4
switchport mode access
snmp trap mac-notification added
snmp trap mac-notification removed
2960
Lab IOS Version: 15.0(2)SE5
Command Line reference: http://www.cisco.com/c/en/us/td/docs/switches/lan/catalyst2960/software/release/15-0_2_se/command/reference/cr2960.pdf
Note
In the next sample configurations, the openNAC server has the IP address 10.10.36.254
2960 Security Profiles
Allow apply Security Profiles or ACLs, in authentication phase, specifying rules to “deny” or “permit” input traffic to the port. We can apply these rules in two different ways:
Statically rules defined: Previosly, we have to define in switch the extended ACL identifier and its rules. From openNAC policies, we have to use the static Security Profile, identified by the correct ID.
General configuration:
ip device tracking
ip access-list extended DENY_DNS_GOOGLE
deny ip any host 8.8.8.8
permit ip any any
Note
In this example, the ACL with name DENY_DNS_GOOGLE, deny any IP traffic with destionation IP address 8.8.8.8, and allow the rest.
You can check if ACL is applied on port, using the command line:
show ip interface
In releases earlier than Cisco IOS Release 12.2(50)SE, per-user ACLs and filter Ids were only supported in single-host mode. In Cisco IOS Release 12.2(50), support was added for MDA and multiauth-enabled ports. In 12.2(52)SE and later, support was added for ports in multihost mode.
In releases earlier than Cisco IOS Release 12.2(50)SE, an ACL configured on the switch is not compatible with an ACL configured on another device running Cisco IOS software, such as a Catalyst 6000 switch.
In Cisco IOS Release 12.2(50)SE or later, the ACLs configured on the switch are compatible with other devices running the Cisco IOS release.
Optionally, you can register in log any request captured by a rule. In this case, probably you want send the syslog messages to an external host.
Extracted from: http://www.cisco.com/c/en/us/td/docs/switches/lan/catalyst2960/software/release/12-2_53_se/configuration/guide/2960scg/sw8021x.html#wp1430313
Dynamically rules defined:
Instead of define on each switch the ACL with an extended ACL identifier, we can send dynamically the rule list from openNAC, so in openNAC Security Profiles, we will define a dynamic one, with the desired rule list. Then in switch configuration only is required the ip device tracking option.
General configuration:
ip device tracking
openNAC Security Profile command:
ip:inacl#1=deny ip any host 8.8.8.8
ip:inacl#2=permit ip any any
In both types of rules definition, we can add log options.
General configuration, with log activated:
logging on
logging 10.10.36.254
ip device tracking
ip access-list extended DENY_DNS_GOOGLE
deny ip any host 8.8.8.8 log
permit ip any any
Additional logging options are available, in order improve performance.
You can review the following link for further information: Understanding Access Control List Logging http://www.cisco.com/web/about/security/intelligence/acl-logging.html
2960 CoA
Allow Change of Authorization (CoA) from an specific devices, in this case from openNAC servers, to disconnect a user device connection.
General configuration:
aaa server radius dynamic-author
client 1.2.3.4 server-key testing123
port 3799
Note
1.2.3.4 is the IP address of openNAC server and testing123 is the shared secret used to send the CoA request, please use it only in LAB environments.
2960 SNMP
Allow access by Snmp, using read and write communities.
General configuration:
snmp-server community public RO
snmp-server community private RW
2960 SnmpTrap Mac change
Enable mac address added and mac address removed traps to be sended to openNAC server (in this case, the openNAC server has the IP address 10.10.36.254).
General configuration:
snmp-server enable traps mac-notification change move threshold
mac address-table notification change
Port configuration:
snmp trap mac-notification change added
snmp trap mac-notification change removed
Note
This configuration isn’t necessary to evaluate policies, if you configure 802.1x supplicant or MAC
2960 802.1x MAC
Allow exclusively 802.1x MAC authentication, using openNAC radius server
General configuration:
ip device tracking
dot1x system-auth-control
aaa new-model
aaa authentication dot1x default group radius
aaa authorization network default group radius
aaa accounting dot1x default start-stop group radius
radius-server host 10.10.36.254 auth-port 1812 acct-port 1813 test username aaaUserTest idle-time 5 key 7 06120A325847071E544541
radius-server deadtime 5
radius-server vsa send accounting
radius-server vsa send authentication
snmp-server community public RO
snmp-server community private RW
snmp-server enable traps snmp authentication linkdown linkup coldstart warmstart
snmp-server host 10.10.36.254 version 2c public
Note
Radius server has to accept requests from switch, configured in raddb_dir>/clients.conf file.
2960 802.1x Port configuration:
switchport access vlan 330
switchport mode access
authentication event server dead action authorize vlan 330
authentication event server alive action reinitialize
authentication host-mode multi-domain
authentication order dot1x mab
authentication port-control auto
authentication periodic
authentication timer reauthenticate 3600
mab
dot1x pae authenticator
dot1x timeout tx-period 5
Stacked 29xx, Stacked 35xx, Stacked 3750, 4500 Series, 6500 Series
The 4500 Series and all the stacked switches work exactly the same way as if they were not stacked so the configuration is the same: they support port-security with static MAC address and allow us to secure a MAC on the data VLAN so we enable it whether there is VoIP or not.
We need to secure bogus MAC addresses on ports in order for the switch to send a trap when a new MAC appears on a port.
Global config settings:
snmp-server community public RO
snmp-server community private RW
snmp-server enable traps port-security
snmp-server enable traps port-security trap-rate 1
snmp-server host 192.168.1.5 version 2c public port-security
On each interface without VoIP
switchport access vlan 4
switchport port-security
switchport port-security maximum 1 vlan access
switchport port-security violation restrict
switchport port-security mac-address 0200.000x.xxxx
On each interface with VoIP:
switchport voice vlan 100
switchport access vlan 4
switchport port-security
switchport port-security maximum 2
switchport port-security maximum 1 vlan access
switchport port-security violation restrict
switchport port-security mac-address 0200.000x.xxxx
where xxxxx stands for the interface ifIndex
Note
ifIndex mapping Use the following templates for interface IfIndex in bogus MAC addresses (0200.000x.xxxx): Fa1/0/1…Fa1/0/48 → 10001…10048 Gi1/0/1…Gi1/0/48 → 10101…10148 Fa2/0/1…Fa2/0/48 → 10501…10548 Gi2/0/1…Gi2/0/48 → 10601…10648 Fa3/0/1…Fa3/0/48 → 11001…11048 Gi3/0/1…Gi3/0/48 → 11101…11148 Fa4/0/1…Fa4/0/48 → 11501…11548 Gi4/0/1…Gi4/0/48 → 11601…11648
IOS XE Switches
openNAC supports the IOS XE switches in MAC Authentication Bypass, 802.1X and web authentication.
802.1x Configuration
The first step on switch is configure the AAA authentication details, use the core IP address that can access from switch.
aaa new-model
aaa authentication dot1x default group radius
aaa authorization network default group radius
aaa accounting dot1x default start-stop group radius
aaa session-id common
dot1x system-auth-control
Set the openNAC as radius server in network device. Use the correct IP address.
radius-server deadtime 5
radius server openNAC
address ipv4 1.2.3.4 auth-port 1812 acct-port 1813
timeout 60
retransmit 10
key 7 00011112222233334444
device-tracking policy opennac_ip
security-level glean
tracking enable
Note
Device tracking policy replaces the command ip device tracking
For interface configuration
switchport access vlan 253
switchport mode access
device-tracking attach-policy opennac_ip
authentication event server dead action authorize vlan 253
authentication event server alive action reinitialize
authentication host-mode multi-auth
authentication order dot1x mab
authentication port-control auto
authentication periodic
mab
dot1x pae authenticator
dot1x timeout tx-period 5
spanning-tree portfast
MAC Authentication Bypass
Global config settings:
dot1x system-auth-control
On each interface:
authentication host-mode multi-domain
authentication order mab
authentication priority mab
authentication port-control auto
authentication periodic
authentication timer restart 10800
authentication timer reauthenticate 10800
authentication violation replace
mab
no snmp trap link-status
dot1x pae authenticator
dot1x timeout quiet-period 2
dot1x timeout tx-period 3
AAA groups and configuration:
aaa new-model
aaa group server radius openNAC
 server 192.168.1.5 auth-port 1812 acct-port 1813
aaa authentication login default local
aaa authentication dot1x default group openNAC
aaa authorization network default group openNAC
RADIUS server configuration:
radius-server host 192.168.1.5 auth-port 1812 acct-port 1813 timeout 2 key Testing123
radius-server vsa send authentication
CoA configuration:
aaa server radius dynamic-author
client 192.168.1.5 server-key Testing123
port 3799
Activate SNMP on the switch:
snmp-server community public RO
802.1X only
Follow the same configuration as for MAC Authentication Bypass but change the authentication priority line with the following:
authentication priority dot1x
802.1X with MAC Authentication fallback
Follow the same configuration as for MAC Authentication Bypass but change the authentication priority line with the following:
authentication priority dot1x mab
Web auth
Web auth requires at least MAC Authentication Bypass to be activated on the switchport but can also work with 802.1X. Configure your switchports as you would usually do, then add the following access lists.
ip access-list extended redirect
 deny   ip any host 192.168.1.5
 deny   udp any any eq domain
 deny   tcp any any eq domain
 deny   udp any any eq bootpc
 deny   udp any any eq bootps
 permit tcp any any eq www
 permit tcp any any eq 443
ip access-list extended registered
 permit ip any any
Global config settings:
Note
ip device tracking
openNAC configuration:
Ensure that openNAC can intercept Web Authentication. The URL can contain dynamic parameters, like the MAC address ($mac), the switch IP ($switch_ip), the username ($user_name).
Screenshots of this configuration are available in the Cisco WLC section of this guide.
Note
AAA authentication is slow to come up after a reload of the IOS XE switches. This makes the recovery from a reboot longer to complete. This is due to a bug in IOS XE. A workaround is to execute the following command no aaa accounting system default start-stop group tacacs+.
Identity Networking Policy
Starting from version 15.2(1)E (IOS) and 3.4.0E (IOSXE) , Cisco introduced the Identity Based Networking Services. It means that you can create an authentication workflow on the switch and create interfaces templates.
To enable it:
authentication display new-style
Global config settings:
dot1x system-auth-control
AAA groups and configuration:

aaa new-model
aaa group server radius openNAC
 server name openNAC
!
aaa authentication login default local
aaa authentication dot1x default group openNAC
aaa authorization network default group openNAC
radius-server vsa send authentication
RADIUS server configuration:

radius-server dead-criteria time 5 tries 4
radius-server deadtime 1
radius server openNAC
 address ipv4 192.168.1.5 auth-port 1812 acct-port 1813
 key Testing123
 automate-tester username cisco ignore-acct-port idle-time 1
CoA configuration:

aaa server radius dynamic-author
 client 192.168.1.5 server-key Testing123
port 3799
Enable SNMP on the switch:
snmp-server community public RO
Enable HTTP and HTTPS server:
ip http server
ip http secure-server
Enable IP device tracking:
ip device tracking
Fallback ACL:
- ip access-list extended ACL-CRITICAL-V4
- permit ip any any
Service Template:
service-template DEFAULT_LINKSEC_POLICY_MUST_SECURE
service-template DEFAULT_LINKSEC_POLICY_SHOULD_SECURE
service-template DEFAULT_CRITICAL_VOICE_TEMPLATE
 voice vlan
service-template CRITICAL_AUTH_VLAN
service-template CRITICAL-ACCESS
 description *Fallback Policy on AAA Fail*
 access-group ACL-CRITICAL-V4
!
Class map:
class-map type control subscriber match-any IN_CRITICAL_AUTH
match activated-service-template DEFAULT_CRITICAL_VOICE_TEMPLATE
match activated-service-template CRITICAL_AUTH_VLAN
match activated-service-template CRITICAL-ACCESS
!
class-map type control subscriber match-none NOT_IN_CRITICAL_AUTH
match activated-service-template DEFAULT_CRITICAL_VOICE_TEMPLATE
match activated-service-template CRITICAL_AUTH_VLAN
match activated-service-template CRITICAL-ACCESS
!
class-map type control subscriber match-all AAA_SVR_DOWN_UNAUTHD_HOST
match result-type aaa-timeout
match authorization-status unauthorized
!
class-map type control subscriber match-all AAA_SVR_DOWN_AUTHD_HOST
match result-type aaa-timeout
match authorization-status authorized
!
class-map type control subscriber match-all DOT1X_NO_RESP
match method dot1x
match result-type method dot1x agent-not-found
!
class-map type control subscriber match-all MAB_FAILED
match method mab
match result-type method mab authoritative
!
class-map type control subscriber match-all DOT1X_FAILED
match method dot1x
match result-type method dot1x authoritative
Policy map:
On the 3 following configurations if the RADIUS server is down then we will apply CRITICAL_AUTH_VLAN, DEFAULT_CRITICAL_VOICE_TEMPLATE and CRITICAL-ACCESS service template. If the RADIUS server goes up then it reinitializes the authentication if the port is in IN_CRITICAL_VLAN.
for 802.1X with MAC Authentication fallback:
policy-map type control subscriber DOT1X_MAB
 event session-started match-all
  10 class always do-until-failure
   10 authenticate using dot1x priority 10
 event authentication-failure match-first
  5 class DOT1X_FAILED do-until-failure
   10 terminate dot1x
   20 authenticate using mab priority 20
  10 class AAA_SVR_DOWN_UNAUTHD_HOST do-until-failure
   10 activate service-template CRITICAL_AUTH_VLAN
   20 activate service-template DEFAULT_CRITICAL_VOICE_TEMPLATE
   30 activate service-template CRITICAL-ACCESS
   40 authorize
   50 pause reauthentication
  20 class AAA_SVR_DOWN_AUTHD_HOST do-until-failure
   10 activate service-template CRITICAL_AUTH_VLAN
   20 activate service-template DEFAULT_CRITICAL_VOICE_TEMPLATE
   30 activate service-template CRITICAL-ACCESS
   40 pause reauthentication
   50 authorize
  30 class DOT1X_NO_RESP do-until-failure
   10 terminate dot1x
   20 authenticate using mab priority 20
  40 class MAB_FAILED do-until-failure
   10 terminate mab
   20 authentication-restart 10800
  60 class always do-until-failure
   10 terminate dot1x
   20 terminate mab
   30 authentication-restart 10800
 event agent-found match-all
  10 class always do-until-failure
   10 terminate mab
   20 authenticate using dot1x priority 10
 event aaa-available match-all
  10 class IN_CRITICAL_AUTH do-until-failure
   10 clear-session
  20 class NOT_IN_CRITICAL_AUTH do-until-failure
   10 resume reauthentication
 event inactivity-timeout match-all
  10 class always do-until-failure
   10 clear-session
 event authentication-success match-all
  10 class always do-until-failure
   10 activate service-template DEFAULT_LINKSEC_POLICY_SHOULD_SECURE
 event violation match-all
  10 class always do-all
   10 replace
For MAC Authentication only:
policy-map type control subscriber MACAUTH
 event session-started match-all
  10 class always do-until-failure
   10 authenticate using mab priority 10
 event authentication-failure match-first
  10 class AAA_SVR_DOWN_UNAUTHD_HOST do-until-failure
   10 activate service-template CRITICAL_AUTH_VLAN
   20 activate service-template DEFAULT_CRITICAL_VOICE_TEMPLATE
   30 activate service-template CRITICAL-ACCESS
   40 authorize
   50 pause reauthentication
  20 class AAA_SVR_DOWN_AUTHD_HOST do-until-failure
   10 activate service-template CRITICAL_AUTH_VLAN
   20 activate service-template DEFAULT_CRITICAL_VOICE_TEMPLATE
   30 activate service-template CRITICAL-ACCESS
   40 pause reauthentication
   50 authorize
  30 class always do-until-failure
   10 terminate mab
   20 authentication-restart 30
 event aaa-available match-all
  10 class IN_CRITICAL_AUTH do-until-failure
   10 clear-session
  20 class NOT_IN_CRITICAL_AUTH do-until-failure
   10 resume reauthentication
 event inactivity-timeout match-all
  10 class always do-until-failure
   10 clear-session
 event authentication-success match-all
  10 class always do-until-failure
   10 activate service-template DEFAULT_LINKSEC_POLICY_SHOULD_SECURE
For 802.1X only:
policy-map type control subscriber DOT1X
 event session-started match-all
  10 class always do-until-failure
   10 authenticate using dot1x priority 10
 event authentication-failure match-first
  10 class AAA_SVR_DOWN_UNAUTHD_HOST do-until-failure
   10 activate service-template CRITICAL_AUTH_VLAN
   20 activate service-template DEFAULT_CRITICAL_VOICE_TEMPLATE
   30 activate service-template CRITICAL-ACCESS
   40 authorize
   50 pause reauthentication
  20 class AAA_SVR_DOWN_AUTHD_HOST do-until-failure
   10 activate service-template CRITICAL_AUTH_VLAN
   20 activate service-template DEFAULT_CRITICAL_VOICE_TEMPLATE
   30 activate service-template CRITICAL-ACCESS
   40 pause reauthentication
   50 authorize
  30 class DOT1X_FAILED do-until-failure
   10 terminate dot1x
  40 class DOT1X_NO_RESP do-until-failure
   10 terminate dot1x
  60 class always do-until-failure
   10 terminate dot1x
   20 authentication-restart 10800
 event agent-found match-all
  10 class always do-until-failure
   10 authenticate using dot1x priority 10
 event aaa-available match-all
  10 class IN_CRITICAL_AUTH do-until-failure
   10 clear-session
  20 class NOT_IN_CRITICAL_AUTH do-until-failure
   10 resume reauthentication
 event inactivity-timeout match-all
  10 class always do-until-failure
   10 clear-session
 event authentication-success match-all
  10 class always do-until-failure
   10 activate service-template DEFAULT_LINKSEC_POLICY_SHOULD_SECURE
Interface Template (802.1X MAC Authentication):
template identity-template-mab
 dot1x pae authenticator
 spanning-tree portfast edge
 switchport access vlan 1
 switchport mode access
 switchport voice vlan 100
 mab
 access-session host-mode multi-domain
 access-session control-direction in
 access-session closed
 access-session port-control auto
 authentication periodic
 authentication timer reauthenticate server
 service-policy type control subscriber DOT1X_MAB
Interface Template (MAC Authentication):
template identity-template-macauth
 dot1x pae authenticator
 spanning-tree portfast edge
 switchport access vlan 1
 switchport mode access
 switchport voice vlan 100
 mab
 access-session host-mode single-host
 access-session control-direction in
 access-session closed
 access-session port-control auto
 authentication periodic
 authentication timer reauthenticate server
 service-policy type control subscriber MACAUTH
Interface Template (802.1X):
template identity-template-dot1x
 dot1x pae authenticator
 spanning-tree portfast edge
 switchport access vlan 1
 switchport mode access
 switchport voice vlan 100
 mab
 access-session host-mode single-host
 access-session control-direction in
 access-session closed
 access-session port-control auto
 authentication periodic
 authentication timer reauthenticate server
 service-policy type control subscriber DOT1X
On each interface for 802.1X with MAC Authentication:
source template identity-template-mab
dot1x timeout tx-period 5
On each interface for MAC Authentication:
source template identity-template-macauth
On each interface for 802.1X:
source template identity-template-dot1x
dot1x timeout tx-period 5
To see what is the status of a port let’s run:
sh access-session interface fastEthernet 0/2 details
                   Interface:  FastEthernet0/2
                 MAC Address:  101f.74b2.f6a5
                IPv6 Address:  Unknown
                IPv4 Address:  172.20.20.49
                   User-Name:  mycompany\pepe
                          Status:  Authorized
                          Domain:  DATA
          Oper host mode:  multi-domain
        Oper control dir:  in
         Session timeout:  12380s (server), Remaining: 12206s
          Timeout action:  Terminate
   Common Session ID:  AC1487290000000C000F8B7A
         Acct Session ID:  Unknown
                          Handle:  0x9C000001
          Current Policy:  DOT1X_MAB
Local Policies:
        Service Template: DEFAULT_LINKSEC_POLICY_SHOULD_SECURE (priority 150)
Server Policies:
  Vlan Group:  Vlan: 20
Idle timeout:  30 sec
Method status list:
           Method           State
dot1x            Authc Success
Debug command:
In order to be able to debug the Identity Networking Policy you can launch the following command in the switch cli:
term mon
debug pre all
DHCP Option 82
In order to enable the DHCP Option 82, you need to add the following parameters. Let’s say you want to enable it for the vlan 1 to 1024:
ip dhcp snooping
ip dhcp snooping vlan 1-1024
On uplink interfaces:
ip dhcp snooping trust
Router ISR 1800 Series
openNAC supports the 1800 series Router with linkUp / linkDown traps. It cannot do anything about the router interfaces (ie: fa0 and fa1 on a 1811). VLAN interfaces ifIndex should also be marked as uplinks in the openNAC switch configuration as they generate traps but are of no interest to openNAC (layer 3).
Global config settings:
snmp-server enable traps snmp linkdown linkup
snmp-server host 192.168.1.5 trap version 2c public
On each interface:
switchport mode access
switchport access vlan 4
Cisco Small Business
The Cisco Small Business switches support MAC based authentication (MAB) as well as 802.1X and VoIP. Both technologies can be combined and will work correctly together on the same switchport.
Nothing is required to activate VoIP on the switch, you must simply configure the voice VLAN you want openNAC to assign in the openNAC switch configuration as well as enabling VoIP there. Note that your phones must not tag their packets on the network and should send their traffic untagged when connected into a openNAC enabled port. This means you should not have the voice VLAN capabilities enabled on the switch itself as they might conflict with the authorization attributes returned by openNAC.
Global configuration:
Note
Before executing these steps, make sure you have a local account configured to login on the switch or are pointing to a RADIUS server for management. Otherwise, you will not be able to login into the switch anymore.
You must first define your RADIUS server and point it to openNAC:
ip device tracking
dot1x system-auth-control
radius-server key Testing123
radius-server host 192.168.1.5
aaa accounting dot1x start-stop group radius
snmp-server community public ro view Default
snmp-server community private rw view Default
MAC Authentication:
In order to configure MAC authentication, you must enable it on each interface
interface x/y/z
 dot1x host-mode multi-sessions
 dot1x reauthentication
 dot1x timeout quiet-period 10
 dot1x timeout server-timeout 5
 dot1x timeout supp-timeout 3
 dot1x authentication mac
 dot1x radius-attributes vlan
 dot1x port-control auto
 spanning-tree portfast
 switchport mode general
 switchport general pvid 2
802.1X with MAB
In order to configure 802.1X with a fall-back to MAC authentication, you must enable it on each interface
interface x/y/z
 dot1x host-mode multi-sessions
 dot1x reauthentication
 dot1x timeout quiet-period 10
 dot1x timeout server-timeout 5
 dot1x timeout supp-timeout 3
 dot1x authentication dot1x mac
 dot1x radius-attributes vlan
 dot1x port-control auto
 spanning-tree portfast
 switchport mode general
 switchport general pvid 2
Once you have configured your switchports, you must configure the switch in openNAC.
Cisco Meraki
Switch Configuration
On the left menu, click on “Switch” and click on Access Policies
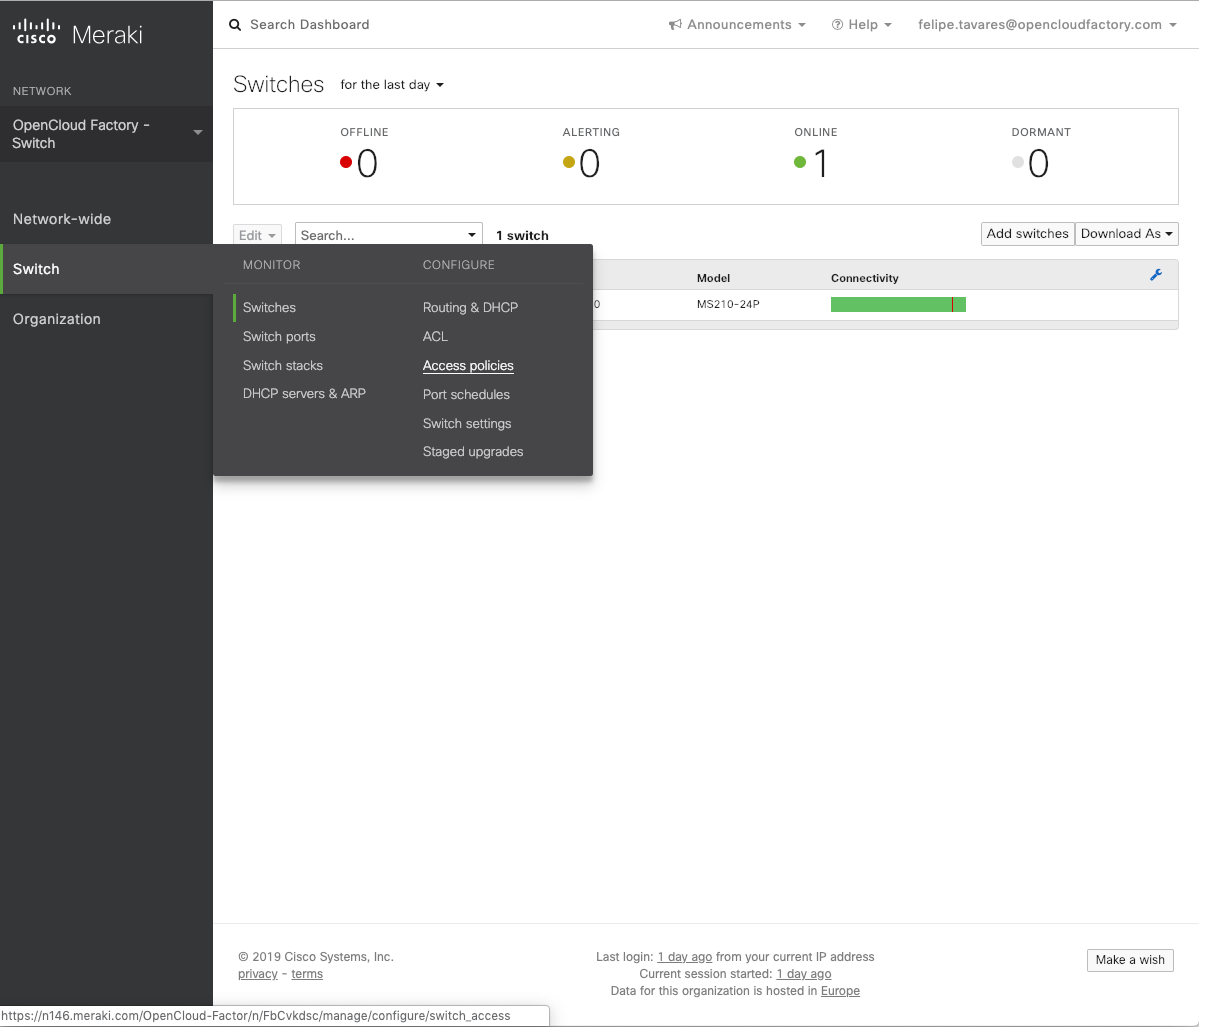
Inside the Access Policies screen, click on “Add an access policy”;
Immediatelly you will be presented with the screen shown below, where you should input the details of your openNAC servers:
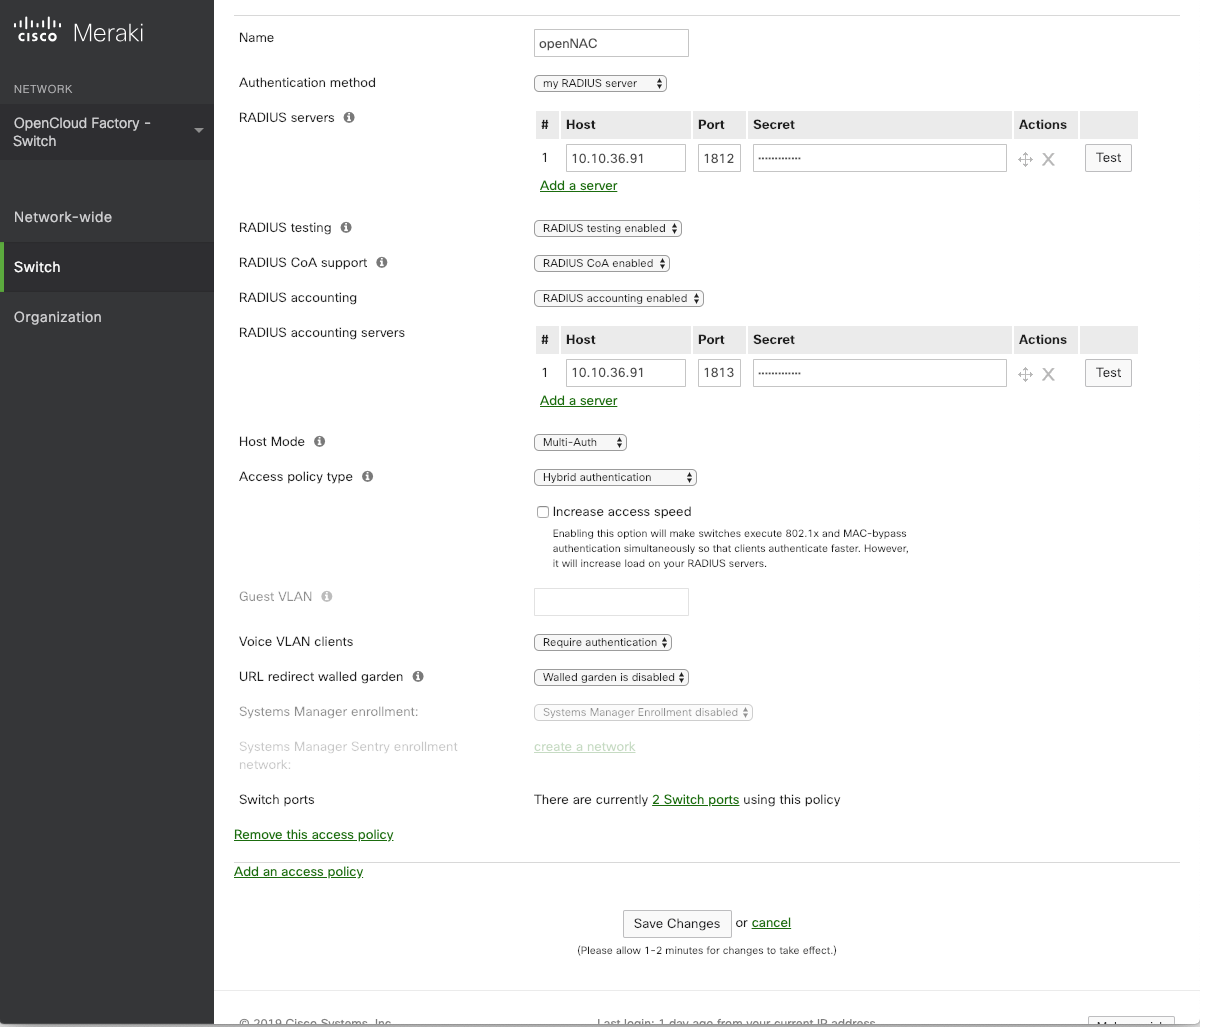
Name: This is the name of the radius group, for example: “openNAC”
Authentication method: “my RADIUS server”
RADIUS servers:
Click on Add a server and input the following details (repeat for each ON Core you have in your infrastructure):
Host: Your ON Core IP (The radius access IP must be local and doesn’t have to be public, since it is accessed locally from the switch)
Port: 1812
Secret: The radius PSK generated by OCF
RADIUS testing: “RADIUS testing enabled”
RADIUS CoA support: “RADIUS CoA enabled”
RADIUS accounting servers:
Click on Add a server and input the following details (repeat for each ON Core you have in your infrastructure):
Host: Your ON Core IP (The radius access IP must be local and doesn’t have to be public, since it is accessed locally from the switch)
Port: 1813
Secret: The radius PSK generated by OCF
Host Mode:
Single-Host: Only one device can be authenticated on the port;
Multi-Domain: Only 2 devices can be authenticated on the port, one in a data vlan, another in a voice vlan;
Multi-Host: Multiple devices can be connected to the port. Only the first will authenticate and the others will be able to access the network unauthenticated;
Multi-Auth: Multiple devices can be connected to the port, each one of them need to be authenticated. Only one device can be on voice vlan can be used. Does not support Guest VLAN (Critical VLAN)
Access policy type:
802.1x: Supplicant authentication, based on user, host or certificate data;
MAC Authentication Bypass: Authentication for devices that does not support supplicant authentication;
Hybrid Authentication: Both authentication methods are supported for the policy. The 802.1x will run first and, if the device does not have a supplicant configured, there will be a fallback to the MAC Authentication Bypass method;
Increase access speed: must remain unchecked;
Guest VLAN: This is the VLAN that should be used in the port, in case openNAC servers are unreacheble (Critical VLAN). Not supported for Multi-Auth.
Voice VLAN clients: “Require authentication”
URL redirect walled garden: “Walled garden is disabled”
Now that we have our access policy, we need to go and configure the ports that should use this policy: TIP: On Meraki, you can define several policies and then configure each subset of ports to use the policy you find most fitting for your needs;
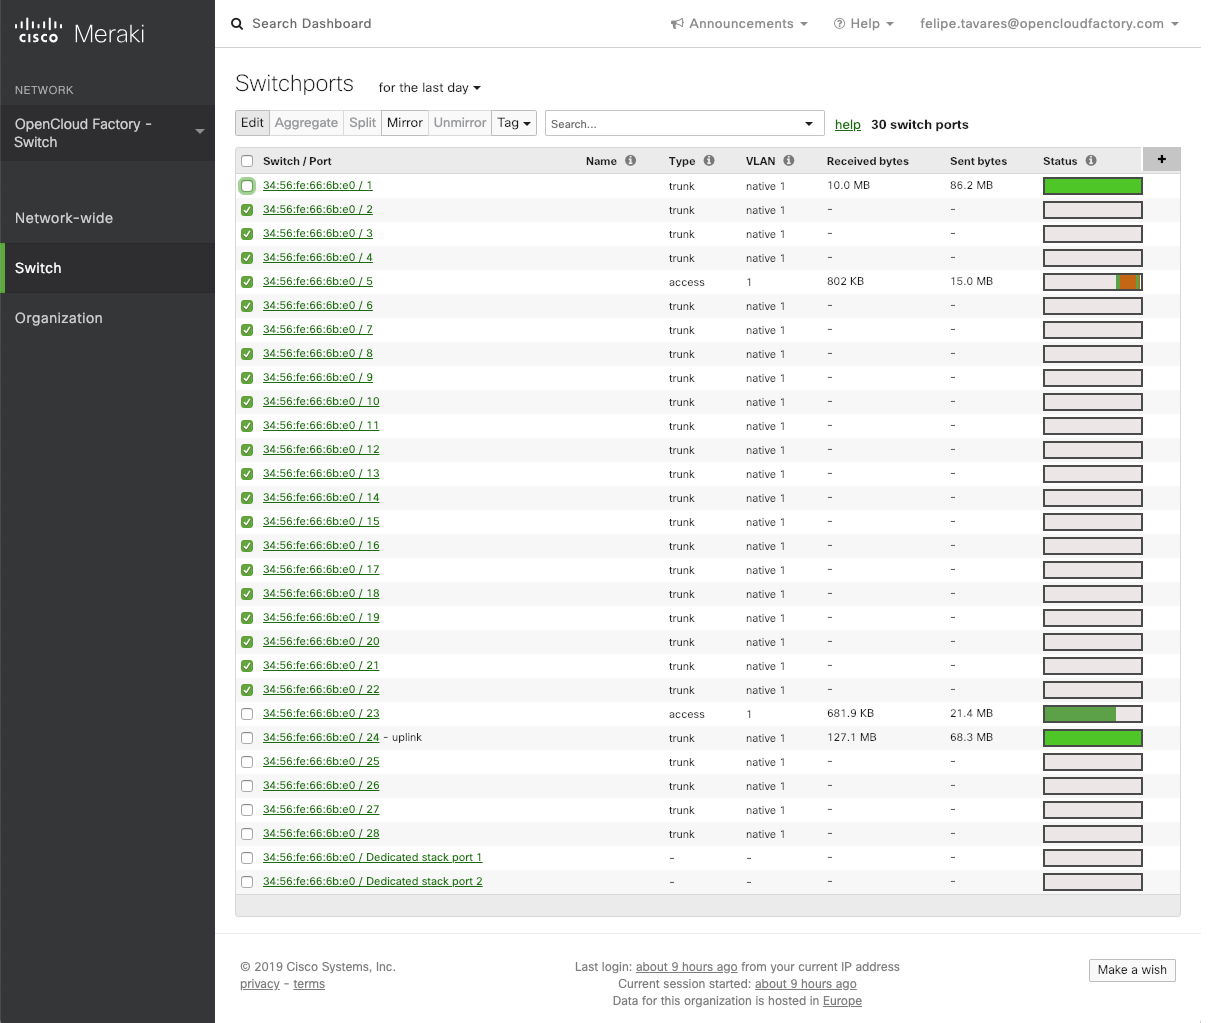
Let’s click on the right menu item “Switch” and on the “switch ports”, as show below:
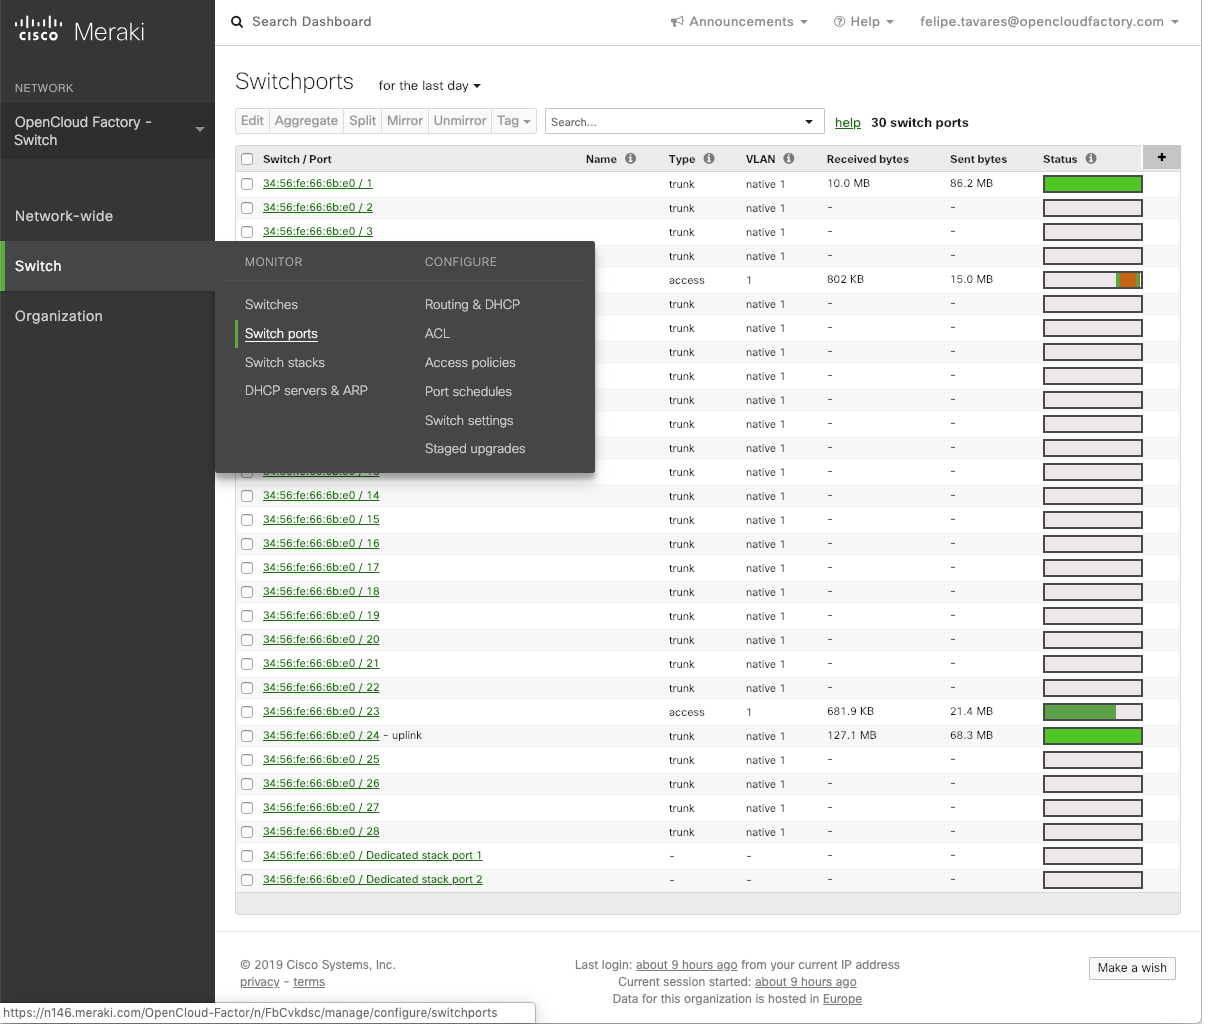
Now, select all the ports that should have the Access List activated and click on the “Edit” button:
Note
When you change the configuration ports, they will go on a cycle and execute an authentication process, so this could interrupt users that are on any kind of communication process in that moment.
In the next screen, you will be able to see all the ports that you have selected, and now it is time to change a pair of configurations, as seen below:
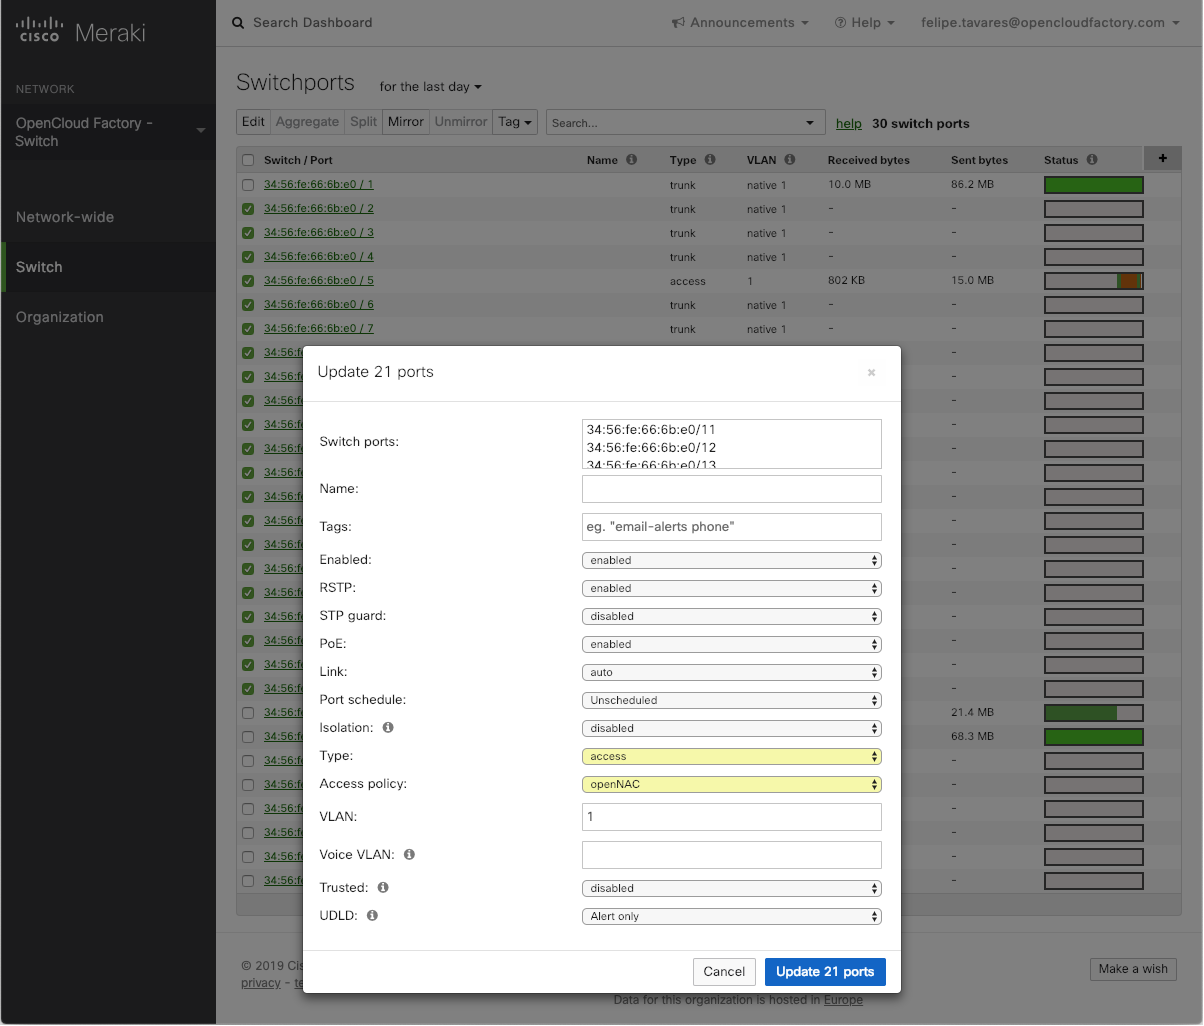
Type: “access”
Access Policy: “openNAC” (or the name that you have set in the creation of the Access Policy)
VLAN: This value is the default vlan that this switch port will have. This value will be applied when from the openNAC policy “Switch default” is indicated as vlan.
Now you are ready to authenticate devices, using your Meraki Switch and openNAC.
D-Link
openNAC supports D-Link switches without VoIP using two different trap types:
- linkUp/linkDown
- MAC Notification
We recommend to enable linkUp/linkDown and MAC notification together.
Note
Don’t forget to update the startup config!
DGS3100/3200
Enable MAC notification:
enable mac_notification
config mac_notification interval 1 historysize 1
config mac_notification ports 1:1-1:24 enable
Enable linkup/linkdown notification:
enable snmp traps
enable snmp linkchange_traps
Add SNMP host:
create snmp host 192.168.1.5 v2c public
Enable MAC base access control:
enable mac_based_access_control
config mac_based_access_control authorization attributes radius enable local disable
config mac_based_access_control method radius
config mac_based_access_control password Testing123
config mac_based_access_control password_type manual_string
config mac_based_access_control max_users no_limit
config mac_based_access_control trap state enable
config mac_based_access_control log state enable
On each interface:
config mac_based_access_control ports 1:1 state enable
config mac_based_access_control ports 1:1 max_users 128
config mac_based_access_control ports 1:1 aging_time 1440
config mac_based_access_control ports 1:1 block_time 300
config mac_based_access_control ports 1:1 mode host_based
Extreme Networks
openNAC supports Extreme Networks switches using:
- linkUp/linkDown
- MAC Address Lockdown (Port Security)
- Netlogin - MAC Authentication
- Netlogin - 802.1X
- RADIUS authentication for CLI access
Note
Don’t forget to save the configuration!
802.1x Configuration Extreme X440G2 - X450G2 - X460G2
X440G2 model accredited with ExtremeXOS version 21.1.3.7
Global configuration
config radius netlogin primary server <IP radius server> client-ip <switch IP> vr VR-Default
config radius netlogin primary shared-secret <Pre shared key>
enable radius netlogin
configure netlogin vlan <VLAN Host> #Esta vlan no debe estar asociada a ningún puerto.
enable netlogin dot1x
Port Configuration
enable netlogin ports <puerto inicio del rango>-<puerto final del rango> dot1x
Troubleshooting commands:
debug netlogin show dot1x-clients
show netlogin dot1x detail
Extreme XOS
In addition to the SNMP and VLANs settings, this switch needs the Web Services to be enabled and an administrative username and password provided in its openNAC configuration for Web Services.
- MAC Address Lockdown (Port-Security)
- linkUp/linkDown traps are enabled by default so we disable them and enable MAC Address Lockdown only.
Global config settings without Voice over IP (VoIP):
enable web http
configure vlan "Default" delete ports <portlist>
configure vlan <vlan_name> add ports <portlist> untagged
configure ports <portlist> vlan <vlan_name> lock-learning
disable snmp traps port-up-down ports <portlist>
where <portlist> are ports you want to secure. It can be an individual port or a port-range with a dash.
Global config settings with Voice over IP (VoIP):
enable web http
configure vlan "Default" delete ports <portlist>
configure vlan <vlan_name> add ports <portlist> untagged
configure vlan voice add ports <portlist> tagged
configure ports <portlist> vlan <vlan_name>  lock-learning
configure ports <portlist> vlan voice limit-learning 1
disable snmp traps port-up-down ports <portlist>
where <portlist> are ports you want to secure. It can be an individual port or a port-range with a dash.
SNMP configuration
Setup snmp v2 configuration
enable snmp access snmp-v1v2c
configure snmp add community readonly <community_name>
configure snmp add trapreceiver <IP openNAC server> community <community_name>
Setup snmp v3 configuration
configure snmpv3 add user <user> authentication [md5|sha] <authpassword> privacy [des|aes|3des] <privpassword>
configure snmpv3 add group <group> user <user> sec-model usm
SNMP v3 Authnopriv security mode: This configuration allows authentication without privacy
configure snmpv3 add access <group> sec-model usm sec-level authnopriv read-view <read_view_name> write-view <write_view_name> notify-view <notify_view_name>
SNMP v3 noauth security mode: This configuration doesn’t need authentication or privacy
configure snmpv3 add access <group> sec-model usm sec-level noauth read-view <read_view_name> write-view <write_view_name> notify-view <notify_view_name>
SNMP v3 priv security mode: This configuration allows authentication and privacy
configure snmpv3 add access <group> sec-model usm sec-level priv read-view <read_view_name> write-view <write_view_name> notify-view <notify_view_name>
MAC Authentication
AAA Configuration:
configure radius netlogin primary server 192.168.1.5 1812 client-ip 10.0.0.8 vr VR-Default
configure radius netlogin primary shared-secret 12345
enable radius netlogin
Netlogin (MAC Authentication)
configure netlogin vlan temp
enable netlogin mac
configure netlogin add mac-list default
configure netlogin dynamic-vlan enable
configure netlogin dynamic-vlan uplink-ports 50
configure netlogin mac authentication database-order radius
enable netlogin ports 1-48 mac
configure netlogin ports 1-48 mode port-based-vlans
configure netlogin ports 1-48 no-restart
802.1X
AAA Configuration
configure radius netlogin primary server 192.168.1.5 1812 client-ip 10.0.0.8 vr VR-Default
configure radius netlogin primary shared-secret 12345
enable radius netlogin
Netlogin (802.1X)
configure netlogin vlan temp
enable netlogin dot1x
configure netlogin dynamic-vlan enable
configure netlogin dynamic-vlan uplink-ports 50
enable netlogin ports 1-48 dot1x
configure netlogin ports 1-48 mode port-based-vlans
configure netlogin ports 1-48 no-restart
Note
You can mix the MAC Authentication and 802.1X on the same switchport. If the device fails 802.1X authentication, it will roll back to the MAC Authentication. RADIUS authentication for CLI access
Configure RADIUS server IP address as primary server and the switch IP address as the client-ip. Be sure to specify the correct virtual router
configure radius mgmt-access primary server <SERVER_IP> 1815 client-ip <CLIENT_IP> vr <VR>
Configure the RADIUS shared-secret:
configure radius mgmt-access primary shared-secret <SHARED_SECRET>
Enable RADIUS for management access:
enable radius mgmt-access
HP
E4800G and E5500G Switch series
These are re-branded 3Com switches, see under the 3Com section for their documentation.
1920 Family (Comware 5)
RADIUS Scheme
In this section we will define the radius servers against which the authentications will be carried out and the format of these:
[switch_hp] radius scheme opennac
[switch_hp-radius-opennac] primary authentication <Authentication_Server_IP>
[switch_hp-radius-opennac] primary accounting <Accounting_Server_IP>
[switch_hp-radius-opennac] key authentication simple <radius_sharedKey>
[switch_hp-radius-opennac] key accounting simple <radius_sharedKey>
[switch_hp-radius-opennac] user-name-format without-domain
We can define secondary radius servers using the command:
[switch_hp-radius-opennac] secondary authentication <Authentication_Server_IP> key simple <radius_sharedKey>
[switch_hp-radius-opennac] secondary accounting <Accounting_Server_IP> key simple <radius_sharedKey>
Domain
In this section you will determine the domain to use and the radius schemes that you will use:
[switch_hp] domain opennac
[switch_hp-isp-opennac] authentication lan-access radius-scheme opennac
[switch_hp-isp-opennac] authorization lan-access radius-scheme opennac
[switch_hp-isp-opennac] accounting lan-access radius-scheme opennac
[switch_hp-isp-opennac] access-limit disable
[switch_hp-isp-opennac] state active
[switch_hp-isp-opennac] idle-cut disable
[switch_hp-isp-opennac] self-service-url disable
Dot1x Configuration
To configure the 802.1x and MAB functionality, we must define the operating mode as port security and each of the ports must be defined in hybrid mode.
Global Configuration:
[switch_hp] port-security enable
[switch_hp] dot1x authentication-method eap
Interface Configuration:
[switch_hp] interface GigabitEthernet x/y/z
[switch_hp-GigabitEthernetx/y/z] port link-type hybrid
[switch_hp-GigabitEthernetx/y/z] port hybrid vlan <VLAN_ID_LIST> tagged
[switch_hp-GigabitEthernetx/y/z] port hybrid vlan <VLAN_ID_LIST> untagged
[switch_hp-GigabitEthernetx/y/z] mac-vlan enable
[switch_hp-GigabitEthernetx/y/z] stp edged-port enable
[switch_hp-GigabitEthernetx/y/z] port-security port-mode userlogin-secure-or-mac-ext
[switch_hp-GigabitEthernetx/y/z] dot1x re-authenticate
[switch_hp-GigabitEthernetx/y/z] undo dot1x handshake
[switch_hp-GigabitEthernetx/y/z] undo dot1x multicast-trigger
MAC-Authentication (MAB)
To enable the MAC-Authentication functionality (used to perform MAB), it will be necessary to define the domain to use and the authentication order in the interface configuration.
Global Configuration:
[switch_hp] mac-authentication domain opennac
Interface Configuration:
[switch_hp] interface GigabitEthernet x/y/z
[switch_hp-GigabitEthernetx/y/z] port-security port-mode userlogin-secure-or-mac-ext
Dot1x Features
Default VLAN
The default VLAN will be the one that will be assigned in case of defining the default VLAN in the openNAC policy.
Interface Configuration:
[switch_hp] interface GigabitEthernet x/y/z
[switch_hp-GigabitEthernetx/y/z] undo port hybrid vlan 1
[switch_hp-GigabitEthernetx/y/z] port hybrid pvid vlan 310
Critical VLAN
The critical VLAN will be the one in which the connections will be established in case the radius servers are not available for authorization.
Interface Configuration:
[switch_hp] interface GigabitEthernet x/y/z
[switch_hp-GigabitEthernetx/y/z] dot1x critical vlan 310
[switch_hp-GigabitEthernetx/y/z] dot1x critical recovery-action reinitialize
Voice VLAN
Global Configuration:
undo voice vlan security enable
Interface Configuration:
[switch_hp] interface GigabitEthernet x/y/z
[switch_hp-GigabitEthernetx/y/z] undo voice vlan mode auto
[switch_hp-GigabitEthernetx/y/z] voice vlan <VLAN_ID> enable
Security Profiles (ACLs)
Static Security Profile
Static security profiles are those where from openNAC we will define which ACL (previously created on the network device) we want to apply to the connection that is established.
Comware switches must receive the ACL number and not its name to make it effective.
To define an ACL on the switch, example:
[switch_hp] acl number 3001
[switch_hp-acl-adv-3001] rule 0 deny icmp destination 10.10.36.40 0
[switch_hp-acl-adv-3001] rule 15 permit ip
Dynamic Security Profile
The dynamic security profiles are those in which from openNAC we will send an ACL not previously defined in the network device.
This network device does not support dynamic assignment of security profiles from openNAC.
TogglePort
SNMP
In order to perform the policy reevaluation through SNMP, it will be necessary to activate this functionality and define the keys of the reading and writing communities:
[switch_hp] snmp-agent
[switch_hp] snmp-agent community read <community>
[switch_hp] snmp-agent community write <community>
[switch_hp] snmp-agent sys-info version v2c
CoA
Compatibility under development.
HP ProCurve
openNAC supports ProCurve switches without VoIP using two different trap types:
- linkUp/linkDown
- Port Security (with static MACs)
We recommend to enable Port Security only.
Note
Don’t forget to update the startup config!
Note
HP ProCurve only sends one security trap to openNAC per security violation so make sure openNAC runs when you configure port-security. Also, because of the above limitation, it is considered good practice to reset the intrusion flag as a first troubleshooting step. If you want to learn more about intrusion flag and port-security, please refer to the ProCurve documentation.
Note
If you configure a switch that is already in production be careful that enabling port-security causes active MAC addresses to be automatically added to the intrusion list without a security trap sent to openNAC. This is undesired because openNAC will not be notified that it needs to configure the port. As a work-around, unplug clients before activating port-security or remove the intrusion flag after you enabled port-security with: port-security <port> clear-intrusion-flag.
2500 Series
linkUp/linkDown traps are enabled by default so we disable them and enable Port Security only.
On 2500’s, we need to secure bogus MAC addresses on ports in order for the switch to send a trap when a new MAC appears on a port.
Global config settings:
snmp-server community "public" Unrestricted
snmp-server host 192.168.1.5 "public" Not-INFO
no snmp-server enable traps link-change 1-26
On each interface:
port-security xx learn-mode static action send-alarm mac-address 0200000000xx
where xx stands for the interface index
CLI authentication:
You can use openNAC for RADIUS CLI authentication on the 2500 Series.
Global config settings
radius-server host 192.168.1.5 key Testing123
aaa authentication ssh login radius local
aaa authentication telnet login radius local
Next, make sure you configure the switch in openNAC accordingly as well as the proper administrative access. Refer to the Administration Guide for more details.
2600 Series and 3400cl Series
- Port-Security
- linkUp/linkDown traps are enabled by default so we disable them and enable Port Security only.
On 2600’s, we don’t need to secure bogus MAC addresses on ports in order for the switch to send a trap when a new MAC appears on a port.
Global config settings:
snmp-server community public manager unrestricted
snmp-server host 192.168.1.5 "public" Not-INFO
no snmp-server enable traps link-change 1-26
On each interface:
port-security xx learn-mode configured action send-alarm
where xx stands for the interface index
MAC Authentication (Firmware > 11.72)
In order to enable RADIUS mac authentication on the ports, you first need to join the ports to either the registration or the mac detection vlan (as a security measure).
Next, define the RADIUS server host:
radius-server host 192.168.1.5 key Testing123
Next, we create a server-group that points to the openNAC server,
aaa server-group radius "openNAC" host 192.168.1.5
Configure the AAA authentication for MAC authentication to use the right server-group:
aaa authentication mac-based chap-radius server-group "openNAC"
Optionally, you can configure the SSH and telnet authentication to point to openNAC (make sure you also follow instructions in the Administration Guide to activate the CLI access):
aaa authentication ssh login radius server-group openNAC local
aaa authentication telnet login radius server-group openNAC local
Finally, enable MAC authentication on all necessary ports:
aaa port-access mac-based 1-24
Don’t forget to permit address moves and the reauth period. x represents the port index:
aaa port-access mac-based x addr-moves
aaa port-access mac-based x reauth-period 14400
2610
- 802.1X
Define the RADIUS server host:
radius-server host 192.168.1.5 key "Testing123"
radius-server host 192.168.1.5 acct-port 1813 key "Testing123"
Define the SNMP configuration:
snmp-server host 192.168.1.5 community "public" informs trap-level not-info
no snmp-server enable traps link-change C1
Configure the server-group:
aaa server-group radius "openNAC" host 192.168.1.5
Configure authentication:
aaa authentication port-access eap-radius server-group "openNAC"
aaa authentication mac-based chap-radius server-group "openNAC"
Configure the port-security:
port-security C1 learn-mode port-access action send-alarm
Configuration of the port:
aaa port-access authenticator C1
aaa port-access authenticator C1 client-limit 1
aaa port-access authenticator active
aaa port-access mac-based C1
aaa port-access mac-based C1 addr-moves
aaa port-access mac-based C1 reauth-period 14400
aaa port-access C1 controlled-direction in
Procurve 5400 Series
IOS accredited: KB.16.01.0007
- Port-Security
- linkUp/linkDown traps are enabled by default
Global config settings:
On global configuration mode we need to configure radius configuration.
HP Switch(config )# radius-server host <ip-openNAC> key <PreSharedKeys>
HP Switch(config )# aaa authentication port-access eap-radius
MAC Authentication (with VoIP):
In order to have MAC Authentication working with VoIP, you need to ensure that the Voice VLAN is tagged on all the port first. You also need to activate lldp notification on all ports that will handle VoIP. In the default configuration, LLDP is globally enabled on the switch. Finally, make sure to change the value of the $VOICEVLANAME variable in the Procurve 5400 module’s source code.
HP Switch(config )# vlan 1
HP Switch(vlan?1) # untagged <initport-endport>
HP Switch(vlan?1) # vlan 2
HP Switch(vlan?2) # voice
HP Switch(vlan?2) # tagged <initport-endport>
HP Switch(vlan?2) # exit
HP Switch(config ) # aaa port-access mac-based <initport-endport>
HP Switch(config ) # aaa port-access mac-based <initport-endport> addr-limit 2
HP Switch(config ) # aaa port-access <initport-endport> controlled-direction in
802.1X (with VoIP)
Same as MAC Authentication, you need to ensure that the Voice VLAN is tagged on all the port first if using 802.1X. You also need to activate lldp notification on all ports that will handle VoIP. In the default configuration, LLDP is globally enabled on the switch. Finally, make sure to change the value of the $VOICEVLANAME variable in the Procurve 5400 module’s source code.
HP Switch(config )# vlan 1
HP Switch(vlan?1) # untagged <initport-endport>
HP Switch(vlan?1) # vlan 2
HP Switch(vlan?2) # voice
HP Switch(vlan?2) # tagged <initport-endport>
HP Switch(vlan?2) # exit
HP Switch(config )# aaa port-access authenticator <initport-endport>
HP Switch(config )# aaa port-access authenticator <initport-endport> client-limit 2
HP Switch(config )# aaa port-access authenticator active
SNMP configuration
SNMP Traps Basic Configuration
HP Switch(config )# snmp-server enable
HP Switch(config )# snmp-server community <community-name> restricted
HP Switch(config )# snmp-server host <ip-openNAC>
HP Switch(config )# snmp-server enable traps link-change [initport-endport|all]
Configuring SNMP v3
To activate SNMP v3 in a HP Procurve, several modes can be configured. Into this section we will describe the configuration you need for three of them.
AuthPriv: This method provides authentication based on the HMAC-MD5 or HMAC-SHA algorithms.
HP Switch(config )# snmpv3 enable
HP Switch(config )# snmpv3 group managerpriv user <username> sec-model ver3
HP Switch(config )# snmpv3 user <username> auth [md5|sha] <preSharedKeyPriv-string> priv [des|aes] <preSharedKeyPriv-string>
AuthNoPriv: This method provides authentication based on the Hashed Message Authentication Code (HMAC)-MD5 or HMAC-SHA algorithms. “preSharedKeyAuth” is the keyword to authenticate. There is not encryption in this method.
HP Switch(config )# snmpv3 enable
HP Switch(config )# snmpv3 group managerauth user <username> sec-model ver3
HP Switch(config )# snmpv3 user <username> auth sha/md5 <preSharedKeyPriv-string>
NoAuthNoPriv: This method provides no authentication and privacy.
HP Switch(config )# snmpv3 enable
HP Switch(config )# snmpv3 group operatornoauth user <username> sec-model ver3
HP Switch(config )# snmpv3 user <username>
The next step is to configure traps receptors with minimum privilege (recommended).
HP Switch(config )# ip authorized-managers <opennac_IP> <opennac_mask> access operator access-method snmp
HP Switch(config )# snmpv3 notify <notify_name> tagvalue <tag_name>
HP Switch(config )# snmpv3 targetaddress [<ipv4-addr|ipv6-addr>] <name>
HP Switch(config )# snmpv3 params <params_name> user <user_name>
Huawei
S5710
Basic configuration:
l2protocol-tunnel user-defined-protocol 802.1X protocol-mac 0180-c200-0003 group-mac 0100-0000-0002
domain on

dot1x enable
dot1x dhcp-trigger

radius-server template openNAC
 radius-server shared-key cipher <Testing123>
 radius-server authentication 192.168.1.5 1812
 radius-server accounting 192.168.1.5 1813
 radius-server retransmit 2
radius-server authorization 192.168.1.5 shared-key cipher <Testing123>

aaa
 authentication-scheme abc
  authentication-mode radius
 accounting-scheme abc
  accounting-mode radius
 domain on
  authentication-scheme abc
  accounting-scheme abc
  radius-server openNAC

snmp-agent
snmp-agent local-engineid 800007DB0304F9389D2360
snmp-agent community write cipher <privateKey>
snmp-agent sys-info version v2c v3
MAC authentication:
interface GigabitEthernet0/0/8
 dot1x mac-bypass mac-auth-first
 dot1x mac-bypass
 dot1x max-user 1
 dot1x reauthenticate
 dot1x authentication-method eap
802.1X:
interface GigabitEthernet0/0/8
 dot1x mac-bypass
 dot1x max-user 1
 dot1x reauthenticate
 dot1x authentication-method eap
S5720
V200R009C00 and later versions -> Tested and working on R011
General Configuration: +++
undo authentication unified-mode
dot1x enable
Note
After apply “undo authnetication unified-mode” command, the switch will reboot.
radius-server template rd1
radius-server authentication <core_ip> 1812
radius-server accounting <core_ip> 1813
radius-server shared-key cipher <opennac_psk>
quit
aaa
authentication-scheme abc
authentication-mode radius
quit
accounting-scheme acco1
accounting-mode radius
accounting realtime 15
quit
domain isp
authentication-scheme abc
accounting-scheme acco1
radius-server rd1
quit
quit
Note
This domain need to be set up as default or as part of the interface configuration
Interface Configuration:
port link-type hybrid
port hybrid pvid vlan <vlan number>
port hybrid untagged vlan <vlan number>
dot1x enable
dot1x authentication-method eap
dot1x mac-bypass
Juniper
EX4200-48PX
Basic interface configuration
root# set interfaces <interface> <enable|disable>
root# set interfaces <interface> unit <unit-number> family <ccc|inet|inet6|iso|mpls|ethernet-switching>
root# set interfaces <interface> unit <unit-number> family ethernet-switching port-mode <access|tagged-access|trunk>
VLAN configuration
root# set vlans <vlan_name> vlan-id <vlan_id>
root# edit interfaces
root# set <interface> unit <unit_number> family <family_type> vlan members <vlan_name>
root# set <interface> unit <unit_number> family <family_type> port-mode <access|tagged-access|trunk>
RADIUS configuration
To use 802.1X or MAC authentication, you must specify the connections on the switch for each RADIUS server to which you will connect.
root# edit access
root# set radius-server <server-ip-address> port 1812 accounting-port 1813 secret <secret-key>
root# set radius-server <server-ip-address> timeout <timeInSecodns> retry <retryAttempts>
root# set profile openNAC authentication-order <(none | ldap | password | radius | s6a | secureid)]>
root# set profile openNAC radius authentication-server <server-ip> accounting-server <server-ip>
Dot1x authentication
root# edit protocols dot1x
root# set authenticator interface <interface-name> supplicant multiple
root# set authenticator interface <interface-name> reauthentication interval <seconds>
root# set authenticator interface <interface-name> supplicant-timeout <seconds>
root# set authenticator interface <interface-name> server-timeout <seconds>
root# set authenticator interface <interface-name> transmit-period <seconds>
root# set authenticator interface <interface-name> maximum-requests <number>
root# set authenticator interface <interface-name> retries <number>
root# set authentication-order [ dot1x | mac-radius ]
MAC-Authentication (MAB)
root# edit protocols
root# set dot1x authenticator interface <interface> mac-radius authentication-protocol pap
root# set dot1x authenticator interface <interface> mac-radius restrict
Dot1x Features
Default VLAN:
The default vlan is called Native vlan in EX Series switches, untagged packets on a trunk/tagged-access interface belong to this vlan.
root# edit interfaces
root# set <interface> unit <unit-number> family ethernet-switching native-vlan-id <id>
Critical VLAN:
The 802.1X critical VLAN on a port accommodates 802.1X users that have failed authentication because none of the RADIUS servers in their domain are reachable.
root# edit protocols dot1x authenticator
root# set interface <interface-name> server-fail vlan-name <vlam-name>
We can also assign a VLAN name for authentication rejected clients. The VLAN specified must already exist on the switch.
root# edit protocols dot1x authenticator
root# set interface <interface-name> server-reject-vlan <vlam-name>
Guest VLAN:
Configure a VLAN for unauthenticated or non-responsive hosts.
root# edit protocols dot1x authenticator
root# set interface <interface-name> guest-vlan <vlam-name>
Voice VLAN:
When VoIP is used with 802.1X, the RADIUS server authenticates the phone, and Link Layer Discovery Protocol–Media Endpoint Discovery (LLDP-MED) provides the class-of-service (CoS) parameters to the phone.
Configure VoIP on the interface and specify the assured-forwarding forwarding class to provide the most dependable class of service:
root# set vlans <voice-vlan-name> vlan-id <id>
root# edit ethernet-switching-options
root# set voip interface <interface-name> vlan voice-vlan-name
root# set voip interface <interface-name> forwarding-class assured-forwarding
Configure LLDP-MED protocol support:
root# edit protocols
root# set lldp-med interface <interface-name>
To authenticate an IP phone and a PC connected to the IP phone on the interface, configure 802.1X authentication support and specify multiple supplicant mode. Also, configure authentication fallback options to specify how VoIP clients sending voice traffic are supported if the RADIUS authentication server becomes unavailable.
root# set dot1x authenticator interface <interface-name> supplicant multiple
root# edit protocols dot1x authenticator
root# set interface <interface-name> server-fail-voip <vlam-name>
Netgear
M Series
Note
openNAC support Netgear M4100 and M4300 switches. It is important to configure the Netgear switch in the following order. Otherwise it is possible to lose connectivity with the switch when activating 802.1x in global mode.
Uplink interfaces
interface 1/0/<Interface Number>
 switchport mode trunk
 dot1x port-control force-authorized
Access interfaces configuration
Note
To configure multiple interfaces range: interface 1/0/<StartPort>-1/0/<EndPort>
interface 1/0/<Interface Number>
 dot1x port-control force-authorized
 dot1x port-control mac-based
 dot1x mac-auth-bypass
 snmp trap link-status
 authentication order dot1x mab
Switch global configuration:
radius server host auth <Radius IP>
radius server key auth <Radius IP> (then press enter and input your secret)
radius server primary <Radius IP>
radius server host acct <Radius IP>
radius server key acct <Radius IP> (then press enter and input your secret)
aaa authentication dot1x default radius
radius accounting mode
radius server msgauth <Radius IP>
authorization network radius
aaa session-id unique
dot1x system-auth-control
aaa server radius dynamic-author
 client <Core IP> server-key <PSKey>