Access Point Configuration
Assumptions APs
Throughout this configuration example we use the following assumptions for our network infrastructure:
Opennac is fully configured with FreeRADIUS running
- openNAC IP address: 192.168.1.5
- Normal VLAN: 1
- Registration VLAN: 2
- Isolation VLAN: 3
- MAC Detection VLAN: 4
- Guest VLAN: 5
- VoIP, Voice VLAN: 100
- use SNMP v2c
- SNMP community name: public
- RADIUS Secret: Testing123 [1]
- Open SSID: opennac-Public
- WPA-Enterprise SSID: opennac-Secure
Unsupported APs
Wireless network access configuration is a lot more consistent between vendors. This is due to the fact that the situation is a lot more standardized than the wired side: VLAN assignment is done centrally with RADIUS and that the client protocol is consistent (MAC-Authentication or 802.1X).
This consistency has the benefit that a lot of the wireless network devices tend to work out-of-the-box with openNAC. The only missing piece being, in most cases, remote deauthentication of the client which is used for VLAN assignment (deauth user so it’ll reconnect and get new VLAN).
So, even if your wireless equipment is not explicitly supported by openNAC, it’s recommended that you give it a try. The next section covers the objectives that you want to accomplish for trying out your equipment even if we don’t have configuration for it.
Here are the high-level requirements for proper wireless integration with openNAC
- The appropriate VLANs must exist
- Allow controller to honor VLAN assignments from AAA (sometimes called AAA override)
- Put your open SSID (if any) in MAC-Authentication mode and authenticate against the FreeRADIUS hosted on openNAC
- Put your secure SSID (if any) in 802.1X mode and authenticate against FreeRADIUS hosted on openNAC.
- On registration / isolation VLANs the DHCP traffic must reach the openNAC server
- On your production VLANs a copy of the DHCP traffic must reach openNAC where dhcpreaders are active and running on the interface.
At this point, user registration with the captive-portal is possible and registered users should have access to the appropriate VLANs. However, VLAN changes (like after a registration) won’t automatically happen, you will need to disconnect / reconnect. An explanation is provided in introduction section above about this behavior.
You can try modules similar to your equipment if any (read appropriate instructions) or you can try to see if RFC3576 is supported. RFC3576 covers RADIUS Packet of Disconnect (PoD) also known as Disconnect Messages (DM) or Change of Authorization (CoA). You can try the Aruba module if you want to verify if RFC3576 is supported by your hardware.
Aruba
All Aruba OS
In this section, we cover the basic configuration of the Aruba wireless controller for openNAC via the web GUI. It was done on an Aruba Controller 200 software version ArubaOS 5.0.3.3, tested on a Controller 600 with ArubaOS 6.0 but it should apply to all Aruba models.
Note
If you are already using your Aruba controllers and don’t want to impact your users you should create new AAA profiles and apply them to new ssids instead of modifying the default ones.
AAA Settings
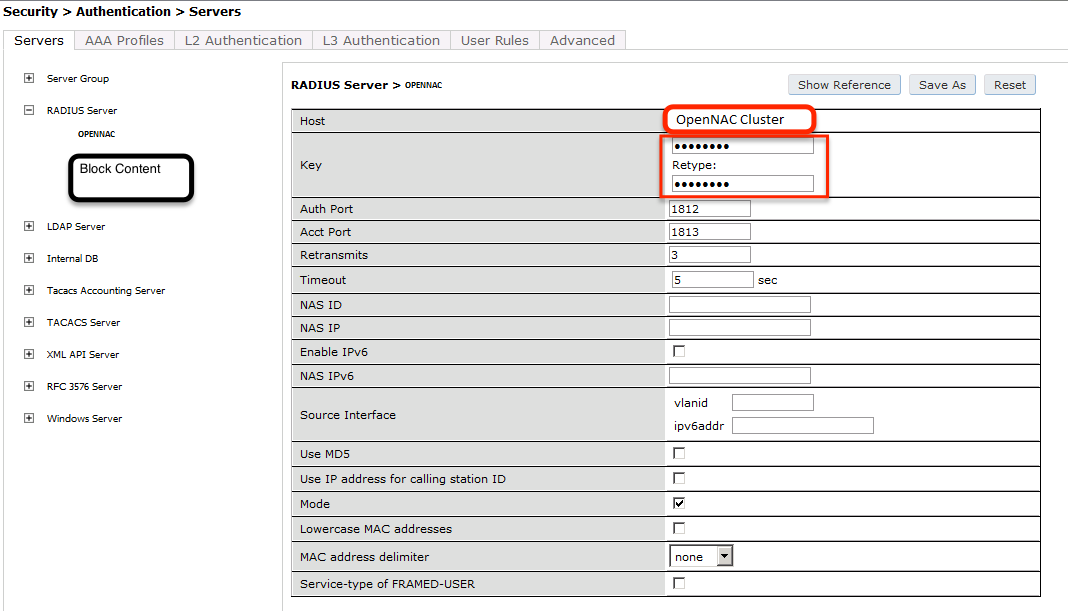
In the Web interface, go to Configuration → Authentication → RADIUS Server and add a RADIUS server named “openNAC” then edit it:
- Set Host to openNAC IP (192.168.1.5)
- Set the Key to your RADIUS shared secret (Testing123)
- Click Apply
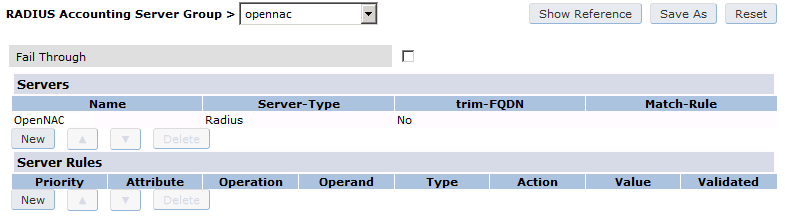
Under Configuration → Authentication → Server Group add a new Server Group named “openNAC” then edit it to add your RADIUS Server “openNAC” to the group. Click Apply.
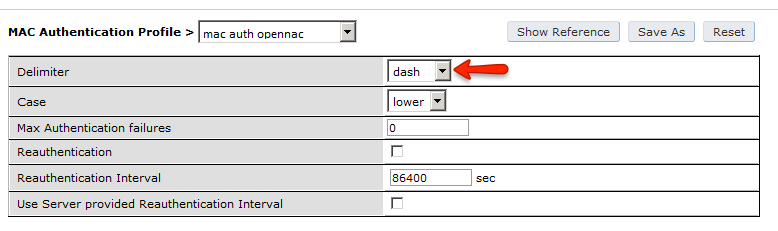
Under Configuration → Authentication → RFC3576 add a new server with openNAC’s IP (192.168.1.5) and your RADIUS shared secret (Testing123). Click Apply. Under Configuration → Authentication → L2 Authentication edit the MAC Authentication Profile called “default” then edit it to change the Delimiter to dash. Click Apply.
Under Configuration → Authentication → L2 Authentication edit the 802.1X Authentication Profile called “default” then edit it to uncheck the Opportunistic Key Caching under Advanced. Click Apply.
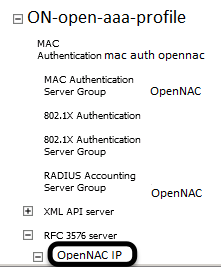
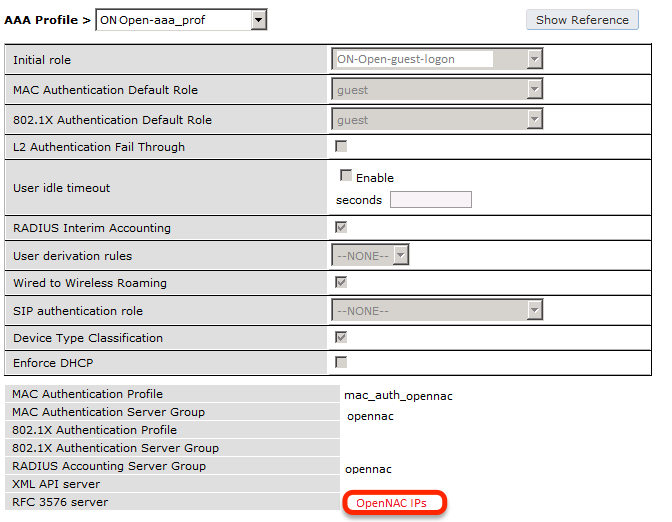
Under Configuration → Authentication → AAA Profiles click on the “default-mac-auth” profile then click on MAC Authentication Server Group and choose the “openNAC” server group. Click Apply. Move to the RFC3576 server sub item and choose PacketFence’s IP (192.168.1.5) click add then apply.
Under Configuration → Authentication → AAA Profiles click on the “default-dot1x” profile then click on 802.1X Authentication Server Group and choose the “openNAC” server group. Click Apply. Move to the RFC3576 server sub item and choose PacketFence’s IP (192.168.1.5) click add then apply.
Public :term:`ssid`
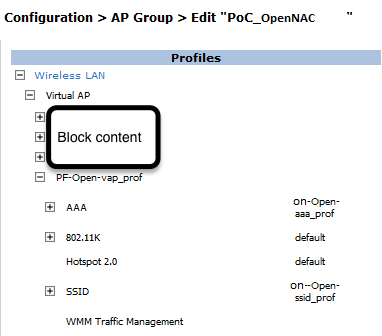
- In the Web interface, go to Configuration → AP Configuration then edit the “default” AP Group. Go in Wireless LAN → Virtual AP create a new profile with the following:
- AAA Profile: default-mac-auth
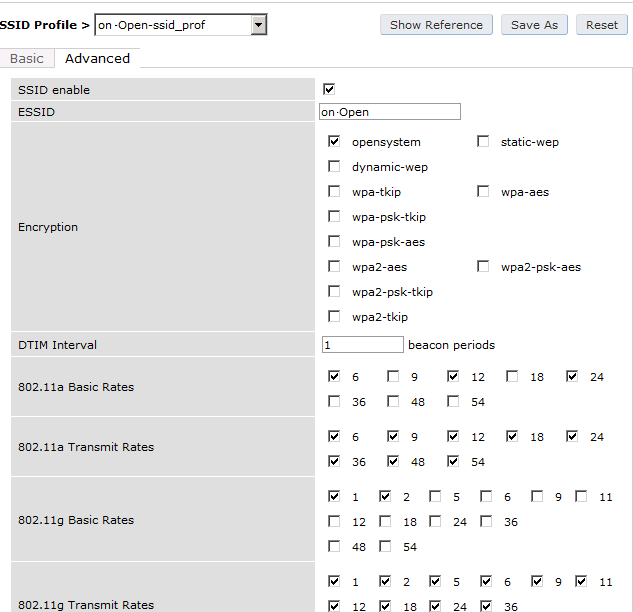
ssid Profile: Select NEW then add an SSID (opennac-Public) and Network authentication set to None
Secure :term:`ssid`
In the Web interface, go to Configuration → AP Configuration then edit the “default” AP Group. Go in Wireless LAN → Virtual AP create a new profile with the following:
- AAA Profile: default-dot1x
- ssid Profile: Select NEW then add an ssid (opennac-Secure) and Network authentication set to WPA2
WebAuth
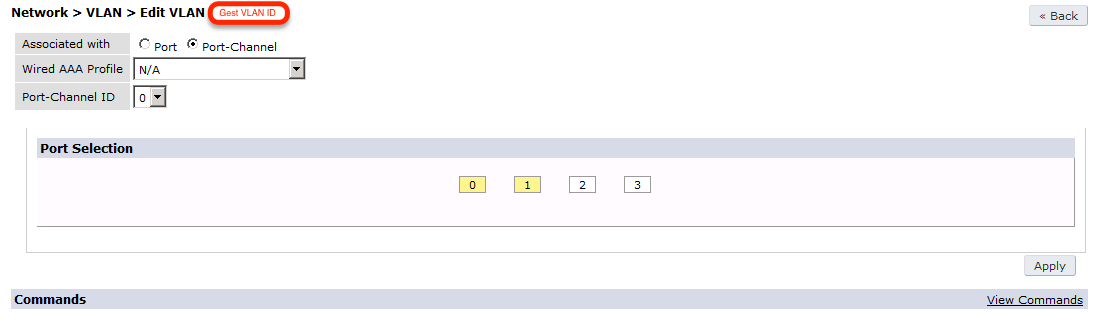
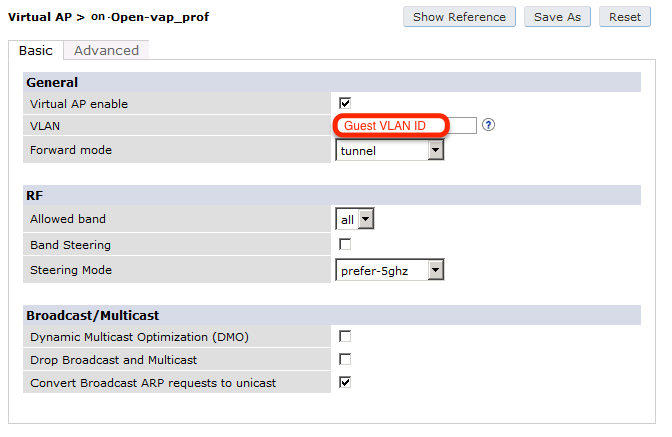
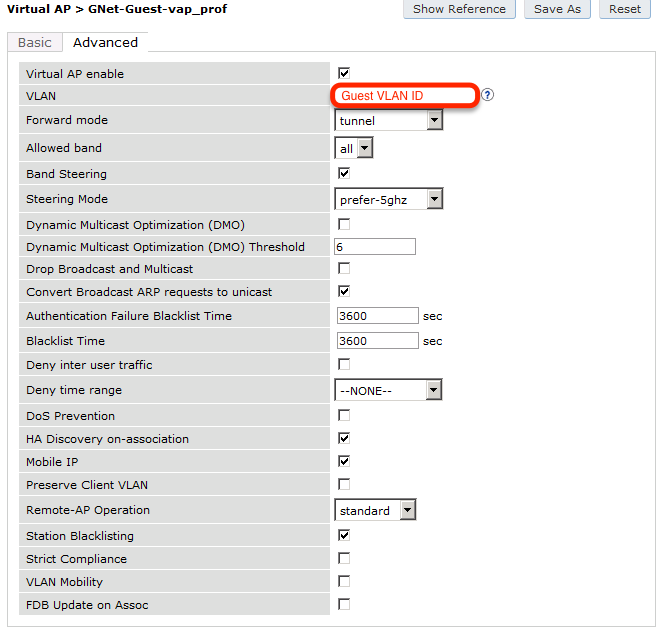
First of all you will need to configure a guest VLAN.
Next, you will need to configure a RADIUS server.
aaa authentication-server radius "openNAC"
host 192.168.1.5
key Testing123
Add your RADIUS server to a AAA group, under Security -> Authentication -> Servers -> Server Group:
aaa server-group "openNAC"
auth-server "openNAC" position 1
Then define the RFC 3576 server, which will allow you to do CoA

aaa rfc-3576-server "192.168.1.5"
key Testing123
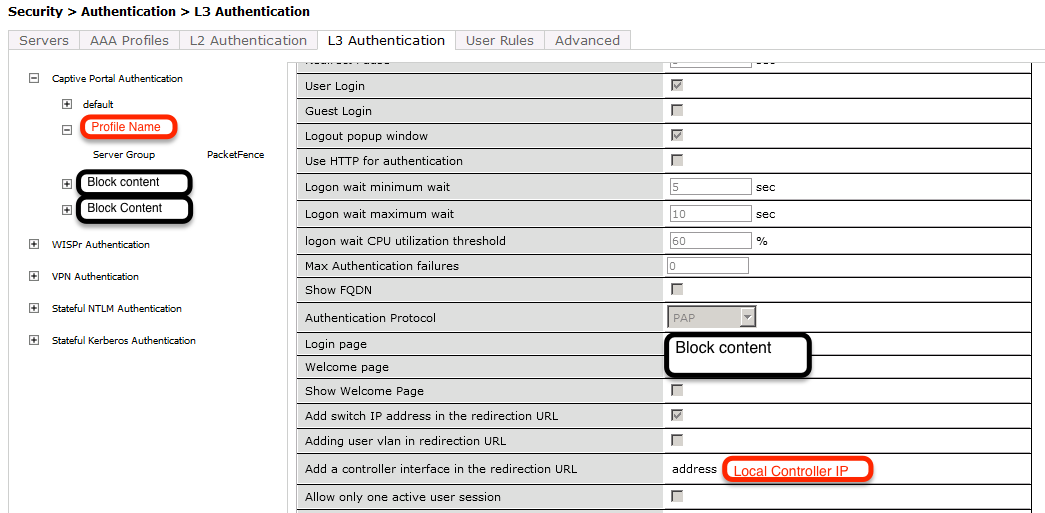
Next, you will need to create the policy that will redirect users to the openNAC captive portal when they are not authenticated. Go to Security → Authentication → L3 Authentication → Captive Portal Authentication Profile
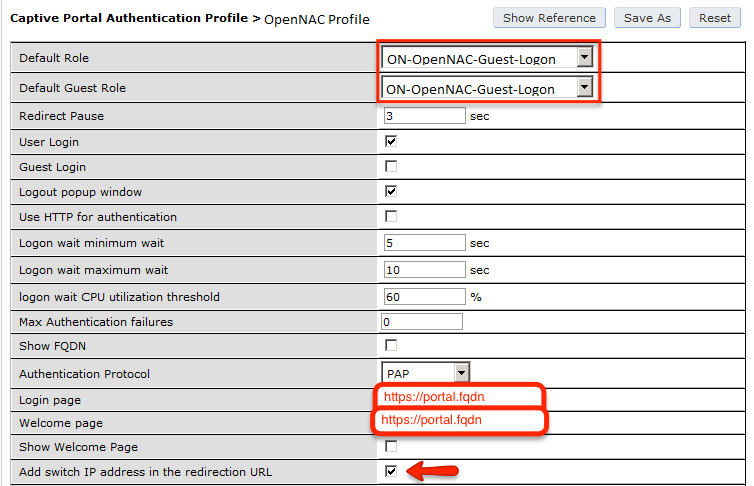
aaa authentication captive-portal "opennac-externalportal"
default-role auth-guest
redirect-pause 3
no logout-popup-window
login-page https://192.168.1.5/Aruba
switchip-in-redirection-url
Now create the policy for the guest access, for example Internet only.
Add the authentication for the Captive Portal Profile via Security → Authentication → L3 Authentication → Captive Portal Authentication Profile → Server Group:
aaa authentication captive-portal "opennac-externalportal"
server-group "openNAC"

aaa profile "opennac-externalportal"
initial-role opennac-portal
radius-interim-accounting
radius-accounting "openNAC"
rfc-3576-server "192.168.1.5"
Define a policy to permit the traffic.
First add a destination, Advanced Services → Stateful Firewall → Destinations:
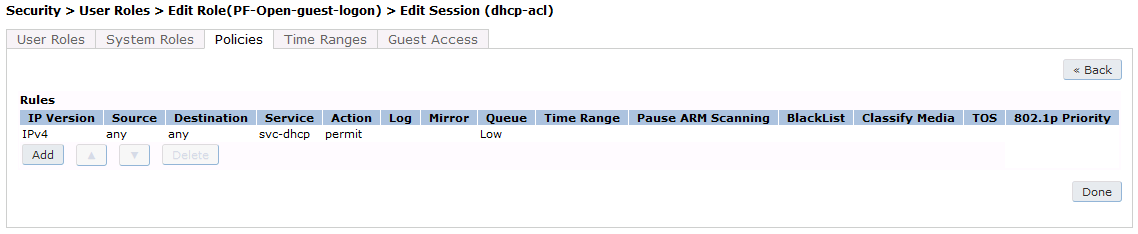
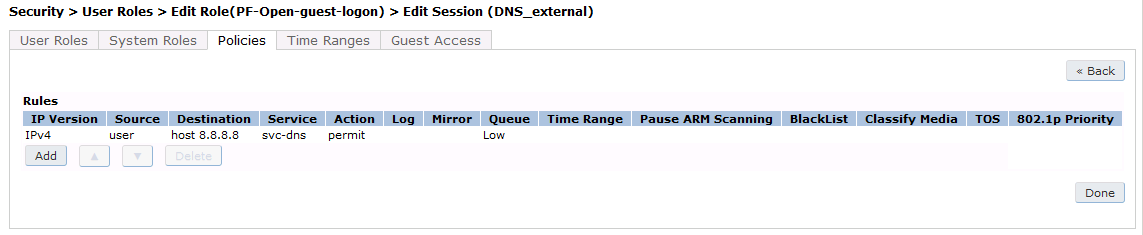
Source NAT on VLAN
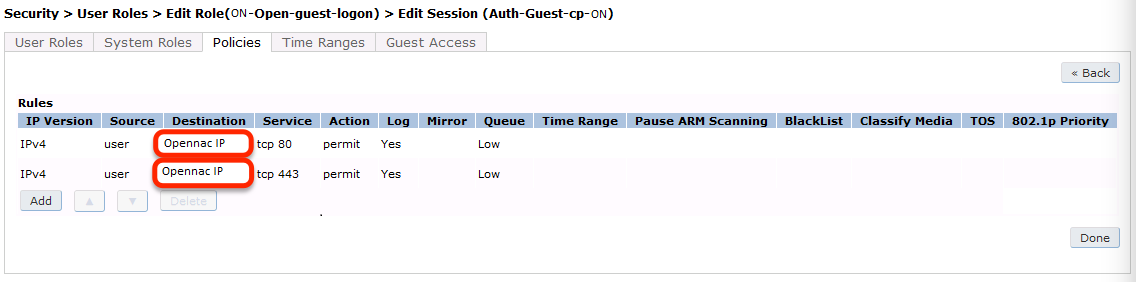
ip access-list session "opennac-externalportal"
alias "user" alias "opennac-portal" "svc-http" permit queue low
alias "user" alias "opennac-portal" "svc-https" permit queue low
Source NAT per Application
ip access-list session "opennac-externalportal"
alias "user" alias "opennac-portal" "svc-http" src-nat queue low
alias "user" alias "opennac-portal" "svc-https" src-nat queue low
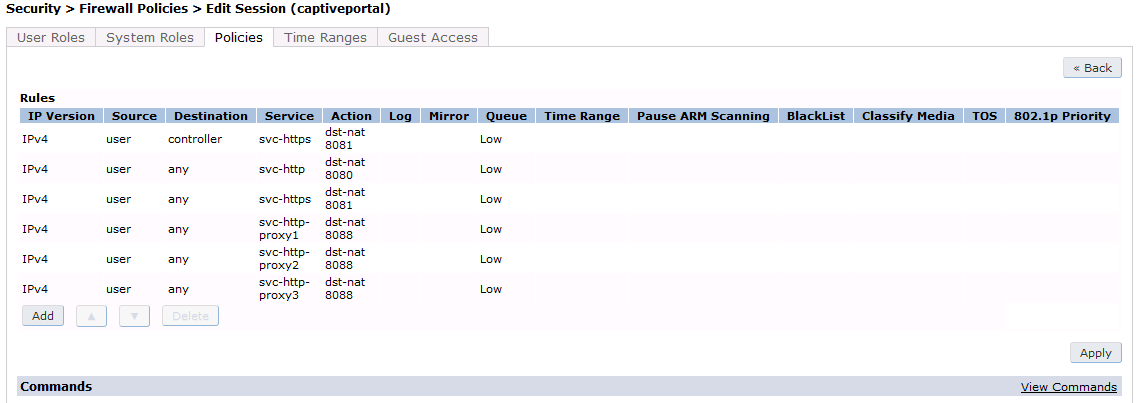
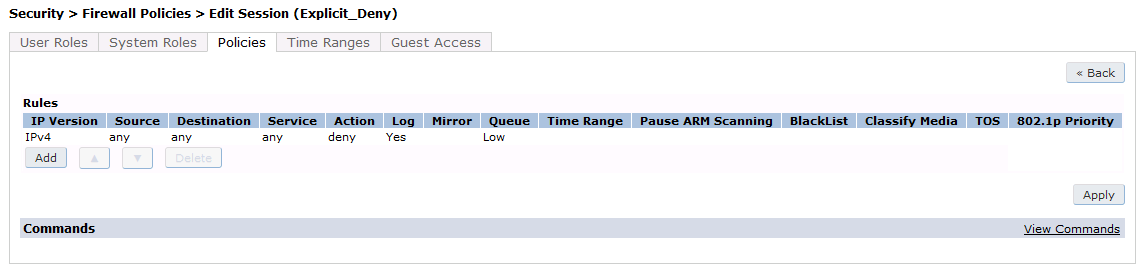
Now add the newly created policy to the Captive Portal Profile, Security → User Roles:
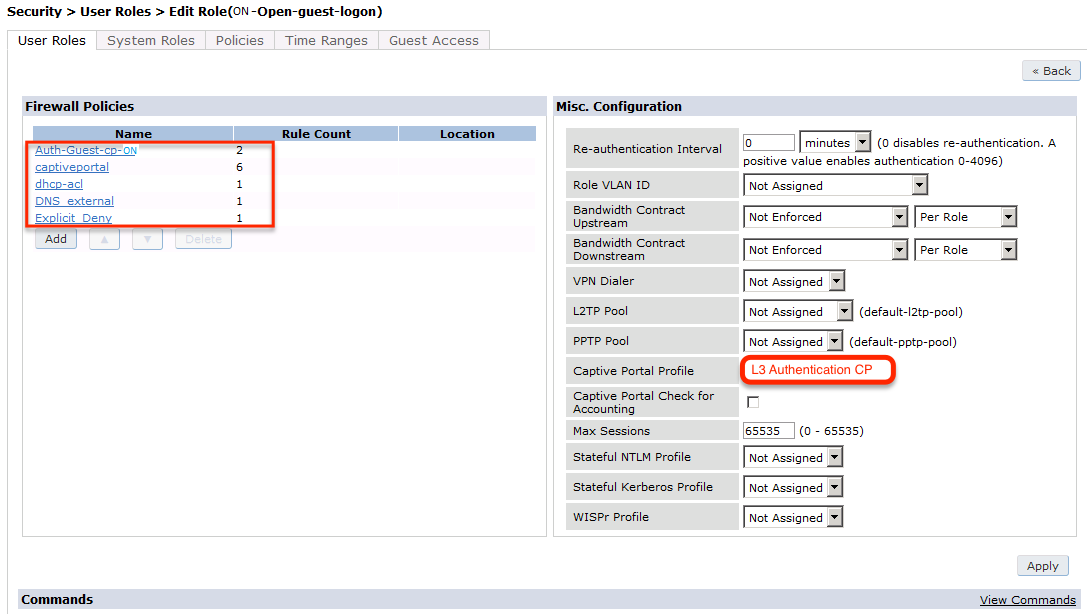
user-role "opennac-portal"
access-list session "opennac-externalportal" position 1
access-list session "captiveportal" position 2
access-list session "guest-logon-access" position 3
access-list session "block-internal-access" position 4
access-list session "v6-logon-control" position 5
access-list session "captiveportal6" position 6
captive-portal "opennac-externalportal"
Finaly create the ssid and associate the profile to it, Virtual AP profile:
wlan virtual-ap "opennac-externalportal"
:term:`ssid`-profile "opennac-externalportal"
aaa-profile "openNAC"
General AP settings and master-slave controller case.

The next step will be to configure the Aruba WiFi controller in openNAC, add the switch in , ON CMDB → Network Devices
aruba-secondary-controller.png
Aruba Controller 200
In this section, we cover the basic configuration of the Aruba Controller 200 for openNAC using the command line interface. We suggest you to use the instructions above for the Web GUI instead.
VLAN definition
Here, we create our openNAC VLANs, and our AccessPoint VLAN (VID 66). It is recommended to isolate the management of the thin APs in a separate VLAN.
vlan 2
vlan 3
vlan 5
vlan 10
vlan 66
AAA Authentication Server
aaa authentication-server radius "openNAC"
   host 192.168.1.5
   key Testing123
aaa server-group "Radius-Group"
 auth-server openNAC
AAA Profiles
aaa profile "default-dot1x"
   authentication-dot1x "default"
   dot1x-default-role "authenticated"
   dot1x-server-group "Radius-Group"
   radius-accounting "Radius-Group"
aaa profile "openNAC"
   authentication-mac "on_mac_auth"
   mac-server-group "Radius-Group"
   radius-accounting "Radius-Group"
WLAN ssids: profiles and virtual AP
wlan ssid-profile "opennac-Public"
   essid "opennac-Public"
wlan ssid-profile "opennac-Secure"
   essid "opennac-Secure"
   opmode wpa2-aes
wlan virtual-ap "Inverse-Guest"
   aaa-profile "openNAC"
   ssid-profile "opennac-Public"
wlan virtual-ap "Inverse-Secure"
   aaa-profile "default-dot1x"
   ssid-profile "opennac-Secure"
ap-group "Inverse"
   virtual-ap "Inverse-Guest"
   virtual-ap "Inverse-Secure"
   ids-profile "ids-disabled"
All Aruba Instant OS
Add your openNAC instance to your configuration:
wlan auth-server openNAC
ip 192.168.1.5
port 1812
acctport 1813
timeout 10
retry-count 5
key Testing123
nas-ip [Aruba Virtual Controller IP]
rfc3576
Add dynamic vlan rules and mac auth to your ssid profile:
wlan ssid-profile ssid
index 0
type employee
essid ESSID
wpa-passphrase WPA-Passphrase
opmode wpa2-psk-aes
max-authentication-failures 0
vlan 1
auth-server openNAC
set-vlan Tunnel-Private-Group-Id contains 1 1
set-vlan Tunnel-Private-Group-Id contains 4 4
rf-band all
captive-portal disable
mac-authentication
dtim-period 1
inactivity-timeout 1000
broadcast-filter none
radius-reauth-interval 5
dmo-channel-utilization-threshold 90
Cisco
Aironet 1121, 1130, 1242, 1250, 1600
Note
With this equipment, the same VLAN cannot be shared between two ssids. Have this in mind in your design. For example, you need two isolation VLAN if you want to isolate hosts on the public and secure ssids. MAC-Authentication + 802.1X configuration
Radio Interfaces:
dot11 vlan-name normal vlan 1
dot11 vlan-name registration vlan 2
dot11 vlan-name isolation vlan 3
dot11 vlan-name guest vlan 5

interface Dot11Radio0
  encryption vlan 1 mode ciphers aes-ccm
  encryption vlan 2 mode ciphers aes-ccm
  ssid opennac-Public
  ssid opennac-Secure

interface Dot11Radio0.2
  encapsulation dot1Q 2
  no ip route-cache
  bridge-group 253
  bridge-group 253 subscriber-loop-control
  bridge-group 253 block-unknown-source
  no bridge-group 253 source-learning
  no bridge-group 253 unicast-flooding
  bridge-group 253 spanning-disabled

interface Dot11Radio0.3
  encapsulation dot1Q 3
  no ip route-cache
  bridge-group 254
  bridge-group 254 subscriber-loop-control
  bridge-group 254 block-unknown-source
  no bridge-group 254 source-learning
  no bridge-group 254 unicast-flooding
  bridge-group 254 spanning-disabled

interface Dot11Radio0.5
  encapsulation dot1Q 5
  no ip route-cache
  bridge-group 255
  bridge-group 255 subscriber-loop-control
  bridge-group 255 block-unknown-source
  no bridge-group 255 source-learning
  no bridge-group 255 unicast-flooding
  bridge-group 255 spanning-disabled
LAN interfaces:
interface FastEthernet0.2
  encapsulation dot1Q 2
  no ip route-cache
  bridge-group 253
  no bridge-group 253 source-learning
  bridge-group 253 spanning-disabled

interface FastEthernet0.3
  encapsulation dot1Q 3
  no ip route-cache
  bridge-group 254
  no bridge-group 254 source-learning
  bridge-group 254 spanning-disabled

interface FastEthernet0.5
  encapsulation dot1Q 5
  no ip route-cache
  bridge-group 255
  no bridge-group 255 source-learning
  bridge-group 255 spanning-disabled
Then create the two SSIDs:
dot11 ssid opennac-Secure
  vlan 3 backup normal
  authentication open eap eap_methods
  authentication key-management wpa

dot11 ssid opennac-Public
  vlan 2 backup guest
  authentication open mac-address mac_methods
  mbssid guest-mode
Configure the RADIUS server:
radius-server host 192.168.1.5 auth-port 1812 acct-port 1813 key Testing123
aaa group server radius rad_eap
  server 192.168.1.5 auth-port 1812 acct-port 1813
aaa authentication login eap_methods group rad_eap
aaa group server radius rad_mac
  server 192.168.1.5 auth-port 1812 acct-port 1813
aaa authentication login mac_methods group rad_mac
5.9.2. Aironet 1600
CoA and radius:

radius-server attribute 32 include-in-access-req format %h
radius-server vsa send accounting
aaa server radius dynamic-author
 client 192.168.1.5
 server-key 7 Testing123
 port 3799
 auth-type all
Aironet 1600
CoA and radius:
radius-server attribute 32 include-in-access-req format %h
radius-server vsa send accounting
aaa server radius dynamic-author
 client 192.168.1.5
 server-key 7 Testing123
 port 3799
 auth-type all
Wireless LAN Controller (WLC) Generic
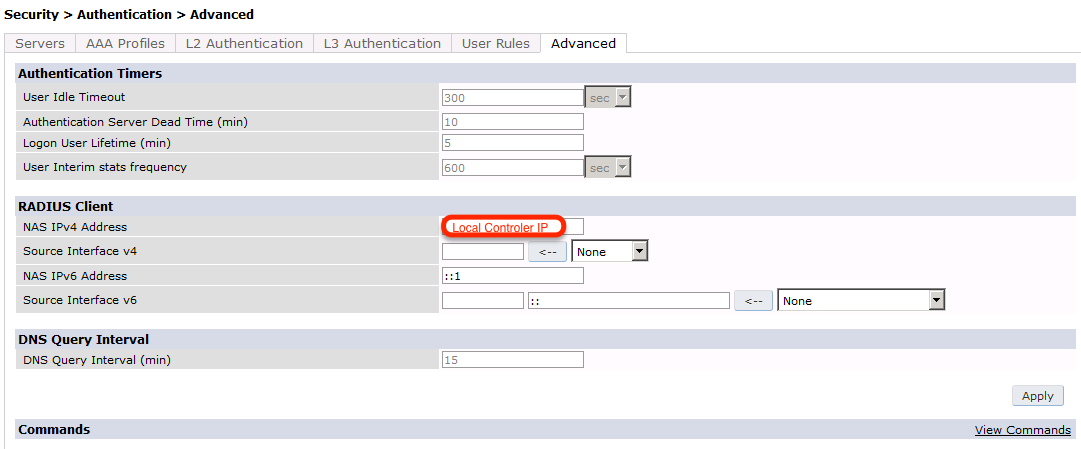
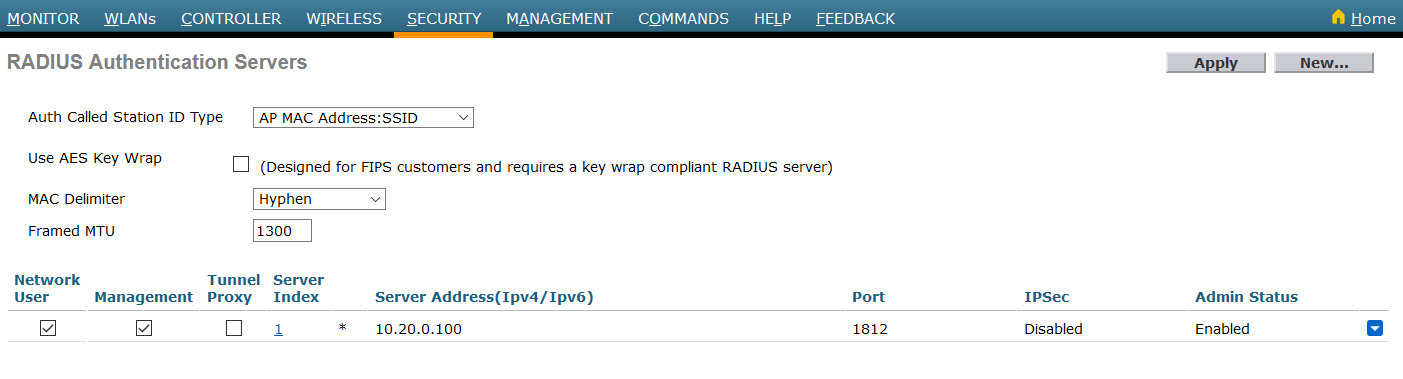
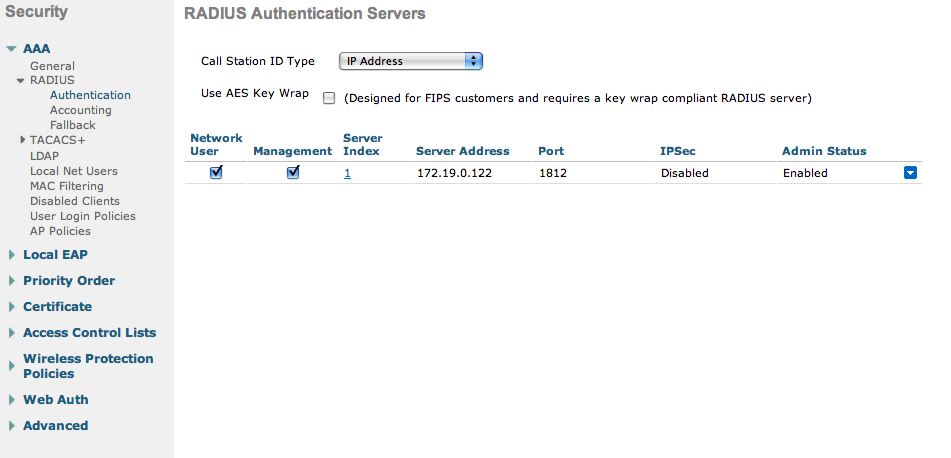
First, globally define the FreeRADIUS server running on openNAC (openNAC’s Administration Interface) and make sure Support for RFC 3576 is enabled (if not present it is enabled by default).
- Authentication server: Security tab → AAA → RADIUS → Authentication
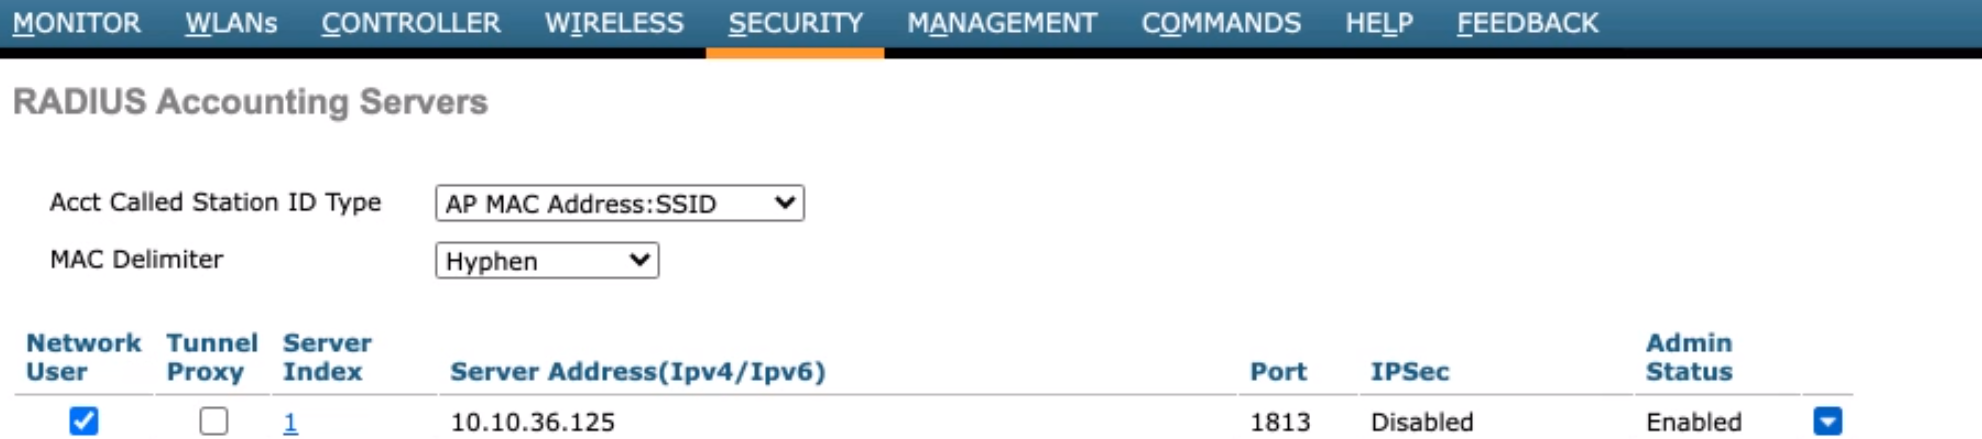
- Accounting server: Security tab → AAA → RADIUS → Accounting
Wireless LAN Controller (WLC) or Wireless Services Module (WiSM)
In this section, we cover the basic configuration of the WiSM for openNAC using the web interface.
- First, globally define the FreeRADIUS server running on openNAC and make sure Support for RFC 3576 is enabled (if not present it is enabled by default)
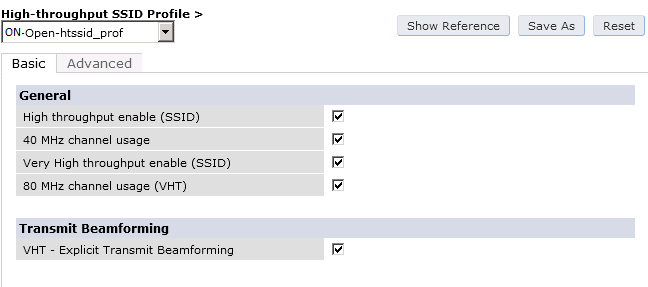
Then we create two ssids:
- opennac-Public: non-secure with MAC authentication only
- opennac-Secure: secure with WPA2 Enterprise PEAP/MSCHAPv2
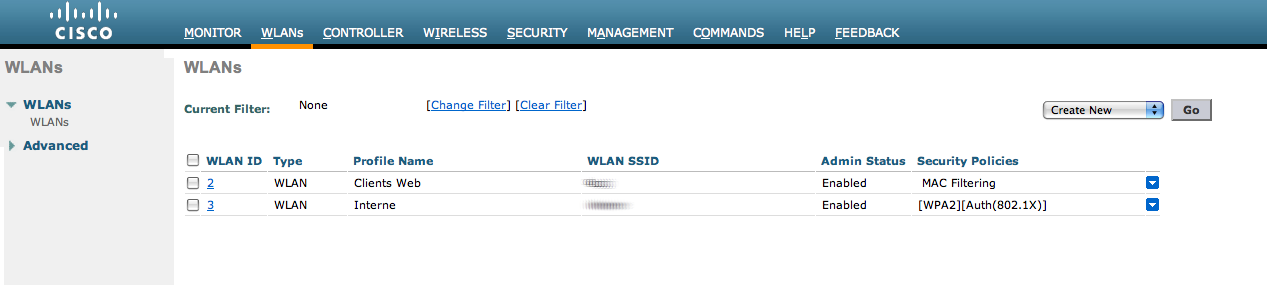
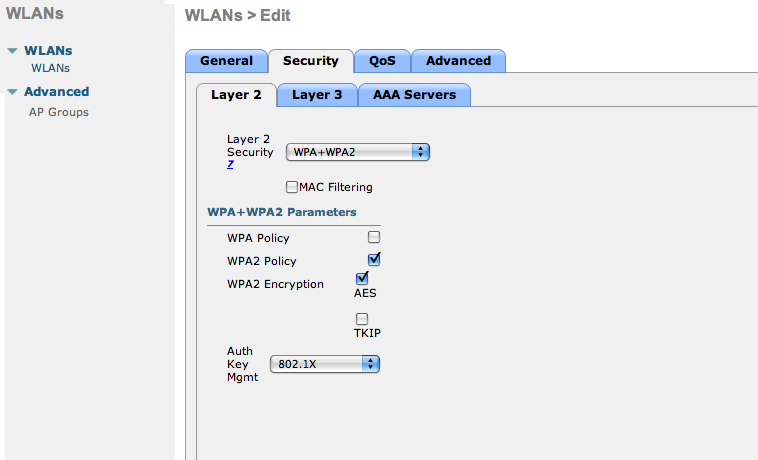
- In the secure ssid, make sure 802.1X is enabled and select the appropriate encryption for your needs (recommended: WPA + WPA2)
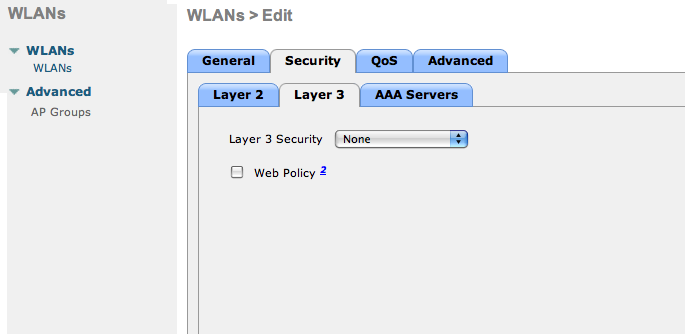
- No layer 3 security
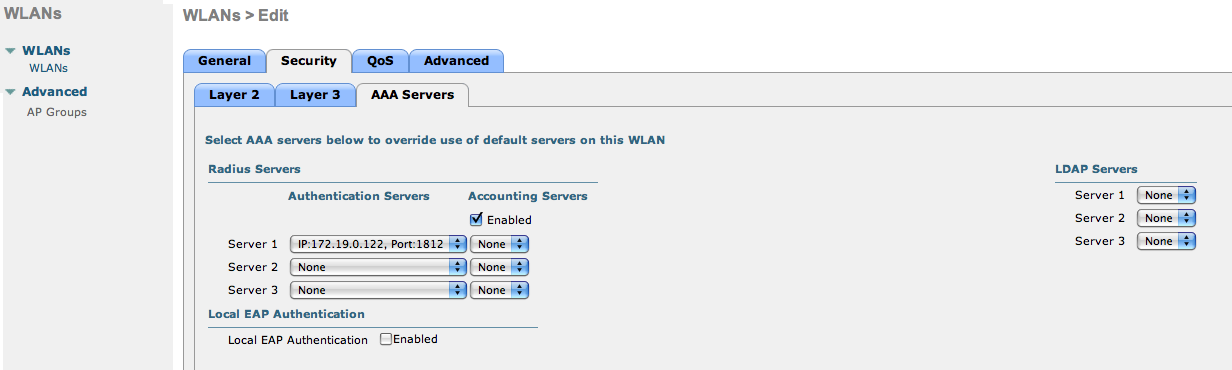
- We set the IP of the openNAC server

- VERY IMPORTANT: Allow AAA override (this allows VLAN assignment from RADIUS)
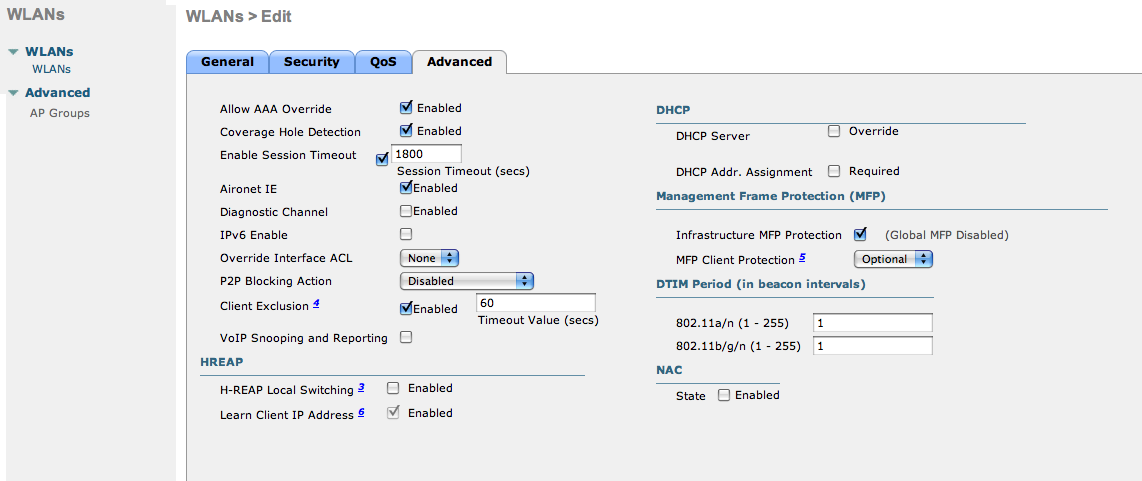
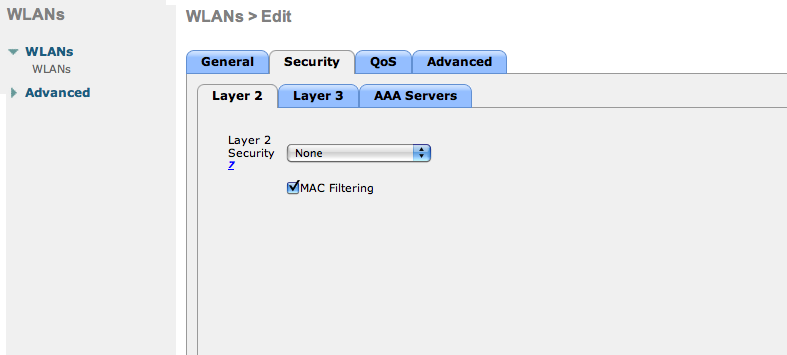
- Edit the non-secure SSID: Enable MAC authentication at level 2
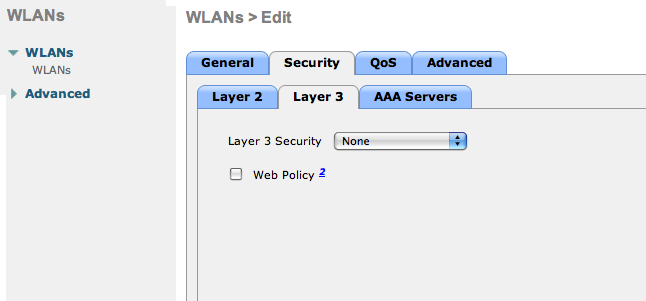
- Nothing at level 3
- We set the IP of the FreeRADIUS server
- VERY IMPORTANT: Allow AAA override (this allows VLAN assignment from RADIUS)
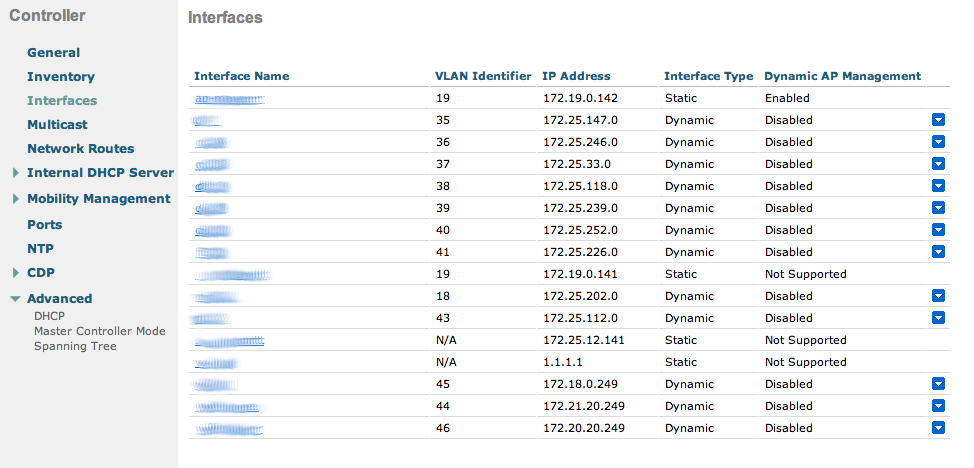
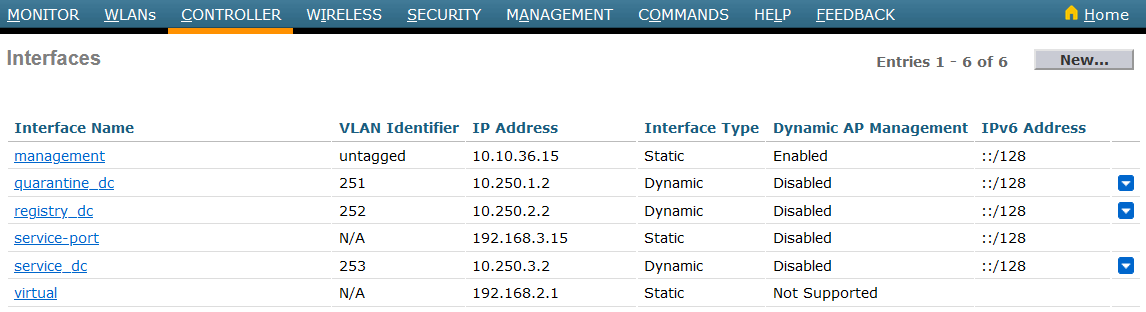
- Finally, in Controller > Interfaces tab, create an interface per VLAN that could be assigned
Wireless LAN Controller (WLC) Web Auth
In this section, we cover the basic configuration of the WLC Web Auth for openNAC using the web interface. The idea is to forward the device to the captive portal with an ACL if the device is in an unregistered state and allow the device to reach Internet (or the normal network) by changing the ACL once registered. In the unregistered state, the WLC will intercept the HTTP traffic and forward the device to the captive portal.
In this sample configuration, the captive portal and the administration interface uses the IP address 10.20.0.100. The DHCP and DNS servers are not managed by openNAC (WLC DHCP Server, Production DHCP Server)
First, globally define the FreeRADIUS server running on openNAC (openNAC’s Administration Interface) and make sure Support for RFC 3576 is enabled (if not present it is enabled by default).
- Authentication server: Security tab → AAA → RADIUS → Authentication
- Accounting server: Security tab → AAA → RADIUS → Accounting
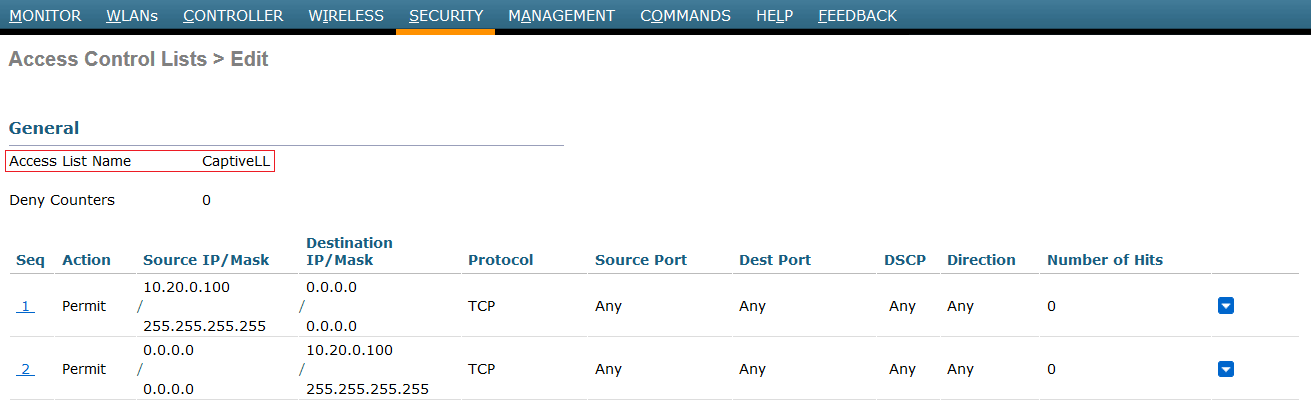
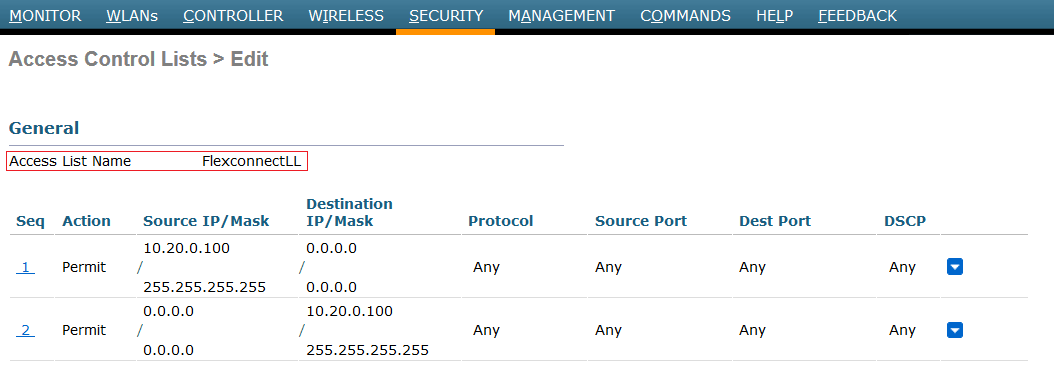
The second step is to define preauthentication Access Control Lists, as simple ACLs or Flexconnect ACLs in case you are using Flexconnect technology. As we comment it, they are used to allow traffic before user authentication. So, the only traffic we want to allow is from user devices to openNAC server, in both directions.
- Simple ACL: Go to Security tab → Access Control Lists → Access Control Lists and add two rules like them:
- Flexconnect ACL: Go to Security tab → Access Control Lists → Flexconnect ACLs and add two rules like them:
All the FlexConnect access points in a group share the same FlexConnect configuration information. So, we need to ensure VLAN ID are sharing into the desired group. Remember, the VLAN must be routed to captive portal.
Go to WIRELESS → FlexConnect VLAN and check if VLAN IDs are mapped on it.
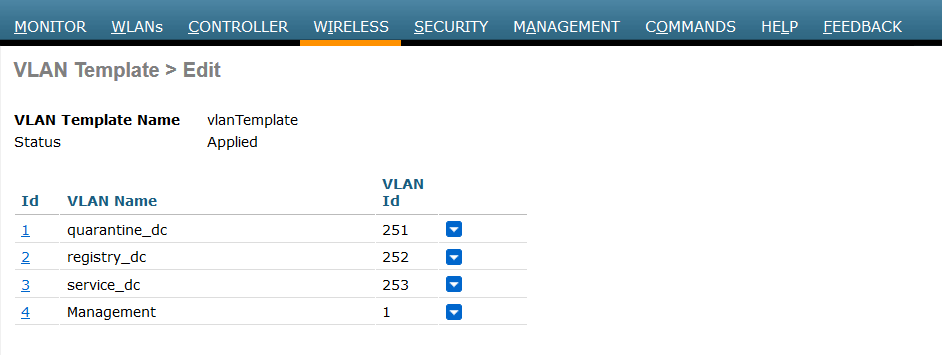
The third step is to select the WLC interface. Before authenticating a user, an IP of this VLAN will be given to him by the DHCP server. Each interface, also known as Dynamic VLAN interface, controls VLANs and other communications between controllers and all other network devices, and each acts as a DHCP relay for wireless clients associated to Wireless LANs (WLANs) mapped to the interface. To do it, go to CONTROLLER tab → Interfaces and edit or add a new one.
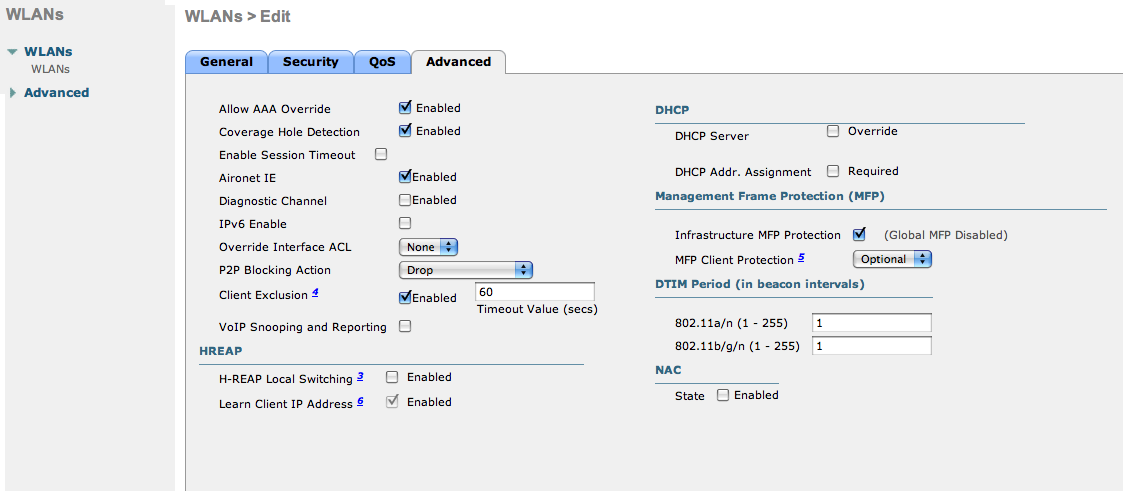
Then we create a ssid:
- New WLAN ssid: non-secure SSID
Enable the SSID and select interface.
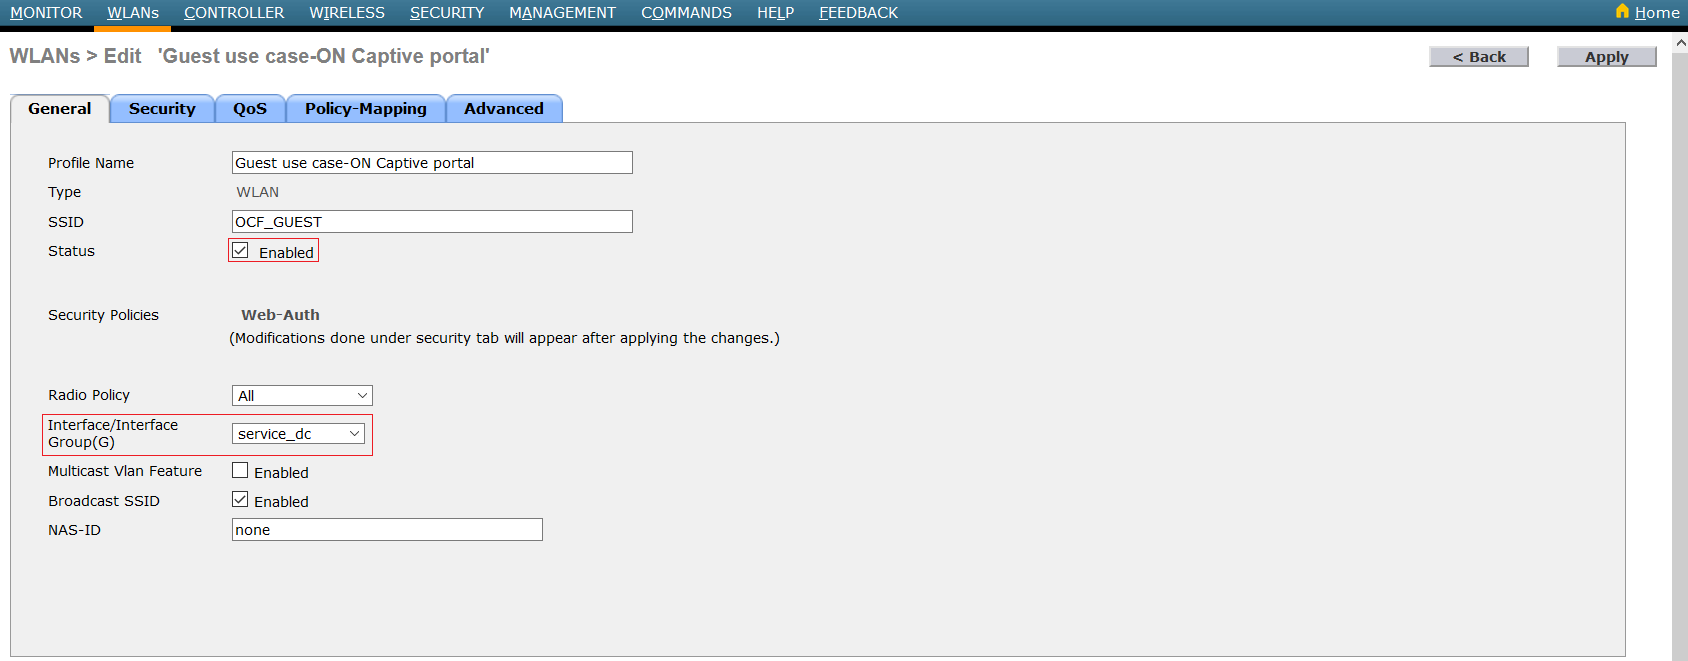
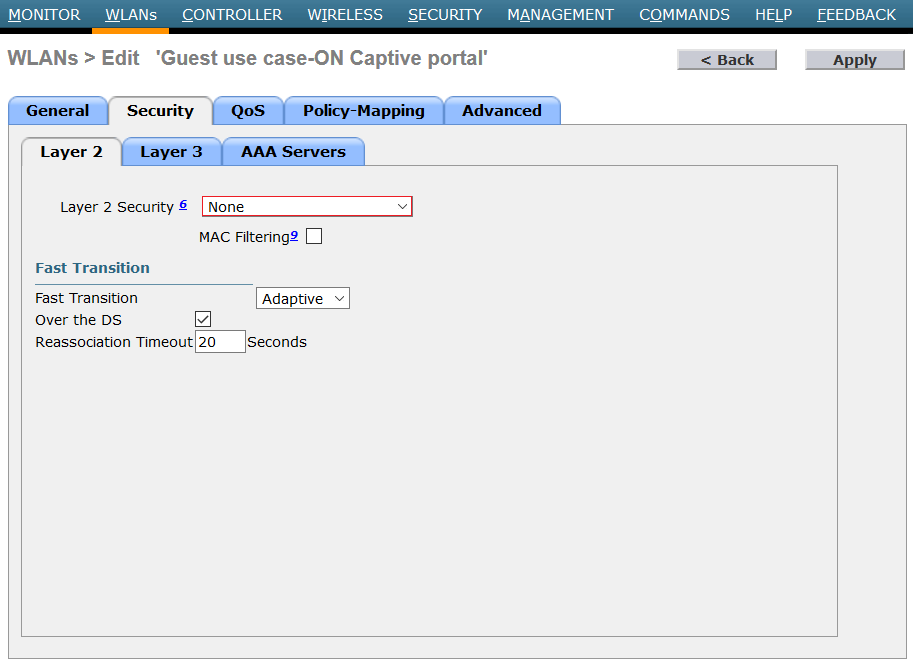
On Security Layer 2, configure Layer 2 security = none
On Security → Layer 3:
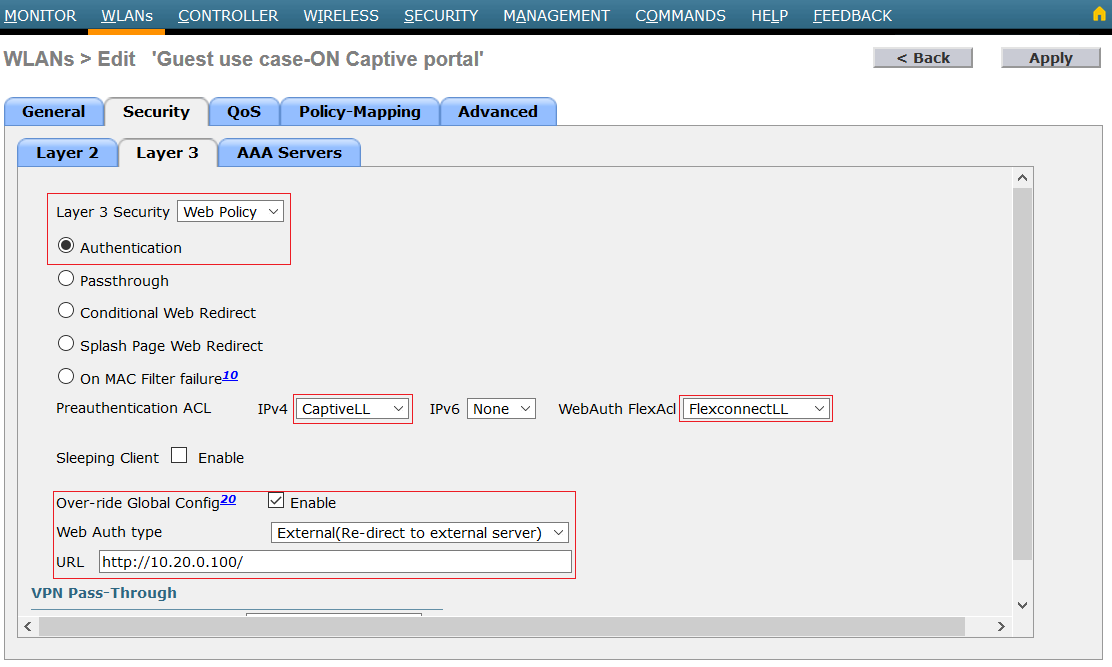
- Layer 3 security = Web Policy Authentication
- Preauthentication ACL = Simple ACL or Flexconnect ACL you created during the second step.
- Over-ride Global config =Enable
- Web auth type = External (Re-direct to external server)
- URL = Captive portal URL
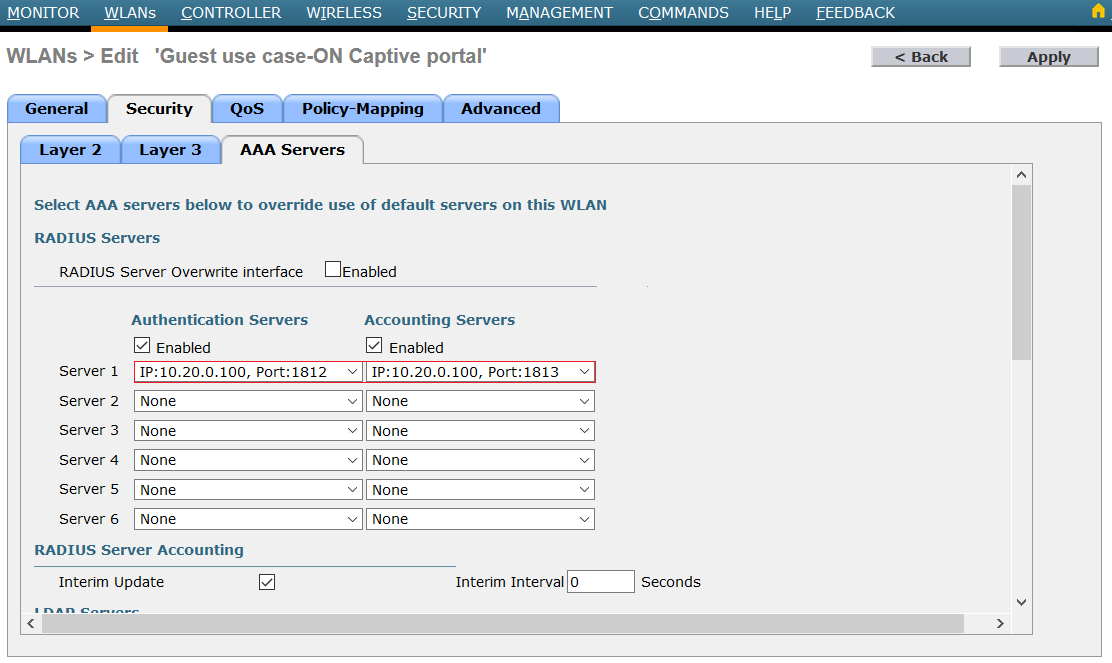
On Security → AAA Servers, select authentication and accounting server:
On Advanced tab:
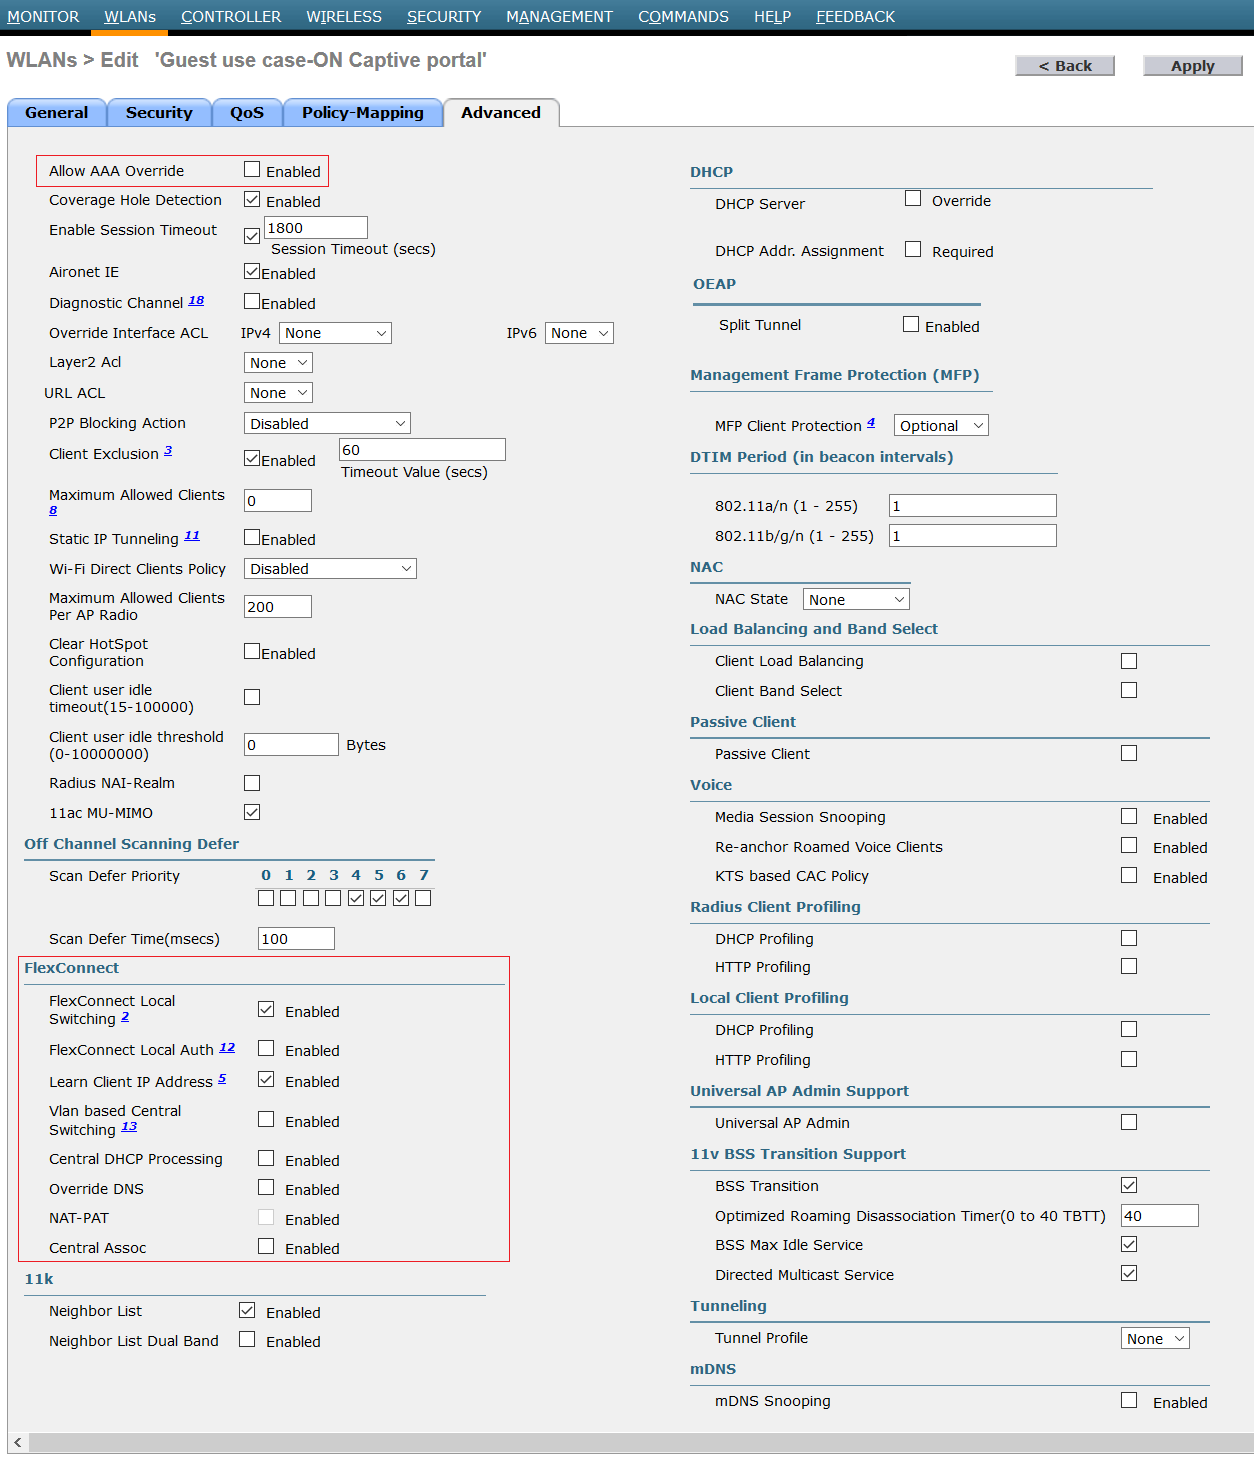
Override AAA server is used with WPA2 or other security type. Using web authentication, the flow is handled by WLC, so Freeradius cannot pass any parameters to WLC. Flexconnect: Don’t forget to configure flexconnect options with Flexconnect technology.
Then the last step is to configure the Captive Portal on openNAC.
Note
Troubleshooting ignored RADIUS replies
In the event the WLC ignores the RADIUS replies from openNAC (you receive multiple requests but access is never granted), validate the following elements : - RADIUS secret is properly configured in openNAC and the WLC controller. - The SSL certificate used by openNAC is not expired.
Meraki
Meraki Access Points Configuration
Generate SSID
The first step here is to enable one SSID and start configuring it for the desired use case. So, to achieve this, click on the left menu item “Wireless”, then click on SSIDs.
The below screen will be shown.
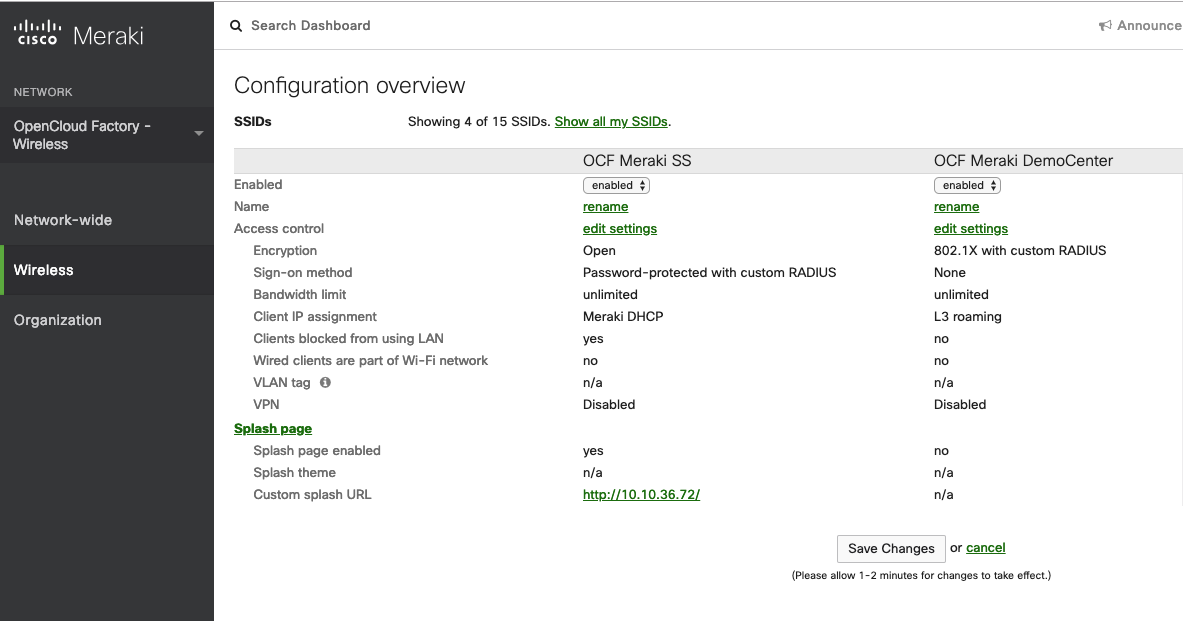
In our example, the “OCF Meraki DemoCenter” will be the corporate SSID and the “OCF Meraki SS” will be the guest access.
So, once we enabled the SSID and changed it’s name, now we click on “edit settings” to start configuring it.
Corporate Access (802.1x Enterprise)
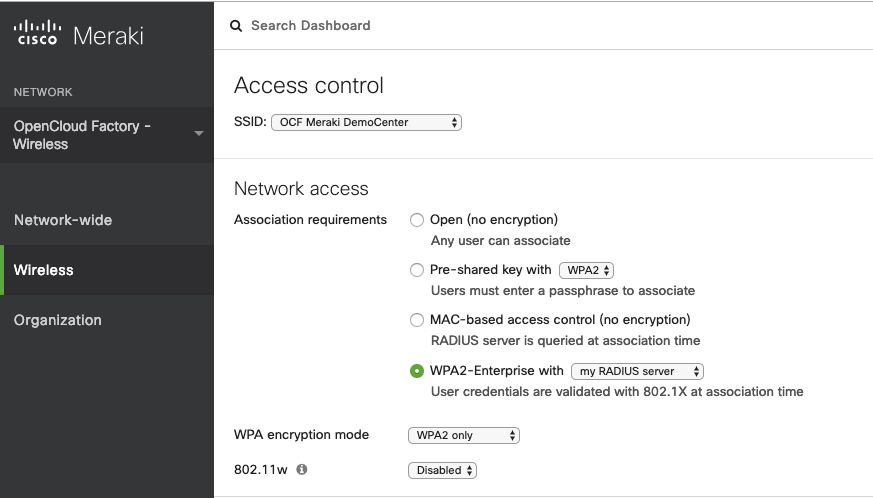
Once inside the Access Control page, we are going to define the “Network access” as “WPA2-Enterprise with my RADIUS server”. The WPA encryption mode should be “WPA2 only”.The 802.11w should be “Disabled”.

The Splash page should be set to None;
RADIUS Servers:
- Click on “Add a server” for as many times as the amount of openNAC authentication cores existing in you infrastructure:
- Host: IP of your openNAC core server the IP to which the radius is pointed must be local without needing to be accessible from the Meraki Cloud;
- Port: 1812;
- Secret: Radius PSK configured in your core;
RADIUS testing: RADIUS testing enabled;
RADIUS CoA support: RADIUS CoA enabled;
RADIUS accounting: RADIUS accounting is enabled;
RADIUS accounting servers:
- Click on “Add a server” for as many times as the amount of openNAC authentication cores existing in you infrastructure:
- Host: IP of your openNAC core server the IP to which the radius is pointed must be local without needing to be accessible from the Meraki Cloud;
- Port: 1813;
- Secret: Radius PSK configured in your core;
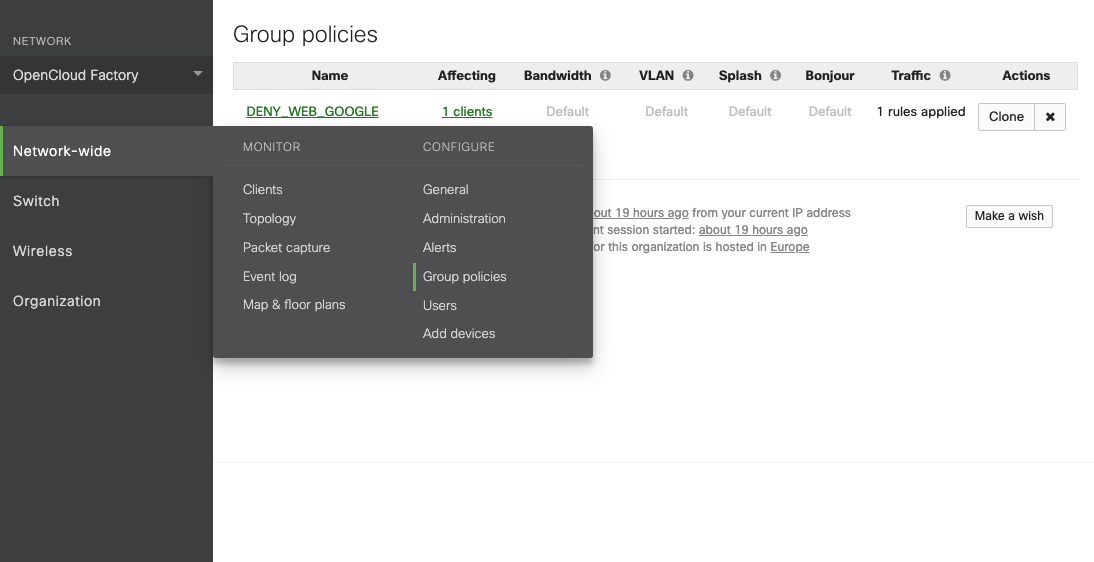
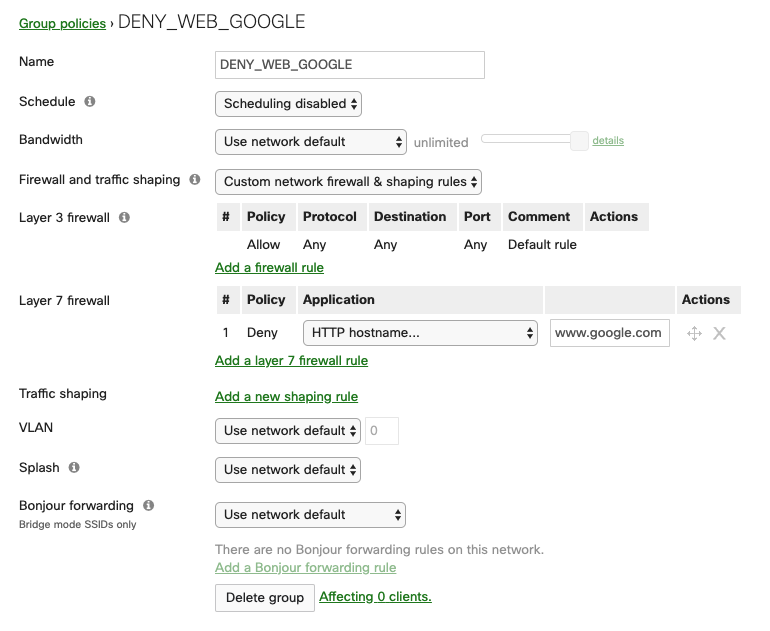
RADIUS attribute specifying group policy name: Filter-Id, this allows you to send static ACLs (openNAC Security Profiles) from the policy. These ACLs are defined in the Meraki Cloud as “Group policies”;
An example of a “Group policy” called “DENY_WEB_GOOGLE”, where HTTP / HTTPS access is denied to the “www.google.com” URL.
- RADIUS proxy: Do not use Meraki proxy;
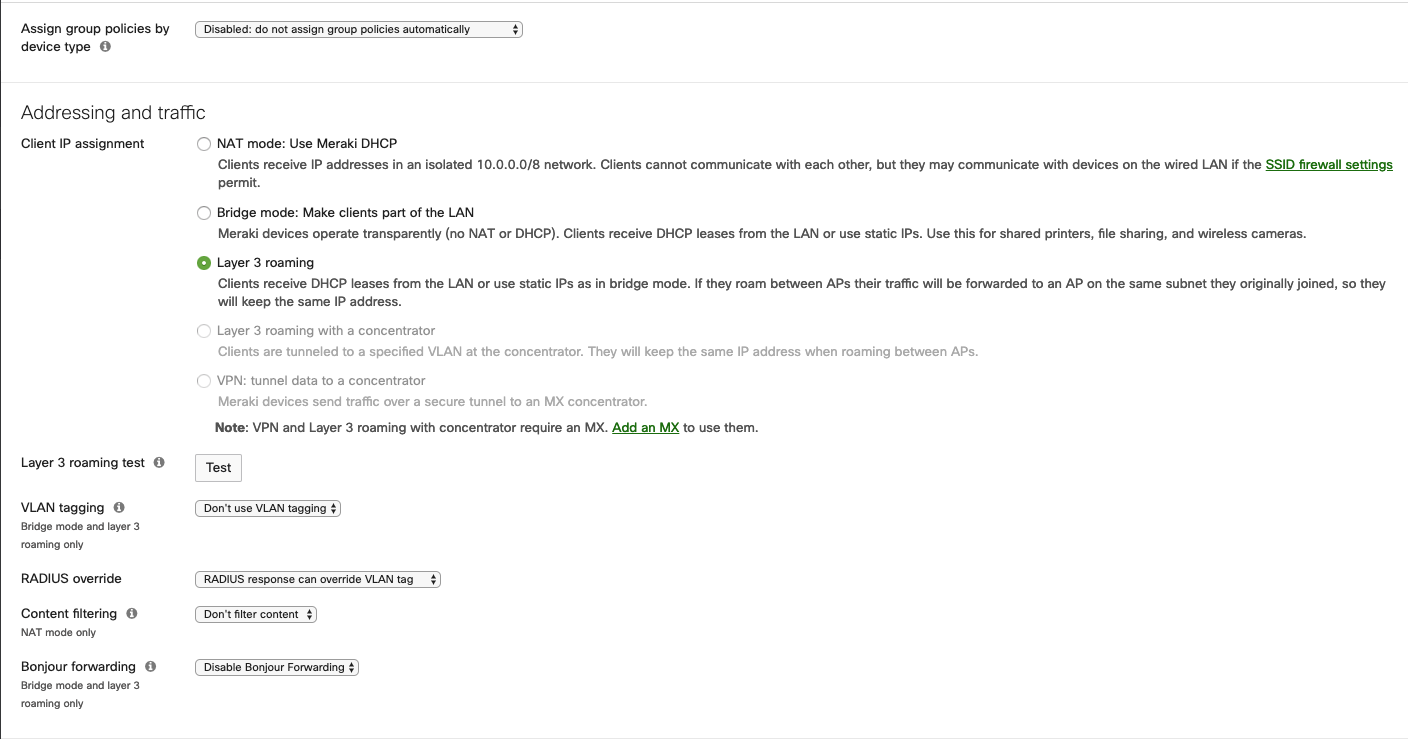
Assign group policies by device type: Disabled
Addressing and traffic
- Client IP assignment: Layer 3 roaming (or the configuration you may need for your network case);
- VLAN tagging: Don’t use VLAN tagging (or the configuration you may need for your network case);
- RADIUS override: RADIUS response can override VLAN tag;
- Content filtering: Don’t filter content;
- Bonjour forwarding: Disable Bonjour Forwarding;
Guest Access or Web authentication
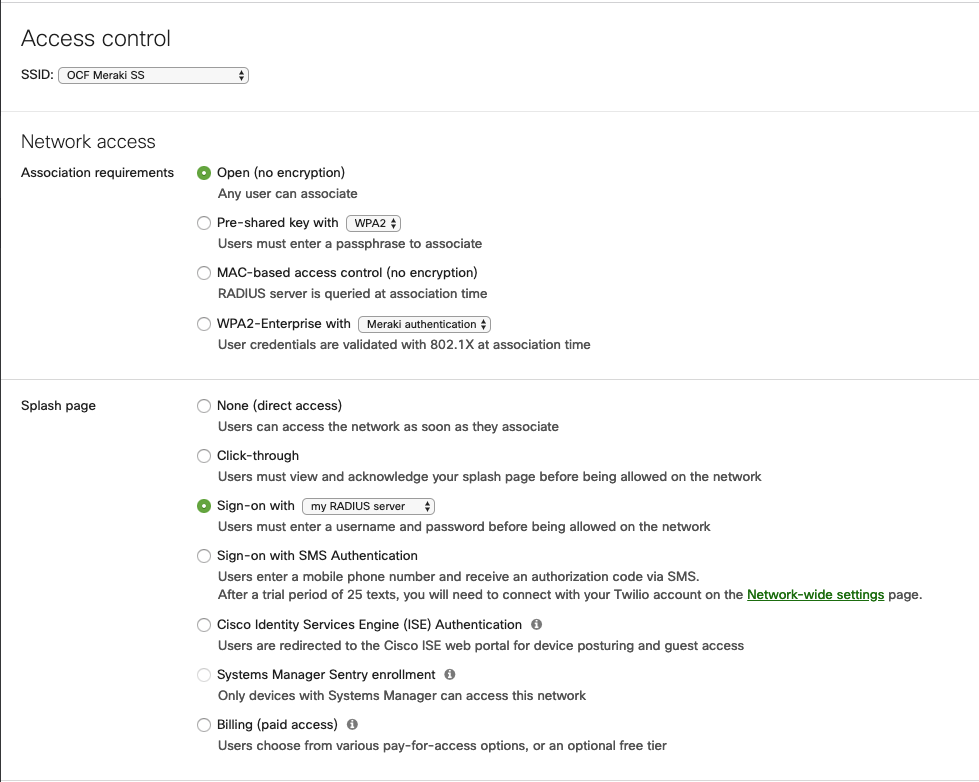
Once inside the Access Control page, we are going to define the “Network access” as “Open (no encryption)”.
The Splash page should be set to “Sign-on with my RADIUS server”
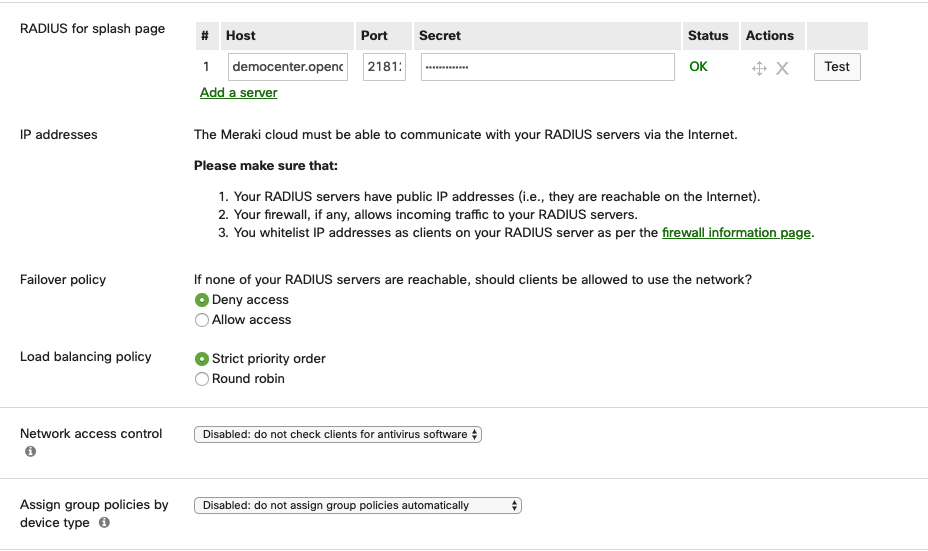
RADIUS for splash page:
- Click on “Add a server” for as many times as the amount of openNAC authentication cores existing in you infrastructure:
- Host: IP of your openNAC core server (As stated in the screenshot, this radius needs to be opened to the internet, so the meraki cloud can reach it.);
- Port: 21812 (for example);
- Secret: Radius PSK configured in your core;
Failover policy: Deny Access (this should be configured as needed by the customer);
Load Balancing policy: Strict priority order;
Network Access Control: Disabled;
Assign group policies by device type: Disabled;
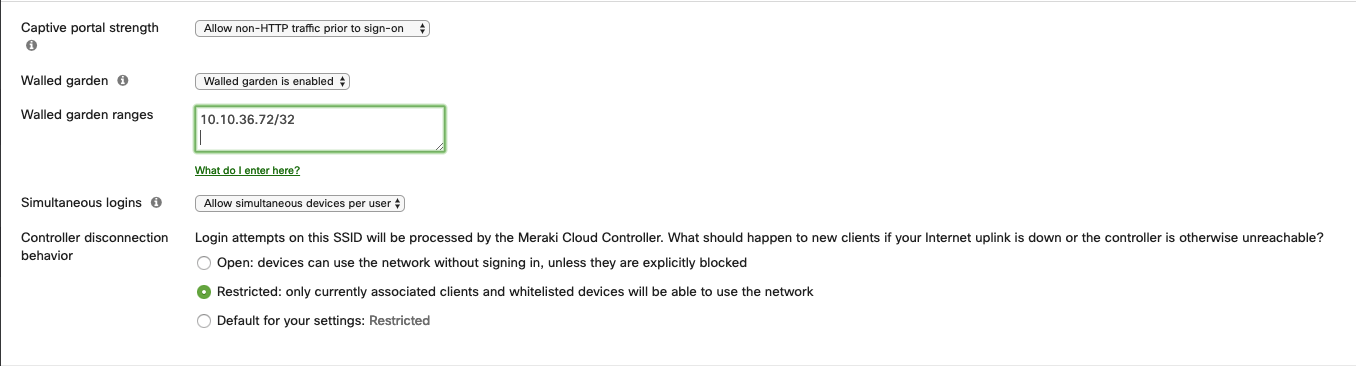
- Captive portal strength: Allow non-HTTP traffic prior to sign-on;
- Walled garden: Walled garden is enabled;
- Walled garden ranges: The ranges of your openNAC boxes and/or any other page that should be needed access prior to the authentication of your guest;
- Simultaneous logins: Allow simultaneous devices per user;
- Controller disconnection behavior: Restricted;
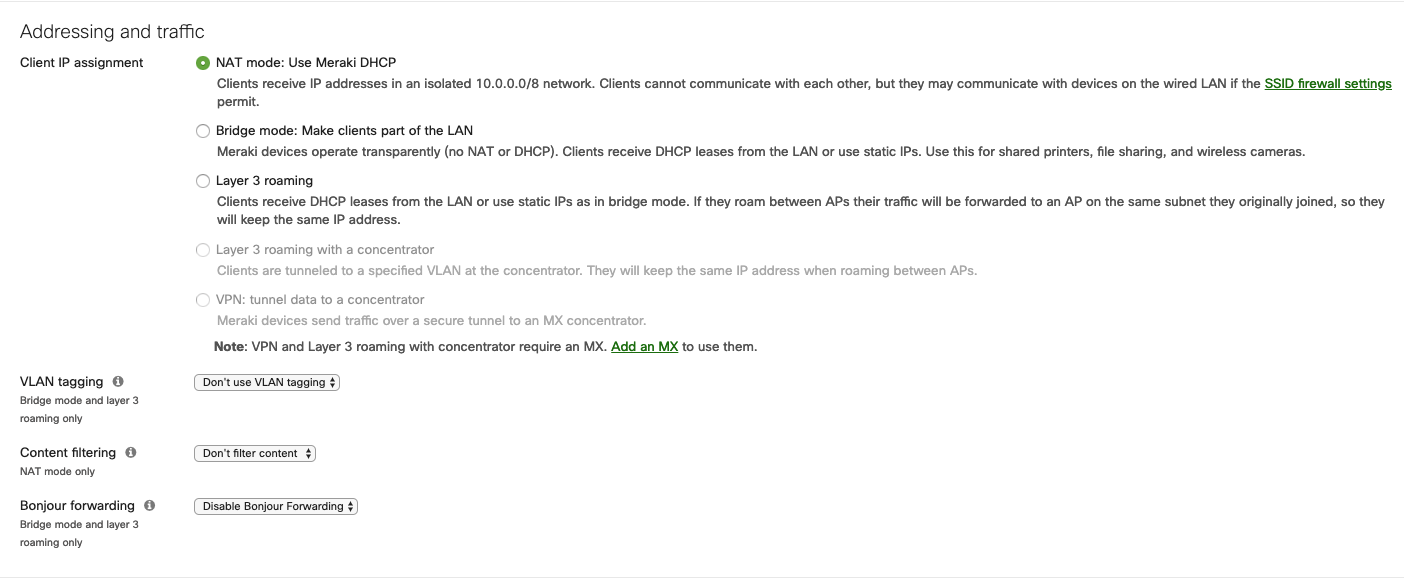
- Client IP assignment: NAT mode (or the configuration you may need for your network case);
- VLAN tagging: Don’t use VLAN tagging (or the configuration you may need for your network case);
- RADIUS override: RADIUS response can override VLAN tag;
- Content filtering: Don’t filter content;
- Bonjour forwarding: Disable Bonjour Forwarding;
Next go in Wireless→Configure→Splash page. Select the Custom splash URL and configure the URL pointing to your openNAC server.
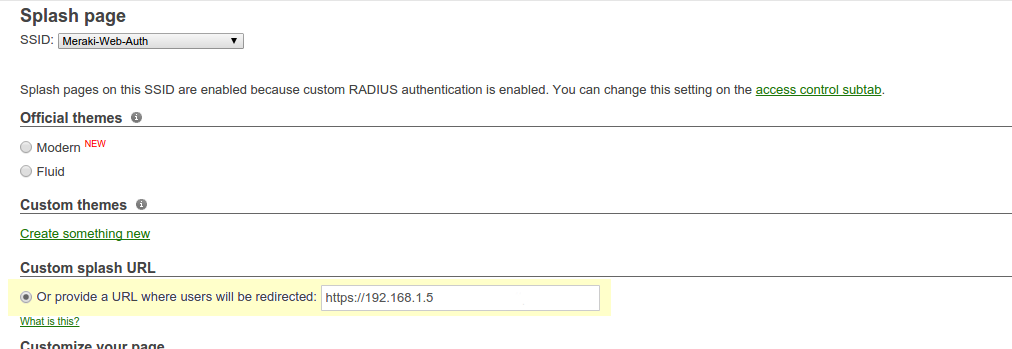
Note
Even if you enabled the bridge mode on the access point, it will still send a NATed IP address during the initial HTTP request. To workaround this you will need to forward the DHCP traffic of the network your nodes are connected to so openNAC has the proper IP information of the devices.
Once you have configured the Meraki, you will need to configure it in the openNAC switches. You will need to create an entry for the public IP address of your cloud controller and one for the MAC address of your AP. After that Meraki is configured this should be properly configured on openNAC Servers.
Mikrotik
his configuration has been tested on Access Point OmniTIK U-5hnD with RouterOS v6.18 and only MAC-Authentication is available now. The only deauthentication method available is SSH, so create an account in the Mikrotik AP and fill the information in openNAC.
Open SSID
In this setup we use the interface ether5 for the bridge (Trunk interface) and ether1 as the management interface.
Configure your access point with the following configuration:
/interface wireless
# managed by CAPsMAN
# channel: 5180/20-Ce/an(17dBm), SSID: OPEN, local forwarding
set [ find default-name=wlan1 ] band=5ghz-a/n channel-width=20/40mhz-Ce disabled=no l2mtu=1600 mode=ap-bridge ssid=MikroTik-05A64D
/interface ethernet
set [ find default-name=ether1 ] name=ether1-gateway
set [ find default-name=ether2 ] name=ether2-master-local
set [ find default-name=ether3 ] master-port=ether2-master-local name=ether3-slave-local
set [ find default-name=ether4 ] master-port=ether2-master-local name=ether4-slave-local
set [ find default-name=ether5 ] name=ether5-master-local
/interface vlan
add interface=BR-CAPS l2mtu=1594 name=default vlan-id=1
add interface=BR-CAPS l2mtu=1594 name=isolation vlan-id=3
add interface=BR-CAPS l2mtu=1594 name=registration vlan-id=2
/caps-man datapath
add bridge=BR-CAPS client-to-client-forwarding=yes local-forwarding=yes name=datapath1
/caps-man interface
#
add arp=enabled configuration.mode=ap configuration.ssid=OPEN datapath=datapath1 disabled=no l2mtu=1600 mac-address=\
        D4:CA:6D:05:A6:4D master-interface=none mtu=1500 name=cap1 radio-mac=D4:CA:6D:05:A6:4D
/caps-man aaa
set interim-update=5m
/caps-man access-list
add action=query-radius interface=cap1 radius-accounting=yes signal-range=-120..120 time=0s-1d,sun,mon,tue,wed,thu,fri,sat
/caps-man manager
set enabled=yes
/interface bridge port
add bridge=bridge-local interface=ether2-master-local
add bridge=bridge-local interface=ether1-gateway
add bridge=BR-CAPS interface=ether5-master-local
/interface wireless cap
set bridge=BR-CAPS discovery-interfaces=BR-CAPS enabled=yes interfaces=wlan1
/ip accounting
set enabled=yes
/radius
add address=192.168.1.5 secret=Testing123 service=wireless
/radius incoming
set accept=yes
Webauth
You can use webauth (external captive portal) on Mikrotik APs. In order to do so, you will have to activate the hotspot feature in the AP configuration as well as modify the redirection template so that it points to openNAC Server.
First, you must establish an FTP connection to your access point and replace the content of hotspot/login.html with the following:
<html>
<head><title>...</title></head>
<body>
$(if chap-id)
<noscript>
<center><b>JavaScript required. Enable JavaScript to continue.</b></center>
</noscript>
$(endif)
<center>If you are not redirected in a few seconds, click 'continue' below<br>
<form name="redirect" action="http://192.168.1.5/" method="get">
  <input type="hidden" name="mac" value="$(mac)">
  <input type="hidden" name="ip" value="$(ip)">
  <input type="hidden" name="username" value="$(username)">
  <input type="hidden" name="link-login" value="$(link-login)">
  <input type="hidden" name="link-orig" value="$(link-orig)">
  <input type="hidden" name="error" value="$(error)">
  <input type="hidden" name="chap-id" value="$(chap-id)">
  <input type="hidden" name="chap-challenge" value="$(chap-challenge)">
  <input type="hidden" name="link-login-only" value="$(link-login-only)">
  <input type="hidden" name="link-orig-esc" value="$(link-orig-esc)">
  <input type="hidden" name="mac-esc" value="$(mac-esc)">
  <input type="hidden" name="ap-id" value="AP_IP_ADDRESS_HERE">
  <input type="submit" value="continue">
</form>
<script language="JavaScript">
<!--
   document.redirect.submit();
//-->
</script></center>
</body>
</html>
Next, in the login.html you have just uploaded, make sure you change AP_IP_ADDRESS_HERE by the management IP address of your access point and 192.168.1.5 by the IP address of your openNAC captive portal.
Now, you must configure the hotspot feature on your AP. This configuration is done on top of an existing ssid you have previously configured which is on interface wlan1. Adjust the interface name if needed.
/ip hotspot
setup
hotspot interface: wlan1
local address of network: 10.5.50.1/24
masquerade network: yes
Set pool for HotSpot addresses
address pool of network: 10.5.50.2-10.5.50.254
Select hotspot SSL certificate
select certificate: none
Select SMTP server
ip address of smtp server: 0.0.0.0
Setup DNS configuration
dns servers: 8.8.8.8
DNS name of local hotspot server
dns name: myhotspot
Create local hotspot user
name of local hotspot user: admin
password for the user:
Next, you need to allow access to the openNAC portal in the hotspot access list. Change 192.168.1.5 with the IP address you pointed to in login.html
/ip hotspot walled-garden
add dst-host=192.168.1.5
add src-address=192.168.1.5
/ip hotspot walled-garden ip
add action=accept disabled=no dst-host=192.168.1.5
add action=accept disabled=no src-address=192.168.1.5
Now, you will also need to configure the hotspot to point to your openNAC RADIUS server:
/radius
add address=192.168.1.5 secret=Testing123 service=hotspot
/ip hotspot profile
add hotspot-address=10.5.50.1 name=hsprof1 use-radius=yes
Next, you need to configure openNAC to use webauth for this Access Point.
Ruckus SmartZone
Webauth
SmartZone configuration
First, you will need to define your RADIUS server configuration at openNAC Server
After, create a Hotspot in Configuration→AP Zones→Your Zone→Hotspot WISPr→Create New. Adjust 192.168.1.5 to the IP address of your portal.
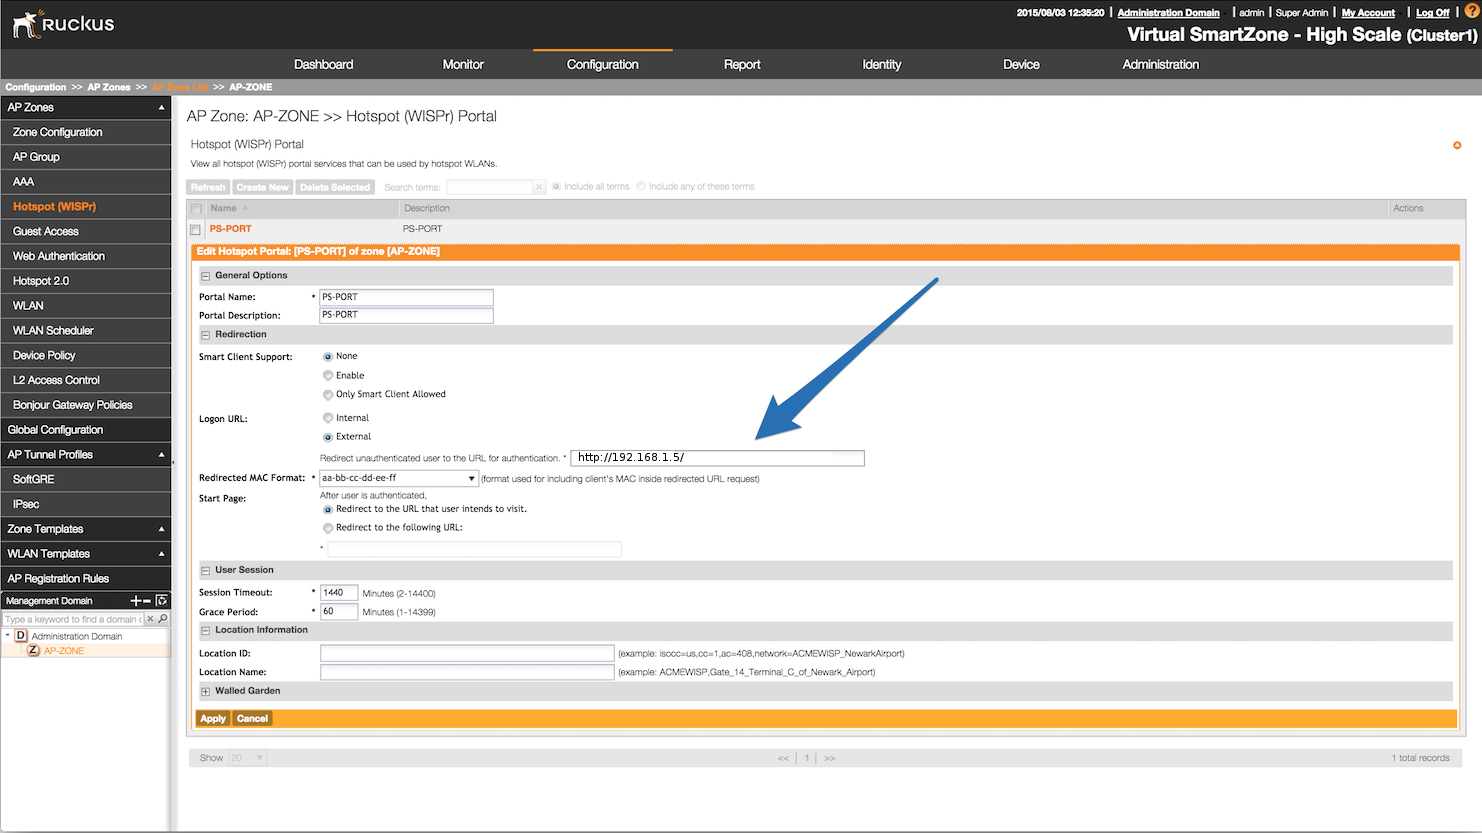
Then, still on this page, in the Walled Gardens, make sure you add the portal IP address in this list.
Next, you will need to configure your WLAN to use the Hotspot authentication and point it to openNAC. Also ensure you set Use the controller as a proxy.
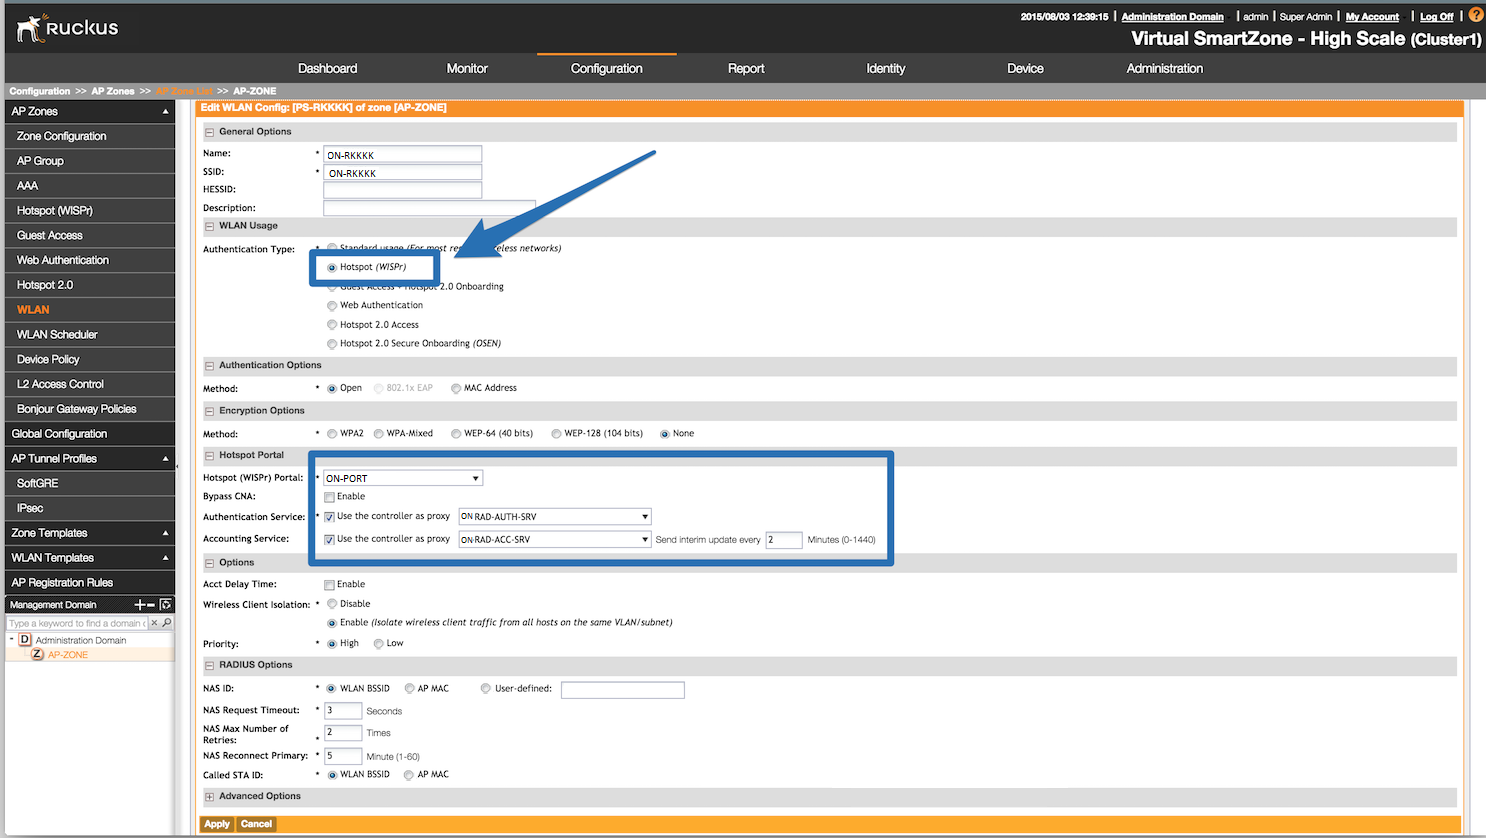
After that the configuration should be carried out at openNAC