4.2.5. Administration
The Administration section focuses on advanced tasks related to the ongoing management and maintenance of the system covering more complex configurations and advanced features.
This section aims to show the workflow in the Administration Portal Configurations for the UNAC use case. We will detail the steps to configure the system, preparing it to operate its UNAC functionality.
Note
It is essential to have correctly deployed and configured the necessary nodes for this use case.
The implementation of the UNAC module can include functionalities of the Segmentation and User Device Compliance modules to improve the security of the network environment.
In this section, you will find the following content:
Integration and Network Device Management:
Authentication Configurations:
UNAC Policies Configuration:
UNAC Policies
Use Case Scenarios:
Integration and Network Device Management
4.2.5.1. Join ON Core to Active Directory domain
We recommend registering the ON Core server in the domain. If no domain is available, you can skip to the next step.
To complete this process, the user must have specific permissions to join the Active Directory (AD). Afterward, the user account can be modified to one with read-only permissions for user queries.
For more information on joining a domain, refer to the Administration Portal section: Join Domain Wizard
4.2.5.2. Registering Network Devices in the CMDB
The CMDB is the ON Core database. It stores, in an organized manner, all known data associated with each connection made on the network. This database contains information related to systems, infrastructure, networks, VLANs, security profiles, user devices, network devices, and more.
In this section of UNAC, we are primarily interested in network devices, such as switches, APs, AP controllers, etc.
Registering network devices in the CMDB allows you to customize the characteristics of each device so that the system can interact with them appropriately.
Note
If you want to register a predefined group of devices, refer to Bulk import of devices.
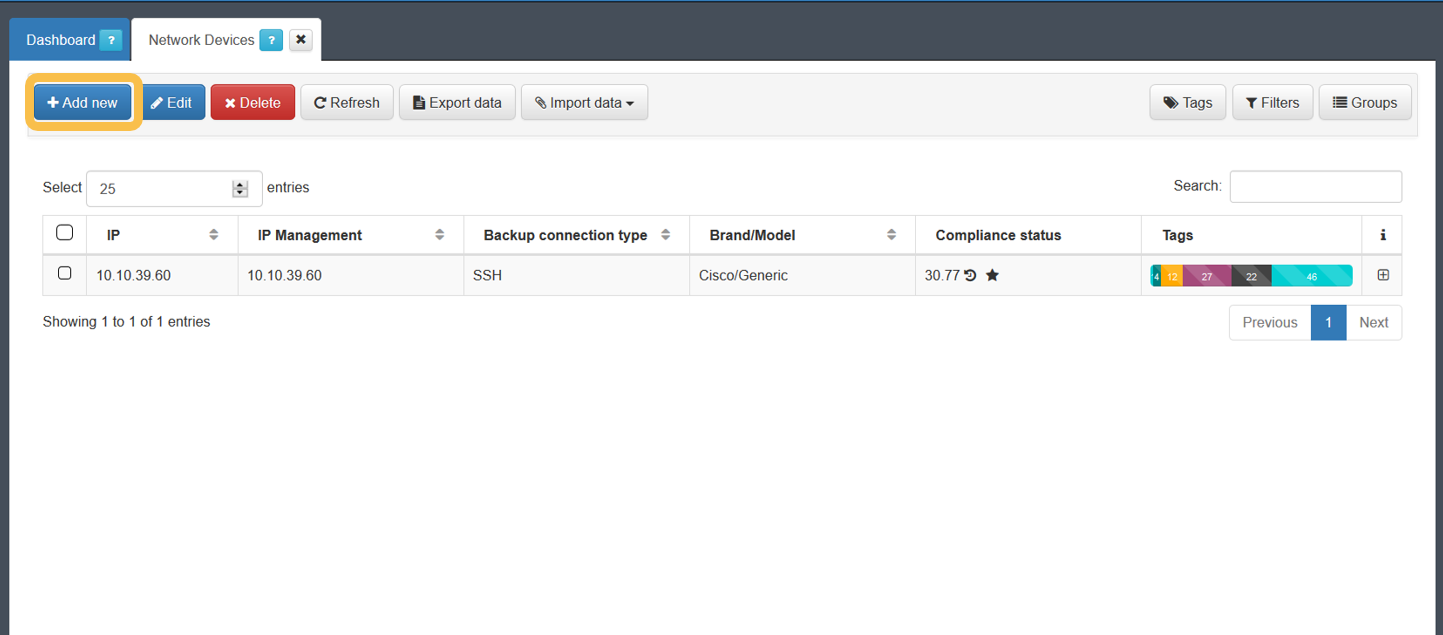
To register a new network device, navigate to the ON CMDB > Network Devices:
Note
If you do not perform any configurations, the default configuration defined in Configuration > Configuration Vars > NetDev will be used. The parameters in this section are the same as those available when configuring any of the devices.
Click on Add new to register a new device. The minimum required information that you must provide is outlined below.
General
The minimum fields required to configure within this tab are: IP, Hostname, and Brand/Model.
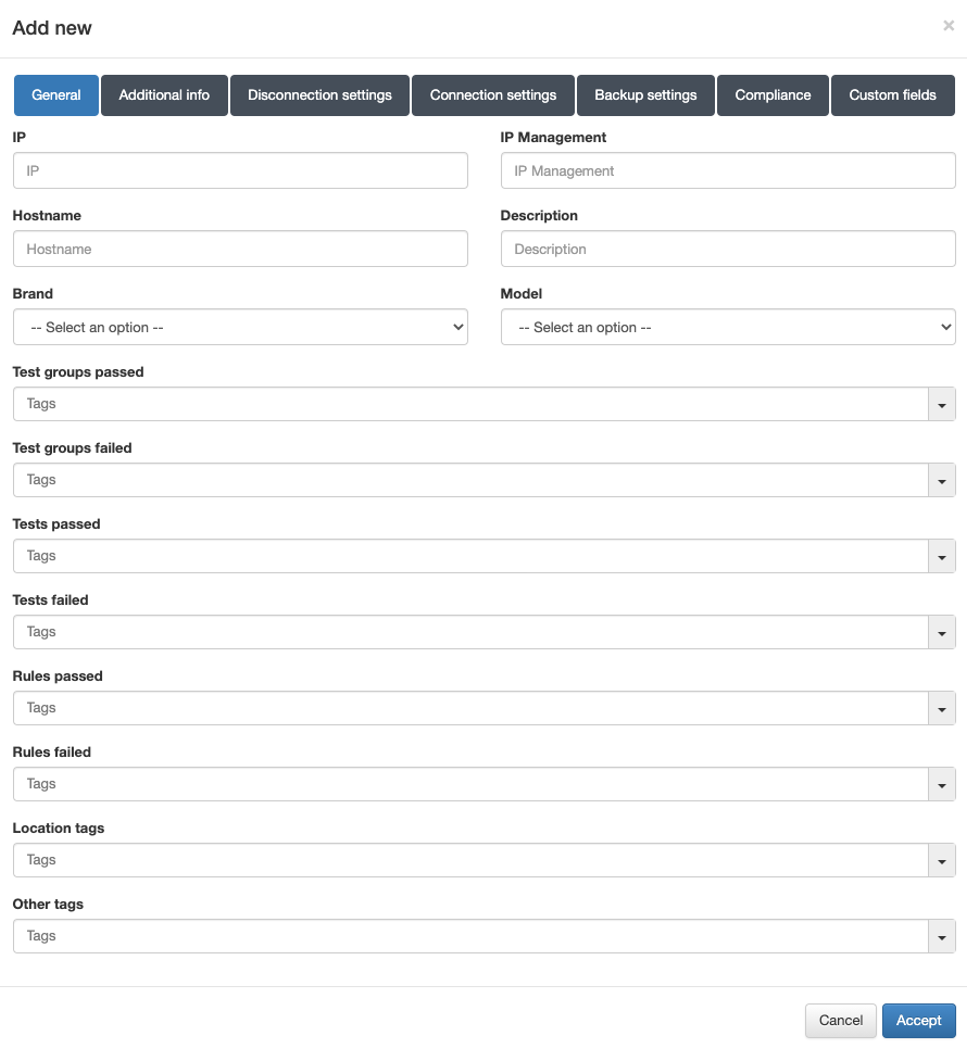
IP: IP address that identifies the device (used solely for identification in the device table).
Hostname: Hostname that identifies the device.
Brand / Model: Brand and model of the device.
Note
It is important to correctly define the brand and model since these will be used to determine the behavior of the system in terms of communication with these devices.
Disconnection settings
In the Disconnection settings tab, the configuration of the Toggle Port functionality is defined. This functionality allows you to force a disconnect from an authenticated session. For example, this allows you to carry out a re-evaluation of the policies in case they have been modified and apply VLANs, ACLs, etc., to the session.
There are two methods of session disconnection:
CoA (Change of Authorization): CoA is a RADIUS mechanism that disconnects a specific session without the need to modify the port status (enable/disable) of the network device.
SNMP: Using SNMP, the interface where the device has been authenticated is disabled and then enabled. This causes the device to re-authenticate and subsequently evaluate policies on the system.
Although both methods perform the same function and are equally valid, the use of SNMP is recommended.

Disconnect type:
Use default option: The configuration defined in Configuration > Configuration Vars > NetDev will be applied.
CoA: Use of CoA to perform session disconnections.
SNMP: Use of SNMP to perform session disconnections.
SNMPProperties
SNMP version: Version used for SNMP messages. The required attributes for each of the versions are:
V1 (not recommended):
SNMP RO: SNMP community with read permissions.
SNMP RW: SNMP community with write permissions.
V2c:
SNMP RO: SNMP community with read permissions.
SNMP RW: SNMP community with write permissions.
V3 (recommended):
SNMP v3 Security name: SNMP username.
SNMP v3 Security level: Security level (noAuthNoPriv/authNoPriv/authPriv).
Depending on the selection, it will be necessary or not to configure some of the following attributes.
SNMP v3 Authorization protocol: Authorization protocol (MD5/SHA).
SNMP v3 Authorization pass phrase: Password for authorization.
SNMP v3 Privacy protocol: Privacy protocol (DES/AES).
SNMP v3 Privacy pass phrase: Password for privacy.
CoAProperties
CoA password: Password defined in the network device to authenticate CoA requests.
CoA port: Port used for communication. (Usually 3799).
After completing all the necessary information, click on the Accept button to save the configured network device.
4.2.5.2.1. Bulk import of devices
The ON CMDB > Network Devices section allows bulk importing of devices to facilitate the management and integration of network infrastructure data efficiently.
To import a set of network devices into the CMDB, execute the following steps.
Export the template that you will use to add the list of devices:
Navigate to ON CMDB > Network Devices.
Select a Network Device as model.
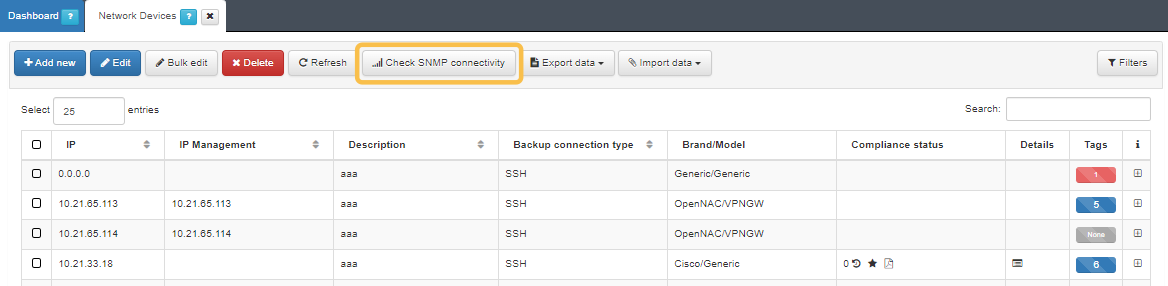
Export the file by clicking on the Export data button. This will generate a JSON and an XML file.
Download the CSV file generated in the previous step:
Navigate to Status > CMDB Exports:
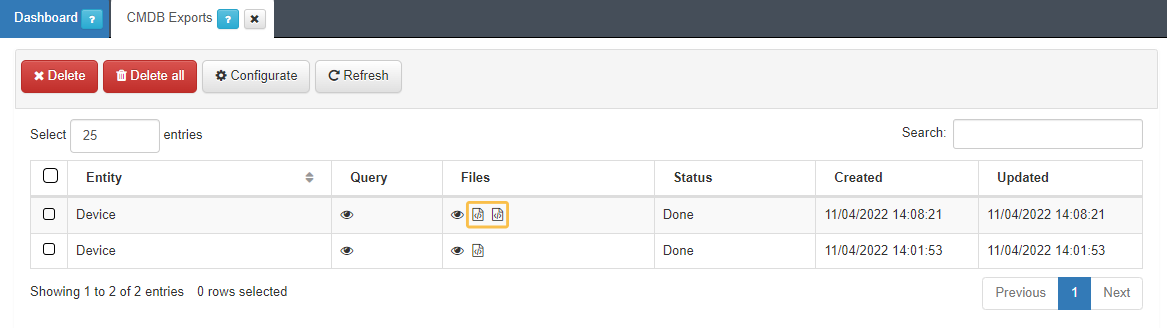
You can export the file in CSV or XLSX format.
Choose the path on the computer (by default in the Downloads folder).
Ensure that the downloaded file is completed with the data of your network devices, while considering the following points:
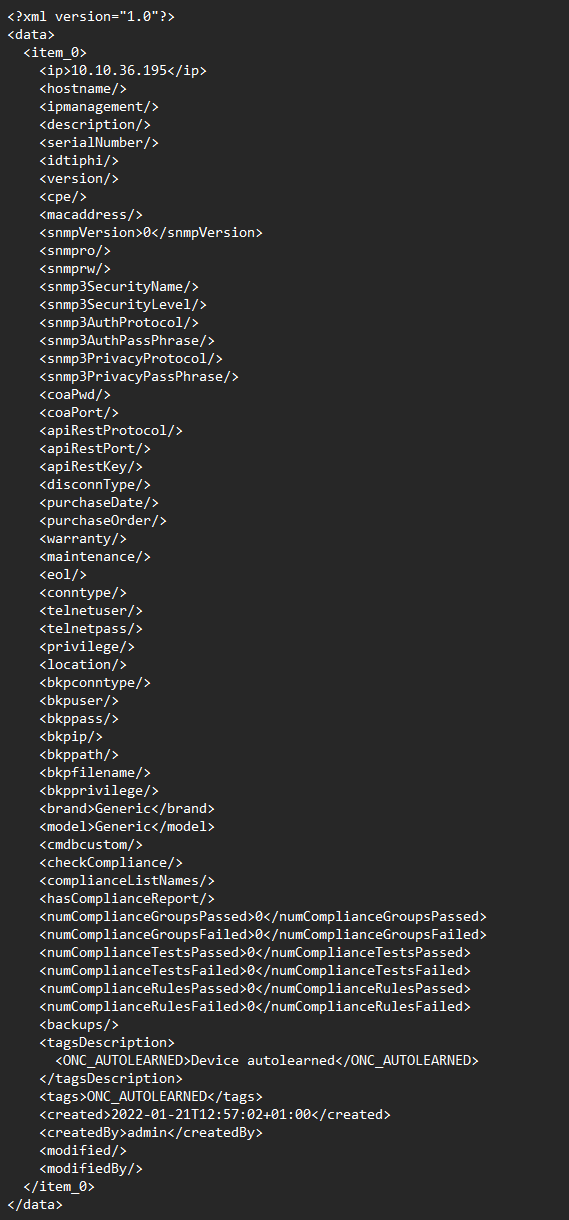
Not all fields need to be filled out.
Leave the columns id, created, createdby, modified and modifiedby blank.
The minimum information required to successfully importing a list is as follows:
IP: Indicate the access IP to the device.
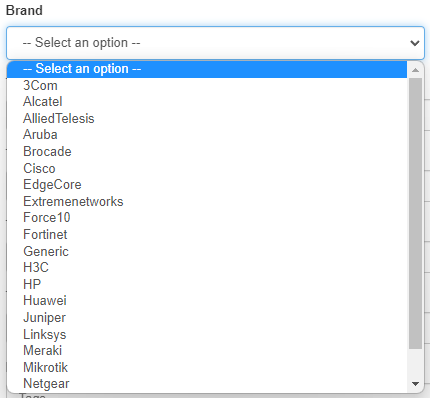
Brand: Indicate the manufacturer. Choose from the list of manufacturers registered in OpenNAC displayed in the “Brand” dropdown field:
Model: Indicate the model. In this case the only possible model will be Generic. If we are not sure of the manufacturer and model we will leave both fields with Generic.
bkpconntype: SSH or SCP.
bkpuser: User to access the SCP repository or network device.
bkppass: Access password to the SCP repository or network device.
bkpip: IP address of the SCP server or network device.
bkppath: Repository directory where to locate the backups (SCP connections).
bkpfilename: Regular expression to identify the name of the file (SCP connections).
bkpprivilege: Password for Privilege EXEC mode (SSH connections).
Although the hostname of the device is not a required field, it is recommended to complete it to have each IP identified in the CMDB.
The SNMP versions registered in the system are the following:

Save the file in CSV format separated by commas.
Import the generated file:
Navigate to ON CMDB > Network Devices.
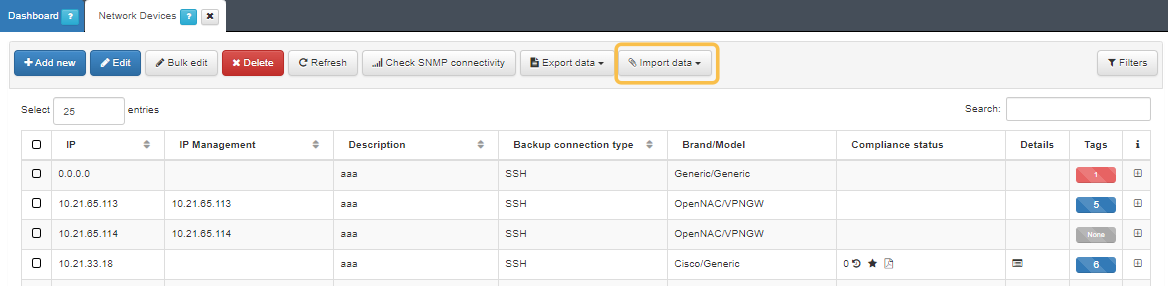
Import the file with the Import data button.
Select the file and click “Accept”.
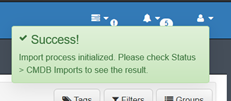
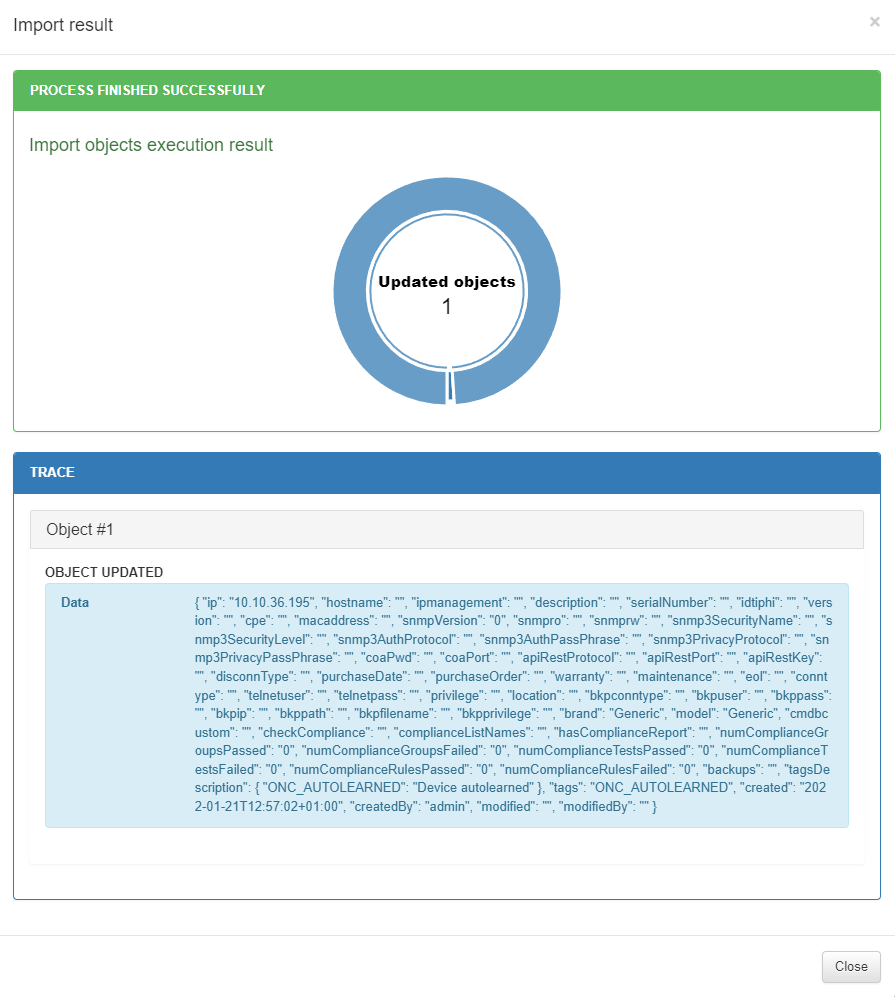
A success message should appear at the upper-right corner of the browser and the import process will be initialized:
Check the progress in Status > CMDB Imports.
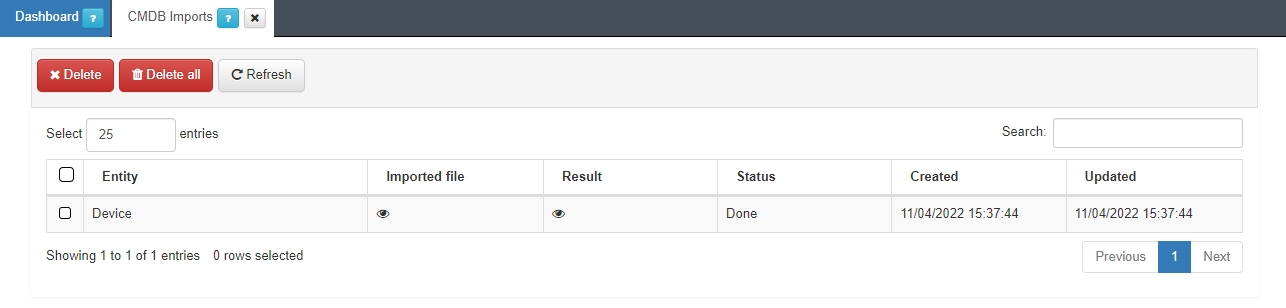
In this section, you can see the imported file, the result of the operation and the current status of the process.
In case of error:
The Status section will display Aborted:
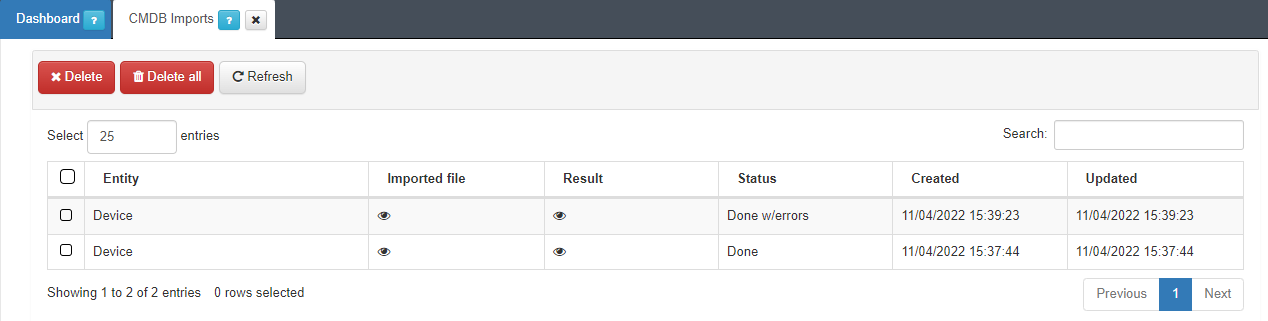
To see the failure reason, open the Result section:
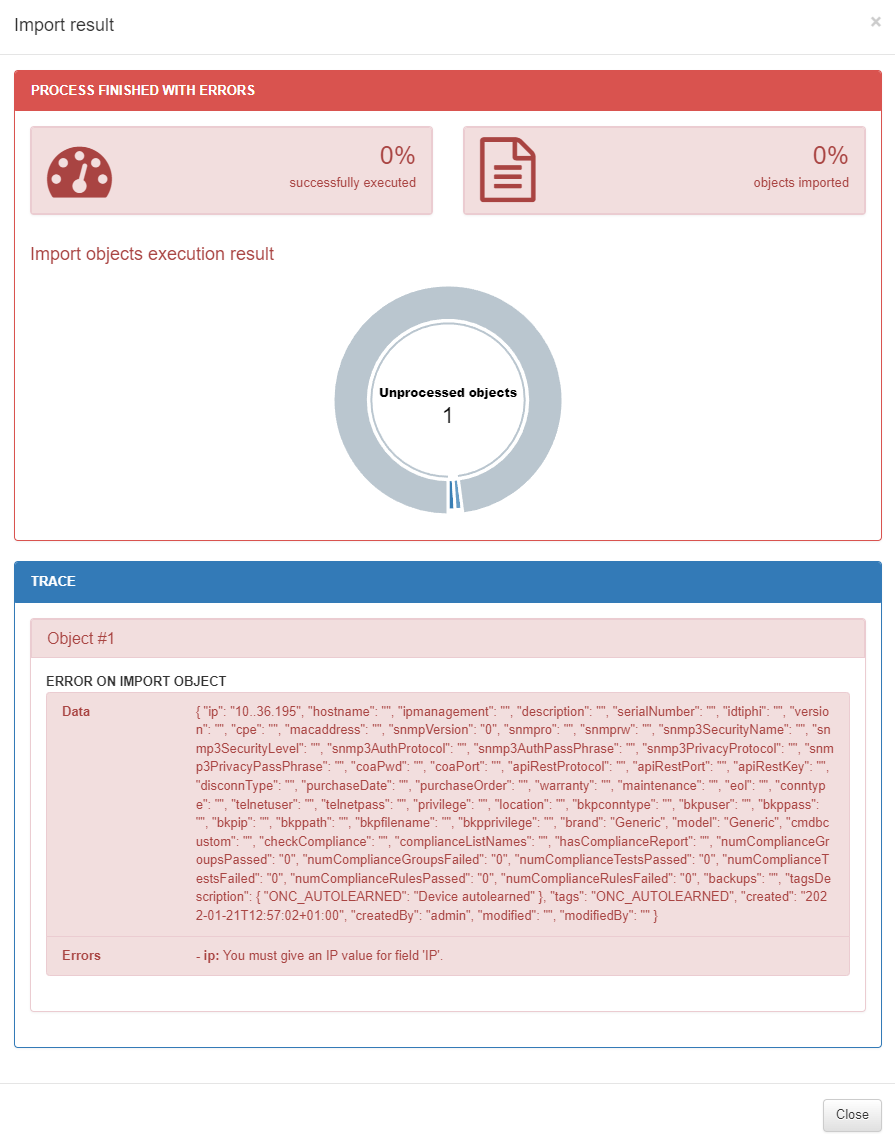
In this example, the IP field is not formatted correctly.
4.2.5.3. Self-learning of Network Devices
When the ON Core receives a request for a network device that has not been previously added to the CMDB, it can be automatically added.
For this to occur, two requirements must be met:
The network device’s IP address or its segment’s IP must be registered in the
clients.conffile. Refer to the Registering Network Devices in the CMDB topic.The Autolearn Network Devices function must be enabled.
To enable the self-learning functionality, navigate to Configuration > Configuration vars and in the NetDev section enable the Autolearn Network devices flag:
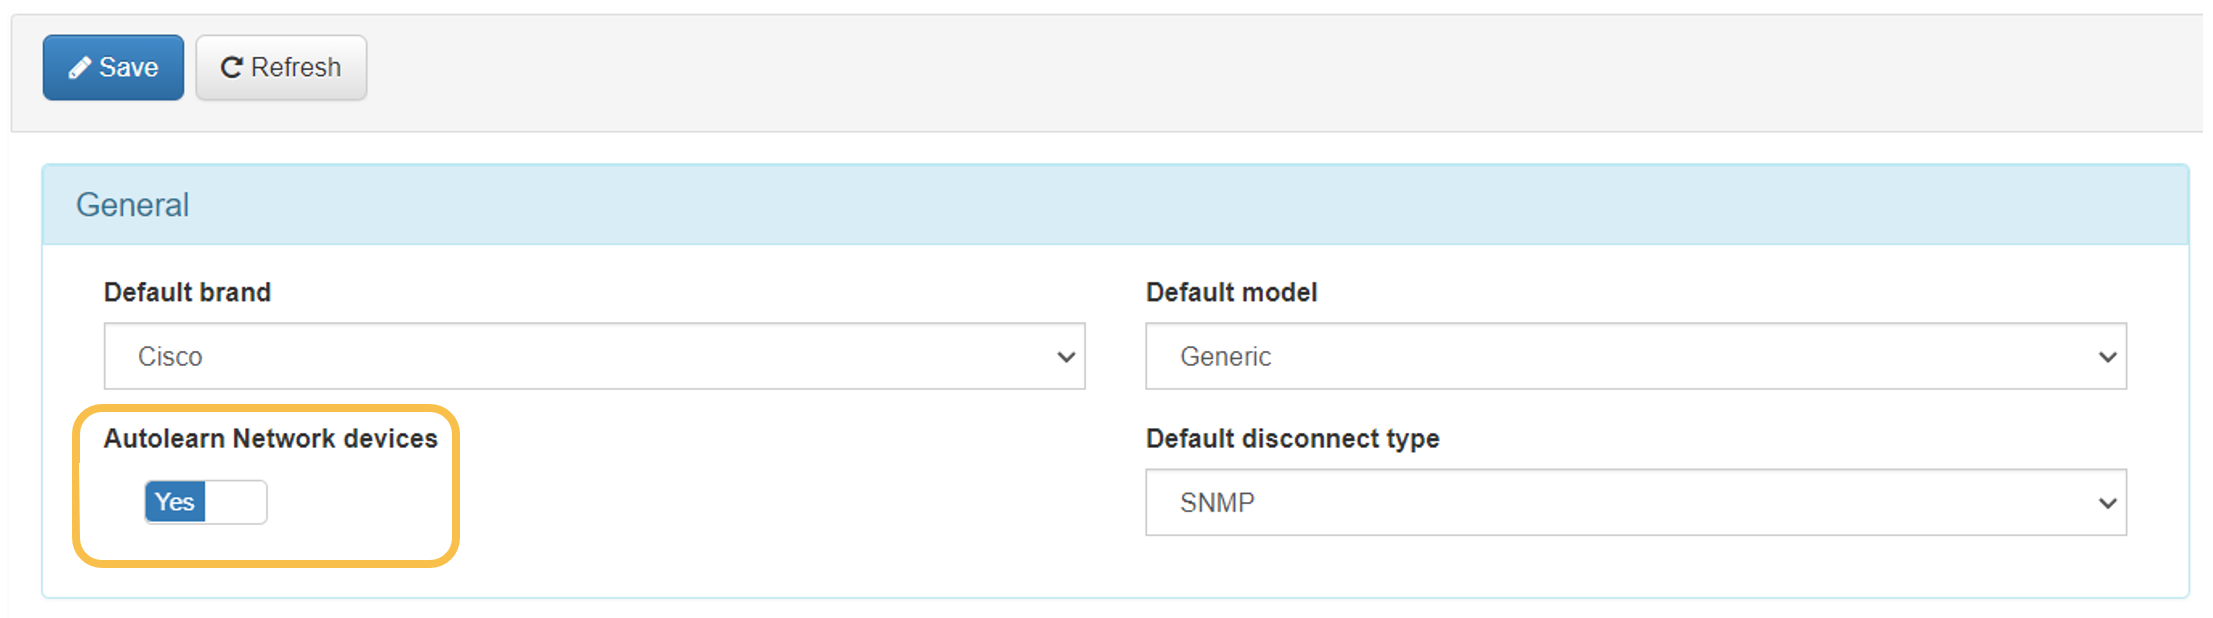
To apply the changes, click on the Save button.
With this function configured, every time a request is received from an unknown network device, it will be added to the CMDB and the “ONC_AUTOLEARNED” tag will be associated with it.
Authentication Configuration
4.2.5.4. Managing APs and Controllers in the CMDB
When there are multiple APs centrally controlled by a controller in the network, the controller must be added as a network device in the CMDB.
Additionally, for each AP in the CMDB, besides the minimum information detailed above, it is essential to include IP management information:
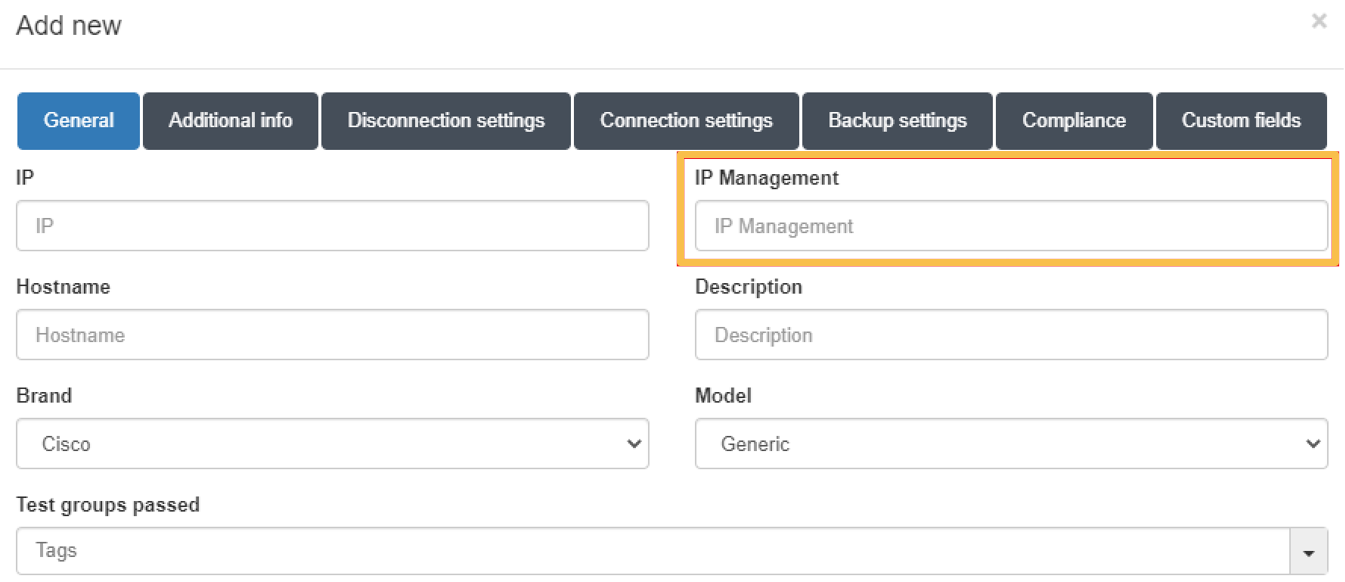
This IP must correspond to the IP of the controller that manages the AP.
4.2.5.5. Defining User Data Sources
User Data Sources (UDS) are the system’s sources for user authentication. These may also be used in the process of authorizing or evaluating system policies.
There are different types of UDS, such as databases or AD/LDAP.
By default, there is a UDS called “LocalDB”. This is the system’s local database for storing local users. While useful for testing, it is not recommended for use in production.
To view the existing UDS, navigate to ON CMDB > User Data Sources. To add a new UDS, click on the Add new button.
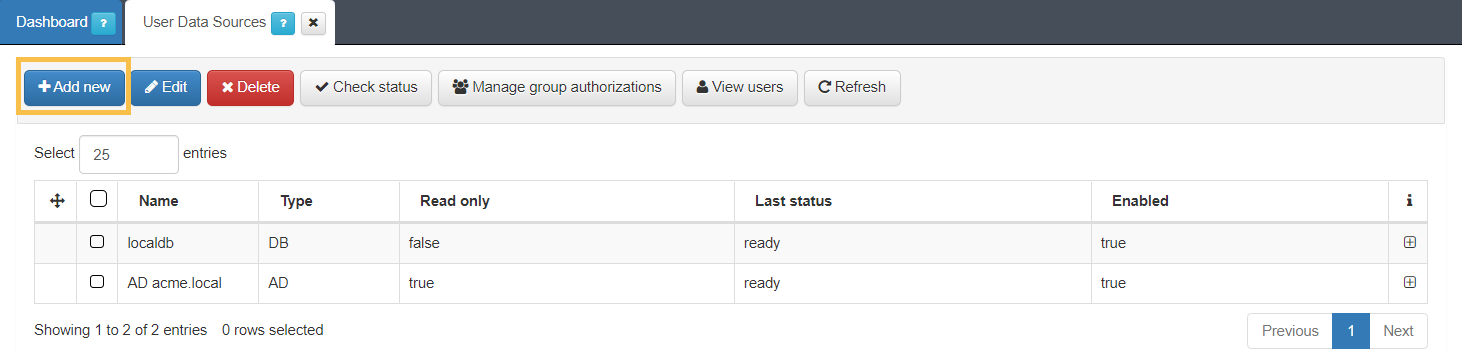
A new window will open, which will have a specific format depending on the type of UDS you want to create. The topics below will detail how to create both the Database type and the LDAP/AD type.
Database
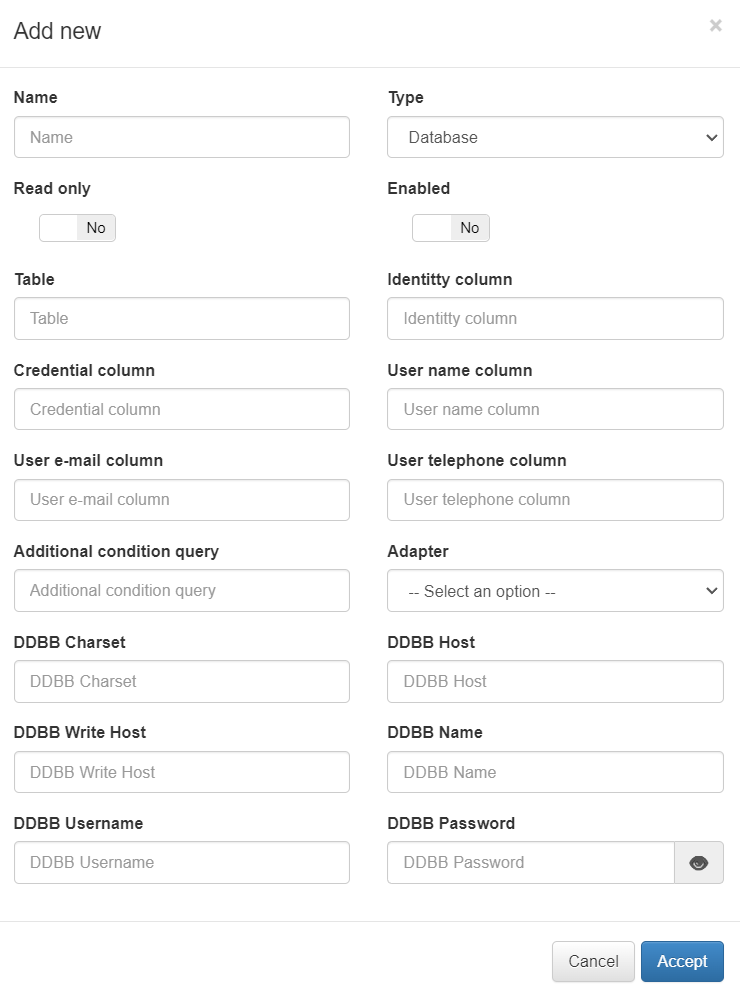
The configuration parameters for a UDS of type “Database” are:
Name: Name to be assigned to the UDS.
Type: Type of UDS (Database, LDAP or AD).
Read only: Check to define if said UDS is read-only .
Enabled: Check to enable or disable udS.
Table: Table Of the database to be queried.
Identity column: A column in the database table that contains the user ID.
Credential column: Column of the database table that contains the user’s credentials.
User name column: Column of the table that contains the user’s name.
User e-mail column: Column of the table that contains the user’s e-mail.
User telephone column: Column of the table that contains the user’s phone.
Additional condition query: Query conditions additional to the database.
Adapter: Type of database adapter (MySQL, PostgrSQL, Oracle…)
DDBB Charset: Character set used by the database (e.g. utf8)
DDBB Host: Name of the host or address of the database to read.
DDBB Write Host: If you want to write to the database, the host name or address.
DDBB Name: Name of the database.
DDBB Username: Username for database access.
DDBB Password: The user’s password for accessing the database.
LDAP/AD UDS

The configuration parameters for a UDS of type “LDAP/AD” are:
Name: Name that will be assigned to the UDS.
Type: Type of UDS (Database, LDAP or AD).
Read only: Check to define if said UDS is read-only .
Enabled: Check to enable or disable udS.
LDAP Host: The LDAP/AD IP where queries are launched.
LDAP Port: The port used for the AD/LDAP search query.
LDAP Username: This is the user registered on the AD/LDAP server, which must have read permissions on the server. It is recommended that such a user only have read permissions.
LDAP Password: This is the password for the AD/LDAP binding.
LDAP Base DN: BaseDN at the top of the domain name structure. For example, if our domain is mycompany.local, its BaseDN is DC = mycompany, DC = local.
LDAP AccountDomainName: This is the DNS name of the domain in uppercase.
LDAP AccountDomainName: Short Is the short domain name or NETBIOS name commonly called, for example, MYCOMPANY.
LDAP AccountFilterFormat: This is the attribute used to select users. Two options have been included (only one should be used). It is used (sAMAccountName =% s) for Active Directory and (uid =% s) for LDAP servers.
LDAP Bindrequires DN: The bindDN DN is the credential you are using to authenticate against an LDAP. When using a bindDN, it usually comes with an associated password, sometimes the anonymous link does not allow certain types of actions.
LDAP Uid attr: This is the attribute used to identify user IDs, depending on whether AD or LDAP is used for filter change.
LDAP Mail attr: This is the filter used to identify mail as a user attribute.
LDAP Phone attr: It is the filter that is used to identify the phone number as an attribute of the user.
LDAP Group attr: This is the filter used to identify groups as an attribute of the user.
Enable LDAPS: Used to authenticate and authorize users when LDAP communication is transmitted over an SSL tunnel port 636 TCP. By default, the use of LDAPS is recommended to improve the security of the environment.
Enable TLS: Used to secure communication between LDAP clients and LDAP servers (See 3.4.1).
Once all the attributes for the UDS type have been defined, click on Accept to save it.
To verify the UDS connection, select and click on the Check status button.

In case the status is correct, the “Last status” column will display Ready:

4.2.5.6. Configuring LDAPS or TLS for Secure LDAP Communication
Note
This procedure is required in case you use a local Certificate Authority (CA).
If you want to use SSL or TLS for communication with the LDAP, you will need to perform some initial configuration to secure the SSL connection. This applies to both enabling LDAPS and enabling TLS in the UDS configuration.
1. Enable the Dynamic CA Configuration feature:
update-ca-trust enable
2. To obtain the public root CA, use the following command to view the Active Directory certificate information, where “server” is the FQDN or IP address of the server:
openssl s_client -showcerts -connect server: 636 </ dev / null | openssl x509 -text -noout
3. With the certificate information, obtain the URL to download the CA certificate based on the “Access to Authority Information: CA Issuers” section. If the above command does not work, request a public certificate file from administrators. The file would have to be similar to:
----- BEGIN CERTIFICATE -----
MIIDWTCCAkGgAwIBAgIQG5sNj3OqU69C1kh4 + Z6oMzANBgkqhkiG9w0BAQ0FADA /
MRUwEwYKCZImiZPyLGQBGRYFbG9jYWwxFDASBgoJkiaJk / IsZAEZFgRhY21lMRAw
DgYDVQQDEwdhY21lLUNBMB4XDTE5MTAyMTE0NTMzNVoXDTI0MTAyMTE1MDMzNVow
P...
----- END CERTIFICATE -----
4. Copy the CA Certificate to the /etc/pki/ca-trust/source/anchors/ directory :
cp CACERT.crt /etc/pki/ca-trust/source/anchors/
5. Update the CA trust database:
update-ca-trust extract
6. Check if certificate was correctly added to system:
trust list --filter=ca-anchors | grep "CA NAME" -i -A 2 -B 3
7. If you can’t see your CA, verify that the certificate has the CA Basic Constraint enabled:
openssl x509 -in <certificate to check> -purpose -noout -text
The output must contain:
X509v3 Basic Constraints: critical
    CA:TRUE
4.2.5.6.1. LDAPS Configuration without Server Certificate Validation (Not Recommended)
In some circumstances, such as in a testing environment, it may be necessary to use LDAPS without validating the certificate, either because it is not available or because it is not required.
Note
This practice is not recommended in production environments.
To enable the functionality, execute the following steps:
1. Edit the /etc/openldap/ldap.conf file:
vim /etc/openldap/ldap.conf
2. Add the following parameter:
TLS_REQCERT never
4.2.5.7. Creating LDAP Filters
This section explains how to generate LDAP filters. Filters are used to segment groups of users accessing the network. These filters can be later applied in access policies.
Note that this document provides an example, you must create LDAP filters required for your access policies.
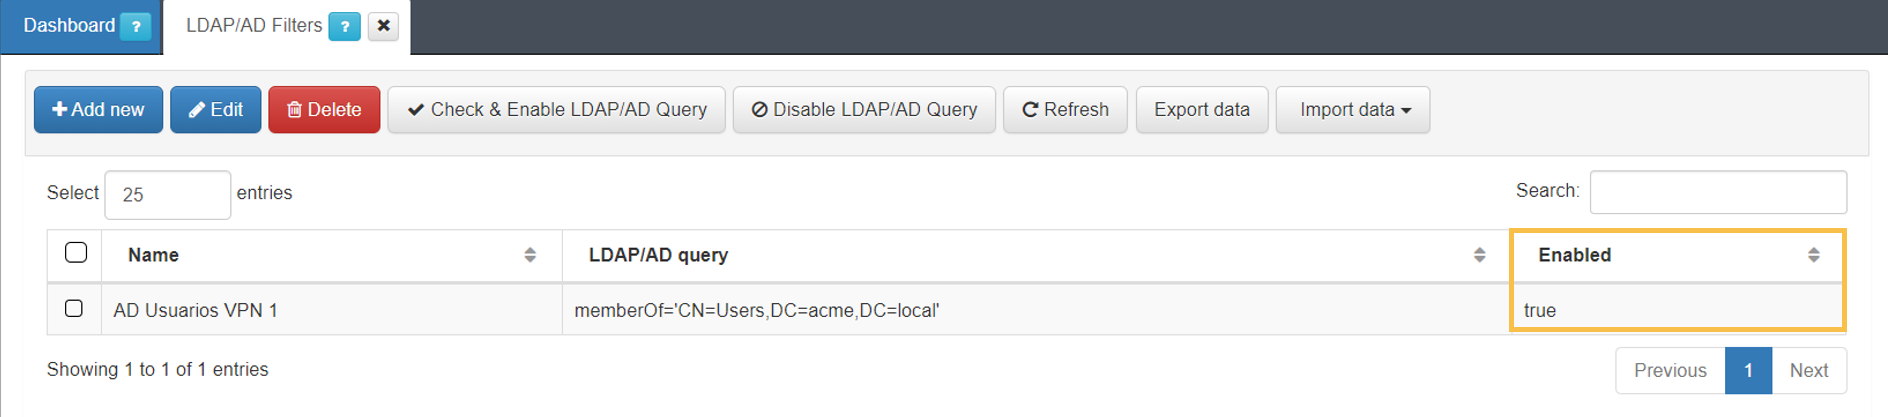
1. Navigate to ON CMDB > LDAP/AD Filters and click on the Add new button.
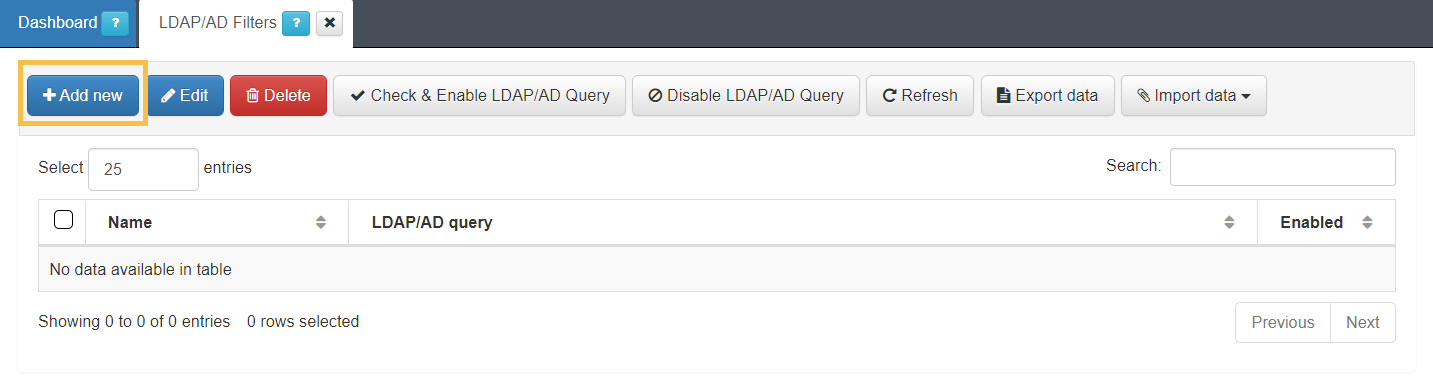
2. Assign a name to the filter and a apply a query. Follow the instructions described in the LDAP filter section to get the attributes needed to this query.
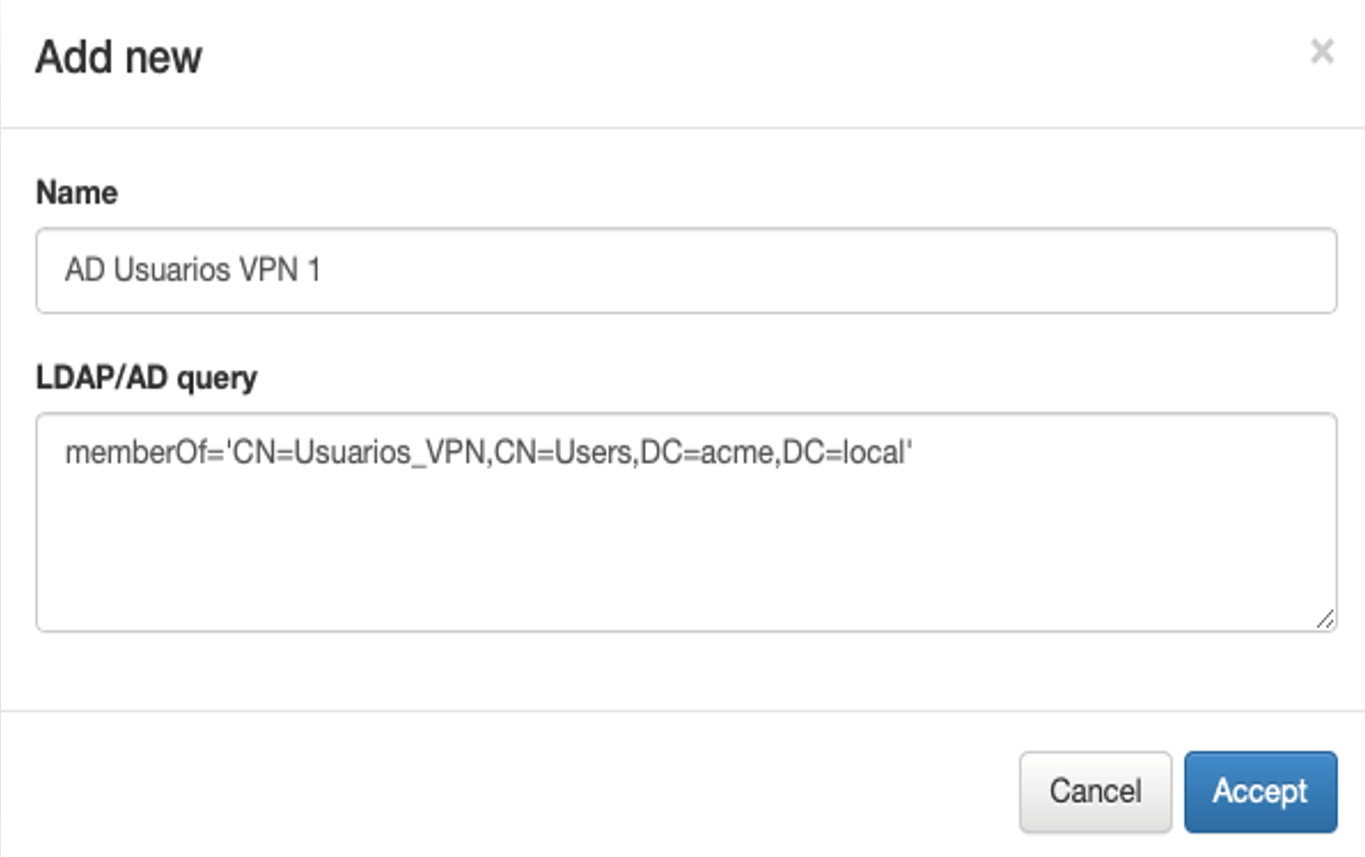
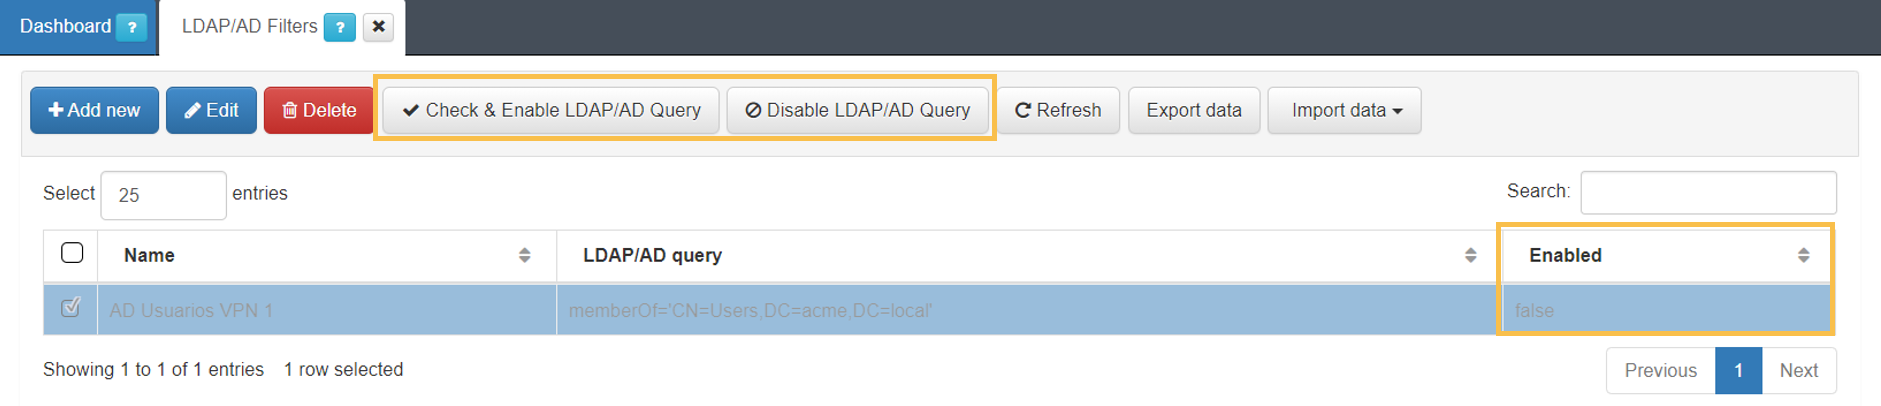
3. Click on Accept to save the configurations and you will see the filter disabled in the main table.
4. To enable the new filter, select it and click the Check & Enable LDAP/AD Query button.
5. Choose the active directory to associate this filter with and click on Accept:
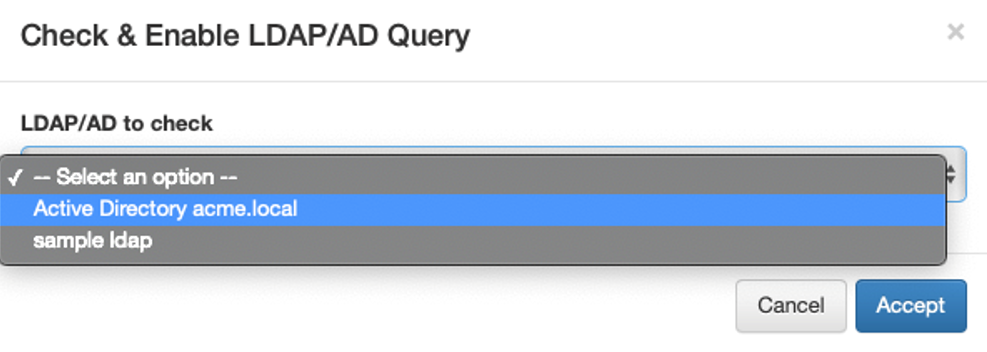
6. In case no errors occur, the filter will be enabled.
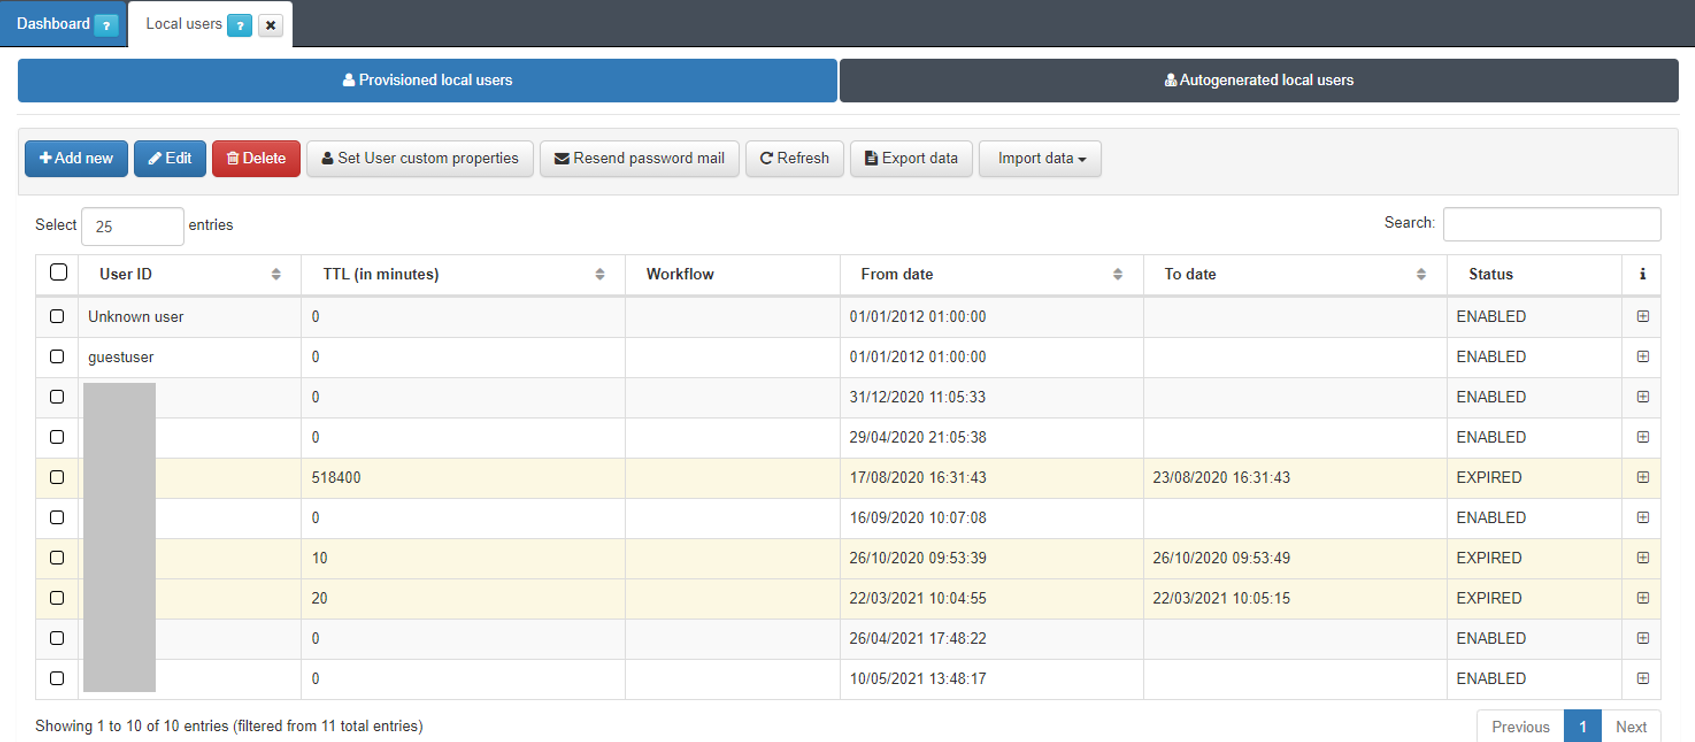
4.2.5.8. Creating Local Users
Although it is not a best practice, you can create users in the local system database to perform authentications. This functionality can be useful for testing and verifying system operation.
1. Navigate to the “Provisioned local users” tab of the ON CMDB > Security > Local Users section:
2. Click on the Add new button to display the configuration window:
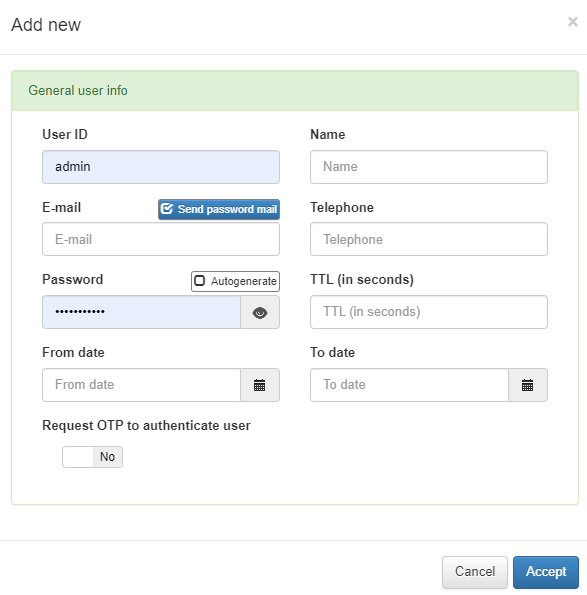
The configuration parameters of the Local users are:
User ID: Identifier of the user.
Name: Name of the user.
E-mail: Email of the user. If we select the option “Send password email” an email with the credentials will be sent to the user. For this feature, the postfix service must be configured. We can find the postfix configuration in UNAC Configuration.
Telephone: User’s phone.
Password: Password of the user. Selecting the “Autogenerate” option will automatically generate a strong password.
TTL (in minutes): User validity time. The time for which this user will be valid is defined (in minutes). In case we want the user to be permanent we must define the TTL as “0”.
From date: Alternatively to TTL, we can define the validity of the user by date range. This is the user’s validity start date.
To date: End date of the user’s validity.
You can enable the “Request OTP to authenticate user” flag if applicable.
Once you finish configuring it, click on Accept to save the new user.
4.2.5.8.1. Local User Custom Properties
There is the possibility to add custom features to local users. These features can be useful if you want to facilitate the identification of these users.
To create a new feature for local users, navigate to ON CMDB > Security > Local Users and in the Provisioned local users tab, click on Set User custom properties:

It will open a new window with all the custom features already created:
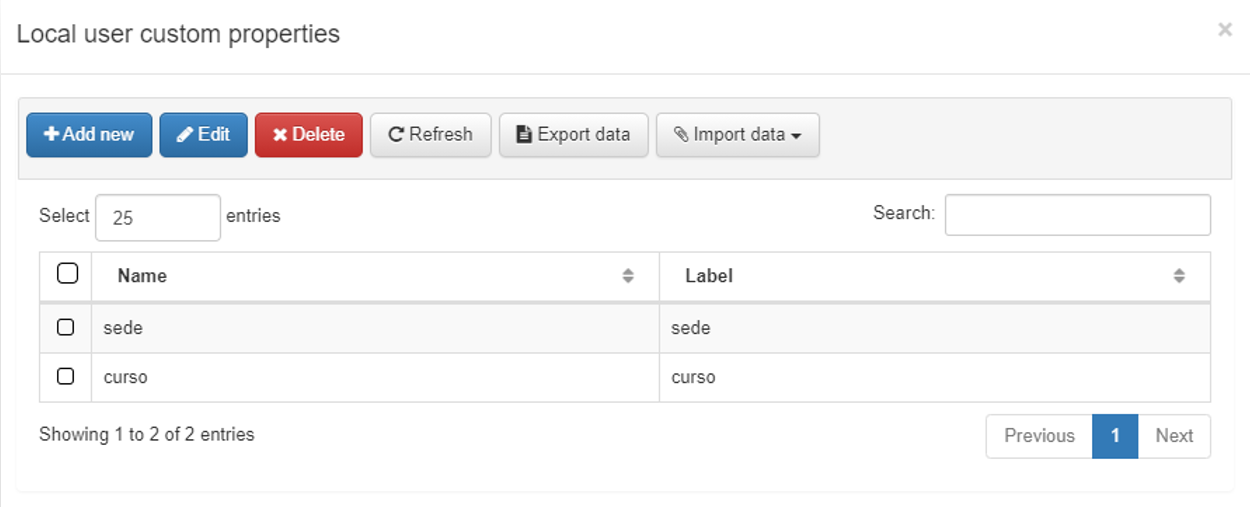
To add a new feature, click Add new:
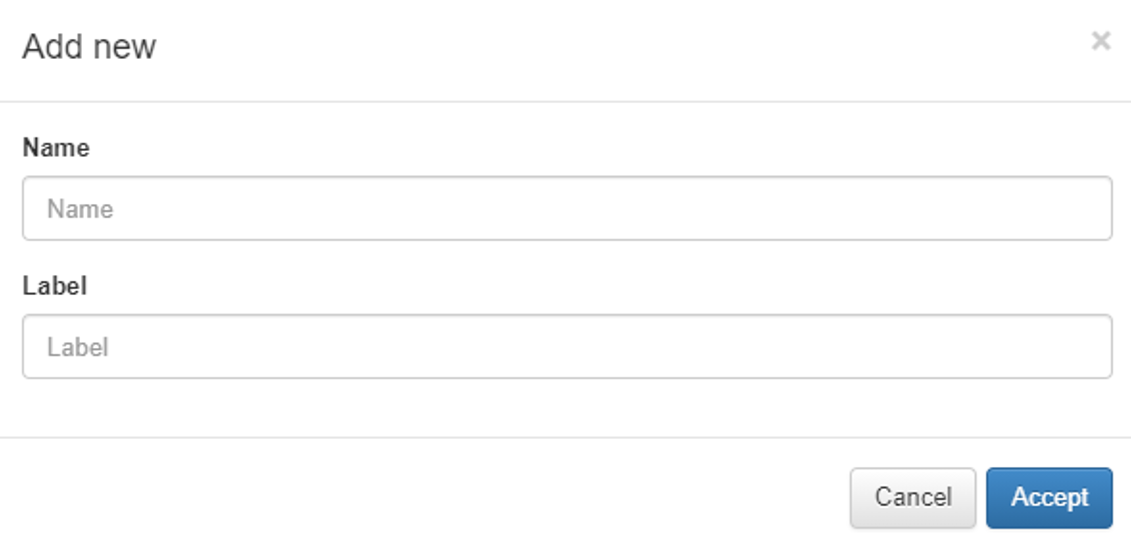
In this window, add a name “Name” and specify the “Label” feature. After defining these attributes, save the configuration by clicking on Accept.
Next time you create a local user, these characteristics will be available for defining them. To assign them to users that are already created, edit those users and apply the characteristics.
UNAC Policies Configuration
4.2.5.9. UNAC Policies
The UNAC Policies enable OpenNAC to control the network access based on specific device conditions. Refer to the Basic Concepts section to understand the policy logic.
This section explains how to create access policies. A NAC policy may utilize user information or data retrieved from the device, such as the operating system type, to direct the user’s or device’s traffic to a specific VLAN or to apply specific port settings.
Navigate to ON NAC > Policies and note that there are a series of preconfigured Polices, including UNAC scenarios:

UNAC Default Policies
MAB - Degraded from 802.1X cert
UNAC - Wire - 802.1X Host
UNAC - Wire - 802.1X User
UNAC - Wire - MAB (COMPLIANCE)
UNAC - Wire - MAB (CDT_MAB)
UNAC - Wifi - 802.1X Host
UNAC - Wifi - 802.1X User
When a network access request occurs, it is processed sequentially through the list of policies. If a policy does not match the request, the system continues to evaluate the next policy in the list. This process repeats until a matching policy is found. The matching policy then determines whether access is allowed or denied.
Note
The final policy (Catch All) matches all events that did not match any of the previous policies. This way, you can know which events are out of your policy scope.
To create a new policy, click on Add new:
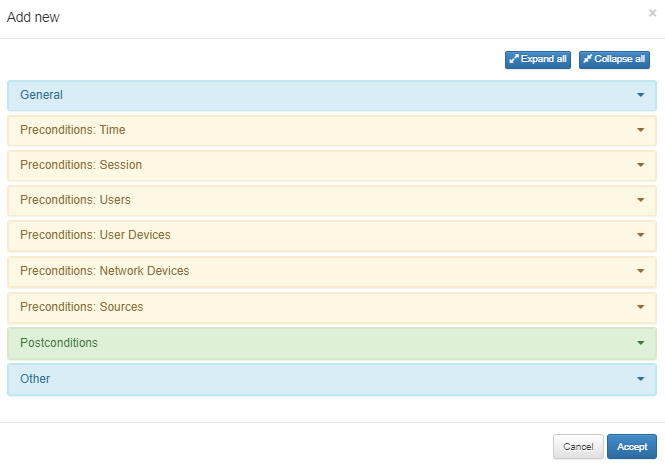
As you can see, there are several sections in the policy evaluation process.
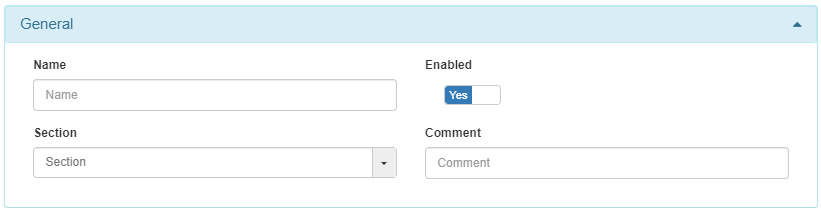
4.2.5.9.1. General
Every policy must have a name, a comment that details the behavior of that policy and finally, if you want to have this policy active, mark the “Enabled” check as “Yes”.
4.2.5.9.2. Preconditions
They allow you to add conditions that will be evaluated for each session to see if the user device should or should not fall into that policy.
Time
This component allows selecting the times during which the policy will be active and user access requests will be processed. This setting enables you to enable the policy in one-hour ranges.

Session
This component allows you to filter users based on information about their session.
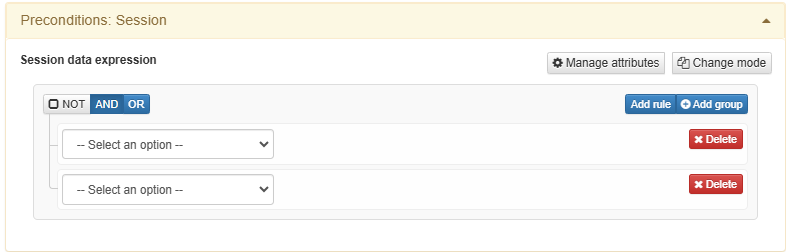
An example of session data expression could be the following:
(&,('==','userGroups','cn=VPN,ou=Groups,dc=opencloudfactory,dc=com'),('==','userGroups','cn=storage,ou=Groups,dc=opencloudfactory,dc=com'))
In this case, it will only match when the session user is in VPN user group and in storage user group.
Another example:
(&,('!=', 'email' , '.*@acme.net' ))
In this case, this will match session users whose email does not finish with @acme.net.
Users
This component allows you to select user identities to determine their inclusion in the policy.
In this section, you can filter users either directly or through the User Data Source (UDS). The UDS serves as the identity repository used by the policy engine, which can include, for example, Active Directory, LDAP Server, Database, etc.
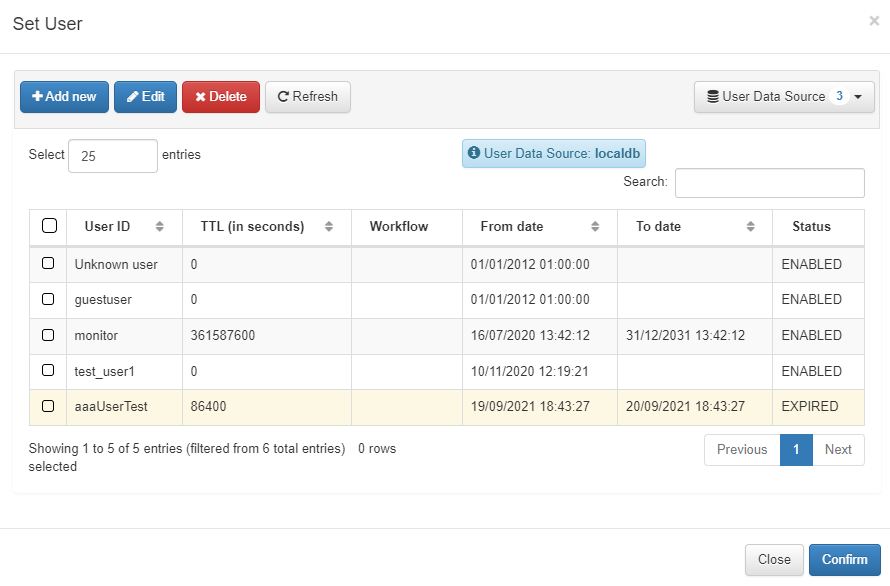
Set user
This option allows selecting a simple user from the database, in our example we set the local database. In this window you can choose a default user of the data source that you have selected.
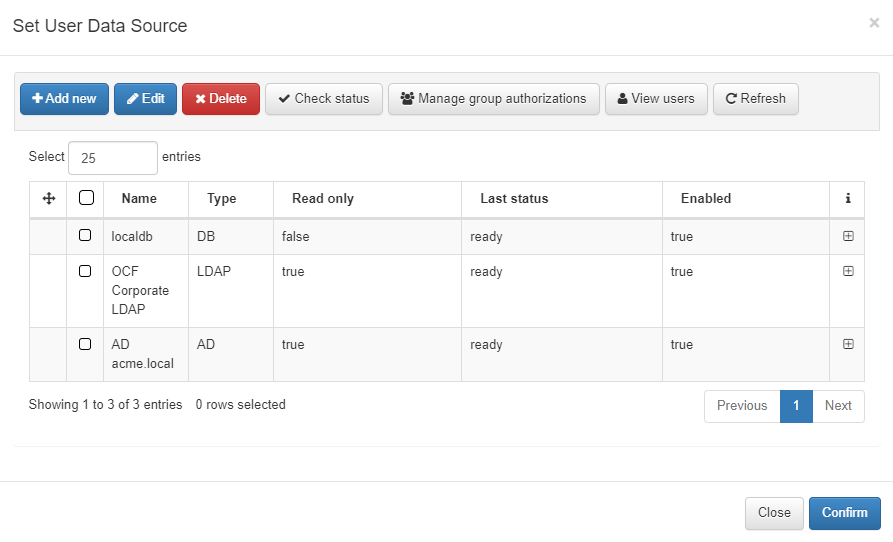
Set User Data Source
In case you want to filter using the User Data Source, select the “Set user Data Source” option. A window will display all the available UDS options.
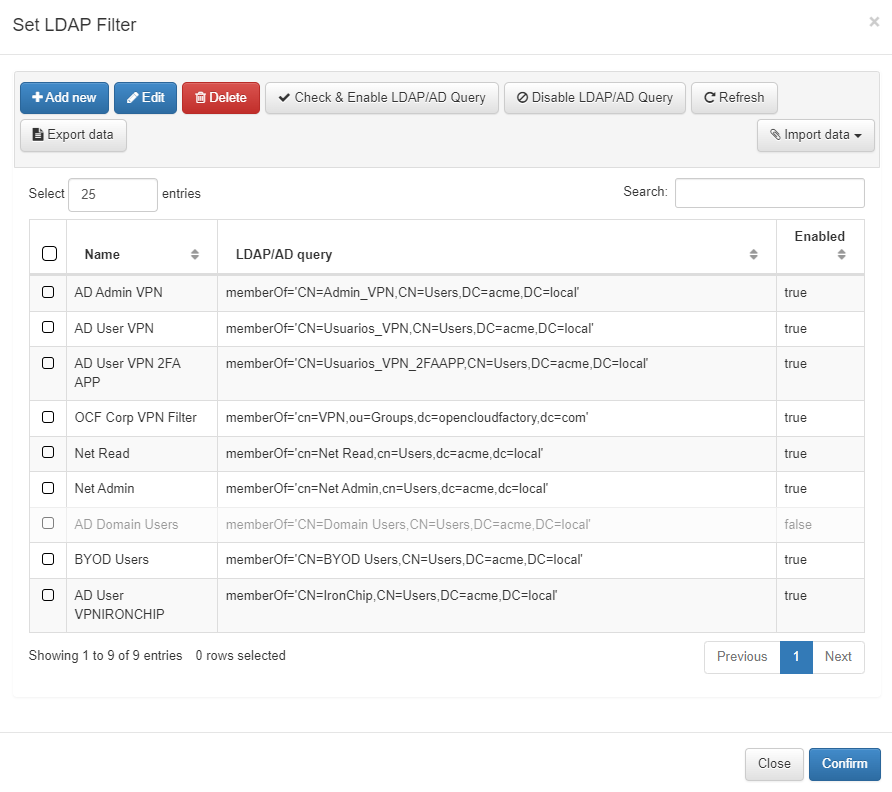
Once you have selected the UDS, you will need to define the conditions for granting access. This is achieved through LDAP Filters.
Set LDAP Filter
Selecting the “User Data Source” allows you to establish a connection with the repository, while “LDAP Filters” enable you to specify which LDAP attributes are used for the authorization process.
If you have a UDS selected (such as Active Directory) and no LDAP filters defined, all users in the AD will have permission to authenticate.
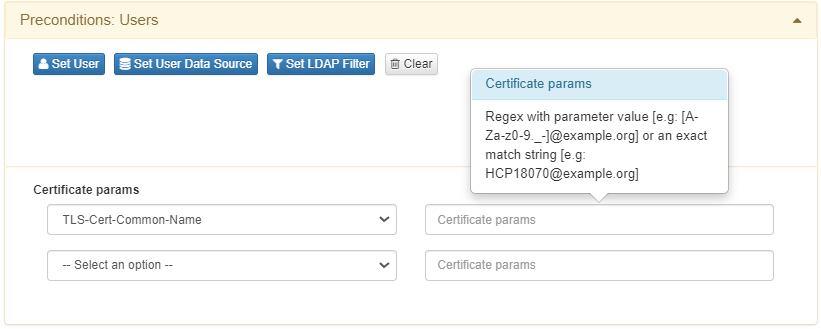
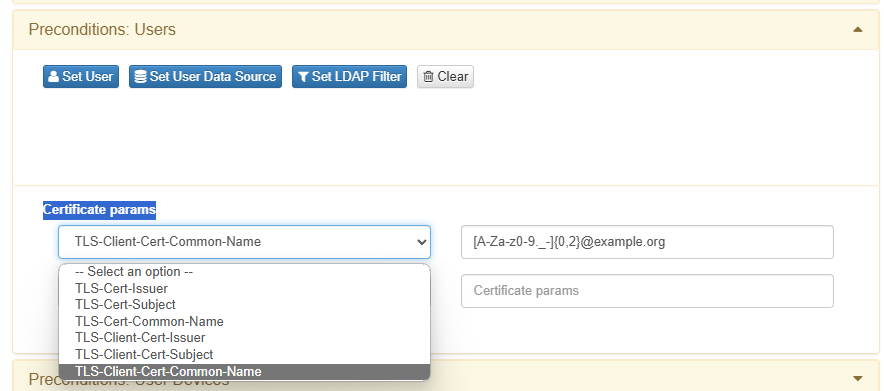
Certificate params
During a certificate authentication process, conditions can also be applied based on the parameters of the received certificate.
To implement this function, use the fields from the “Certificate params” drop-down
User Devices
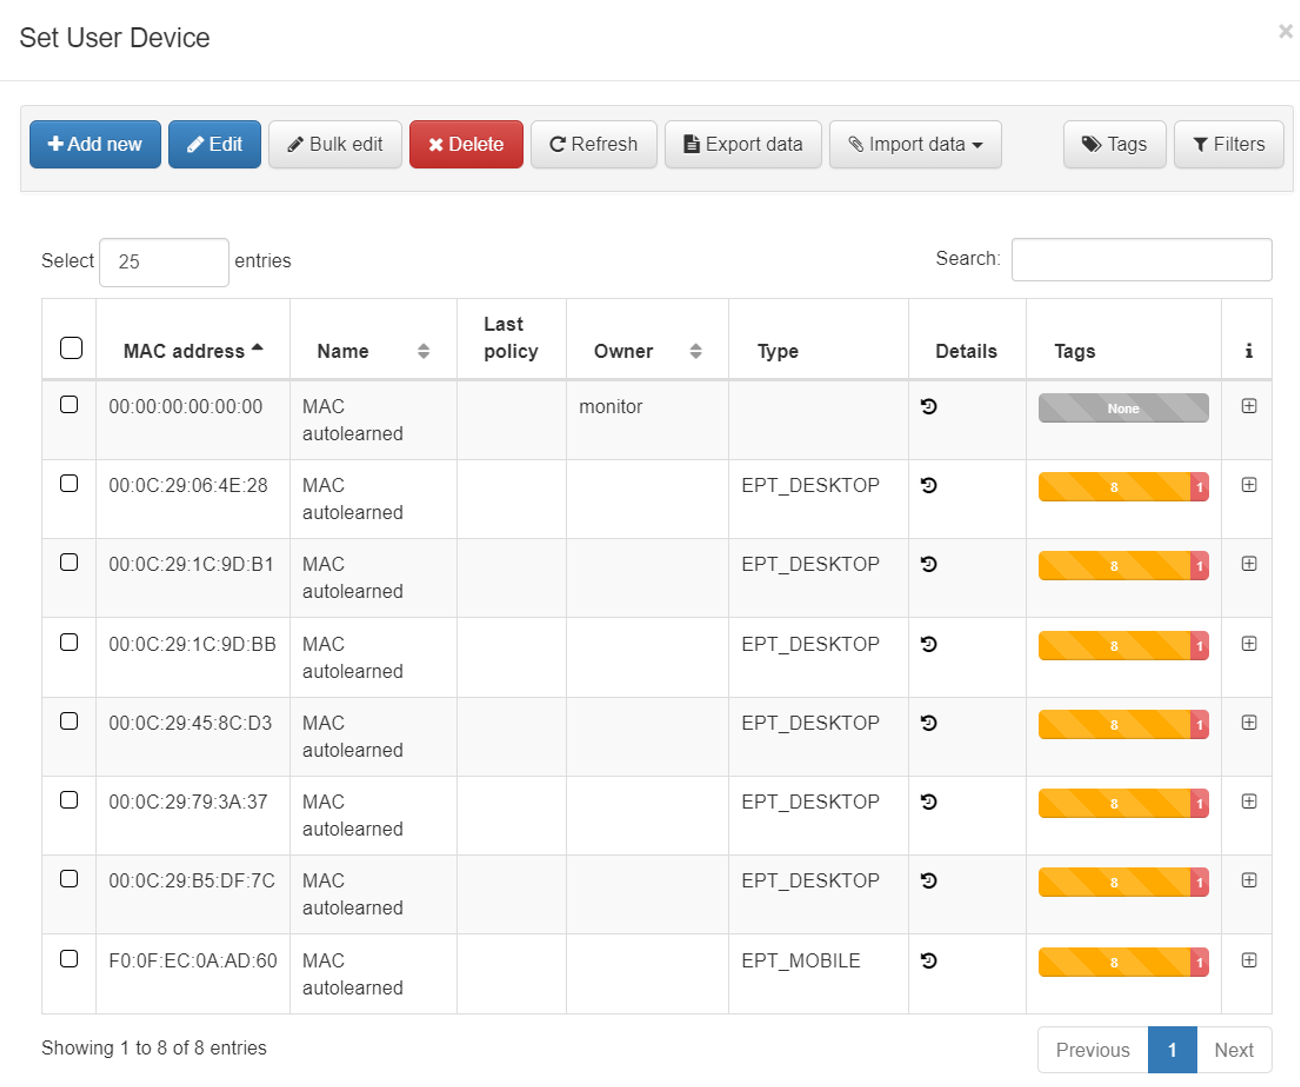
This component allows selecting user devices which are registered in the ON CMDB.
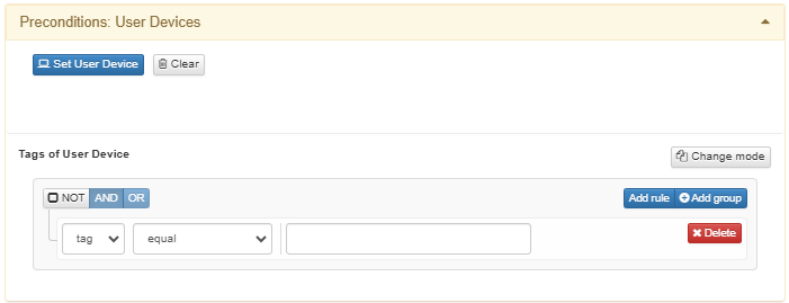
To select one of these user devices, click on Set User Device. The selection of the user device is unique.
You can also create conditions using the Tags assigned to that user device.
To do this, you will have to create conditions within the text field “Tags of User Device Expression”.
This option allows us to use the Tags defined within the End Point Compliance module. To implement this module, refer to End Point Compliance module.
Network Devices
This component allows selecting network devices that are registered in the system CMDB. This precondition will limit the policy to requests arriving from the selected network device.
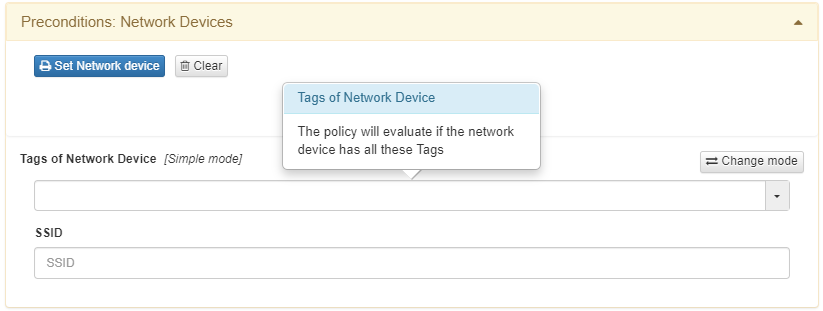
Similarly to selecting “User Devices”, to choose one of these devices, click on Set Network Device. A list of all registered network devices will be displayed from which you can make a selection. The selection of the network device is unique.
You can also create conditions using the Tags assigned to said network device. To do this, create conditions within the text field “Tags of User Device”.
In this section, you can also utilize the SSID (for Wi-Fi connections) of the device to create conditions. Enter the SSID value in the “SSID” text field, which supports regular expressions.
Sources
This precondition allows defining the authentication process that will be carried out during the request for network access.
There are different methods of device authentication:
Supplicant User
Supplicant Host
Supplicant certificate
VPN
User
Certificate
MAB
Note
We recommend avoid using all conditions simultaneously. Implementing a focused policy ensures better results and prevents mistakes.
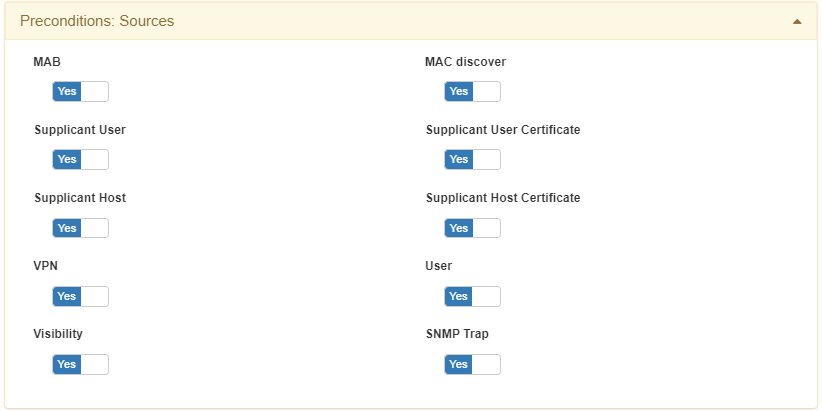
MAB |
The “MAC Authentication” Bypass (MAB) method is an emulation of the 802.1x method. In case the authentication process does not exist an 802.1x supplicant, it sends the MAC as the authentication method. This process is used with devices that do not have an 802.1x supplicant such as printers, phones, or other devices. |
Supplicant User |
The Supplicant user method is used if you have an 802.1x authentication method configured. In this case, this process is accompanied by username/password credentials. |
Supplicant Host |
This method is used if you have an 802.1x authentication method configured. In this case, the credentials of the device are used to carry out authentication. |
Supplicant Certificate |
This method is used when we have an authentication method that uses digital certificates. These certificates can be either user or machine. |
VPN |
With this option, we allow authentication as a backend of VPN servers. Some of the monthly VPN hubs used and easy to integrate are Juniper, Cisco, Fortigate, Checkpoint. The communication protocol used between the technologies is the RADIUS protocol. This font is also used with the implementation of the remote access use case, the 2SRA module. |
User |
The “User” font can be used generically to authenticate access credentials using RADIUS. An example could be access authentication to network devices such as Switches, Routers, VPN, etc. This means that we can use the tool for authenticated access to network devices and at the same time we can also create authorizations. |
Visibility |
With this option, we allow the ON Core node to process the events collected by the ON Sensor node. These events will be reported from the ON Aggregator node. As an example of a use case, the devices learned by the ON Sensor node are sent to the ON Aggregator node and this notifies ON Core by adding the Tag SRC_SENSOR. |
SNMP Trap |
Using this option we can process the events coming from the SNMP TRAP processes sent by the network devices. This Trap must be in version 1 or 2 and must include the MAC address of the user device. |
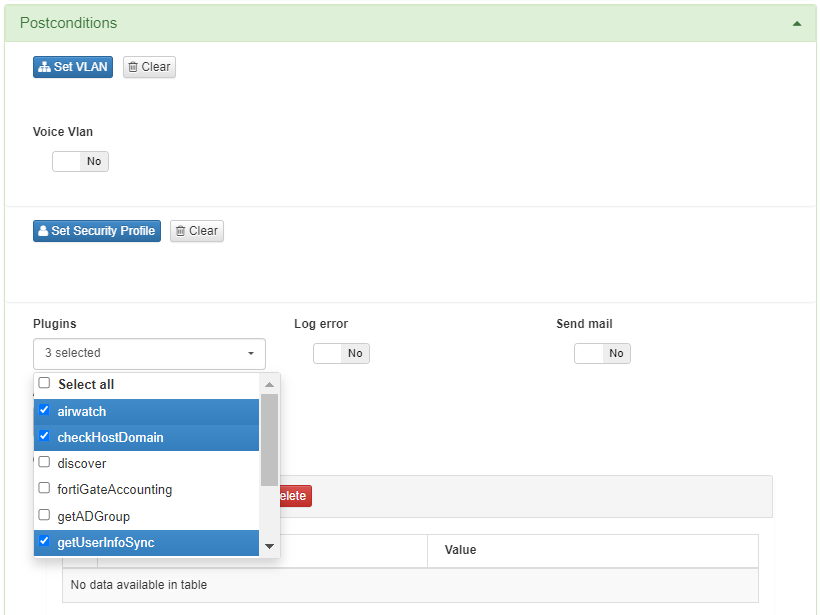
4.2.5.9.3. Postconditions
This section allows adding conditions and actions to apply once the user device has fallen into the policy and all preconditions have been met.
This section can also be defined in different blocks, where each one is used to configure certain postconditions.
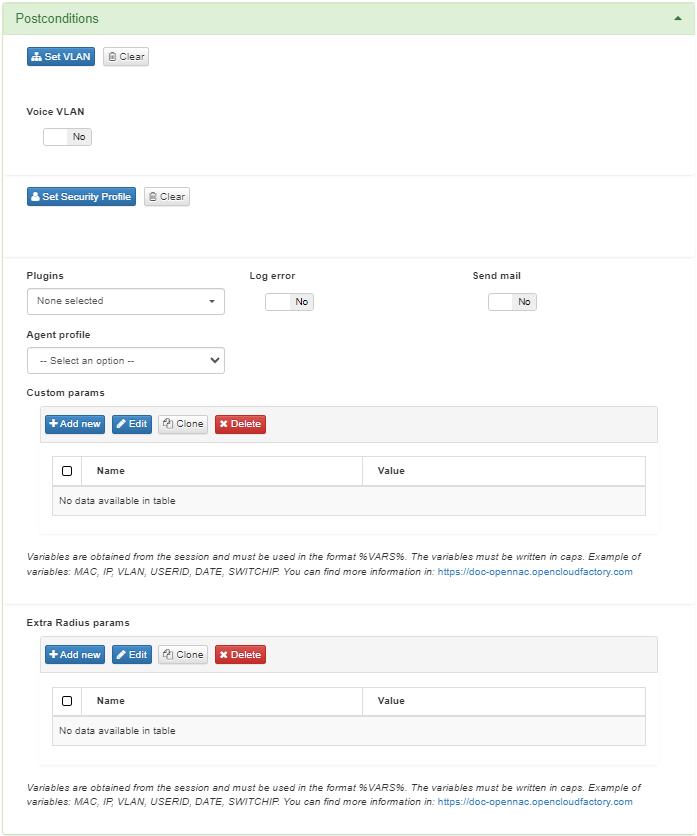
VLAN
The first block is used to define which VLAN to assign to the authenticated user or device.
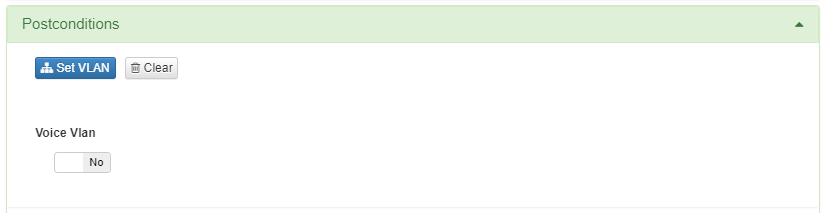
Click on Set VLAN to display the VLANs that we have previously defined in the CMDB.
Note
The VLAN segmentation relies on the Segmentation use case. Refer to the Segmentation Use Case section to create the VLANs and apply the segmentation.
Without a Segmentation module, the VLANS available are the following:
VLAN 0 (SWITCH DEFAULT) is used to indicate that you want to make use of the VLAN defined by default on our Switch. This will be responsible for assigning the VLAN.
VLAN 4095 (ACCESS DENIED) is used to directly deny access to the network. It is not a valid identification value and for that reason, in case of defining this VLAN we will get all access to the network denied.
Security Profiles

Note
The ACLs segmentation relies on the Segmentation use case. Refer to the Segmentation Use Case section to create the ACLS and apply the segmentation.
Otherwise, you will not be able to apply a Security Profile within this section.
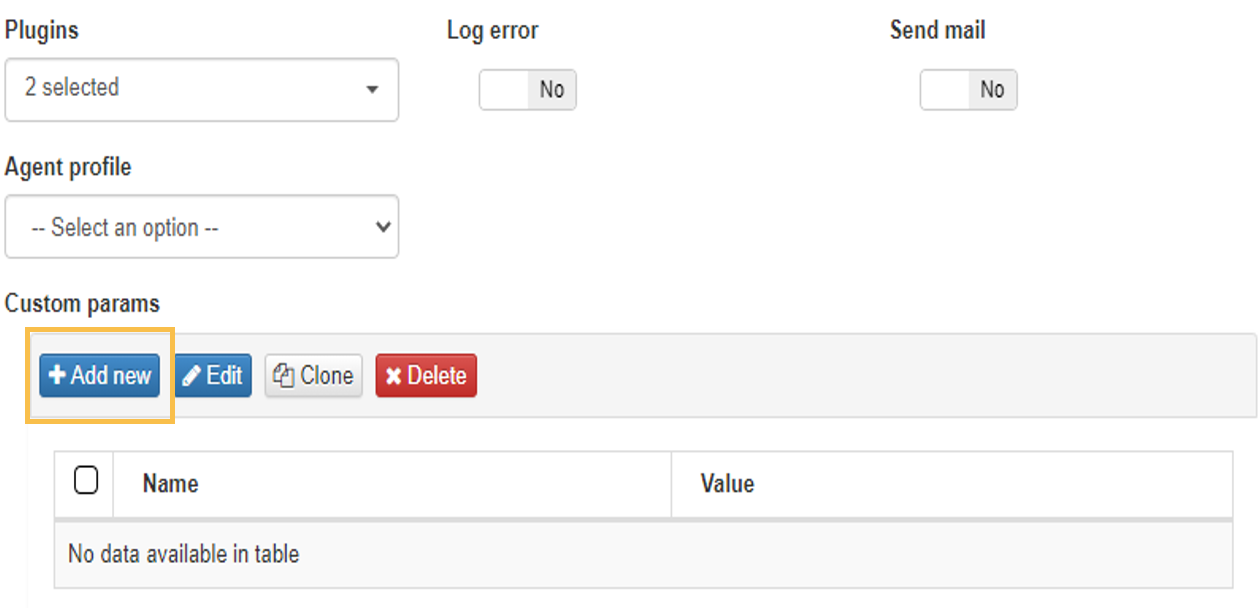
Plugins
The following section defines the use of different plugins and their parameters.
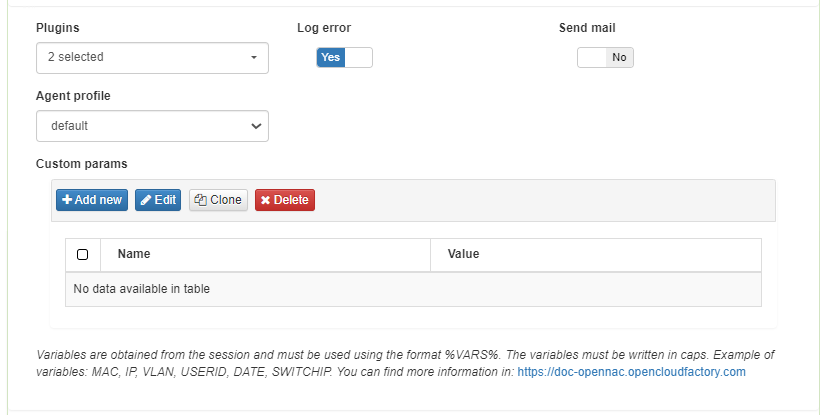
In the Plugins drop-down, you can choose among all the available plugins.
Note
For the plugins to be available in this view, they must be previously enabled in Configuration > Plugins.
In this section, you can also enable plugins that allow segmentation through integration with NGFW.
The Log error flag allows you to send error logs using syslog. By default, this option is disabled.
The Send mail flag allows you to send a notification email when this policy matches the authentication request.
The Agent profile dropdown allows you to choose a user profile to associate with this policy. If none is defined, the default profile will be used.
The Custom params option allows you to define customized parameters for the plugins associated to this policy. This configuration will overwrite the plugin default configuration.
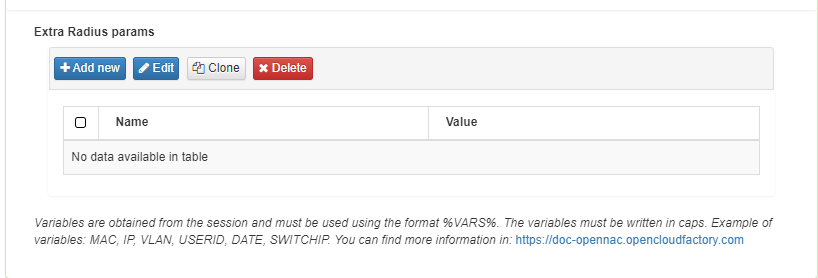
Extra Radius params
The last section defines additional parameters that can be sent as part of the RADIUS response for the policy.
4.2.5.9.4. Other
In the last section, you can configure notifications to devices with the ON Agent installed, learn user devices automatically and assign Tags to the device that matches the policy.
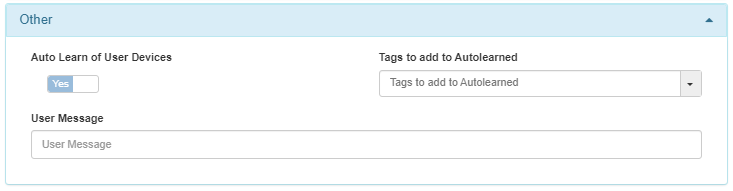
The Auto Learn of User Devices flag adds unknown devices that match that policy. The device is auto-learned during its first policy evaluation without requiring reevaluation and then registered in the database (CMDB). Devices learned through these policies will be assigned the “ONC_AUTOLEARNED” tag.
The Tags to add to Autolearned option requires the previous flag to be enabled. In this case, you can define tags to be added to the devices that have been learned through the authentication and policy matching process.
The User Message field allows you to define a message that will be displayed as a pop-up when a user makes a connection through an Agent.
4.2.5.10. Enable Plugins
Plugins have several functionalities related to network access control:
Plugins related to the asset discovery process
Plugins related to network structure (NGFW,MDM)
Plugins related to asset profiling
Plugins related to the two-factor authentication process (2FA)
Plugins related to the registration, categorization and control of assets
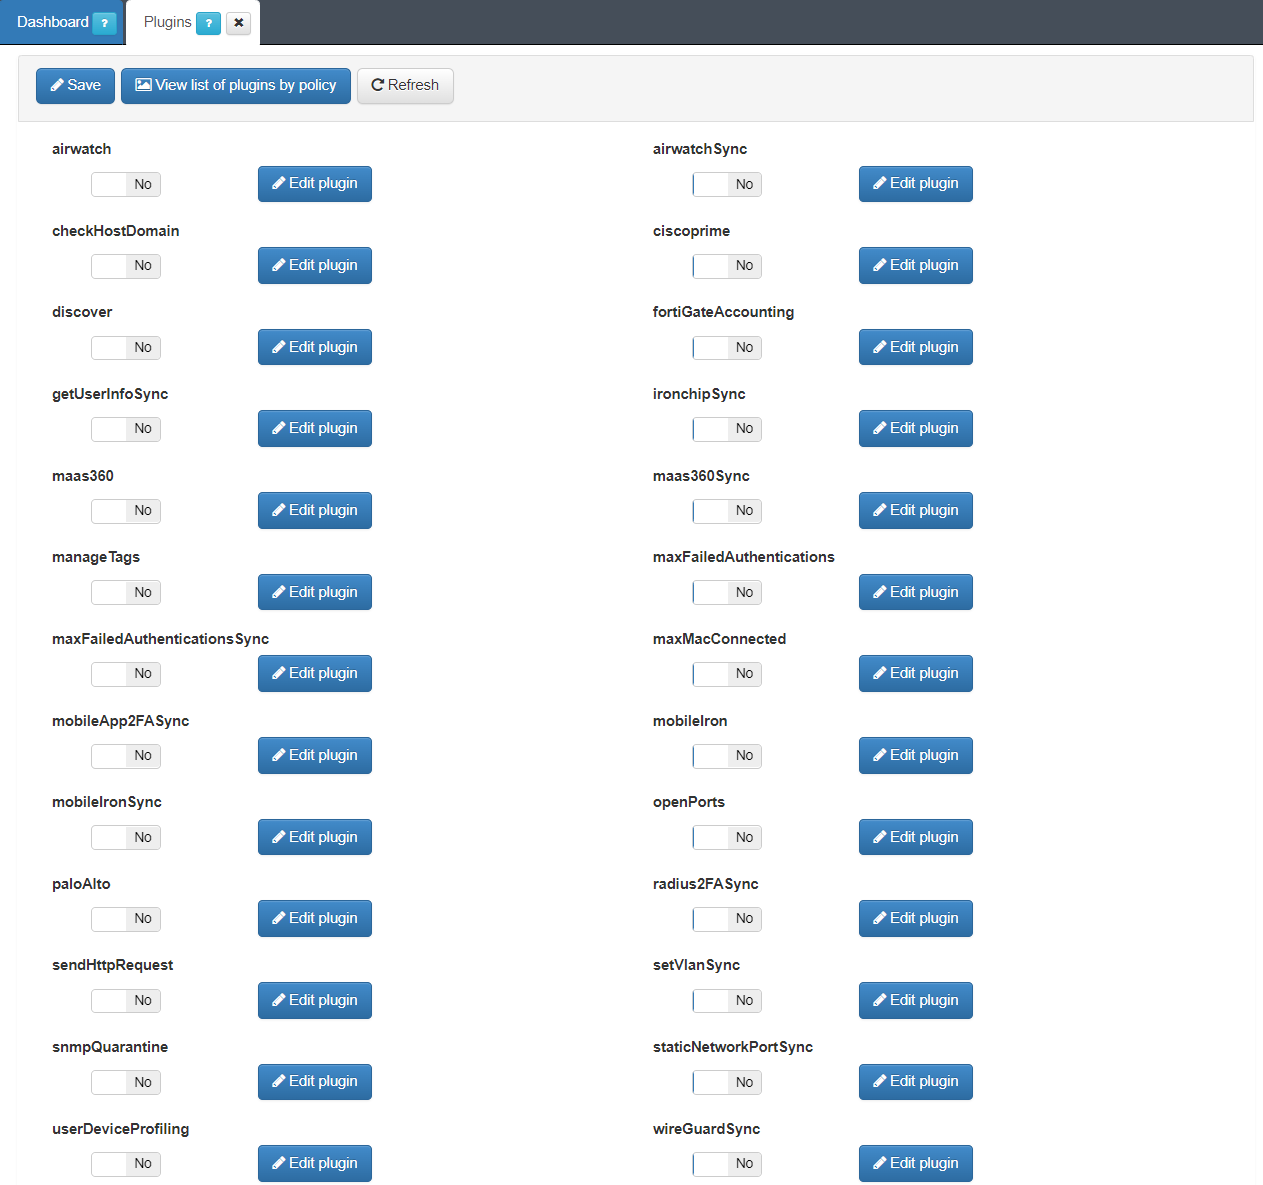
Navigate to Configuration > Plugins, to see all the available plugins. From this section, you can enable them and set the default configuration parameters.
Note
To define specific parameters, you must configure them when setting up policies and associating plugins to their postconditions.
Refer to the Plugins concept section to understand their capabilities.
These are the plugins that are relevant for the UNAC use case:
4.2.5.10.1. Applying plugins to policies
To use plugins, they must be enabled in each of the network access policies. These plugins are part of the Postconditions section of the policies, that is, they are executed once the device has matched that policy.
Navigate to ON NAC > Policies and configure policies associating plugins to their postconditions.
Click on Add new or Edit at the top row of the tab and the configuration window will open.
Scroll down to the “Postconditions” section and in the Plugins drop-down, select those that you want to associate to the policy:

You can modify the configuration of these plugins in the policy itself by adding “Custom params”. This way, the configuration parameters of the plugin are modified only for its execution in that specific policy.
These custom params are configured with the following attributes:
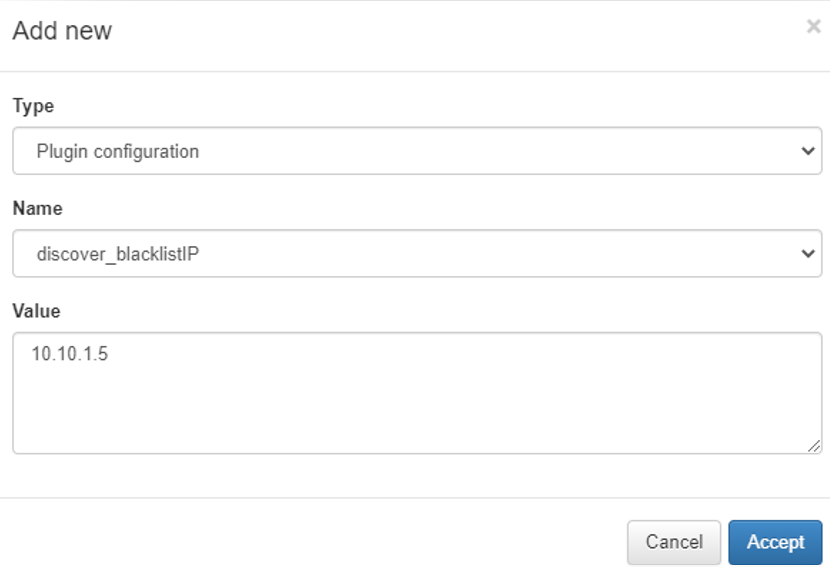
Type: Type of custom parameter, in this case Plugin configuration.
Name: Name and parameter of the plug-in that we want to modify.
Value: The value you want to assign to the selected parameter.
Once all the necessary plugins have been enabled and the rest of the policy configured, click on Accept to save it.
4.2.5.11. Policy Notification
You can configure the system to send notifications to an email address whenever a user device falls into or matches any of the policies defined in the system. To do this, you must configure the email addresses where you want to send the message and define the content of that message.
Navigate to Configuration > Configuration vars section and find the Notifications tab:

The fields to configure the policy Notification are:
Critical alert e-mail form: Email address with which email notifications will be sent.
Critical alert e-mail: Email addresses to which notifications will be sent. We can add several by using commas “,”.
Critical alert e-mail title: Title of the email, it is possible to use the internal parameters of the policy as variables.
Critical alert e-mail content: Content of the email, as with the title, it is possible to use the internal parameters of the policy as variables.
Once you finish the configuration, click the on Save to apply the changes.
To activate the notifications in a policy, navigate to ON NAC > Policies and edit the policies for which you want to configure notifications.
To do this, select the policy you want to edit and click the Edit button:

In the preconditions section, enable the Send mail flag:
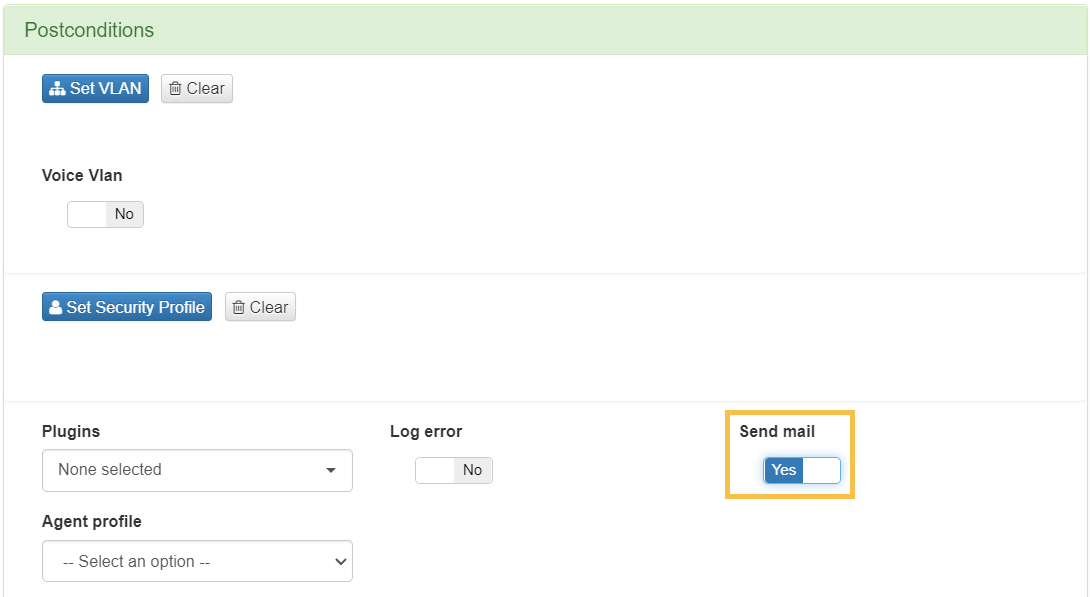
To apply the changes click Accept. Now every time a device matches the policy you will receive an email notification.
Use Case Scenarios
4.2.5.12. UNAC Scenarios
The following section outlines the primary scenarios commonly addressed using the UNAC module. These scenarios include:
Network Access Control (UNAC)
Kerberos Authentication
VPN connection authentication
UNAC + End Point Compliance
UNAC + Segmentation
UNAC + Integration with NGFW
User device quarantine
4.2.5.12.1. Network Access Control (UNAC)
The main UNAC scenario is related to the control of devices accessing the network based based on the AAA protocol consisting of the following phases:
Authentication: The access credentials provided by the user device are verified.
Authorization: By evaluating policies, the resources to which the user has access are established.
Accounting: During the user’s uptime, information regarding their session is collected.
This implementation relies on the 802.1x protocol for communication between client and switch (or MAB in case there is no supplicant), and the RADIUS protocol for communication between the switch and our system.
The requirements for this scenario are:
Proper Node Configurations (UNAC Configuration).
Switch configured with 802.1x and/or MAB.
Windows computers with supplicant (802.1x Authentication) and/or without supplicant (MAB Authentication).
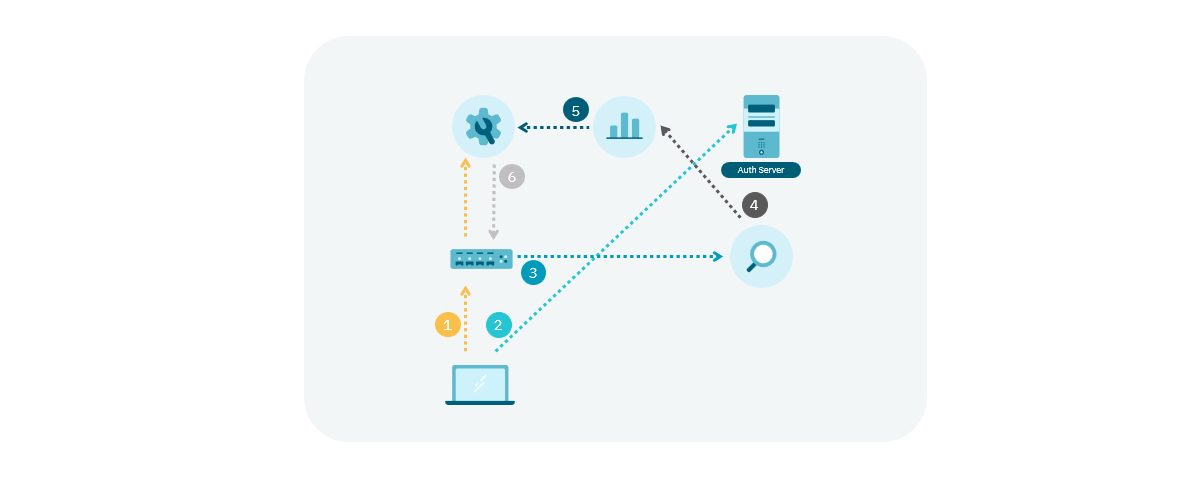
The operating flow of the scenario is as follows:
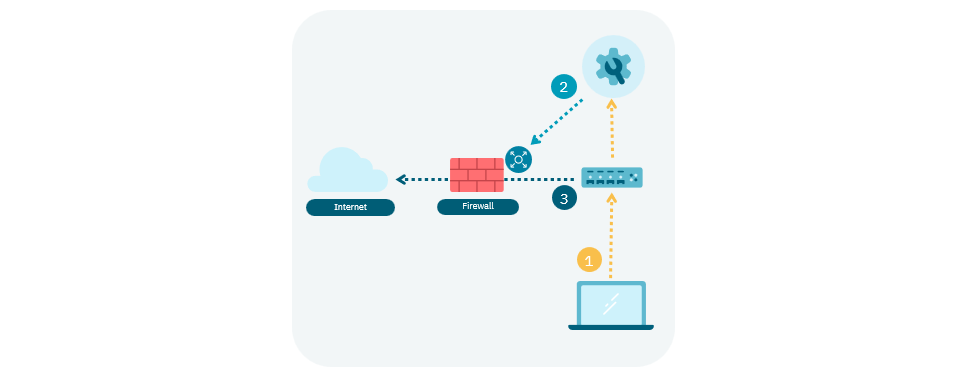
Username/Password:

1. When a user device connects to the network, the authentication process begins. The device first sends its credentials (user or computer) to the switch using the 802.1x protocol, which then forwards them to ON Core for validation via RADIUS.
2. ON Core verifies the credentials against the defined User Data Source (UDS). If the authentication is successful, it evaluates the policies to determine the appropriate access level for the user (Authorization).
3. ON Core then notifies the switch via RADIUS about the access level the client should receive.
MAB:

1. When a user device without a supplicant connects to the network, the authentication process begins. Since it does not have a supplicant, the switch uses the detected MAC address as the access credentials (Authentication).
2. ON Core performs certificate verification locally by checking the validity of the certificate signature. If the authentication is valid, it evaluates the policies to determine the appropriate access level for the device (Authorization).
3. ON Core then notifies the switch via RADIUS about the access level the device should receive.
Certificate:

1. When a user device connects to the network, the authentication process begins. The certificate is first sent to the switch using 802.1x, which then forwards it to ON Core for validation via RADIUS.
2. ON Core performs certificate verification locally by checking the validity of the certificate signature (Authentication). If the authentication is valid, ON Core evaluates the policies to determine the appropriate access level for the client (Authorization).
3. ON Core then notifies the switch via RADIUS about the access level the client should receive.
Note
At the policy level, it is essential that the “Source” precondition matches the expected type of authentication for each scenario.
4.2.5.12.2. Kerberos Authentication
In environments where you log on to Windows computers using Kerberos authentication, you can apply this UNAC scenario without activating the supplicant on those computers.
The requirements for this scenario are:
Proper Node Configurations (UNAC Configuration)
Switch configured with MAB.
Windows computers without supplicant.
The authentication flow for the scenario happens as follows:
1. When a Windows computer boots and does not have any type of supplicant configured, an initial authentication using Mac Address Bypass (MAB) will be performed.
2. When the user logs into their Windows account, the user will authenticate against the authentication server using the Kerberos protocol.
3. The ON Sensor server will receive the Kerberos ticket through the SPAN port.
4. ON Sensor will send this information to ON Aggregator.
5. ON Aggregator will make a policy evaluation request to ON Core with the Kerberos ticket information. Upon receiving this request, ON Core will associate the Kerberos user with the existing MAB session. A “USERIN” event will be generated, and if a VLAN change is necessary, a “REEVAL” event will be executed. You can consult the :ref:OpenNAC Events<events> for more details on the types of events in the system.
6. Once the reevaluation is done, the new policy will be applied to the switch.
In terms of policies, it is essential to have the following configurations implemented:
1. A first policy with precondition of type Source = MAB. The Windows computer will initially fall into this policy (before logging in).
2. A first policy with precondition of type Source = Visibility. This policy will apply the postconditions of the user’s authentication based on the information collected by ON Sensor.
4.2.5.12.3. VPN connection authentication
UNAC allows the use of an authentication backend for VPN hubs, both SSL-VPN and IPSEC, using the RADIUS protocol. These authentications are performed using a username and password. While it is possible to use external VPN hubs, it is recommended to use the 2SRA module for remote access to the network.
The requirements for this scenario are:
ON Core server configured for VPN authentication (UNAC Configuration)
Compatible VPN hub (SSL or IPSEC) (Juniper, Netscaler, Cisco ASA, PaloAlto or FortiGate).
The authentication flow for the scenario happens as follows:
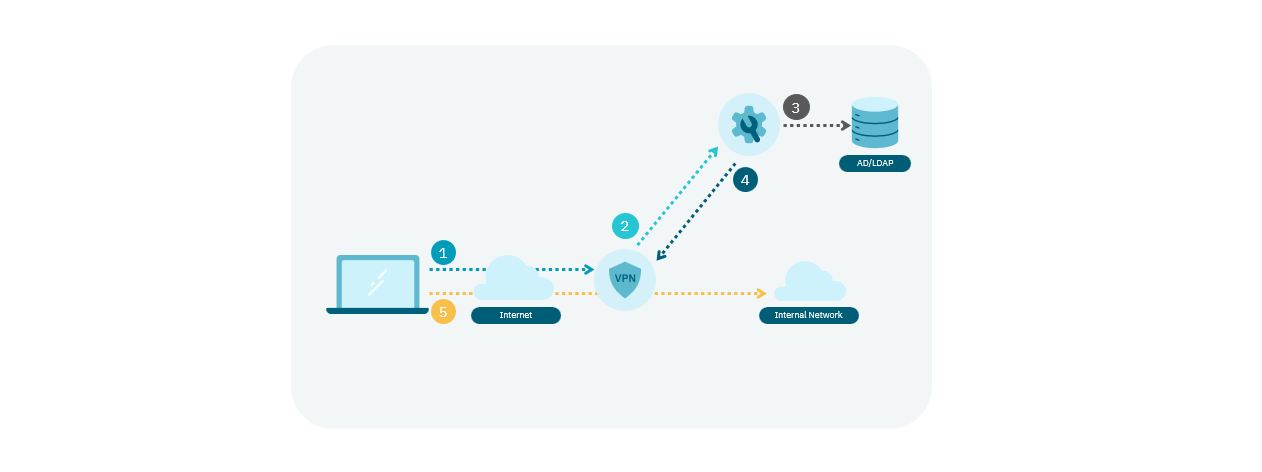
1. The client attempts to connect to the network and initiates the network access process using the VPN hub.
2. The VPN hub receives the client’s authentication attempt and sends an authentication request to the ON Core server via RADIUS.
3. ON Core uses its policy engine to verify the credentials against the corporate active directory and decide whether to allow or deny access.
4. If a policy grants access, ON Core will send a message to the VPN hub via RADIUS to accept the access attempt.
5. The VPN hub will establish the connection based on the response from ON Core.
In terms of policies, it is essential to have the following configurations implemented:
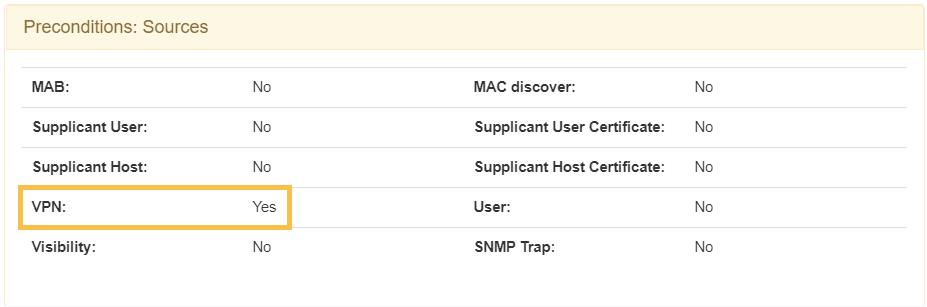
1. A policy with precondition of type Source = VPN.
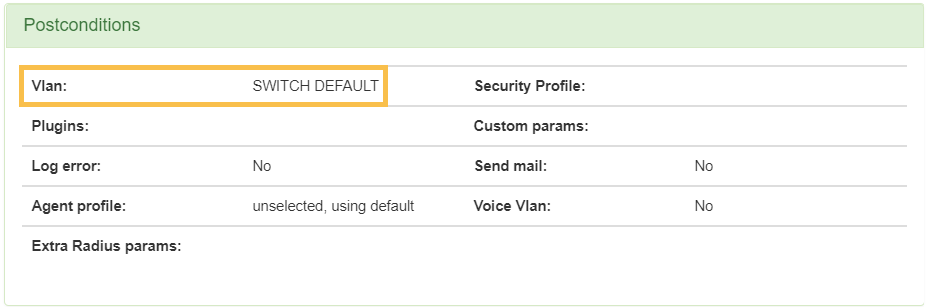
2. The policy postcondition must define the VLAN “SWITCH DEFAULT”.
All requests from VPN authentications will fall into this policy.
Preconditions:
Post-conditions:
4.2.5.12.4. UNAC + End Point Compliance
The End Point Compliance scenario applies to environments where compliance requirements are enforced. These requirements include parameters such as device settings, installed and activated elements, versions of installed applications, and more.
Combining this module with UNAC enhances control over network access by considering the specific characteristics of the device.
The requirements for this scenario are:
Have the Agent installed and running on the user device.
Implementation of the End Point Compliance module.
The authentication flow for the scenario happens as follows:

1. A user device that has the Agent installed connects to the network sending the information of that device to the ON Core.
2. The ON Core obtains this information and assigns Tags.
3. The Tags associated with this device are evaluated against the UD Tags Policies.
4. Access policies are evaluated to check the user’s compliance with the policy requirements.
Satisfactory Compliance: The device meets the requirements set out in the Compliance policy, allowing it to access the network and be assigned to the appropriate VLAN, such as a service VLAN.
Unsatisfactory Compliance: The device does not meet the requirements set out in the Compliance policy and falls under the Non-Compliance policy. It is assigned to a control VLAN defined in that policy, and access can be restricted using ACLs defined in the “Security Profile”.
5. If the characteristics of the device change and the agent reports these changes, the device can switch between Compliance and Non-Compliance statuses accordingly.
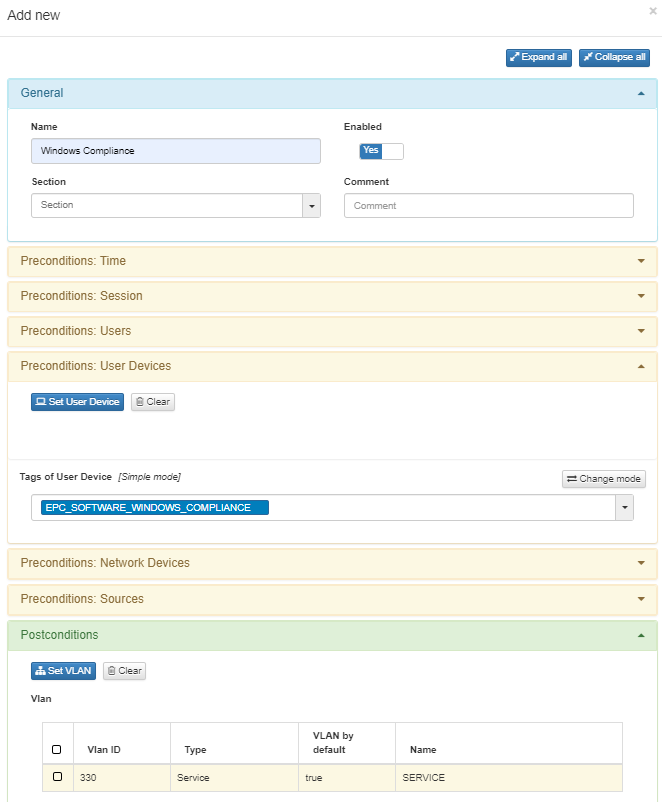
In case you want to notify users about their compliance status, scroll down to the Other section of the compliance policy, and in the “User Message” field, define the message you want to display to the user.
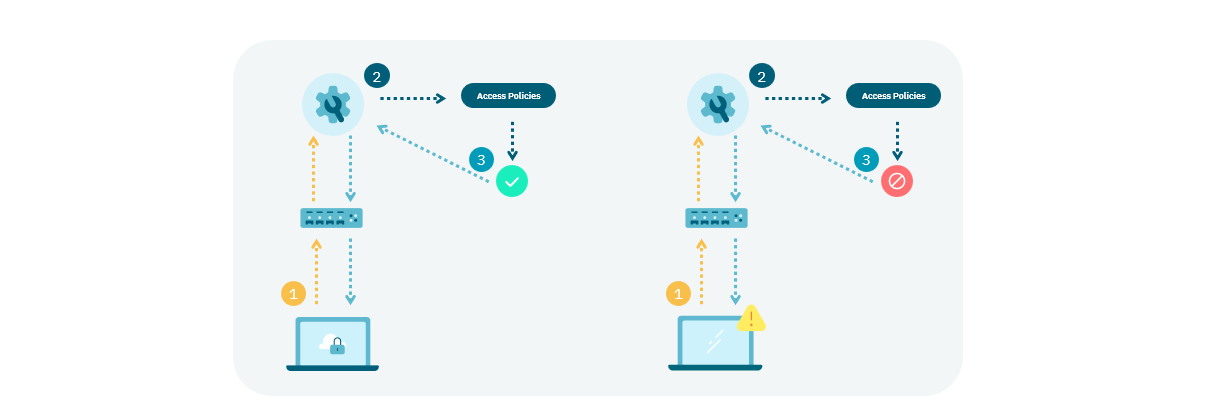
The following image shows the policy example for this scenario, which will verify that the user’s device meets the Windows compliance requirements defined by the tag EPC_SOFTWARE_WINDOWS_COMPLIANCE.
Compliance Policy Example
4.2.5.12.5. UNAC + Segmentation
Through the combination of the UNAC module and the Segmentation module, you can apply stricter and more controlled network segmentation granularly.
This implementation relies on the 802.1x protocols for communication between client and switch (or MAB in case there is no supplicant), and the RADIUS protocol for communication between the switch and our system.
The requirements for this scenario are:
Proper Node Configurations (UNAC Configuration).
Implementation of the Segmentation module (Segmentation module).
Switch configured with 802.1x and/or MAB.
Windows computers with supplicant (802.1x Authentication) and/or without supplicant (MAB Authentication).
The authentication flow for the scenario happens as follows:
1. When a user device connects to the network, the authentication process is initiated using 802.1x or MAB.
2. ON Core performs credential verification against defined UDS (Authentication). If the authentication is valid, the evaluation of policies that will determine access (Authorization) is performed.
3. ON Core will notify the switch (via RADIUS) of the access to which the client must have and segment the client’s access through the VLANs and/or Security Profiles (ACLs) defined in the policies.
You can also perform segmentation with NGFW (Next Generation Firewall) integration .
4.2.5.12.6. UNAC + Integration with NGFW
The integration with NGFW corresponds to the Segmentation module, which enhances network segmentation by transmitting user authentication information to the network firewalls. This allows firewalls to enforce policies more accurately.
The operational flow for this scenario happens as follows:
1. A user device connects to the network. ON Core executes the policy engine, and the user falls under a policy that includes a post-condition requiring the application of an NGFW integration plugin.
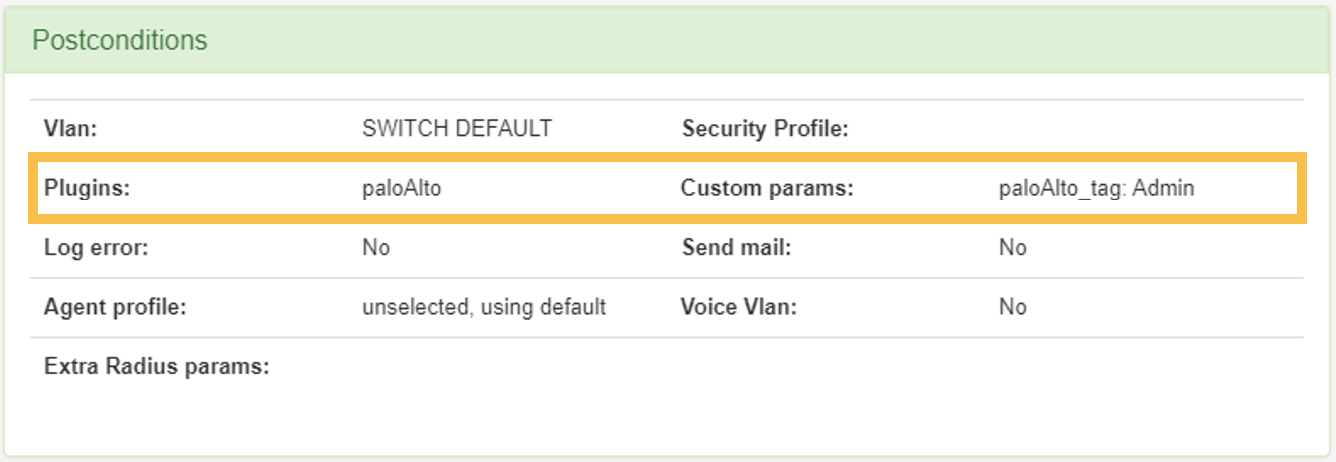
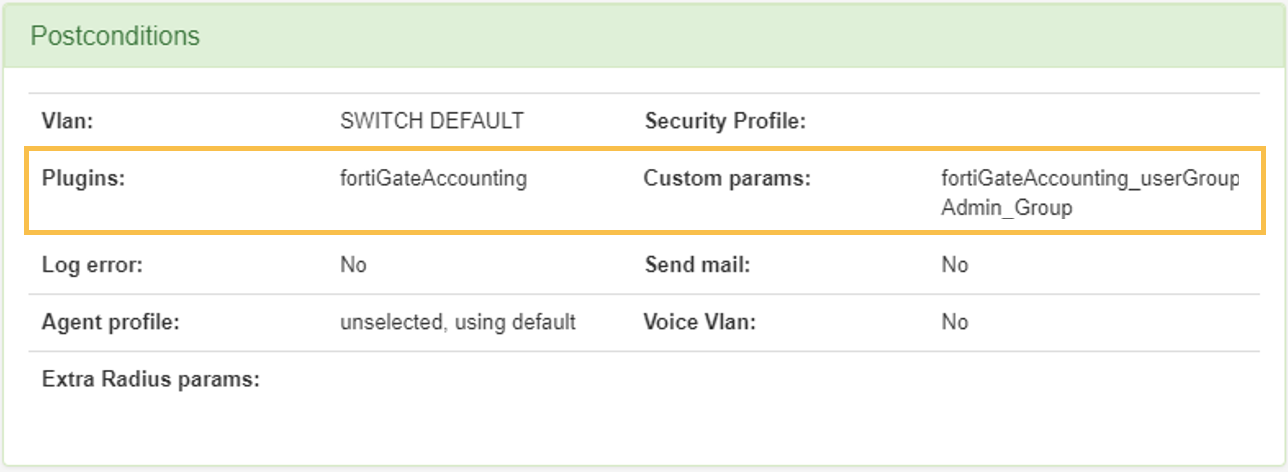
2. As part of the postconditions, the ON Core sends information to the firewall. This information links the user’s IP address with the group to which they must belong within the firewall. In Palo Alto firewalls, this association is achieved using Tags, while in FortiGate firewalls, it is based on user groups.
3. Based on the group assignment determined by the system, the firewall will enforce specific policies tailored to that group.
In terms of policies, it is essential to have the following configurations implemented:
One or more policies with NGFW integration plugins enabled in the postconditions. These can be “paloAlto” or “fortiGateAccounting”. As part of the postconditions, define the “Custom param” specifying the Tag or User Group to which users assigned to this policy must belong in the firewall.
Palo Alto Example:
FortiGate Example:
4.2.5.12.7. Quarantine user devices
The user device Quarantine scenario applies to environments where a user device does not meet security requirements, necessitating its isolation from the rest of the network assets.
To achieve this, implement this functionality through the Segmentation module. Consult the implementation process in Segmentation module.
The requirements for this scenario are:
Ensure that a quarantine policy is defined and prioritized above the valid access policies.
The flow for the scenario happens as follows:
1. A user device connects to the network.
2. Initially, access is allowed because the device meets the security requirements based on the information collected by the Agent.
3. The user installs software considered dangerous on the device. The Agent reports this to the ON Core, which evaluates the policies and determines that the device must be quarantined.
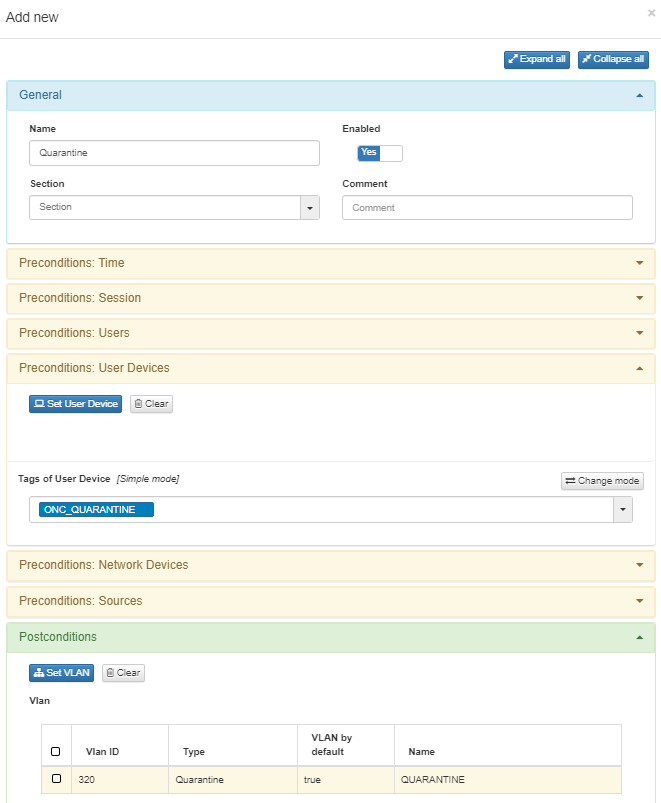
4. Once the device is quarantined, it is assigned the VLAN defined in the policy. In this case, it is “VLAN 320: Quarantine”.
Manual Quarantine of User Device
You can also perform a manual quarantine of a user devices. To do it, refer to the UNAC - Quarentine (Operation) section.
The flow for the scenario happens as follows:
1. A user device connects to the network.
2. Initially, access is allowed as the device has not been quarantined and does not fall under the previously created policy.
3. For security reasons, we decide to quarantine the user. To do this, navigate to ON NAC > Business Profiles, select the desired user device, and click on Quarantine.
4. Once the device is manually quarantined, it is assigned the ONC_QUARANTINE tag.
5. Assigning the device to the quarantine group forces a reauthentication of the user device. This time, being part of the group defined as a precondition in the policy, the device will enter the policy.
6. Once the device enters the policy, it is assigned the VLAN defined in the policy. In this case, we use the default VLAN for this scenario, “VLAN 320: Quarantine”.