3.1.6.8. User Data Sources
Multiple User Data Sources (UDS) can be defined on the OpenNAC Enterprise CMDB. This allows the system to use different authorities in the authorization process. AD attributes are used to be part of the authorization process.
By adding the ON Core into the domain and configuring UDS, it is possible to define different authorization policies.
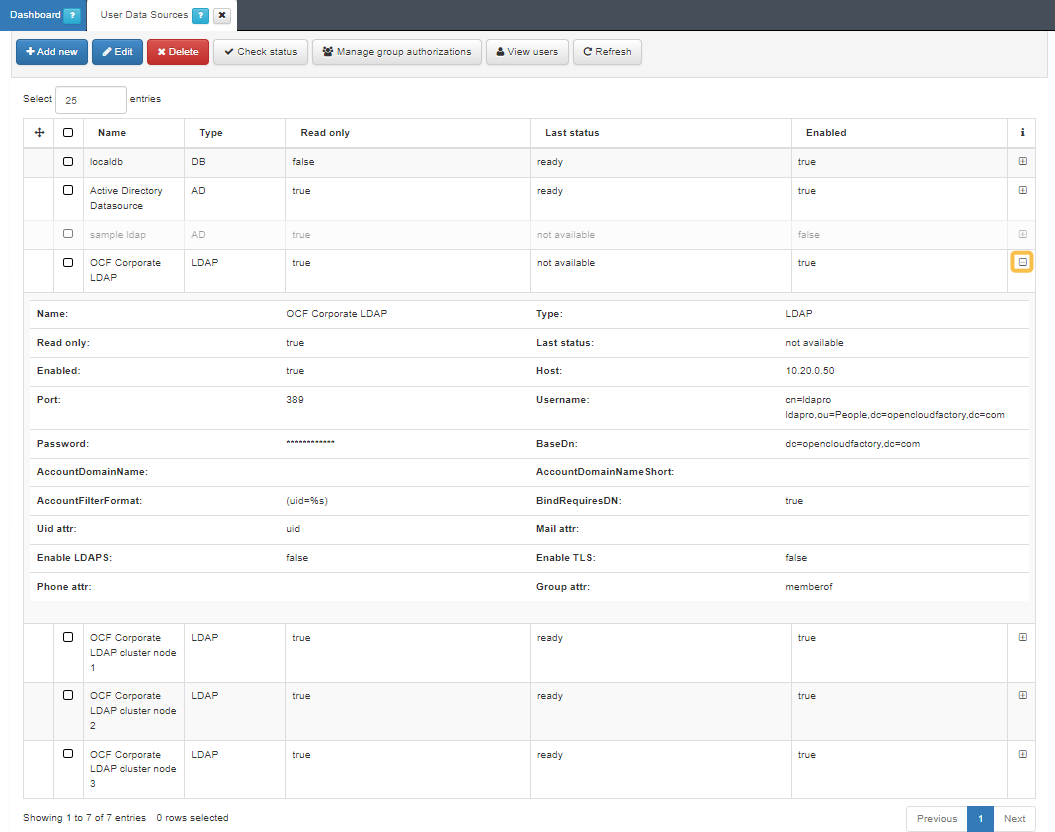
You can check a UDS status, its connection details, and if it is enabled or disabled by clicking on the “+” button at the end of each UDS row.
Here are some of the user data sources that can be defined:
LocalDB: This is a local database based on MySQL.
Sample LDAP: TA local LDAP service intended for proof of concepts; not recommended for production environments.
Active Directory (optional): A connection established with Active Directory.
LDAP Server: A central directory service for managing user information and authentication.
External Database: A network-accessible database for storing and managing user data.
These are just a few examples, and many other data sources can be defined as well.
3.1.6.8.1. Operational Capabilities

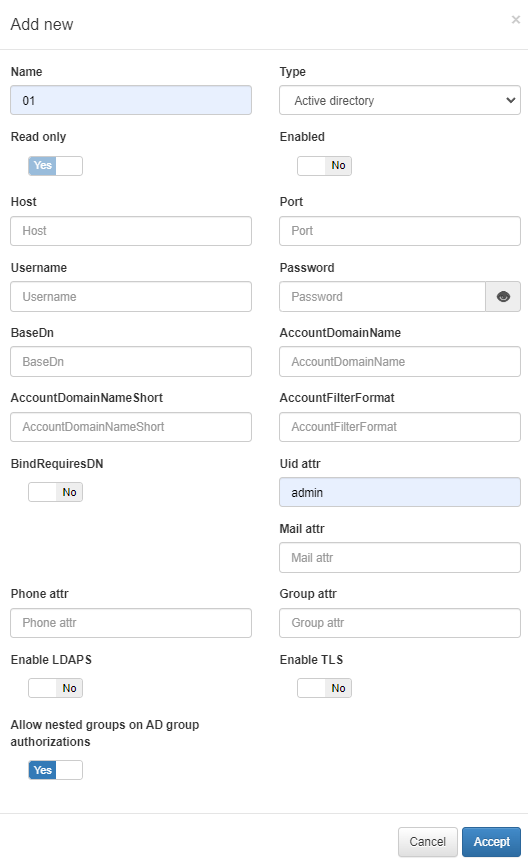
To add a new UDS, click on the Add new button. It will display a window in which we must fill in the following information:
Parameter |
Description |
|---|---|
Name |
The name used by the UDS. In this case, this is a UDS type LDAP/AD, and for this reason, for instance: AD Mycompany |
Type |
Defined as LDAP/AD. The database connection could be used to get user attributes. |
Read only |
If the query is launched with a Read only flag. This will avoid any write action in the commands. |
Enabled |
The UDS can be enabled and disabled. |
Host |
The LDAP/AD IP where the queries are launched. For instance: 172.16.11.5, additional IPs can be added. |
Port |
The port used for the AD/LDAP Search query, by default, uses an unsecured connection. The default is 389 and if AD/LDAP SSL is enabled is 636. |
Username |
The user registered in the AD/LDAP server. This allows us to bind and use AD/LDAP information. For instance, the user created the picture in the active directory in Step 1. |
Password |
The password for the AD/LDAP binding. |
Base DN |
BaseDN at the top of the domain name structure. Our domain is named mycompay.local and its BaseDN is DC=mycompany,DC=local. |
AccountDomainName |
The DNS name for the domain is in uppercase. In this case MYCOMPANY.LOCAL. |
AccountDomainName Short |
The short name for the domain or commonly named NETBIOS name. For instance, MYCOMPANY. |
AccountFilterFormat |
The attribute used to select users. We have included two options, but**only one must be used**. In this example sAMAccountName=%s is defined for Active Directory, and uid=%s for LDAP Servers. |
Bindrequires DN |
It is basically the credential you are using to authenticate against an LDAP. When using a bindDN, it usually comes with a password associated with it. Sometimes, anonymous binding doesn’t allow certain types of actions. |
Uid attr |
The attribute is used to identify users’ IDs. The filter changes depending on if AD or LDAP is used. |
Mail attr |
The filter is used to identify the mail as an attribute of the user. |
Phone attr |
The filter is used to identify the phone number as an attribute of the user. |
Group attr |
The filter use to identify the groups as an attribute of the user. |
Enable LDAPS |
For authenticating and authorizing users where LDAP communication is transmitted over an SSL tunnel port 636 TCP. |
Enable TLS |
For securing communication between LDAP clients and LDAP servers. |
Allow nested groups on AD group authorizations |
* Flag that controls whether subgroup memberships within AD groups are considered for access permissions |
* Regarding the usage of the Allow nested groups on AD group authorizations flag, understand the following example:
If we have the subgroups “Development” and “Management” inside the group “General”:
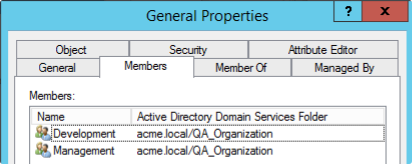
And we have the users “Developer QA” and “Manager QA” that belong to these subgroups:

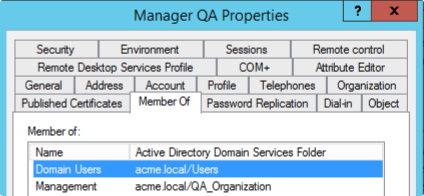
Then, we configure the Group authorizations to the “General” group. Note that none of the users directly belong to this group, but its subgroups do.
If the Allow nested groups on AD group authorizations flag is enabled, both users will be found as members of the “General” group, because “Development” and “Management” belong to that group.
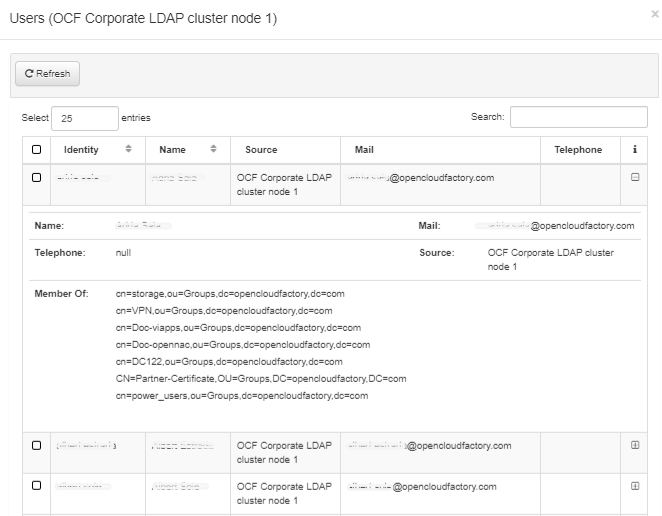
To visualize users details, select the desired UDS and click on the View users button. From this view you can expand the user information for each identity:
You can also modify the configuration of a User Data Source (Edit), check its status (Check Status), and refresh the view (Refresh) using the operational buttons. Simply select the UDS you wish to interact with and click the appropriate button.
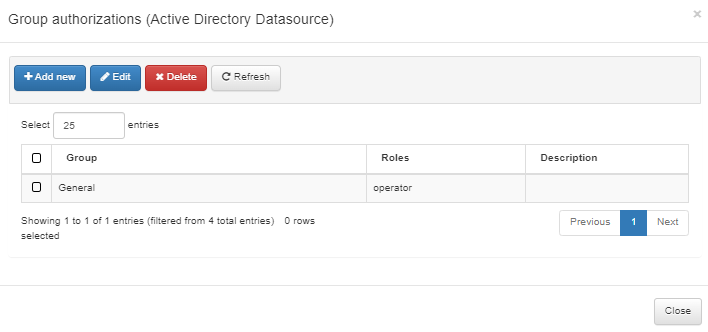
3.1.6.8.2. Group Authorizations
This view also allows managing group authorizations by using local groups and assigning them to authorized administration roles. You can also use Active Directory Groups; this allows us to delegate administration portal identities and profiles to any Active Directory Group.
To create a User role based on AD groups, select the desired UDS and then click on the Manage group authorizations button. A pop-up window will display fields for configuring different groups and associate a role with them.
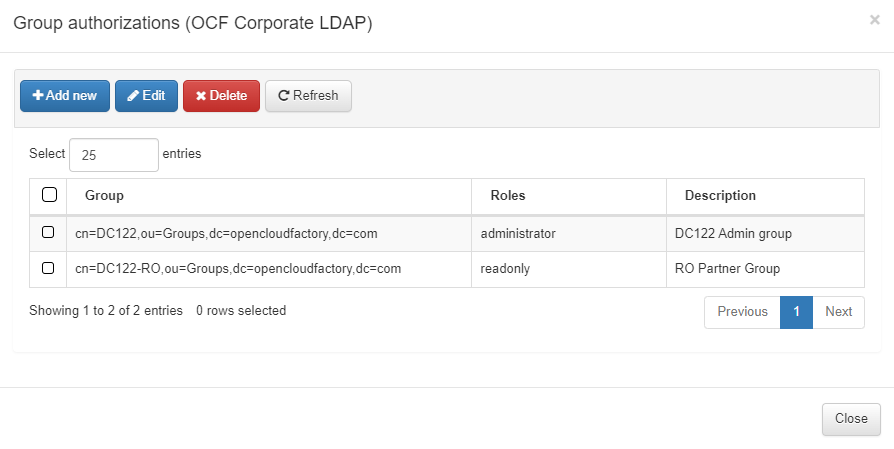
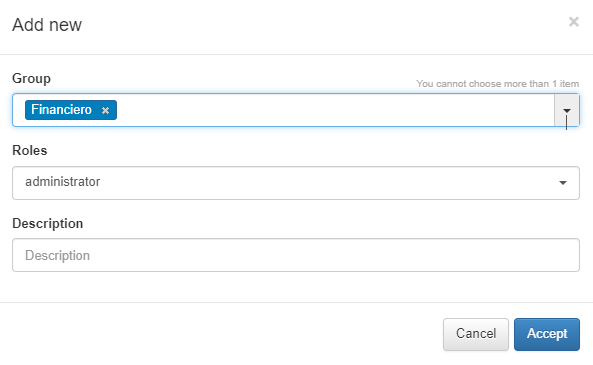
To add a new group authorization, click on the Add new button. In the pop-up window, select the AD group and associate a role or multiple roles and set a description.
Note
If you are using LDAPS to contact the UDS (Enable LDAPS), please check LDAPS configuration for your use case UNAC or BYOD.
Note
You can add a UDS within the Join Domain Wizard. For detailed instructions, see Join Domain Wizard.