3.1.6.8. User Data Sources
Multiple User Data Sources (UDS) can be defined on the OpenNAC Enterprise CMDB. This allows the system to use different authorities in the authorization process. AD attributes are used to be part of the authorization process.
By adding the ON Core into the domain and configuring UDS, it is possible to define different authorization policies.

Some of the User Data Sources that can be defined are the following:
LocalDB: This is a local database based on MySQL.
Sample ldap: This is a local ldap service that can be used for proof of concepts, and is not recommended for productive environments.
Active Directory (optional): This is the connection established with the Active Directory.
LDAP Server.
External Database and many others.
You can check the UDS status, its connection details, and if it is enabled or disabled by clicking on the “+” button.
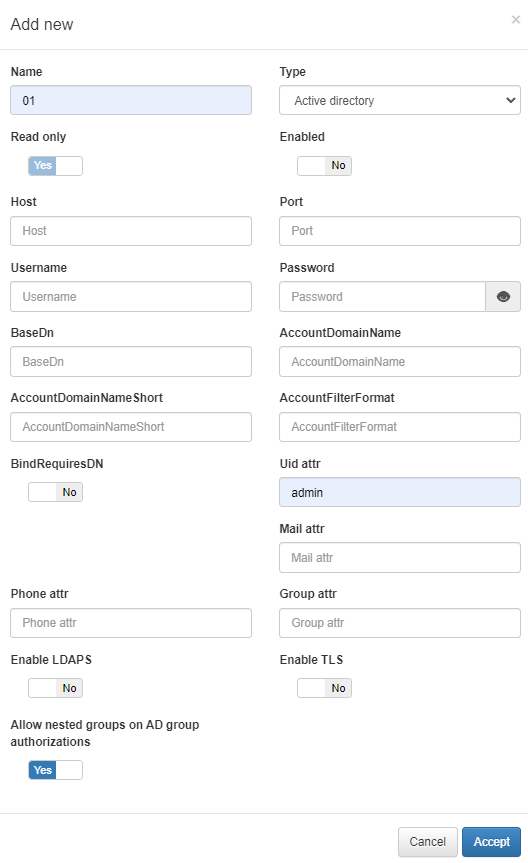
To add a new UDS, click on the Add new button. It will display a window in which we must fill in the following information:
Parameter |
Description |
|---|---|
Name |
The name used by the UDS. In this case, this is a UDS type LDAP/AD, and for this reason, for instance: AD Mycompany |
Type |
Defined as LDAP/AD. The database connection could be used to get user attributes. |
Read only |
If the query is launched with a Read only flag. This will avoid any write action in the commands. |
Enabled |
The UDS can be enabled and disabled. |
Host |
The LDAP/AD IP where the queries are launched. For instance: 172.16.11.5, additional IPs can be added. |
Port |
The port used for the AD/LDAP Search query, by default, uses an unsecured connection. The default is 389 and if AD/LDAP SSL is enabled is 636. |
Username |
The user registered in the AD/LDAP server. This allows us to bind and use AD/LDAP information. For instance, the user created the picture in the active directory in Step 1. |
Password |
The password for the AD/LDAP binding. |
Base DN |
BaseDN at the top of the domain name structure. Our domain is named mycompay.local and its BaseDN is DC=mycompany,DC=local. |
AccountDomainName |
The DNS name for the domain is in uppercase. In this case MYCOMPANY.LOCAL. |
AccountDomainName Short |
The short name for the domain or commonly named NETBIOS name. For instance, MYCOMPANY. |
AccountFilterFormat |
The attribute used to select users. We have included two options, but**only one must be used**. In this example sAMAccountName=%s is defined for Active Directory, and uid=%s for LDAP Servers. |
Bindrequires DN |
It is basically the credential you are using to authenticate against an LDAP. When using a bindDN, it usually comes with a password associated with it. Sometimes, anonymous binding doesn’t allow certain types of actions. |
Uid attr |
The attribute is used to identify users’ IDs. The filter changes depending on if AD or LDAP is used. |
Mail attr |
The filter is used to identify the mail as an attribute of the user. |
Phone attr |
The filter is used to identify the phone number as an attribute of the user. |
Group attr |
The filter use to identify the groups as an attribute of the user. |
Enable LDAPS |
For authenticating and authorizing users where LDAP communication is transmitted over an SSL tunnel port 636 TCP. |
Enable TLS |
For securing communication between LDAP clients and LDAP servers. |
Allow nested groups on AD group authorizations |
* Flag that controls whether subgroup memberships within AD groups are considered for access permissions |
* Regarding the usage of the Allow nested groups on AD group authorizations flag, understand the following example:
If we have the subgroups “Development” and “Management” inside the group “General”:
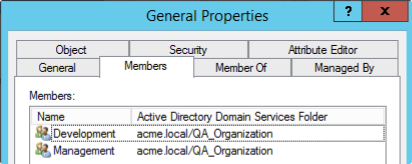
And we have the users “Developer QA” and “Manager QA” that belong to these subgroups:
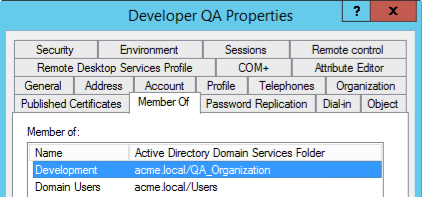
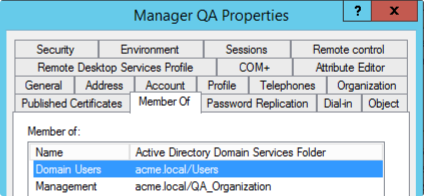
Then, we configure the Group authorizations to the “General” group. Note that none of the users directly belong to this group, but its subgroups do.
If the Allow nested groups on AD group authorizations flag is enabled, both users will be found as members of the “General” group, because “Development” and “Management” belong to that group.
3.1.6.8.1. Role based in AD Groups
We can also manage group authorizations by using local groups and assigning them to authorized administration roles. You can also use Active Directory Groups; this allows us to delegate administration portal identities and profiles to any Active Directory Group.
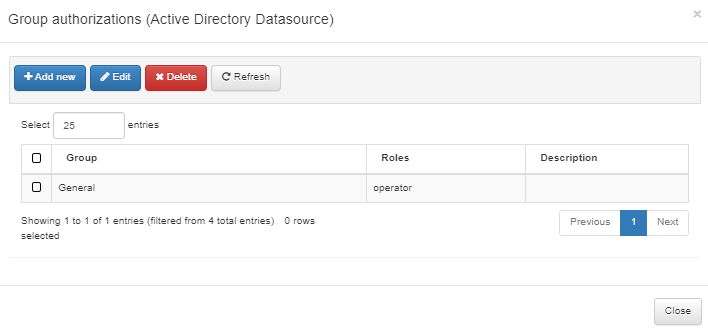
To create a User role based on AD groups, right-click the desired UDS and then click the Manage group authorizations button. A pop-up window will appear where we will be able to define the different groups and associate a role with them.
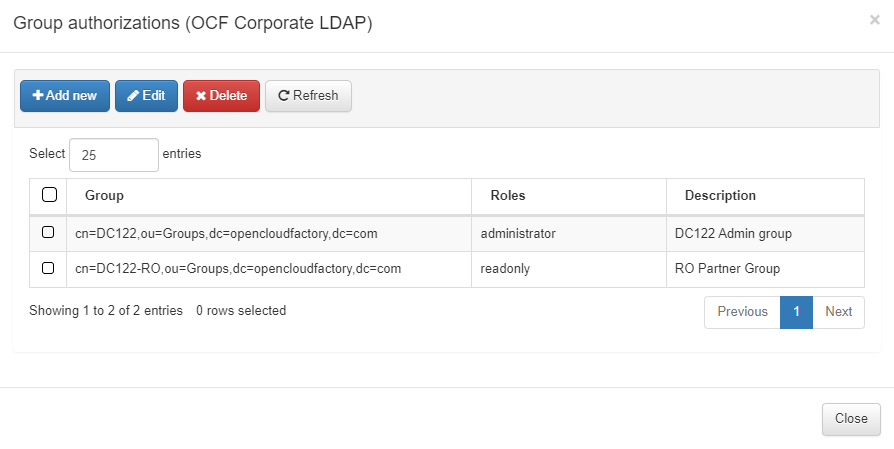
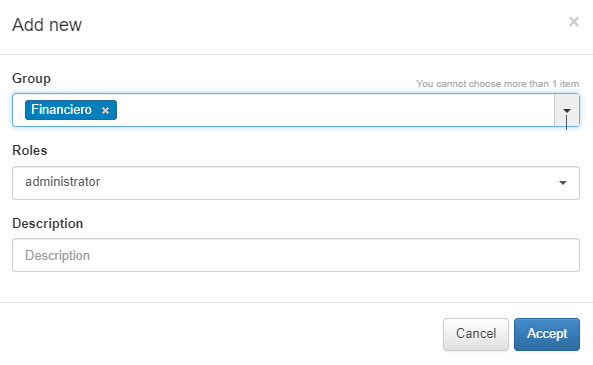
To add a new group authorization, click on the Add new button. In the pop-up window, we will be able to select the AD group and associate a role or multiple roles and set a description.
3.1.6.8.2. Previous steps when LDAPS or TLS enabled
To connect to the server using ssl, we need to trust the certificate issued.
If ssl is not yet activated in the AD server, the following tutorial may be helpful to enable it:
http://www.javaxt.com/Tutorials/Windows/How_to_Enable_LDAPS_in_Active_Directory
Install the ca-certificates package:
dnf install ca-certificates
Enable the dynamic CA configuration feature:
update-ca-trust enable
To get the public root CA, we can use the following command in order to view the Active Directory certificate information, where “server” is the FQDN or IP server:
openssl s_client -showcerts -connect server:636 </dev/null | openssl x509 -text -noout
With that information, we could obtain the URL to download the CA certificate based on the “Authority Information Access: CA Issuers” section. If the previous command does not work, we can ask for a public certificate file from the administrators. The file would have to look like the one shown below:
-----BEGIN CERTIFICATE-----
MIIDWTCCAkGgAwIBAgIQG5sNj3OqU69C1kh4+Z6oMzANBgkqhkiG9w0BAQ0FADA/
MRUwEwYKCZImiZPyLGQBGRYFbG9jYWwxFDASBgoJkiaJk/IsZAEZFgRhY21lMRAw
DgYDVQQDEwdhY21lLUNBMB4XDTE5MTAyMTE0NTMzNVoXDTI0MTAyMTE1MDMzNVow
PzEVMBMGCgmSJomT8ixkARkWBWxvY2FsMRQwEgYKCZImiZPyLGQBGRYEYWNtZTEQ
MA4GA1UEAxMHYWNtZS1DQTCCASIwDQYJKoZIhvcNAQEBBQADggEPADCCAQoCggEB
ALOTvg/OcABHWMLhfHivGRptpbr7K0afOiPAejEqnrdE75zINM21VaLD+wIOoB4f
sQQTWu7GKPRoTzCEzh1oaqw9usiyDAiXMohi9plxIvg6ueJDBAoLnUBo8emIzWzA
4ZZT7kYNvhUcTjQWtuZL3tBa/vHW5eb5tsXg3GKZJoQyvyDeZw8Q+aY66AQR9/N8
GHPmSLP68us4Hs4YiMw4zEQvGjeV7w6o3mvA+6Q4RAeKVzL5ovr6cws46iMN0wW1
le3RkAidbnLzAq8WnyePxtt0UXywwZzAi2HsSkYvXJjj9HxcD9ycXcfThAJ/GgDM
jyJ4iE6Vuhb/ddZGlr3mavcjdirejdclpE8wCwYDVR0PBAQDAgGGMA8GA1UdEwEB
/wQFMAMBAf8wHQYDVR0OBBYEFMchuxqQkdel/jKewzF5zv+N5N9LMBAGCSsGAQQB
gjcVAQQDAgEAMA0GCSqGSIb3DQEBDQUAA4IBAQBO+harKEtEfx7UsbKVHOgUlSK0
ijrGI9d7t+E7yC/2xkNE/CNwiZuoSZOcotftoTSwQgzdfr5Ck4ZEv8LbWmq0fscz
4e52yjkI8yqY+4KF/YPUvO4xcjmRPVpatiNxPT2pX0GD4fABPlc3tzsNpQIZBi/4
A/vCXNlJuUaJLET++7RberkAI6vy6uH8yTYiiuhgvnKLs8Ao8W2Ur1n6BHyYR9WB
Qm7J9sO1ddbjvgEb6kQ/vSb8MtgX1wrNB5OZ6Cz/IzSWg1Yy0w73Z3hf2Yr93nQm
yvEdIK97JPv5Q5LnY9iw89yldVbEdj9Ee9lhDO2pGqhLwgCugkZjlaHmHl0W
-----END CERTIFICATE-----
Add it as a new file to /etc/pki/ca-trust/source/anchors/:
cp CACERT.crt /etc/pki/ca-trust/source/anchors/
Use command:
update-ca-trust extract
Note
Review Join Domain Wizard
During the Join Domain Wizard an UDS can be added.