4.6.5. Administration
The administration section focuses on advanced tasks related to the ongoing management and maintenance of the system covering more complex configurations and advanced features.
We will detail the steps to configure the system, preparing it to operate its Guest functionality.
Note
It is essential to have correctly deployed and configured the necessary nodes for this use case.
This section provides a step-by-step guide for creating and customizing a captive workflow, detailing the necessary policies for successful implementation. Here, you will find the following content:
Network Device Management:
Captive Configurations:
Guest Policies:
Network Device Management
4.6.5.1. Register Network Devices in the CMDB
The CMDB is the ON Core database. It stores, in an organized manner, all known data associated with each connection made on the network. This database contains information related to systems, infrastructure, networks, VLANs, security profiles, user devices, network devices, and more.
In this section of UNAC, we are primarily interested in network devices, such as switches, APs, AP controllers, etc.
Registering network devices in the CMDB allows you to customize the characteristics of each device so that the system can interact with them appropriately.
Note
If you want to register a predefined group of devices, refer to Bulk import of devices.
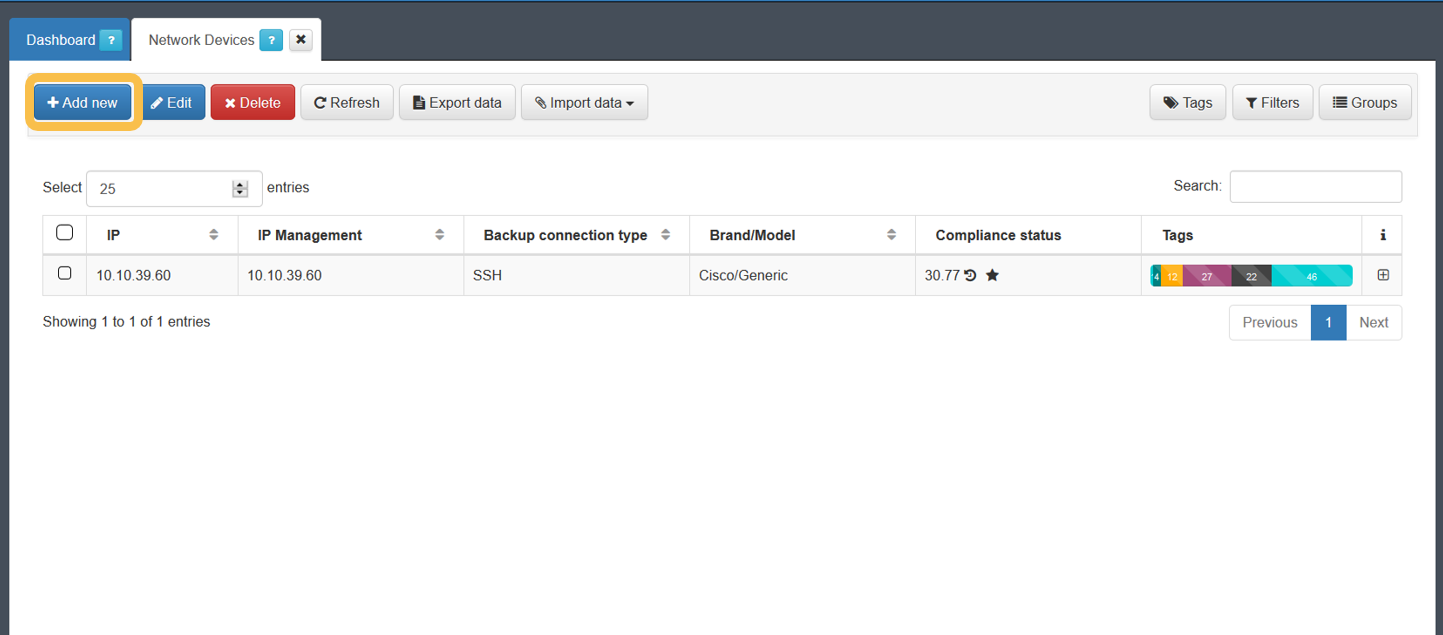
To register a new network device, navigate to the ON CMDB > Network Devices:
Note
If you do not perform any configurations, the default configuration defined in Configuration > Configuration Vars > NetDev will be used. The parameters in this section are the same as those available when configuring any of the devices.
Click on Add new to register a new device. The minimum required information that you must provide is outlined below.
General
The minimum fields required to configure within this tab are: IP, Hostname, and Brand/Model.
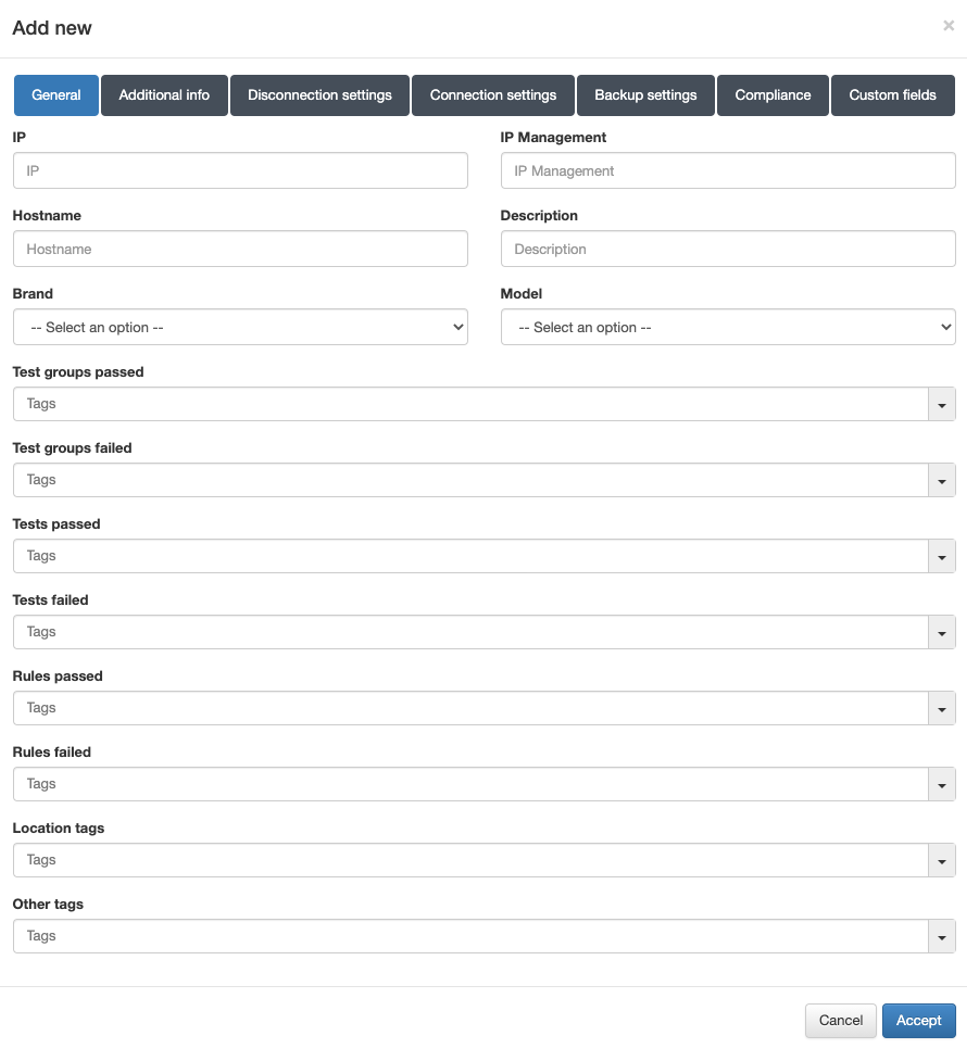
IP: IP address that identifies the device (used solely for identification in the device table).
Hostname: Hostname that identifies the device.
Brand / Model: Brand and model of the device.
Note
It is important to correctly define the brand and model since these will be used to determine the behavior of the system in terms of communication with these devices.
Disconnection settings
In the Disconnection settings tab, the configuration of the Toggle Port functionality is defined. This functionality allows you to force a disconnect from an authenticated session. For example, this allows you to carry out a re-evaluation of the policies in case they have been modified and apply VLANs, ACLs, etc., to the session.
There are two methods of session disconnection:
CoA (Change of Authorization): CoA is a RADIUS mechanism that disconnects a specific session without the need to modify the port status (enable/disable) of the network device.
SNMP: Using SNMP, the interface where the device has been authenticated is disabled and then enabled. This causes the device to re-authenticate and subsequently evaluate policies on the system.
Although both methods perform the same function and are equally valid, the use of SNMP is recommended.
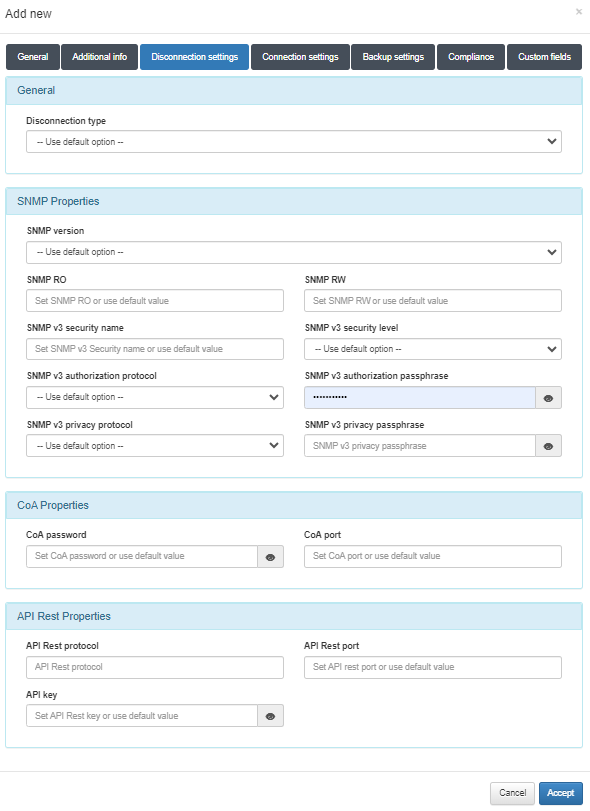
Disconnect type:
Use default option: The configuration defined in Configuration > Configuration Vars > NetDev will be applied.
CoA: Use of CoA to perform session disconnections.
SNMP: Use of SNMP to perform session disconnections.
SNMPProperties
SNMP version: Version used for SNMP messages. The required attributes for each of the versions are:
V1 (not recommended):
SNMP RO: SNMP community with read permissions.
SNMP RW: SNMP community with write permissions.
V2c:
SNMP RO: SNMP community with read permissions.
SNMP RW: SNMP community with write permissions.
V3 (recommended):
SNMP v3 Security name: SNMP username.
SNMP v3 Security level: Security level (noAuthNoPriv/authNoPriv/authPriv).
Depending on the selection, it will be necessary or not to configure some of the following attributes.
SNMP v3 Authorization protocol: Authorization protocol (MD5/SHA).
SNMP v3 Authorization pass phrase: Password for authorization.
SNMP v3 Privacy protocol: Privacy protocol (DES/AES).
SNMP v3 Privacy pass phrase: Password for privacy.
CoAProperties
CoA password: Password defined in the network device to authenticate CoA requests.
CoA port: Port used for communication. (Usually 3799).
After completing all the necessary information, click on the Accept button to save the configured network device.
For bulk-importing devices, refer to the UNAC use case section.
Captive Configurations
4.6.5.2. Configuring Captive Sponsors
The primary role of a sponsor is to validate requests from users who want to register through a captive workflow. When a user goes through a workflow that requires sponsor email validation, a validation email will be sent to all configured sponsors. Sponsors must then approve the user’s request, granting them access to the network.
Navigate to the ON Captive > Captive sponsors section, to add, remove, or edit sponsors.

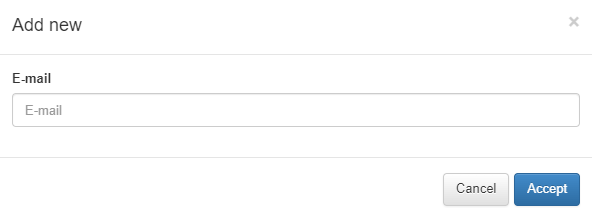
To add a new sponsor, click the Add new button. A pop-up window will appear, where you can enter the desired email. After entering the email, click Accept.
4.6.5.3. Creating Captive Workflows
A workflow is an authentication process that can be configured in the ON Captive > Captive workflows section.
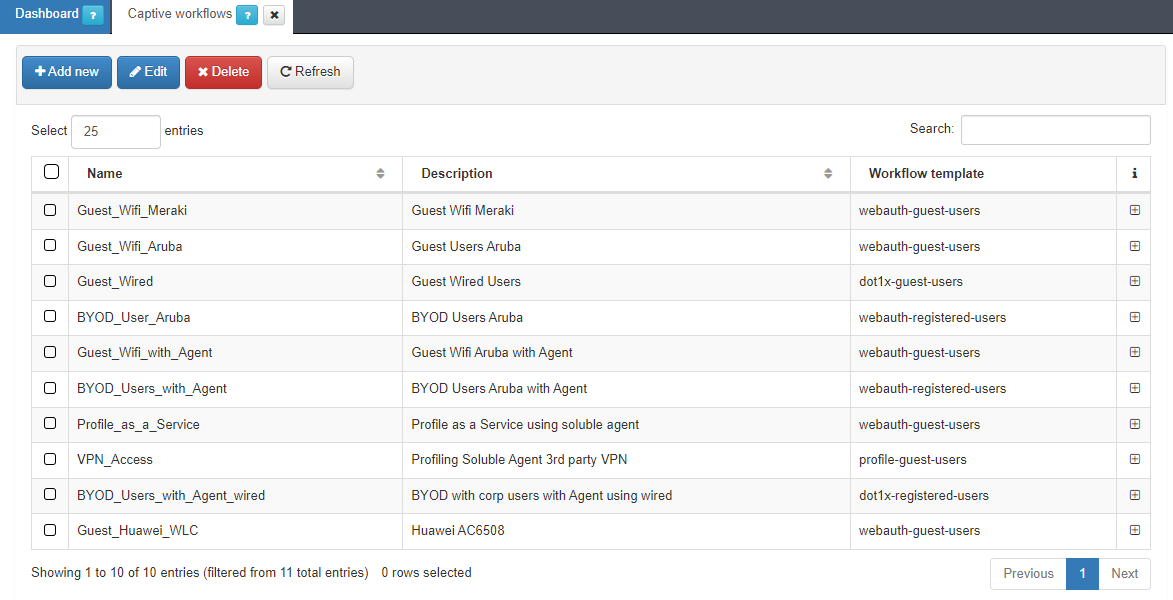
To add a new workflow, click the Add new button.
You will see five different templates available:
Two of them are Guest templates, one wired (dot1x-guest-users) and the other Wi-Fi connections (webauth-guest-users).
4.6.5.3.1. Wired Guest Workflow
To create a wired workflow, the following parameters are required:
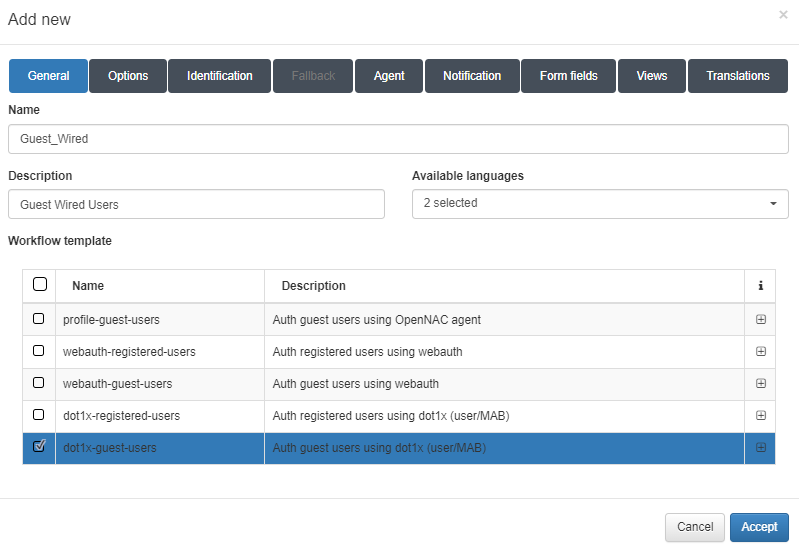
General tab
Name: Name of the workflow.
Description: Workflow description.
Available languages: Select all languages in which the workflow can be displayed.
Template: Workflow template. There are two templates for the Guest use case, one for wire and the other for Wi-Fi. We will also find two templates for the BYOD use case, one for wire and the other for Wi-Fi. And finally, we will find one for the OpenNAC Agent.
In this example, we have chosen the dot1x-guest-users template to create a wired workflow for a Guest use case.
Options tab
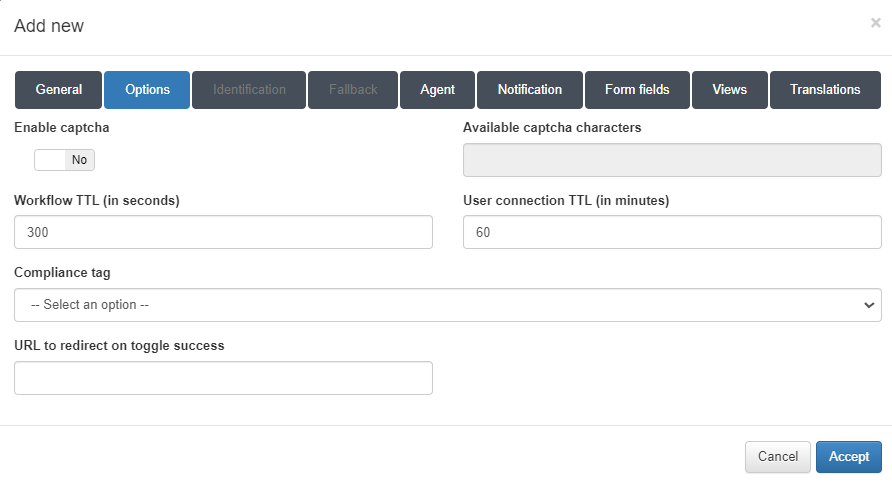
Enable captcha: Allows the option to enable a captcha within the workflow
Available captcha characters: Specifies the characters that can appear in the captcha.
Workflow TTL (in seconds): The time limit, in seconds, for the workflow’s duration.
User connection TTL (in minutes): The maximum duration, in minutes, for a user’s connection.
Compliance tag: A tag that must match to grant network access. If the tag does not match, the user will be informed of the reason for access denial.
URL to redirect on toggle success: The URL to which the registered user is redirected once the workflow is completed.
Identification tab
There are two types of configurations available: E-mail and SMS.
1. For the E-mail type, the following parameters can be configured:
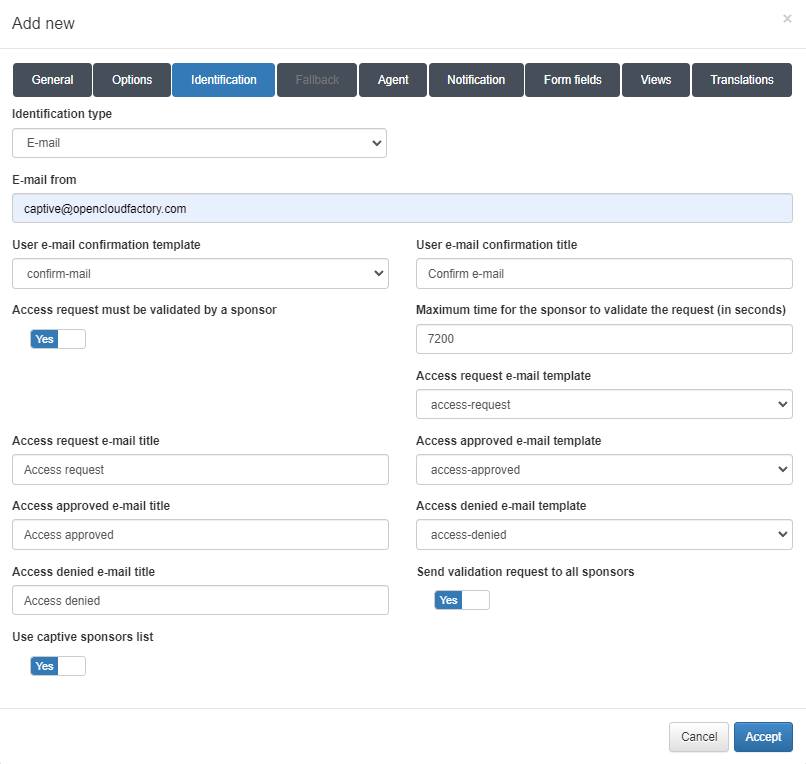
Identification type: Specifies the type of identification, in this case, E-mail.
E-mail from: The e-mail address that will send the message to the user.
User e-mail confirmation template: Template used for the confirmation e-mail.
User e-mail confirmation title: Subject line for the confirmation e-mail.
Access request must be validated by a sponsor: Enables sponsor validation for the access request.
Maximum time for the sponsor to validate the request (in seconds): The amount of time the sponsor has to validate the access request.
Access request e-mail template: Template used for the access request e-mail.
Access request e-mail title: Subject line for the access request e-mail.
Access approved e-mail template: Template used for the access approval e-mail.
Access approved e-mail title: Subject line for the access approval e-mail.
Access denied e-mail template: Template used for the access denial e-mail.
Access denied e-mail title: Subject line for the access denial e-mail.
Send validation request to all sponsors: Enables sending the validation request to all sponsors. If disabled, a sponsor field will appear in the* Form Fields* tab.
Use captive sponsors list: Enables the use of the sponsor list found in On Captive > Captive Sponsors. If not enabled, the following fields must be completed:
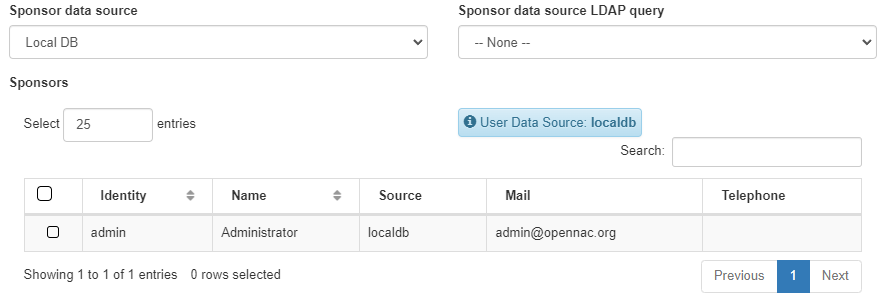
Sponsor data source: Source for the sponsors list.
Sponsor data source LDAP query: LDAP query for the sponsors list source.
Sponsors: Sponsors that can validate the E-mails.
2. For SMS two-factor authentication, the following parameters can be configured:
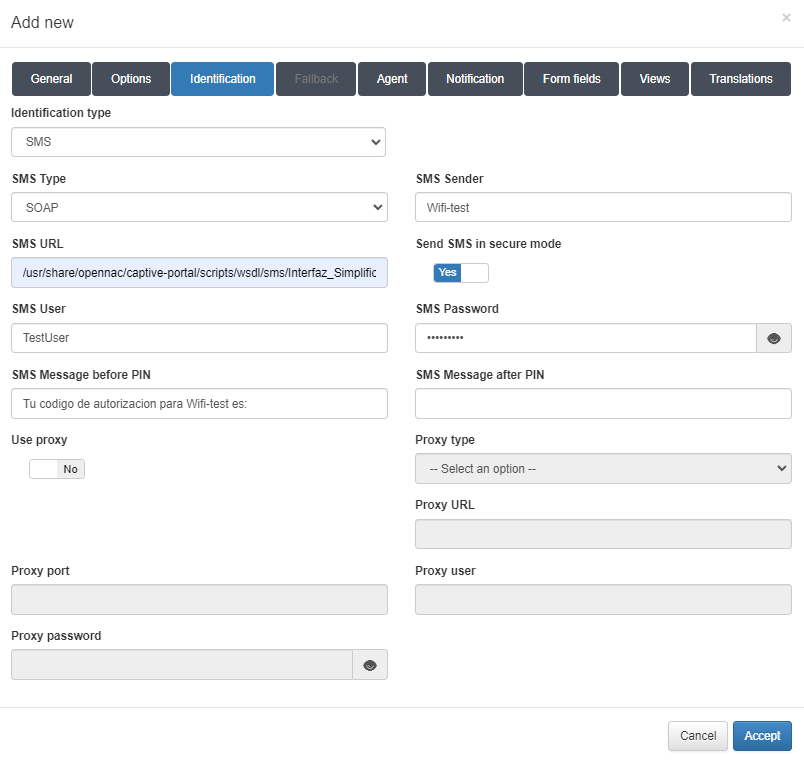
Identification type: Specifies the type of identification, in this case, SMS.
SMS Type: The type of SMS service.
SMS Sender: The sender that will send the SMS.
SMS URL: The URL of the SMS service.
Send SMS in secure mode: Enables sending the SMS in secure mode.
SMS User: Username for the SMS service.
SMS Password: Password for the SMS service user.
SMS Message before PIN: Text that appears before the PIN in the message.
SMS Message after PIN: Text that appears after the PIN in the message.
Use proxy: Enables the use of a proxy and activates the proxy fields.
Proxy type: Selects the type of proxy, either HTTP or HTTPS.
Proxy URL: URL of the proxy server.
Proxy port: Port number used by the proxy.
Proxy user: Username for the proxy.
Proxy password: Password for the proxy user.
Agent tab
In this tab, you can enable the Agent for the workflow.
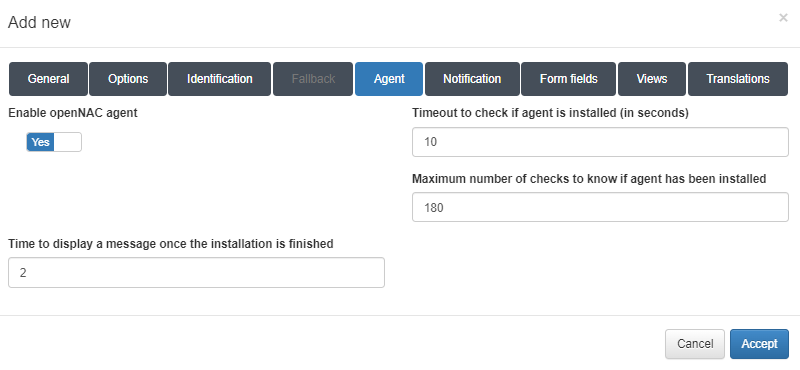
Enable OpenNAC agent: Activates the ON agent.
Timeout to check if agent is installed (in seconds): The timeout period for checking if the agent is installed.
Maximum number of checks to know if agent has been installed: The maximum number of checks to confirm agent installation.
Time to display a message once the installation is finished: The duration for which a message will be displayed upon completion of the installation.
Notification tab
In this tab, you can enable notifications for the user.
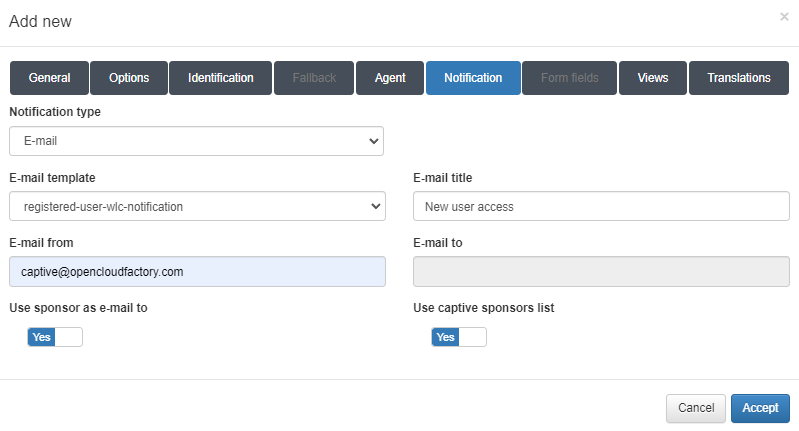
Notification type: The type of notification.
E-mail template: The template for the email notification.
E-mail title: The subject line for the email.
E-mail from: The sender’s email address.
E-mail to: The recipient’s email address.
Use sponsor as e-mail to: Enables sending the notification to the sponsors.
Use captive sponsors list: EEnables the use of the sponsor list in On Captive > Captive Sponsors. If this option is not enabled, the following fields must be filled out:

Sponsor data source: The source for the sponsors list.
Sponsor data source LDAP query: The LDAP query for the sponsors list source.
Sponsors: The sponsors who can validate the emails.
Form fields
In this tab, you can create forms that request fields in the workflow.
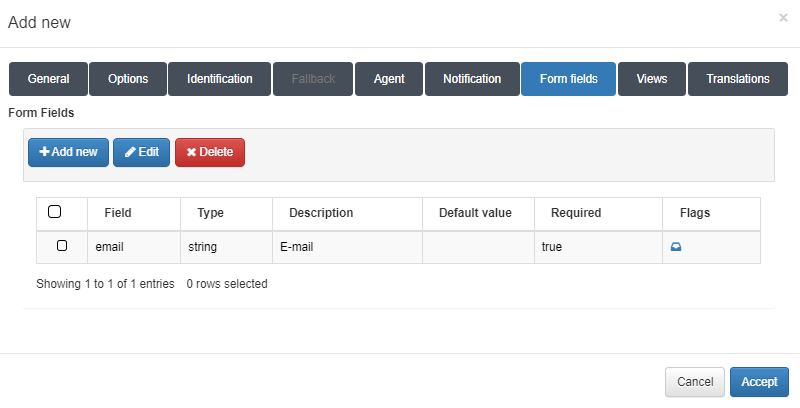
To add a new form, click on the Add new button:
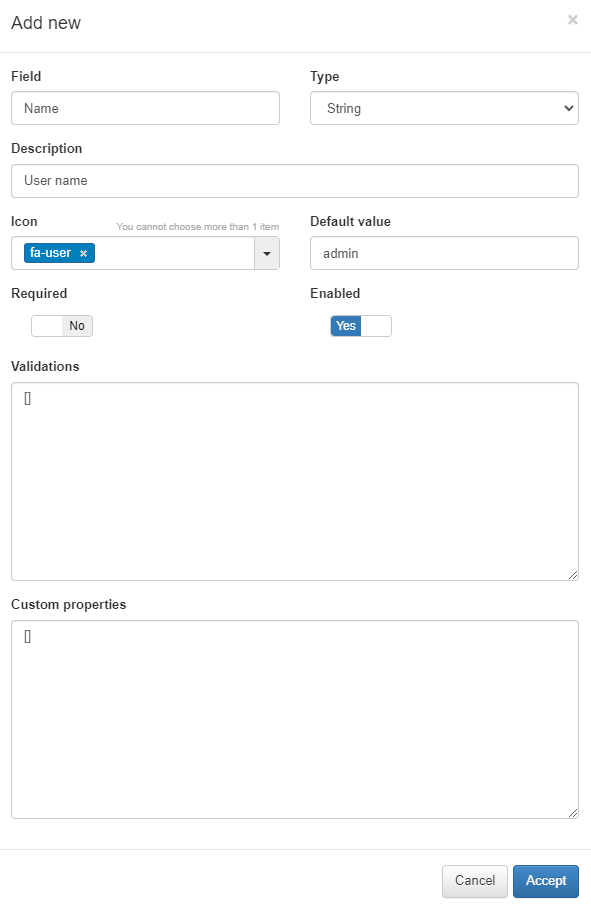
Field: The name of the field.
Type: This pop-up menu contains a set of data types corresponding to the form field being created. The selected type must match the type of information provided by the user. For example, if the information is a username, the type must be String. If the information is a password, then the type must be Password, and so on.
Description: A meaningful description of the purpose of the form field.
Icon: The icon image that will be displayed in the Flags column of the form field. This helps users quickly identify the corresponding type of information.
Default value: The default information to be displayed in the field.
Required: Specifies whether this form field must be filled out by the user.
Enabled: Indicates whether the form field is enabled and will be displayed on the authentication screen along with other fields.
Validations: The type of validation to be performed by the ON Captive module during the authentication process to ensure that the information entered matches the expected input for this particular form field.
Custom properties: Specific additional properties that may be necessary for validating certain types of submitted data and/or for further verification.
Views tab
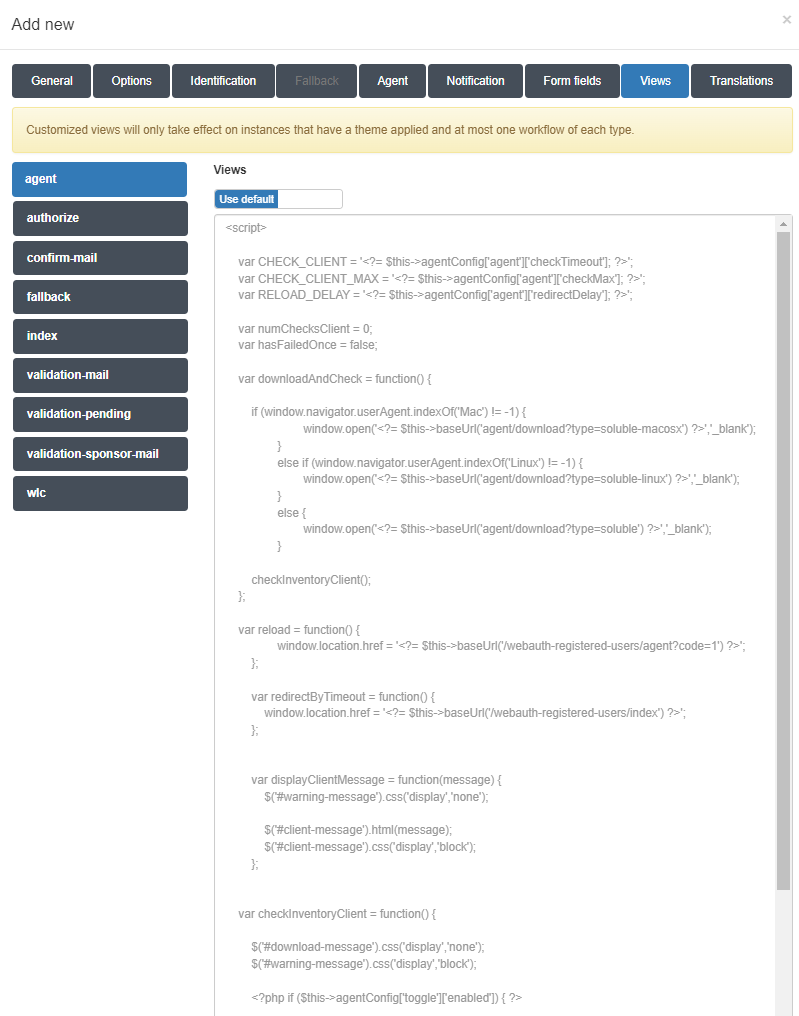
This tab allows the insertion of custom code that changes the presentation layer behavior of the Captive Portal web elements according to the specific needs of the customer.
To allow the insertion of code for each view, switch the flag, which is set to Use Default by default. This will change to Set Custom, allowing you to insert the custom view code.
Translations tab
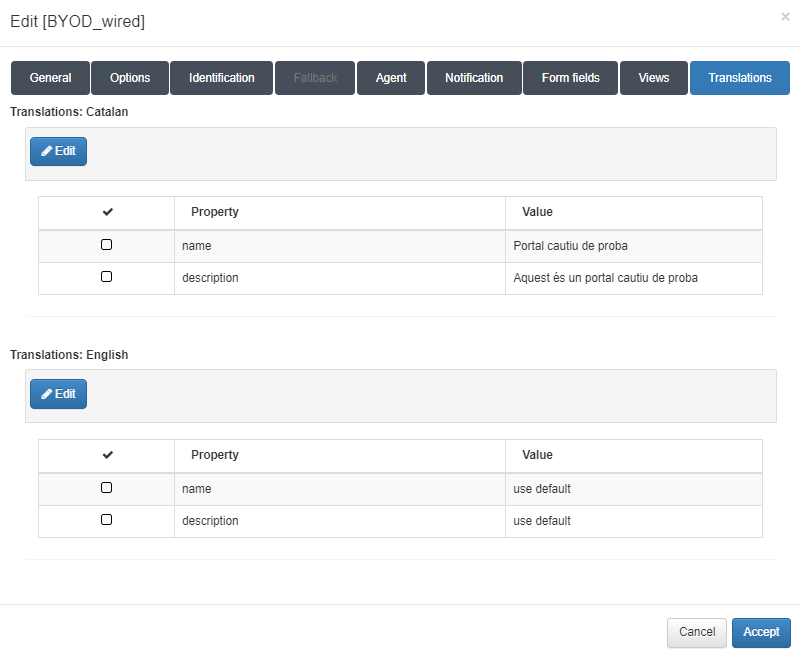
This tab permits adding translations for the workflow name and description in the workflow presentation. The languages available are those selected in the General tab.
4.6.5.3.2. Wireless Guest Workflow
To create a wireless workflow, the following parameters are required:
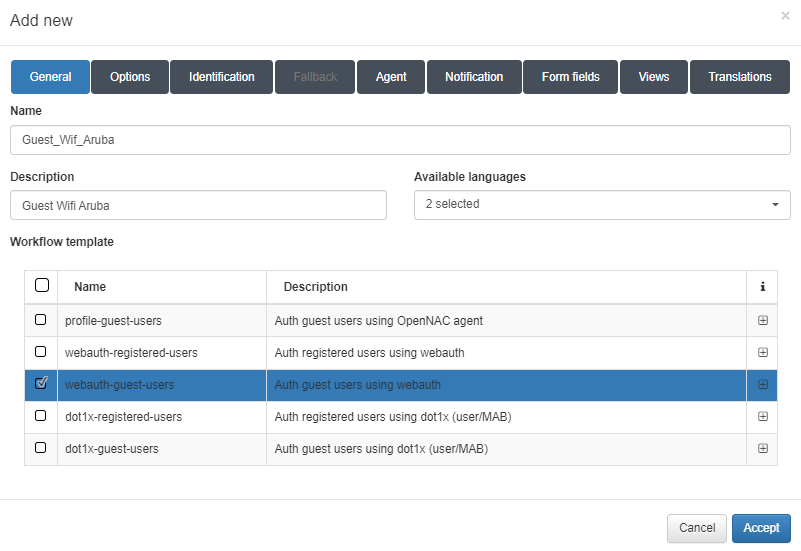
General tab
Name: Name of the workflow.
Description: Workflow description.
Available languages: Select all languages in which the workflow can be displayed.
Template: Workflow template. There are two templates for the Guest use case, one for wire and the other for Wi-Fi. We will also find two templates for the BYOD use case, one for wire and the other for Wi-Fi. And finally, we will find one for the OpenNAC Agent.
In this example, we have chosen the webauth-guest-users template to create a WiFi workflow for a Guest use case.
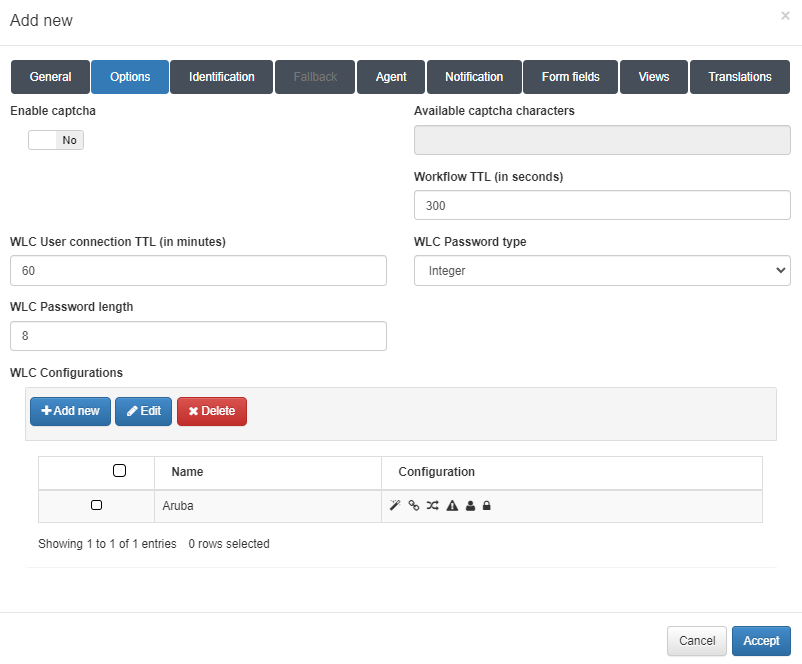
Options tab
Enable captcha: Allows the enabling of a captcha in the workflow.
Available captcha characters: All the characters in this field can be used in the captcha.
Workflow TTL (in seconds): The time limit, in seconds, for the workflow duration.
WLC User connection TTL (in minutes): The maximum duration, in minutes, for a WLC connection. This should be synchronized with the WLC TTL to avoid desynchronization.
WLC Password type: The type of WLC password.
WLC Password length: The length of the WLC password.
WLC Configurations:Configuration settings for the WLC type. To add a new configuration, click on the Add new button:
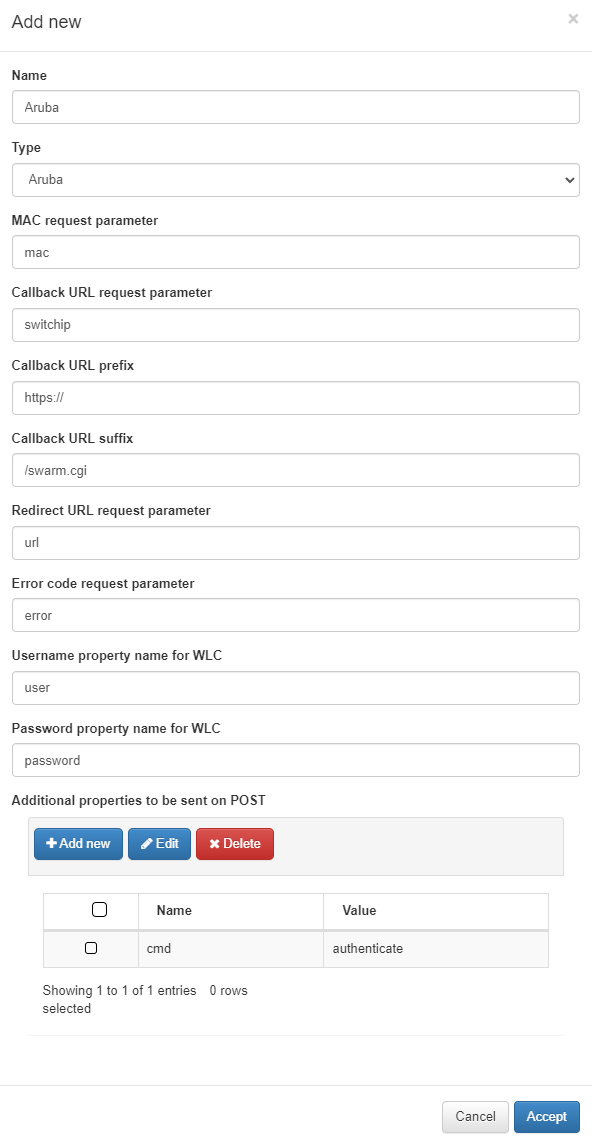
Name: The name for the WLC configuration.
Type: The type of configuration. You can select from three templates (Aruba, Cisco, and Meraki) or choose “Other” to insert a custom one.
MAC request parameter: Parameter for the MAC request.
Callback URL request parameter: URL for the request parameter callback.
Callback URL prefix: URL for the prefix callback.
Callback URL suffix: URL for the suffix callback.
Redirect URL request parameter: URL for the request parameter redirect.
Error code request parameter: URL for the request parameter error code.
Username property name for WLC: WLC username.
Password property name for WLC: Password for the WLC username.
Additional properties to be sent on POST: Allows you to add new properties to the POST request.
Identification tab
There are two types of configurations available: E-mail and SMS.
1. For the E-mail type, the following parameters can be configured:

Identification type: Specifies the type of identification, in this case, E-mail.
E-mail from: The e-mail address that will send the message to the user.
User e-mail confirmation template: Template used for the confirmation e-mail.
User e-mail confirmation title: Subject line for the confirmation e-mail.
Access request must be validated by a sponsor: Enables sponsor validation for the access request.
Maximum time for the sponsor to validate the request (in seconds): The amount of time the sponsor has to validate the access request.
Access request e-mail template: Template used for the access request e-mail.
Access request e-mail title: Subject line for the access request e-mail.
Access approved e-mail template: Template used for the access approval e-mail.
Access approved e-mail title: Subject line for the access approval e-mail.
Access denied e-mail template: Template used for the access denial e-mail.
Access denied e-mail title: Subject line for the access denial e-mail.
Send validation request to all sponsors: Enables sending the validation request to all sponsors. If disabled, a sponsor field will appear in the* Form Fields* tab.
Use captive sponsors list: Enables the use of the sponsor list found in On Captive > Captive Sponsors. If not enabled, the following fields must be completed:

Sponsor data source: Source for the sponsors list.
Sponsor data source LDAP query: LDAP query for the sponsors list source.
Sponsors: Sponsors that can validate the E-mails.
2. For SMS two-factor authentication, the following parameters can be configured:

Identification type: Specifies the type of identification, in this case, SMS.
SMS Type: The type of SMS service.
SMS Sender: The sender that will send the SMS.
SMS URL: The URL of the SMS service.
Send SMS in secure mode: Enables sending the SMS in secure mode.
SMS User: Username for the SMS service.
SMS Password: Password for the SMS service user.
SMS Message before PIN: Text that appears before the PIN in the message.
SMS Message after PIN: Text that appears after the PIN in the message.
Use proxy: Enables the use of a proxy and activates the proxy fields.
Proxy type: Selects the type of proxy, either HTTP or HTTPS.
Proxy URL: URL of the proxy server.
Proxy port: Port number used by the proxy.
Proxy user: Username for the proxy.
Proxy password: Password for the proxy user.
Agent tab
In this tab, you can enable the Agent for the workflow.

Enable OpenNAC agent: Activates the ON agent.
Timeout to check if agent is installed (in seconds): The timeout period for checking if the agent is installed.
Maximum number of checks to know if agent has been installed: The maximum number of checks to confirm agent installation.
Time to display a message once the installation is finished: The duration for which a message will be displayed upon completion of the installation.
Notification tab
In this tab, you can enable notifications for the user.

Notification type: The type of notification.
E-mail template: The template for the email notification.
E-mail title: The subject line for the email.
E-mail from: The sender’s email address.
E-mail to: The recipient’s email address.
Use sponsor as e-mail to: Enables sending the notification to the sponsors.
Use captive sponsors list: EEnables the use of the sponsor list in On Captive > Captive Sponsors. If this option is not enabled, the following fields must be filled out:

Sponsor data source: The source for the sponsors list.
Sponsor data source LDAP query: The LDAP query for the sponsors list source.
Sponsors: The sponsors who can validate the emails.
To add a new form, click on the Add new button:

Field: The name of the field.
Type: This pop-up menu contains a set of data types corresponding to the form field being created. The selected type must match the type of information provided by the user. For example, if the information is a username, the type must be String. If the information is a password, then the type must be Password, and so on.
Description: A meaningful description of the purpose of the form field.
Icon: The icon image that will be displayed in the Flags column of the form field. This helps users quickly identify the corresponding type of information.
Default value: The default information to be displayed in the field.
Required: Specifies whether this form field must be filled out by the user.
Enabled: Indicates whether the form field is enabled and will be displayed on the authentication screen along with other fields.
Validations: The type of validation to be performed by the ON Captive module during the authentication process to ensure that the information entered matches the expected input for this particular form field.
Custom properties: Specific additional properties that may be necessary for validating certain types of submitted data and/or for further verification.
Views tab
This tab allows the insertion of custom code that changes the presentation layer behavior of the Captive Portal web elements according to the specific needs of the customer.
To allow the insertion of code for each view, switch the flag, which is set to Use Default by default. This will change to Set Custom, allowing you to insert the custom view code.

Translations tab
This tab permits adding translations for the workflow name and description in the workflow presentation. The languages available are those selected in the General tab.

4.6.5.3.3. Profile-Based Workflow
To create a Profile-Based workflow, the following parameters are required:
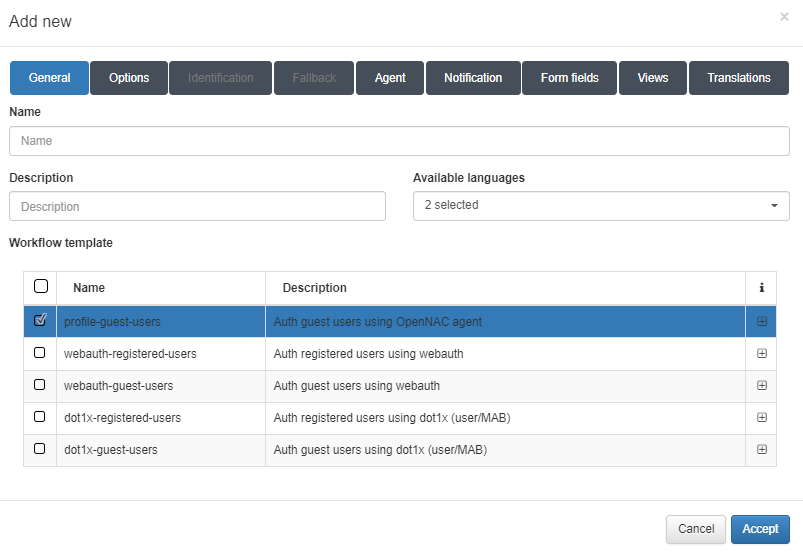
General tab
Name: Name of the workflow.
Description: Workflow description.
Available languages: Select all languages in which the workflow can be displayed.
Template: Workflow template. There are two templates for the Guest use case, one for wire and the other for Wi-Fi. We will also find two templates for the BYOD use case, one for wire and the other for Wi-Fi. And finally, we will find one for the OpenNAC Agent.
In this example, we have chosen the profile-guest-users template to create a WiFi workflow for a Guest use case using the ON Agent.
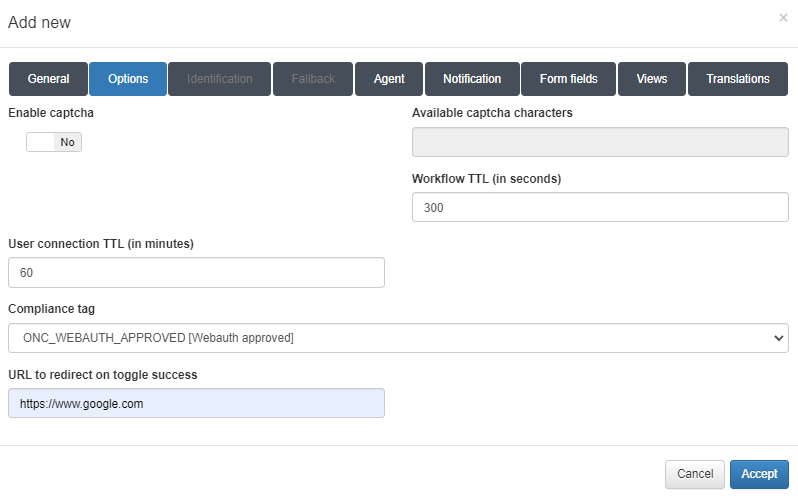
Options tab
Enable captcha: Enables the use of a captcha in the workflow.
Available captcha characters: Defines the characters that can appear in the captcha.
Workflow TTL (in seconds): Specifies the time limit for the workflow in seconds.
User connection TTL (in minutes): The maximum duration of a user connection in minutes.
Compliance tag: A tag that must match to grant network access. If the tag does not match, it will indicate why the user is denied access. The typical tag is* ONC_WEBAUTH_APPROVED*.
URL to redirect on toggle success: URL to redirect the guest to once the workflow is completed successfully.
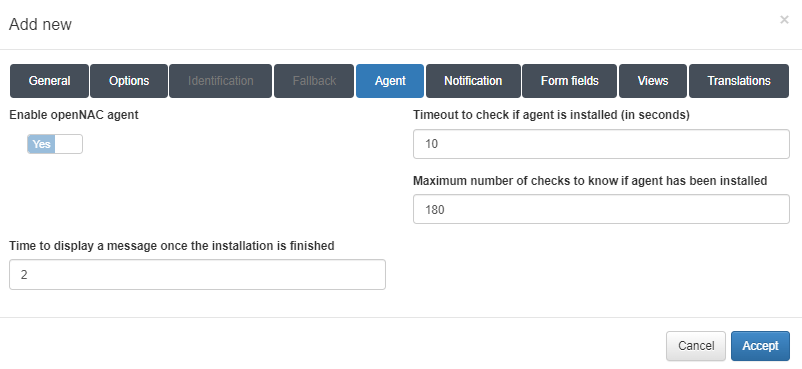
Agent tab
In this tab, you can enable the Agent for the workflow.
Enable openNAC agent: Enables the ON Agent.
Timeout to check if agent is installed (in seconds): Timeout to verify if the Agent is installed. Since the agent is critical for this workflow, this setting cannot be modified.
Maximum number of checks to know if agent has been installed: The maximum number of attempts to verify if the agent has been installed.
Time to display a message once the installation is finished: Duration for displaying a message after the installation is finished.
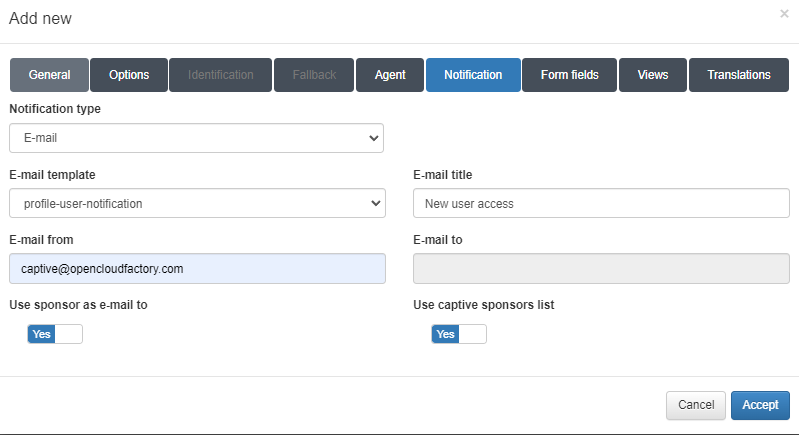
Notification tab
In this tab, you can enable notifications for the user.
Notification type: The type of notification.
E-mail template: The template for the email notification.
E-mail title: The subject line for the email.
E-mail from: The sender’s email address.
E-mail to: The recipient’s email address.
Use sponsor as e-mail to: Enables sending the notification to the sponsors.
Use captive sponsors list: EEnables the use of the sponsor list in On Captive > Captive Sponsors. If this option is not enabled, the following fields must be filled out:
Important
Note that email notifications require the postfix email delivery service to be properly configured.
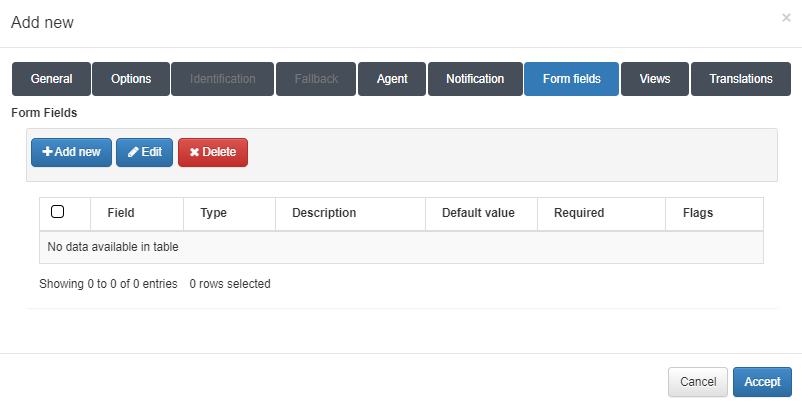
Form fields tab
In this tab, you can create forms that request fields in the workflow.
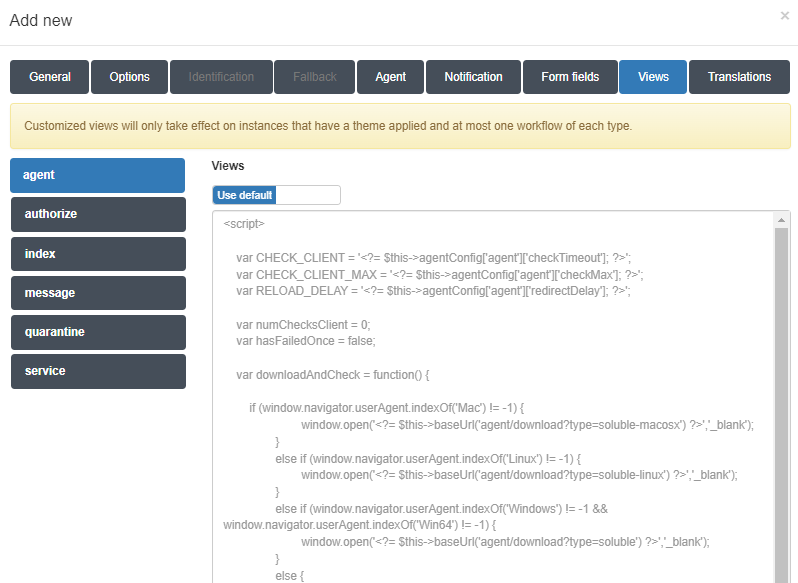
Views tab
This tab allows the insertion of custom code that changes the presentation layer behavior of the Captive Portal web elements according to the specific needs of the customer.
To allow the insertion of code for each view, switch the flag, which is set to Use Default by default. This will change to Set Custom, allowing you to insert the custom view code.
Translations tab
This tab permits adding translations for the workflow name and description in the workflow presentation. The languages available are those selected in the General tab.

4.6.5.4. Customizing Captive Themes
You can create and modify different themes that will affect the appearance of the Captive Portal web interface.
Navigate to ON Captive > Captive themes>

To create a new Captive theme, click the Add new button. By default, the window displays the configurations related to the General tab:
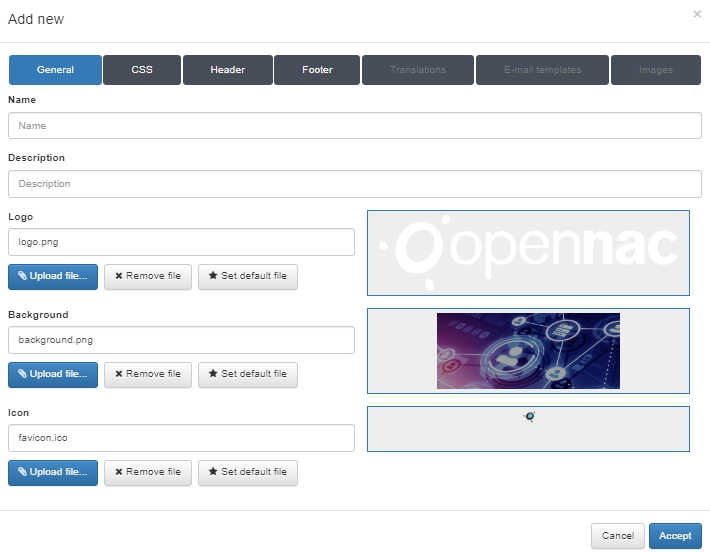
You can customize multiple parameters:
General
Name: Enter a name for this Captive theme.
Description: Provide a meaningful description of the theme.
Logo: Defines the .png image to be used as the logo for the theme. By default, this is set to the OpenNAC logo.
Background: Defines the .png image to be used as the background for the theme. By default, this is the OpenNAC background image.
Icon: Defines the .ico image used as the favicon for the theme. By default, the OpenNAC favicon is used. The favicon appears in the browser’s address bar.
There are three buttons available for each field that allow for changing the images:
Upload file: Allows you to upload the desired logo image. The preview will be displayed in the square next to the field.
Remove file: Removes the uploaded element.
Set default file: Sets the file as the default for future themes.
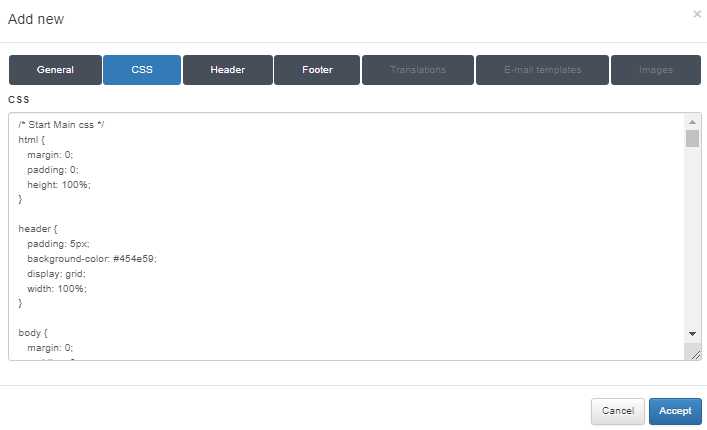
CSS
From this tab, you can insert custom CSS code to modify the look and feel of the Captive Portal.
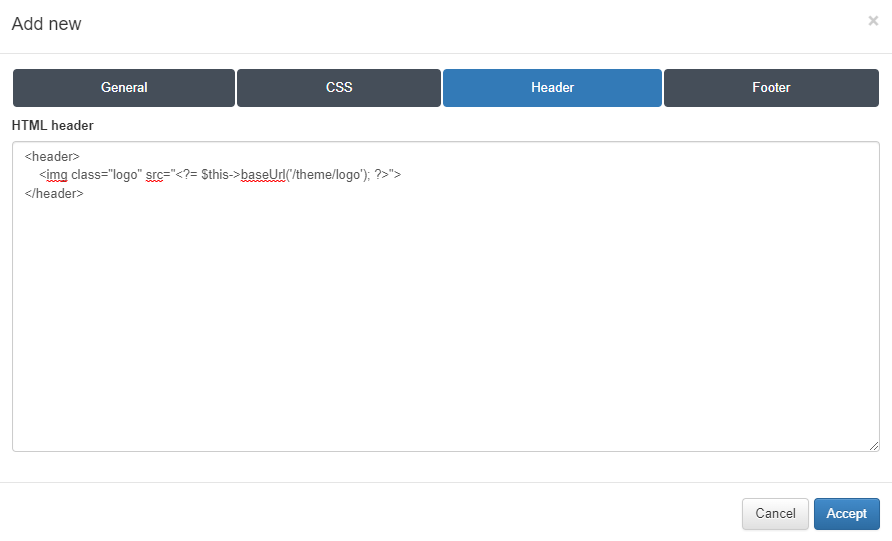
Header
From this tab, you can insert custom HTML code for the header of the Captive theme.
Footer
From this tab, you can insert custom HTML code for the footer of the Captive theme.
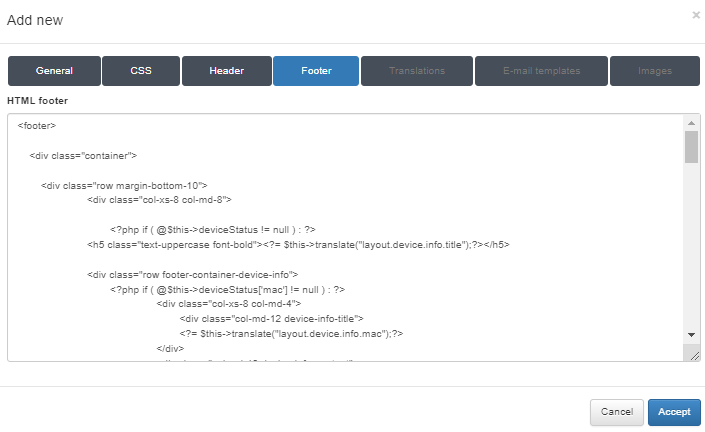
To complete the creation of the new Captive theme, click the Accept button.
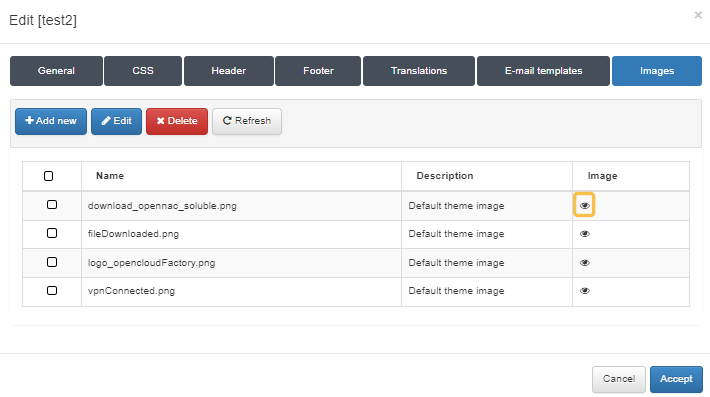
To upload images for the theme, you can select an already created theme and click the Set images button.
Once the pop-up window appears, you will see all the uploaded images. You can edit the existing images and preview them by clicking the eye icon.
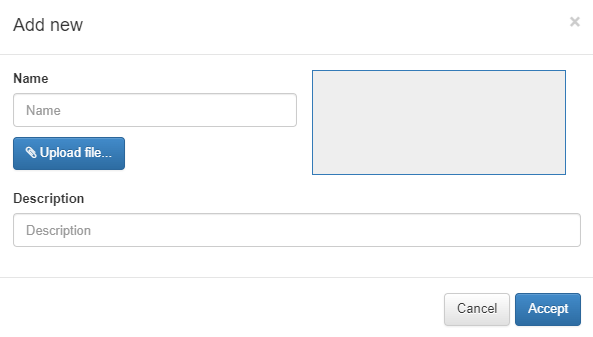
To upload a new image, click the Add new button. A dialogue will appear where you can name and describe the image and upload it.
Translations
You can also manage translations for the different Captive Portal workflows and sections. To do this, select a theme and click the Set translations button.
Once the pop-up window appears, you will see all the existing translations. You can edit them and preview the content by clicking the eye icon.
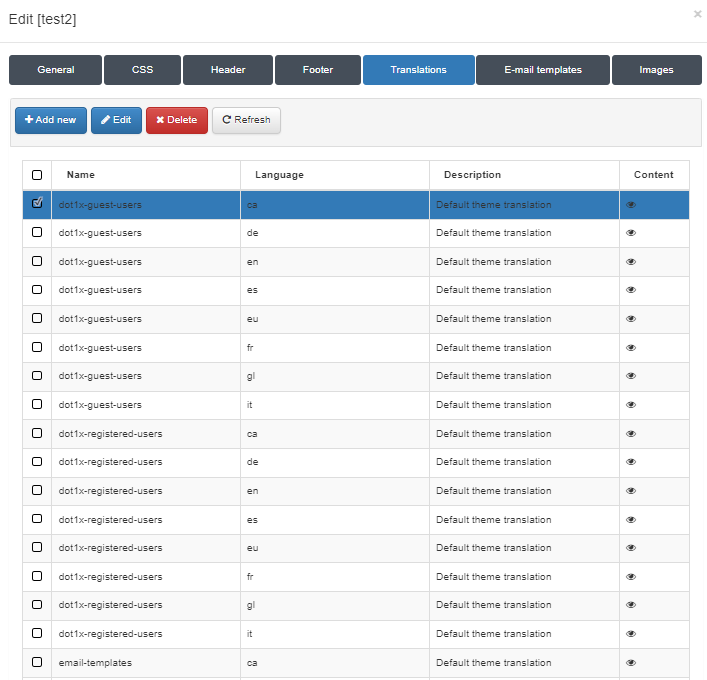
To translate a new section, click the Add new button.
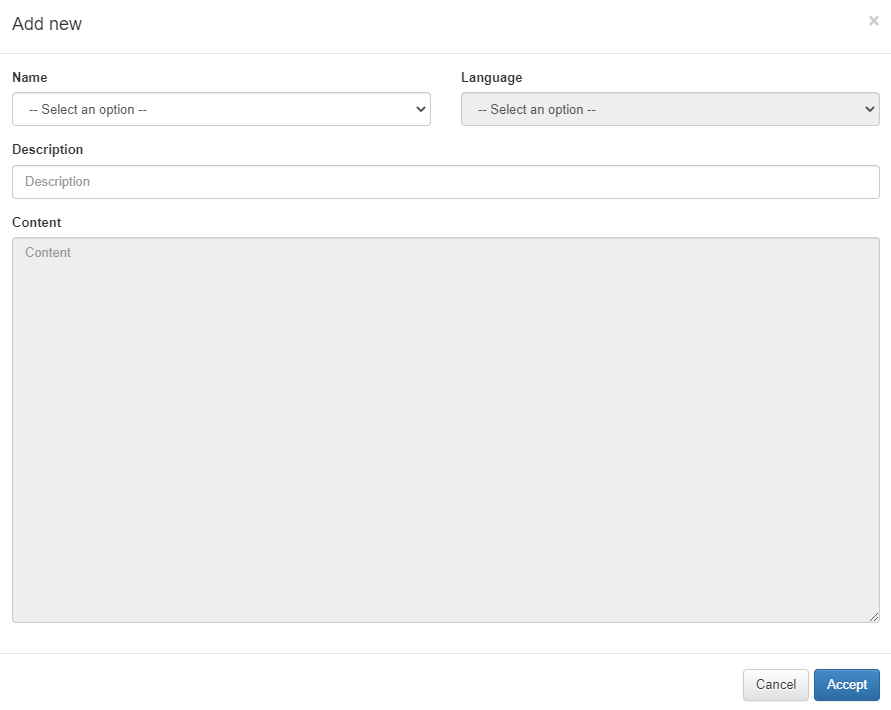
From the pop-up window, you can select a module to translate. The content and associated text will appear in the field, where you can input your translations. Then, select the language you are translating to and provide a description if necessary.
E-mail templates
You can also configure e-mail templates or modify existing ones by editing the HTML code used in emails sent from the Captive Portal workflows. To do this, select a theme and click the Set e-mail templates button.
Once the pop-up window appears, you will see all existing templates for the workflows. You can edit and preview them by clicking the eye icon.
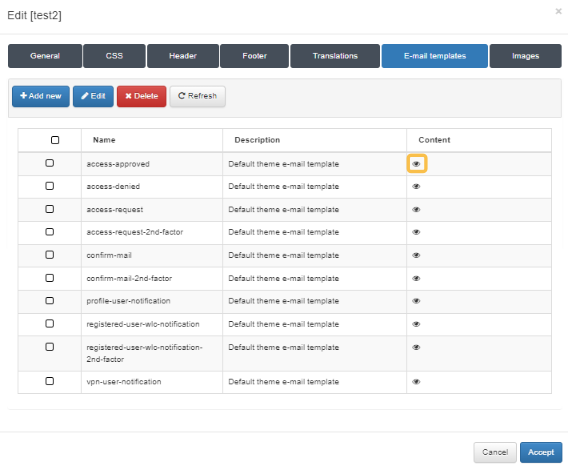
To configure a new email template, click the Add new button.
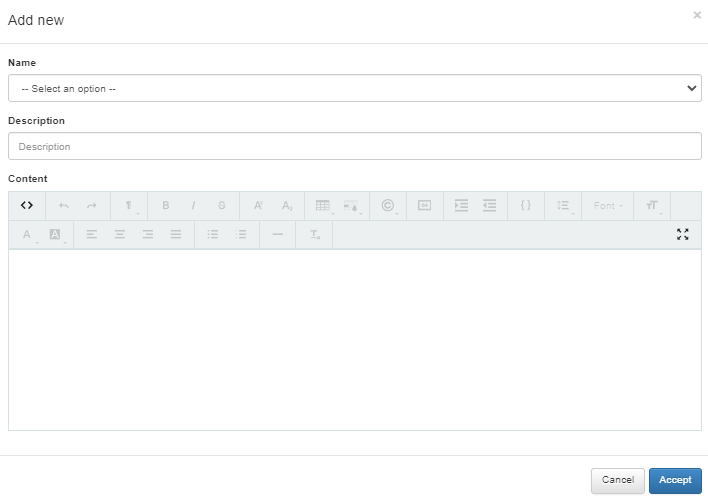
From the pop-up window, you can select a module to modify. You can then edit the module content in HTML format and add a description.
Apply themes
To apply the created theme to an instance, navigate to the instance in ON Captive > Captive instances and select the desired theme:
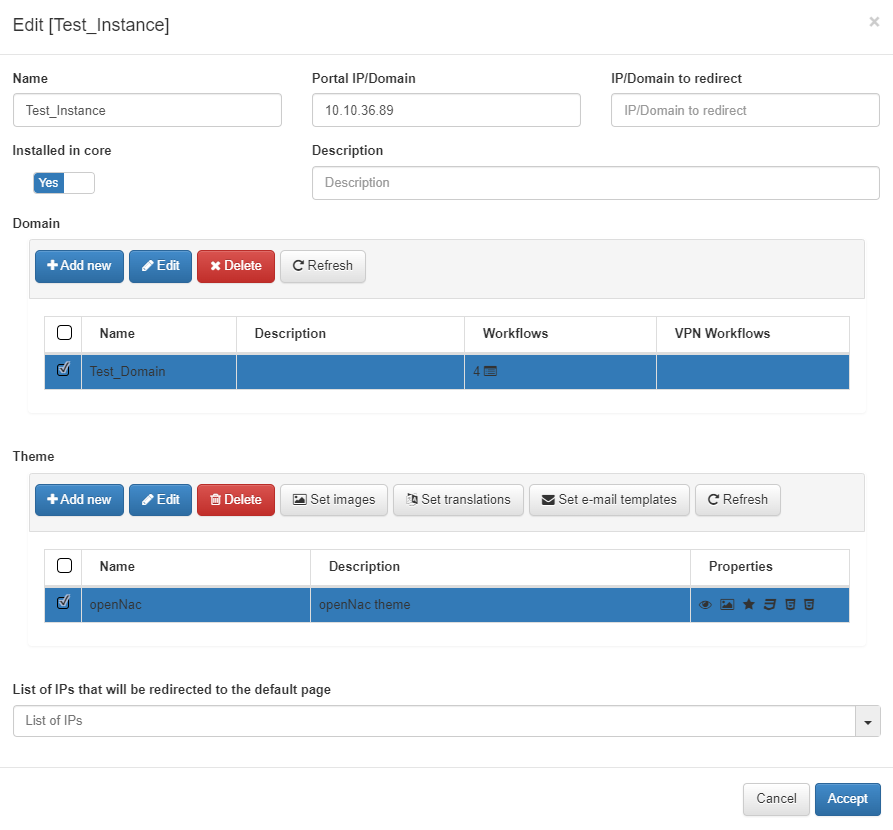
After applying the theme, navigate to the Captive Portal and refresh the browser to see the changes.
4.6.5.5. Creating Captive Instances
A Captive Instance is a customized deployment of the Captive Portal, designed to control user authentication and access for a specific network or user group. From this section you will associate workflows and themes to an instance.
Navigate to ON Captive > Captive instances to create a new instance:

To create a new Captive instance, click on the Add new button.
The following configurations must be completed to create a functional Captive Instance, based on the settings described in the previous sections:
General
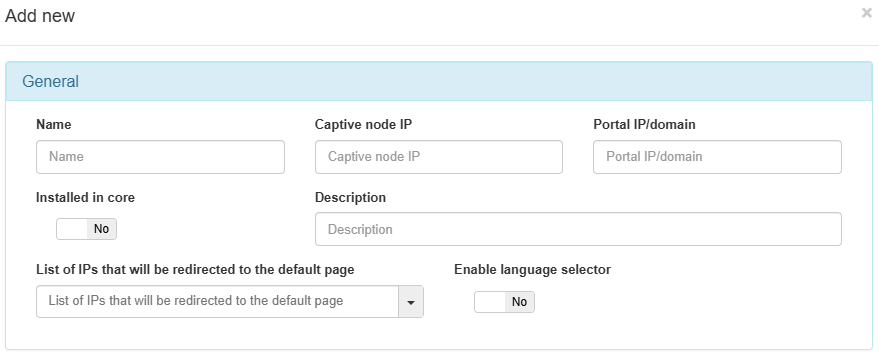
Name: The name of the new captive instance being created.
Captive node IP: The IP address for the Captive node. This field is required.
Portal IP/Domain: The IP address or FQDN of the server running the OpenNAC Enterprise Captive Portal. It can be the same IP of the ON Core server if the captive portal will be running on this server along with ON Core, or the address can be that of a standalone server dedicated to running the OpenNAC Enterprise captive portal. This field is required.
Installed in core: Set to yes if the Captive Portal is running on the ON Core. Automatically, the Captive node IP will be set to localhost.
Description: A meaningful description of this new Captive instance.
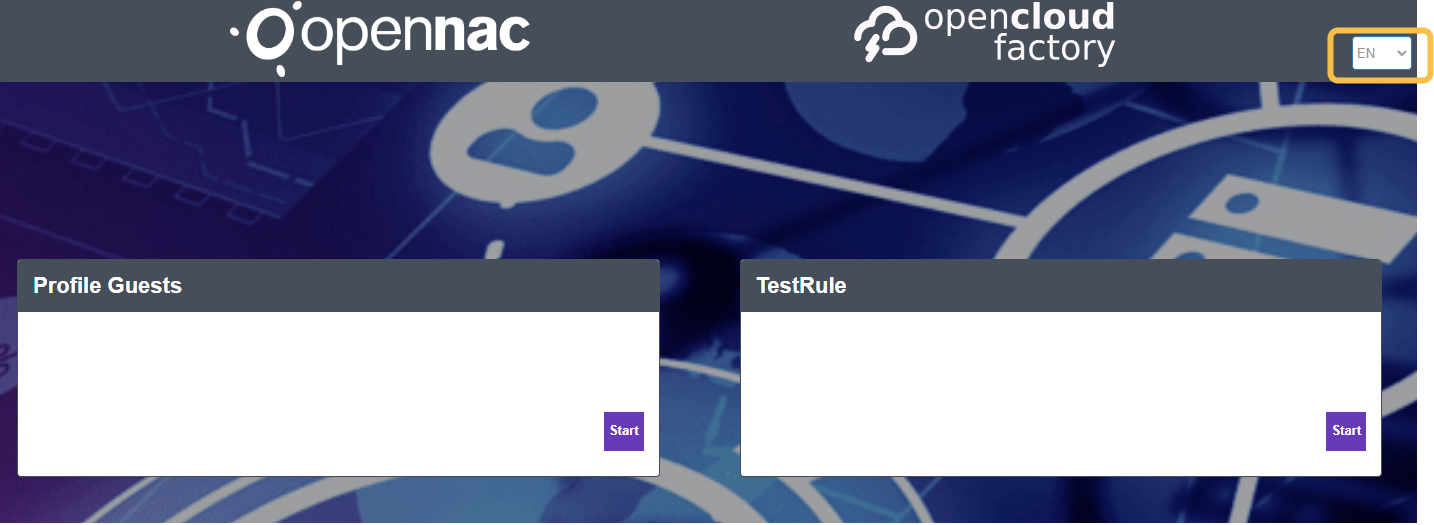
Enable language selector: Enables the language selector in the Captive portal instance. The shown languages depend on the languages configured inside ON Captive -> Captive themes in the General section, with the corresponding translations in the Translations section. If this selector is not enabled, the language will be the browser language.
List of IPs that will be redirected to the default page: The IP or IPs that will be redirected.
Workflows
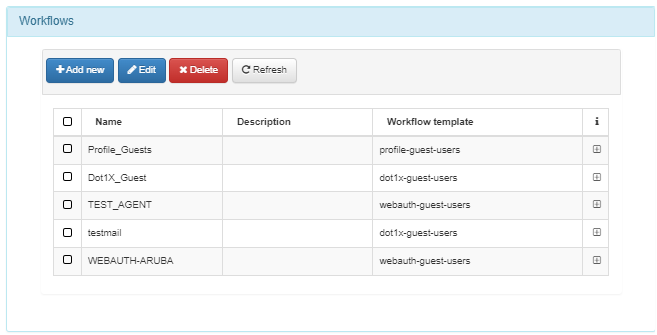
Select from the listed Workflows, or create a new one to associate with this instance.
VPN Workflows
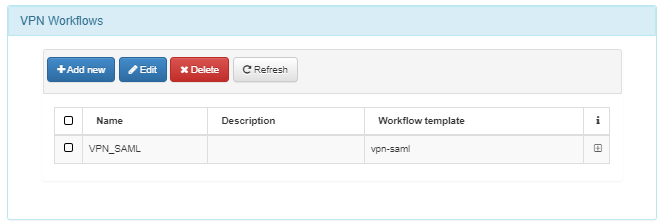
Select one of the listed VPN Workflows, or create a new one to associate with this instance.
Theme
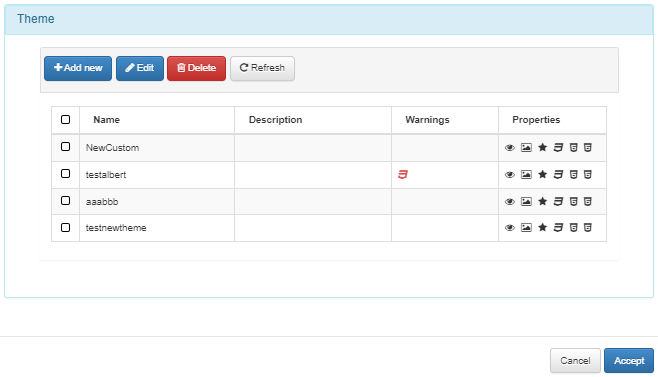
Select one of the listed Themes, or create a new one to associate with this instance.
Click on Accept to save the configurations.
Guest Policies
4.6.5.6. Wired Guest Policies
It is necessary to add different policies for the Wired Guest use case. Navigate to the ON NAC > Policies section. The following policies need to be set up:
Note
The order of the policies is important, starting from the most restrictive to the least restrictive.

4.6.5.6.1. Unknown Device Policy
The first policy to configure is the Unknown device. This policy matches all the devices connected via wired connections that do not meet the criteria of any other policies.

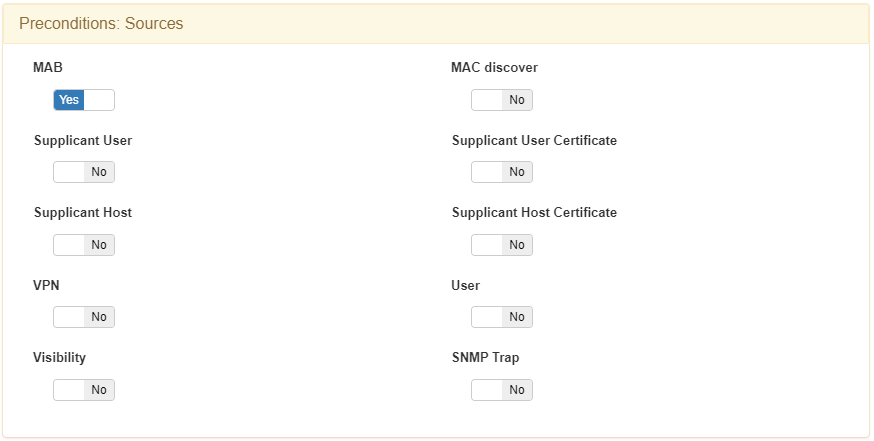
In the Preconditions: Source field, you need to set MAB.
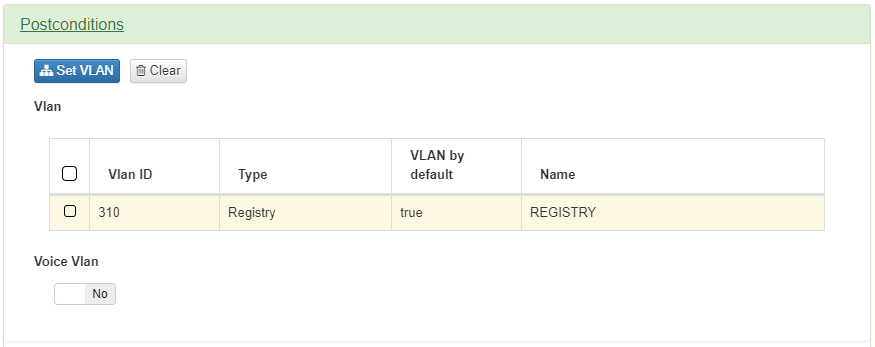
This policy sends the device to a VLAN of type Registry, as the device needs to be registered.
4.6.5.6.2. Guest Compliance Policy
The next policy to configure is Guest Compliance. This policy matches all wired devices that have successfully passed the Guest workflow with compliance.

For a device to be compliant, it must have the following tags:

ONC_WEBAUTH_APPROVED: Indicates the workflow is complete.
EPC_FULL_COMPLIANCE: Compliance tag that must align with the captive portal configuration.
ONC_CAPTIVE_REGISTERED: Indicates that the device has completed the BYOD workflow.
In the Preconditions: Source field, you need to set MAB.

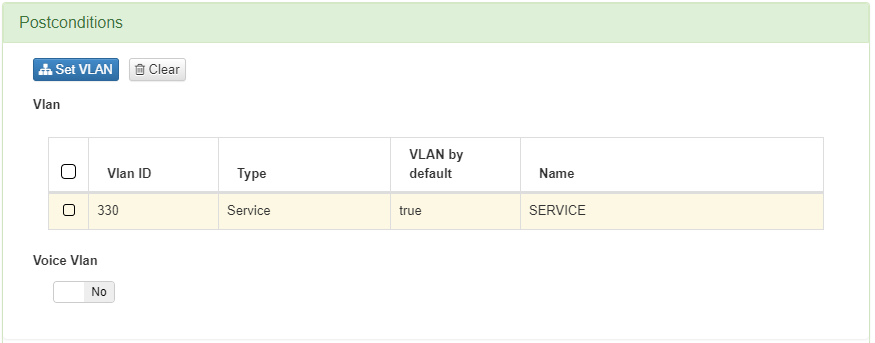
This policy sends the device to a VLAN of type Service, granting the device access.
4.6.5.6.3. Guest Quarantine Policy
The next policy to configure is Guest Quarantine. This policy applies to all devices connected by wire that have passed the Guest workflow with agent authentication.

After Agent authentication is enabled, a device should have the following tags:

ONC_WEBAUTH_APPROVED: Indicates the workflow is complete.
ONC_AGENT: Confirms successful agent authentication.
ONC_CAPTIVE_REGISTERED: Indicates the device is part of a BYOD workflow.
In the Preconditions: Source field, you need to set MAB.

This policy sends the device to a VLAN of type Quarantine, notifying the device of any missing requirements needed for compliance.
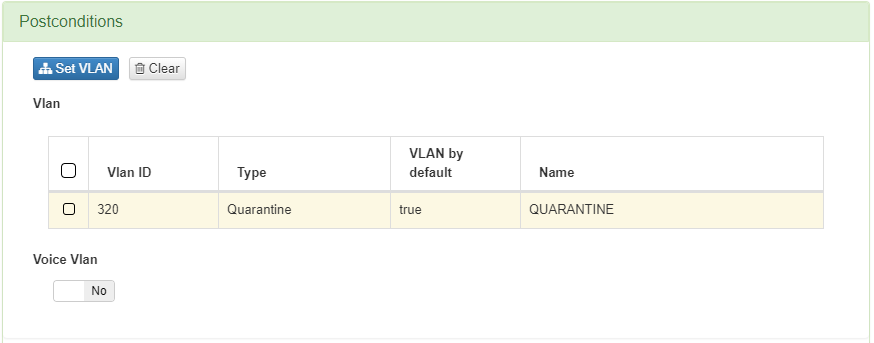
4.6.5.6.4. Guest Without Agent Policy
The next policy to configure is Guest Without Agent. This policy applies to all wired devices that have passed the Guest workflow without Agent authentication.

The following tags are assigned to a device after it completes the workflow:

ONC_WEBAUTH_APPROVED: Indicates the workflow is complete.
ONC_CAPTIVE_REGISTERED: Confirms the device has gone through the BYOD workflow.
In the Preconditions: Source field, you need to set MAB.

This policy sends the device to a VLAN of type Service, notifying the device of any missing requirements needed for full compliance.

4.6.5.7. Wireless Guest Polices
It is necessary to add different policies for the Wireless Guest use case. Navigate to the ON NAC > Policies section. The following policies need to be set up:
Note
The order of the policies is important, starting from the most restrictive to the least restrictive.

4.6.5.7.1. Unknown Device Policy
The first policy to configure is the Unknown device. This policy matches all the devices connected via Wi-Fi connections that do not meet the criteria of any other policies.

In the Preconditions: User field, you need to set Supplicant User.
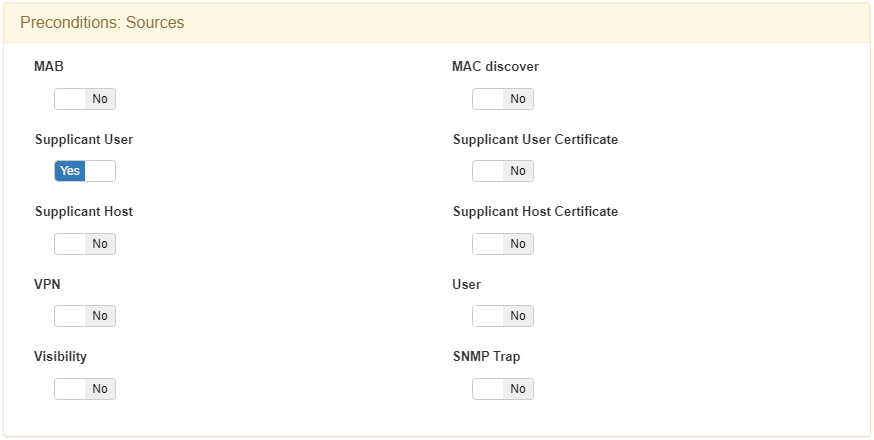
This policy sends the device to a VLAN of type Registry, as the device needs to be registered.

4.6.5.7.2. Guest Compliance Policy
The next policy to configure is Guest Compliance. This policy matches all devices connected via Wi-Fi that have successfully passed the Guest workflow with compliance.

For a device to be compliant, it must have the following tags:

ONC_WEBAUTH_APPROVED: Indicates the workflow is complete.
EPC_FULL_COMPLIANCE: Compliance tag that must align with the captive portal configuration.
ONC_CAPTIVE_REGISTERED: Indicates that the device has completed the BYOD workflow.
You need to set the NDT_WIFI tag, which filters by network device type, along with the SSID of the WLC in the Preconditions: Network Devices section:
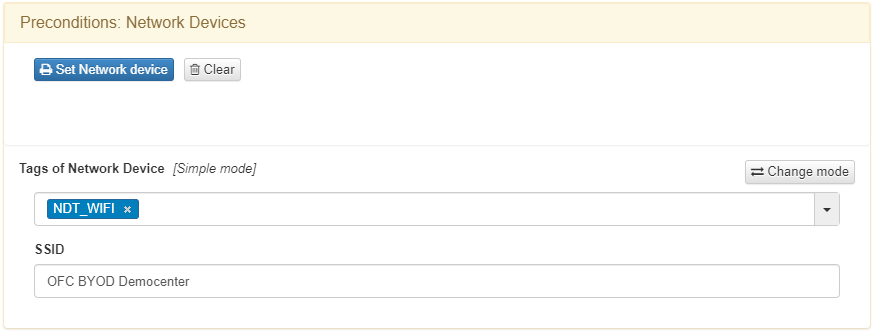
In the Preconditions: Sources field, you need to set Supplicant User.

This policy sends the device to a VLAN of type Service, notifying the device of any missing requirements needed for full compliance.

4.6.5.7.3. Guest quarantine
The next policy to configure is Guest Quarantine. This policy applies to all devices connected via Wi-Fi that have passed the Guest workflow with agent authentication.

After agent authentication is enabled, a device should have the following tags:

ONC_WEBAUTH_APPROVED: Indicates the workflow is complete.
ONC_AGENT: Confirms successful agent authentication.
ONC_CAPTIVE_REGISTERED: Indicates the device is part of a BYOD workflow.
You need to set the NDT_WIFI tag, which filters by network device type, along with the SSID of the WLC in the Preconditions: Network Devices section:

In the Preconditions: Sources field, you need to set Supplicant User.

This policy sends the device to a VLAN of type Quarantine, notifying the device of any missing requirements needed for compliance.

4.6.5.7.4. Guest Without Agent Policy
The next policy to configure is Guest Without Agent. This policy applies to all devices connected via Wi-fi that have passed the Guest workflow without Agent authentication.

The following tags are assigned to a device after it completes the workflow:

ONC_WEBAUTH_APPROVED: Indicates the workflow is complete.
ONC_CAPTIVE_REGISTERED: Confirms the device has gone through the BYOD workflow.
You need to set the NDT_WIFI tag, which filters by network device type, along with the SSID of the WLC in the Preconditions: Network Devices section:

In the Preconditions: Sources field, you need to set Supplicant User.

This policy sends the device to a VLAN of type Service, notifying the device of any missing requirements needed for full compliance.
