4.6.4. Configuration
To proceed with this configuration, all nodes necessary for this use case must already be deployed, following the steps in the node deployment and basic configuration section.
This section includes configuration steps for Wired and Wireless deployments.
4.6.4.1. Network Device permissions
When a user device connects to a network, the network device it connects to must send an authentication request to the authentication server (ON Core). For ON Core to accept and process this request, the clients.conf file must be properly configured.
This file is used to control and restrict RADIUS permissions by specifying which network devices and other authenticators are allowed to send RADIUS requests to the system. In it, you should define all authorized devices or network segments that can make such requests, along with the shared key that each must use.
To add or modify devices or network segments, execute the following steps:
Edit the
/etc/raddb/clients.conffile:
client 192.168.0.0/16 {
   secret = testing123
   shortname = internal192168
}

client 172.16.1.0/24 {
   secret = testing123
   shortname = internal172161
}
For each “client” block, three key elements must be configured:
client: The IP address or network segment from which the requests will originate.
secret: The pre-shared RADIUS key, which acts as the password to verify incoming requests.
shortname: A descriptive name to identify the client or network segment. This name is useful for log entries, making it easier to track and identify connections.
You can define additional networks or host IPs based on your needs. Ensure that the “secret” value in each block matches the shared key configured on the corresponding network device.
After modifying the file, restart the RADIUS service on all Worker nodes to apply the changes.
systemctl restart radiusd
4.6.4.2. Wired Network Configuration for BYOD
The BYOD setup requires specific network-level configurations.
For wired network deployments, the necessary configurations are as follows:
4.6.4.2.1. Network Device Configuration for Wired Authentication (Switch)
4.6.4.2.1.1. MAB Authentication for Wired Devices
Wired network devices must be configured to perform MAB (MAC Authentication Bypass) authentication.
In a typical BYOD workflow, these devices will undergo two authentication steps:
The first MAB is used to grant access to the registration VLAN.
The second MAB, after the workflow is completed, provides access to the service VLAN. The VLAN transition is managed through a TogglePort initiated by OpenNAC.
For detailed instructions on configuring MAB authentication on network devices, refer to the OpenNAC Network Device Compatibility page.
4.6.4.2.1.2. TogglePort
To perform a VLAN change, a reevaluation is required, which is triggered by a TogglePort from OpenNAC.
There are two available methods to execute the TogglePort: via SNMP or CoA (Change of Authorization).
Before configuring TogglePort in OpenNAC, you must first set up the preferred method on the network devices. For guidance on supported configurations, refer to OpenNAC Network Device Compatibility).
4.6.4.2.2. DNS Poisoning
When users first connect to the network, they will not have access to resources and must register through the Captive Portal.
To speed up the process, DNS poisoning can be implemented on the registration VLAN:
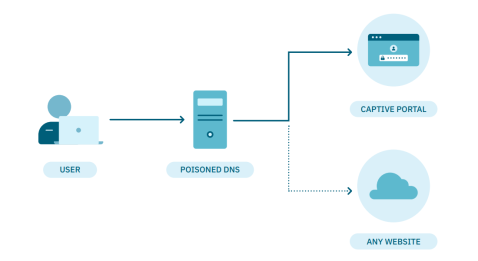
At the architecture level, a poisoned DNS is set up so that any DNS query is redirected to the ON Captive Portal, allowing the user to complete the registration.
Once registered, the VLAN will be switched (via TogglePort) to one that provides access to network resources.
OpenNAC Enterprise supports DNS poisoning with the following steps:
Important
Ensure the DHCP server in the registration VLAN is configured to use OpenNAC Enterprise as the DNS server.
Install the dnsmasq package:
dnf install dnsmasq
Copy the preconfigured files to the dnsmasq configuration directory:
cp -rfv /usr/share/opennac/utils/dnsmasq/etc/dnsmasq.conf /etc/
cp -rfv /usr/share/opennac/utils/dnsmasq/etc/dnsmasq.d/ /etc/
Edit the
<catchall.conf>file to configure DNS redirections:
vim /etc/dnsmasq.d/catchall.conf
To resolve a specific URL using a specific DNS server, add:
server=/<URL>/<DNS_SERVER_IP>
To redirect all requests to the ON Captive Portal, add the following line at the end of the file:
address=/#/<CAPTIVE_PORTAL_IP>
Stop and disable the named service:
systemctl stop named
chkconfig named off
Start and enable the dnsmasq service:
chkconfig dnsmasq on
systemctl start dnsmasq
Note
If authentication is performed via SAML, make sure to allow DNS resolution for the IDP’s IP or URL.
4.6.4.3. Wireless Network Configuration for BYOD
The BYOD setup requires specific network-level configurations.
For WiFi network deployments, the necessary configurations are as follows:
4.6.4.3.1. Network Device Configuration for WLC and AP
4.6.4.3.1.1. Web Authentication Method
Wireless LAN Controllers (WLC) and Access Points (AP) utilize web authentication to manage captive portals and handle user authentication. Unlike wired networks, WLCs and APs employ Access Control Lists (ACLs) to regulate network access for users.
For detailed instructions on configuring your WiFi network devices, please refer to the OpenNAC Network Device Compatibility page.