4.7.1.9. Troubleshooting
This section explains how to Troubleshoot VPN connection related issues. To carry out this task correctly, it is necessary to keep in mind the flow of the VPN connection, from the moment the user connects until the connection is established (this process consists of 8 steps). The following diagram shows all the steps that are carried out.
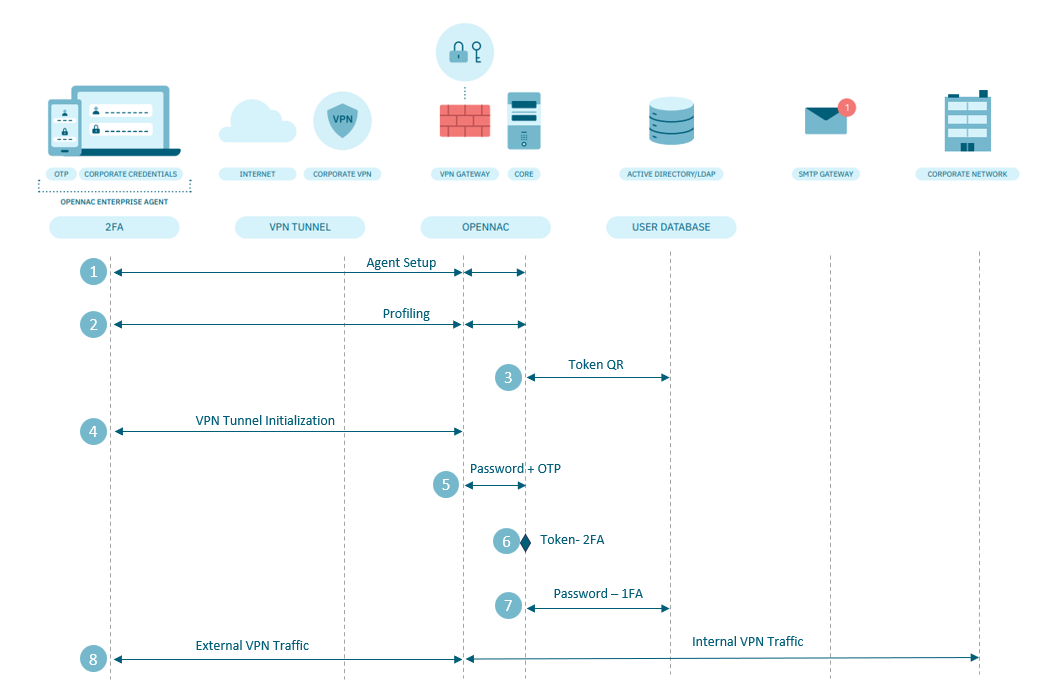
Each part of the flow can be described as follows:
The initial set up of the agent, therefore, its download and installation.
The initial connection between the agent and the Core, to carry out the profiling of the device.
The generation of the user QR Token.
The establishment of the VPN tunnel.
Sending user credentials.
The validation of the 2FA Token.
The validation of the user’s password, and therefore the communication with the AD.
Once the VPN tunnel is established, connectivity to the corporate network and access to the desired servers/services.
To be more agile in solving problems, it is necessary to understand:
In which part of the above diagram flow the problem occurs.
The sources of information available to find where the problem comes from are:
Business Profiles (seen in the previous section).
Dashboards (seen in the previous section).
Logs.
4.7.1.9.1. Flows
4.7.1.9.1.1. User fails to download/install ON Agent
In this case, the user is not able to download or install the Agent, let’s check the following points:
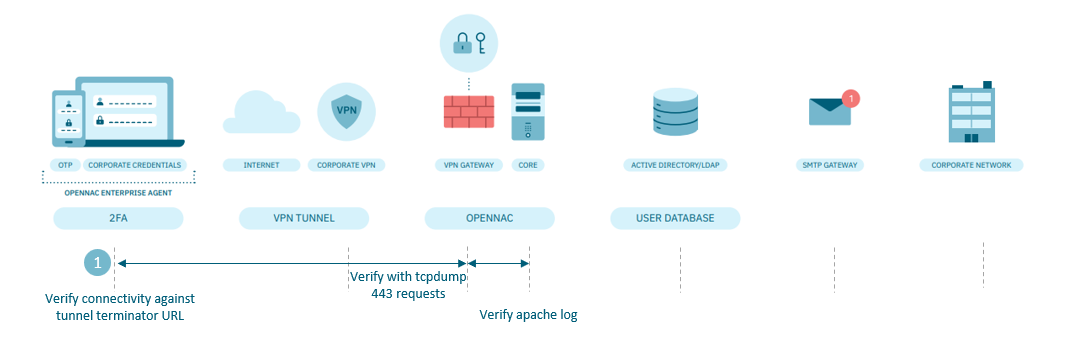
On the Windows device:
If the problem is related to the download: verify that there is connectivity against the VPN gateway.
If the problem is related to the installation: check the errors that Windows gives you.
On the VPN gateway:
Verify that requests are being received through port 443. For this you can use the tcpdump command, accessing through the command line.
In the ON Core:
It is possible that the remote client reaches the download portal correctly, but there is a problem in the download. Check the apache logs.
4.7.1.9.1.2. The Visibility input does not appear in the system (Agent installed)
The Agent, after its download and installation, periodically analyzes the device to send information to the Backend CORE. This type of communication is shown in the Dashboard as “Visibility” and is used for profiling, that is, checking compliance with the security policy of the device that wants to access the VPN.
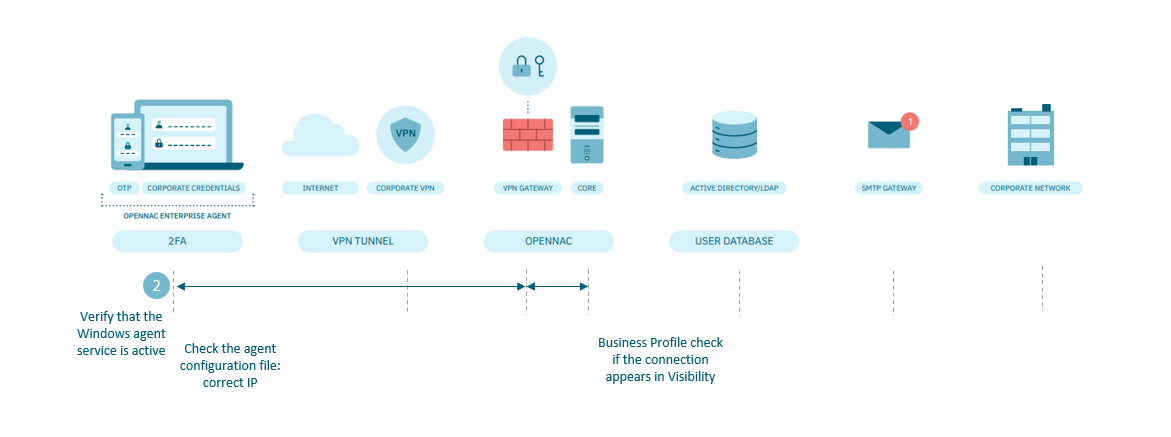
If the Agent is installed, and no visibility events are received, it means that there is a problem with the connection between the Agent and the Core. If this communication does not exist, the user will not be able to connect to the VPN since one of the requirements is to know the security compliance status of the device. It would be necessary to review the following points:
On the Windows device:
See that the agent is active. If it is not restart it.
Look in the agent logs inside the %ProgramData%\OpenCloudFactory\opennac-agent\logs\ folder and check if it is sending the requests correctly to the Core.
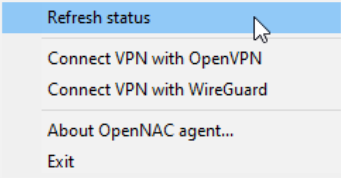
We can force the agent to send requests, for this we will use the “Refresh Status” option from the agent menu, by right clicking the agent icon, forcing the agent to send the information to the Core.
Check that the IP configured in the agent configuration file correctly points to the Core, %ProgramData%OpenCloudFactoryopennac-agentconfig.ini. If it is not correct, modify it
Check if there is communication between the remote device and the Core. It is possible that the connection is blocked by an intermediate firewall, the connection is made through HTTPS using port 443/tcp
4.7.1.9.1.3. Problems with the user’s QR token
If the user experiences problems with the Authentication Token, it can be for two main reasons:
In use, when you try to connect to the VPN.
A failure in receiving the QR that causes the user to not have access to the OTP.
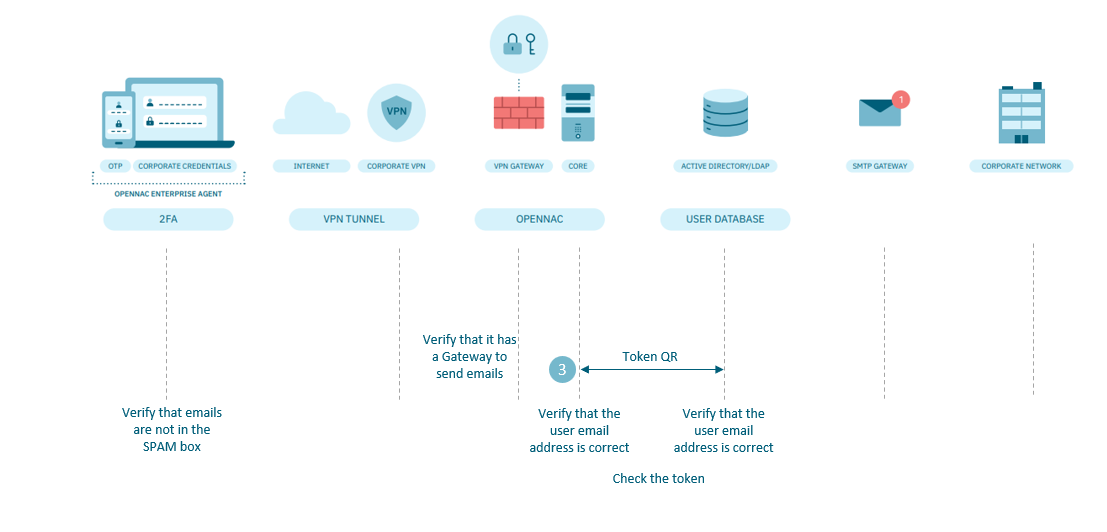
Check the following points:
In the IDP (AD/LDAP):
Check that the user’s email address is correct. NOTE: we can also verify it from the Core.
In the Core:
Check that the user is registered in the Core
Verify that the Core can send emails
Check that the user’s email address is correct. When a user registers to send the mail with the Token for Google Authenticator, this information is saved in a local database. You can look at the user’s email in the local database and in the IDP (AD/LDAP)
Check that the Token is correct.
On the user device:
Verify that the email sent with the Token is not in the SPAM folder
4.7.1.9.1.4. Trouble starting the tunnel
When the user cannot start the VPN connection, we need to check:
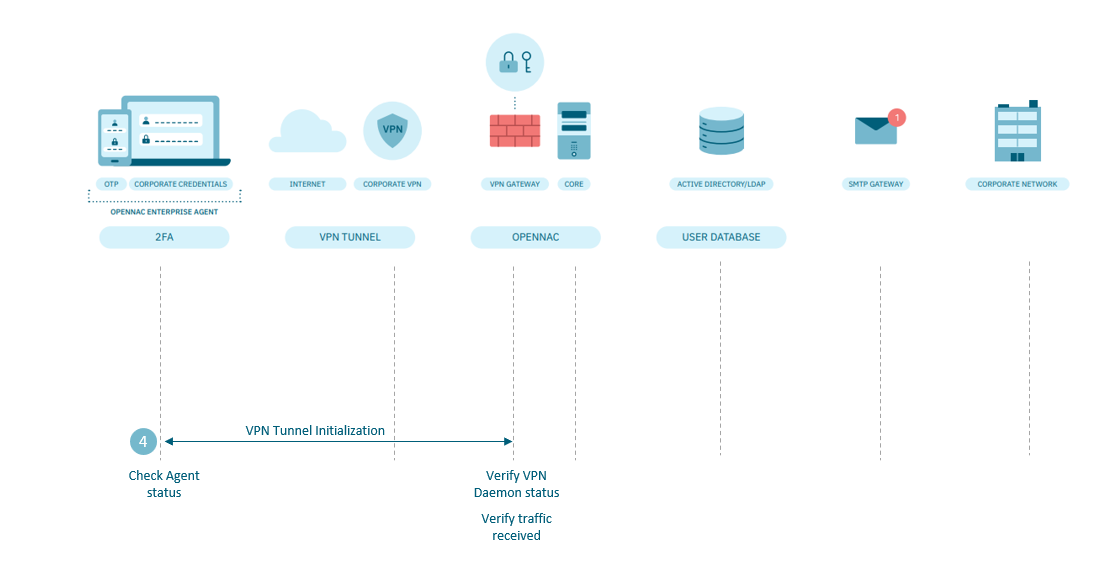
On the Windows device:
Check that the agent is active. If it is not restart it.
If there are no visibility entries in the ON Core (repeat the actions described in chapter The Visibility input does not appear in the system (Agent installed) of this page)
VPN Gateway:
Verify that the OpenVPN service is active, through the command line (remember that by default this is only accessed from the ON Core)
If we see that the service is not working, start it.
If necessary restart it. (Note that if there are more users connected, it will disconnect them, so restart the service only if absolutely necessary.)
Verify that traffic is being received through the VPN tunnel interface. For this you can use the tcpdump command, through the command line (remember that by default this is only accessed from the ON Core)
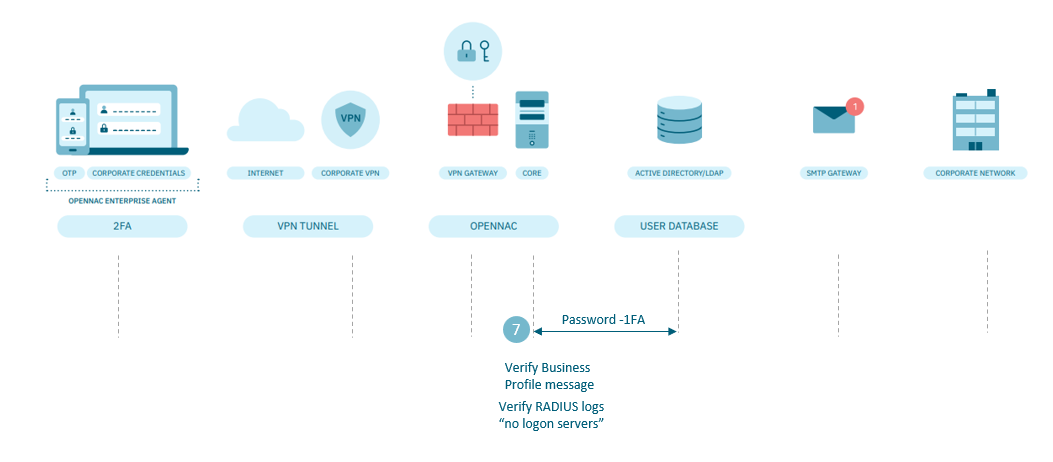
4.7.1.9.1.5. User credentials
The user has credential issues (OTP or wrong password) so they cannot start the VPN connection. Check the following points:
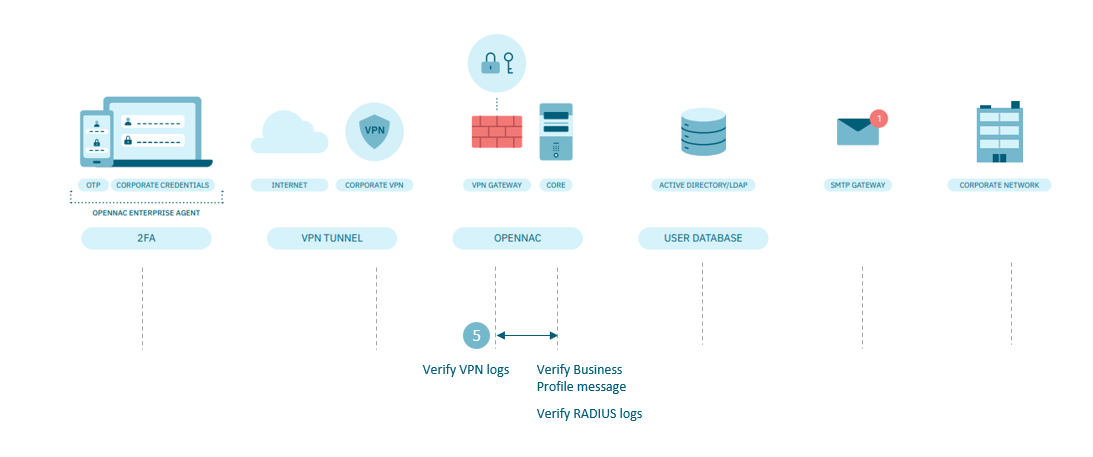
In the Core:
Check if the connection error is related to Credentials or OTP
Go to the menu ON NAC > Business Profiles > Default view to review the connection error message.
Go to the Analytics > 2SRA > 2SRA Overview dashboard and look for the list of connections.
We can narrow down the issue by determining whether it is related to credentials or OTP. If the problem lies with OTP, see to the next chapter.
Check the RADIUS logs, via command line, /var/log/radius/radius.log.
At the VPN gateway:
Check the logs, starting with /var/log/opennac/wireguard/<NAME_VPN>.log or /var/log/opennac/openvpn/cmix-openvpn-<NAME_VPN>.log, according to your VPN service, through the command line.
4.7.1.9.1.6. Wrong token detection on connection
The user has problems with the 2FA (OTP managed with Google Authenticator) so he cannot initiate the VPN connection. Check the following points:
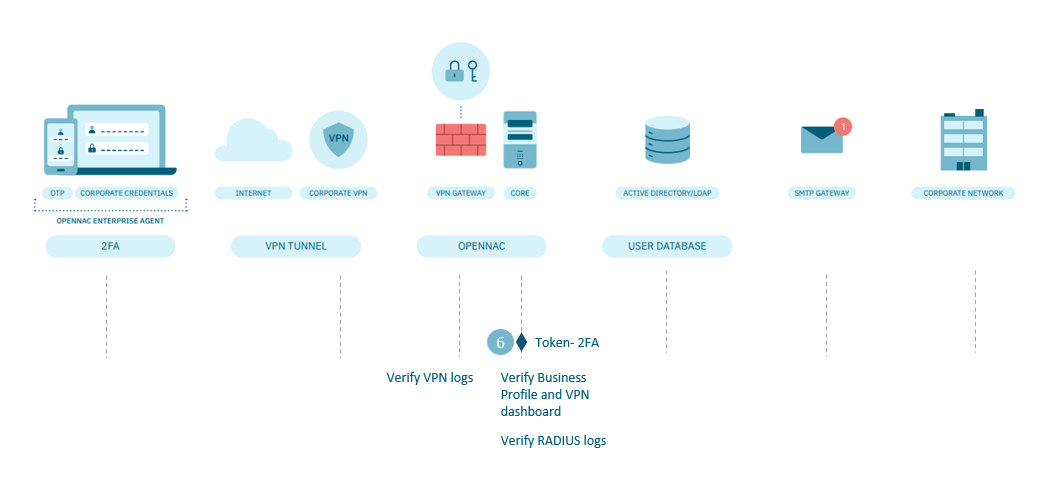
In the Core:
Check if the connection error is related to the OTP
Go to the menu ON NAC > Business Profiles > Default View to review the connection error message.
Go to the Analytics > 2SRA > 2SRA Overview menu and look at the bottom of the Dashboard for the list of connections
We can determine whether the problem is related to OTP or something else. If the problem is related to OTP (repeat the actions described in chapter Problems with the user’s QR token of this page)
Check the radius logs, via the command line, /var/log/radius/radius.log.
At the VPN gateway:
Check the logs, starting with /var/log/opennac/wireguard/<NAME_VPN>.log or /var/log/opennac/openvpn/cmix-openvpn-<NAME_VPN>.log, according to your VPN service, through the command line,
4.7.1.9.1.7. AD password error
The user is having problems with credentials. Check the following points:
In the Core:
Check if the connection error is related to user credentials.
Go to the menu ON NAC > Business Profiles > Default View to review the connection error message.
Go to the Analytics > 2SRA> 2SRA Overview dashboard and look for the list of connections.
If you have identified that the credentials are not correct, check if the username and password are being entered correctly.
Verify that the same credentials are used in the IDP (AD/LDAP)
Check the radius logs, via the command line, /var/log/radius/radius.log.
In the event that the identified error is “no logon servers”, see the actions described in the next chapter.
4.7.1.9.1.8. The user does not get connectivity against the expected servers
In this case, the user establishes the VPN connection successfully, but is unable to connect against the servers to which he is authorized. Therefore, we should examine the following points:
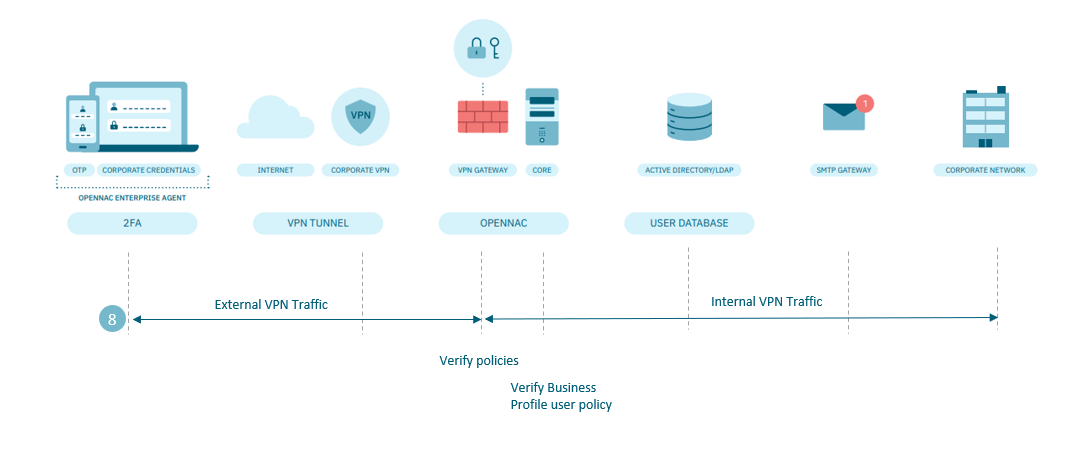
In the Core of the Backend:
Verify in the Business Profiles in which policy the user accessed:
If the user accessed the wrong policy, they will not be able to access the desired servers. The next step would be verifying why the user accessed the network through that policy. For example, compliance.
If the user is accessing the correct policy, check why they are not being associated with the dynamic zone configured in the VPN gateway. For example, it is not sent or it is sent erroneously in the “Extra Radius Param” configuration.
On the VPN gateway:
Check the policies.
Check the filter rules.
Verify names of dynamic zones. It must be exact one configured in the Backend policy within “Extra Radius Param”, in our example: “vpnusr and vpnadm”.
4.7.1.9.2. Logs
In this section we will see the different logs, which are relevant to obtain information regarding the problems that may occur related to the VPN connection.
4.7.1.9.2.1. At the VPN gateway
Depending on the VPN provider in use, we can find different logs:
4.7.1.9.2.1.1. OpenVPN
In this log, you can find all the information related to openvpn. Therefore, we will be able to see what actions and what errors are occurring on /var/log/opennac/openvpn/cmix-openvpn-<NAME_VPN>.log
4.7.1.9.2.1.2. Wireguard
In this log, you can find all the information related to wireguard. Therefore, we will be able to see what actions and what errors are occurring on /var/log/opennac/wireguard/<NAME_VPN>.log
4.7.1.9.2.2. Backend Core
We can see the Radius logs. This log contains all the information related to user authentications. For example, the results of authentications and authorizations. It is located on /var/log/radius/radius.log
4.7.1.9.2.3. ON Agent
/Library/com.opencloudfactory.opennacagent/wireguard
Linux
/opt/opencloudfactory/opencloudfactory.agent.service.linux/wireguard
4.7.1.9.2.4. OpenVPN
Windows
For the the locations of various configuration files, Agent’s UI application logs, and other relevant resources in different operating systems, refer to the Agent’s troubleshooting section.
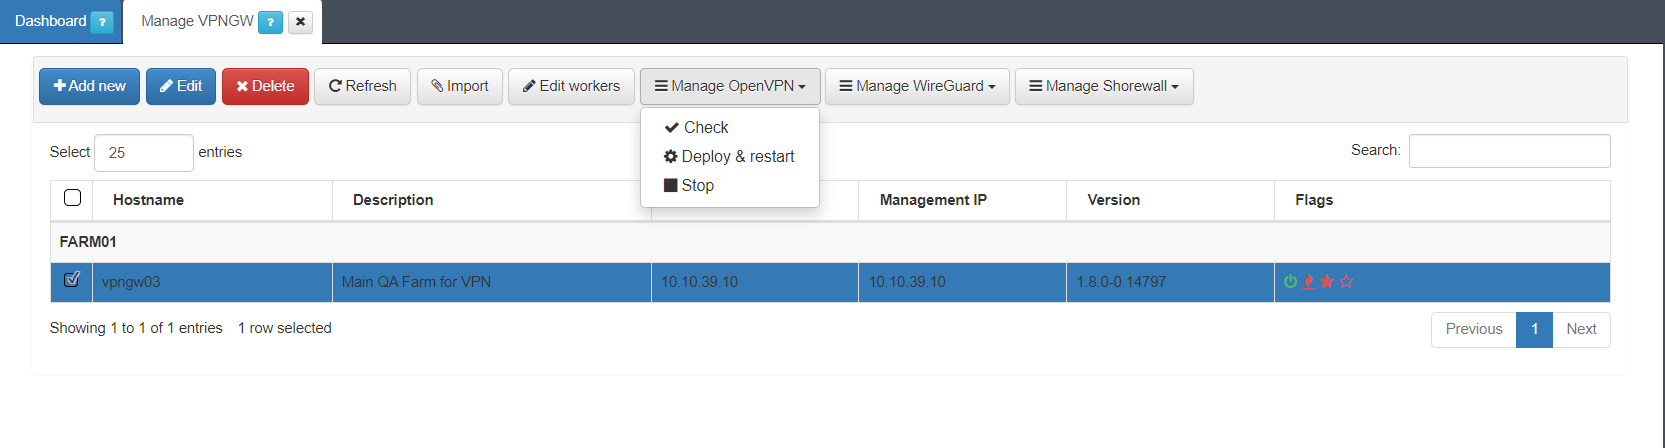
4.7.1.9.3. Restart services
In some cases, we may need to restart the services.
To restart the VPN service:
Go to the VPNGW section in the Administration Portal.
Open the Manage VPNGW view.
Select the VPN service and click Manage OpenVPN/WireGuard > Deploy & restart.
To restart the ON Agent service:
Access the Windows services. To do it, type “Services” on the Windows Search Box
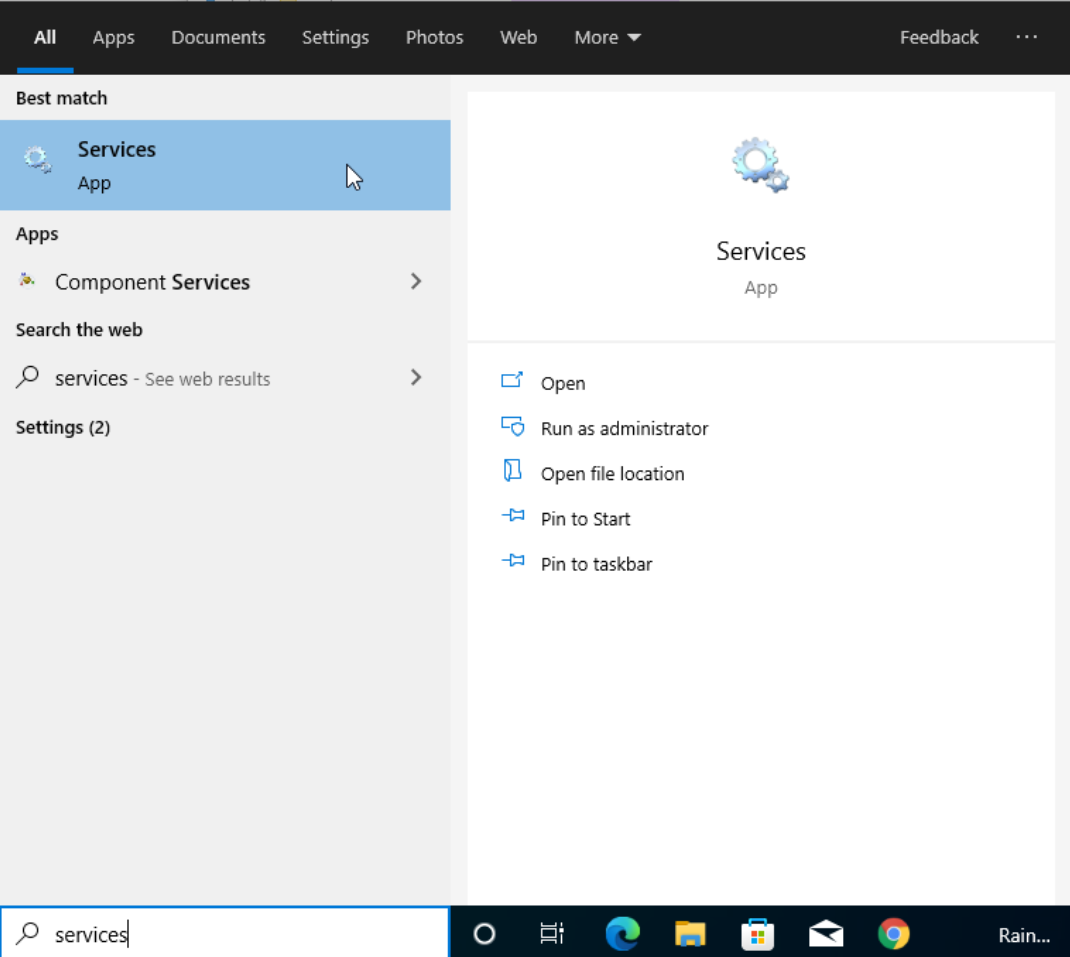
On the Windows services console, search for the OpenNACService (Agent).
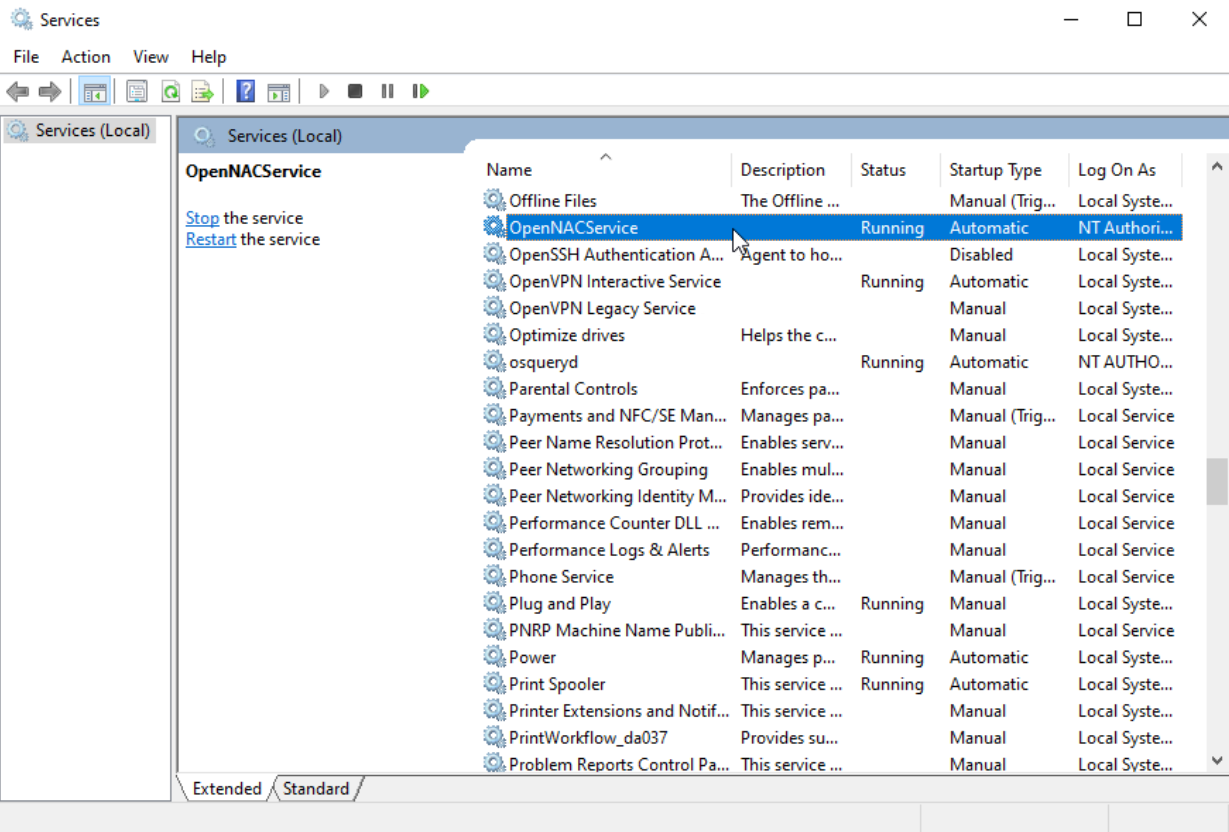
Select the Start or Restart option.
4.7.1.9.4. Known Issues
This section features minor identified errors that may occur while implementing the 2SRA use case.
4.7.1.9.4.1. VPN connection with SAML authentication
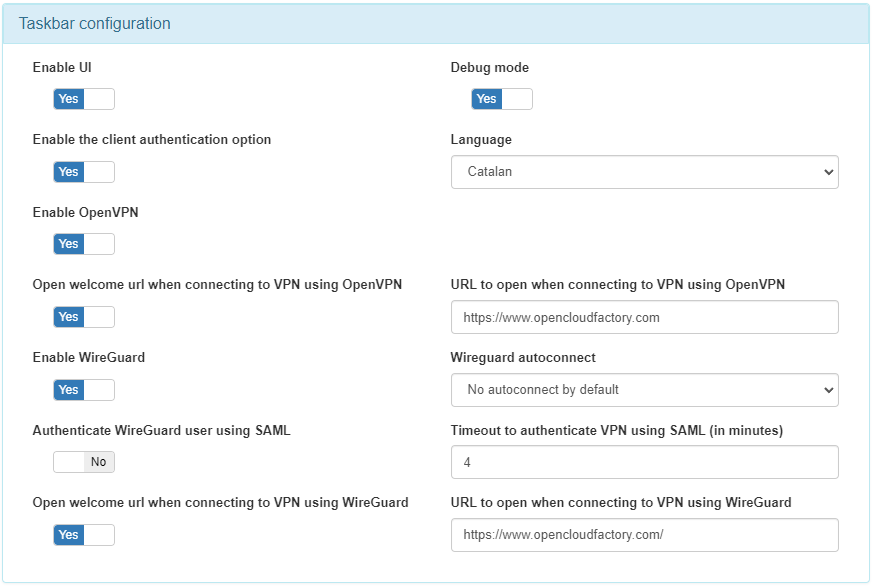
If you encounter problems during the SAML authentication process, follow this troubleshooting flow to identify and resolve it.
Verify if SAML authentication is enabled in the Administration Portal.
Go to ON Agent > Agent Profiles
Select the corresponding profile and click on Edit.
Scroll down to the Taskbar configuration section and enable the Enable WireGuard and Authenticate WireGuard use using SAML flags.
Look for error messages in the VPN logs.
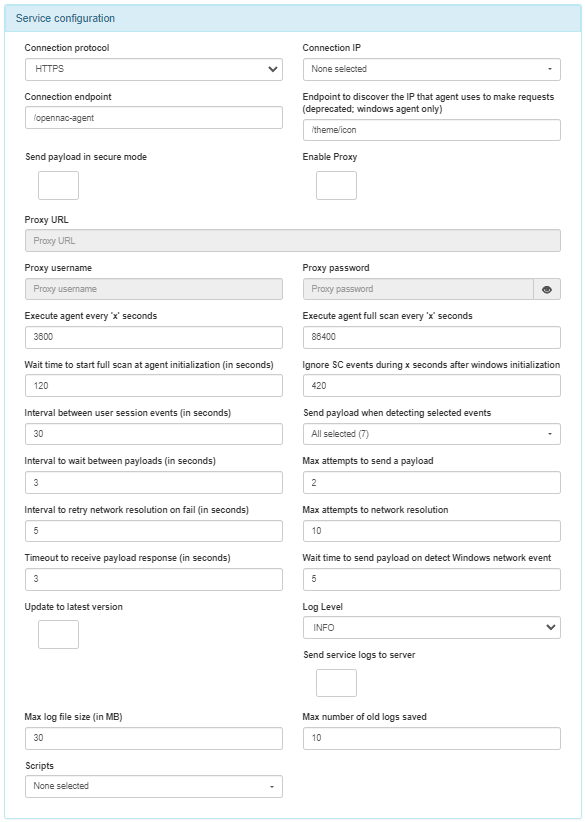
Check if the Debug mode is enabled in the Agent Profile section.
Go to the Administration Portal > ON Agent > Agent Profiles section.
Click on edit for the corresponding profile.
Scroll down to the Service Configuration section.
In the Agent profile summary view, check if the Debug mode flag is enabled.
Test SAML authentication:
Attempt to authenticate using SAML and record any error messages or unexpected behavior.
Test different scenarios, such as successful authentication with valid credentials, unsuccessful authentication with incorrect credentials, or any specific use cases relevant to your VPN setup.
Check network connectivity:
Ensure that the VPN server can establish network connectivity with the SAML endpoints.
Verify that the necessary ports and protocols for SAML communication are open and not blocked by firewalls or other network devices.
4.7.1.9.4.2. VPN Agent - Please check your internet connection
A user enters their credentials into the Agent UI, the Agent tries to connect and displays the following error to the user.
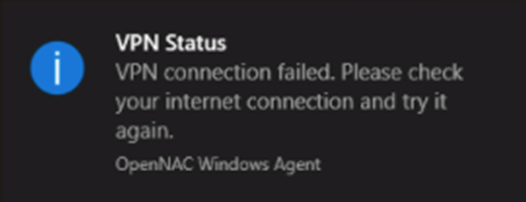
Check that there is internet connection.
This error can be caused by several reasons:
VPN service is NOT active.
There is a “dead” openvpn process.
The Windows Device does NOT meet compliance requirements.
4.7.1.9.4.2.1. VPN service is not active
It is possible that the OpenVPN service is not active and for this reason the timeout occurs.
Access the VPNGW section in the Administration Portal.
Go to the correspondent Farm and open the OpenVPN view
Open the Node configuration tab.
Check if the name of the VPN connection is “shadowed” this means that the tunnel is not enabled.
Check that you have the Switch “Start on Boot” enabled and if it is not, enable it by clicking on Edit.
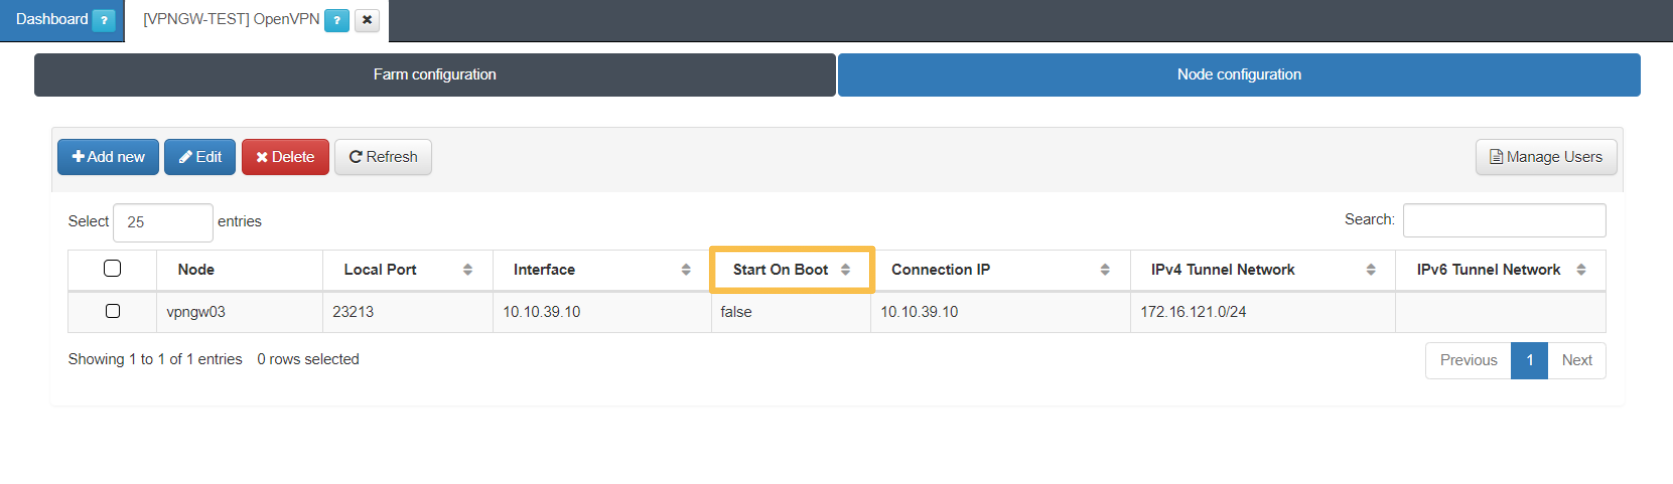
In the form you can see that the “Start On Boot” is disabled:
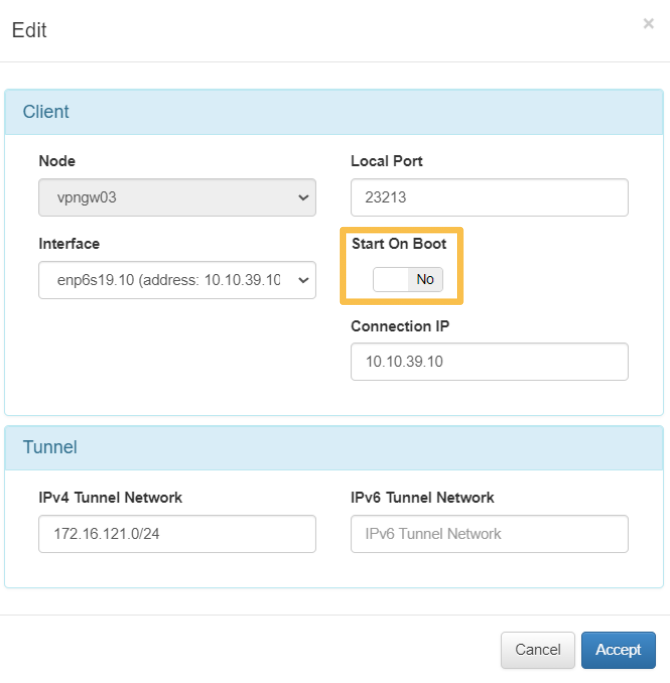
Enable the Start On Boot and click Accept, so that at the next reboot it will boot automatically.
Start the tunnel manually by selecting it and clicking on Start in the top menu.
4.7.1.9.4.2.2. There is a “dead” OpenVPN process
OpenVPN uses three processes for its operation. If for any reason any of these processes dies, the service will not work properly.
To verify that all three OpenVPN processes are active:
Access the Tunes Finisher via SSH, remember that by default it can only be done from the CMI
Check openvpn processes are running
ps aux | grep openvpn

In the image you can see that there are two processes running and one is “defunct”. Therefore, the service is NOT behaving properly.
Restart the OpenVPN service by following the steps seen in section Restart services
Access the VPN service again (from the Windows device).
4.7.1.9.4.2.3. Windows device does not meet the requirements
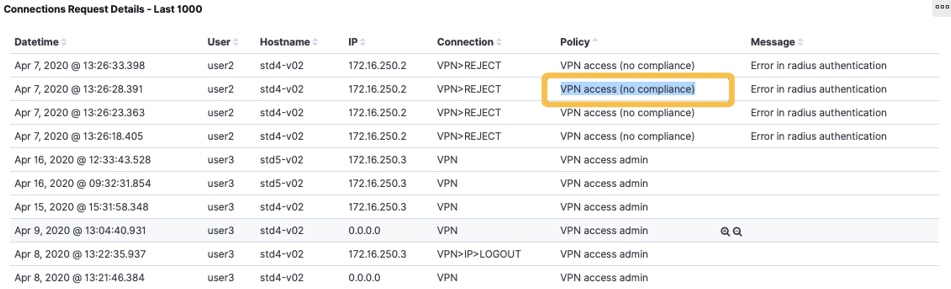
If the device does NOT comply with the configured compliance policy (by default AV and FW activated and updated) defined by the Tag EPC_SECURITY_COMPLIANCE of the Tag Policies, it will not be able to connect. We must look for the connection in the Business Profile or the Dashboards, and it will be seen that there is a message indicating that there is NO compliance.
To solve it, it is necessary to find out what is not being fulfilled in the user’s device.
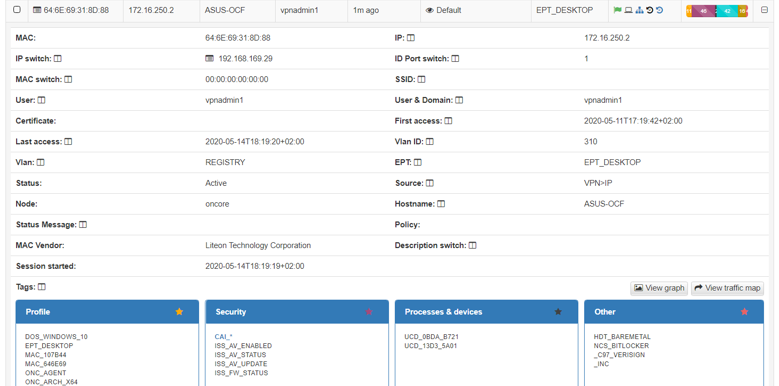
To do this, we will zoom in on the connection by clicking on the + on the right side and at the bottom we will find the Security table where we can see which of the Tags associated with the compliance policy we do not have. Fix the problem on the remote device and try to connect again.
4.7.1.9.4.3. VPN Agent - Invalid credentials
The user enters the VPN connection data, the agent tries to connect and displays the following error message to the user.

This error message can be displayed for various reasons:
The user entered an incorrect password
Wrong OTP error
No logon servers (Communication problem with AD/LDAP configured in Backend)
To search for the specific problem:
Access the Backend web portal.
Go to Analytics -> Use Cases -> VPN or ON NAC -> Buisness Profile -> Default view.
Analyze the error you are showing
Once the possible cause has been identified, it will be possible to carry out the corresponding troubleshooting.
4.7.1.9.4.3.1. The user entered an incorrect password
In case the user has entered the wrong password, check the following:
The user is entering the password incorrectly multiple times, resulting in the account being blocked in the IDP (AD/LDAP).
Ensure that the password being entered matches the one stored in the AD/LDAP and has not been modified by the administrator or the user after the initial login.
Note
In these cases, talk to the AD/LDAP administrator.
4.7.1.9.4.3.2. OTP error
OTP error cases can be caused by several reasons:
The user entered the wrong OTP PIN.
The user does NOT have 2FA activated.
The user is NOT registered in the AD/LDAP.
THE USER ENTERED THE WRONG OTP CODE
In this case, make sure that the code entered by the user is correct. To check the code inside the Backend Core:
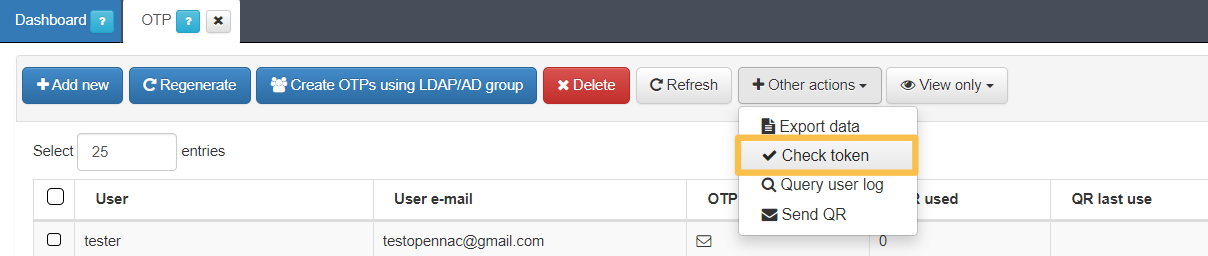
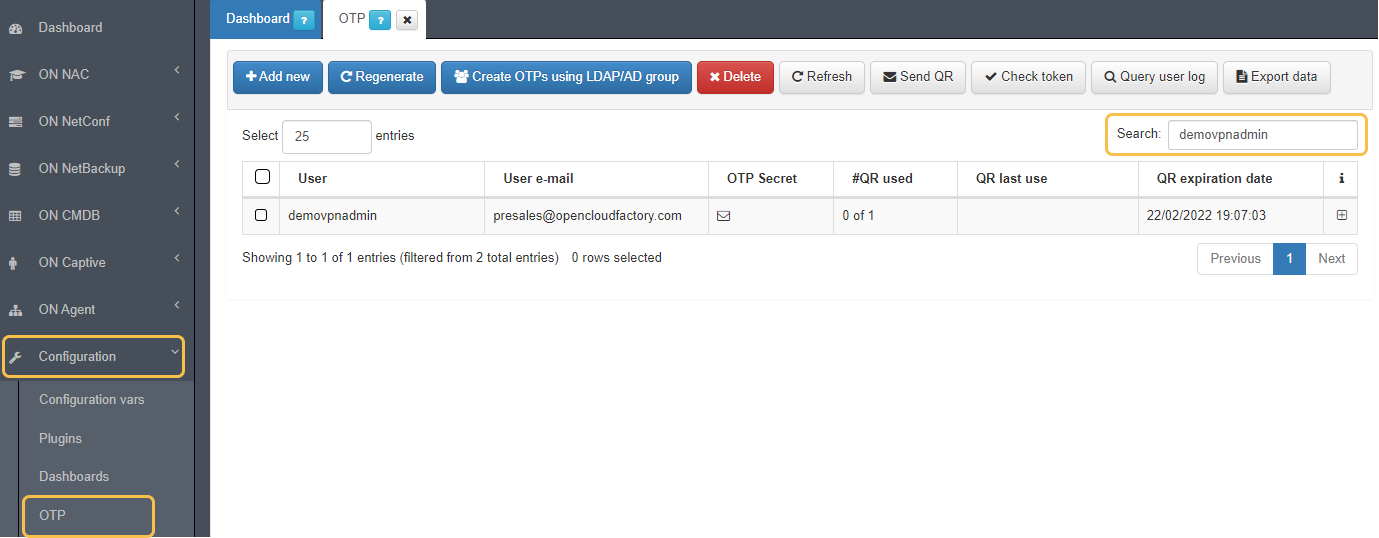
Go to Configuration > OTP.
Click on Other actions > Check token.
Enter the user’s OTP code in Google Authenticator. We will check if the Token is valid or not. In case you try it several times and it is still invalid, regenerate the Token and send it again. If the problem persists, check the other cases; The user does NOT have 2FA activated or The user does NOT exist in the AD.
THE USER DOES NOT HAVE 2FA ACTIVATED
In this step, it is necessary to verify that the user has 2FA enabled in the Backend Core. To do so we will have to:
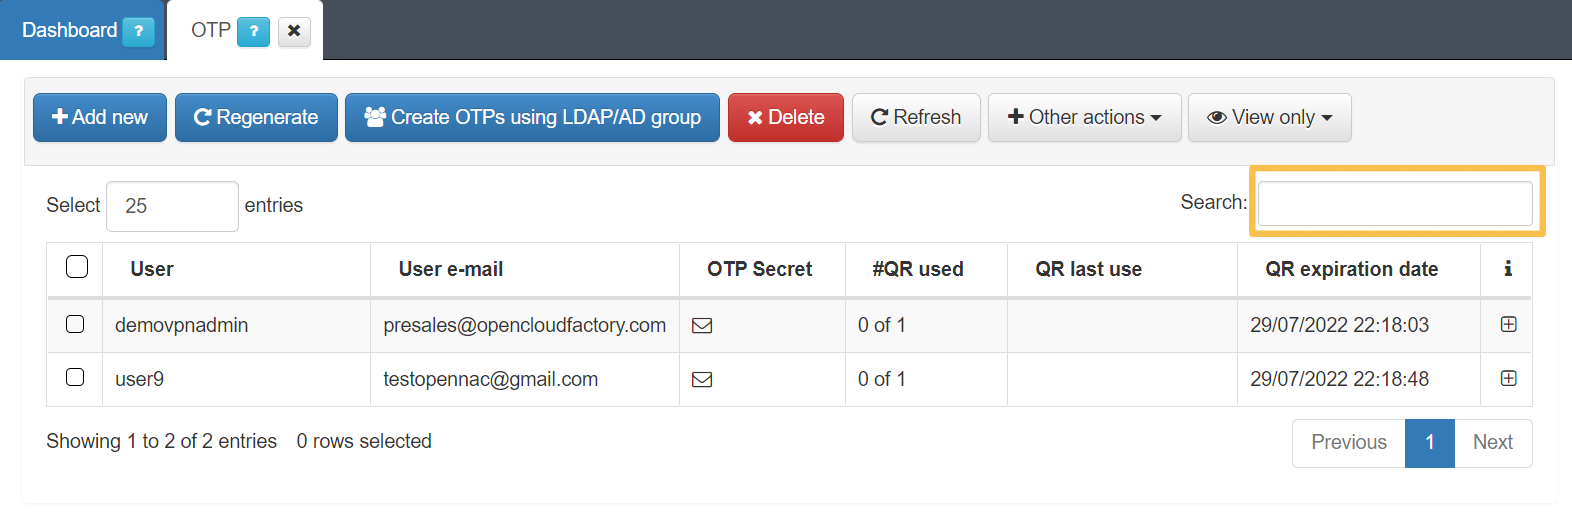
Go to the menu Configuration -> OTP
Enter the username in the Search input.
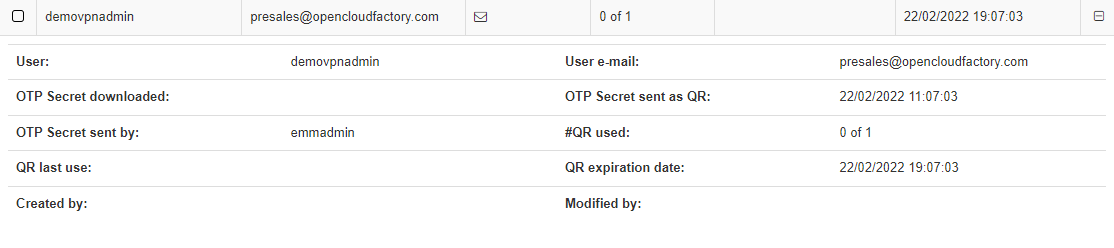
If the user exists, if we click in the + button, the following form will be displayed with the user information.
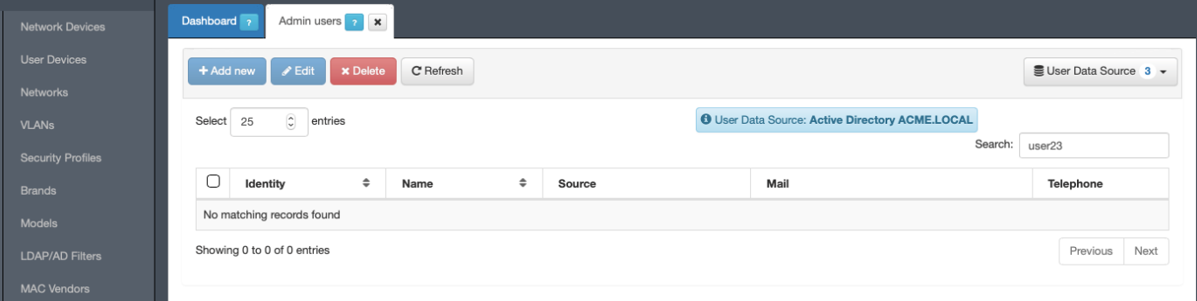
USER DOES NOT EXIST IN AD/LDAP
In this case, it is necessary to verify that the user exists in the AD/LDAP.
Choose the data source corresponding to AD/LDAP.
Using the search box, search for the corresponding user
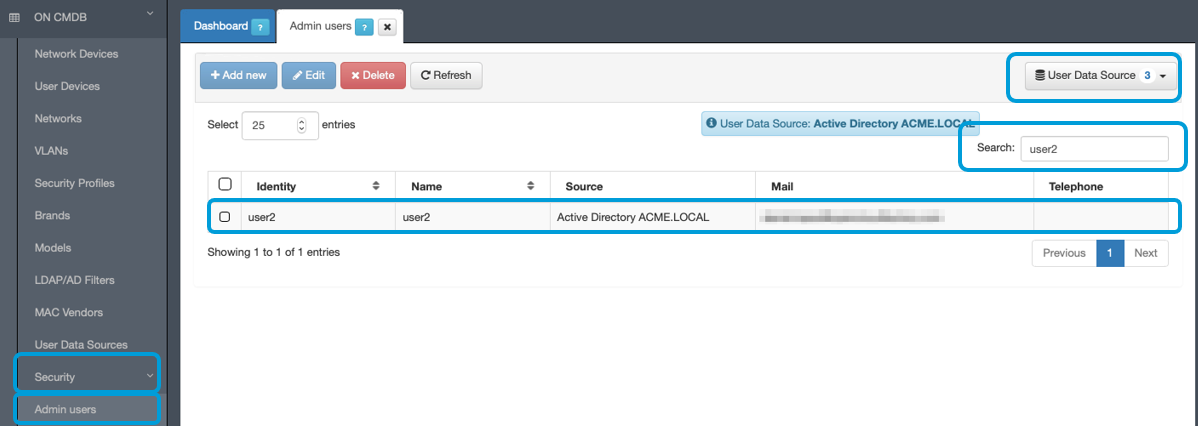
In case the user does not exist, no results will be seen.
4.7.1.9.4.3.3. No logon servers (communication problem with the AD)
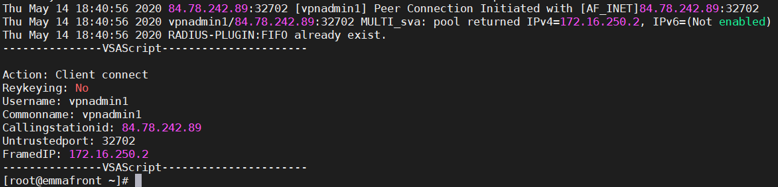
This error is shown when from the Backend Core it cannot authenticate against the AD, to verify if it is working:
Connect via SSH to the Core
Examine the /etc/resolv.conf file
DNS is probably not pointing to the AD so it does NOT resolve the domain and cannot find it.
Make sure there is a line similar to the one in the example, otherwise change it with the IP of your AD or of a DNS server that correctly resolves the AD domain
nameserver 172.16.30.20
Once the IP is changed, restart the kerberos, samba and windbind services.
/etc/init.d/krb5kdc restart && service smb restart && service winbind restart
Check that there is connection with the AD, you can use the following command:
ntlm_auth --username=<username>
<username>: the username of a registered user, it will ask for the user’s password.
In the following image, you can see how after restarting the services it is possible to establish the connection with the AD. (If a wrong password is entered, it gives an error, and if the password is valid, it shows the success message).
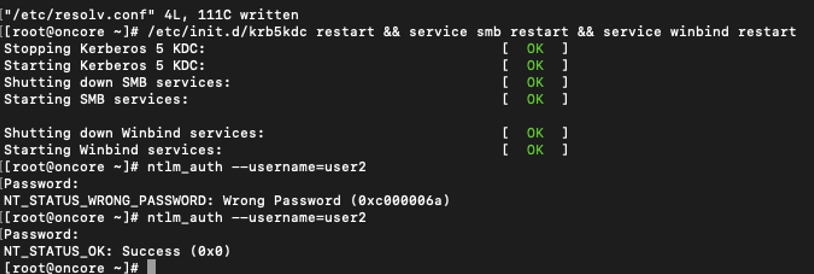
Finally, verify that the user is able to connect through the VPN.
4.7.1.9.4.4. VPN connected, but with incorrect access
The user enters the data to connect to the VPN and the agent connects successfully.

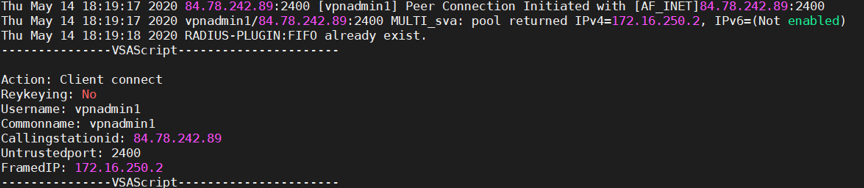
We see the remote user connected to the tunnel through the VPN gateway web interface.
We observe that the remote user is connected in the tunnel, but is NOT in the Correct Dynamic Zone through the VPN gateway web interface.
We see that the user accessed the correct or incorrect policy in the Default View of the Core.
This error can occur for several reasons.
The Security Compliance policy is not compliant
We have not configured the Extra Params
To find out what the specific problem is:
Go to Analytics -> Use Cases -> VPN or ON NAC -> Buisness Profile -> Default view
Go to the radius log to see what could be happening
Go to the VPN gateway log to see if the parameter is correct
Go to ON NAC -> Policies
Once the possible cause has been identified, it is possible to carry out the corresponding troubleshooting.
4.7.1.9.4.4.1. The security compliance policy is not followed
In the event that the device that connects to the VPN does not comply with the appropriate security posture EPC_SECURITY_COMPLIANCE, it is possible that the user’s access is validated with the Default policy (product policy) so the user lifts the tunnel , but we will not have access to the network by not having a dynamic zone applied in the VPN gateway, NOT applying any of the access policies.
The user appears connected to the VPN.

But it does NOT appear in any of the dynamic zones.
In the Radius log, we see Login OK, but we also see that it sends a VLAN that we don’t know about.

In the VPN gateway log, we have access, but we see that it does not have a VSA Attribute.
As a summary, we have validated a domain user, which is within the group that we selected in the filter, but something is wrong.
If we go to the Default View of the Core, ON NAC -> Business Profiles -> Default View and look for the connection, we will see that it entered through the Default policy. We do + in the right column to see more information about it and look for the TAGS, we will see that it complies with some of the “ISS” type TAGS but not all, so it does not comply with EPC_SECURITY_COMPLIANCE, we have allowed access to the VPN to a valid user but their device is not.
Check the policies in the Backend Core, if you did not create the Reject Policy, you must create it to avoid this type of incorrect access, blocking access to the valid user who has a device that is not.
4.7.1.9.4.4.2. No extra params have been configured
In case we have configured Extra Params or it is misconfigured, the remote client, despite entering the correct policy, will not be associated with the dynamic zone configured in the VPN gateway. This way, it will not apply the associated ACLs and will not have the correct access to the network.
The user appears connected to the VPN:
But it does NOT appear in any of the dynamic zones.
In the RADIUS log, we see Login OK, and we see that it sends a correct VLAN.

In the VPN gateway log, we have access, but we see that it does not have a VSA Attribute.
If we go to the Default View of the Core, ON NAC -> Business Profiles -> Default View and look for the connection, we will see that it entered the correct policy.
We click on + to see more information about it and look for the TAGS. We will see that it complies with EPC_SECURITY_COMPLIANCE. We have allowed a valid user to access the VPN, but we do not locate it where we want, what is missing?

As a summary, we have validated a domain user, who is within the group that we selected in the filter, that complies with the device’s compliance policy, but does not associate it to the dynamic zone.
Review the access policies.
Access ON NAC -> Policies and click on the Edit button.
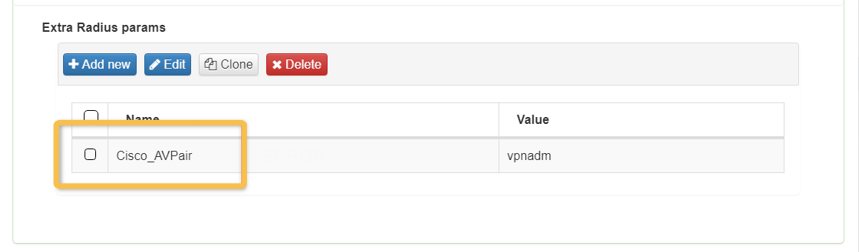
The CORRECT parameter is Cisco-AVPair with “-“ mid-dash.
4.7.1.9.4.5. Agent connection test
This section shows how to make the VPN connection in a Windows computer which the configured Agent was downloaded and installed. To carry out these steps, the connection will be made with user2, belonging to the group of standard users of our example.
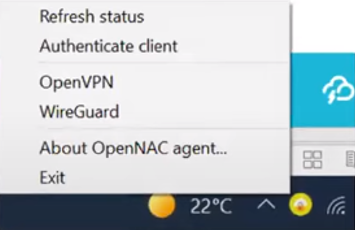
Right click on the ON Agent icon.
Select Wireguard or OpenVPN depending on the service used:
In the following form, fill in the necessary information
Click on Connect.
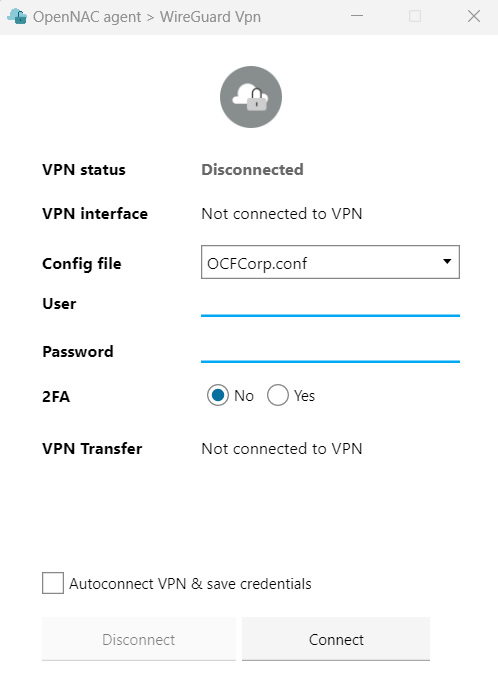
File: configuration file, configured in chapter 4.3.1. In the “dropdown” dropdown field, the different options found in the device will be shown.
User: user name.
Password: user’s password.
2FA: In case of using 2FA we must activate the check.
Code: (In case of activating 2FA) code generated by Google Authenticator.
When connecting, the following message will appear:
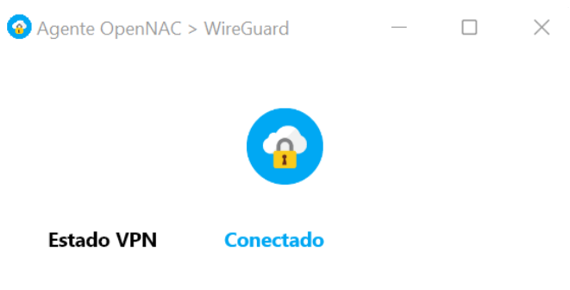
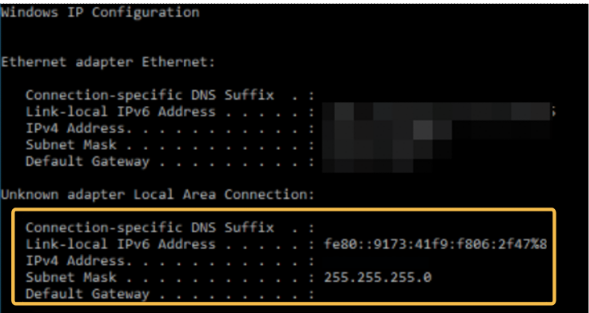
It can be verified that the connection was successful and the client received IP configuration:
On Windows device, access the cmd command line
Run the command
ipconfig
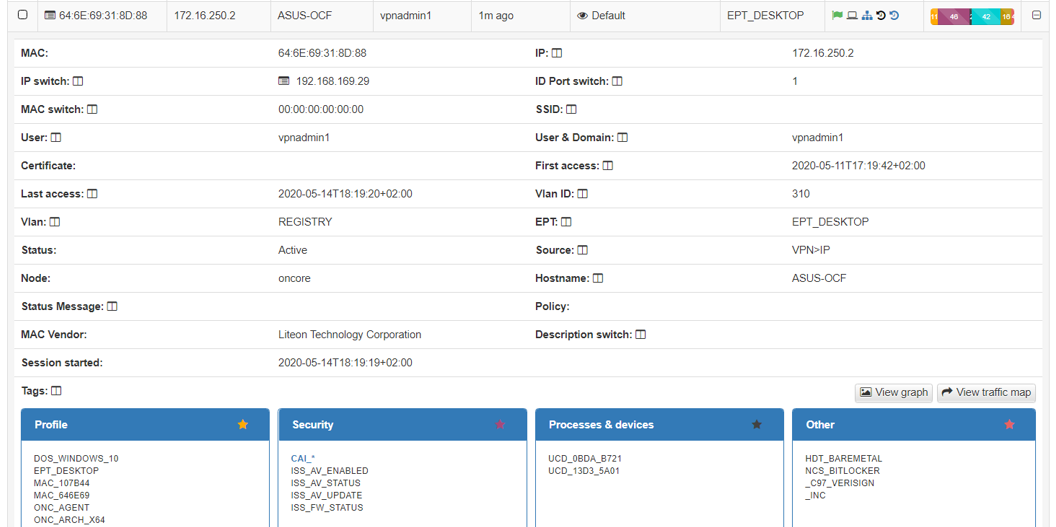
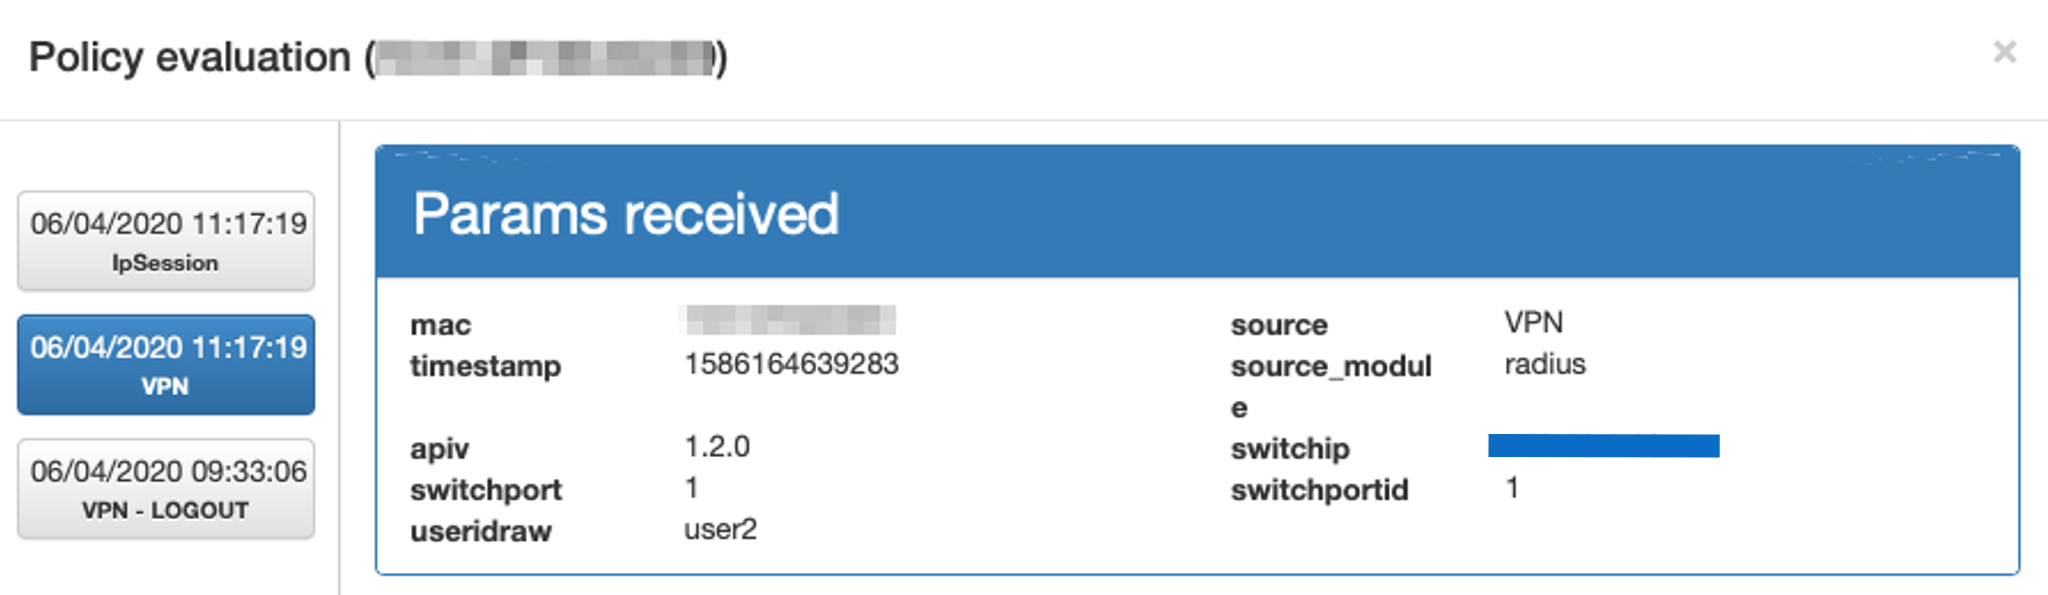
From the BackEnd ON Core, through the administration portal, we will see the access policy in which you made “Match”:
Go to the menu ON NAC > Default view
Click on the business profile “VPN”
You will be able to see the user connection

Click the eye icon in the Policy column. This way you can see more information related to the event. In this case, you can see the VPN event of user2.
From the VPNGW section in the Administration Portal:
Go to the “Manage Users” tab of OpenVPN or WireGuard
You will be able to see that the user is connected:
The last step of the connection test would be to check that the user accesses only the networks/servers on which it was configured.
After the VPN connection is established from the Windows device and using user2 (which is a vpnusr user or standard users) we check access to the servers.
We access the cmd command line
We ping one of the standard servers 172.16.20.45 (Ping OK)
We ping another of the standard servers 172.16.20.65 (Ping OK)
We ping one of the critical servers 172.16.30.20 (Request Time out)
We ping another of the critical servers 172.16.30.30 (Request Time out)
We do the same check, now establishing the VPN connection with user3 (which is a vpnadm user or administrator users)
We access the cmd command line
We ping one of the standard servers 172.16.20.45 (Request Time out)
We ping another of the standard servers 172.16.20.65 (Request Time out)
We ping one of the critical servers 172.16.30.20 (Ping OK)
We ping another of the critical servers 172.16.30.30 (Ping OK)