4.7.1.6. Administration
The administration section focuses on advanced tasks related to the ongoing management and maintenance of the system covering more complex configurations and advanced features.
We will detail the steps to configure the system, preparing it to operate its 2SRA functionality.
Note
It is essential to have correctly deployed and configured the necessary nodes for this use case.
In this section, we will configure the BackEnd ON Core and its associated components. The initial configuration involves setting up the IDP (AD/LDAP and LDAP) to enable the creation of user filter validation policies. Next, we will proceed to configure the Agent VPN, and finally, we will configure the OTP settings.
4.7.1.6.1. Creating User Data Sources
By defining multiple User Data Sources (UDS) on a system, different authorities can be used in the authorization process. Active Directory attributes support this process.
To create a new UDS, follow the steps provided below:
Go to ON CMDB > User data sources
Click on the Add new button.
Define a name and select a type for the new UDS. In our example we will select the Active Directory type. It displays the following configuration properties:
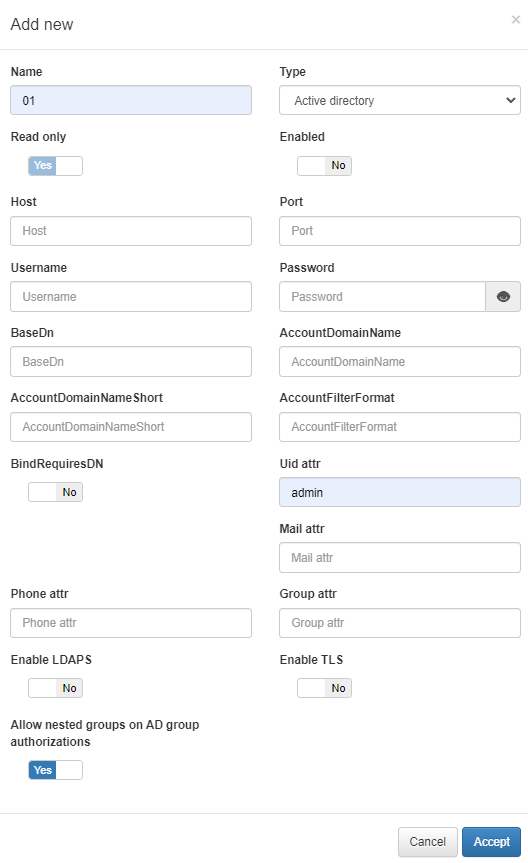
Parameter |
Description |
|---|---|
Name |
The name used by the UDS. In this case, this is a UDS type LDAP/AD, and for this reason, for instance: AD Mycompany |
Type |
Defined as LDAP/AD. The database connection could be used to get user attributes. |
Read only |
If the query is launched with a Read only flag. This will avoid any write action in the commands. |
Enabled |
The UDS can be enabled and disabled. |
Host |
The LDAP/AD IP where the queries are launched. For instance: 172.16.11.5, additional IPs can be added. |
Port |
The port used for the AD/LDAP Search query, by default, uses an unsecured connection. The default is 389 and if AD/LDAP SSL is enabled is 636. |
Username |
The user registered in the AD/LDAP server. This allows us to bind and use AD/LDAP information. For instance, the user created the picture in the active directory in Step 1. |
Password |
The password for the AD/LDAP binding. |
Base DN |
BaseDN at the top of the domain name structure. Our domain is named mycompay.local and its BaseDN is DC=mycompany,DC=local. |
AccountDomainName |
The DNS name for the domain is in uppercase. In this case MYCOMPANY.LOCAL. |
AccountDomainName Short |
The short name for the domain or commonly named NETBIOS name. For instance, MYCOMPANY. |
AccountFilterFormat |
The attribute used to select users. We have included two options, but**only one must be used**. In this example sAMAccountName=%s is defined for Active Directory, and uid=%s for LDAP Servers. |
Bindrequires DN |
It is basically the credential you are using to authenticate against an LDAP. When using a bindDN, it usually comes with a password associated with it. Sometimes, anonymous binding doesn’t allow certain types of actions. |
Uid attr |
The attribute is used to identify users’ IDs. The filter changes depending on if AD or LDAP is used. |
Mail attr |
The filter is used to identify the mail as an attribute of the user. |
Phone attr |
The filter is used to identify the phone number as an attribute of the user. |
Group attr |
The filter use to identify the groups as an attribute of the user. |
Enable LDAPS |
For authenticating and authorizing users where LDAP communication is transmitted over an SSL tunnel port 636 TCP. |
Enable TLS |
For securing communication between LDAP clients and LDAP servers. |
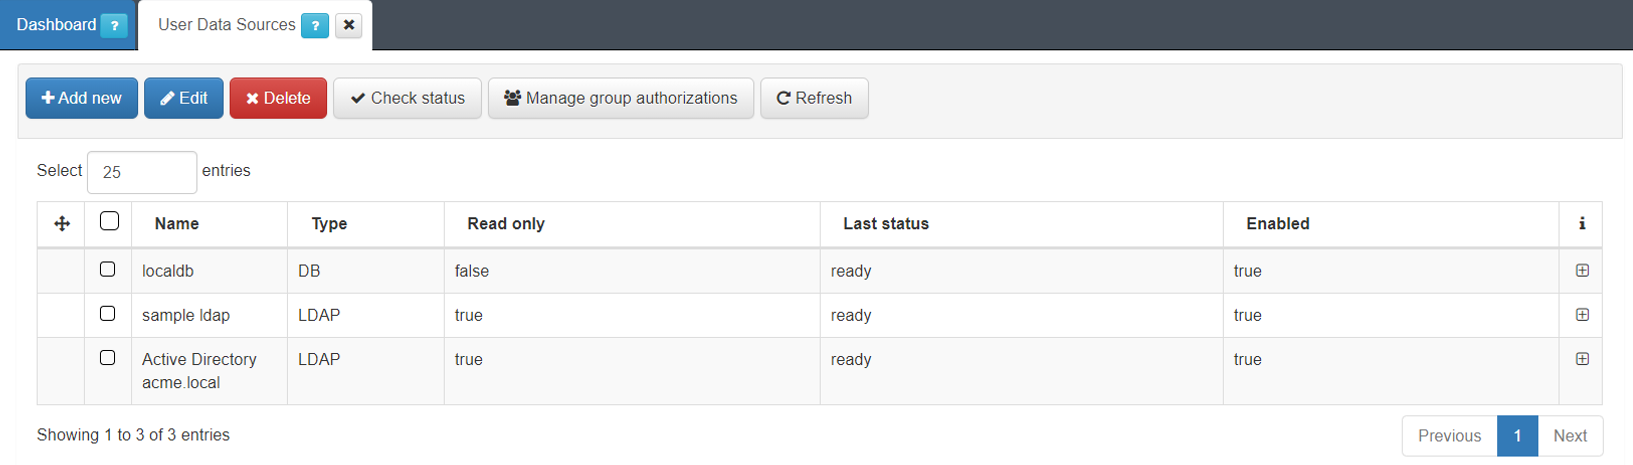
Once finished with this configuration window, click on Accept. It should now be displayed in the User data sources table.
Check the Last status column, if it shows Ready, the configuration is done. If not, right-click on it and it will display the following options:
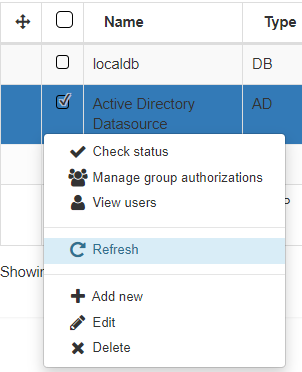
Select the Check status option, and if there are no errors, the UDS will change its state to Ready.
- Otherwise:
select it
Click on the “Check status” button.
If there are no errors, the UDS will change state to “ready”.
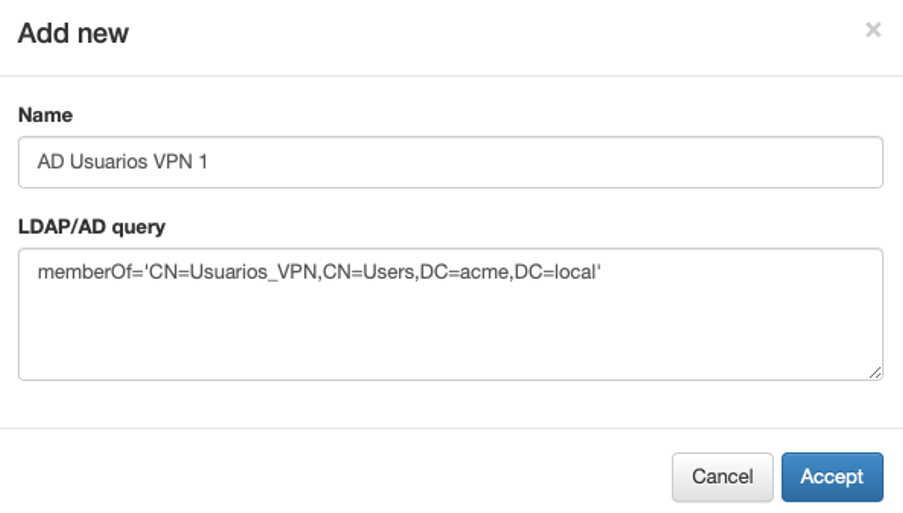
4.7.1.6.1.1. LDAP filters VPN groups
This section explains how to generate LDAP filters. The filters are used to segment the groups of users that access through the VPN and associate them with the dynamic zones in the VPNGW, assigning the different access ACLs through the VPN. Keep in mind that an example is provided in this document, you must create the different LDAP filters necessary for your access policies.
Go to “ON CMDB -> LDAP/AD Filters” menu.
Click the Add new button
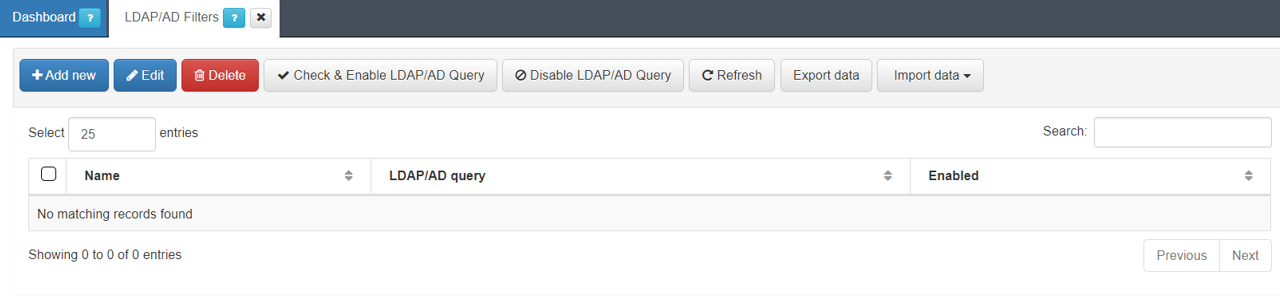
- In this section:
Add a name to the filter
Write the LDAP query with the required information
Click the “Accept” button
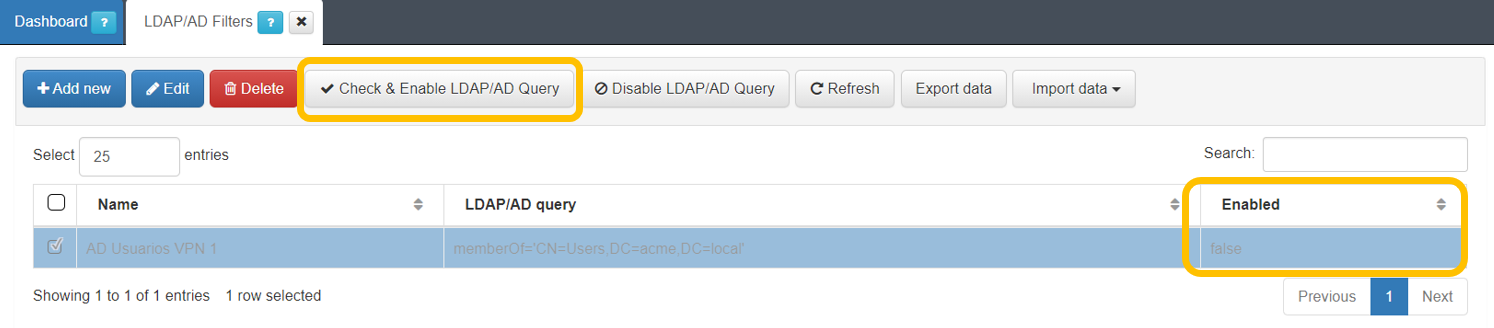
Once the filter is created, it will appear in the list in grey. You can see that the filter is disabled by default
- To enable the new filter:
Select it
Click the “Check & Enable LDAP/AD Query” button
- In this section:
Choose the active directory to associate this filter with
Click the “Accept” button
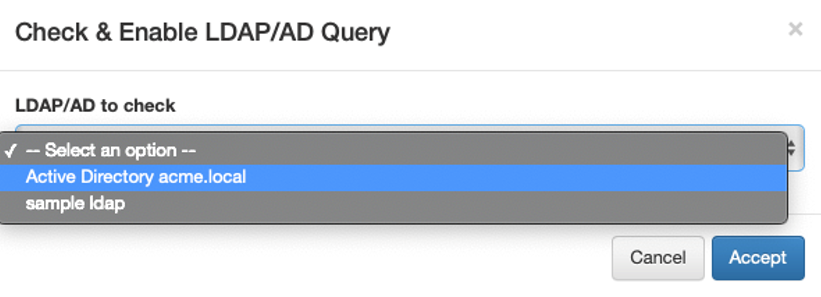
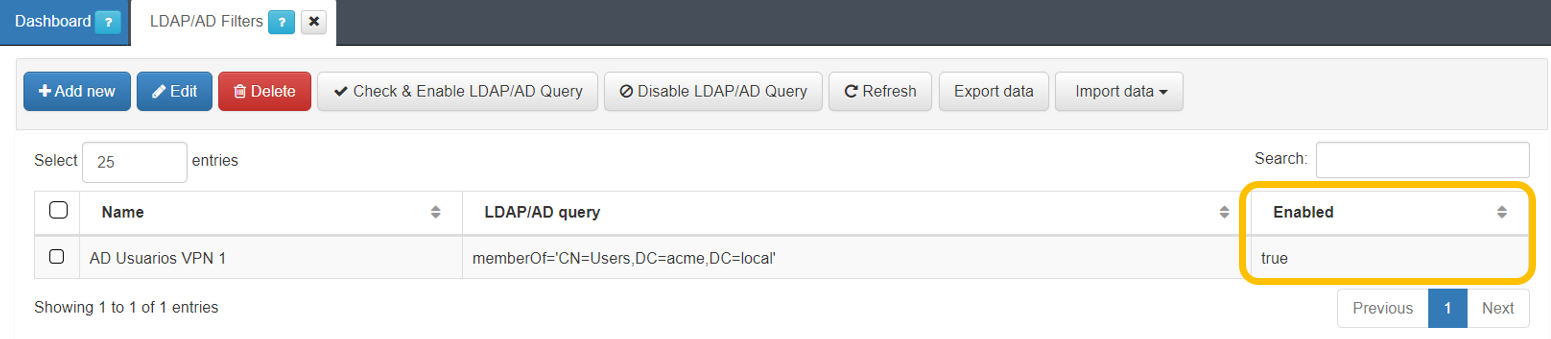
If no errors occur, the filter will be enabled
4.7.1.6.2. Set Firewall as Network Device
It will be necessary to set the Firewall as a Network Device in the ON Core CMDB. To do this, we go to “ON CMDB -> Network Devices” and click “Add new”:
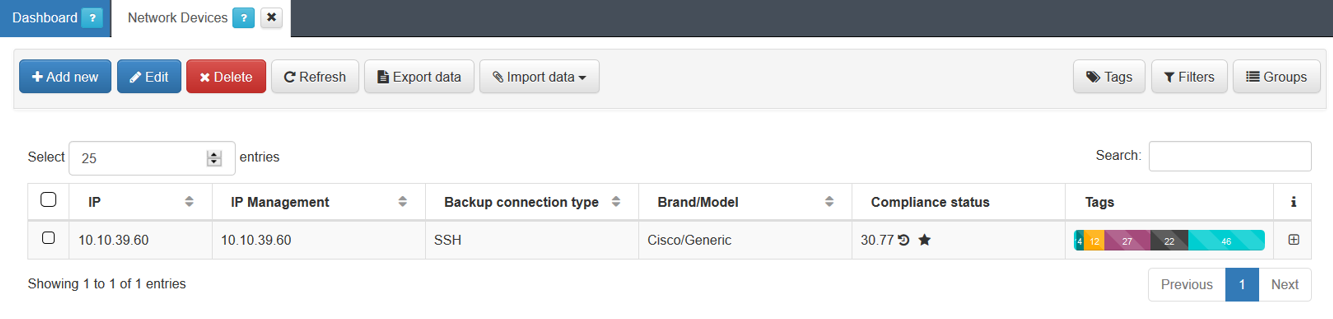
The minimum information that must be filled in is indicated below.
4.7.1.6.2.1. General info
In this tab, it is required to complete at least the following fields.
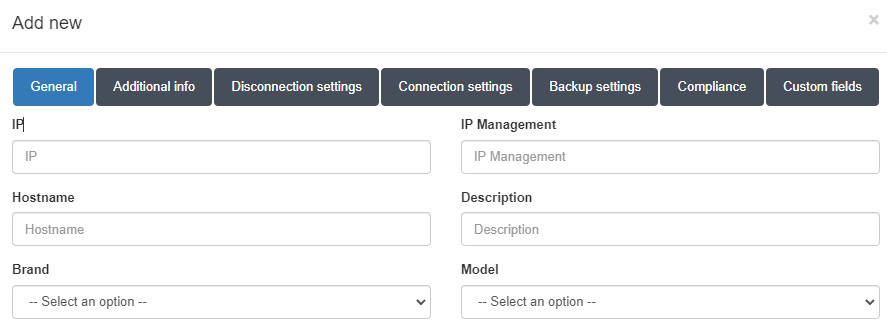
IP: IP address that identifies the device. FW IP.
Hostname: Hostname that identifies the device. FW hostname.
Brand / Model: Brand and model of the device.
4.7.1.6.2.2. Disconnection Settings - WireGuard VPN
The WireGuard VPN allows us to TogglePort connections for re-authentication. To do this, we must configure the disconnections settings with the following information:
General:
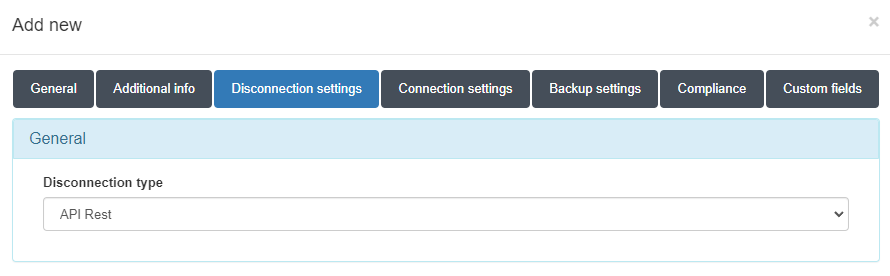
In the “General” section, we select the type “API Rest”.
API Rest Properties:
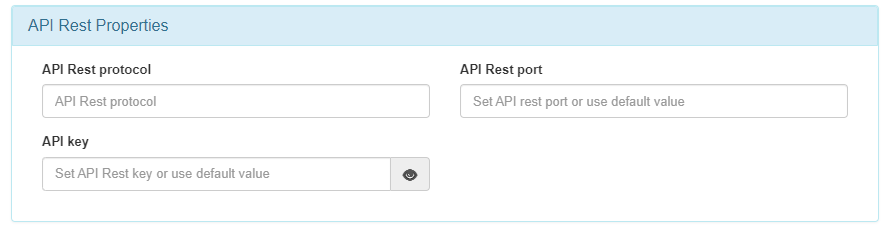
In this section, we must define the following parameters:
API Rest protocol: Connection protocol with the API Rest of the FW. (default https)
API Rest port: Connection port with the API Rest of the FW. (Default 10443)
API Key: API Key to make requests to the API Rest of the FW.
To obtain an API KEY from VPN Gateway go to the ON CMDB > Security > API Key section in the Administration Portal.
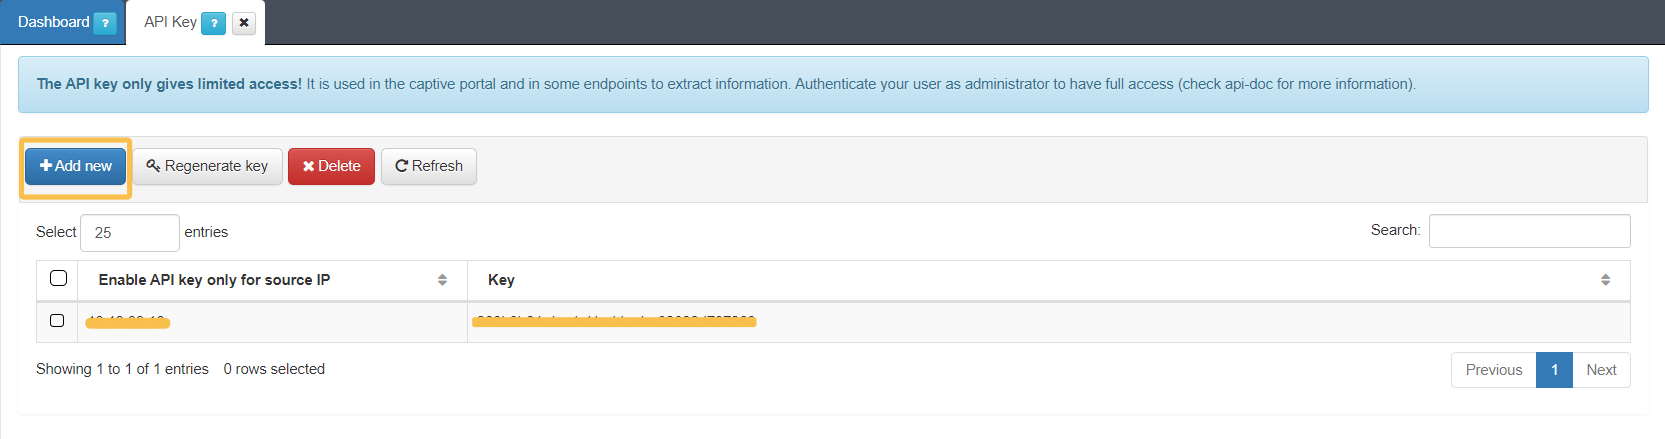
Click on the Add new button:
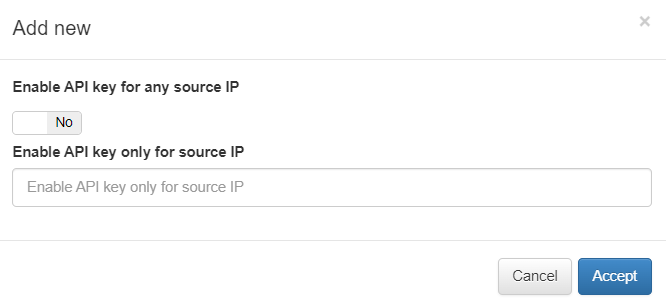
If there is more than one OpenNAC node (workers), enable the flag Enable API key for any source IP, otherwise, just enter the VPN Gateway IP in the IP field.
4.7.1.6.3. VPNGW policy configuration (ON Core)
4.7.1.6.3.1. Agent Profiles
Agent Profiles are the settings that are sent to remote agents installed in client devices, after receiving information from them.
It is necessary to add the connection profile to the Agent configuration profile that we have registered as the default profile. In this way, when the agent connects with the Backend we will send the VPN configuration.
Go to the “ON Agent > Agent Profiles” section to open the agent profiles management screen.
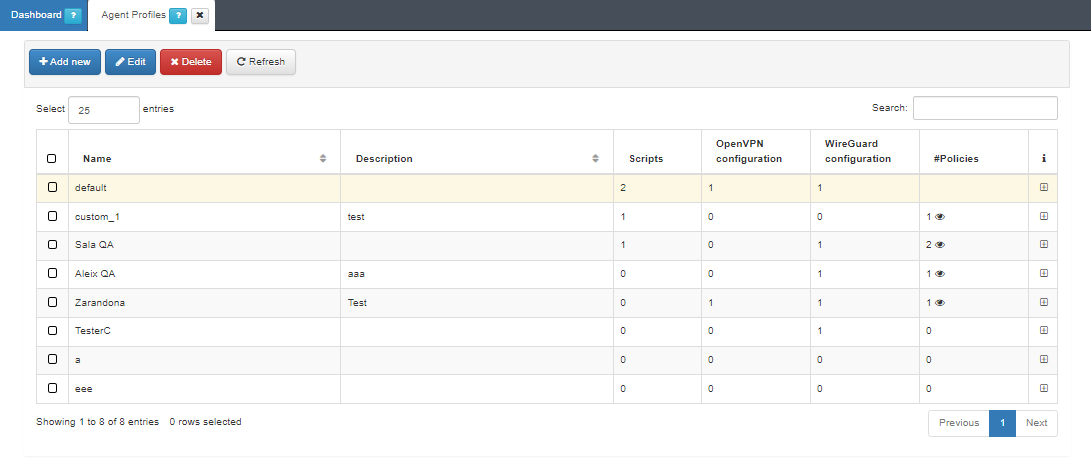
Select the “default” profile and click “Edit”.
In the VPN configuration module of the pop-up window, you will find the OpenVPN and Wireguard fields that allows you to select the VPN connection profile with the settings previously created.
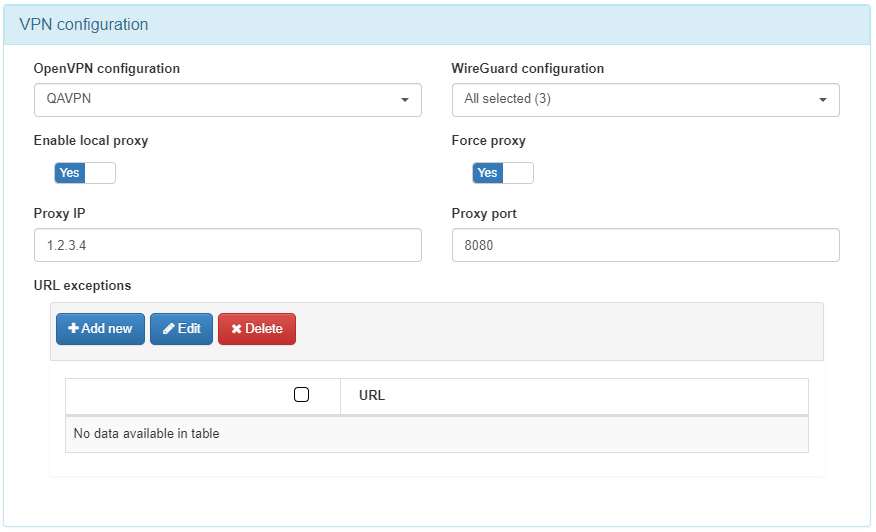
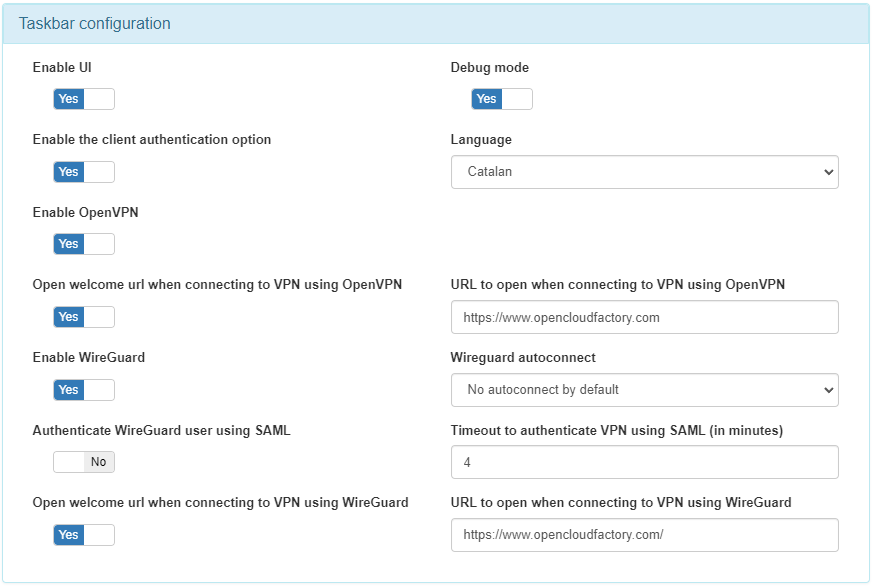
Inside the “Taskbar Configuration” module, enable “Enable UI”, “Enable the client authentication option” and “Enable OpenVPN” or “Enable WireGuard” corresponding to what we have previously configured.

Finally, after selecting the desired settings, click the “Accept” button to save the changes made.
After configuring the Agent, we will configure the download to indicate the connection IP and enable the use of VPNs such as WireGuard or OpenVPN.
To do that, go to “ON Agent > Agent configuration > Download & parse”, and in Download & Install agent options fill the Server list, and enable Wireguard or OpenVPN corresponding to what we have configured previously.
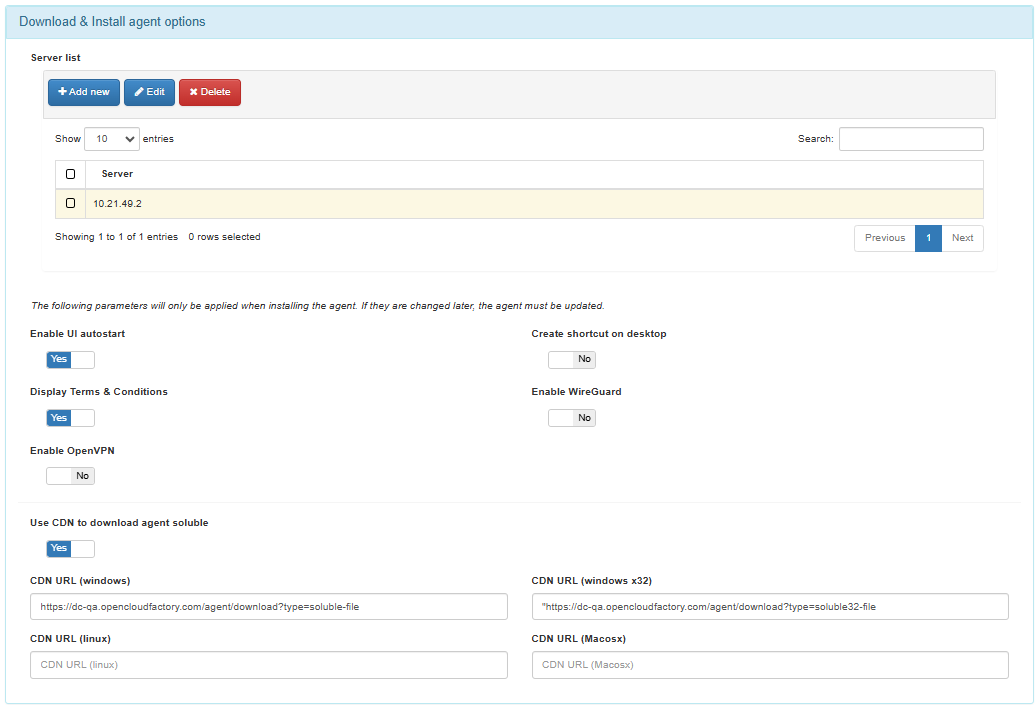
Note
In the “Server list” field, you should enter the Public URL of the VPN connection, which should be associated with the name registered in the public DNS and the certificate that was generated beforehand
Click on Save to save the settings.
4.7.1.6.4. Policies Configuration
4.7.1.6.4.1. Plugin Configuration (WireGuard Only)
If you are using the WireGuard VPN service, you need to configure its plugin before configuring policies. For the OpenVPN service, this step is not necessary.
Configure the WireGuard plugin.
Open the menu “Configuration > Plugins > wireGuardSync > Edit plugin”.
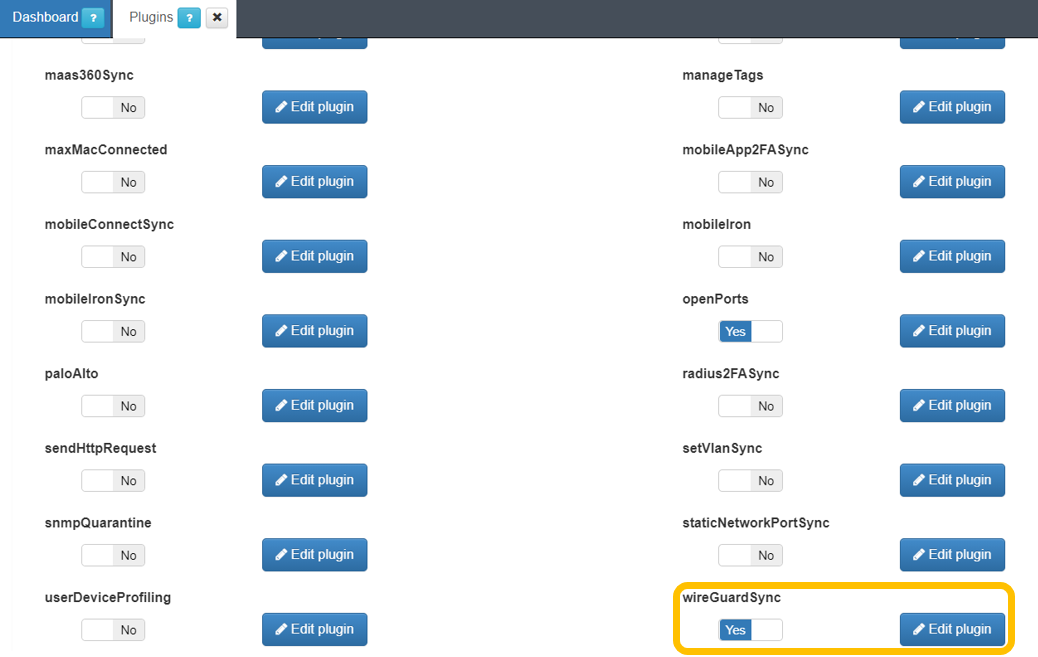
Configure the Synchronous WireGuard plugin form.
4.7.1.6.5. Policies
In this section, we will configure the VPN user validation policies. Here, we will create four policies as examples: one for Admin users, one for Standard users, one for Rejected users, and one for Visibility Agent.
Note
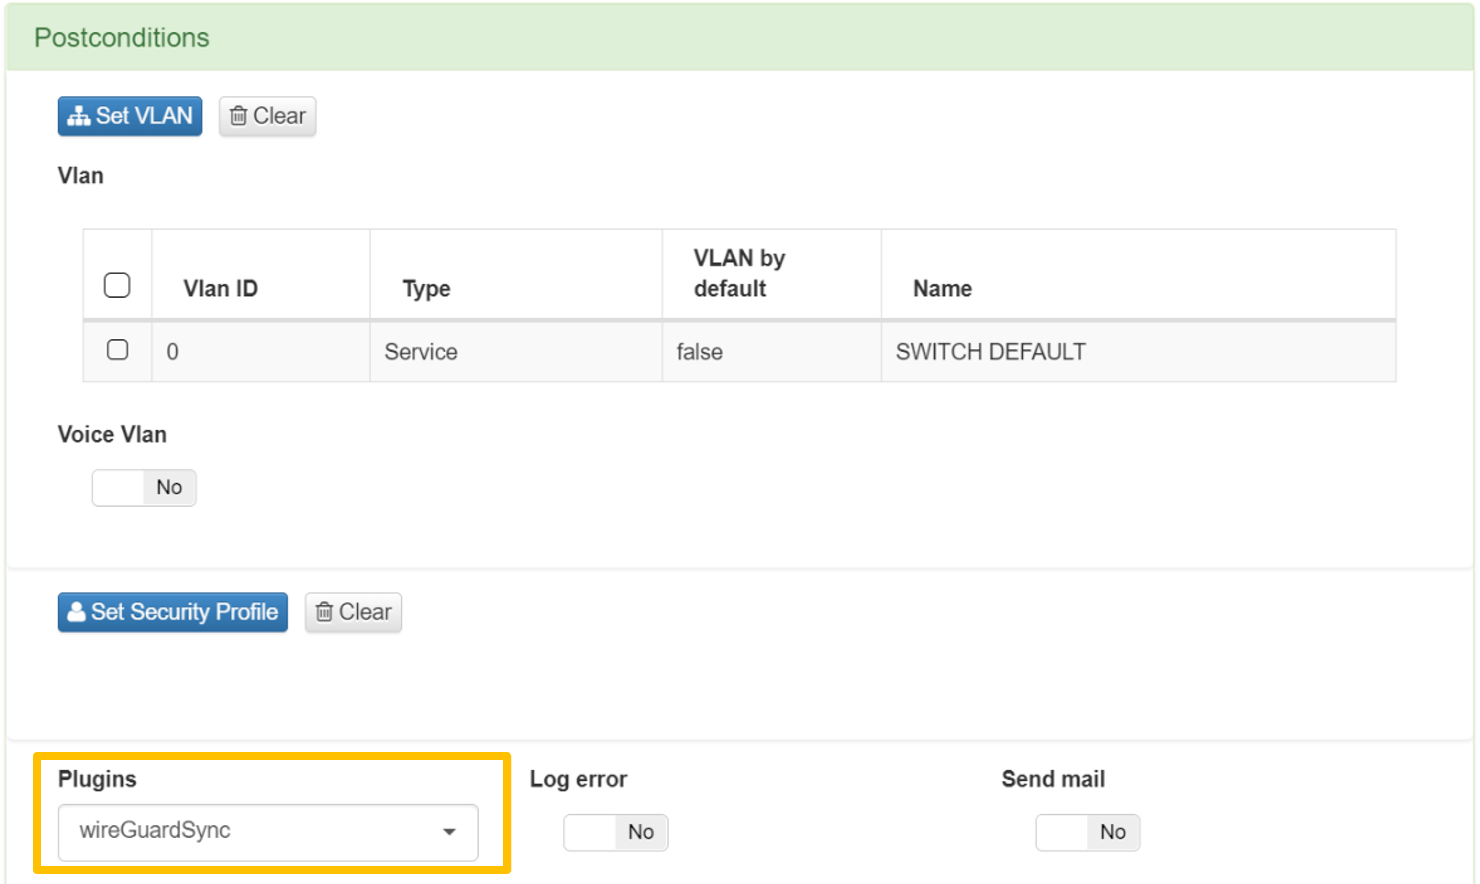
For WireGuard VPNs it is necessary to associate the appropriate WireGuard plugin during the configuration process. However,note that this configuration step is not required when using OpenVPN.
To associate the WireGuard plugin to a policy:
Go to the ON NAC > Policies section.
Scroll down to the Postconditions configuration of the policy you want to associate the WireGuard plugin and select the WireGuard plugin:
4.7.1.6.5.1. Creating an Admin Users policy
Go to the ON NAC > Policies section.
Click on the Add new button.
In the General section:
Name: policy name
Enable: yes (so that the policy is enabled from the beginning)
Section: policy section
Comment: policy comment

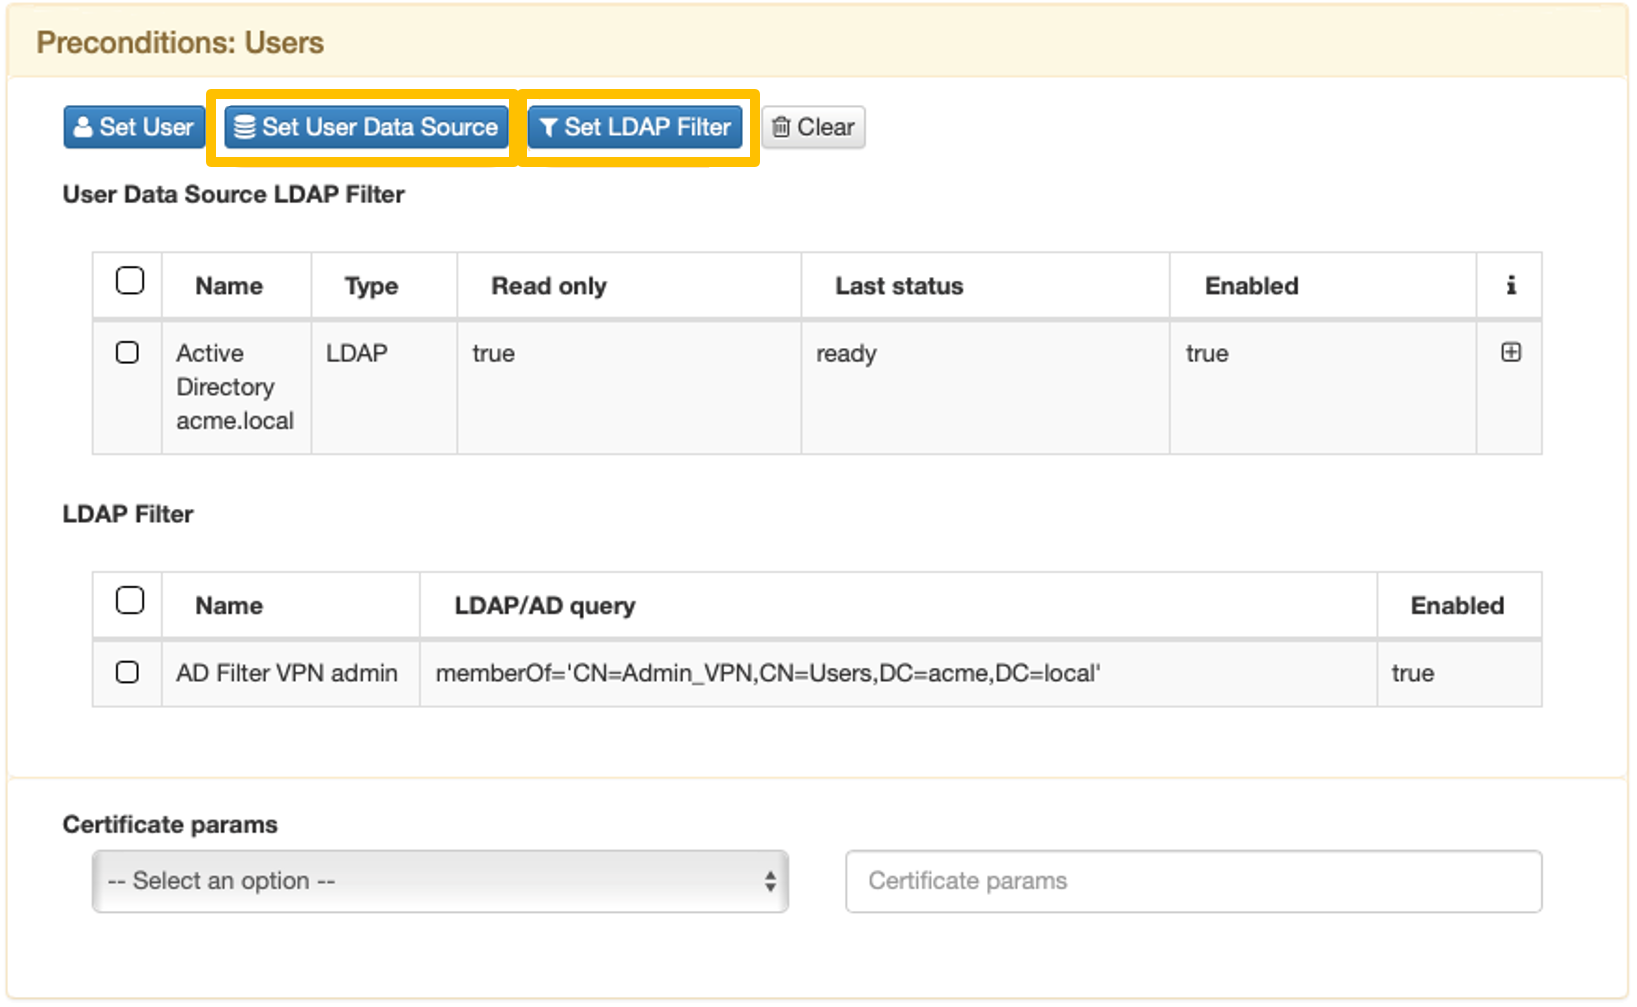
In the Preconditions: Users form:
Click on “Set User Data Source”
Select the AD to use
Click on “Set LDAP Filter”
Select the Rule to use (if you don’t have it, you can create a new one)
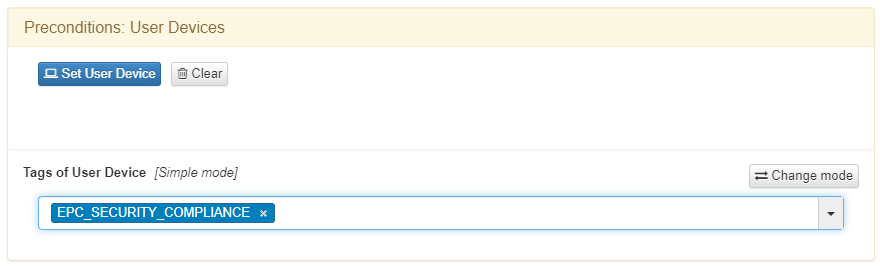
In the Preconditions: User Devices window, add a Tag from those previously created.
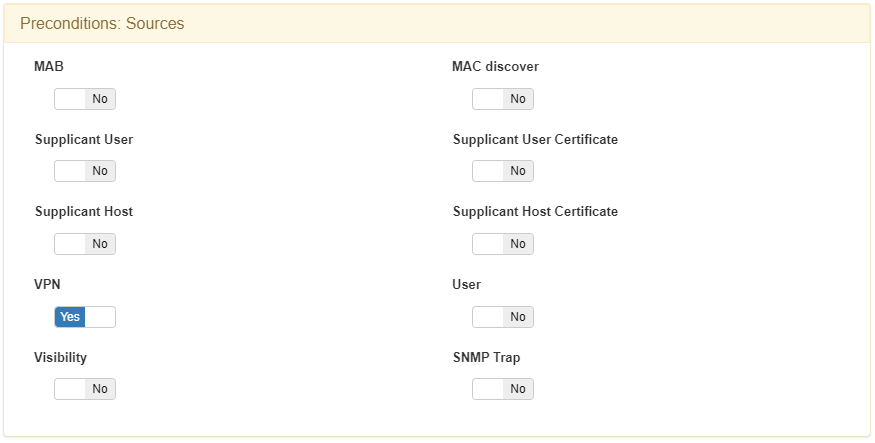
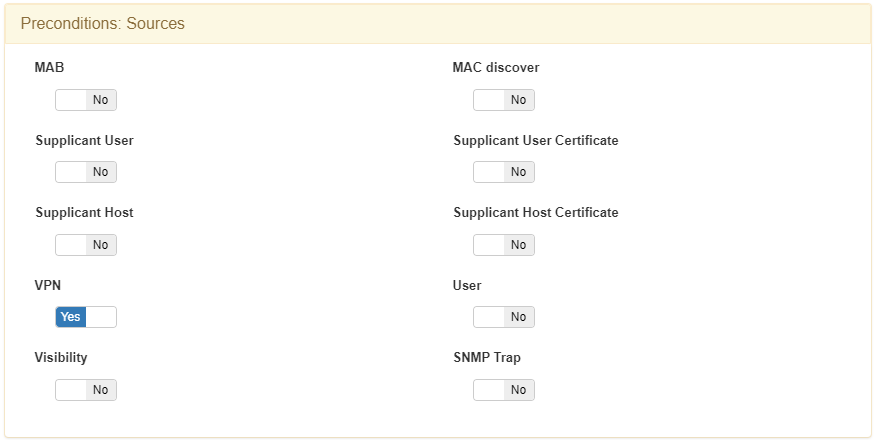
In the Preconditions: Sources form select only VPN:
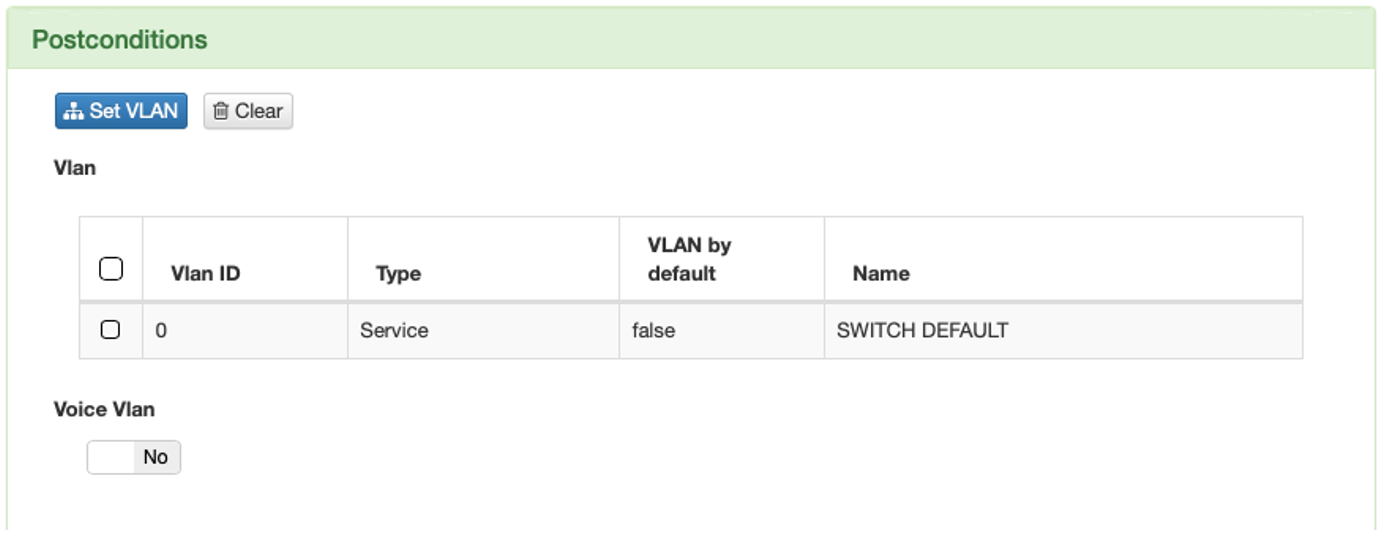
In the Postconditions section:
Click on “Set Vlan”
Select the VLAN “Switch default”
Zone Assignment:
8.1. OpenVPN
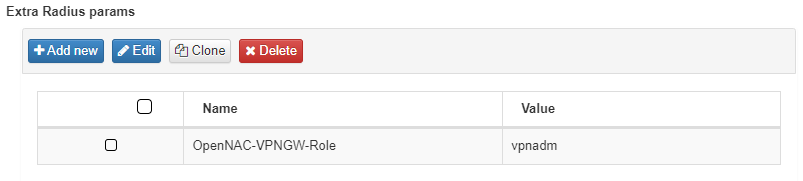
In the Postconditions section: Extra Radius params
Click on Add new
Fill in the fields
Vendor -> opennac
Name -> OpenNAC-VPNGW-Role
Value -> We will assign the name of the dynamic zone created previously and that allows us to associate the group of AD users and the selected LDAP filter, and validate with the rule that we are creating, to assign the ACLs security policies in the finalizer automatically.
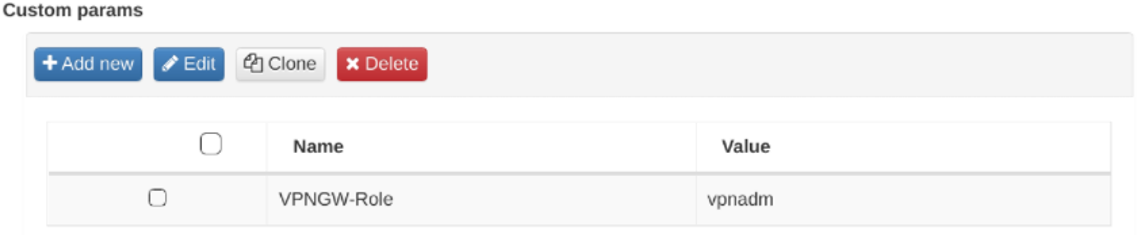
8.2. WireGuard
In the form in Postconditions: Custom params
Click on Add new
Fill in the fields
Type -> Free text
Name -> VPNGW-Role
Value -> We will assign the name of the dynamic zone created previously and that allows us to associate the group of AD users and selected LDAP filter, and validate with the rule that we are creating, to assign the ACLs security policies in the finisher automatically.
Click on Accept to save the configurations.
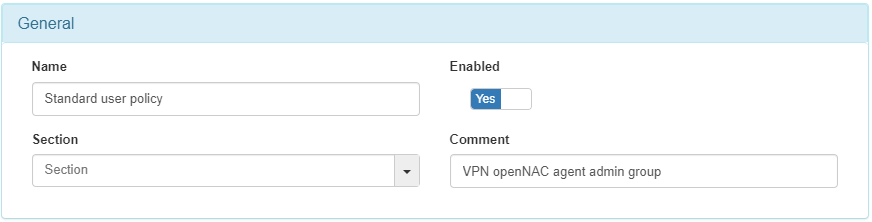
4.7.1.6.5.2. Creating a Standard User policy
Repeat the steps 1 and 2.
In the General section:
Name: policy name
Enable: yes (so that the policy is enabled from the beginning)
Section: policy section
Comment: policy comment
In step 4 you have to select the necessary LDAP Filter, in Preconditions: Users. In this example it would be the following:

Repeat the steps 5,6,7.
In step 8, you have to create a parameter with a new value. This is because this parameter is used in the firewall to be able to distinguish VPN networks. The corresponding zone must be assigned in “Custom params” in the case of WireGuard or “Extra Radius params” in the case of OpenVPN.

Repeat the step 9.
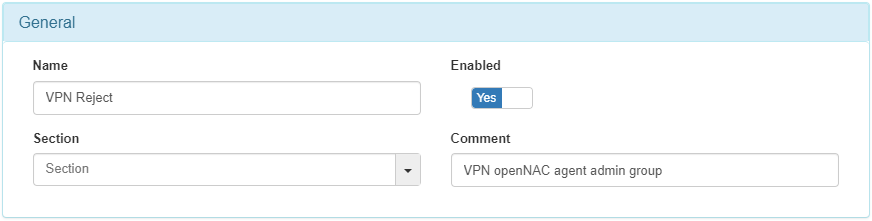
4.7.1.6.5.3. Creating a Reject User policy
A Reject policy must be created to reject the connection of those users who do not comply with the rest of the VPN policies, this policy must be located at the end of all VPN policies:
In the form in General:
Name: policy name
Enable: yes (so that the policy is enabled from the beginning)
Section: policy section
Comment: policy comment
In the form in Preconditions: Sources select only VPN
In the Postconditions section:
Click on “Set Vlan”
Select the Vlan “Access Denied”

Click on Accept to save the configurations.
4.7.1.6.5.4. Creating a Visibility Agent policy
This policy will give an agent profile to all the devices that contains agent before they are connected.
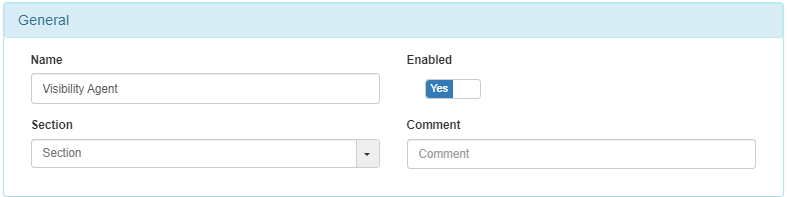
In the General section:
Name: policy name
Enable: yes (so that the policy is enabled from the beginning)
Section: policy section
Comment: policy comment
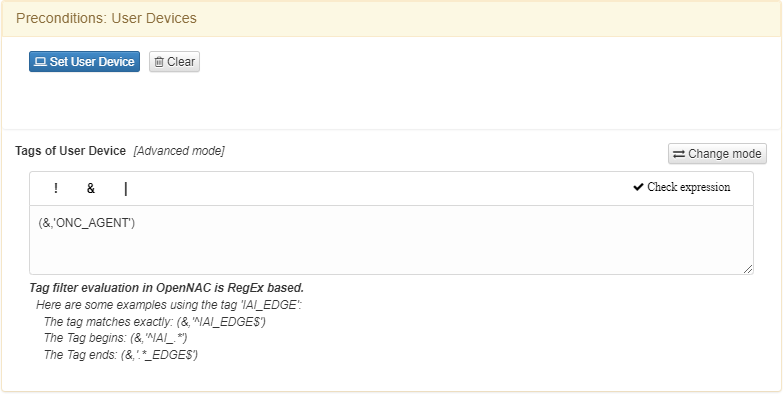
In Preconditions: User Devices:
Add the agent tag to filter ($,’ONC_AGENT’).
Check that is correct pressing Check expression.
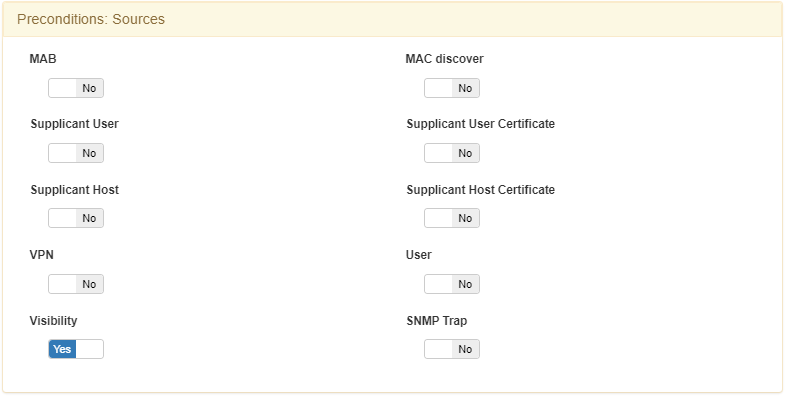
In Preconditions: Sources select the Visibility source:
In the Postconditions section:
Click on “Set Vlan”
Select the VLAN “Switch default”

In Postconditions section:
Add the Agent Profile created previously.

4.7.1.6.6. Single Sign-On Wireguard VPN using SAML
You can perform a Single Sign-On (SOO) authentication flow using SAML to perform WireGuard-type VPN authentications.
To configure this authentication, execute the following steps:
4.7.1.6.6.1. VPN captive portal creation
When users start the authentication process, they will be redirected to the system’s captive portal and must go through the flow configured for authentication.
For the creation and start-up of the captive portal where users will carry out the SAML authentication flow, we must make the following configurations:
4.7.1.6.6.1.1. Captive Portal Flow Creation (IdP Federation)
The first step includes creating the authentication flow. At this point, the federation of the SP in the IdP will be configured, so it will be necessary to have:
IdP federation metadata.
IdP server ID.
Once we have this data, we can follow the steps in the ON Captive -> Captive VPN workflows.
4.7.1.6.6.1.2. Captive Portal Domain Creation
Once we have defined the VPN authentication flow, we will need to add it to a new captive portal domain. The domain corresponds to a grouping of different flows, including VPN flows. To do this we go to “ON Captive -> Captive domains” and add a new domain by clicking on Add new:
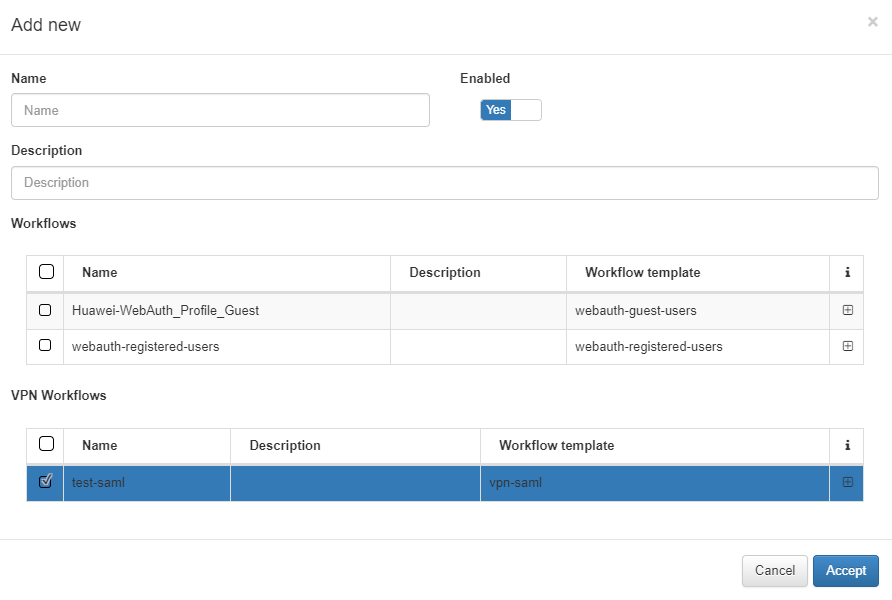
Name: Name of the new domain.
Enabled: Check to enable or disable the domain.
Description: Description of the new domain.
Workflows: Cable/wifi authentication flows.
VPN Workflows: VPN authentication flows. Here we must select the flow created in the previous section.
4.7.1.6.6.1.3. Captive Portal Instance Creation
Once we have defined the VPN authentication flow, we will need to add it to a new captive portal instance. To do this we go to “ON Captive -> Captive instances” and add a new domain by clicking Add new:
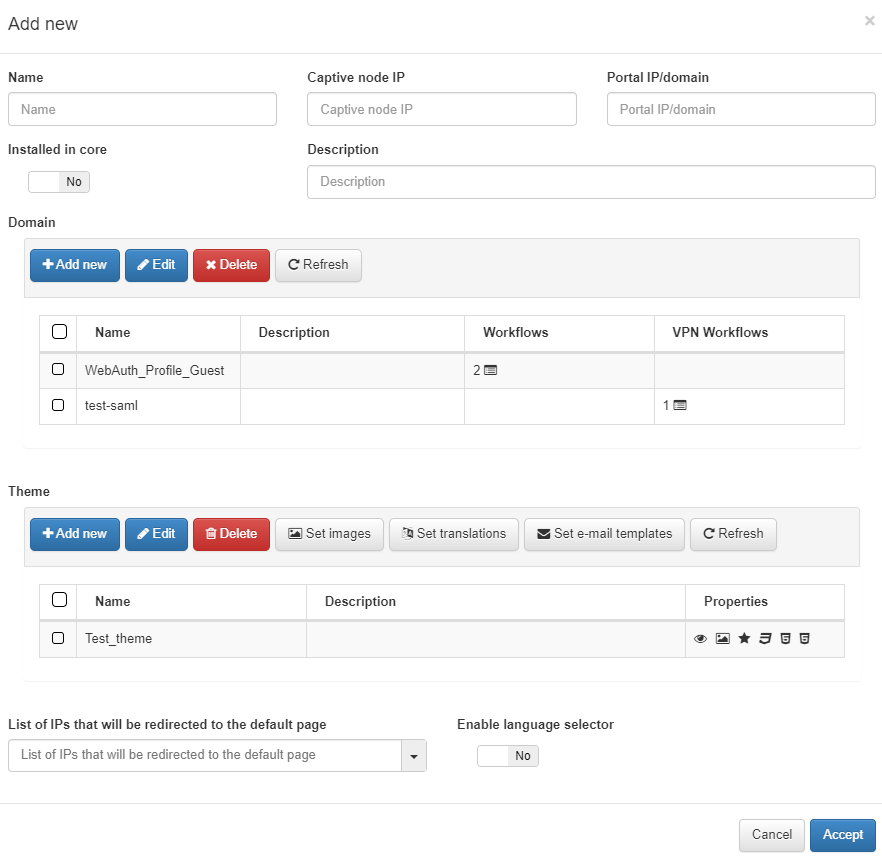
Name: Name of the new captive portal instance.
Captive node IP: The IP address for the Captive node.
Portal IP/Domain: IP address or domain (FQDN) to which the instance will be assigned.
Installed in core: Check that verifies if the instance is installed on the ON Core server itself.
Description: Description of the new instance.
Domain: Domain created in the previous step. This will define the flow to follow.
Theme: Theme applied to the captive portal.
List of IPs that will be redirected to the default page: This parameter can be used to redirect users to the default page and not to the captive portal.
4.7.1.6.6.2. Federation of the SP in the IdP
Once the “Captive VPN Workflow” is created, we can obtain the metadata and identity of our SP in the following link:
https://<captive_portal_ip_or_domain>/simplesaml/module.php/saml/sp/metadata.php/saml-test?output=xhtml
When accessing the link we will see the page of our SP with the metadata:

This metadata is what we must provide to the IdP in order to complete the federation between the two.
4.7.1.6.6.3. Agent Configuration
The use of SAML to authenticate the VPN connections of the WireGuard service requires an additional configuration. This setting is to enable such functionality in the ON Agent software.
To activate the SAML functionality in the agents we must go to “ON Agent -> Agent Profiles” and in the profile used for it (default by default) activate the options “Enable WireGuard” and “Authenticate WireGuard use using SAML”:
4.7.1.6.6.4. SAML Authentication Flow Example
This section will explain an example of a connection using the SAML authentication flow.
Having already downloaded and installed the Agent, the first step will be to right-click on the icon in the taskbar and select the “WireGuard” type VPN connection:

When opening the Agent, it will appear to connect to the VPN without the possibility of entering access credentials. We must click “Connect”:

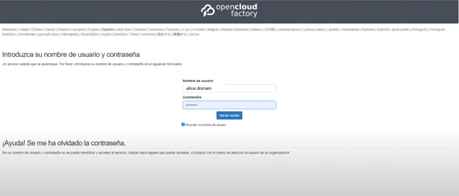
A new window will automatically open in the browser that will direct us to the IdP access page (example image) where we must enter our credentials:
Once we have authenticated ourselves, we will return to the ON Core portal where, if we have accessed correctly, we will be able to download the VPN access file:
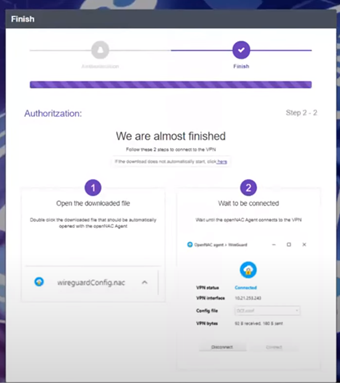
When we have downloaded the VPN access file we must execute it:
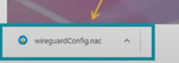
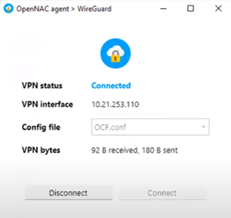
The Agent will automatically configure itself and access the VPN:
4.7.1.6.7. OTP Configuration
4.7.1.6.7.1. OTP Email Template
This section explains how to configure the email that we will send to users.
Go to menu “Configuration -> Configuration vars”
Click on the OTP tab
Fill in the fields
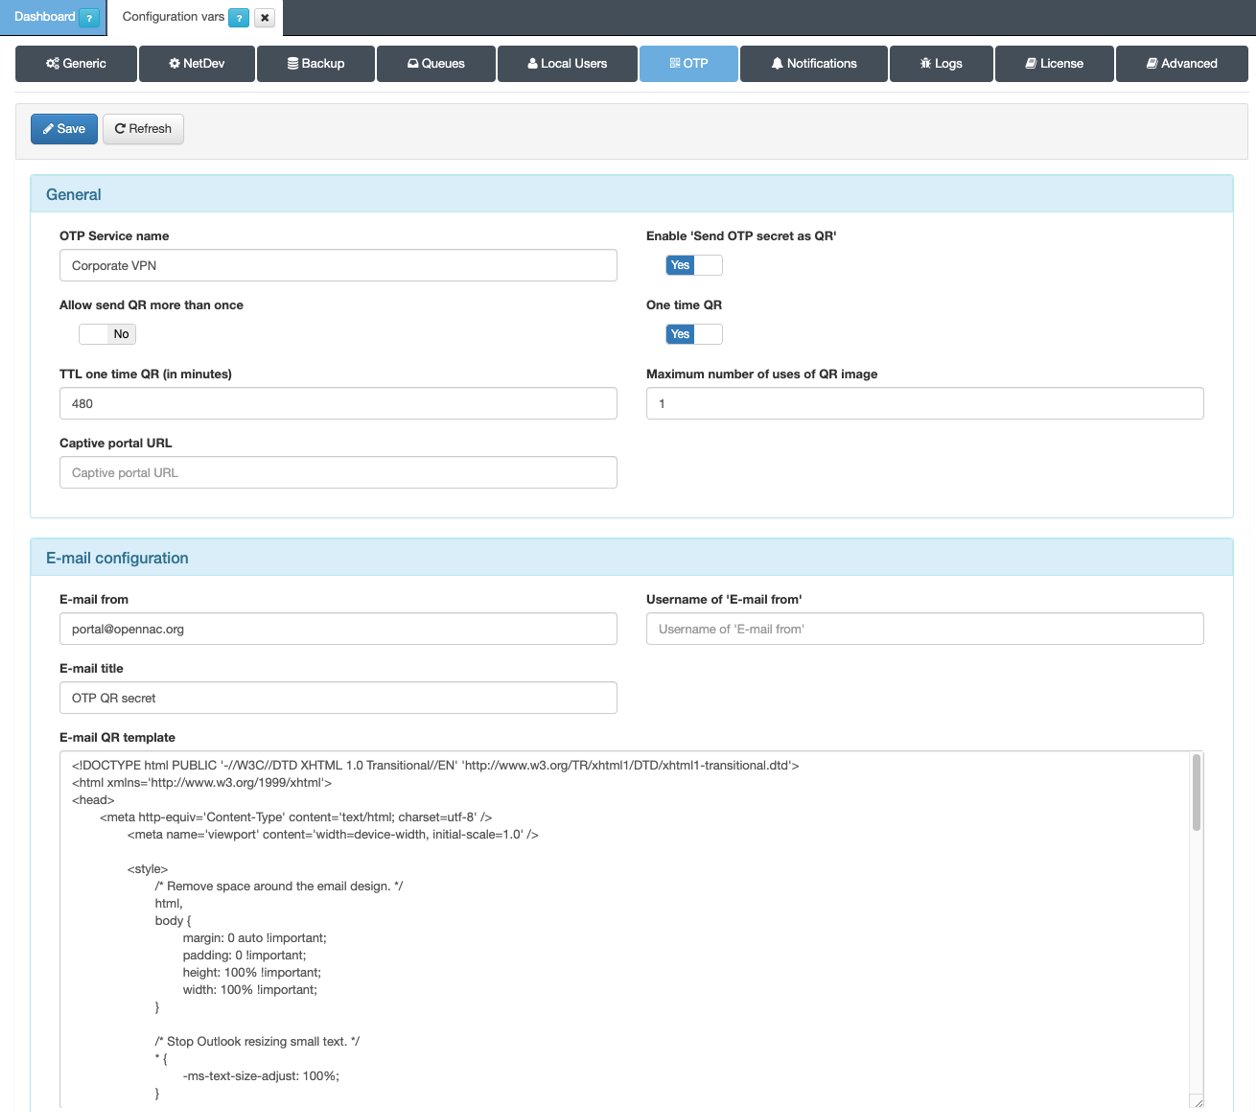
Enable ‘Send OTP secret as QR’: select “yes” so that the user receives a QR code that will be used in Google Authenticator.
Allow send QR more than once: by default the QR Code can be sent only once (if you want to send another email, you must generate a new OTP secret). In case you want to reuse the same code, enable this field.
One time QR: enable one time QR mode.
TTL one time QR (in minutes): defines the time in minutes that a QR image will take to expire from when it is sent until it is scanned by the user. Default 480 minutes.
Maximum number of uses of QR image: defines the maximum number of scans of the same QR image.
Captive portal URL: Fill in the captive portal address for the one time QR.
- E-mail configuration: configuration of the mail without the one time QR mode enabled.
E-mail QR from: fill in the name of the email sender.
E-mail QR title: fill in the email title.
E-mail QR template: this section includes the HTML code that will be seen in the content of the email with the one time QR mode disabled.
- One time QR e-mail configuration: email configuration with the one time QR mode enabled.
E-mail QR from: fill in the name of the email sender.
E-mail QR title: fill in the email title.
E-mail QR template: this section includes the HTML code that will be seen in the content of the email with the one time QR mode enabled
Click “Save” to save the changes
In the following image you can see the different sections previously mentioned:
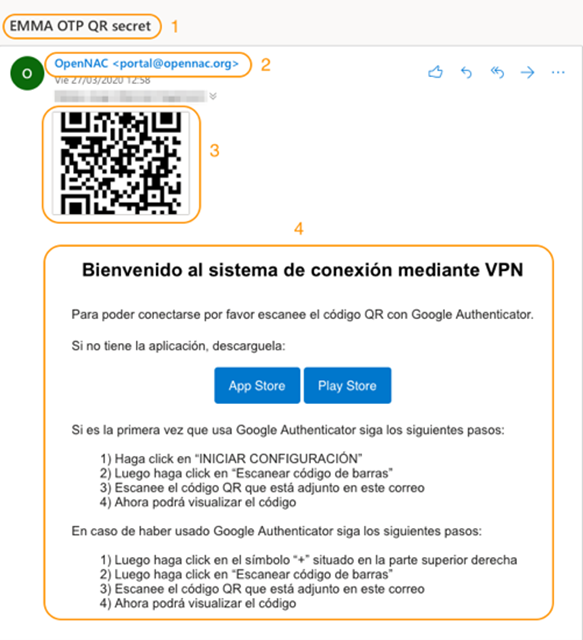
The title of the email
Name of who sends the mail
The OTP in the form of a QR
The HTML template rendered in the mail
4.7.1.6.7.2. Sending QR Codes via Email
Going to Configuration -> OTP, it is possible to manage all the tasks related with OTP Network Access. OTP Management includes many different functions.
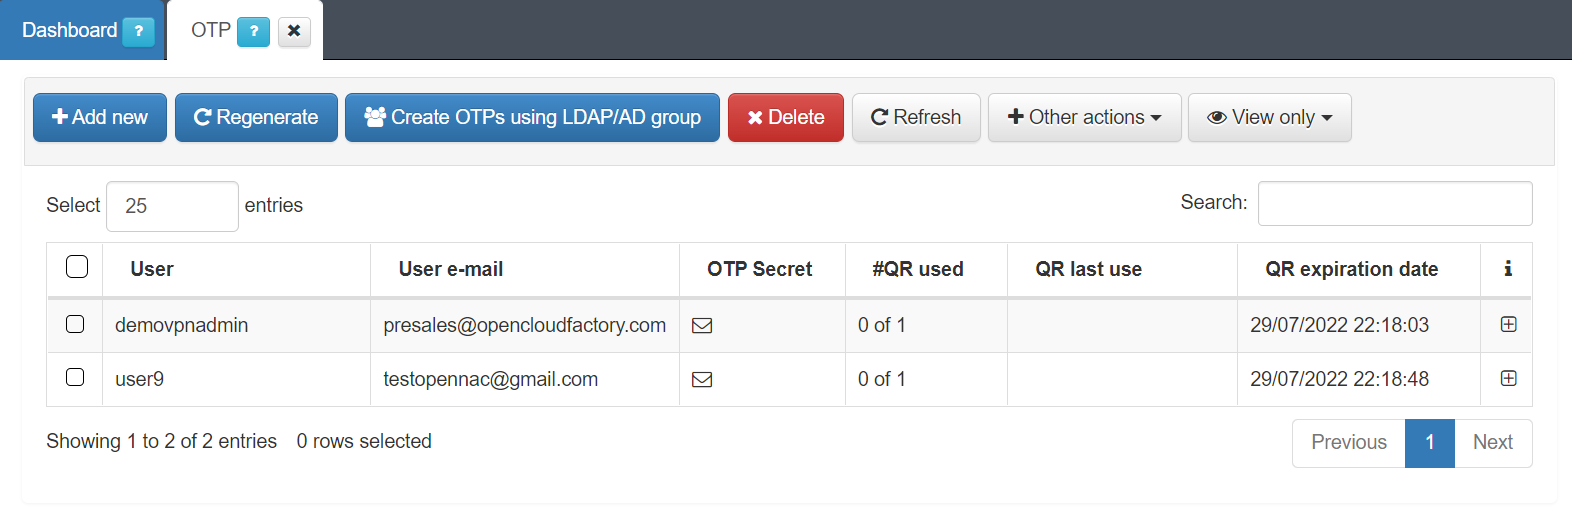
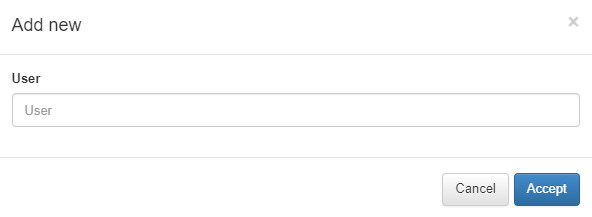
We can add new users by clicking on the Add new and writing the desired username for the QR owner.
We can also Regenerate the QR for a selected user.
You can create an OTP for a user selecting a group from a selected LDAP or AD by clicking on Create OTP using LDAP/AD group. We have to select the options:
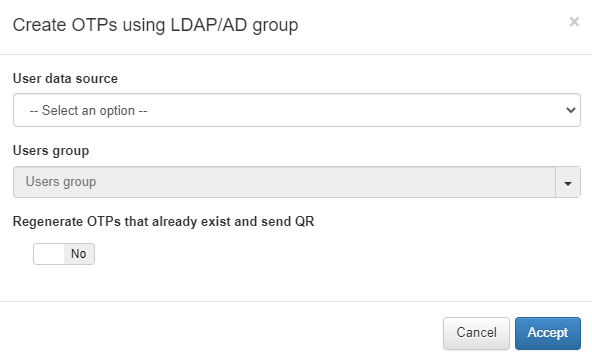
User data source: the LDAP or AD source we want to use
Users group: the group of users that will be using the OTP
Regenerate OTPs that already exist and send QR: flag that allows to enable or disable the OTP regeneration if it already existed.
We can Delete the selected OTP or Refresh the page.
To get the email with the QR for a selected user, click on Send QR.
The functionality Check token allows us to check a token based on a username.
It is easy to see the Query user log selecting the user and clicking on this button.
Finally, we can click on Export data to export the data in JSON format.
You can also Search a user and review its OTP parameters clicking on the + icon.
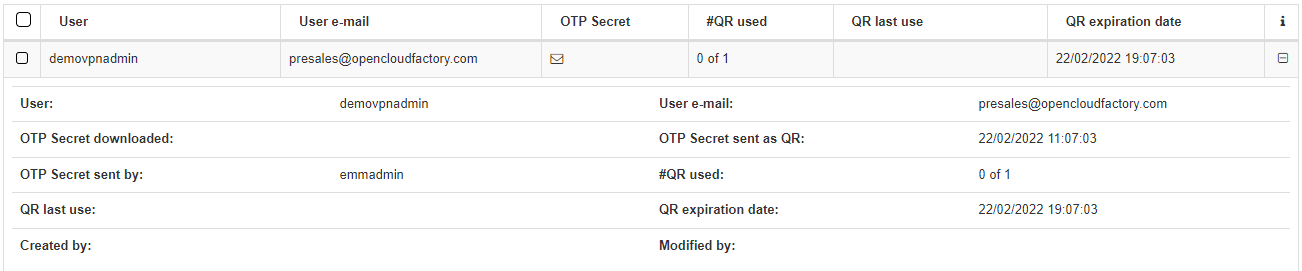
User: the owner of the QR.
User e-mail: the email where the QR has been sent.
OTP Secret downloaded: Boolean indicating whether the OTP has been downloaded or not.
OTP Secret sent as QR: date and time indicating when the QR was sent.
OTP Secret sent by: the user that sent the QR.
#QR used: number of times the QR was used.
QR last use: date of the last use of the QR.
QR expiration date: expiration date of the sent QR (in red if the QR has expired).
Created by: user who created the OTP.
Modified by: user who modified the OTP.
After creating an user or group QR and sending it to the users, you will also have to have configured the Configuration -> Configuration Vars -> OTP.
You can use your one time QR with any authenticator app such as Google authenticator.
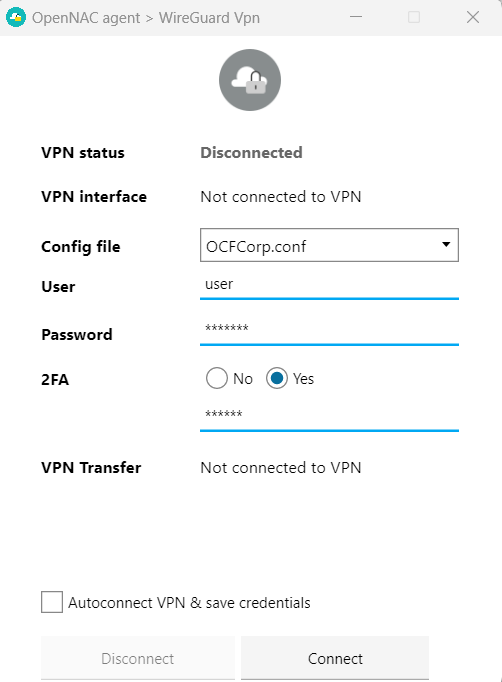
Once you scan the QR, a dynamic PIN will appear and it lasts about 30 seconds. Now you can connect to the VPN selecting the 2FA on the authentication window and filling with your username, password, and OTP pin.
4.7.1.6.8. ON Agent Configuration
Once we have the Agent installed on the client computers, downloading it from the portal, we can continue with the registration in Google Authenticator and the connection tests.
We can find the information regarding the ON Agent installation in the Node Deployment Guide.
4.7.1.6.8.1. Registration of a QR
4.7.1.6.8.1.1. Registering QR codes for Ongoing Google Authenticator Authentication
When establishing the VPN connection, the double authentication factor (2FA), will be requested. This second factor is offered through Google Authenticator, having registered the user account by scanning the QR code that was sent by email to the user.
To install the application, the user must download it from one of the following links:
App Store:
https://apps.apple.com/us/app/google-authenticator/id388497605
PlayStore:
https://play.google.com/store/apps/details?id=com.google.android.apps.authenticator2
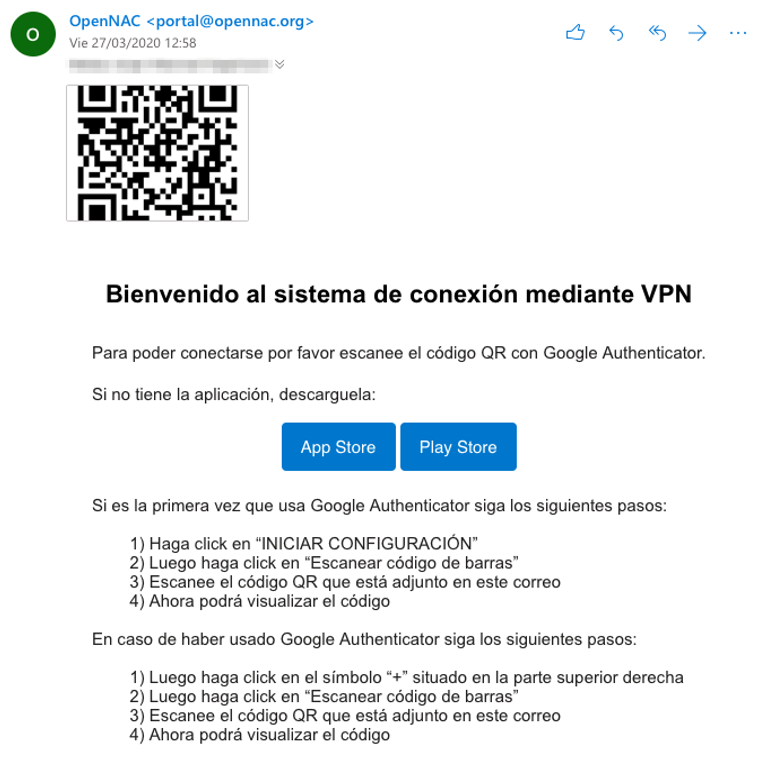
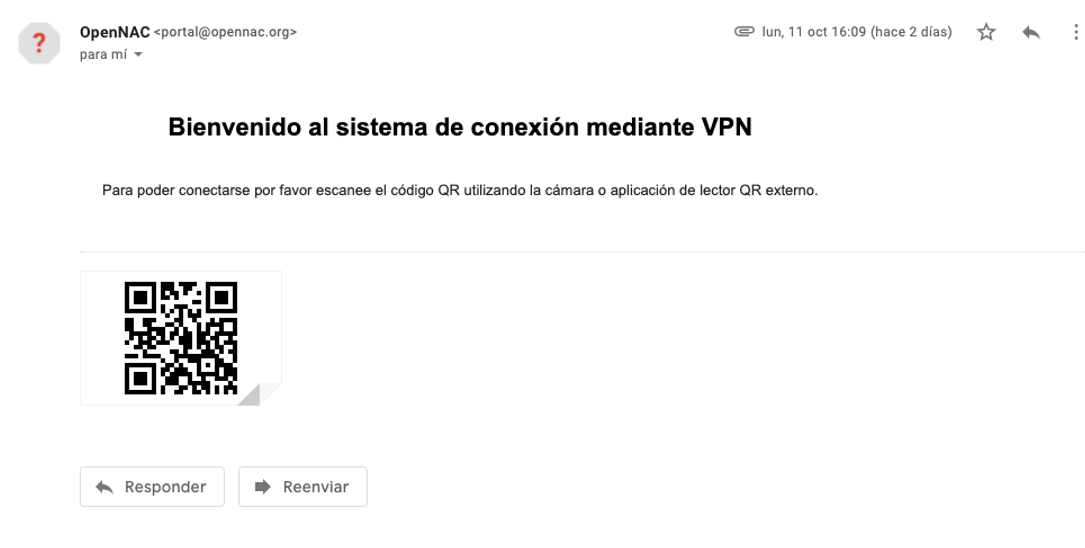
Once installed, the user must scan the QR code they received, the email the user receives is similar to the one in the following image:
To register the 2FA, the user must open the application with their mobile phone and execute the following steps:
If this is your first time using Google Authenticator, follow these steps:
Click “START SETUP”
Then click on “Scan Barcode”
Scan the QR code that is attached to the email
Now you can view the code
If you have previously used Google Authenticator, follow these steps:
Click on the “+” symbol at the top right
Then click on “Scan Barcode”
Scan the QR code that is attached to the email
Now you can view the code
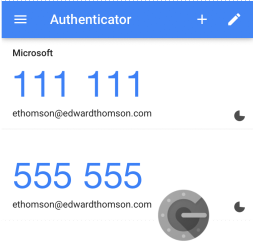
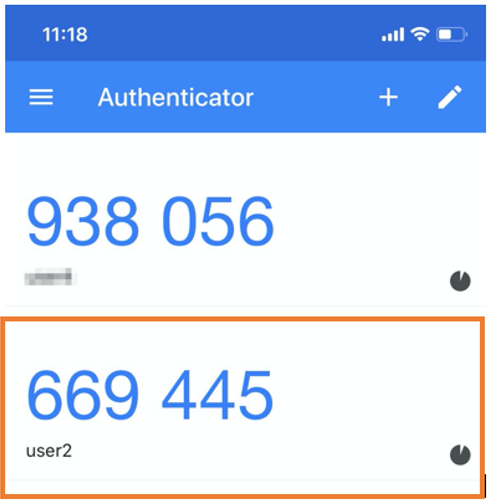
In the following image, you can see how the Google Authenticator OTP code is displayed.
4.7.1.6.8.1.2. Registering one-time QR codes
When establishing the VPN connection, the double authentication factor (2FA) will be requested. This second factor is offered through the captive portal defined in the configuration, having registered the user account by scanning the QR code that was sent by email to the user.
To obtain the 2FA code, you must scan the QR code received in the specified email, which will look like this:
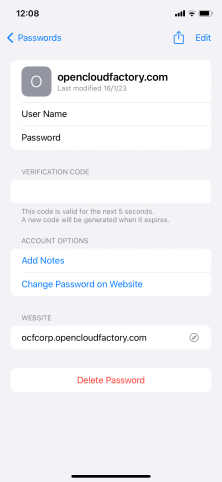
By scanning the code, you will be directed to a web portal that will generate the OTP and redirect you to your password wallet (Apple) or default application (Android) to save and display the access code:
In the event that the QR has expired or the maximum number of scans has been exceeded, the portal will display an error message.