4.2.5. Admon Portal Configuration
This section aims to show the workflow in the Admnistration Portal Configurations for the UNAC use case.
The implementation of the UNAC module can include functionalities such as network segmentation (Segmentation module) and end device (Compliance module) to improve the security of the network environment.
The UNAC Operation module will detail all those dashboards that, from a basic operation point of view, will provide us with useful information on the operation and UNAC registration of our network.
The Administration Portal Configuration section will detail the steps to follow to configure the system and make it ready to operate its UNAC functionality together with all its functionalities, network access, segmentation, compliance, etc.
To carry out the operation of the UNAC module, it is essential to have successfully completed the deployment of the necessary components and the correct configuration of these.
4.2.5.1. Join ON Core to Active Directory domain
It is recommended that the ON Core server should be registered in the domain. In case there is no domain, you can skip to the next step.
To carry out this process, it is necessary for the user to have specific permissions to Join in AD, later the user can be modified, using one that only has read permission to make user queries.
For the join domain information see the process in the Administration Portal section: Join Domain Wizard
4.2.5.2. Register Network Devices in the CMDB
The CMDB is the ON Core database, in this database we find information related to the system, infrastructure, networks, VLANs, Security Profiles, user devices, network devices, etc. In this section of UNAC we are mainly interested in Network Devices (Network devices such as Switches, APs, AP controllers, etc.).
The definition of network devices in the CMDB allows us to customize the characteristics of the device so that the system acts in one way or another on each of these devices.
If you want to register a predefined group of devices, consult Bulk import of devices.
To create a new network device, go to the “ON CMDB > Network Devices” section.
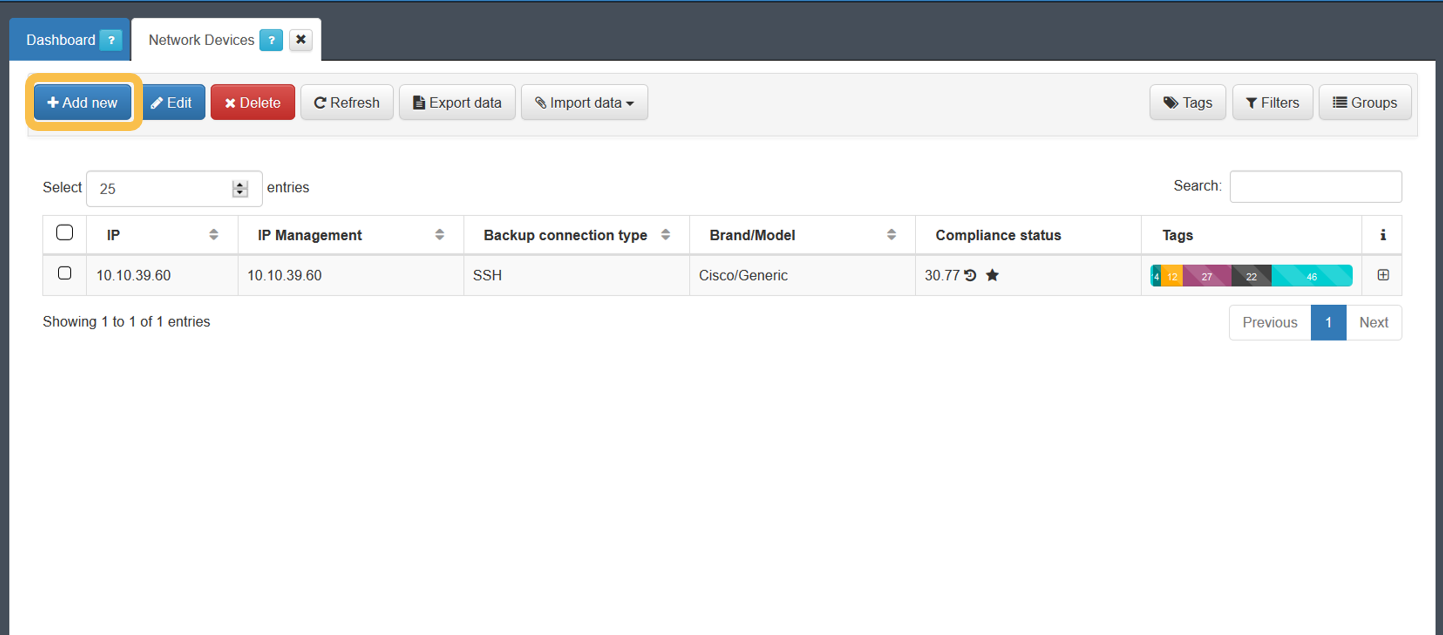
To register a new device, simply click on the Add new button and complete the information on the form. After completing all the necessary information, we will click on the “Accept” button to save the configured network device.
By default, the configuration of the device will be applied to the one that we have defined by default. This default configuration is found in “Configuration -> Configuration Vars -> NetDev”. The sections that we will find here are the same that we can find when configuring any of the devices.
The minimum information that must be filled in is indicated below.
General
In this tab, it is required to fill in at least the following fields:
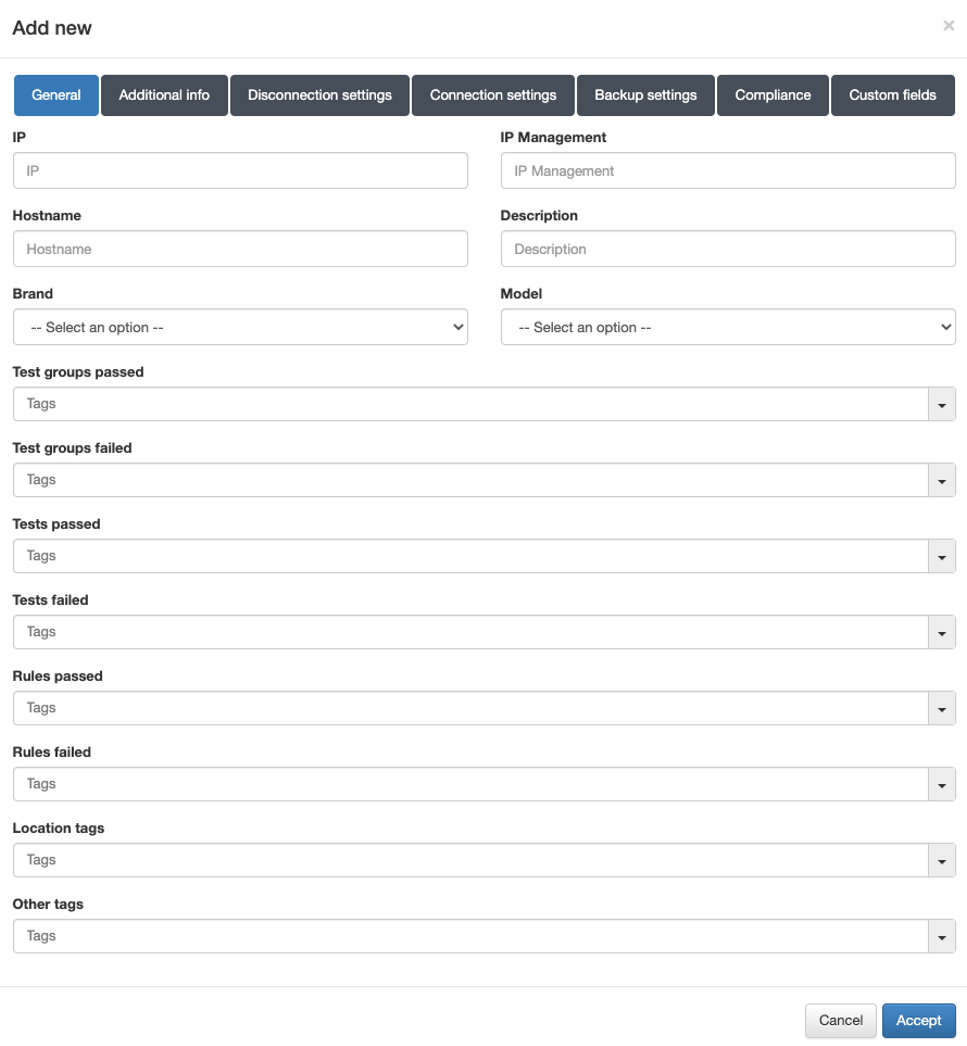
IP: IP address that identifies the device.
The IP address is only for identification (to see it in the device table).
Hostname: Hostname that identifies the device.
Brand / Model: Brand and model of the device.
Note
It is important to correctly define the brand and model since these will be used to determine the behavior of the system in terms of communication with these devices.
Disconnection settings
In the “Disconnection settings” section, the configuration of the Toggle Port functionality is defined. This functionality allows you to force a disconnect from an authenticated session. This allows us, for example, to carry out a re-evaluation of the policies in case they have been modified, and the application of VLANs, ACLs, etc. to the session.
There are two methods of session disconnection:
CoA (Change of Authorization): CoA is a Radius mechanism that allows us to disconnect a specific session without the need to modify the port status (enable/disable) of the network device.
SNMP: Using SNMP, the interface where the device has been authenticated is disabled and enabled. This causes the device to have to re-authenticate and subsequently evaluate policies on the system.
The use of SNMP is recommended, although both methods perform the same functionality and are equally valid.
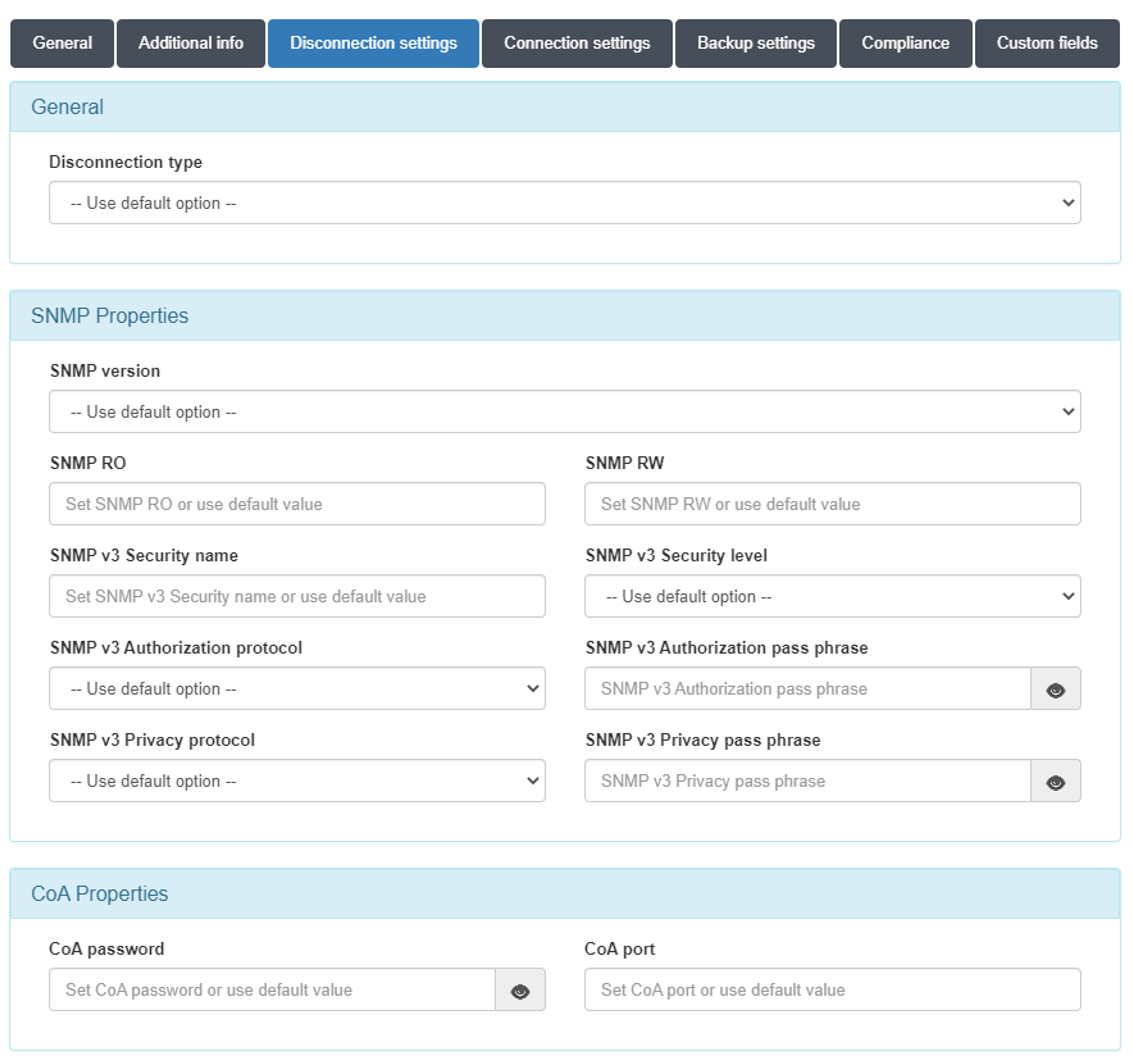
Disconnect type:
Use default option: The configuration defined in “Configuration vars” will be applied.
CoA: Use of CoA to perform session disconnections.
SNMP: Use of SNMP to perform session disconnections.
SNMPProperties
SNMP version: Version used for SNMP messages. The required attributes for each of the versions are:
V1 (not recommended):
SNMP RO: SNMP community with read permissions.
SNMP RW: SNMP community with write permissions.
V2c:
SNMP RO: SNMP community with read permissions.
SNMP RW: SNMP community with write permissions.
V3 (recommended):
SNMP v3 Security name: SNMP username.
SNMP v3 Security level: Security level (noAuthNoPriv/authNoPriv/authPriv).
Depending on the selection, it will be necessary or not to configure some of the following attributes.
SNMP v3 Authorization protocol: Authorization protocol (MD5/SHA).
SNMP v3 Authorization pass phrase: Password for authorization.
SNMP v3 Privacy protocol: Privacy protocol (DES/AES).
SNMP v3 Privacy pass phrase: Password for privacy.
CoAProperties
CoA password: Password defined in the network device to authenticate CoA requests.
CoA port: Port used for communication. (Usually 3799).
If you do not perform any of the configurations, those defined in Configuration -> Configuration Vars > NetDev will be used.
4.2.5.2.1. Bulk import of devices
To import a set of network devices in the CMDB we must execute the following steps.
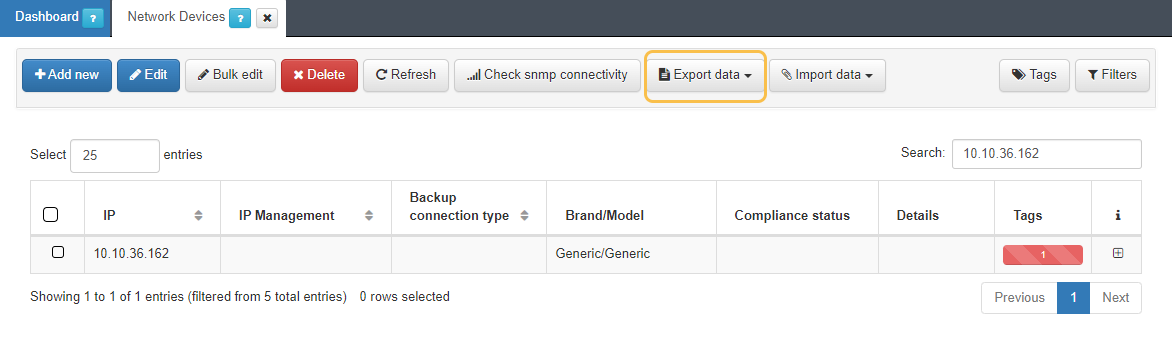
First of all, it is necessary to export the template that we will use to add the list of devices:
Go to ON CMDB -> Network Devices.
We select a Network Device as model.
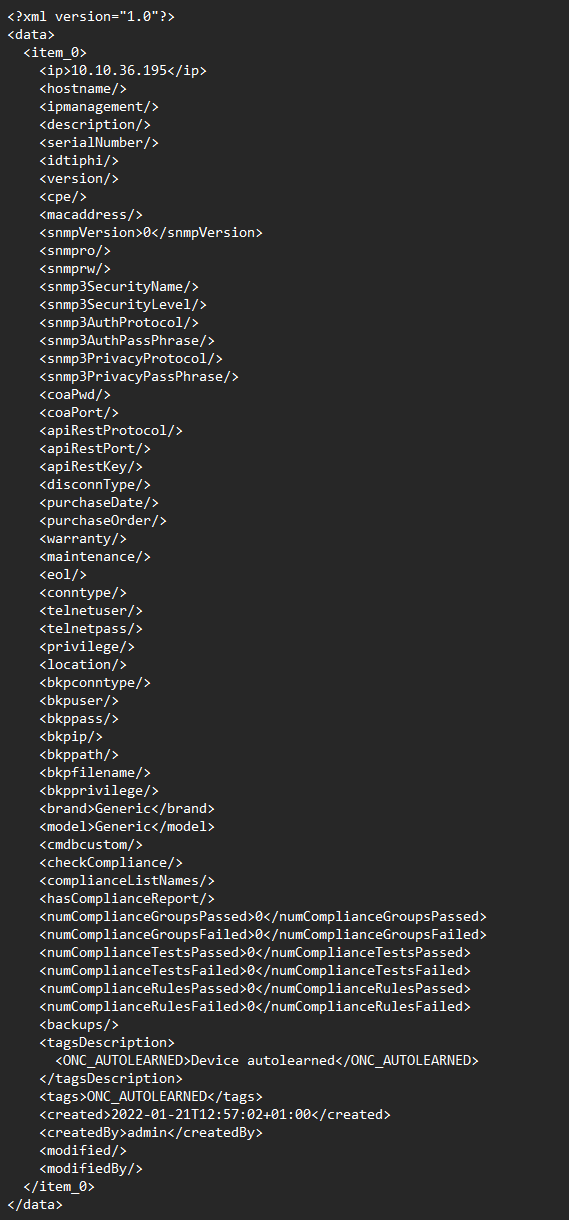
We export the file with the Export data button. With this action we generate a JSON and a XML file.
Download the CSV file generated in the previous step:
Go to Status -> CMDB Exports:
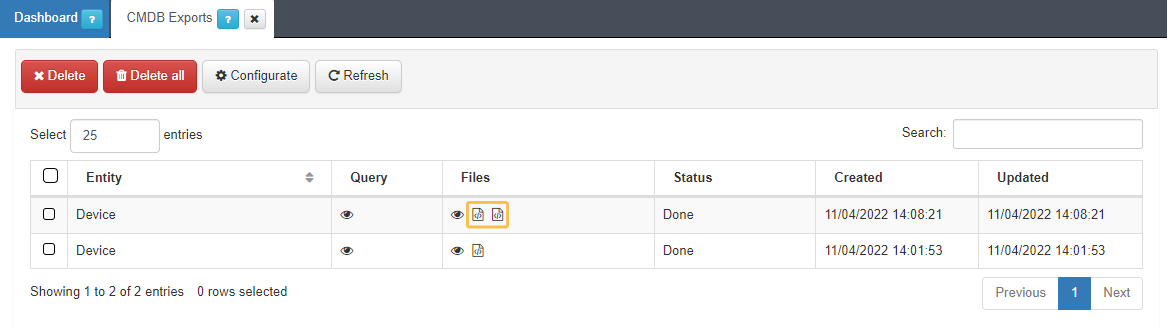
You can export both the file in CSV or XLSX format.
Choose the path on the computer (by default in Download).
Complete the downloaded file with the data of the network devices. The following points must be taken into consideration:
Not all fields must be filled out.
Leave the columns id, created, createdby, modified and modifiedby blank.
The minimum information required to successfully import a list is as follows:
IP: Indicate the access IP to the device.
Brand: Indicate the manufacturer. The list of manufacturers registered in the system is as follows:

Model: Indicate the model. In this case the only possible model will be Generic. If we are not sure of the manufacturer and model we will leave both fields with Generic.
bkpconntype: SSH or SCP.
bkpuser: User to access the SCP repository or network device.
bkppass: Access password to the SCP repository or network device.
bkpip: IP address of the SCP server or network device.
bkppath: Repository directory where to locate the backups (SCP connections).
bkpfilename: Regular expression to identify the name of the file (SCP connections).
bkpprivilege: Password for Privilege EXEC mode (SSH connections).
Although the hostname of the device is not a required field, it is recommended to complete it to have each IP identified in the CMDB.
The SNMP versions registered in the system are the following:

Save the file in CSV format separated by commas.
Import the generated file:
Go to ON CMDB -> Network Devices.
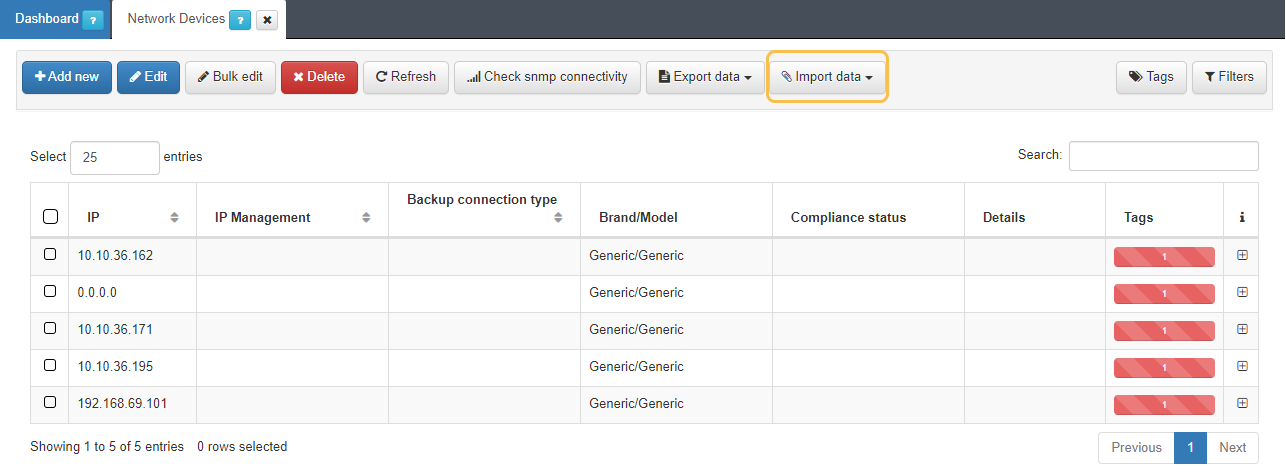
Import the file with the Import data button.
Select the file and accept.
A success message should appear at the top right of the browser:
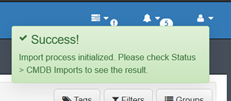
The import process will be initialized, we can see the process in Status -> CMDB Imports.
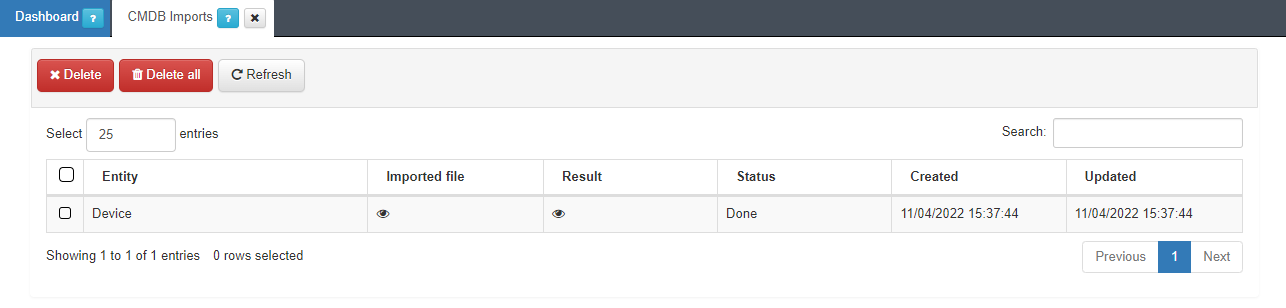
In this section, we can see the file that has been imported, the result of the operation and the current status of the process.

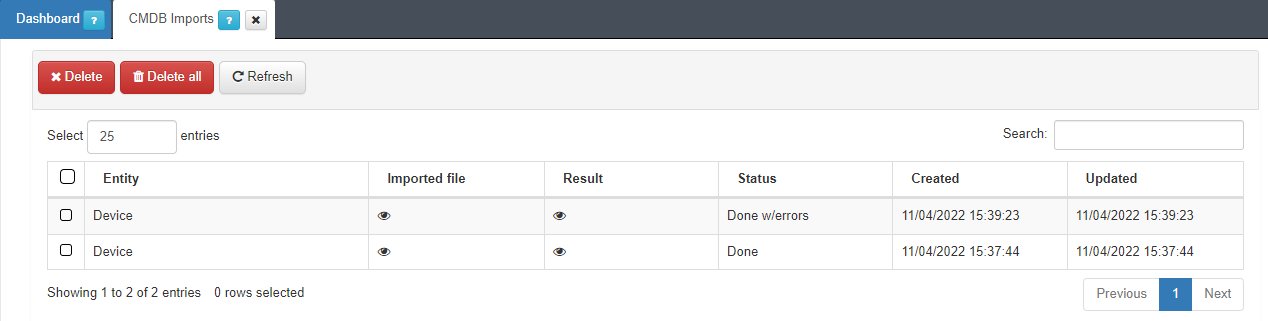
In case of error:
The Status section will display Aborted:
To see the failure reason, open the Result section:
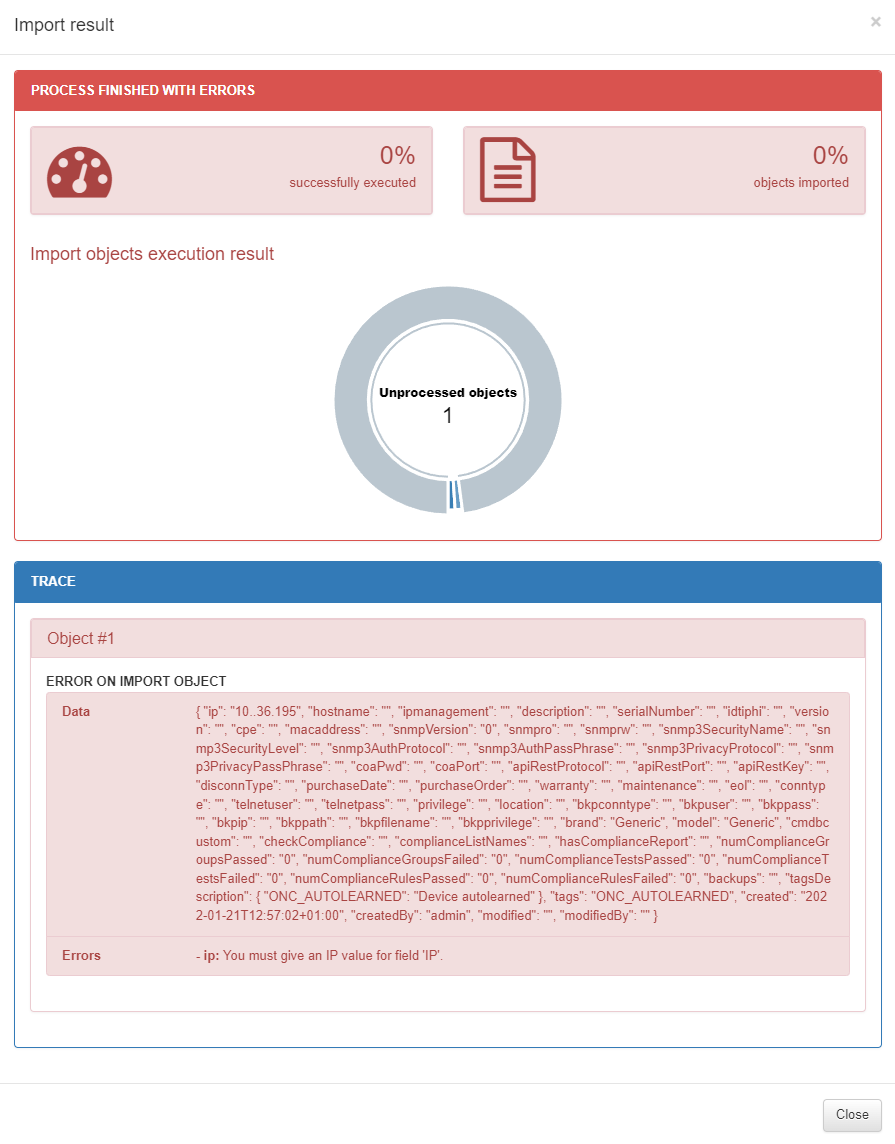
In this example, the IP field is not formatted correctly.
4.2.5.3. APs Management controller
When there are many APs centrally controlled by a controller in the network, it is necessary to add the controller as a network device in the CMDB and additional information for each of the APs in the CMDB.
For these APs, apart from the minimum information detailed above, it will be necessary to add the information corresponding to IP Management:
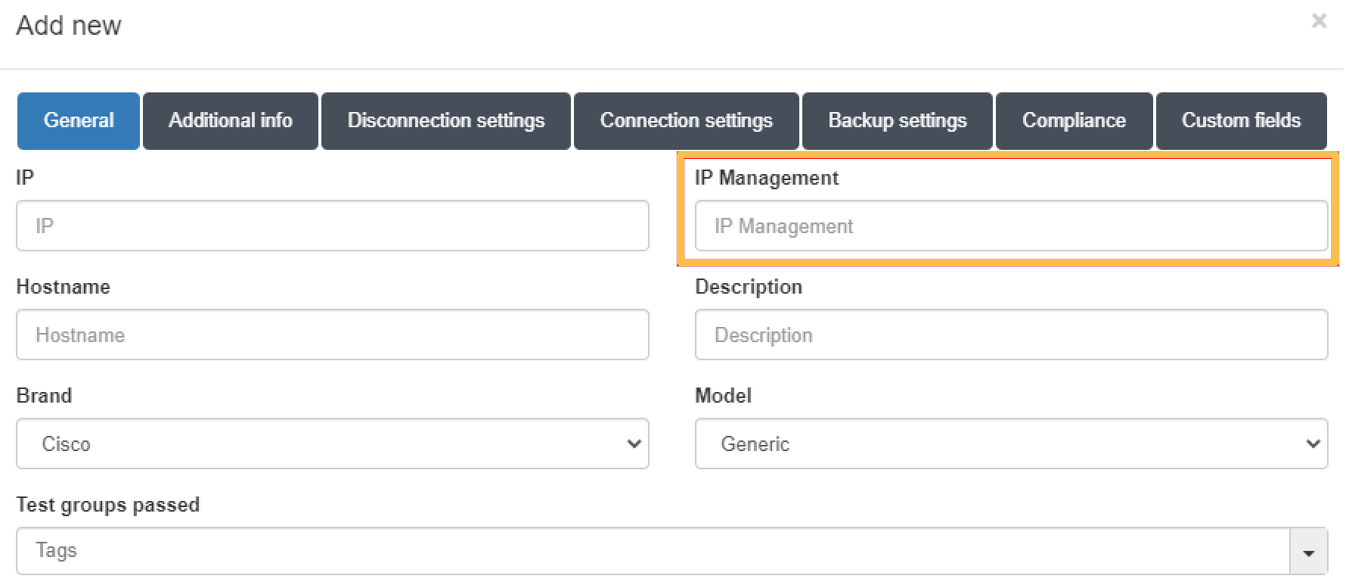
This IP must correspond to the IP associated with the controller that manages the AP.
4.2.5.4. Self-learning of network devices
When in ON Core we receive a request for a network device that has not been previously added to the CMDB, it is possible to have it added automatically.
For this, two requirements must be met:
That the IP of the network device or its segment is registered in the “clients.conf” file. (Section Creating Network Devices in the CMDB)
That the “Autolearn Network Devices” function is activated.
To activate the self-learning functionality, we must go to “Configuration -> Configuration vars” and in the NetDev section check the “Autolearn Network devices” option:
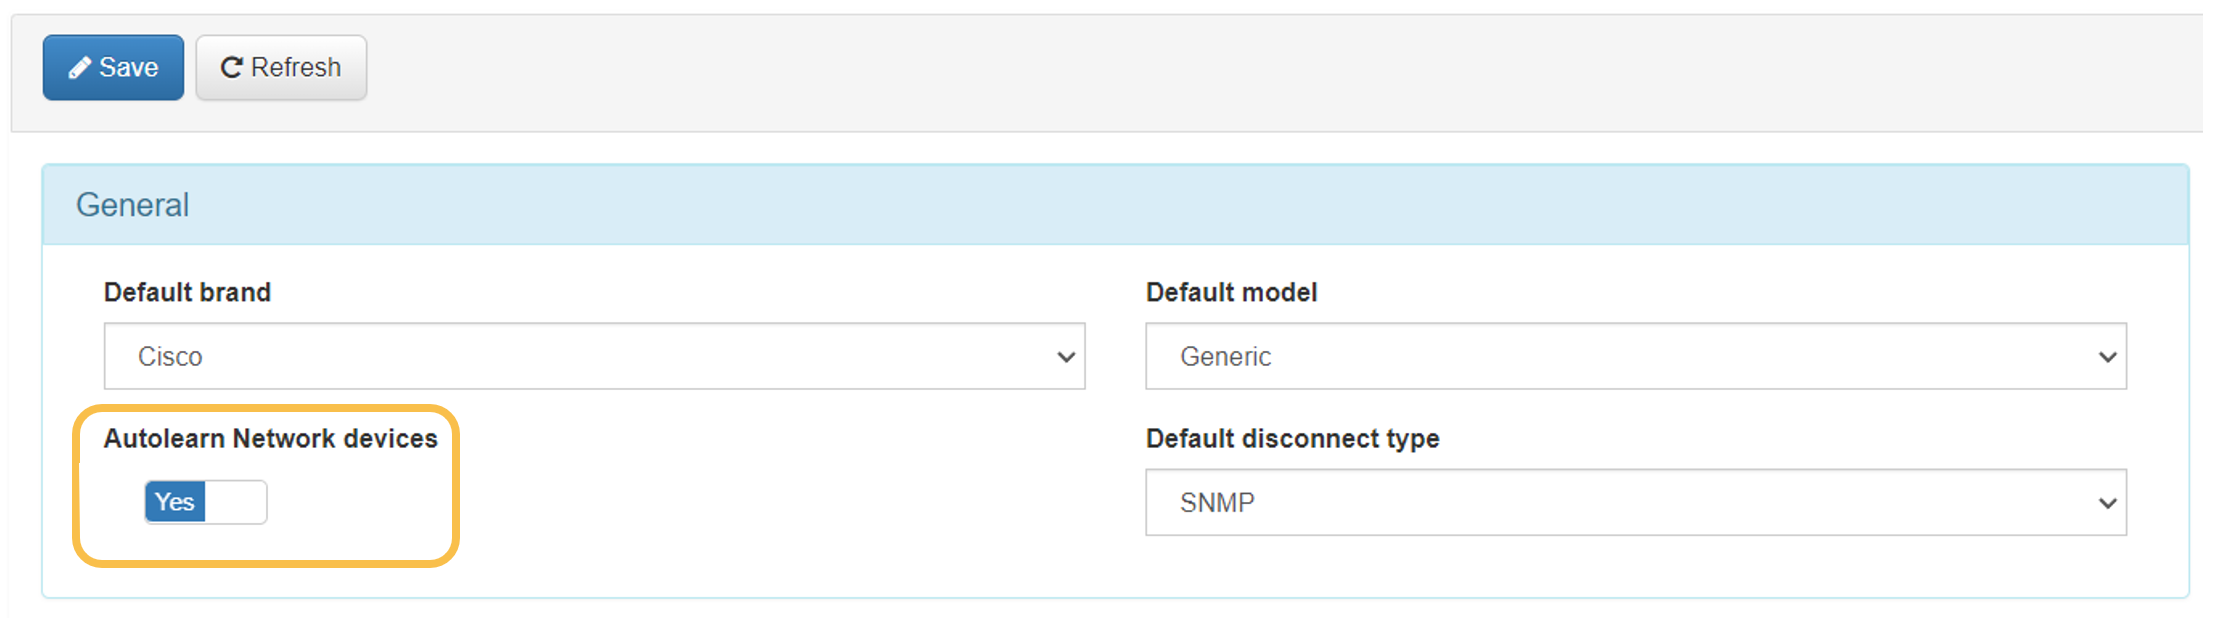
To apply the changes, it is necessary to press the “Save” button.
With this function configured, every time a request is received from an unknown network device, it will be added to the CMDB and an “ONC_AUTOLEARNED” tag will be associated with it.
4.2.5.5. Define the User Data Sources
User Data Sources (UDS) are the system’s sources for user authentication. These may also be used in the process of authorizing or evaluating system policies.
There are different types of UDS, these can be databases or AD/LDAP.
By default, we have a UDS called “LocalDB”. This is the system’s local database where we can store local users. This can be useful for testing but is not recommended for use in production.
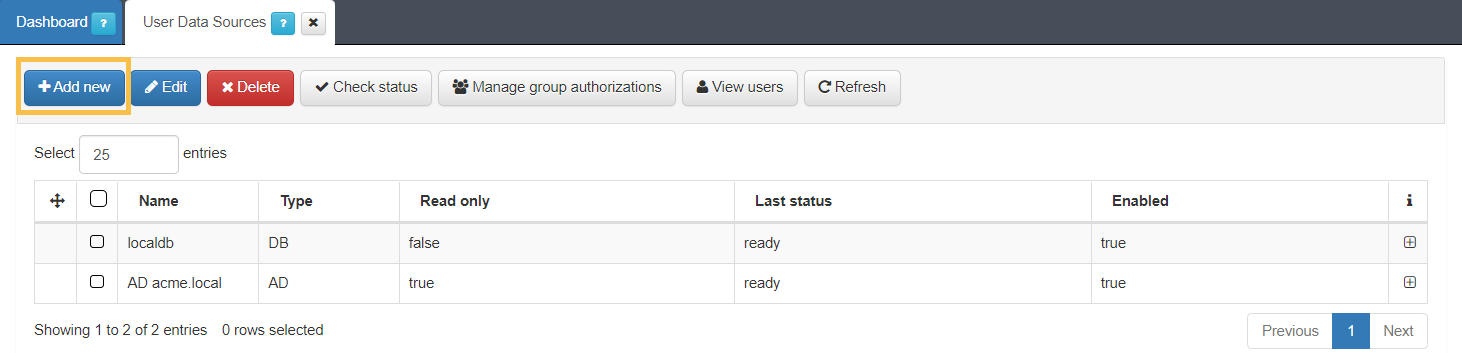
To see the existing UDS we must go to “ON CMDB -> User Data Sources”. To add a new UDS, click on the Add new button.
A new window will open, in which, depending on the type (Type) of UDS that we want to create, it will have one format or another. The topics below will detail how to create both the “Database” type and the “LDAP/AD” type.
Once all the attributes for the UDS type have been defined, press the “Accept” button to save it. We can verify the connection with the UDS by selecting it in the list and clicking the “Check status” button. In case the status is correct, a message that displays “ready” will be shown in the “Last status” column.
Database
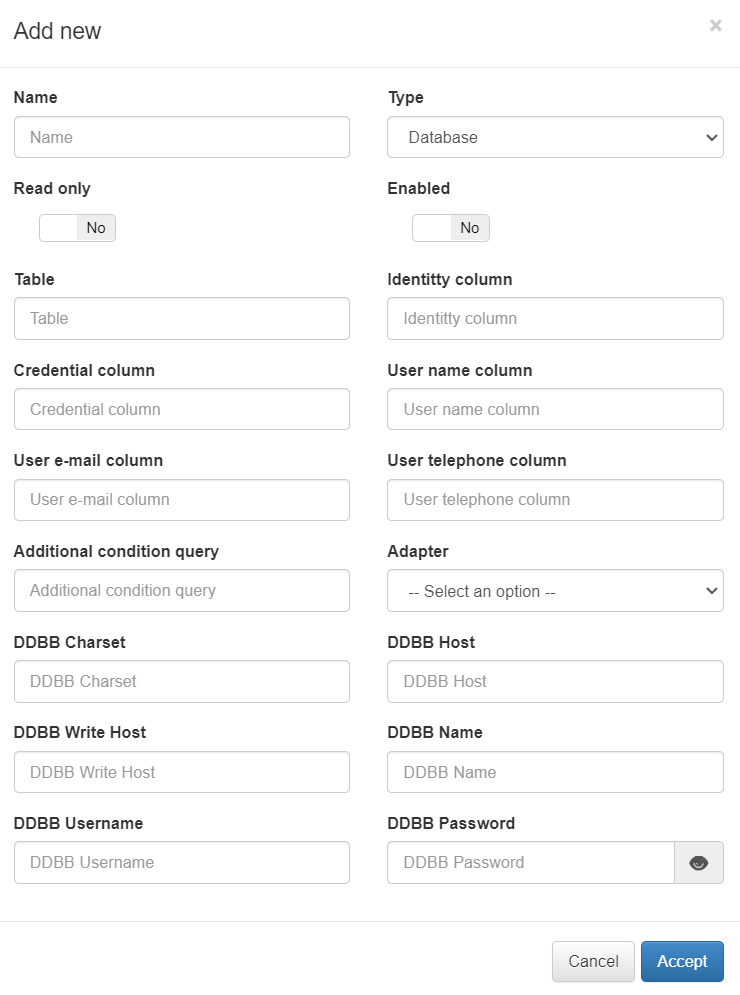
The fields to fill in for a UDS of type “Database” are:
Name: Name to be assigned to the UDS.
Type: Type of UDS (Database, LDAP or AD).
Read only: Check to define if said UDS is read-only .
Enabled: Check to enable or disable udS.
Table: Table Of the database to be queried.
Identity column: A column in the database table that contains the user ID.
Credential column: Column of the database table that contains the user’s credentials.
User name column: Column of the table that contains the user’s name.
User e-mail column: Column of the table that contains the user’s e-mail.
User telephone column: Column of the table that contains the user’s phone.
Additional condition query: Query conditions additional to the database.
Adapter: Type of database adapter (MySQL, PostgrSQL, Oracle…)
DDBB Charset: Character set used by the database (e.g. utf8)
DDBB Host: Name of the host or address of the database to read.
DDBB Write Host: If you want to write to the database, the host name or address.
DDBB Name: Name of the database.
DDBB Username: Username for database access.
DDBB Password: The user’s password for accessing the database.
LDAP/AD UDS
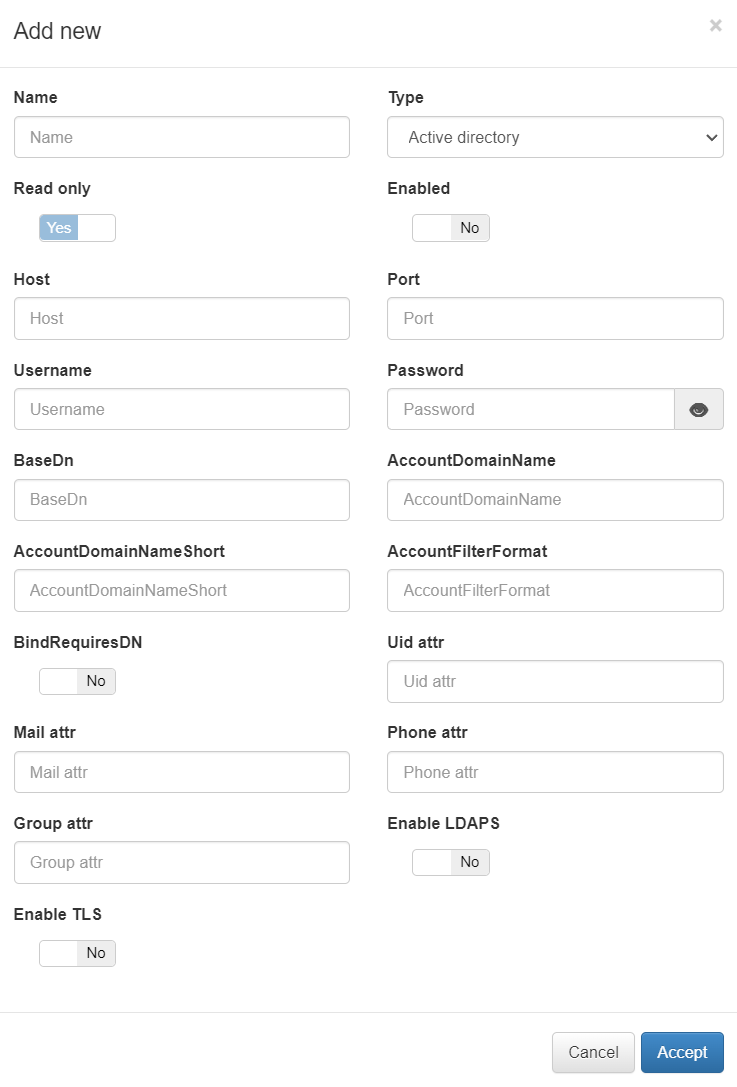
The fields to fill in for a UDS of type “LDAP/AD” are:
Name: Name that will be assigned to the UDS.
Type: Type of UDS (Database, LDAP or AD).
Read only: Check to define if said UDS is read-only .
Enabled: Check to enable or disable udS.
LDAP Host: The LDAP/AD IP where queries are launched.
LDAP Port: The port used for the AD/LDAP search query.
LDAP Username: This is the user registered on the AD/LDAP server, which must have read permissions on the server. It is recommended that such a user only have read permissions.
LDAP Password: This is the password for the AD/LDAP binding.
LDAP Base DN: BaseDN at the top of the domain name structure. For example, if our domain is mycompany.local, its BaseDN is DC = mycompany, DC = local.
LDAP AccountDomainName: This is the DNS name of the domain in uppercase.
LDAP AccountDomainName: Short Is the short domain name or NETBIOS name commonly called, for example, MYCOMPANY.
LDAP AccountFilterFormat: This is the attribute used to select users. Two options have been included (only one should be used). It is used (sAMAccountName =% s) for Active Directory and (uid =% s) for LDAP servers.
LDAP Bindrequires DN: The bindDN DN is the credential you are using to authenticate against an LDAP. When using a bindDN, it usually comes with an associated password, sometimes the anonymous link does not allow certain types of actions.
LDAP Uid attr: This is the attribute used to identify user IDs, depending on whether AD or LDAP is used for filter change.
LDAP Mail attr: This is the filter used to identify mail as a user attribute.
LDAP Phone attr: It is the filter that is used to identify the phone number as an attribute of the user.
LDAP Group attr: This is the filter used to identify groups as an attribute of the user.
Enable LDAPS: Used to authenticate and authorize users when LDAP communication is transmitted over an SSL tunnel port 636 TCP. By default, the use of LDAPS is recommended to improve the security of the environment.
Enable TLS: Used to secure communication between LDAP clients and LDAP servers (See 3.4.1).
4.2.5.5.1. Using LDAPS or TLS in communication with LDAP (UDS)
If you want to use SSL or TLS in the communication with the LDAP (Enable LDAPS or Enable TLS in the UDS configuration), a previous configuration will be necessary to secure the SSL connection.
Enable the Dynamic CA Configuration feature:
update-ca-trust enable
To get the public root CA, we can use the following command to view the Active Directory certificate information, where “server” is the FQDN or IP server:
openssl s_client -showcerts -connect server: 636 </ dev / null | openssl x509 -text -noout
With that information, we could obtain the URL to download the CA certificate based on the “Access to Authority Information: CA Issuers” section. If the above command does not work, we can request a public certificate file from administrators. The file would have to be similar to:
----- BEGIN CERTIFICATE -----
MIIDWTCCAkGgAwIBAgIQG5sNj3OqU69C1kh4 + Z6oMzANBgkqhkiG9w0BAQ0FADA /
MRUwEwYKCZImiZPyLGQBGRYFbG9jYWwxFDASBgoJkiaJk / IsZAEZFgRhY21lMRAw
DgYDVQQDEwdhY21lLUNBMB4XDTE5MTAyMTE0NTMzNVoXDTI0MTAyMTE1MDMzNVow
P...
----- END CERTIFICATE -----
Add it as a new file in:
cp CACERT.crt /etc/pki/ca-trust/source/anchors/
Use command:
update-ca-trust extract
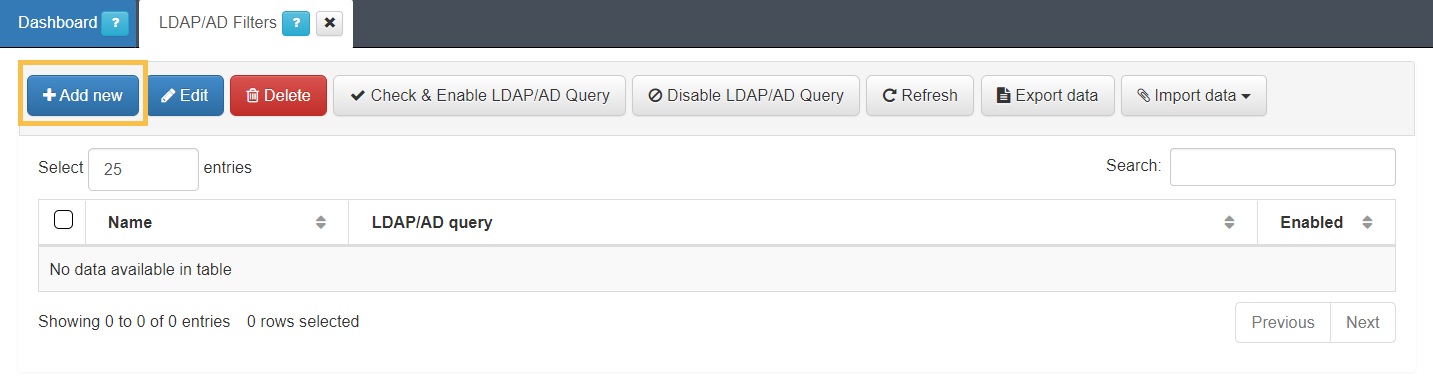
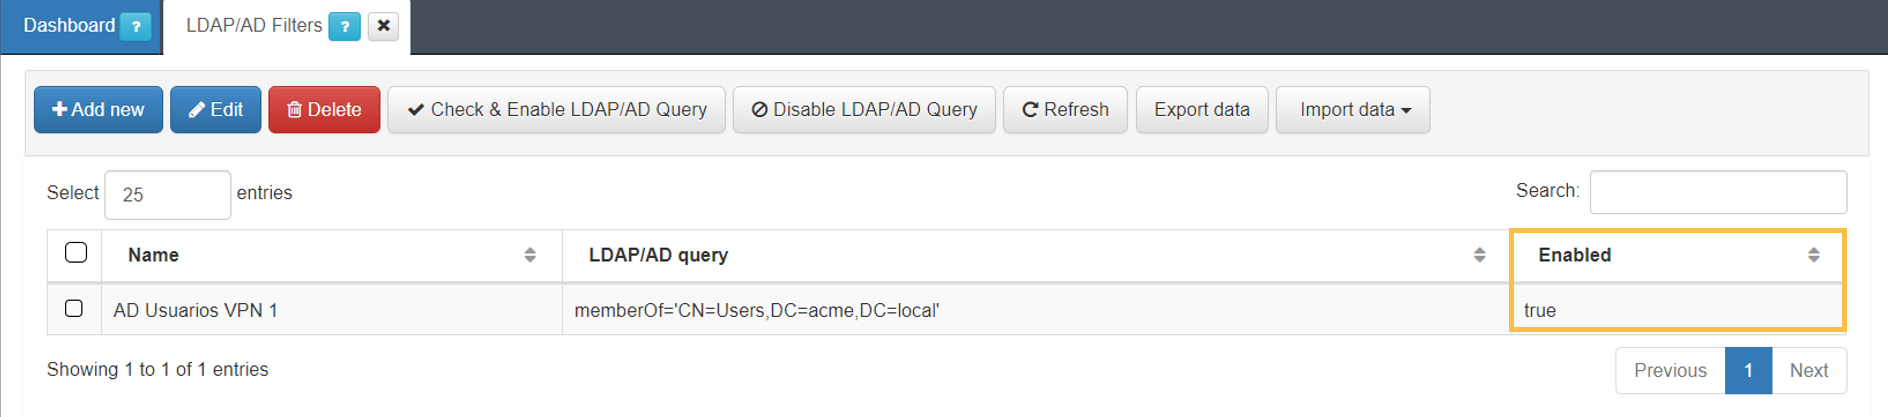
4.2.5.6. Creating LDAP Filters
This section explains how to generate LDAP filters. Filters are used to segment the groups of users accessing the network. These filters can be used later as access policies. Note that this document provides an example, you must create the different LDAP filters required for your access policies.
Go to the ON CMDB -> LDAP/AD Filters menu.
Click on the Add new button.
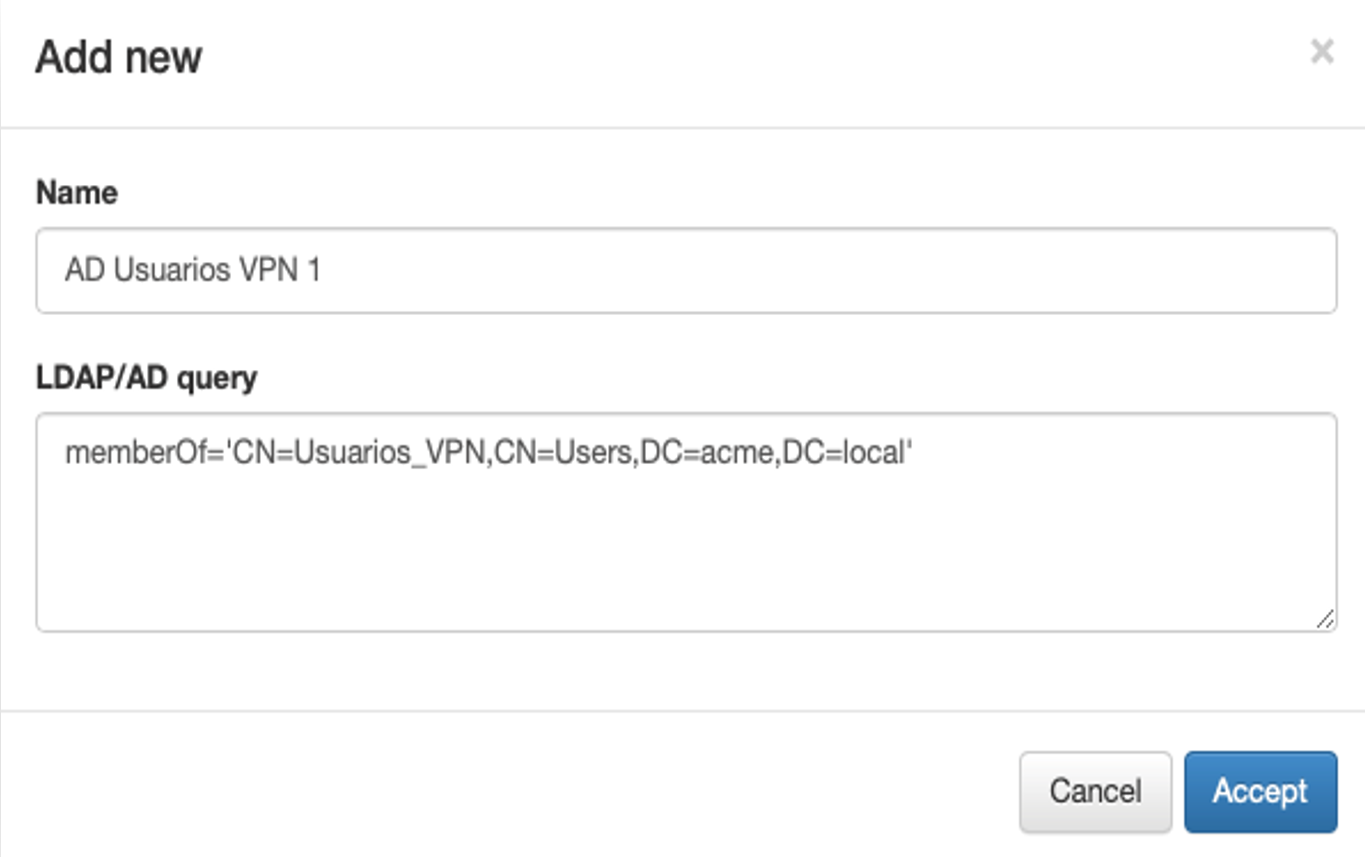
On the form:
Add a name to the filter.
Type the LDAP query with the required information.
Click the Accept button.
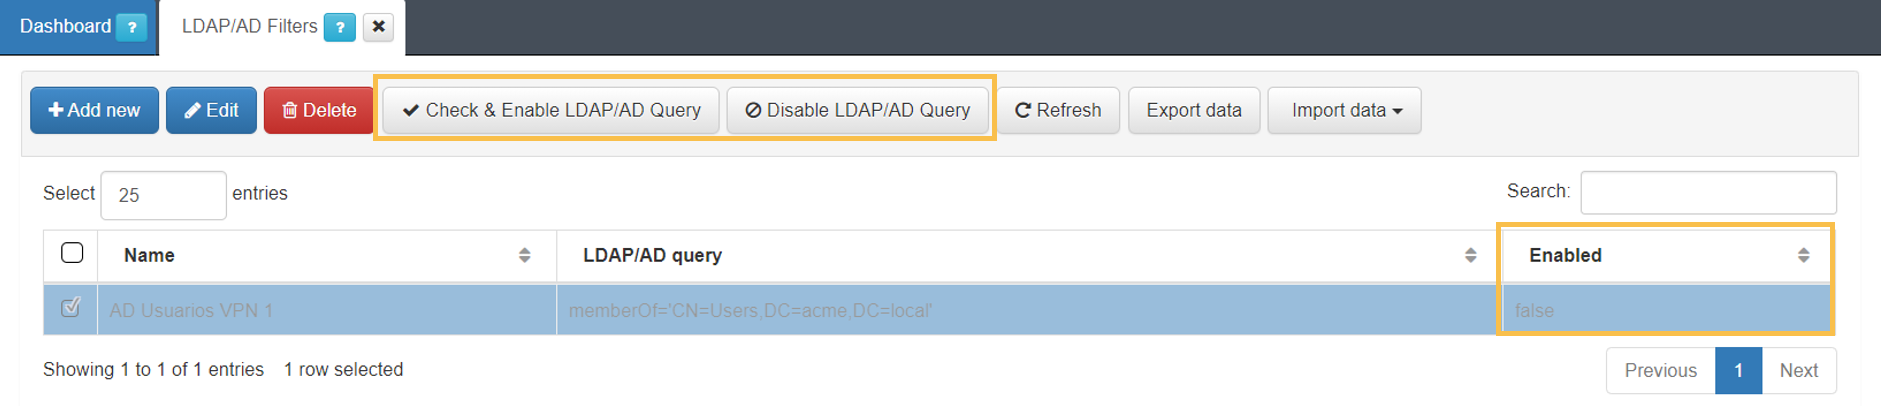
Once the filter is created, it will appear in the gray list. You can see that the filter is disabled by default.
To enable the new filter:
Select.
Click the Check & Enable LDAP/AD Query button
On the form:
Choose the active directory to associate this filter with.
Click the Accept button.
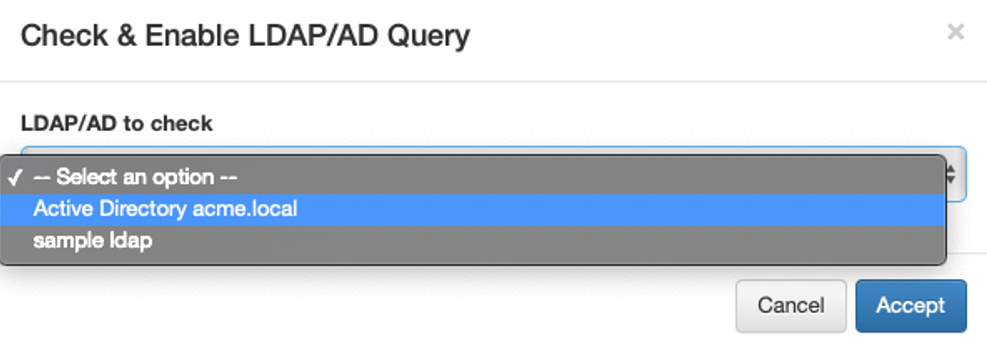
In case no errors occur, the filter will be enabled.
4.2.5.7. Creating Local Users
Although it is not a best practice, you can create users in the local system database to perform authentications. This functionality can be useful for testing and verifying system operation.
To create new users, open the “Provisioned local users” tab in “ON CMDB -> Security -> Local Users”:
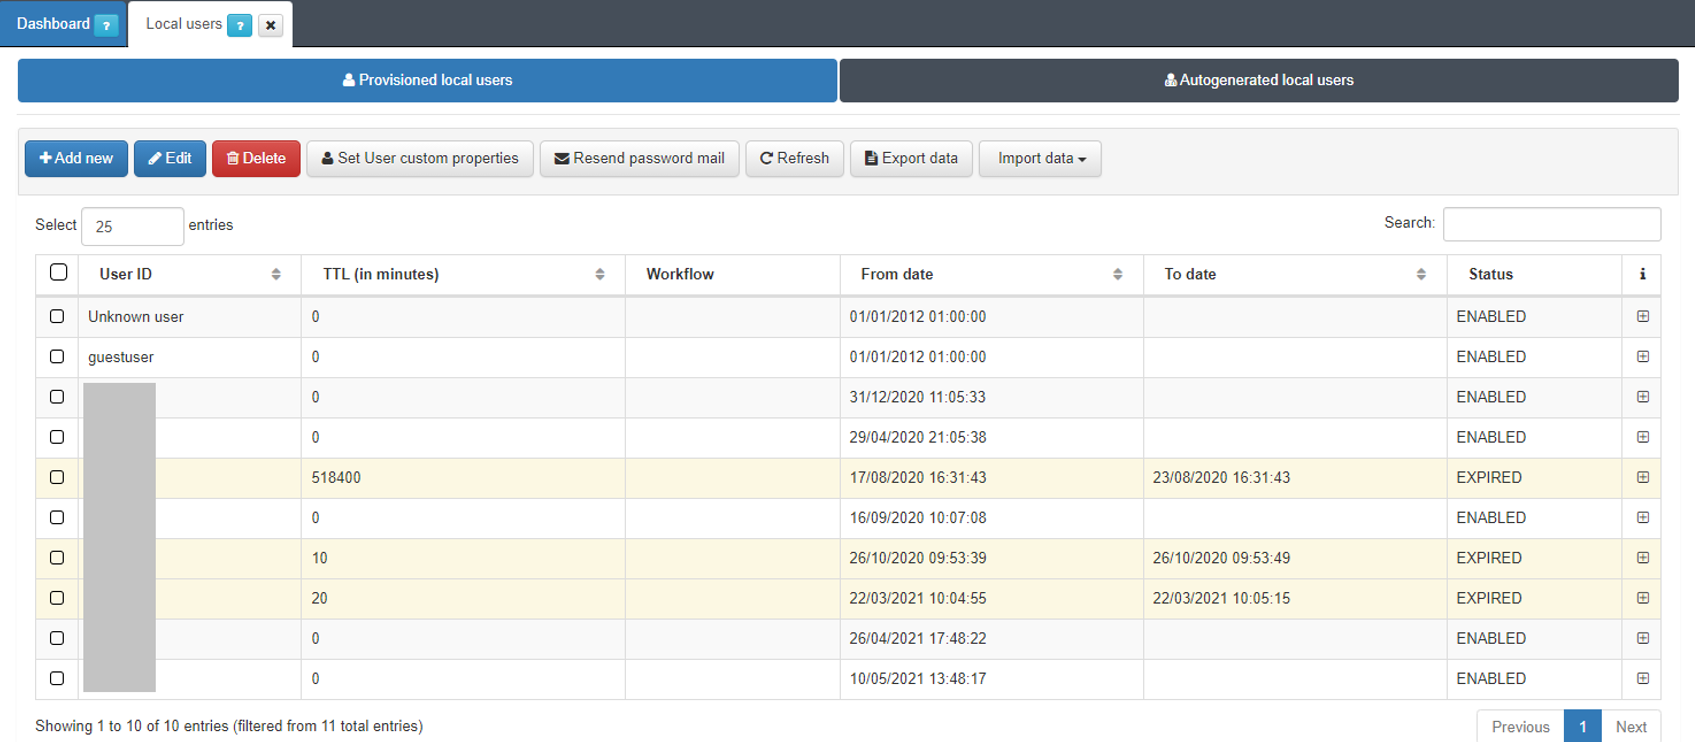
To add a new user, click on the Add new button and a new window will pop-up so you can fill in with the user’s characteristics:

The characteristics of the users are:
User ID: Identifier of the user.
Name: Name of the user.
E-mail: Email of the user. If we select the option “Send password email” an email with the credentials will be sent to the user. For this feature, the postfix service must be configured. We can find the postfix configuration in UNAC Configuration.
Telephone: User’s phone.
Password: Password of the user. Selecting the “Autogenerate” option will automatically generate a strong password.
TTL (in minutes): User validity time. The time for which this user will be valid is defined (in minutes). In case we want the user to be permanent we must define the TTL as “0”.
From date: Alternatively to TTL, we can define the validity of the user by date range. This is the user’s validity start date.
To date: End date of the user’s validity.
Once this information is filled in, we can click on “Accept” to save the new user.
4.2.5.7.1. Local User Custom Properties
There is the possibility to add custom features to local users. These features can be useful if you want to facilitate the identification of these users.
To create a new feature for local users, in “ON CMDB -> Security -> Local Users” in the “Provisioned local users” tab we select the top button “Set User custom properties”:

Clicking will open a new window with all the custom features already created:
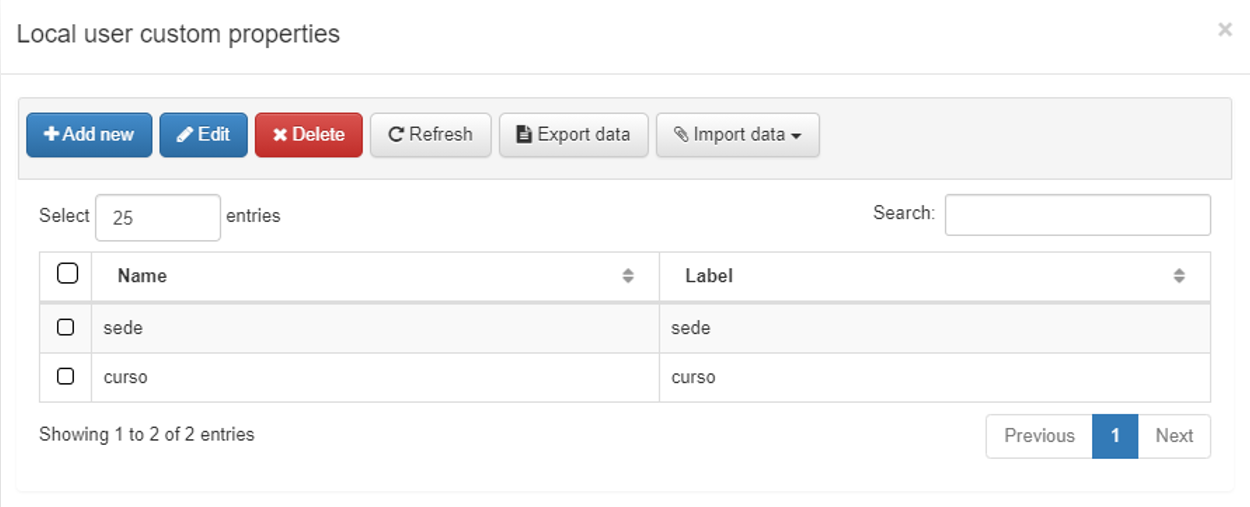
To add a new feature, click Add new:
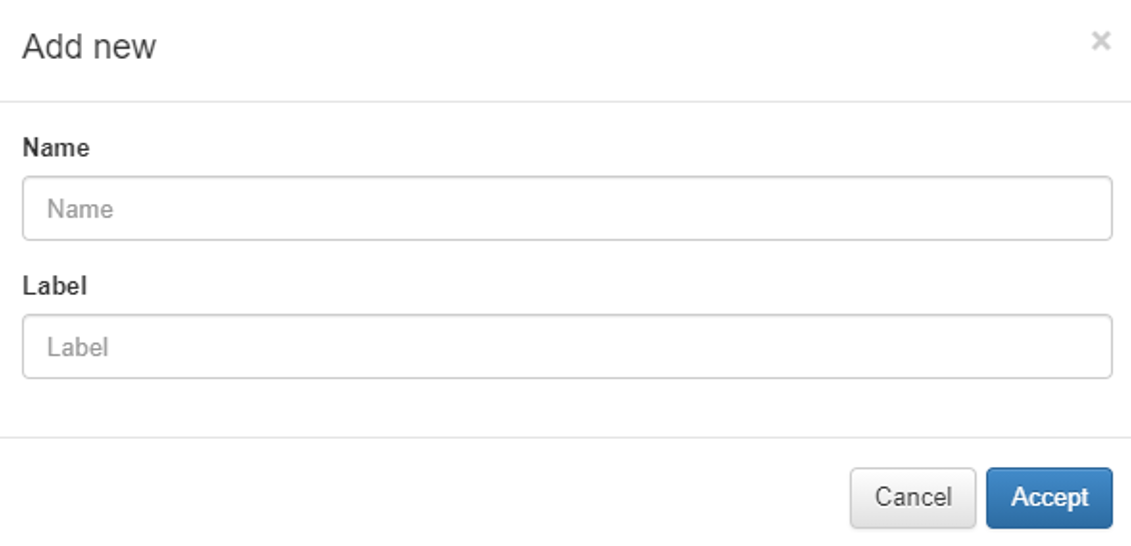
In this window we will add a name “Name” and the label of the “Label” feature, once these attributes are defined, we can save it by pressing “Accept”.
The next time we create a local user, these characteristics will appear to define them. If we want to define them in users already created, we will only have to edit those users and define the characteristics.
4.2.5.7.2. Define the access Policies
This section details the process of creating access policies. A NAC policy may use user information or information obtained from the device, such as the type of operating system used, to designate the traffic of that user or device to a specific VLAN or to apply specific port settings to it.
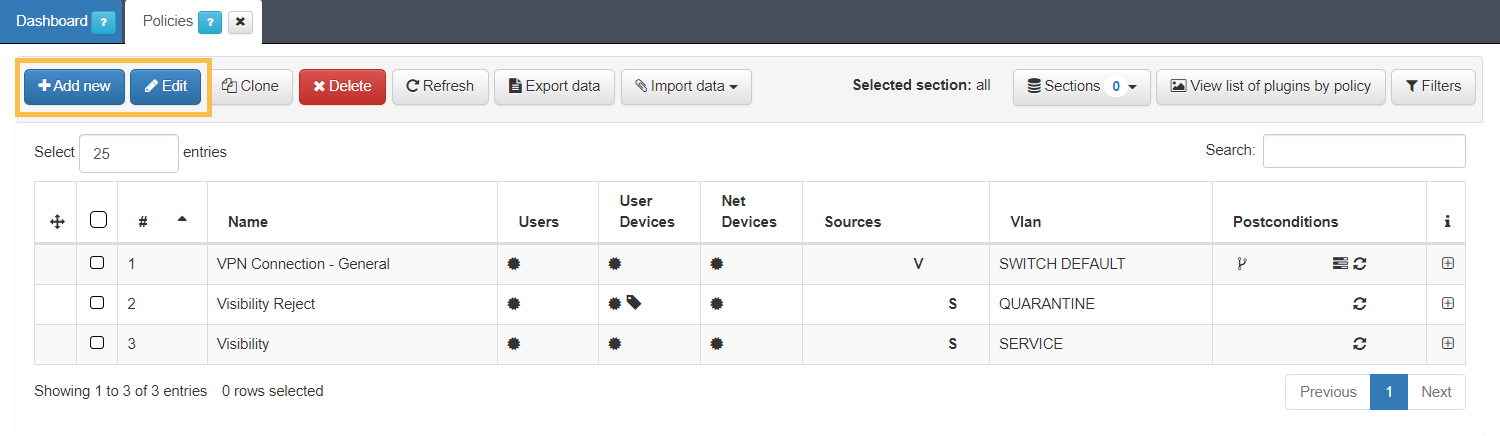
To access the list of policies we go to “ON NAC > Policies”
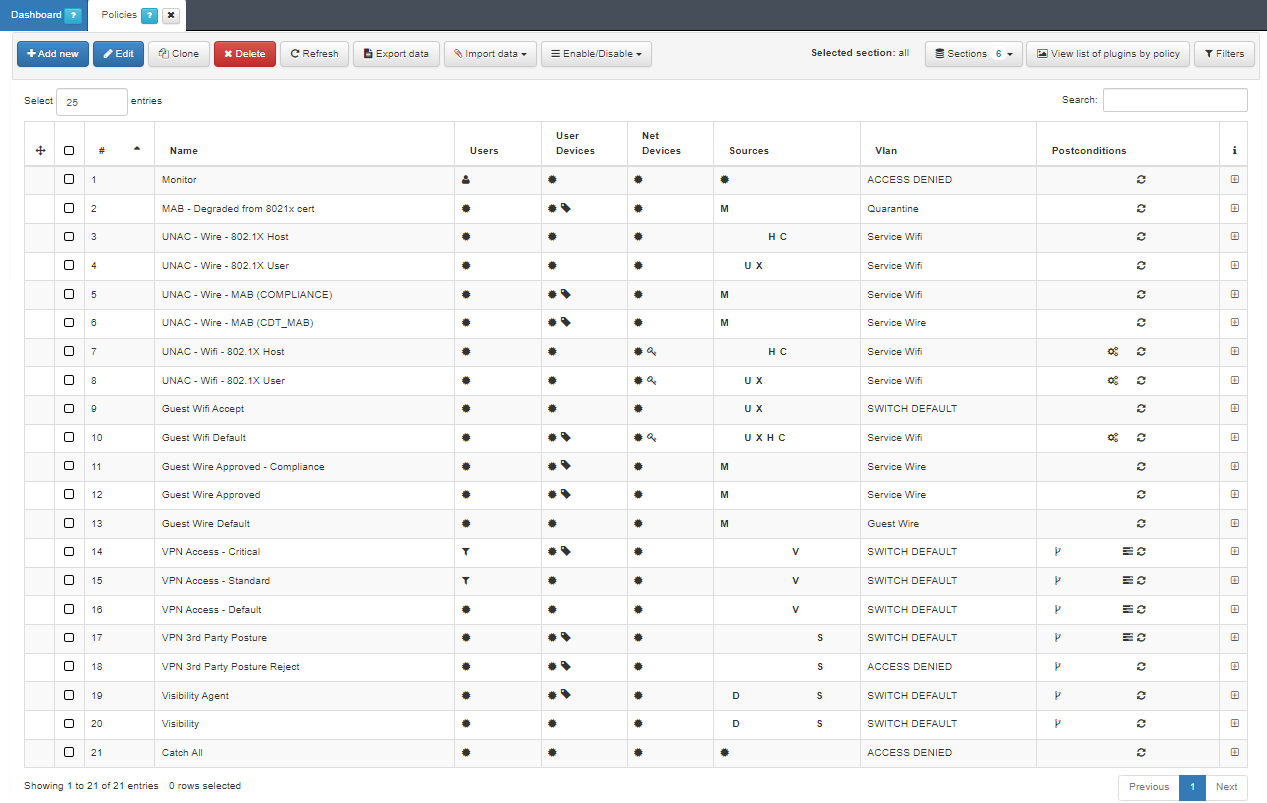
This window lists all configured policies. In case of a network access request, the first on the list will process it. If this does not match, it will continue with the second and so on, until it reaches a “match” and decides whether or not to allow access.
Important
It is recommended to configure a policy that “matches” all types of authentications, so that you can know which events do not match the current policy.
4.2.5.8. Policy Creation
Click on Add new at the top and a window to configure the new policy will open.
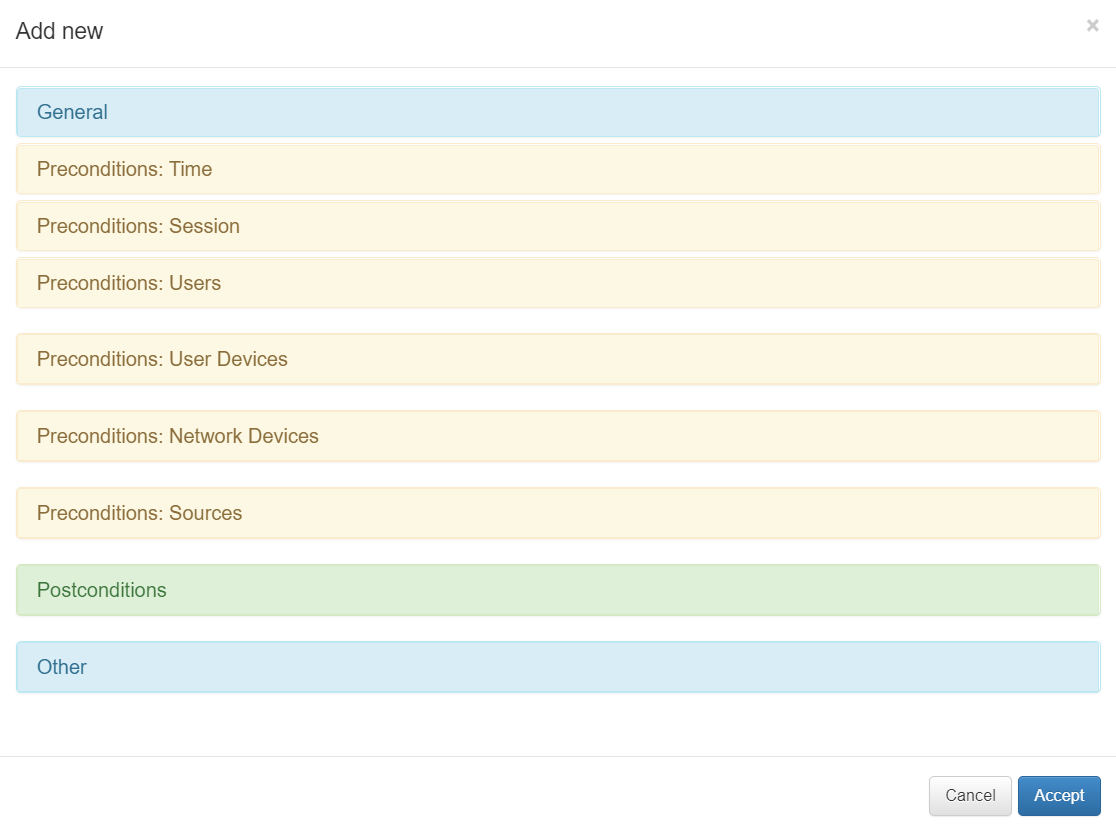
As you can see, there are several sections in the policy evaluation process.
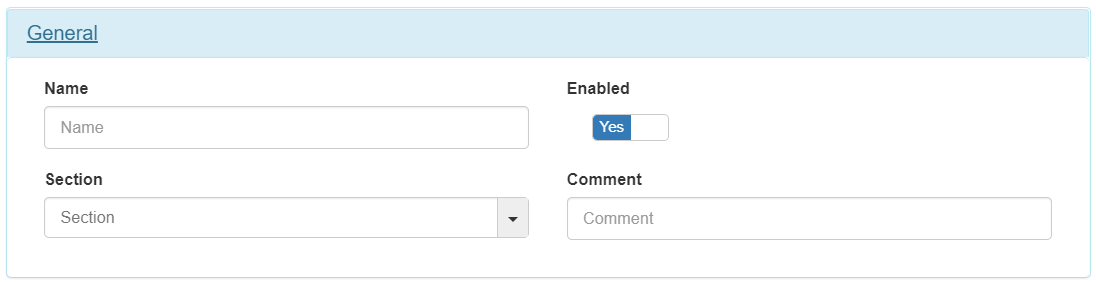
4.2.5.8.1. General
Every policy must have a name, a comment that details the behavior of that policy and finally, if you want to have this policy active, mark the “Enabled” check as “Yes”.
4.2.5.8.2. Preconditions
They allow you to add conditions that will be evaluated for each session to see if the user device should or should not fall into that policy.
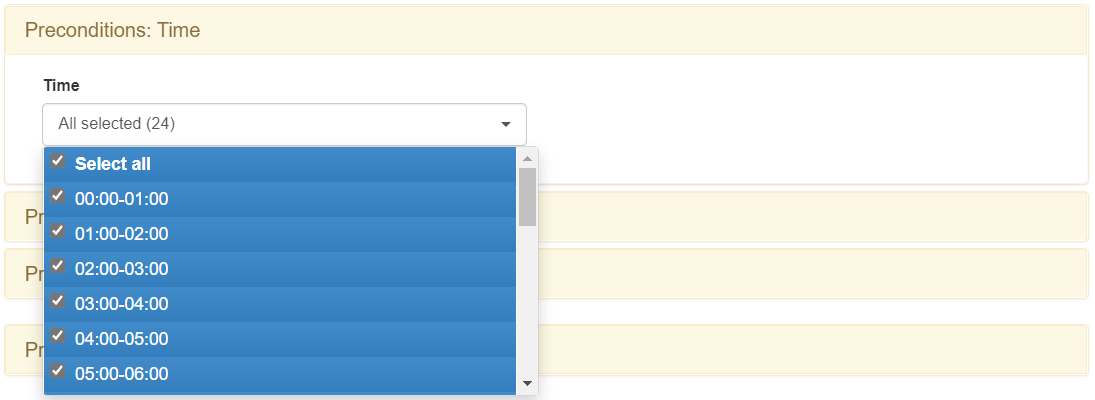
Time
This component gives the possibility to select at which times the policy will be active and the access requests of the users will be processed. This setting allows you to enable the policy in one-hour ranges.
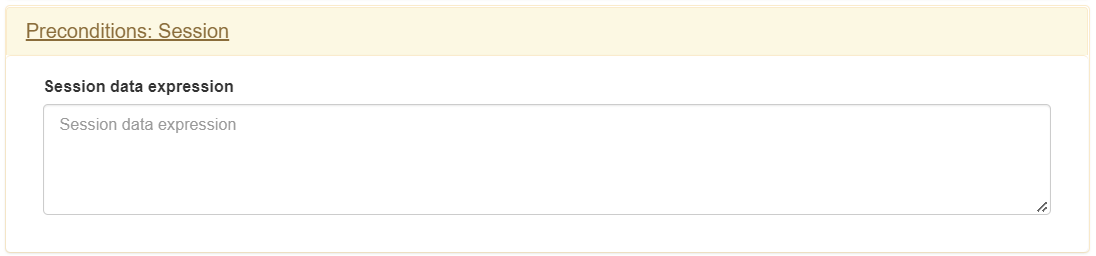
Session
This component allows you to filter users using information about their session.
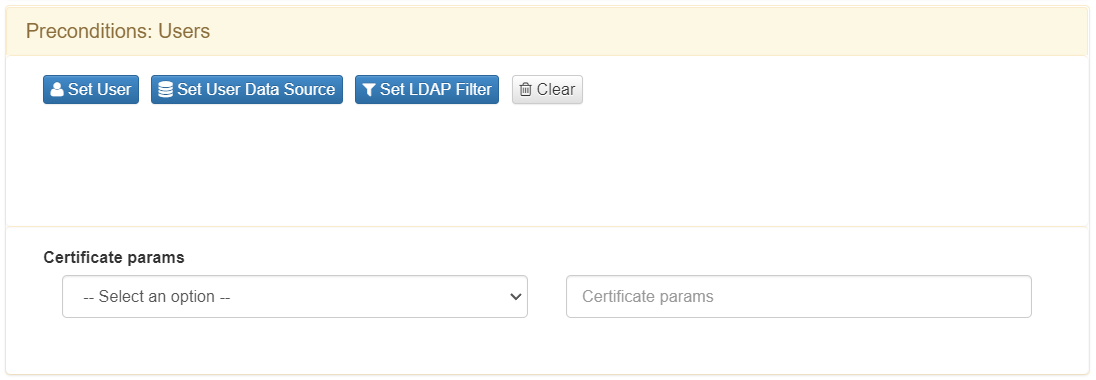
Users
This component gives you the ability to select user identities to determine whether or not they should fit into the policy.
In this section, we have the possibility to filter through a user or through the UDS (User Data Source). The UDS is the identity of the repository that is used for the policy engine, this can be for example an Active Directory, an LDAP Server, Database, etc.
The “Set user” option gives us the possibility to select a simple user from our database, in our example we will use the local database.
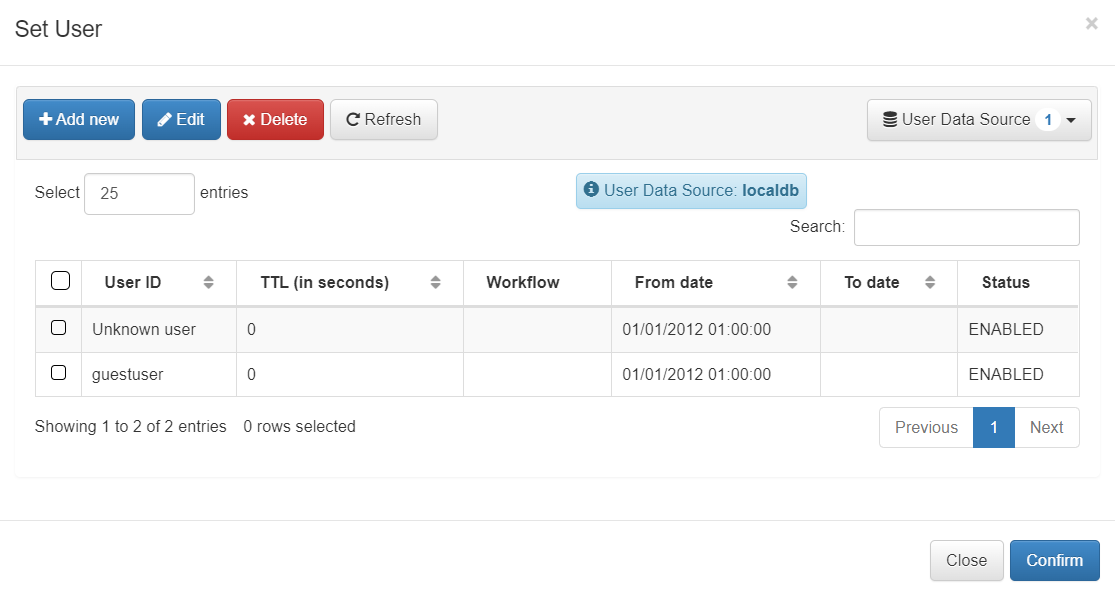
In this window we can choose a default user of the data source that we have selected.
In case we want to filter using the User Datasource we will have to go to the previous window and click on the “Set user Data Source” option.
A window displaying all the different UDS available will open. Once we have the UDS selected, we will have to define the conditions to allow access. This will be achieved through the “LDAP Filters”. Defining the “User Data Source” allows us to select the connection with the Repository, and through the “LDAP Filters” we can select which LDAP attributes are used for the authorization process.
If you have a UDS selected (for example, an Active Directory), and you do not have any LDAP Filter, all users who are in the AD will have permission to authenticate.
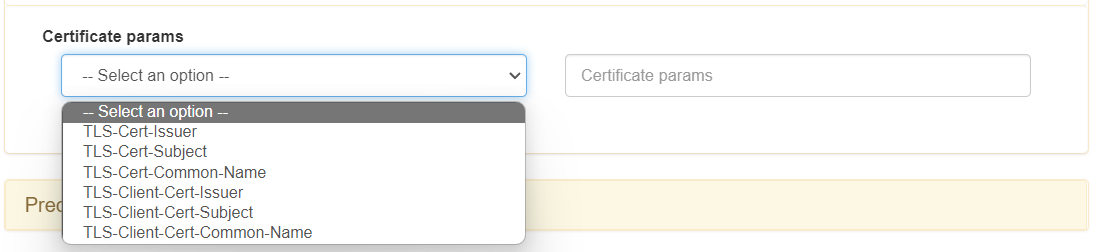
In the case of a certificate authentication process, there is also the possibility of applying conditions depending on the parameters of the certificate received.
To implement this function, we will have to use the fields that we find in the drop-down “Certificate params”
User Devices
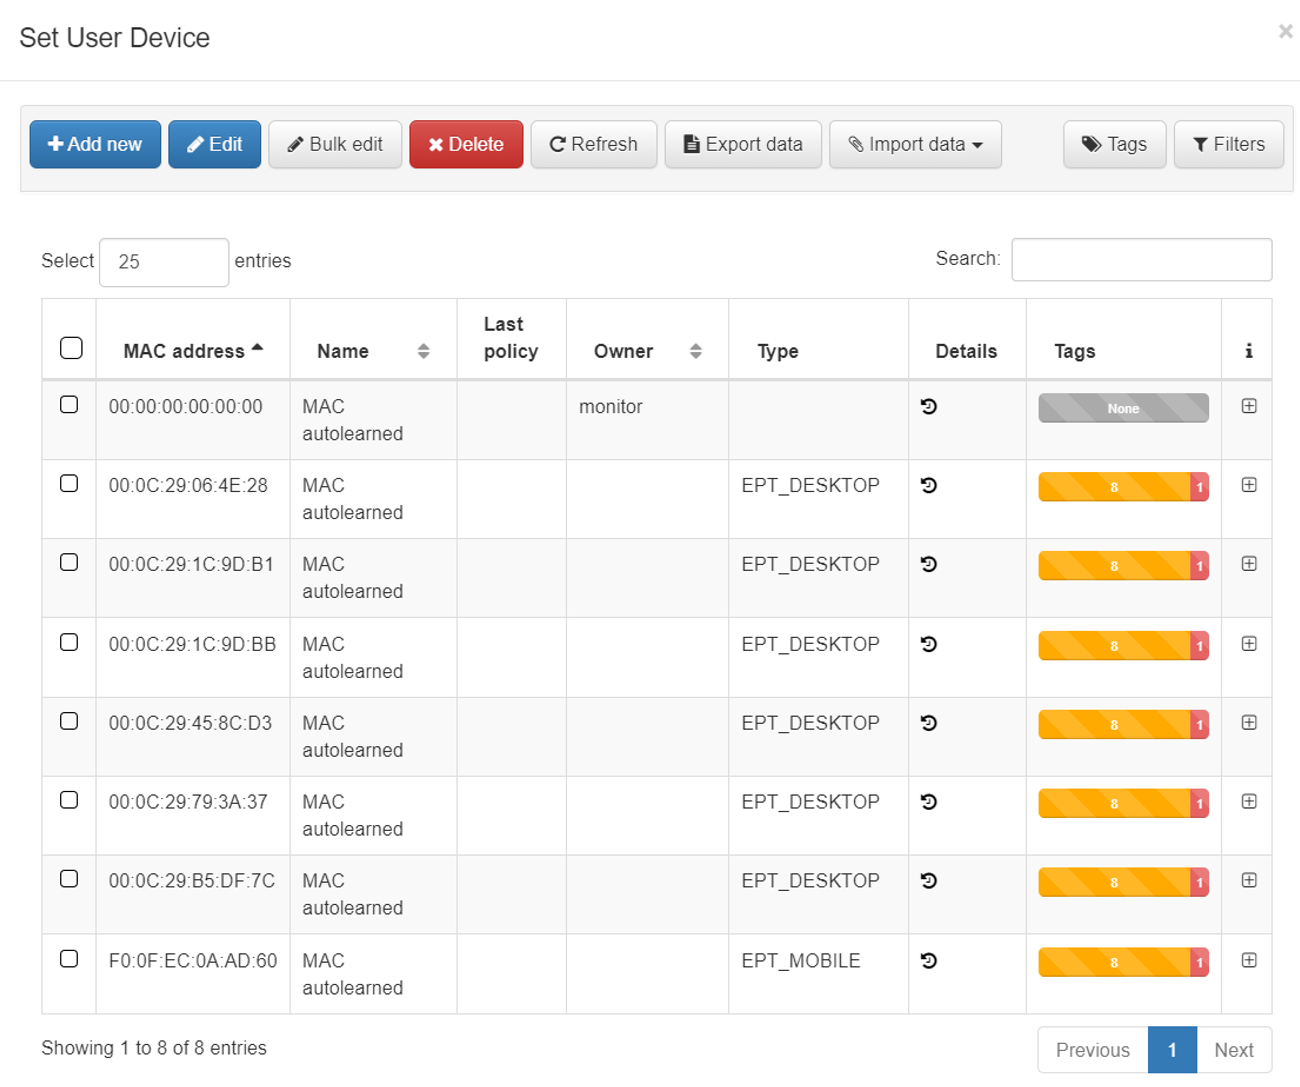
This component allows us to select devices from users who are registered in the system’s CMDB.
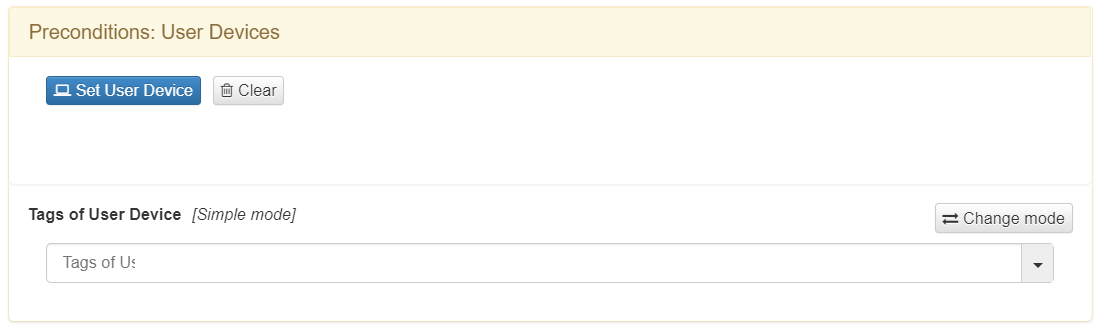
To select one of these user devices we click on “Set User Device”. A list of all the user devices that we have registered and from which we can choose will be displayed.
The selection of the user device is unique.
We also have the possibility to create conditions using the Tags assigned to that user device.
To do this we will have to create conditions within the text field “Tags of User Device Expression”.
This option allows us to use the Tags defined through the End Point Compliance module. To implement this module, refer to End Point Compliance module.
Network Devices
This component of the ability to select network devices that are registered in the system CMDB. This precondition will limit the policy to requests arriving from the selected network device.

In the same way as with the “User Devices”, to select one of these user devices we click on “Set Network Device”. A list of all the network electronics devices that we have registered and from which we can choose will be displayed at that time.
The selection of the network electronics device is unique.
We also have the possibility to create conditions using the Tags assigned to said network electronics device. To do this, we will have to create conditions within the text field “Tags of User Device Expression”.
In this section, we also have the possibility to use the SSID (in case of Wi-Fi connections) of the device to create conditions. To do this, we will have to add this value in the text field “SSID”. This field supports regular expressions.
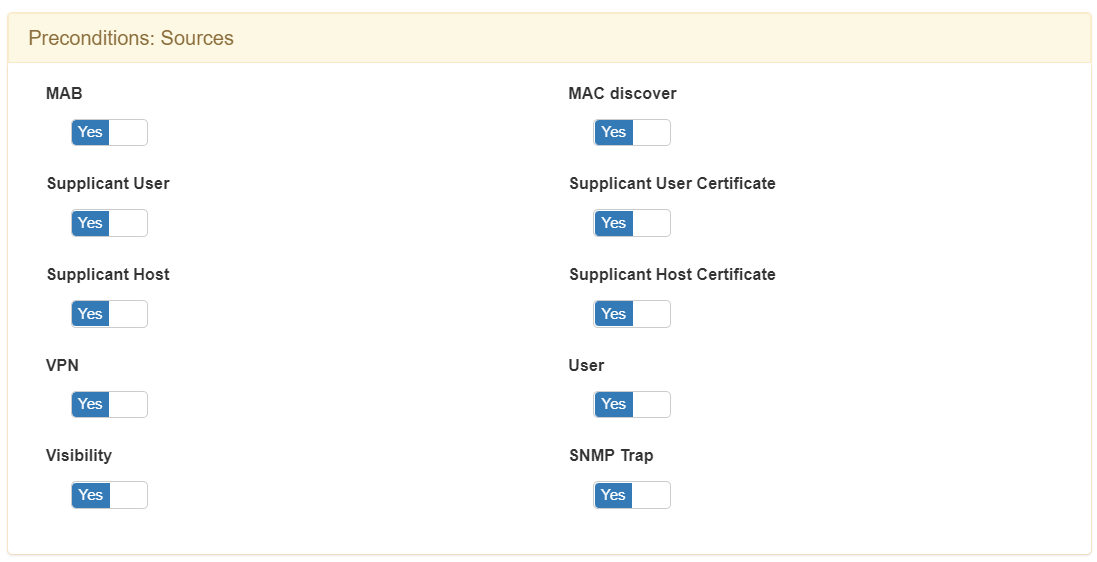
Sources
This precondition allows us to define the authentication process that will be carried out during the request for network access.
There are different methods of device authentication:
Supplicant User
Supplicant Host
Supplicant certificate
VPN
User
Certificate
MAB
It is recommended not to use all at once. With a tight policy we can guarantee better policy results and avoid mistakes.
- MAB
The “Mac Authentication” Bypass (MAB) method is an emulation of the 802.1x method.
In case the authentication process does not exist an 802.1x supplicant, it sends the MAC as the authentication method. This process is used with devices that do not have an 802.1x supplicant such as printers, phones or other devices.
- Supplicant User
The Supplicant user method is used if you have an 802.1x authentication method configured. In this case, this process is accompanied by username/password credentials.
- Supplicant Host
This method is used if you have an 802.1x authentication method configured. In this case, the credentials of the device are used to carry out authentication.
- Supplicant certificate
This method is used when we have an authentication method that uses digital certificates. These certificates can be either user or machine.
- VPN
With this option, we allow authentication as a backend of VPN servers. Some of the monthly VPN hubs used and easy to integrate are Juniper, Cisco, Fortigate, Checkpoint. The communication protocol used between the technologies is the RADIUS protocol.
This font is also used with the implementation of the remote access use case, the 2SRA module.
- User
The “User” font can be used generically to authenticate access credentials using RADIUS. An example could be access authentication to network devices such as Switches, Routers, VPN, etc. This means that we can use the tool for authenticated access to network devices and at the same time we can also create authorizations.
- Visibility
With this option we allow the ON Core node to process the events collected by the ON Sensor node. These events will be reported from the ON Aggregator node. As an example of a use case, the devices learned by the ON Sensor node are sent to the ON Aggregator node and this notifies ON Core by adding the Tag SRC_SENSOR.
- SNMP Trap
Using this option we can process the events coming from the SNMP TRAP processes sent by the network devices. This Trap must be in version 1 or 2 and must include the MAC address of the user device.
4.2.5.8.3. Postconditions
Allows you to add conditions and actions to apply once the user device has fallen into the policy and all preconditions have been met.
This section can also be defined in different blocks, where each one is used to configure certain postconditions.
VLAN
The first block serves to define to which VLAN we will assign the user or device that is being authenticated.
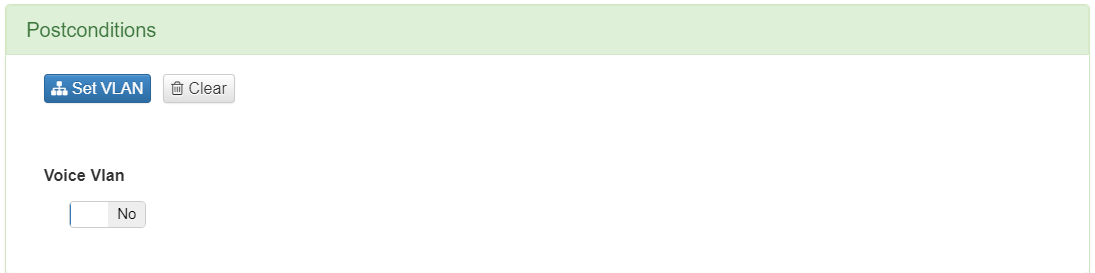
We will have to click on “Set VLAN” and a window will open displaying all the different VLANs that we have defined.
If you want to segment the network through VLANS, you must use the Segmentation module. To do this, consult the corresponding guide (Segmentation module) to create the VLANs and apply the segmentation.
Otherwise, without a segmentation module, the VLANS available are the following:
o VLAN 0 (SWITCH DEFAULT) is used to indicate that you want to make use of the VLAN defined by default on our Switch. This will be responsible for assigning the VLAN.
o VLAN 4095 (ACCESS DENIED) is used to directly deny access to the network. It is not a valid identification value and for that reason, in case of defining this VLAN we will get all access to the network denied.
Security Profiles

If you want to segment the network through ACLs, we must use the Segmentation module. To do this, consult the corresponding guide (Segmentation module) to create the ACLs and apply the segmentation.
Otherwise, we will not define any Security Profile in this section.
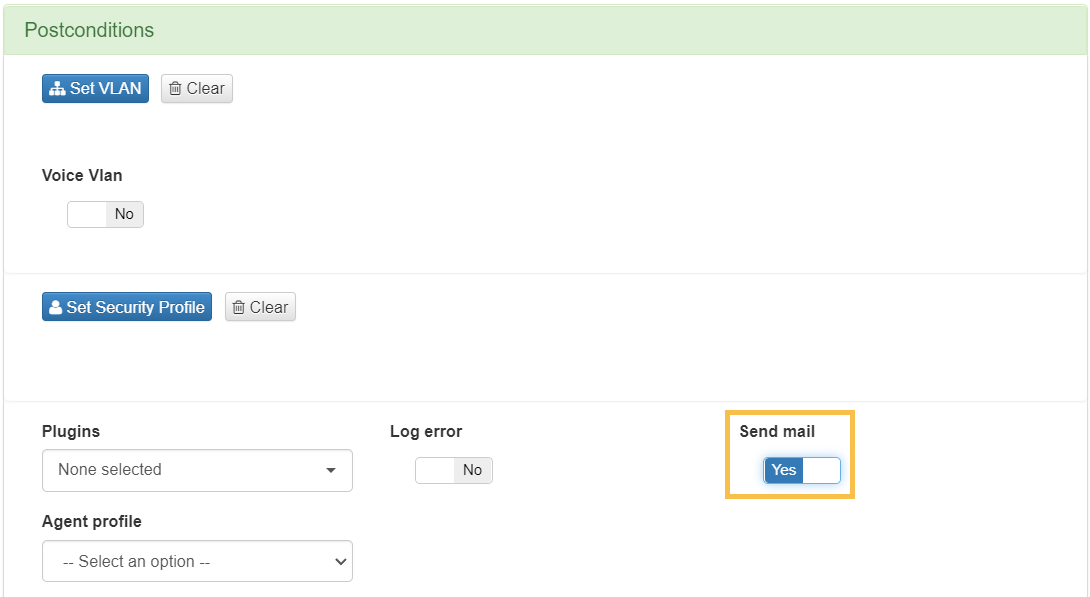
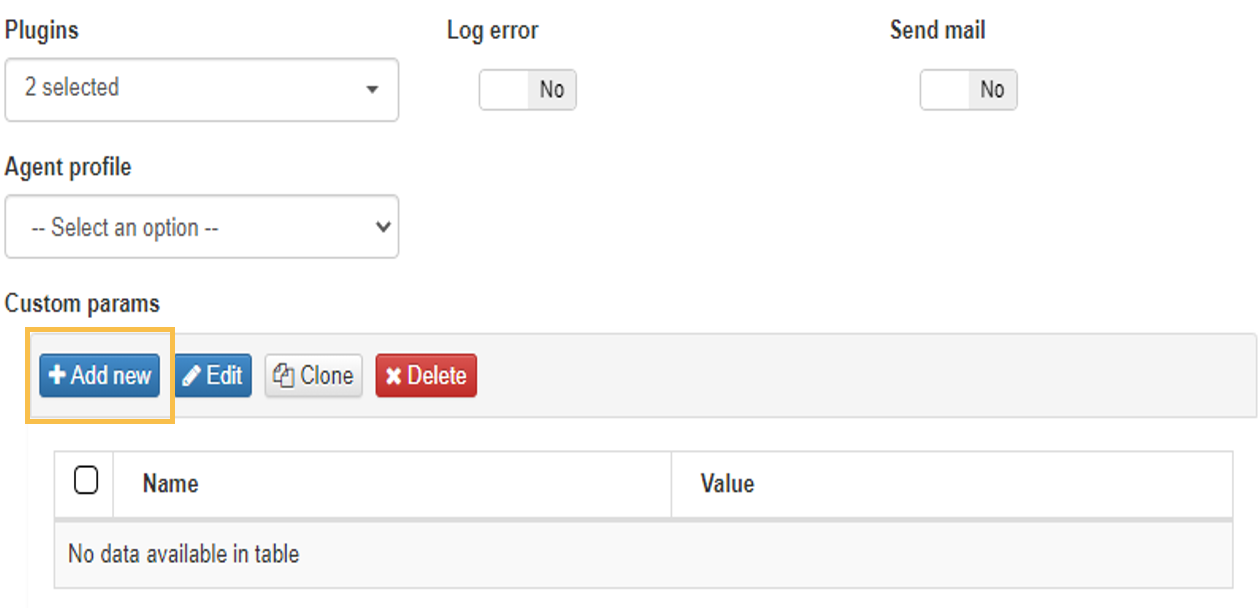
Plugins
The following section defines the use of the different plugins and their parameters.
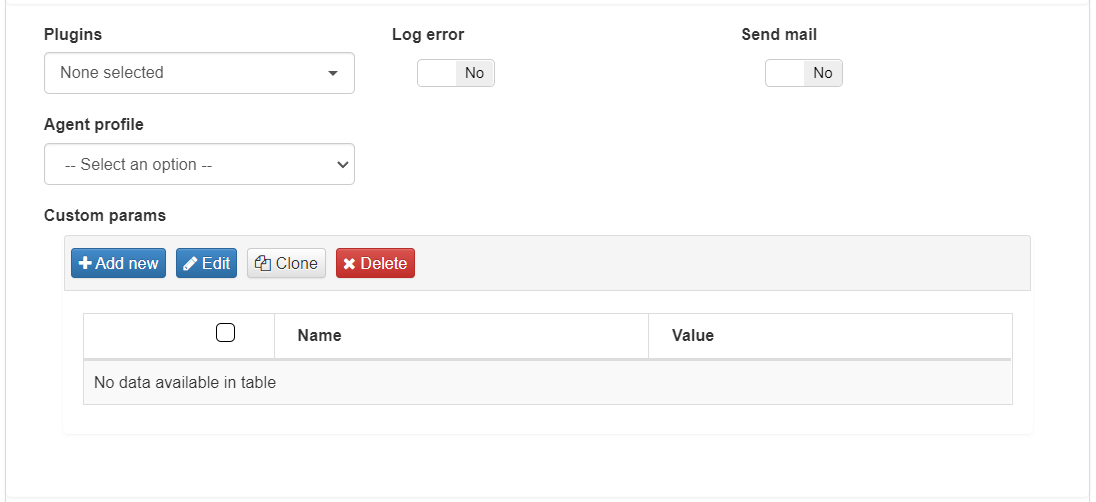
In the Plugins drop-down, you can choose between all the previously activated plugins. To activate/deactivate them you have to access Configuration -> Plugins. In this section we can also activate those plugins that allow us to perform segmentation through integration with NGFW.
The Log error option allows you to send error logs using syslog. By default, this option is disabled. The Send mail option allows you to send a notification email at the time this policy matches the authentication request.
The Agent profile option allows you to choose a user profile. If none is defined, the default profile will be used.
The Custom params option allows you to define necessary parameters for some plugins.
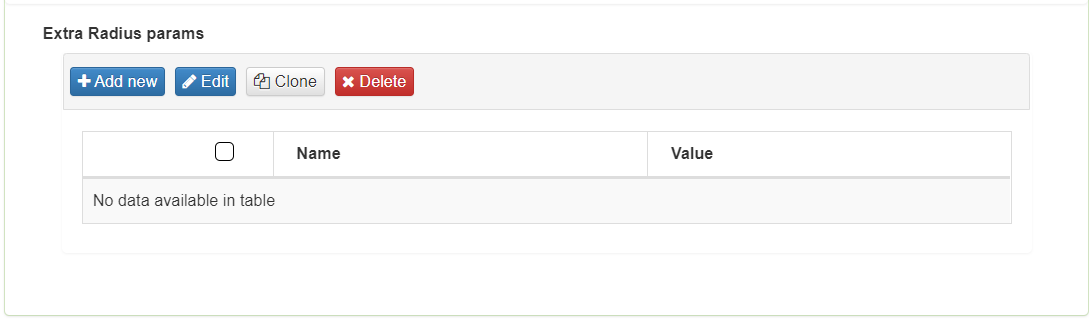
Extra Radius params
The last section defines extra parameters that we can send as part of the Radius response of the policy.
4.2.5.8.4. Other
This last section allows you to define messages for network accesses, learn user devices automatically and define Tags for that device.
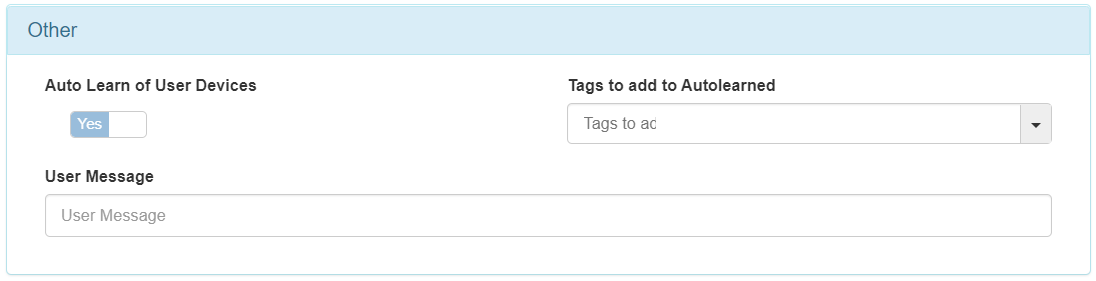
The Auto Learn of User Devices option is used by the system. If the option is enabled, it adds unknown devices and matches that policy. These devices will then be registered in the database (CMDB). Devices learned through these policies will be assigned the “ONC_AUTOLEARNED” Tag.
Adding Tags to add to Auto learned option requires the previous option to be enabled. In this case, you can define adding Tags to the devices that have been learned through the authentication and policy matching process.
The User Message option allows you to define a message that will be displayed as a pop-up when a user makes a connection through an Agent.
4.2.5.9. Policy Notification
There is the possibility of receiving notifications to an email address whenever a user device falls or fits into any of the policies defined in the system. To do this, we must configure the emails where we want to send the message and the content of that message.
Go to “Configuration > Configuration vars” tab and find the “Notifications” section:
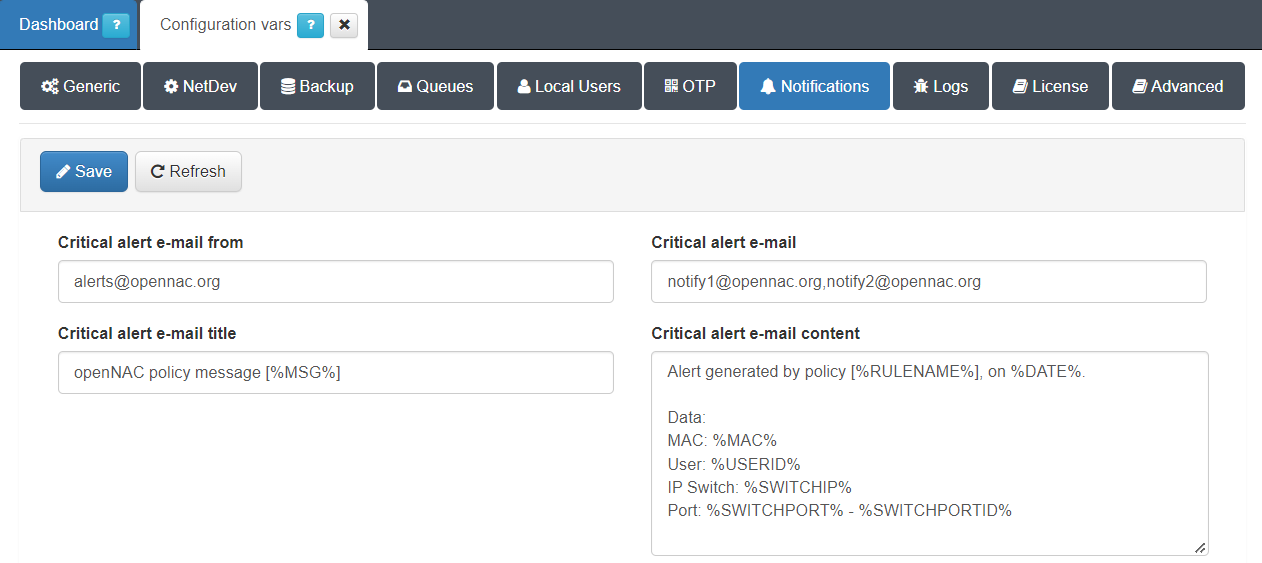
The fields to configure the policy Notification are:
Critical alert e-mail form: Email address with which email notifications will be sent.
Critical alert e-mail: Email addresses to which notifications will be sent. We can add several by using commas “,”.
Critical alert e-mail title: Title of the email, it is possible to use the internal parameters of the policy as variables.
Critical alert e-mail content: Content of the email, as with the title, it is possible to use the internal parameters of the policy as variables.
Once the fields are defined, click the “Save” button to apply the changes.
To activate the notifications in the policies, we must go to “ON NAC -> Policies” and edit the policies to which we want to configure the notifications.
To do this, select the policy you want to edit and click the “Edit” button:

In the preconditions section, enable the “Send mail” flag:
To apply the changes click “Accept”. Now every time a device matches the policy we will receive an email notification.
4.2.5.10. Use cases
The following section will detail some of the main use cases to be implemented using the UNAC module. These use cases are the following:
Network Access Control (UNAC)
Kerberos Authentication
Vpn connection authentication
UNAC + End Point Compliance
UNAC + Segmentation
UNAC + Integration with NGFW
User device quarantine
4.2.5.10.1. Network Access Control (UNAC)
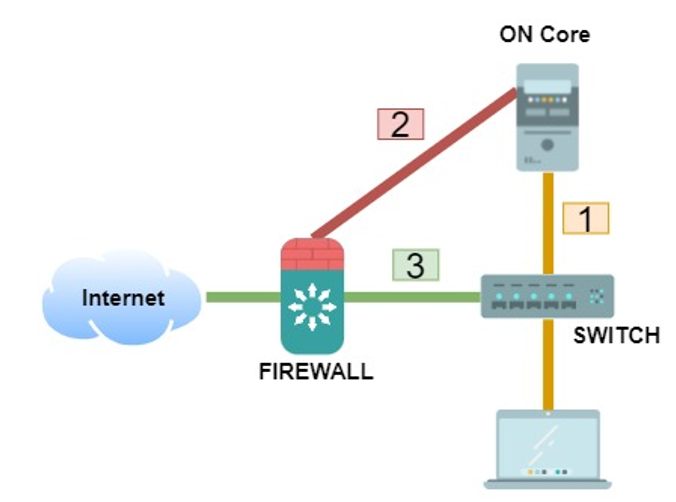
The main use case of the UNAC module is related to the control of devices accessing the network. This use case is based on the AAA protocol consisting of the following phases:
Authentication: The access credentials provided by the user device are verified.
Authorization: By evaluating policies, the resources to which the user has access are established.
Accounting: During the user’s uptime, information regarding their session is collected.
For this implementation, the 802.1x protocols are used for communication between client and switch (or MAB in case there is no supplicant), and the RADIUS protocol for communication between the switch and our system.
The requirements to apply such a use case are:
System configured correctly (UNAC Configuration).
Switch configured with 802.1x and/or MAB.
Windows computers with supplicant (802.1x Authentication) and/or without supplicant (MAB Authentication).
The operating flow of the use case is as follows:
By Username/Password:
When a user device connects to the network, the authentication process starts. First the credentials (user or computer) are sent to the switch (802.1x). Later it sends them to ON Core to validate them (RADIUS).
ON Core performs credential verification against defined UDS (Authentication). If the authentication is valid, the evaluation of policies that will determine access (Authorization) is performed.
ON Core will notify the switch (via RADIUS) of the access to which the client must have.
Via MAB:
When a user device without a supplicant connects to the network, the authentication process starts. Since it do not have a supplicant, the switch makes use of the MAC detected as access credentials (Authentication).
ON Core performs certificate verification. This validation is performed locally by checking the validity of the certificate signature. If the authentication is valid, the evaluation of policies that will determine access (Authorization) is performed.
ON Core will notify the switch (via RADIUS) of the access to which the device must have.
By Certificate:

When a user device connects to the network, the authentication process starts. The certificate is first sent to the switch (802.1x). Later it sends it to ON Core to validate it (RADIUS).
ON Core performs certificate verification. This validation is performed locally by checking the validity of the certificate signature (Authentication). If the authentication is valid, the evaluation of policies that will determine access (Authorization) is performed.
ON Core will notify the switch (via RADIUS) of the access to the client.
At the policy level, it is essential that, for each type of authentication, the “Source” precondition coincides with the one we plan to receive.
4.2.5.10.2. Kerberos Authentication
In environments where you log on to Windows computers using Kerberos authentication, you can apply the UNAC module without activating the supplicant on those computers.
The requirements to apply such a use case are:
Correctly configured system (UNAC Configuration)
Switch configured with MAB.
Windows computers without supplicant.
The authentication flow for the use case happens as follows:

When the Windows computer boots and the Windows computer does not have any type of supplicant configured, an initial authentication of type Mac Address Bypass (MAB) will be performed.
When the user logs on to the Windows account, the user will authenticate against the authentication server using the Kerberos protocol.
The ON Sensor server will receive the Kerberos ticket through the SPAN port.
ON Sensor will send the information to ON Aggregator.
ON Aggregator will make a policy evaluation request to ON Core with the Kerberos ticket information. When ON Core receives this request, the Kerberos user will be associated with the existing MAB session. An event of type “USERIN” will be generated and if a VLAN change is necessary, a “REEVAL” event will be executed. We can consult the OpenNAC Events to know in more detail the types of events in the system.
Once the revaluation is done, the new policy will be applied on the Switch.
In terms of policies, it is essential to have the following configurations implemented in the portal:
A first policy where, in the preconditions of type “Source”, MAB is defined as a source. This policy will be the one in which the Windows computer will initially fall (before logging in).
A second policy where, in this case, the precondition of “Source” will be of type “Visibility”. This policy will be the one that once received the information collected by ON Sensor will apply the postconditions of the user’s authentication.
4.2.5.10.3. VPN connection authentication
The UNAC module allows the use as an authentication backend for VPN hubs, both SSL-VPN and IPSEC, using the RADIUS protocol. These authentications are made by Username and Password. Even if the use of external VPN hubs is possible, it is recommended to use the 2SRA module for remote access to the network. The requirements to apply this use case are:
ON Core server configured for VPN authentication (UNAC Configuration)
Compatible VPN hub (SSL or IPSEC) (Juniper, Netscaler, Cisco ASA, PaloAlto or FortiGate).
The authentication flow happens as follows:
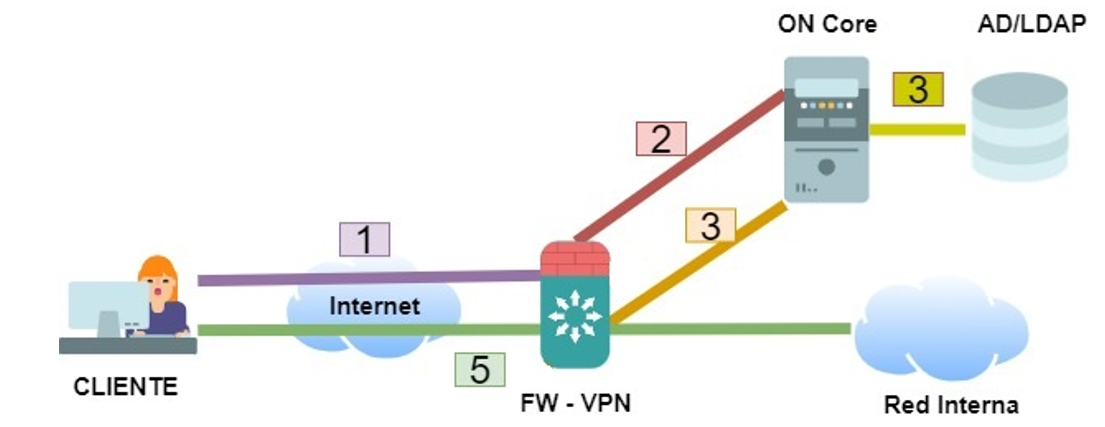
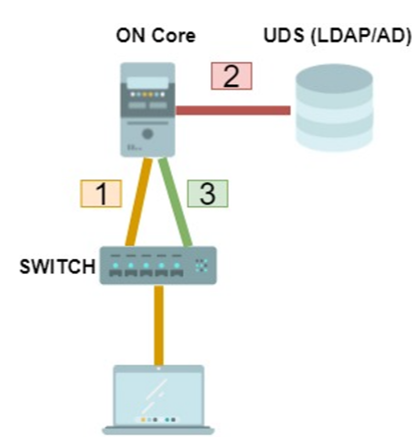
The client trying to connect to the network and start the network access process using the VPN hub.
The VPN hub that receives the client’s authentication attempt sends an authentication request to the ON Core server (via RADIUS).
ON Core uses its policy engine to allow or deny access by verifying credentials with the corporate active directory.
If there is a policy in which access is granted, ON Core will send a message to the hub to accept attempts to access the network (via RADIUS).
The VPN hub will establish the connection depending on the result of ON Core.
In terms of policies, it is essential to have the following:
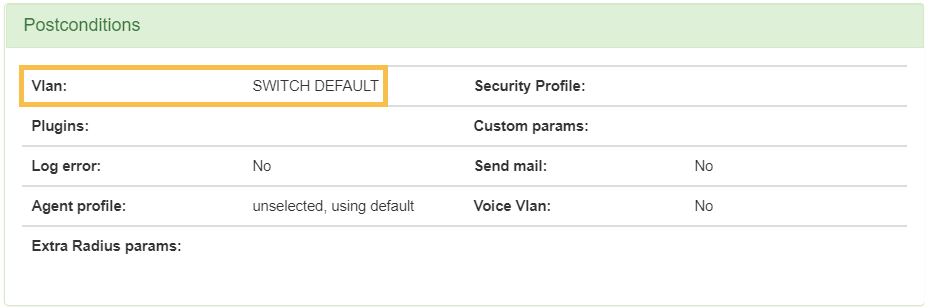
1. A policy where, in the “Source” preconditions, VPN is defined as a source. As a post-condition it is important to define the VLAN “SWITCH DEFAULT”. This policy will be the one in which all requests from VPN authentications of the hub will enter.
Preconditions:
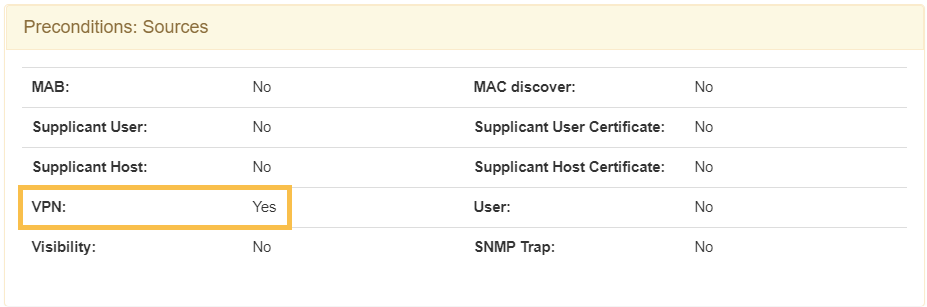
Post-conditions:
4.2.5.10.4. UNAC + End Point Compliance
The use case of “End Point Compliance” corresponds to environments where we apply compliance requirements such as parameters of the device itself, elements that it has installed and activated, versions of installed applications, etc.
The combination of this module with UNAC provides greater control over who can access the network depending on the characteristics of the device.
The requirements to apply this use case are:
Have the Agent installed and running on the user device
Implementation of the End Point Compliance module (End Point Compliance module).
A flow example for this use case would be as follows:
A user device is connected, with the agent previously installed.
The agent is responsible for sending the information of that device to the system.
The system obtains this information and identifies it through Tags.
The Tags associated with this device are evaluated, with those defined in the “UD Tags Policies” policies.
Access policies are evaluated and this user is checked for compliance with the policy requirements.
Satisfactory Compliance: In this situation, the device would meet the requirements we have set out in the Compliance policy. This way you could access the network and be assigned, for example, to the service VLAN.
Unsatisfactory Compliance: In this situation, the device would not meet the requirements we have set out in the “Compliance” policy and would enter the “Non-Compliance” policy. This would assign you a control VLAN defined in that policy. You can also restrict access using ACLs defined in the “Security Profile”.
In the event that the characteristics of the device change and the agent reports such changes, it is possible for that device to go from “Compliance” to “Non-Compliance” or vice versa.
In case you want to notify the user that your device is in one of the two states, we can go to the “Other” section of the policy we want, and in the “User Message” field, we define the message that we want to display to the user when the device enters it.
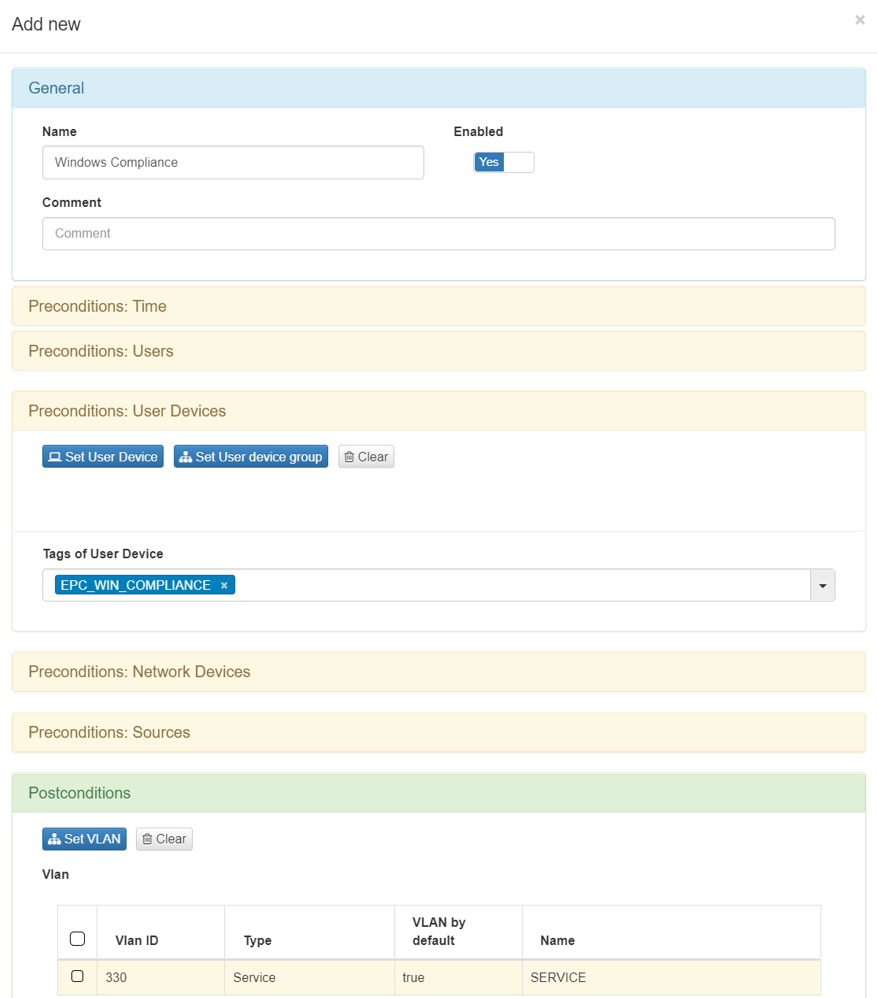
The following window shows the policy example for this use case, which will take care of verifying that the user device meets the Windows compliance requirements (defined by the Tag EPC_WIN_COMPLIANCE).
Compliance Policy Example
4.2.5.10.5. UNAC + Segmentation
Through the combination of the UNAC module and the Segmentation module, we can granularly apply a stricter and more controlled network segmentation.
For this implementation, the 802.1x protocols are used for communication between client and switch (or MAB in case there is no supplicant), and the RADIUS protocol for communication between the switch and our system.
The requirements to apply such a use case are:
System configured correctly (UNAC Configuration).
Implementation of the Segmentation module (Segmentation module).
Switch configured with 802.1x and/or MAB.
Windows computers with supplicant (802.1x Authentication) and/or without supplicant (MAB Authentication).
The operating flow of the use case happens as follows:
When a user device connects to the network, the authentication process is initiated using 802.1x or MAB.
ON Core performs credential verification against defined UDS (Authentication). If the authentication is valid, the evaluation of policies that will determine access (Authorization) is performed.
ON Core will notify the switch (through RADIUS) of the access to which the client must have and segment the client’s access through the VLANs and / or Security Profiles (ACLs) that have been defined in the policies.
It is also possible to perform segmentation through integration with NGFW.
4.2.5.10.6. UNAC + Integration with NGFW
The integration with the NGFW corresponds to the Segmentation module. It allows us to improve the segmentation of the network by sending information about the users who authenticate to the firewalls of the network, so that they can execute their policies more accurately.
The operating flow is as follows:
A user device connects to the network. On Core runs the policy engine and the user falls into a policy that has as a post-condition the application of an NGFW integration plugin.
As part of the post-conditions, the system sends information to the firewall. This information relates the user’s IP to the group to which it must belong in the firewall. In a Palo Alto firewall this association is done using Tags. In FortiGate firewalls, this association is done by user groups.
Depending on the group to which the system has decided that the user belongs, the firewall will apply some policies or others.
In terms of policies, it is essential to have the following:
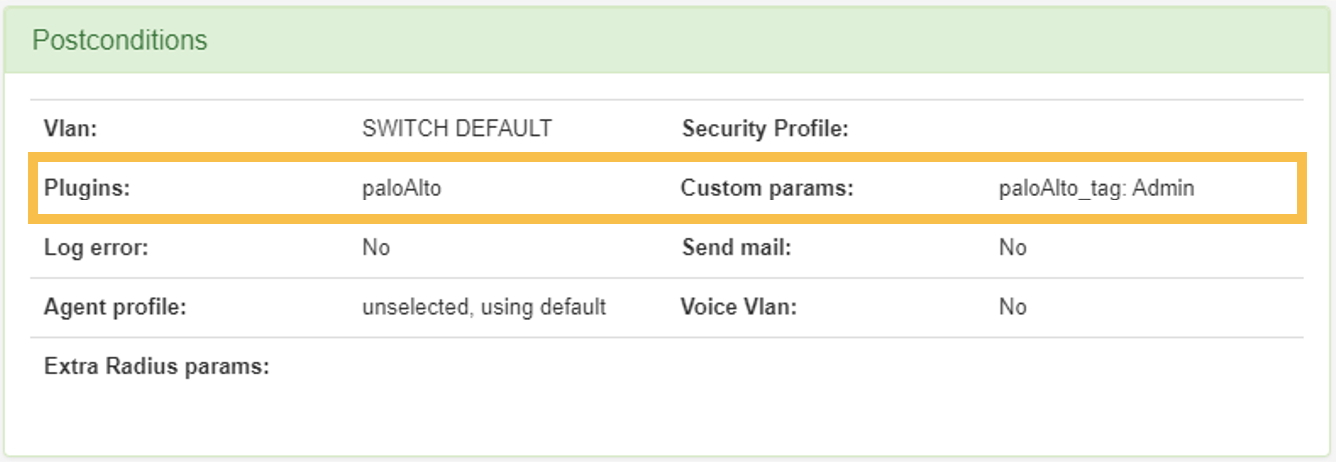
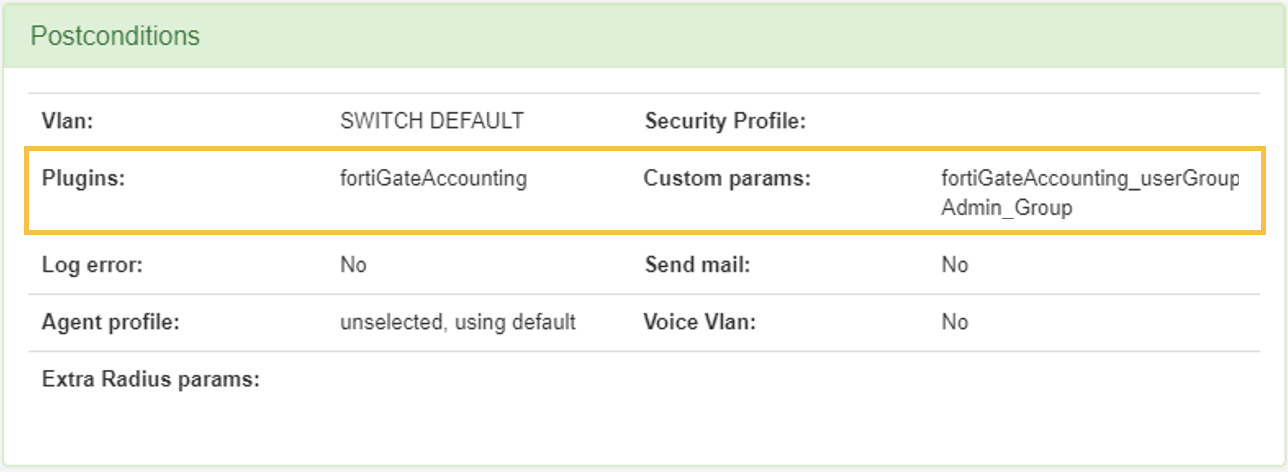
One or more policies where, in the postconditions, the use of a plugin of type NGFW integration is activated. These can be “paloAlto” or “fortiGateAccounting”. As part of the postconditions we can define the “Custom param” of the Tag or Group of Users to which the users who fall in this policy in the firewall must belong.
Palo Alto Example:
FortiGate Example:
4.2.5.10.7. Quarantine user devices
The user device quarantine use case corresponds to environments where we find that, due to situations where a user device not meet security requirements, we want to isolate that device from the rest of the network assets.
To do this, we must have this functionality implemented through the Segmentation module. We can consult the configuration process in Segmentation module.
The requirements to apply this use case are:
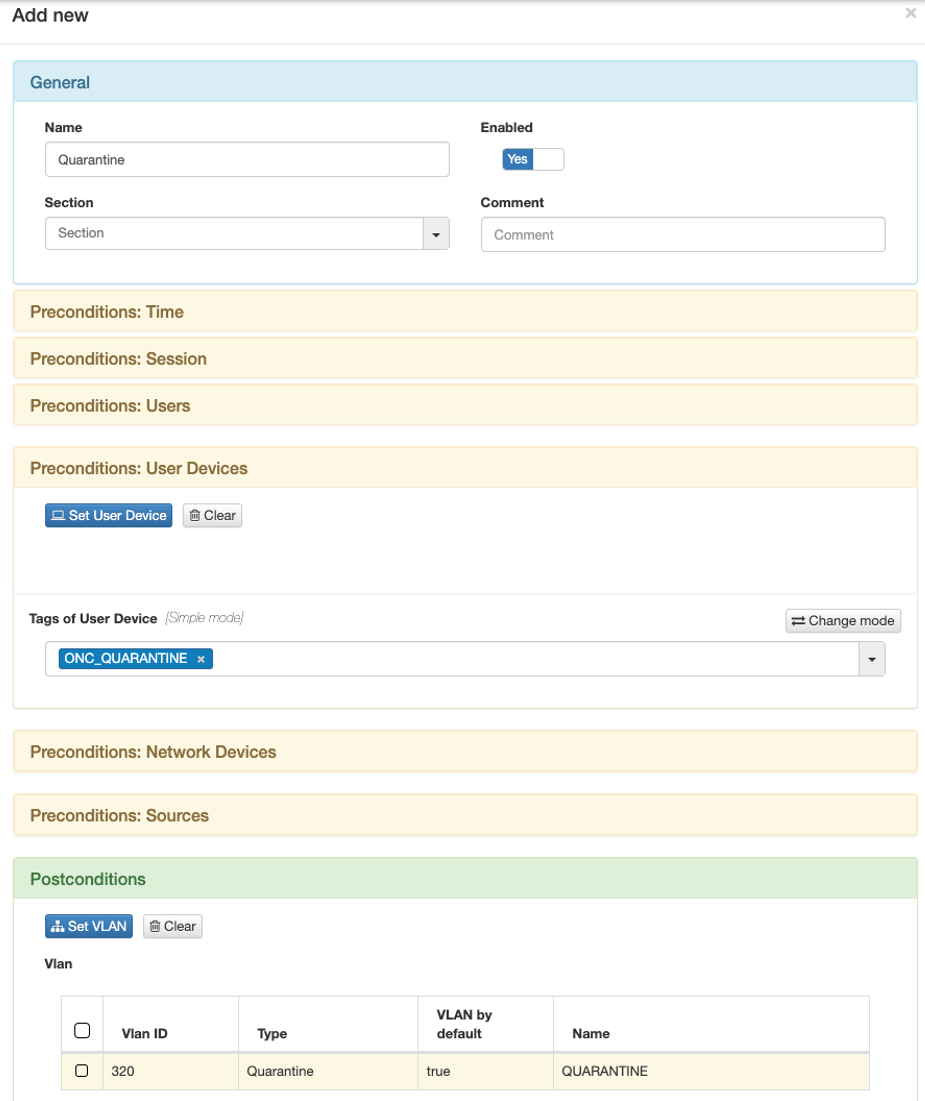
Have a quarantine policy defined and that this is on top of the valid access policies.
A flow example for this use case would be the following:
A user device is connected.
Initially access is allowed since, through the information collected by the Agent, it complies with the security requirements for access.
The user installs software considered dangerous on the device, the Agent reports this information to the system and this, through the evaluation of policies determines that the device must go to quarantine.
Once you enter the policy, you will be assigned the VLAN defined in it. In this case we use the forty VLAN for this use case, the “VLAN 320: Quarantine”.
Manual Quarantine of User Device
It is also possible to perform a manual quarantine of user devices. To do it, consult UNAC - Quarentine (Basic Operation).
A flow example for this use case would be the following:
A user device is connected.
Initially access is allowed as we have not quarantined it and does not enter the policy created previously
For security reasons, we quarantine the user. To do this we go to ON NAC -> Business profiles, select the desired user device and then click on “Quarantine”.
The moment we manually put the device in quarantine, it will have the ONC_QUARANTINE tag.
By making this assignment to the group, a reauthentication of the user device is forced, which this time, being part of the group defined as a precondition in the policy, will enter it.
Once you enter the policy, you will be assigned the VLAN defined in it. In this case we use the default VLAN for this use case, the “VLAN 320: Quarantine”.
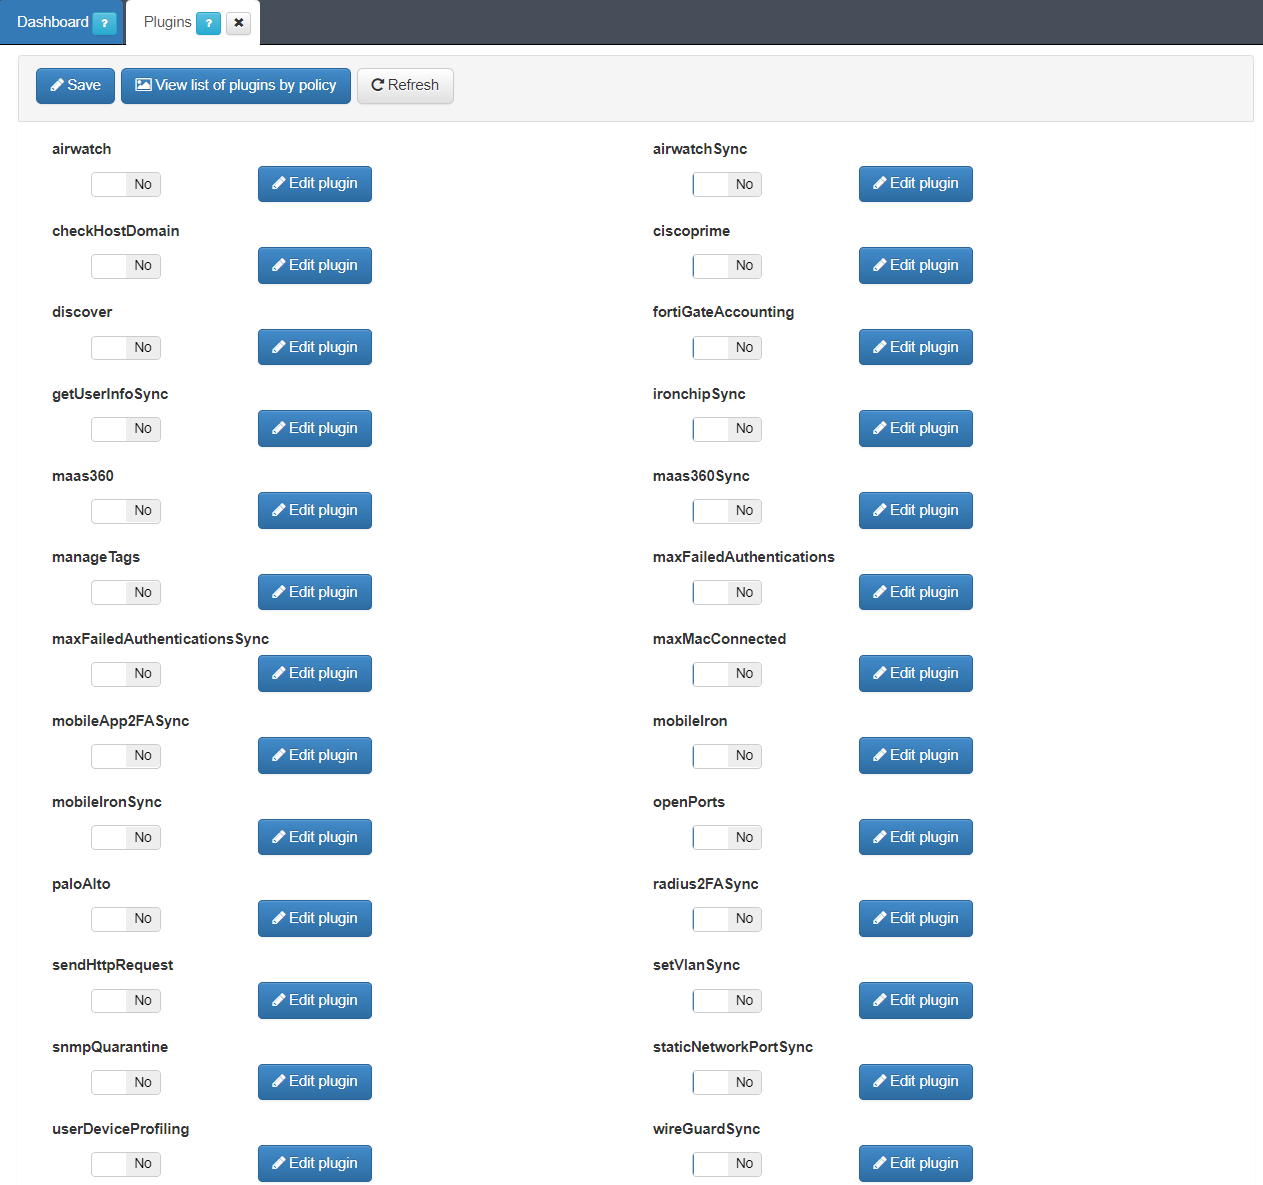
4.2.5.11. Enable Plugins
The following section will cover the different plugins available that we can use for our use case.
Plugins are a very interesting component of the tool. They have several functionalities related to network access control.
Plugins related to the asset discovery process
Plugins related to network structure (NGFW,MDM)
Plugins related to asset profiling
Plugins related to the two-step authentication process (2FA)
Plugins related to the registration, categorization and control of assets
By accessing “Configuration -> Plugins”, we have the possibility to see all the available plugins. We can activate them and set the default configuration parameters. To define specific parameters of the plugins you have to do it from ON NAC -> Policies, at the moment we assign a plugin to a policy.
If we click on the option “View list of plugins by policy” we can see the different plugins that are used in each of the policies configured in the tool.
These plugins are classified into two types:
Synchronous: The plugin runs with the authentication process and modifies the result of the policy evaluation. These are identified because their name ends in “Sync”.
Asynchronous: the plugin runs independently of the authentication process, to get more information about the asset. The outcome of the implementation does not change the outcome of the policy evaluation.
In the UNAC use case, we will focus on the following plugins:
4.2.5.12. Applying plugins to policies
To use visibility plugins, they must be activated in each of the network access policies. These plugins are part of the “Postconditions” section of the policies, that is, they are executed once the device has matched that policy.
To adopt these plugins, we must go to “ON NAC -> Policies” to create a new policy or modify an existing one.
Click on Add new or Edit at the top row of the tab and a window to configure a policy will open. Go to the “Postconditions” section and in the “Plugins” drop-down, we select those that we want to activate.

You can modify the configuration of these plugins in the policy itself by adding “Custom params”. In this way, the configuration parameters of the plugin are modified only for the execution of this in that policy.
These custom params are configured with the following attributes:
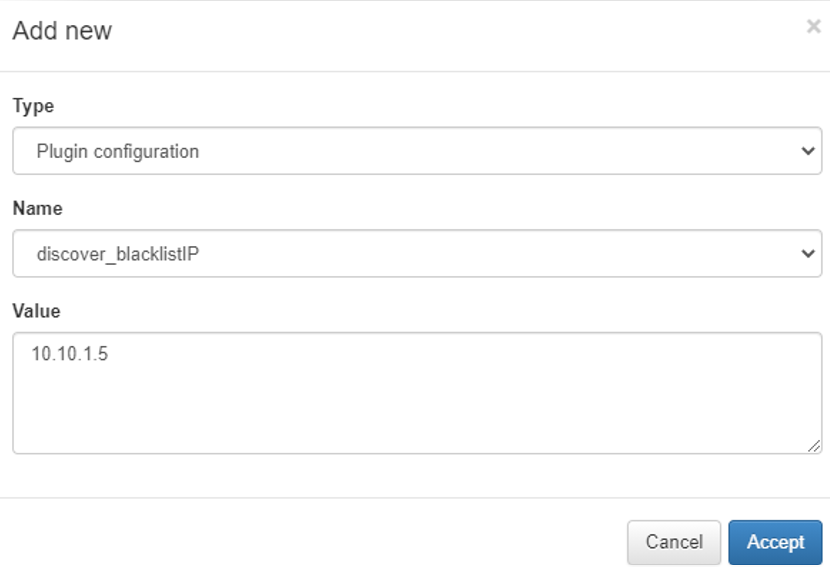
Type: Type of custom parameter, in this case Plugin configuration.
Name: Name and parameter of the plug-in that we want to modify.
Value: The value you want to assign to the selected parameter.
Once all the necessary plugins have been marked and the rest of the policy configured, we can click on “Accept” to save it.