4.3.5. Administration
The administration section focuses on advanced tasks related to the ongoing management and maintenance of the system covering more complex configurations and advanced features.
We will detail the steps to configure the system, preparing it to operate its Segmentation functionality.
Note
It is essential to have correctly deployed and configured the necessary nodes for this use case.
This module relies on the UNAC module, so it is also conditioned by the configuration and operation of the UNAC module.
The Segmentation module allows the user to define a network segmentation and assign assets to said segments based on the preconditions defined in the system policy engine (UNAC).
4.3.5.1. Segmentation methods
There are three different methods to implement the Segmentation:
VLANS: Dynamic VLAN assignment to user devices.
Security Profiles: Use of ACLs applied to user devices in network devices.
Integration with NGFW: Through the use of firewall policies based on system information.
4.3.5.1.1. VLANS
This method is implemented using RADIUS parameters. In these parameters, the system sends information about the VLAN identifiers to the Switch so that it configures the port of the network device that has been used by the user device.
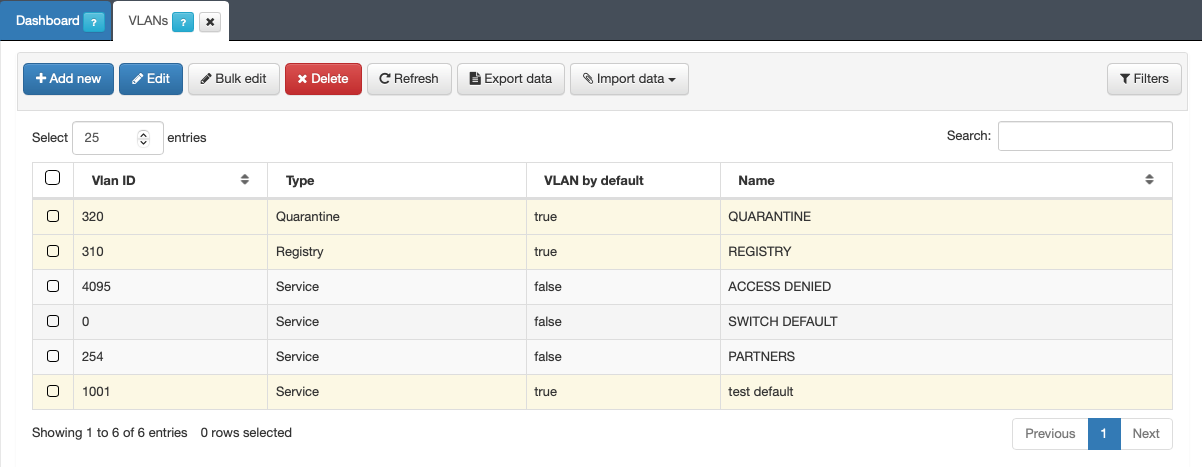
You can also create and register VLANs in the CMDB database. To create a new VLAN, go to ON CMDB > VLANs , and click on Add new.
Configure the desired parameters for this new VLAN in the following window:
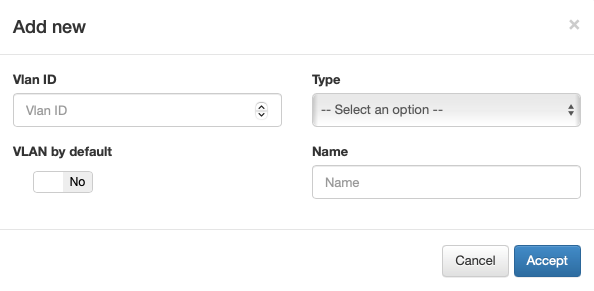
Vlan ID: VLAN identifier. This value must be between 0 and 4095
- Type: Type of VLAN. We have the following options for this parameter:
Service: VLAN used to grant access to a service.
Registry: VLAN used to grant access to a registration process prior to network access, such as the captive portal.
Quarantine: VLAN used to isolate assets that do not meet network access requirements.
Hotspot: VLAN used in environments with hotspots.
VLAN by default: We can choose if we want said VLAN to be the one used by default in the network
Name: Name of the VLAN
All the information registered in the CMDB can be exported by accessing the desired section and clicking on Export data.
You can check the status and results of the process in Status > CMDB Exports. Similarly, it can import data by clicking on Import data and selecting the file with the desired information. Monitor the process and its outcome under Status > CMDB Imports.
4.3.5.1.2. Security Profiles
You can create Security profiles (access lists) objects for use in the policy engine as postcondition parameters. These profiles can be assigned to any user ingress port during network access, enabling the definition of access lists that allow or deny ingress traffic at end users’ access ports. This information is then utilized as a RADIUS parameter for communication with network devices.
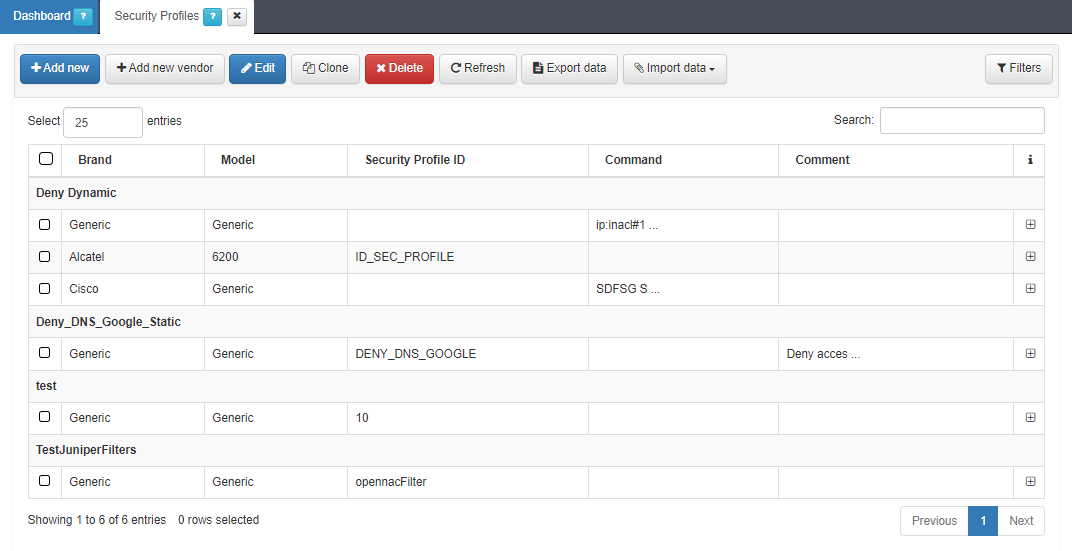
There are two types of Security profiles:
Static: For static security profiles, the Access Control List (ACL) must be pre-defined on the network device. Specify the name or ID of the security profile, ensuring it matches the ACLs on the network devices. When a user device accesses the network and triggers the security policy, the corresponding Security Profile is sent via RADIUS.
Dynamic: For dynamic security profiles, run a security profile command directly to the network devices from OpenNAC Enterprise without prior definition on the network device. This allows for remote application. In a dynamic security profile, specify the command to be sent to the network device, defining ACLs that permit specific traffic in the user port.
4.3.5.1.2.1. Static configuration
Begin by applying a specific ACL configuration on the network device, allowing reference from the OpenNAC Enterprise system.
For example, defining the ACL DENY_DNS_GOOGLE when configuring a Cisco 2920:
ip device tracking
ip access-list extended DENY_DNS_GOOGLE
deny ip any host 8.8.8.8
permit ip any any
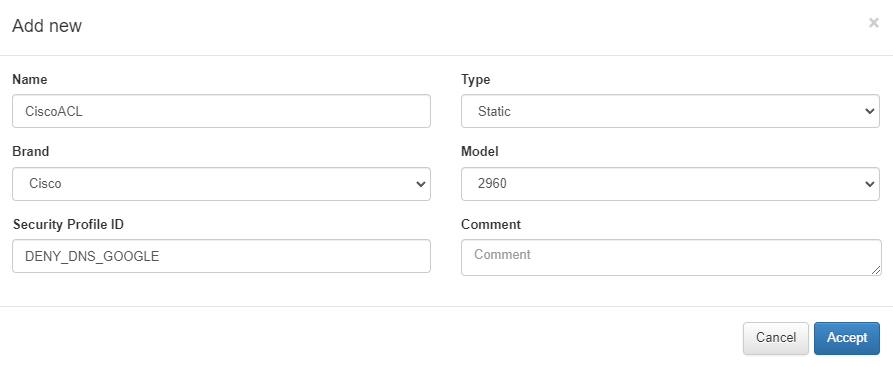
In the Administration Portal, when adding a new security profile, configure the Security Profile ID parameter, in this case, with the value “DENY_DNS_GOOGLE”:
4.3.5.1.2.2. Dynamic configuration
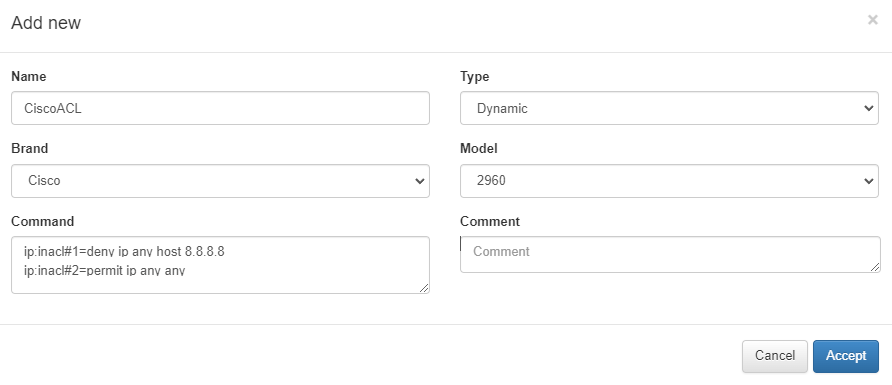
The Dynamic configuration requires a single step. When creating a Security Profile, configure the Command parameter with the ACLs that you want to send to the network device.
The format of these ACLs will depend on the model of the device. Following the example of Cisco models, we use the following format:
ip:inacl#1=deny ip any host 8.8.8.8
ip:inacl#2=permit ip any any
4.3.5.1.3. NGFW Intregation
The system allows integration with some manufacturers of Next Generation Firewalls (NGFW). This way, through the information received in the authentication processes, it increases the level of network segmentation through firewall policies.
This integration is done through a plugin. Currently, there are two plugins for two NGFW manufacturers:
PluginfortiGateAccounting(Firewall FortiGate)
PluginpaloAlto(Firewall Palo Alto)By using these plugins, we can send information from the system to the firewall so that it applies control policies.
If we want to use any of these plugins, we must activate and configure them in “Configuration -> Plugins”. To activate a plugin, we must switch the corresponding flag to Yes. To configure it, we will click on Edit plugin. To apply the changes, we must press the Save button at the upper left corner of the window.

4.3.5.1.3.1. PaloAlto Plugin
The paloAlto plugin allows the Palo Alto firewall to be sent to Panorama (PaloAlto firewall manager), information related to the username associated with an IP address.
This notifies the firewall of the username associated with a specific IP address, and this relationship is active until a logout is received or a session times out. In addition, the IP address is associated with a dynamic Palo Alto tag, so a group of dynamic addresses can be defined in the Palo Alto firewall and used in firewall policies.
Plugin configuration
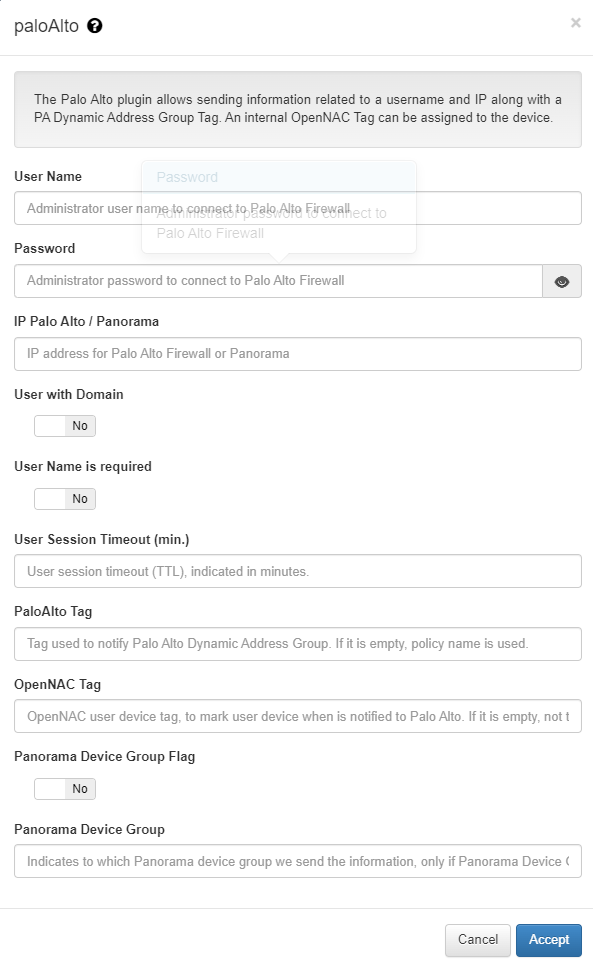
User Name: Administrator username to connect to the firewall. A user with “XML API” rights is required.
Password: Administrator password to connect to the Palo Alto Firewall
IP Palo Alto: IP address of the firewall.
User with Domain: Indicates whether the username sent to Palo Alto has to be include the domain name if it is included in the user’s request.
User Name is required: indicates whether a user name is required in the access request to send the information to the firewall. In the event of a MAB request, the information will not be sent.
User Session Timeout(min.): Timeout for the user session (TTL), indicated in minutes.
PaloAlto Tag: value used to define the Tag that will be assigned to the user in the firewall.If it is empty, the group of users is not used.This parameter can be modified in each of the policies through “Custom params” to adapt to each of these policies.
OpenNAC Tag: Device tag of the openNAC user, to mark the d user’s device when Palo Alto is notified. If it is empty, no label is used.
Panorama Device Droup Flag: In case the target device is a firewall manager (Panorama) and not a firewall, we must activate this function.
Panorama Device Group: In case the target device is a firewall manager (Panorama) and not a firewall, we must use this Tag. This will be the value used to define the Tag that will be assigned to the user in Panorama. If it is empty, the user group is not used. This parameter can be modified in each of the policies through “Custom params” to adapt to each of these policies.
4.3.5.1.3.2. fortiGateAccounting Plugin
This plugin allows sending session information to a fortiGate firewall. This information is sent through a RADIUS protocol and its port, and PSK (Preshared key) must be exchanged between peers to accept messages. The information includes the username associated and its IP address in the network.
This plugin allows that as soon as the user gains access to the network through OpenNAC Enterprise network access policies, it registers its information in the FortiGate Firewalls to allow access and unified network policies inside the OpenNAC Enterprise management.
For that, a User Group is used. For instance, it can be defined as a fortiGateAccounting_UserGroup, this means that the information is registered in a User Group that belongs to the Fortigate platform. In case the user accessing the network uses a Domain and sends this information in the events is required to be defined.
This plugin allows sending information related to the username associated with an IP address to the FortiGate firewall.
This information is sent by accounting radius protocol based on FortiGate RADIUS Single Sign-On (RSSO), for further information check: https://docs.fortinet.com/document/fortigate/7.4.3/administration-guide/85730/radius-single-sign-on-agent
To configure the fortiGateAccounting plugin we need to enter the following information:
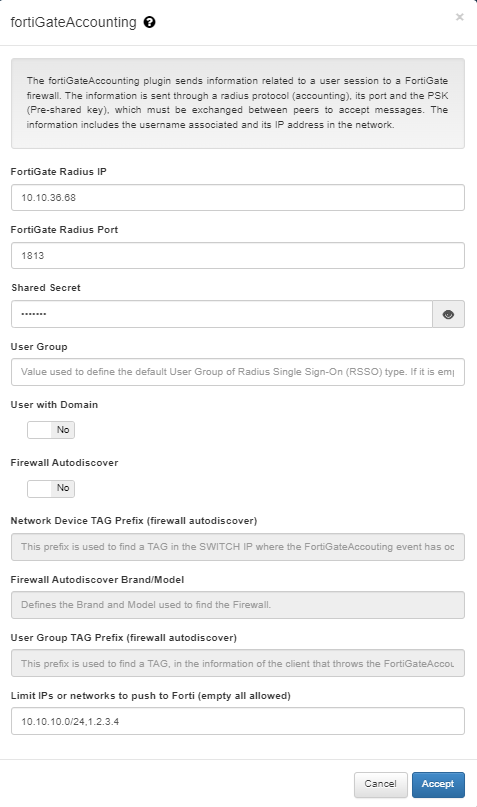
FortiGate Radius IP: IP to send radius accounting messages to FortiGate.
FortiGate Radius Port: Port to send RADIUS accounting messages to FortiGate.
Shared Secret: The shared secret to connect to FortiGate radius.
User Group: Value used to define the default User Group of Radius Single Sign-On (RSSO) type. If it is empty, any user group is used.
User with Domain: It indicates if the username sent to FortiGate has to include the domain name in case it is included in the user request.
Limit IPs or networks to push to Forti (empty all allowed): This parameter defines the range of IPs that can trigger the execution of the plugin. If an event occurs without an IP within the configured range in this field, the plugin will not be executed. On the other hand, if no IPs are configured, the plugin will always run regardless of the IP received in the initiating event.
Custom properties
The fortiGateAccounting plugin allows you to send a custom user group for all users who match the policy, overwriting the default user group specified in general plugin properties.
To provide this custom user group, you have to define a Custom param in the policy. The custom param has to be named fortiGateAccounting_UserGroup and its value has to be the user group associated with all users who match this policy.
To continue the FortiGate NGFW configuration, please read NGFW FortiGate Configurations.
4.3.5.1.3.2.1. (Feature) fortiGateAccounting Firewall Autodiscover
The fortiGateAccounting plugin has the Firewall Autodiscover feature that allows you to dynamically relate which Fortinet Firewall is associated to a network device (firewall, switch, AP, etc.) that processes a user event.
When we enable this feature, the system will automatically look for the IP of the firewall that must process a new user event, for this, we must previously have all the network devices (firewall, switch, AP, etc.) registered in the CMDB with the tags correctly defined so that the system can make the association.
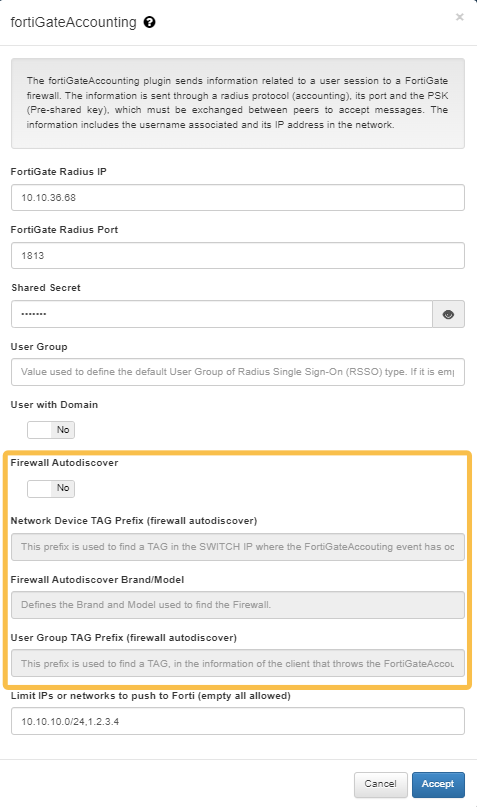
Firewall Autodiscover: This boolean enables the firewall auto-discover function and defines if the FortiGate Radius IP will be automatically filled in. If we enable this feature, the FortiGate Radius IP field will be ignored.
The Firewall Autodiscover flag must be enabled to configure the Network Device TAG Prefix, Firewall autodiscover Brand/Model, and UserGroup TAG prefix fields.
Network Device TAG Prefix (firewall autodiscover): TAG prefix that will be used to perform the association between the network device and the firewall associated.
Firewall autodiscover Brand/Model: Define which brand and model use to locate the firewall (which already has the “NetworkDevice TAG prefix”). Default Fortinet/Generic.
UserGroup TAG prefix (firewall autodiscover): TAG prefix that will be used as userGroup. If the user device in the new event contains a TAG that matches with the defined prefix, we will use it as userGroup (the userGroup must be previously defined on the Firewall).
Note
Network Device TAG Prefix and UserGroup TAG prefix should be unique. Consult the TAGS table.
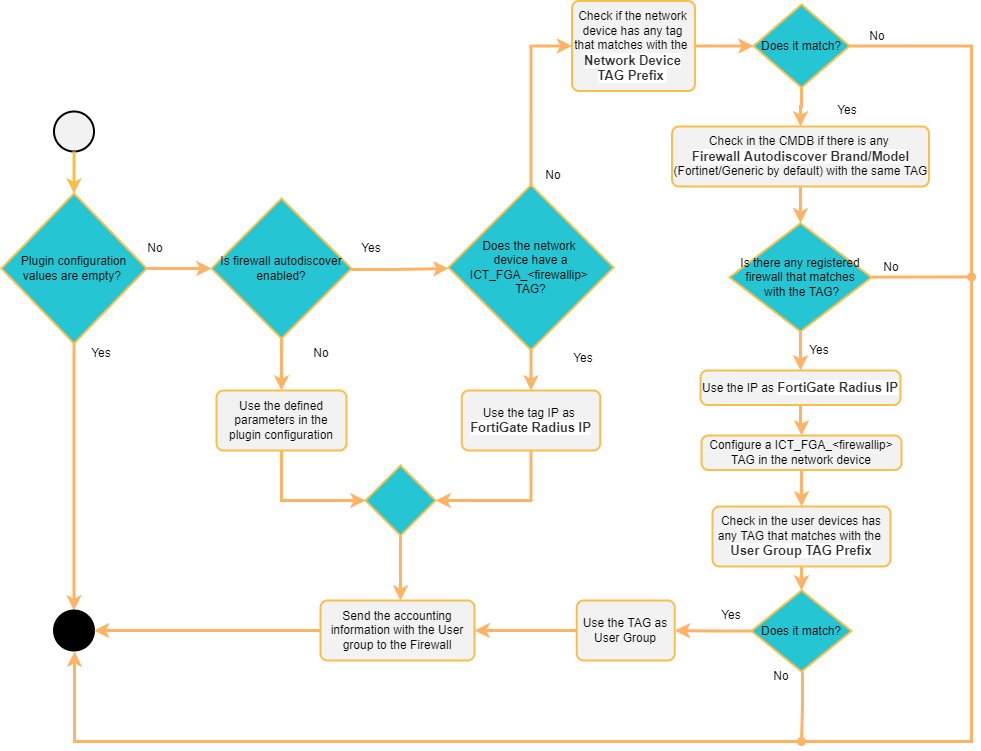
For example, a new event in OpenNAC Enterprise executes the fortiGateAccounting plugin. This event will have a “switchIP” field with a network device associated. This network device is registered on the CMDB and it has some tags associated. Using the field “NetworkDevice TAG prefix” we can find a specific TAG in the network device. Once we find it, we will look for the different firewalls registered on the CMDB that match with the specified Brand/Model, and with the tag found on the network device. When the first Fortinet firewall matches these filters, its IP will be used as the ‘FortiGate Radius IP’, and we will send the information related to the event.
Once we have a match with a firewall and the switch, the system will store a TAG with the following format [ICT_FGA_{firewallIP} which means Internal Cache TAG _ FortiGate Accounting _ IP firewall] in the switch. That will indicate which FortiGate Radius IP is associated to the network device. This will help to speed up the process in future events since we will not need to repeat the search.
The “UserGroup TAG prefix” will be used to find a TAG inside the client tags. Once the TAG matches with the defined prefix, it will be used as userGroup and it will be send to the firewall.
Execution flow:
After the configuration is completed, you will be able to apply it as a ‘Plugin’ post-condition to those policies in you we want to activate them.
4.3.5.2. Registering Network Devices in the CMDB
The CMDB is the ON Core database. In this database we find information related to the system, infrastructure, networks, VLANs, Security Profiles, user devices, network devices, etc. In this section of Segmentation we are mainly interested in Network Devices (Network devices such as Switches, APs, AP controllers, etc.).
The definition of network devices in the CMDB, allows us to customize the characteristics of the device so that the system acts in one way or another with each of these devices.
If you want to register a predefined group of devices, consult Bulk import of devices.
To create a new network device, consult the “ON CMDB > Network Devices” section.
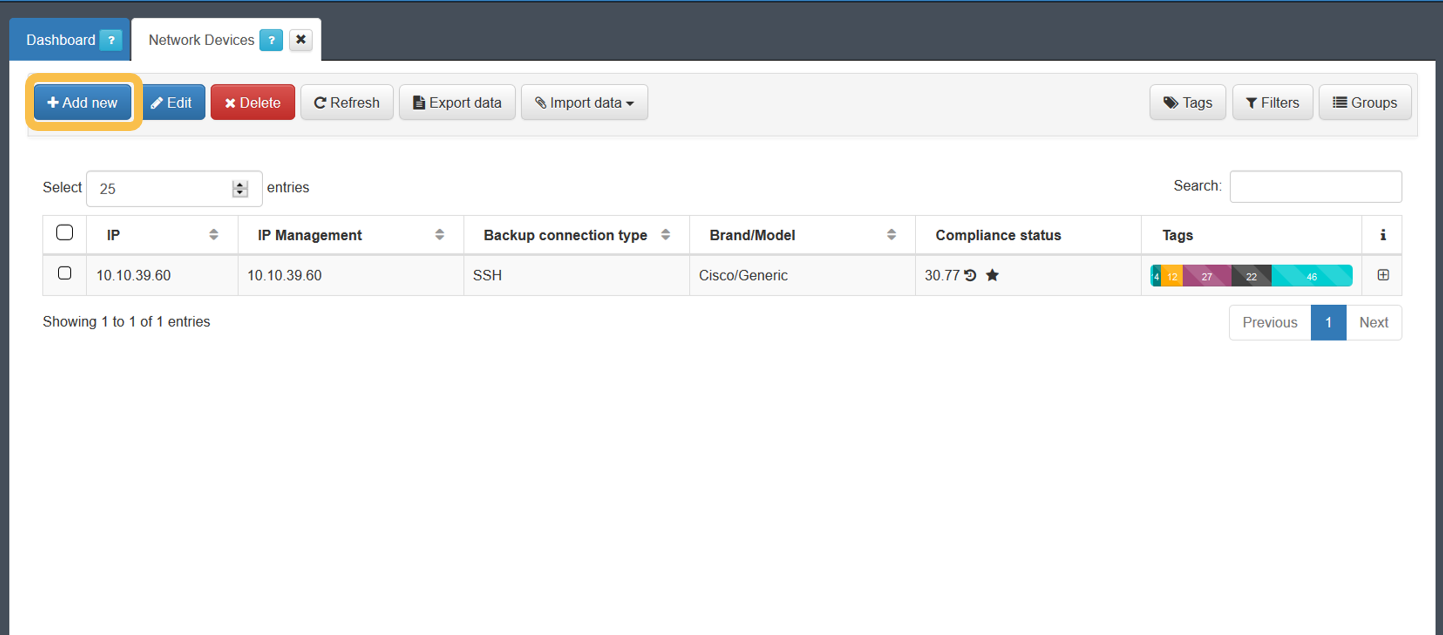
To register a new device, simply use the Add new button and fill in the fields displayed on the window. After completing all the necessary information, we will press the “Accept” button to save the configured network device.
The configuration of the device will be applied to the one that we have defined by default. This default configuration is found in “Configuration > Configuration Vars > NetDev”. The sections that we will find here are the same that we can find when configuring any of the devices.
The minimum information that must be filled in is indicated below.
4.3.5.2.1. General
In this tab, it is required to complete (at least) the following fields:
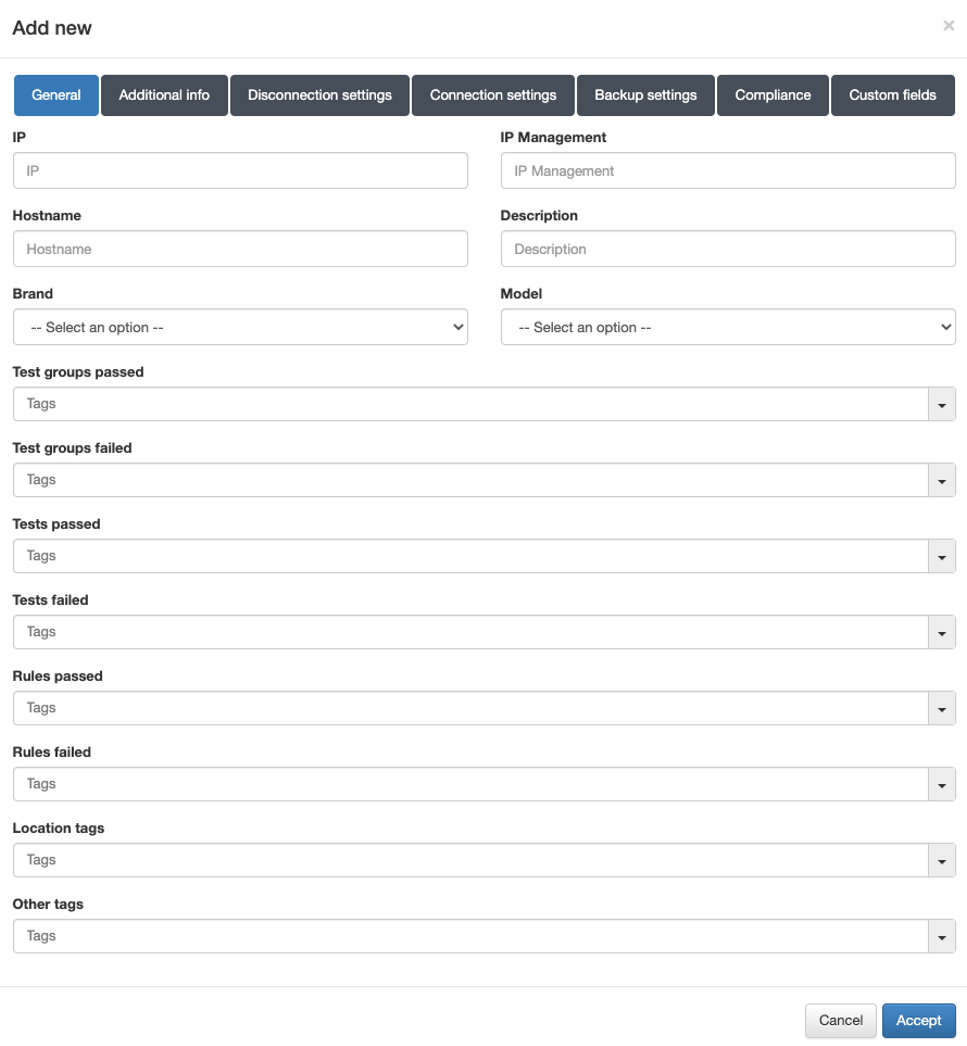
IP: IP address that identifies the device.
The IP address is only for identification (to see it in the device table).
Hostname: Hostname that identifies the device.
Brand / Model: Brand and model of the device.
Note
It is important to correctly define the brand and model, since they will be used to determine the behavior of the system in terms of communication with these devices.
4.3.5.2.2. Disconnection settings
In the “Disconnection settings” section, the configuration of the Toggle Port functionality is defined. This functionality allows you to force a disconnect from an authenticated session. This allows us, for example, to carry out a re-evaluation of the policies in case they have been modified, and the application of VLANs, ACLs, etc. to the session.
There are two methods of session disconnection:
CoA (Change of Authorization): CoA is a Radius mechanism that allows us to disconnect a specific session without the need to modify the port status (enable/disable) of the network device.
SNMP: Using SNMP, the interface where the device has been authenticated is disabled and enabled. This causes the device to have to re-authenticate and subsequently evaluate policies on the system.
The use of SNMP is recommended, although both methods perform the same functionality and are equally valid.
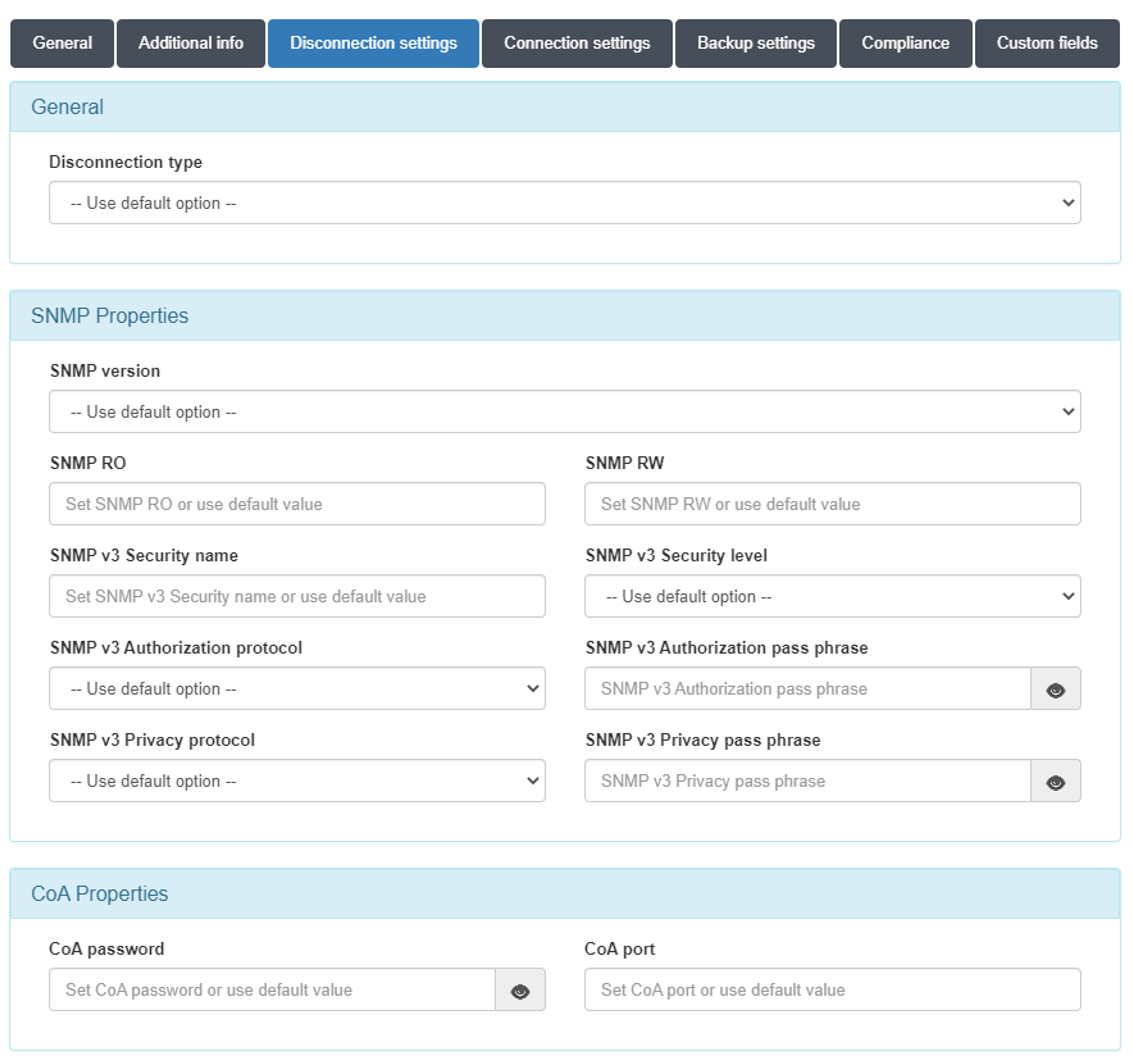
Disconnect type:
Use default option: The configuration defined in “Configuration vars” will be applied.
CoA: Use of CoA to perform session disconnections.
SNMP: Use of SNMP to perform session disconnections.
SNMPProperties
SNMP version: Version used for SNMP messages. The required attributes for each of the versions are:
V1 (not recommended):
SNMP RO: SNMP community with read permissions.
SNMP RW: SNMP community with write permissions.
V2c:
SNMP RO: SNMP community with read permissions.
SNMP RW: SNMP community with write permissions.
V3 (recommended):
SNMP v3 Security name: SNMP username.
SNMP v3 Security level: Security level (noAuthNoPriv/authNoPriv/authPriv).
Depending on the selection, it will be necessary or not to configure some of the following attributes.
SNMP v3 Authorization protocol: Authorization protocol (MD5/SHA).
SNMP v3 Authorization pass phrase: Password for authorization.
SNMP v3 Privacy protocol: Privacy protocol (DES/AES).
SNMP v3 Privacy pass phrase: Password for privacy.
CoAProperties
CoA password: Password defined in the network device to authenticate CoA requests.
CoA port: Port used for communication. (Usually 3799).
If you do not perform any of the configurations, the ones defined in “Configuration -> Configuration Vars -> NetDev” will be used.
4.3.5.3. APs Management controller
When there are many APs centrally controlled by a controller in the network, it is necessary to add the controller as a network device in the CMDB and additional information for each of the APs in the CMDB.
For these APs, apart from the minimum information detailed above, it will be necessary to add the information corresponding to IP Management:
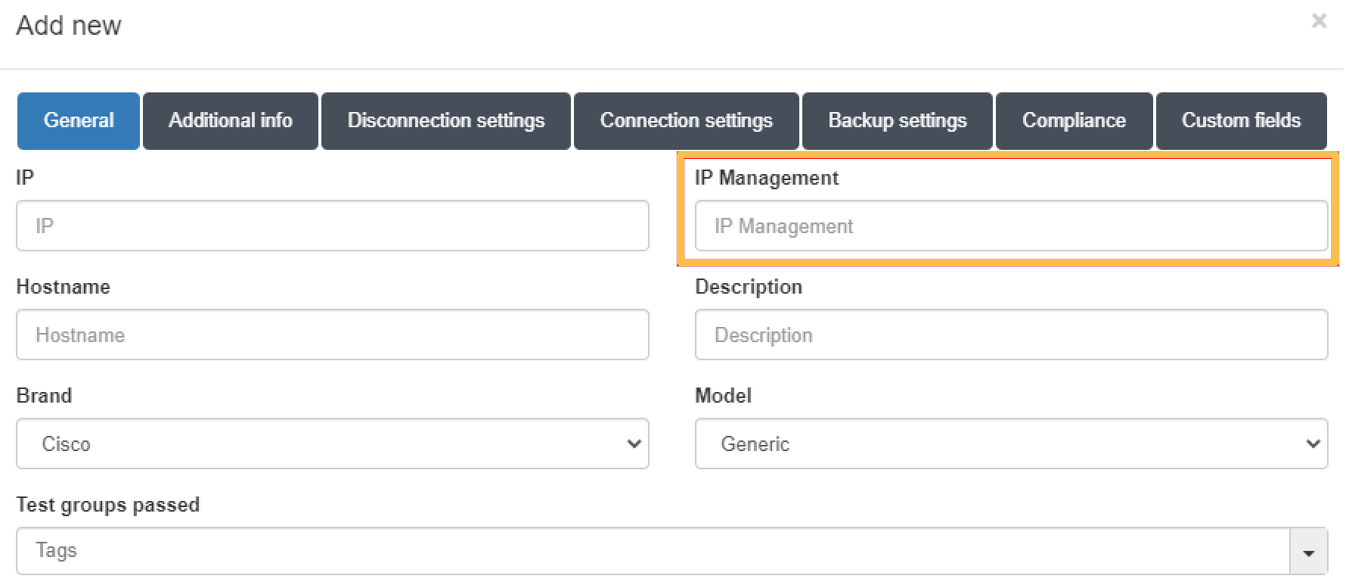
This IP must correspond to the IP associated with the controller that manages the AP.
4.3.5.4. Self-learning of network devices
When the ON Core receives a request for a network device not yet added to the CMDB, there is a configuration option to add it automatically.
For this, two requirements must be met:
The IP of the network device or its segment is registered in the
clients.conffile. (Section Registering Network Devices in the CMDB)That the “Autolearn Network Devices” function is activated.
To activate the self-learning functionality, go to Configuration > Configuration vars > NetDev and enable the “Autolearn Network devices” option:
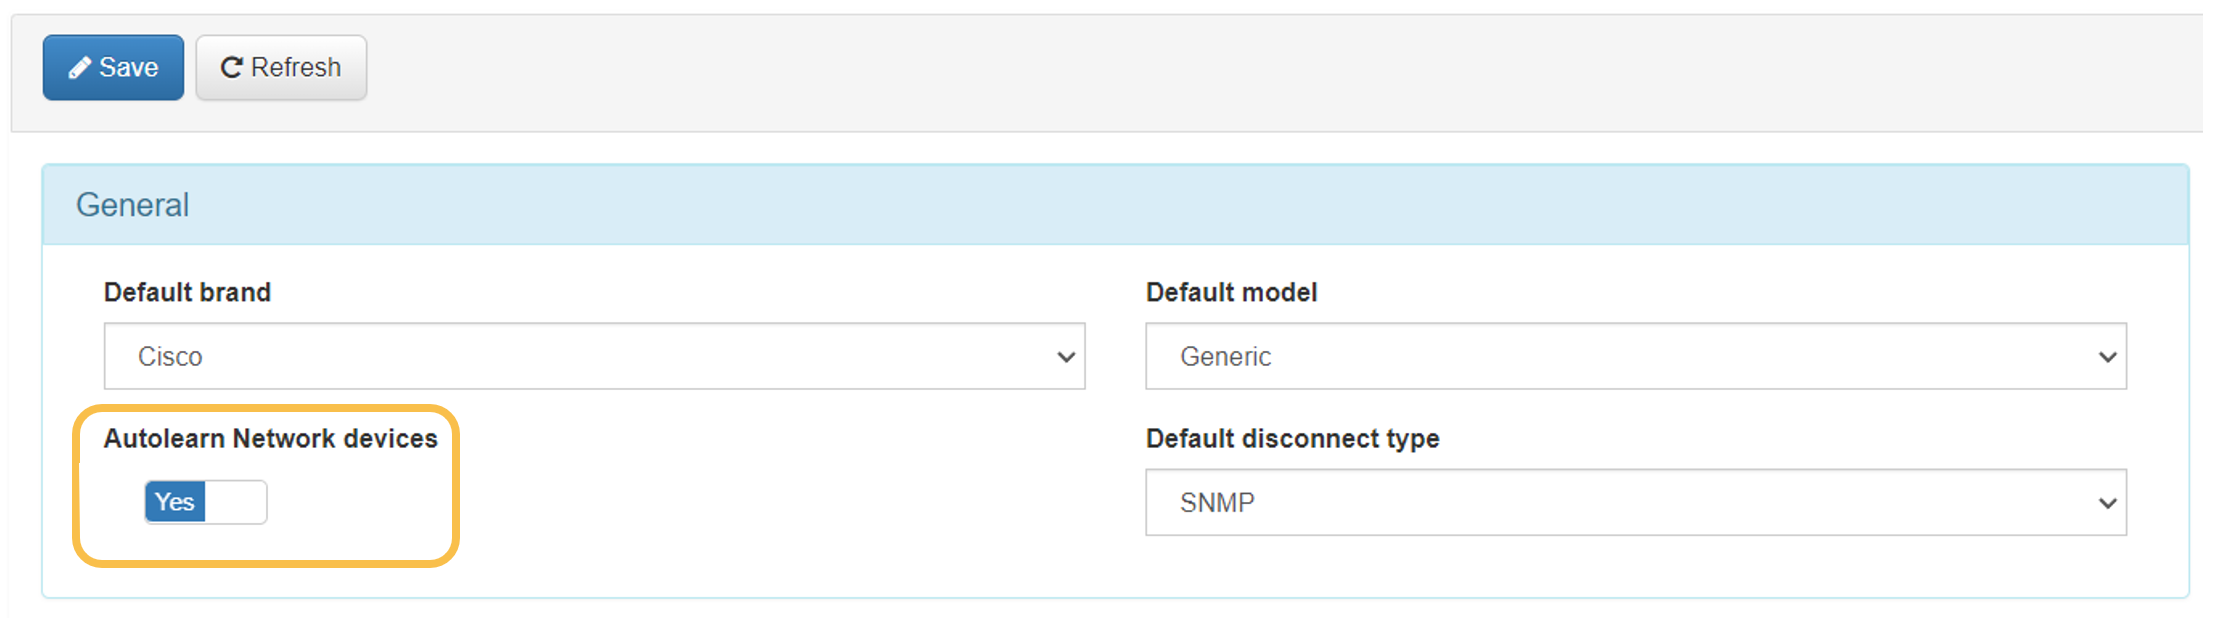
To apply the changes, click on the Save button.
With this function configured, every time a request is received from an unknown network device, it will be added to the CMDB and an “ONC_AUTOLEARNED” Tag will be associated with it.
4.3.5.4.1. Segmentation in UNAC policies
Applying segmentation in UNAC policies consists on applying postconditions which are actions to be applied once the user device has fallen into the policy ( once all preconditions have been met).
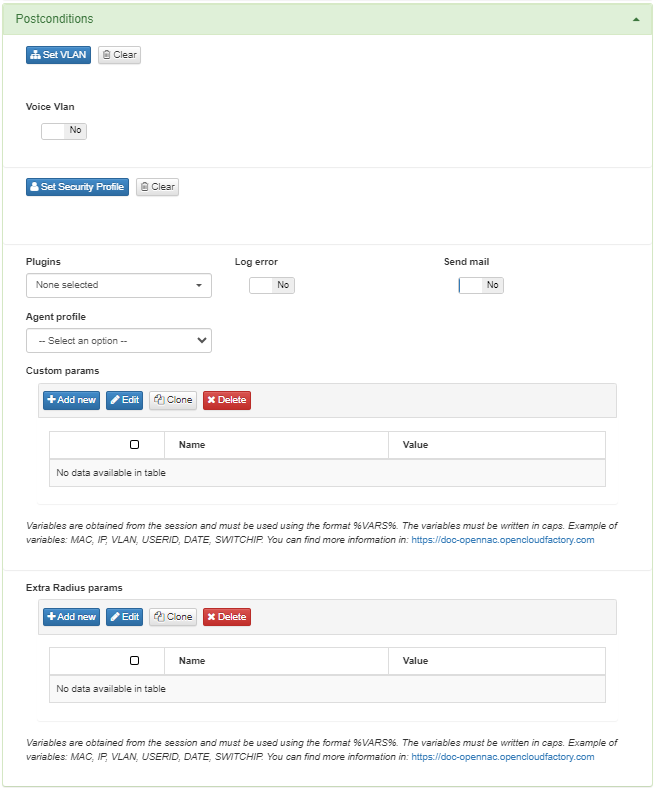
VLAN
The first section is used to define to which VLAN you will assign the user or device that is being authenticated.

Click on Set VLAN and a window will open displaying the available VLANs for assignation. By default, the following VLANs are already configured in the CMDB:
The service VLAN (330) is used for give access, as the name indicates, to a serviceo
The registration VLAN (310) is used to give access to a registry prior to network access, such as the Captive Portal.
The quarantine VLAN (320) it is used to send assets that do not meet the defined requirements to authenticate and access the network. This VLAN is used to isolate these devices so that they do not have access to other devices in case of wanting to carry out malicious activities.
The VLAN 0 (SWITCH DEFAULT) is used to indicate that you want to use the VLAN defined by default in our Switch . This will be in charge of assigning the VLAN.
The VLAN 4095 (ACCESS DENIED) is used to directly deny access to the network. It is not a valid identification value and for that reason, if we define this VLAN we will get all access denied.
In case you have a voice VLAN in your Switch port, define it by clicking on the “Voice Vlan” option .
Security Profiles
The next section defines the security profiles that will be applied.

If you want to apply any of these profiles, click on Set Security Profile and it will display a list with all the profiles created and saved in the system’s CMDB.
Plugin Integration
Here you can configure which plugins are going to be executed when a user device matches the configured policy.
In this case, we will focus only with the plugins related with NGFW, PaloAlto and FortiGateAccounting. OpenNAC can be integrated with this NGFW and modify access rules defined on that devices according with openNAC policies. Also openNAC can use NGFW information to perform settings over other network devices as an network orchestrator.
For plugins to be available during policy configuration, they must have been previously configured and enabled in the Configuration > Plugins section.
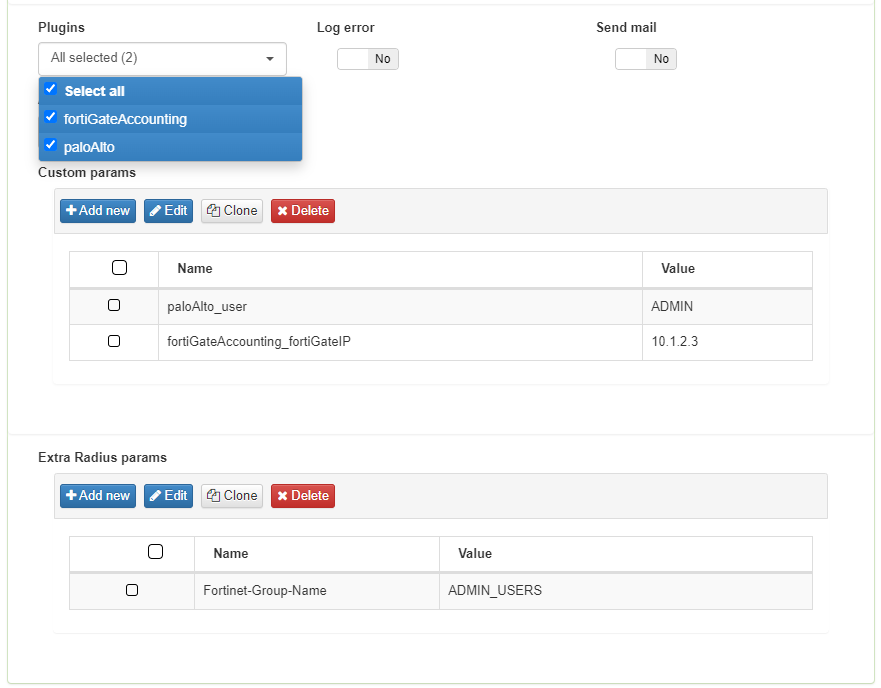
Custom params
You can also configure custom parameters that correspond to the plugin configuration, adapting the necessary parameters based on the policy chosen.
Extra Radius params
Some settings performed by OpenNAC Enterprise on network devices through segmentation use RADIUS parameters. Be sure to perform the correct RADIUS configuration before using it. Sometimes additional RADIUS parameters are needed, for this case, use the extra radius params section on policy postconditions.