4.3.4. Configuration
As previously mentioned, the segmentation module largely depends on the UNAC module in terms of configuration. So to configure the Segmentation module, we will use some of the same tools as in the UNAC module. Check UNAC Configuration.
To follow this configuration process, it is necessary that all nodes have been previously deployed for module operation (ON Core and ON Analytics), ON Sensor and ON Agent, following the official node deployment guide.
This module allows us to control which devices and users can access the network and which ones cannot, relying on the segmentation to determine on which VLAN should they belong, determining also the access restrictions to each of them depending on the needs or requirements associated with the defined security policies or business policies. This process is carried out using mainly protocols such as 802.1x, and RADIUS based on AAA (Authentication,Authorization and Accounting).
The Segmentation configuration and operation process consists of 4 steps:
Choose scenario, User/Pass, Certificate, MAB (User database AD, LDAP, CA has to be configured)
Activate 802.1x in network and user devices (activate protocol and configure params)
Define network access policy(Choose evaluation criteria to authenticate users)
Visualize results (Get all valueable information related to authentication)
The first two are explained in the Configuration documentation and the last two in the Operation documentation.
In the following section, we detail the steps to configure the Segmentation module and make it ready to operate.
4.3.4.1. Contextualization
To configure the Segmentation module, it is essential to have correctly deployed the necessary nodes. We can find all the information related to the initial deployment in the node deployment documentation. This section is a configuration guide for the nodes required for the Segmentation module. The operation of the Segmentation module is detailed in the Segmentation Operation document. Since the Segmentation module can make use of some functionalities of network devices from different manufacturers, you need to have the necessary knowledge to configure these devices.
This document will show configuration examples for specific models. It rests with the user the responsibility to adapt the configuration of the network devices in his infrastructure.
The main objectives of this document are:
Carry out the correct configuration of the necessary nodes for the Segmentation module.
Configure the different services used by the system.
Understand, by means of an example, the necessary configuration of network devices. This configuration must be extrapolated to the existing network devices in each infrastructure.
4.3.4.2. Network device Radius permissions
When a user device connects to a network, the network device to which it connects must send an authentication request to the authentication server (ON Core). For this request to be accepted and processed by ON Core, it is necessary to configure the “clients.conf” file.
This file allows us to control and restrict Radius permissions. Choose which network devices and other authenticators can make Radius requests to the system. In this file, we will define all those devices or network segments that have permission to make such requests, as well as the shared key that each of them must use.
To add or modify new devices or network segments we must edit the /etc/raddb/clients.conf file:
client 192.168.0.0/16 {
   secret = testing123
   shortname = internal192168
}

client 172.16.1.0/24 {
   secret = testing123
   shortname = internal172161
}
For each “client” block, 3 points must be taken into consideration:
client: IP of the host or network segment from which the requests will arrive.
secret: Pre-shared key of radius, this is the password to verify the requests.
shortname: Name to identify the client or network segment (identifier). This name is important as it will be included in the logs and can help us identify the information more easily.
Here we can define additional networks or host IPs depending on the needs. Keep in mind that the “secret” value of each of the blocks must match the value of the shared-key defined in the configuration of the network device itself.
Once the file has been modified, we must restart the radius service to apply the changes (all worker nodes):
systemctl restart radiusd
4.3.4.3. 802.1x Certificate configuration in ON Core
The system supports several authentication methods:
Supplicant for user credentials
Supplicant for team credentials
Supplicant for user certificate
Supplicant for equipment certificate
Mac-Address-Bypass
User credentials
Some of these methods may require additional system configuration. These configurations are detailed below.
4.3.4.3.1. Certificate Authentication
You can perform authentications through certificates installed on the end user devices or devices that allow it. These certificates will be validated in the system during the Authentication process and their attributes may be used in the Authorization process (policy evaluation).
To configure authentication through certificates, we can do it in two ways:
o Using certificates generated internally in the system. o Using certificates issued by an external CA.
Given that in environments where authentication by certificates is required, there is usually its own CA and certificate management by the organization, this is the most frequent option. Even so, the possibility of implementing certificate authentication through the system itself can be useful in a test or lower-volume environments.
4.3.4.3.1.1. Through certificates generated by the Internal CA
When an ON Core node is deployed from an OVA, it likely has expired internal certificates that will need to be renewed.
Certificate renewal
First, go to the certificates folder “/etc/raddb/certs/” and delete the old certificates and counters:
cd /etc/raddb/certs
rm -f *.pem *.der *.csr *.crt *.key *.p12 serial* index.txt*
make destroycerts
Define the property default_days in each CNF file (ca, server, and client), to indicate the validity of the certificates. By default, 60 days are set. If you wish, you can modify the information related to the organization and passwords.
vim <file>.cnf
Run the bootstrap file, to generate the CA and server certificates:
cd /etc/raddb/certs
./bootstrap
Generate client certificates
To generate client certificates, you must provide a unique email address and common name in the client.cnf file, and generate the certificate with the following command:
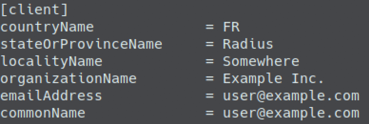
make client
At this point we must install the generated client certificate (client.p12) and install it on the client that we want to authenticate. On the client side, the supplicant must be configured to perform authentication using a certificate.
4.3.4.3.1.2. Through an external CA
If you already have a certification authority (CA) in the infrastructure where UNAC will be deployed, you can use it to sign and use the certificates for authentication.
For this we will need the following certificates that must be provided from the CA:
CA certificate (if there is a PKI structure with several certificates, it is recommended that they all be provided).
Server certificate signed by the CA.
Client certificates.
It is possible to configure the server certificate with external CA through the Configuration Wizard: Radius Certificate Wizard
Installing the existing CA on ON Core
To install the CA on the server we must have said CA in .pem format, if there is a PKI structure with several certifying entities, it is recommended to join them all in the same .pem file. It is possible to obtain them in another format and carry out the subsequent conversion.
To configure the existing CA in the ON Core server, we simply must move and overwrite said CA with the one already installed:
cp <External_Complete_CA>.pem /etc/raddb/ca.pem
Creation of CSR (Server Certificate Request)
To obtain a valid ON Core server certificate, we must generate a certificate signing request file (.csr) so that the certifying entity can deliver the signed certificate.
First, we will eliminate all those certificates that exist in the Radius configuration, for this:
cd /etc/raddb/certs
make destroycerts
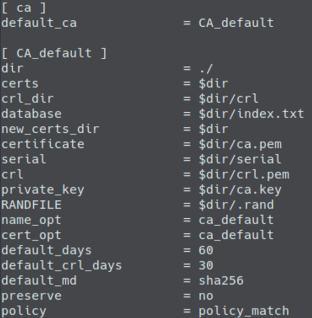
To generate the CSR we will need to modify the /etc/raddb/certs/server.cnf file. We must modify all those necessary attributes, based on the information provided by the client:
Default_days: Certificate validity days.
Input_password: Certificate input password.
Output_password: Certificate output password.
CountryName: Country code in two letters (eg ES).
StateOrProvinceName: Name of the state or province.
LocalityName: Name of the locality.
OrganizationName: Name of the organization.
Once modified with the necessary information, we will save the file and generate the CSR file based on it. To do this, we will execute the following command:
make server.csr
Now we must take the /etc/raddb/certs/server.csr file and send it to the certifying entity so that the request can be signed. We must obtain a new certificate (.pem) signed by the CA. It is possible to obtain them in another format and carry out the subsequent conversion.
Installing the server certificate on ON Core
Once we obtain the certificate signed by the certifying entity, we must install and configure the certificate. To install the server certificate in ON Core, we must first overwrite the existing certificate:
cp <Server_New_Cert>.pem /etc/raddb/server.pem
Once the certificate has been overwritten, we must modify the Radius configuration where we must specify the password of the new certificate.
To do this, in the /etc/raddb/eap.conf and /etc/raddb/modules/inner-eap files, we must change the “private_key_password” attribute to the one defined when generating the CSR of this certificate (Output_password).
We must prepare the dh and the random files:
make dh
make random
Finally we make sure that all the files inside /etc/raddb/certs have permissions for “root:radiusd” and restart the service:
chown root:radiusd *
systemctl restart radiusd
If there is any problem with the certificates, the Radius service will NOT start. We will be able to see more detailed information about the problem in the Radius logs.
4.3.4.4. Supplicant configuration
To perform authentication using 802.1x, it is necessary to configure the supplicant service of the client computers according to the needs of the network.
Depending on the type of authentication and client, we will make one configuration or another.
Examples of some of the most popular operating systems are described below.
4.3.4.4.1. Windows
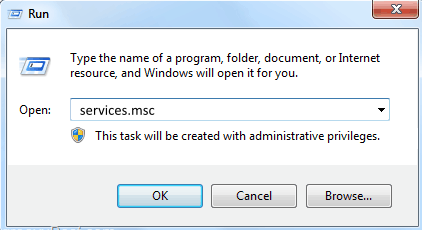
To use the 802.1x functionality on Windows computers, it will be necessary to start the service in charge of managing the functionality. To do this we will access the services menu with “Windows + R” and open “services.msc”:
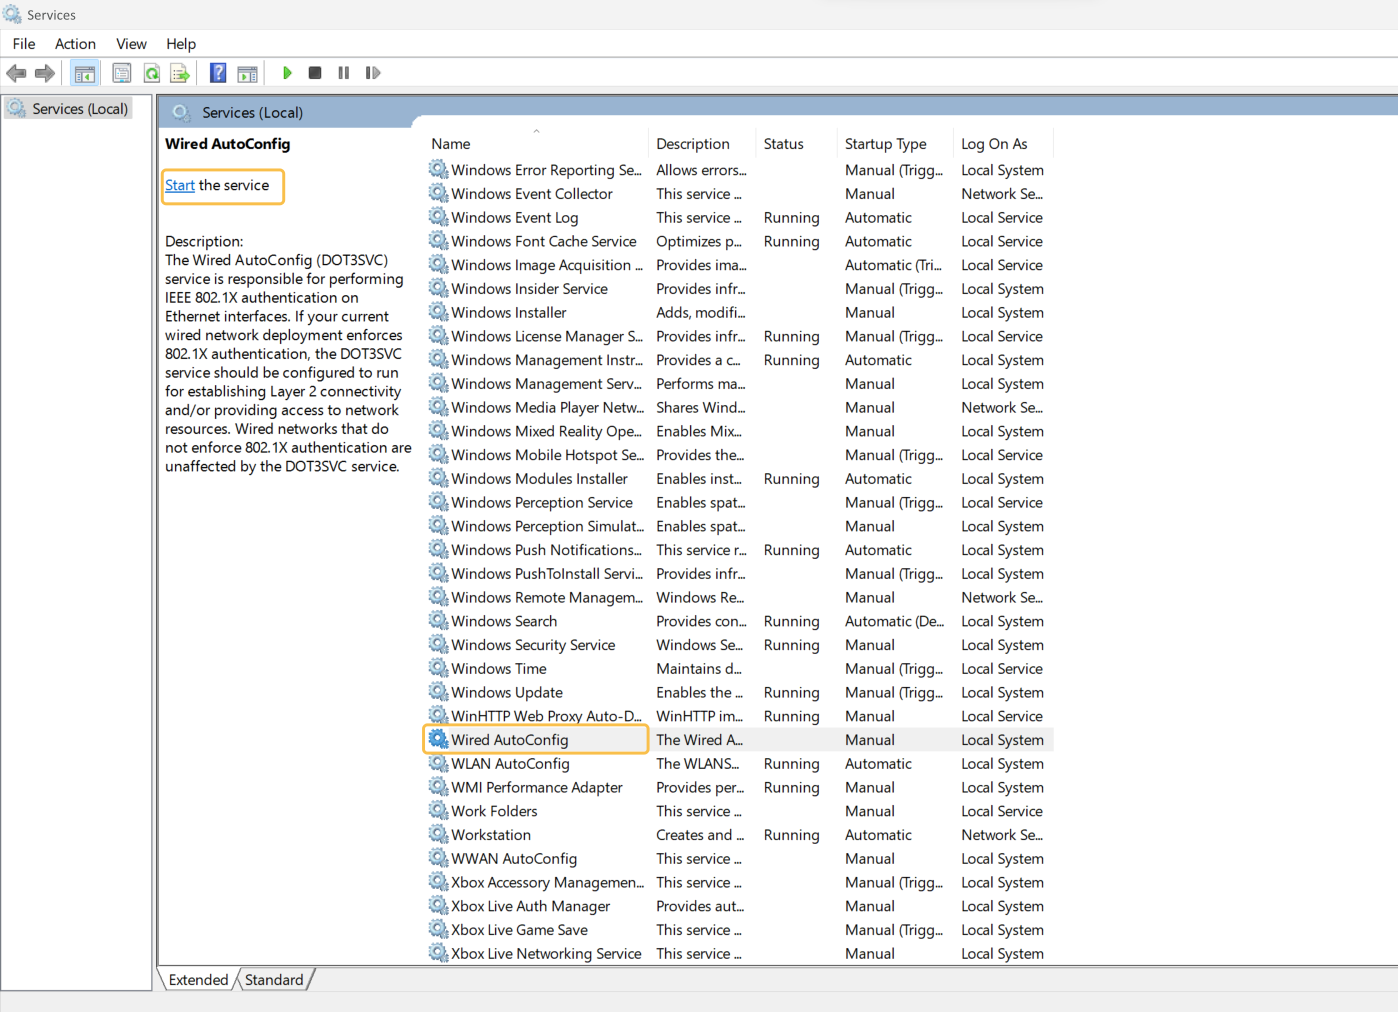
In the list of services, we will select the “Wired AutoConfig” or “Automatic configuration of wired networks” and start the service:
Once we have the active service we can configure the supplicant in the corresponding network interface, for this:
In “Control Panel -> Network and Internet -> Network Connections” we select the interface that we want to configure and right click on “Properties”. In the pop-up window we must access the “Authentication” tab.
Depending on the type of authentication that we want to use, we will make one configuration or another: - Authentication by user/computer - Authentication by certificate
Windows has the “Fast Reconnect” functionality that allows us to make faster connections through cache. To configure this functionality, consult the Setup with Windows Fast Reconnect.
4.3.4.4.1.1. Authentication by user/device
To configure the supplicant for authentication by user and/or device, we must configure the supplicant in the following way. This is a recommended and most used configuration. You can configure the supplicant to use other methods that may require additional configuration in ON Core.
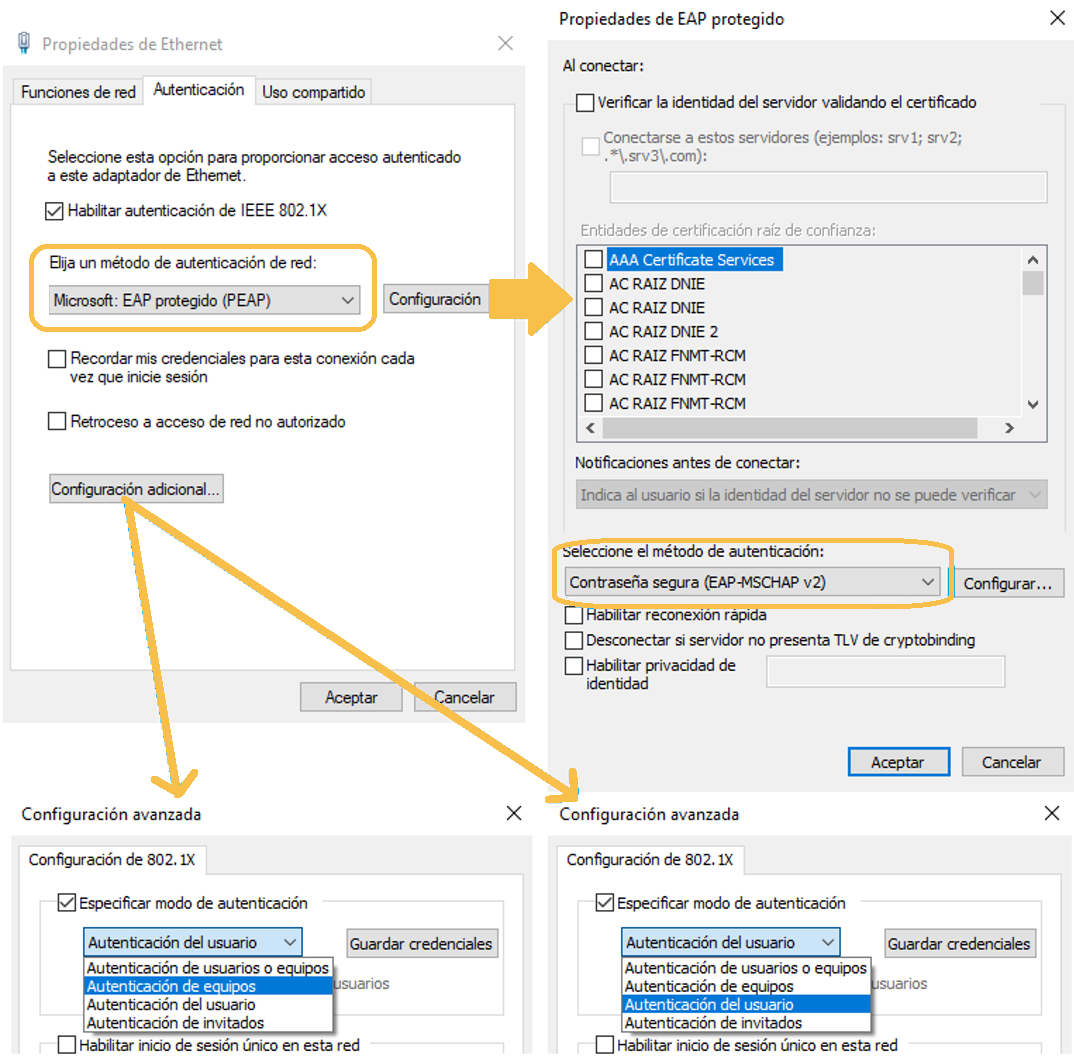
In the additional configuration we can select what type of credentials we want to use for authentication, user (they will be requested at each connection, or they can be saved in “Save credentials”) or team (the team’s credentials will be used). We can also configure “Authentication of users or devices” to be carried out automatically.
In case of having configured a valid server certificate in ON Core, we can activate the option “Verify the identity of the server validated the certificate” to add a security layer.
4.3.4.4.1.2. Authentication by certificate
To configure the supplicant for authentication by user and/or device through a certificate, we must configure the supplicant in the following way, this is a recommended and most used configuration. There is the possibility to configure the supplicant to use other methods that may require additional configuration in ON Core.
It is important to emphasize that, in order to authenticate using certificates, these must be previously installed on the computer, as well as the certifying entity (CA).
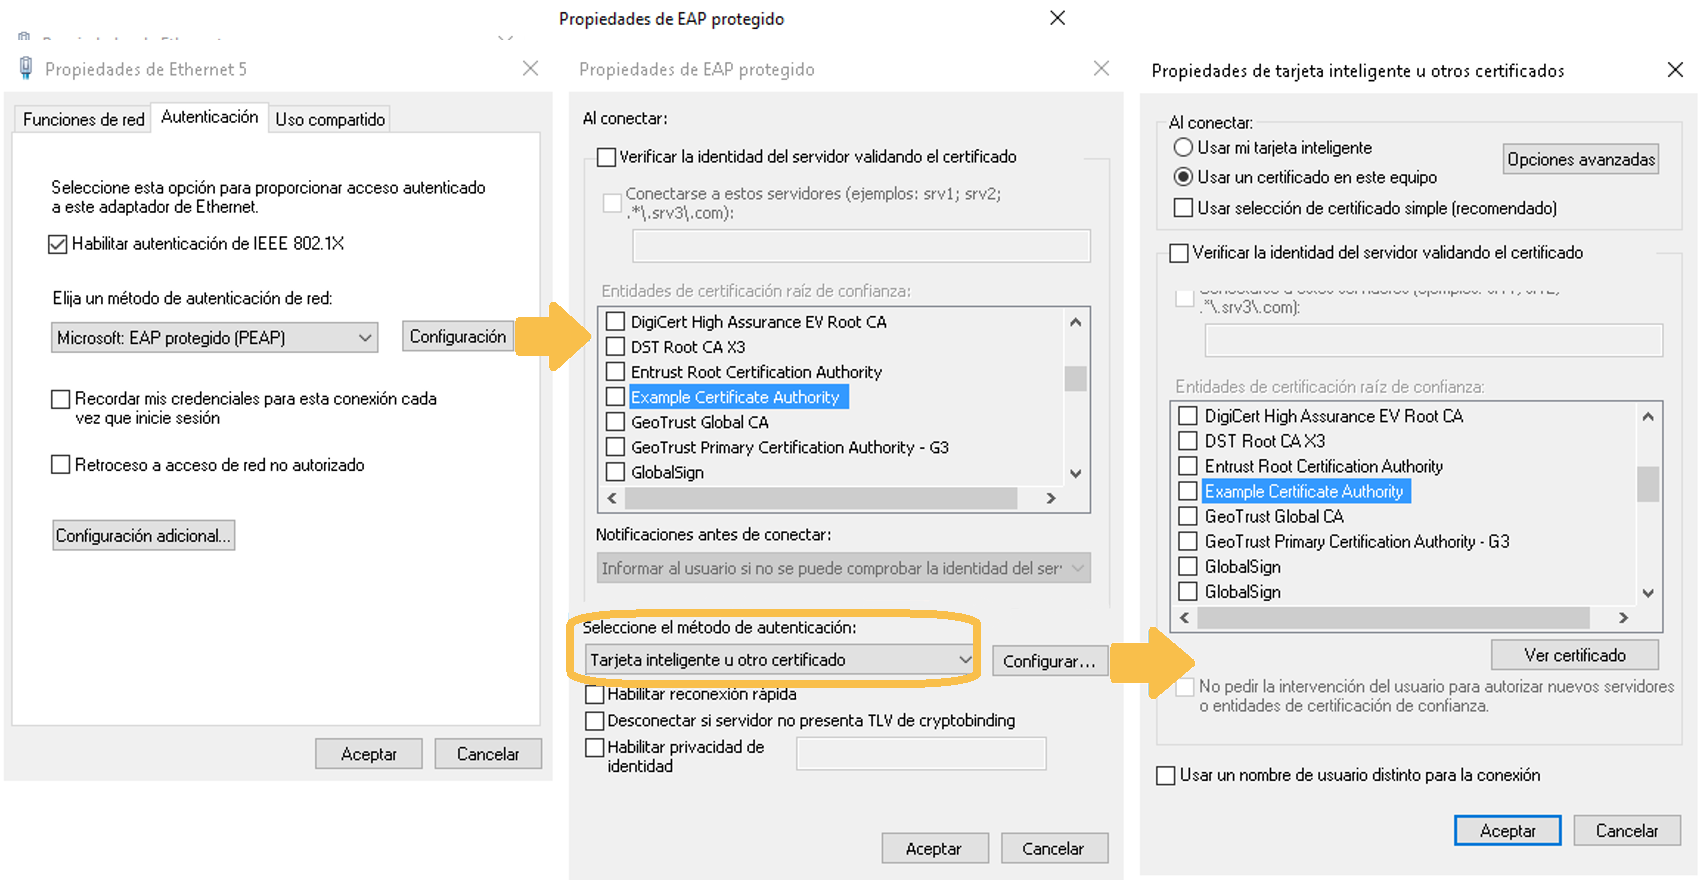
It is also possible to define whether you want to use computer or user certificates manually in “Additional settings” in the network adapter properties window.
In case of having configured a valid server certificate in ON Core, we can activate the option “Verify the identity of the server validated the certificate” to add a security layer.
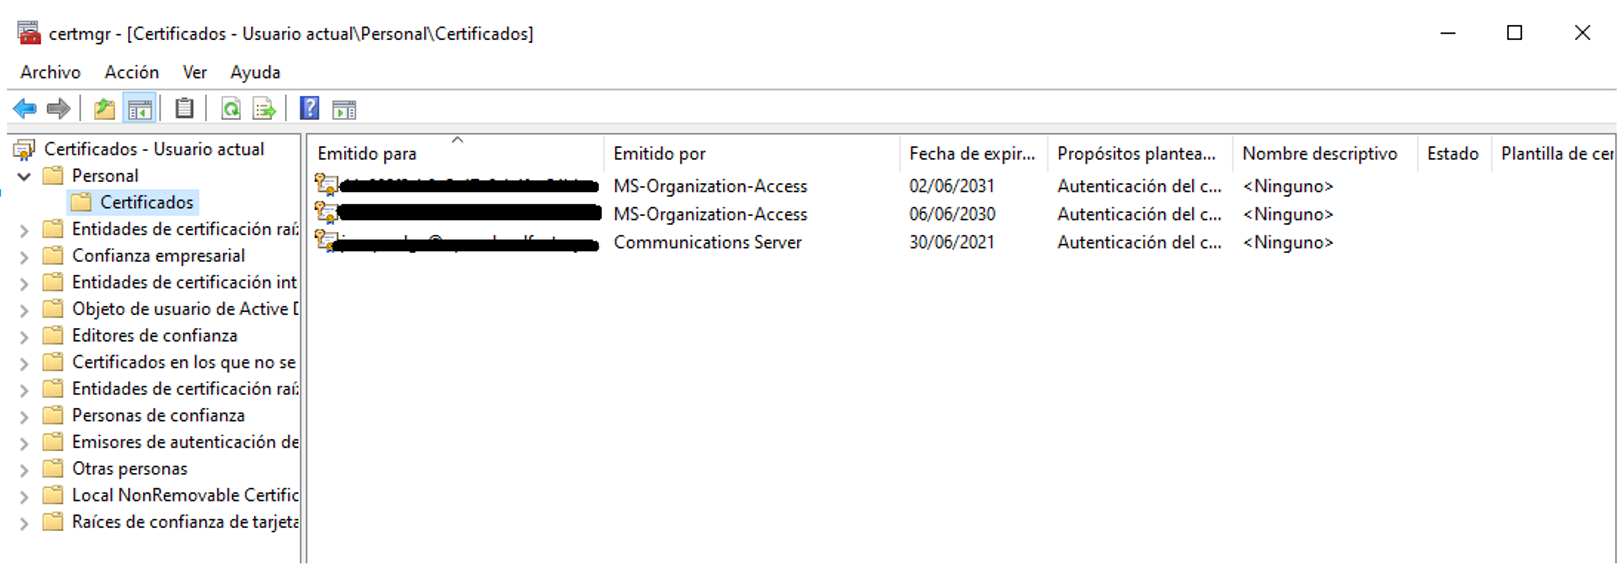
To verify the correct installation of certificates on Windows computers, we can access “Manage user certificates” or “Manage computer certificates” depending on the type of certificate deployed. The installed certificates should appear in the “Personal -> Certificates” folder.
4.3.4.4.2. Linux (Ubuntu)
This example will explain how to configure an Ubuntu computer, this configuration can be replicated in several similar distributions.
Wired:
To configure the supplicant in Ubuntu, we must access the network section in the upper bar and select the desired interface and then Wired Settings. In the pop-up window that will open, we must select the network to which we want to configure the supplicant and click “Edit”.
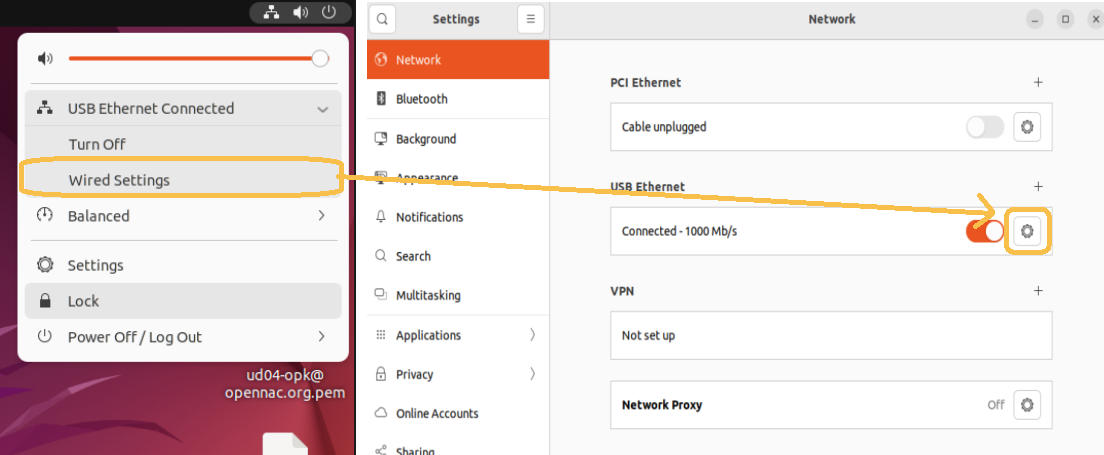
A new window will open with the properties of the connection and in the “Security” tab we will have to configure the supplicant. The configuration shown below is recommended, although it can be adjusted to the needs of each case.
User Authentication:
To configure 802.1x to perform authentication with credentials we will perform the following configuration:
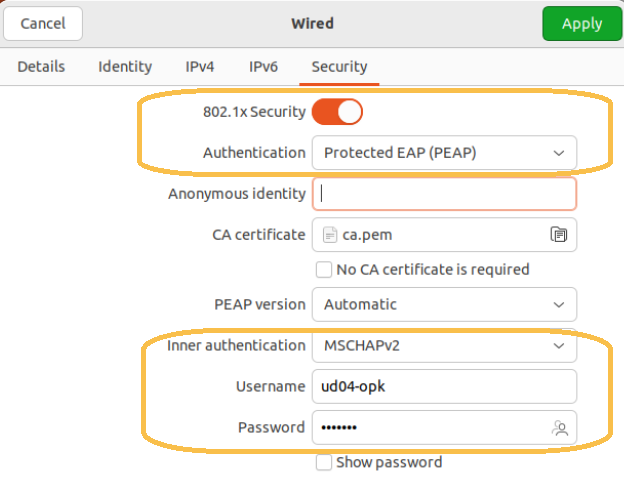
Authentication: Protected EAP
CA certificate: in case of validating the identity of the server, here we must indicate the CA used for validation.
No CA certificate is required: If we do not want to validate the identity of the server, we must mark this check.
Inner Authentication: the authentication method will be MSCHAPv2
Username/Password: Credentials used for authentication.
Certificate Authentication:
To configure 802.1x to perform authentication with certificates we will perform the following configuration:
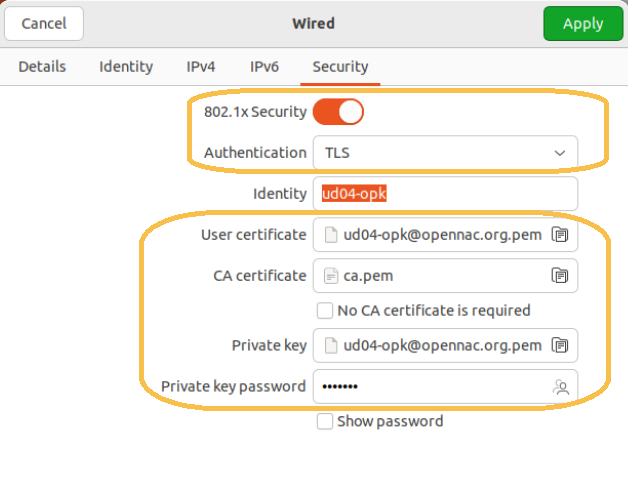
Authentication: TLS
Identity: identity for authentication, this information is not relevant when authenticating against OpenNAC.
User certificate: Certificate that will be used to authenticate against OpenNAC.
CA certificate: in case of validating the identity of the server, here we must indicate the CA used for validation.
No CA certificate is required: If we do not want to validate the identity of the server, we must mark this check.
Private key: private key of the client certificate.
Private key password: encryption password for the private key of the client certificate.
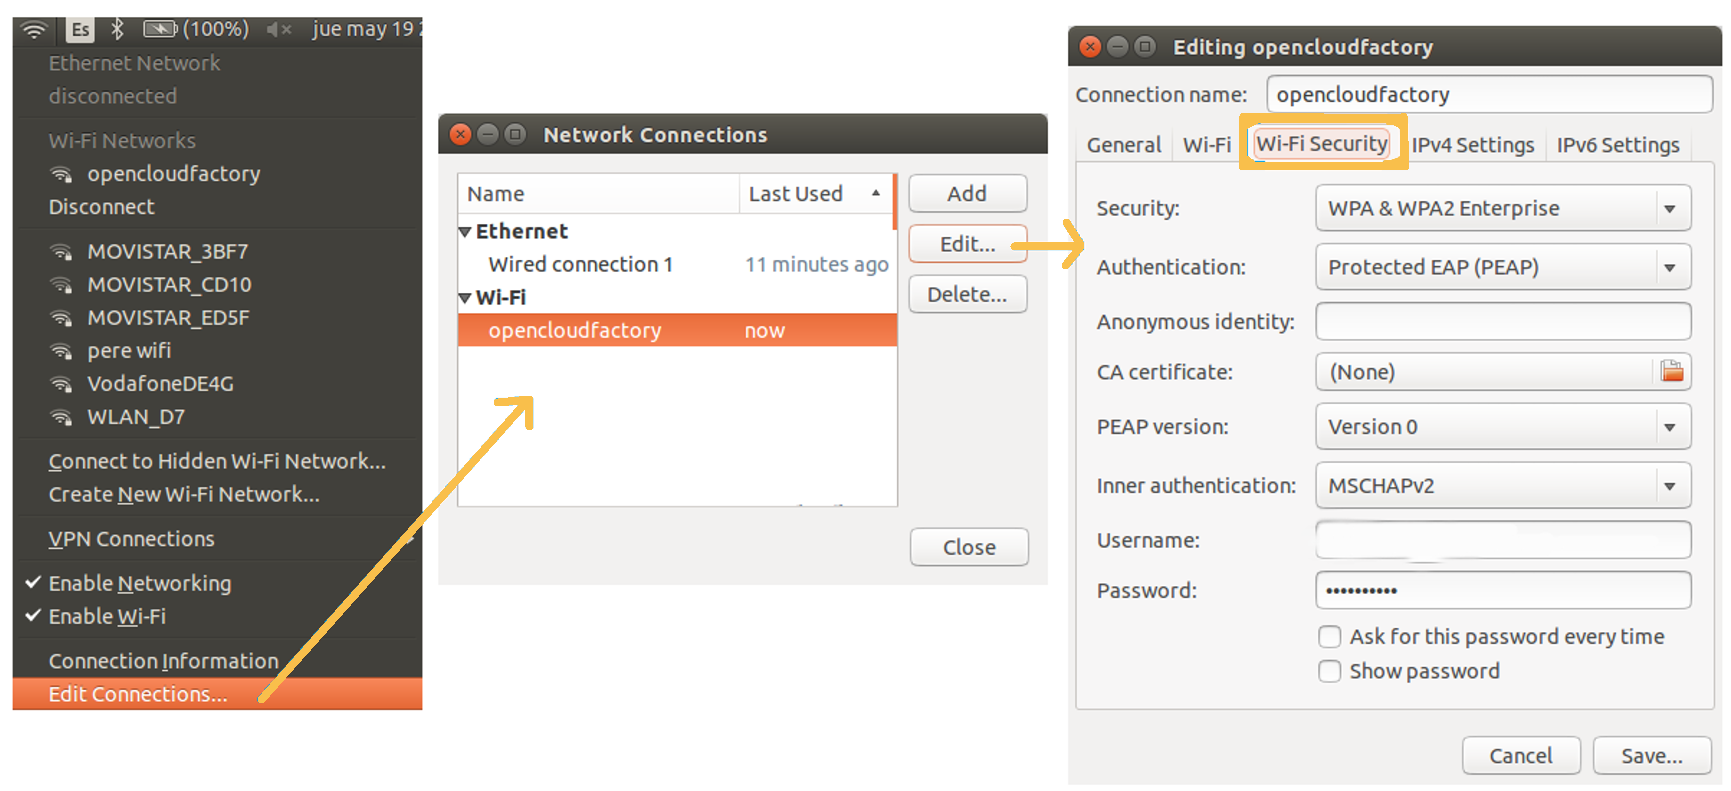
WiFi:
To configure the supplicant in Ubuntu, we must access the network section in the upper bar and select “Edit Connections…”. In the pop-up window that will open, we must select the network to which we want to configure the supplicant and click “Edit”. A new window will open with the properties of the connection and in the “Security” tab we will have to configure the supplicant.
The configuration shown below is recommended, although it can be adjusted to the needs of each case.
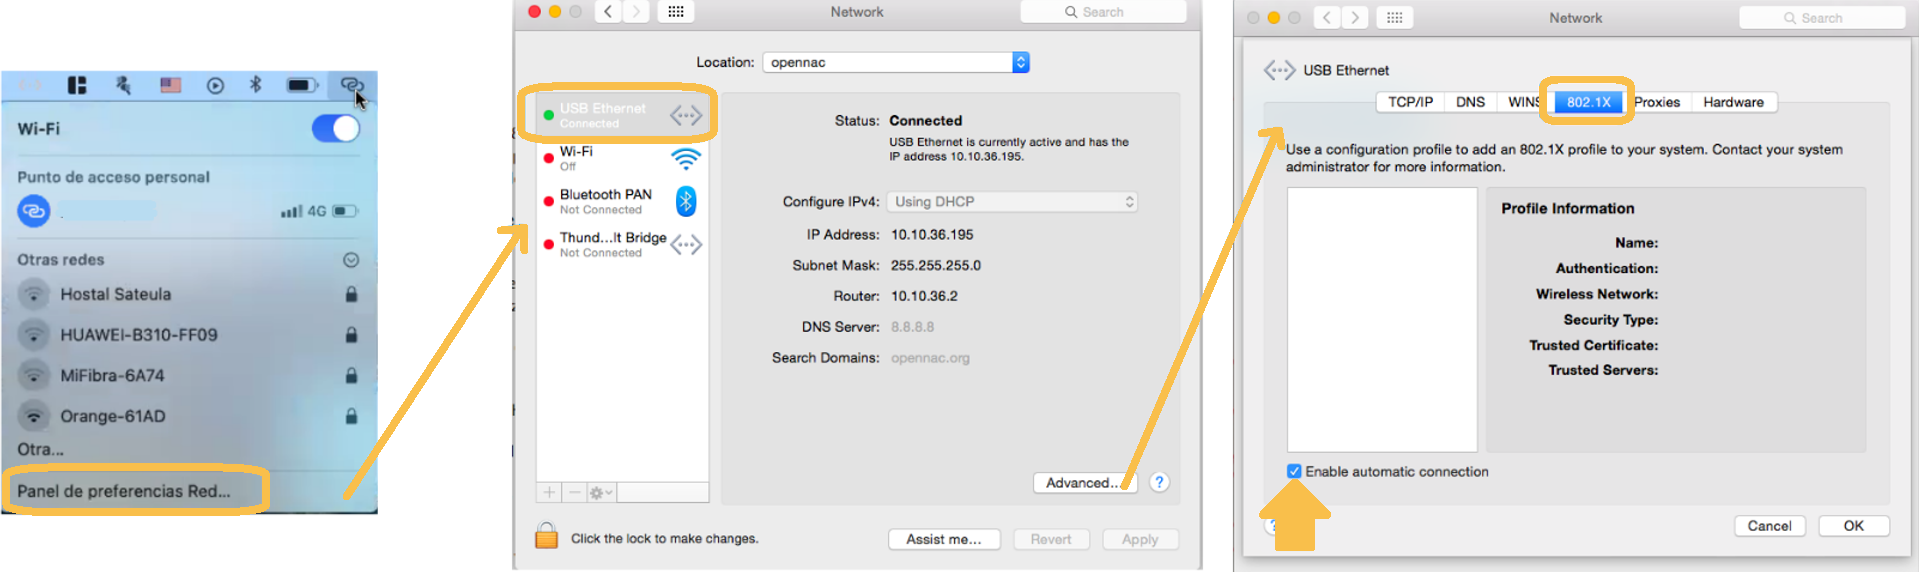
4.3.4.4.3. MacOS
To configure the supplicant in MacOS, we must access the network section in the upper bar and select “Network preferences panel…”. In the pop-up window that will open, we must select the network to which we want to configure the supplicant and click “Advanced”.
A new window will open with the properties of the connection and in the “802.1X” tab we will have to configure the supplicant to use an automatic connection. For this, check the box “Enable automatic connection”.
4.3.4.5. Network Device Configuration
The network devices must be configured to use the UNAC case, they are usually those through which the end devices (PCs, printers, mobiles, etc.) access. These are usually Access Switches, APs, and AP Controllers.
The basic configuration of these devices is 802.1x and Radius. The UNAC module allows us to work with those network devices compatible with the protocols described above regardless of the brand and model. Additionally, there are a series of tested and approved devices for complete integration with the solution, which has specific guides for their configuration. Otherwise, it will be the user who must determine the relevant configuration.
The recommended configuration for network devices includes the following points:
802.1x configuration (wired networks)
Radius configuration
CoA configuration (Change of Authorization)
SNMP configuration
Default VLAN definition
Critical VLAN definition
Optional:
Guest VLAN definition
VoIP VLAN definition
4.3.4.6. Next-Generation Firewall Integration
To enable certain functionalities in the OpenNAC Segmentation module, we can integrate Palo Alto and Fortinet next generation firewalls.
To expand the use of the tool and to be able to perform layer 3 segmentation, we can send information about users and events registered in OpenNAC Enterprise to the firewalls so that they can process the data and apply new segmentation policies.
We can see the necessary configurations for the firewalls on the following link. NGFW integration