4.5.5. Administration
The administration section focuses on advanced tasks related to the ongoing management and maintenance of the system covering more complex configurations and advanced features.
We will detail the steps to configure the system, preparing it to operate its BYOD functionality.
Note
It is essential to have correctly deployed and configured the necessary nodes for this use case.
This section guides you through the creation and customization of a captive workflow, outlining the necessary policies for implementation.
4.5.5.1. User Data Sources
User Data Sources (UDS) are the sources that the system will use for user authentication. These may also be used in the process of authorizing or evaluating system policies.
There are different types of UDS, these can be databases or AD/LDAP.
By default, we have a UDS called “LocalDB”. This is the local database of the system where we can store local users. This can be useful for testing, but is not recommended for use in production.
To see the existing UDS we must go to “ON CMDB -> User Data Sources”. To add a new UDS, click on the Add new button.
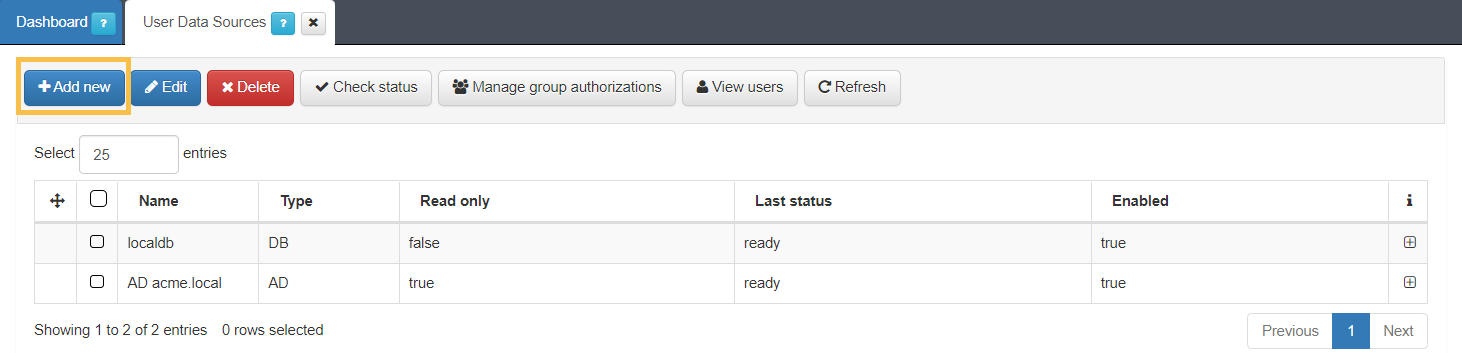
A new window will open, in which, depending on the type (Type) of UDS that we want to create, it will have one format or another. In the points below, it will be detailed how to create both the “Database” type and the “LDAP/AD” type.
Once all the attributes for the UDS type have been defined, press the “Accept” button to save it. We can verify the connection with the UDS by selecting it in the list, and pressing the “Check status” button. In case the status is correct, we will be shown a message and “ready” will appear in the “Last status” column.
4.5.5.1.1. Database UDS
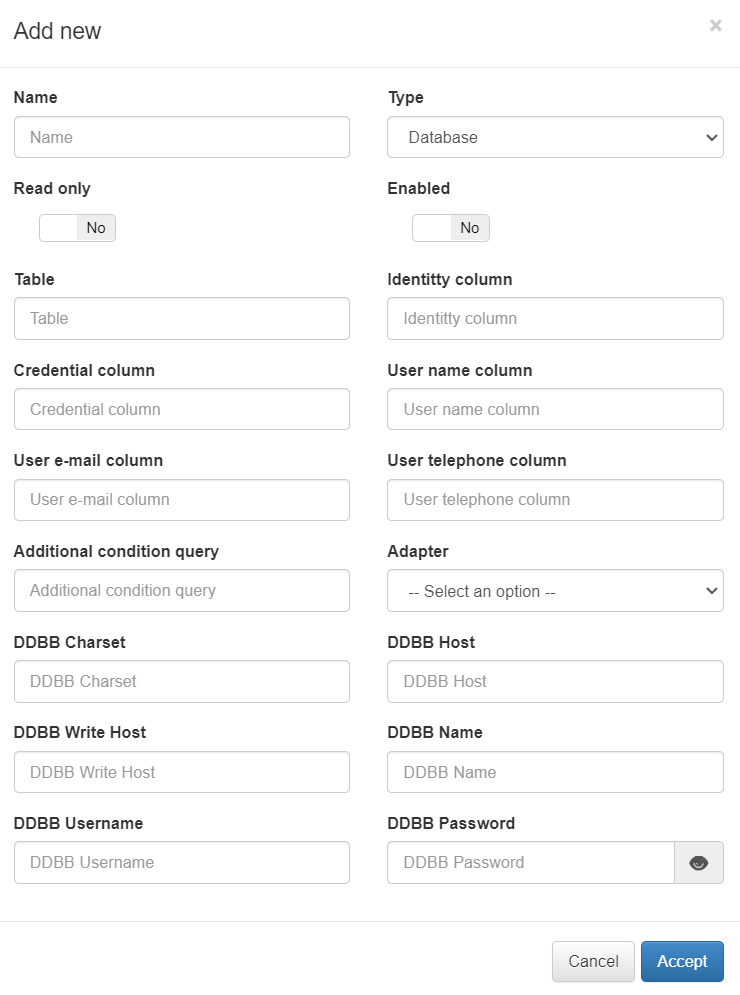
The fields to fill in for a UDS of type “Database” are:
Name: Name to be assigned to the UDS.
Type: Type of UDS (Database, LDAP or AD).
Read only: Check to define if said UDS is read-only .
Enabled: Check to enable or disable udS.
Table: Table Of the database to be queried.
Identity column: A column in the database table that contains the user ID.
Credential column: Column of the database table that contains the user’s credentials.
User name column: Column of the table that contains the user’s name.
User e-mail column: Column of the table that contains the user’s e-mail.
User telephone column: Column of the table that contains the user’s phone.
Additional condition query: Query conditions additional to the database.
Adapter: Type of database adapter (MySQL, PostgrSQL, Oracle…)
DDBB Charset: Character set used by the database (e.g. utf8)
DDBB Host: Name of the host or address of the database to read.
DDBB Write Host: If you want to write to the database, the host name or address.
DDBB Name: Name of the database.
DDBB Username: Username for database access.
DDBB Password: The user’s password for accessing the database.
4.5.5.1.2. LDAP/AD UDS
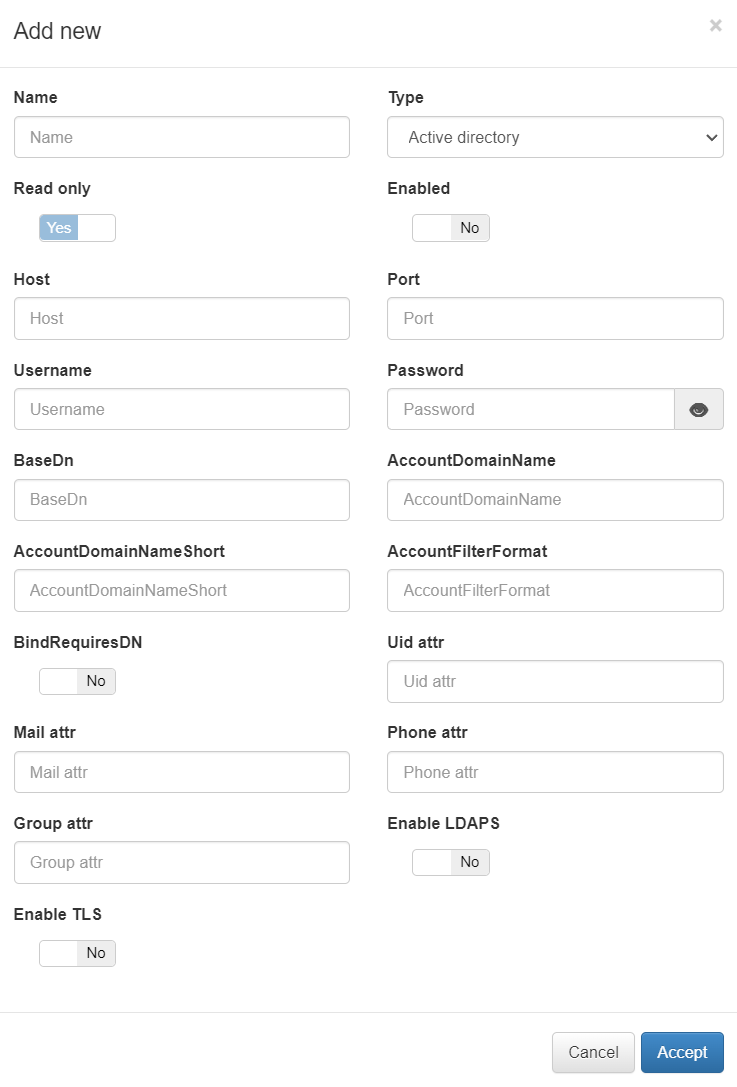
The fields to fill in for a UDS of type “LDAP/AD” are:
Name: Name that will be assigned to the UDS.
Type: Type of UDS (Database, LDAP or AD).
Read only: Check to define if said UDS is read-only .
Enabled: Check to enable or disable udS.
LDAP Host: The LDAP/AD IP where queries are launched.
LDAP Port: The port used for the AD/LDAP search query.
LDAP Username: This is the user registered on the AD/LDAP server, which must have read permissions on the server. It is recommended that such a user only have read permissions.
LDAP Password: This is the password for the AD/LDAP binding.
LDAP Base DN: BaseDN at the top of the domain name structure. For example, if our domain is mycompany.local, its BaseDN is DC = mycompany, DC = local.
LDAP AccountDomainName: This is the DNS name of the domain in uppercase.
LDAP AccountDomainName: Short Is the short domain name or NETBIOS name commonly called, for example, MYCOMPANY.
LDAP AccountFilterFormat: This is the attribute used to select users. Two options have been included (only one should be used). It is used (sAMAccountName =% s) for Active Directory and (uid =% s) for LDAP servers.
LDAP Bindrequires DN: The bindDN DN is the credential you are using to authenticate against an LDAP. When using a bindDN, it usually comes with an associated password, sometimes the anonymous link does not allow certain types of actions.
LDAP Uid attr: This is the attribute used to identify user IDs, depending on whether AD or LDAP is used for filter change.
LDAP Mail attr: This is the filter used to identify mail as a user attribute.
LDAP Phone attr: It is the filter that is used to identify the phone number as an attribute of the user.
LDAP Group attr: This is the filter used to identify groups as an attribute of the user.
Enable LDAPS: Used to authenticate and authorize users when LDAP communication is transmitted over an SSL tunnel port 636 TCP. By default, the use of LDAPS is recommended to improve the security of the environment.
Enable TLS: Used to secure communication between LDAP clients and LDAP servers (See 3.4.1).
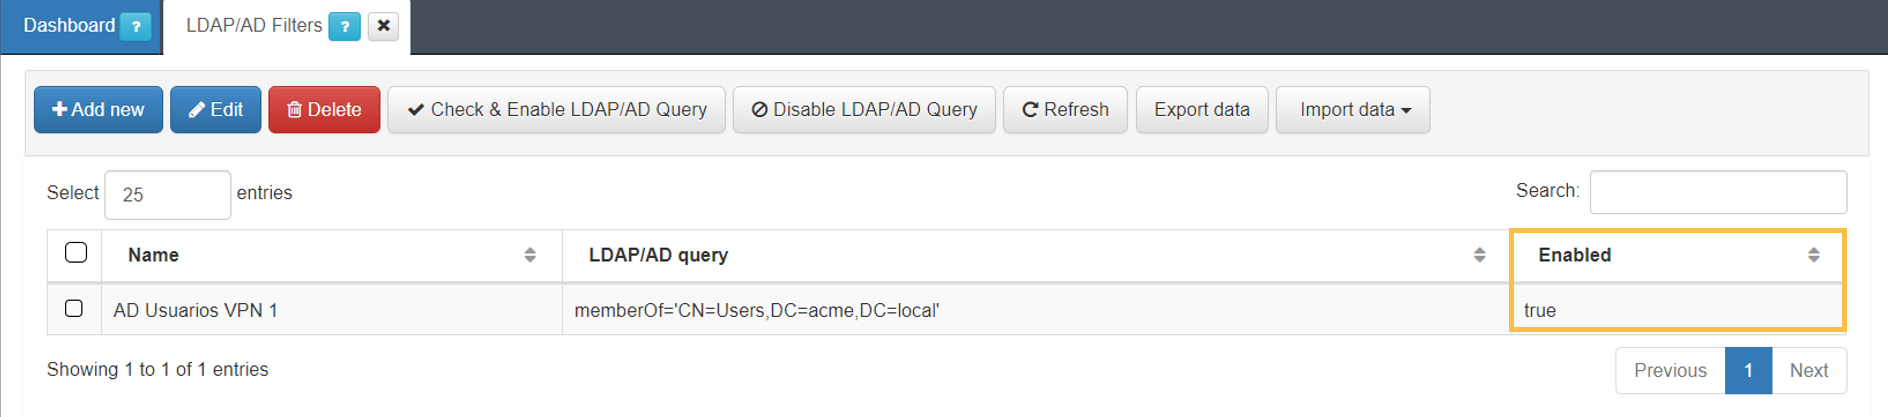
4.5.5.1.3. Creating LDAP Filters
This section explains how to generate LDAP filters. Filters are used to segment the groups of users accessing the network. These filters can be used later as access policies. Note that this document provides an example, you must create the different LDAP filters required for your access policies.
Go to the ON CMDB -> LDAP/AD Filters menu.
Click on the Add new button.
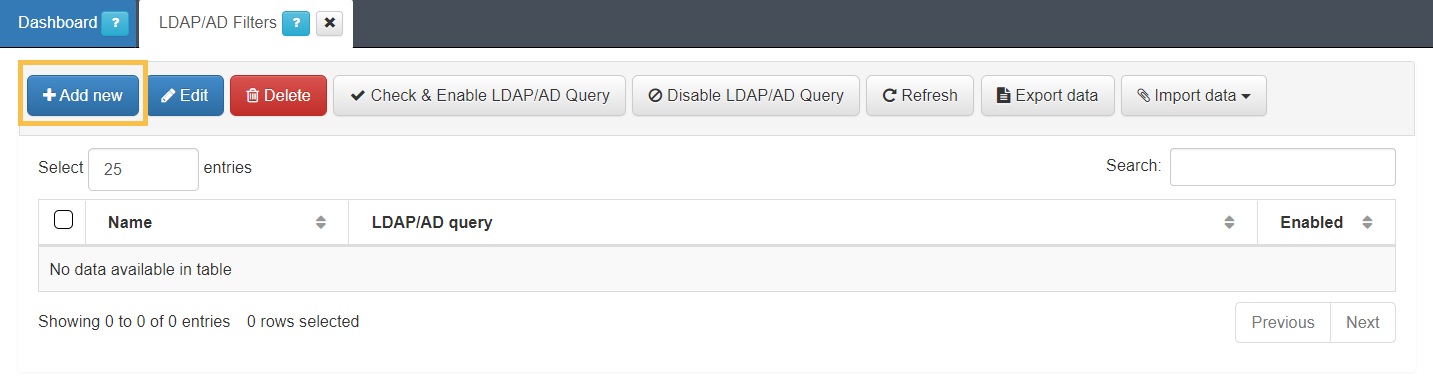
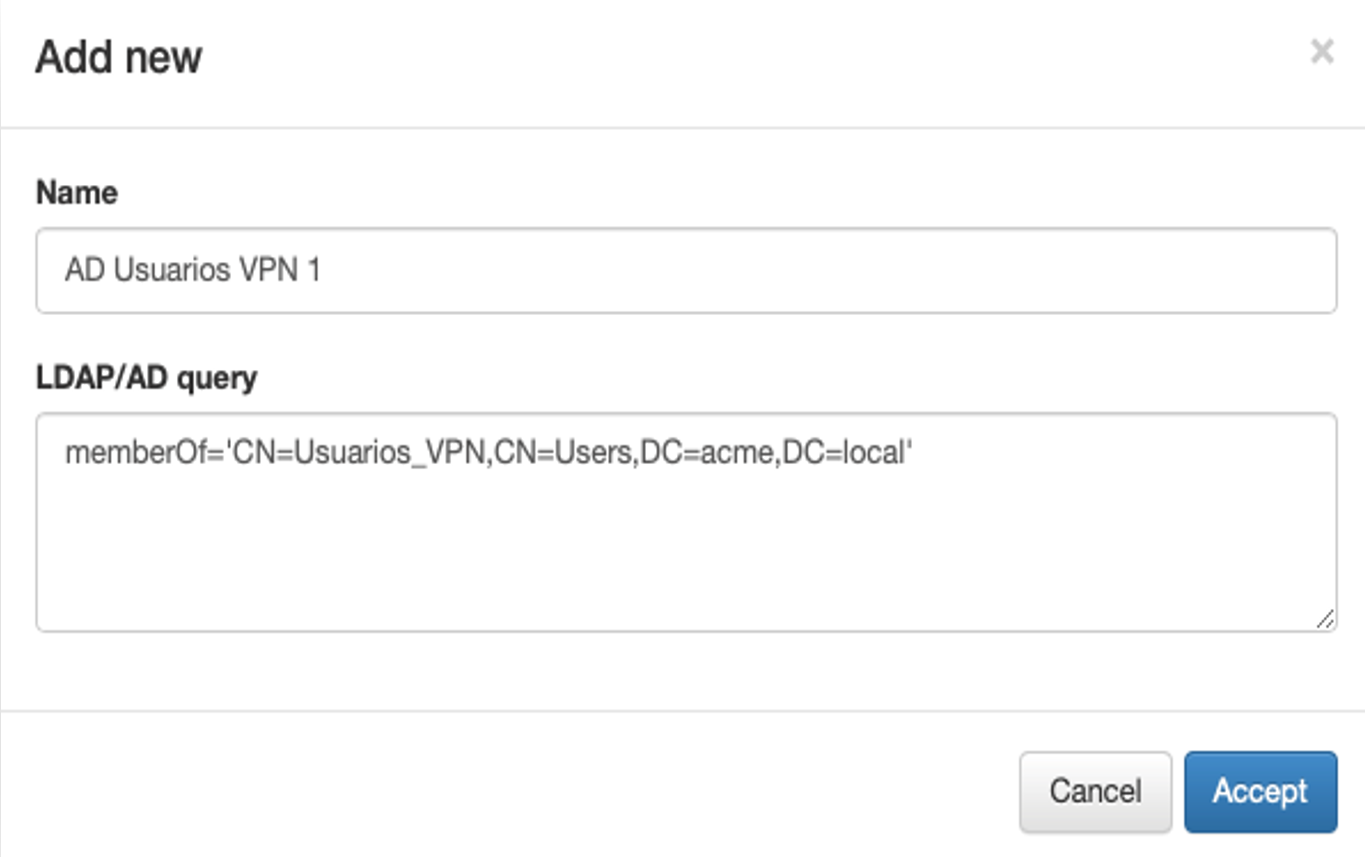
Fill in the fields displayed on the window:
Add a name to the filter
Type the LDAP query with the required information
Click the Accept button.
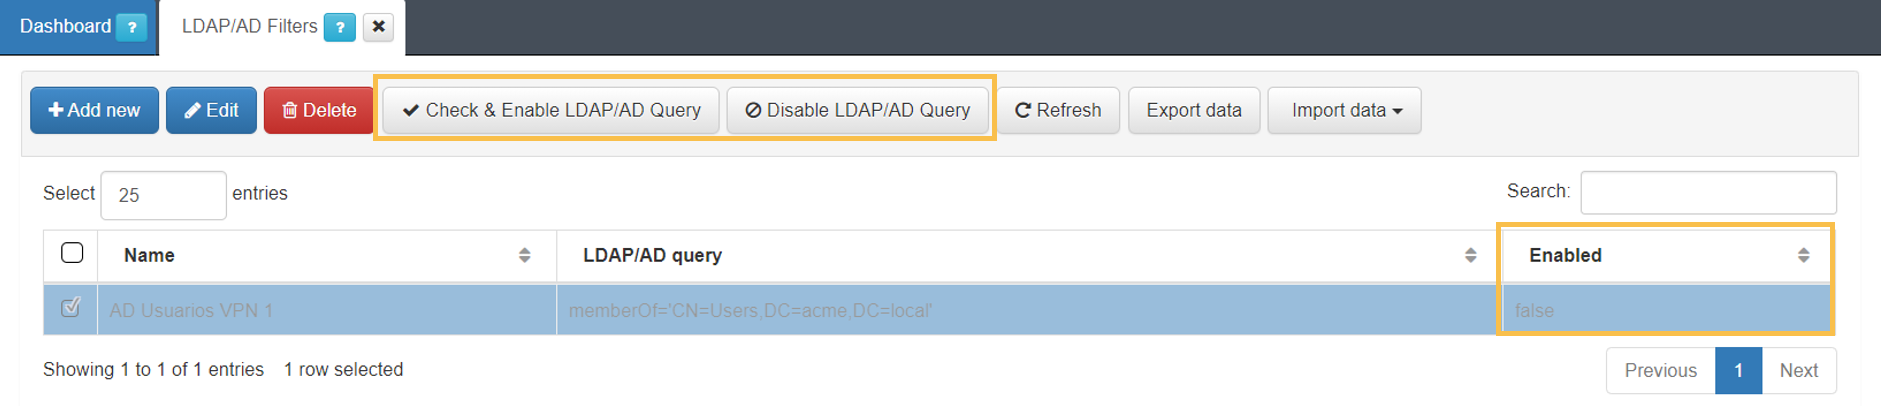
Once the filter is created, it will appear in the gray list. You can see that the filter is disabled by default.
To enable the new filter:
Select.
Click the Check & Enable LDAP/AD Query button.
On the window displayed:
Choose the active directory to which to associate this filter.
Click the Accept button.
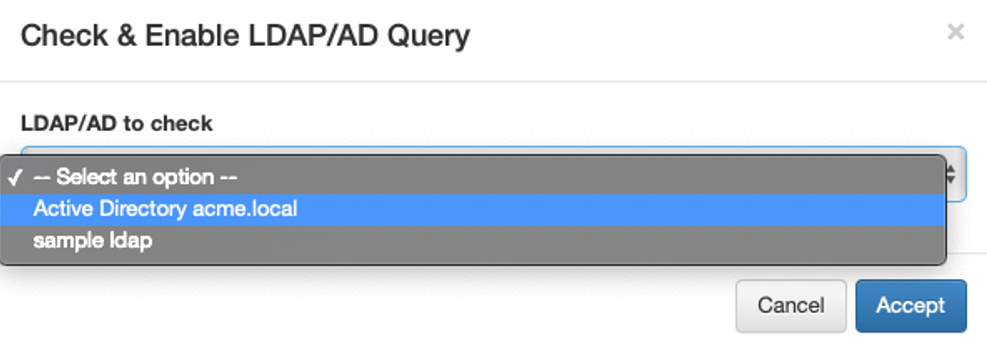
In case no errors occur, the filter will be enabled.
4.5.5.2. Join ON Core to Active Directory domain
We recommend you to register the ON Core server in the domain in order to authenticate users stored in the AD/LDAP. In case there is no domain, you can skip to the next step.
To carry out this process, it is necessary for the user to have specific permissions to Join in AD. Later, the user can be modified, using one that only has read permission to make user queries.
For joining domain information see the process in the Administration Portal section: Join Domain Wizard
We will detail the steps to configure the system, preparing it to operate its Guest functionality.
Note
It is essential to have correctly deployed and configured the necessary nodes for this use case.
This section guides you through the creation and customization of a captive workflow, outlining the necessary policies for implementation.
4.5.5.3. Creating Network Devices in the ON Core CMDB
The CMDB is the ON Core database, in this database we find information related to the system, infrastructure, networks, VLANs, Security Profiles, user devices, network devices, etc.
The definition of network devices in the CMDB allows us to customize the characteristics of the device so that the system acts in one way or another with each of these devices.
If you want to register a predefined group of devices, consult Bulk import of devices.
Go to the “ON CMDB > Network Devices” section to create a new network device.
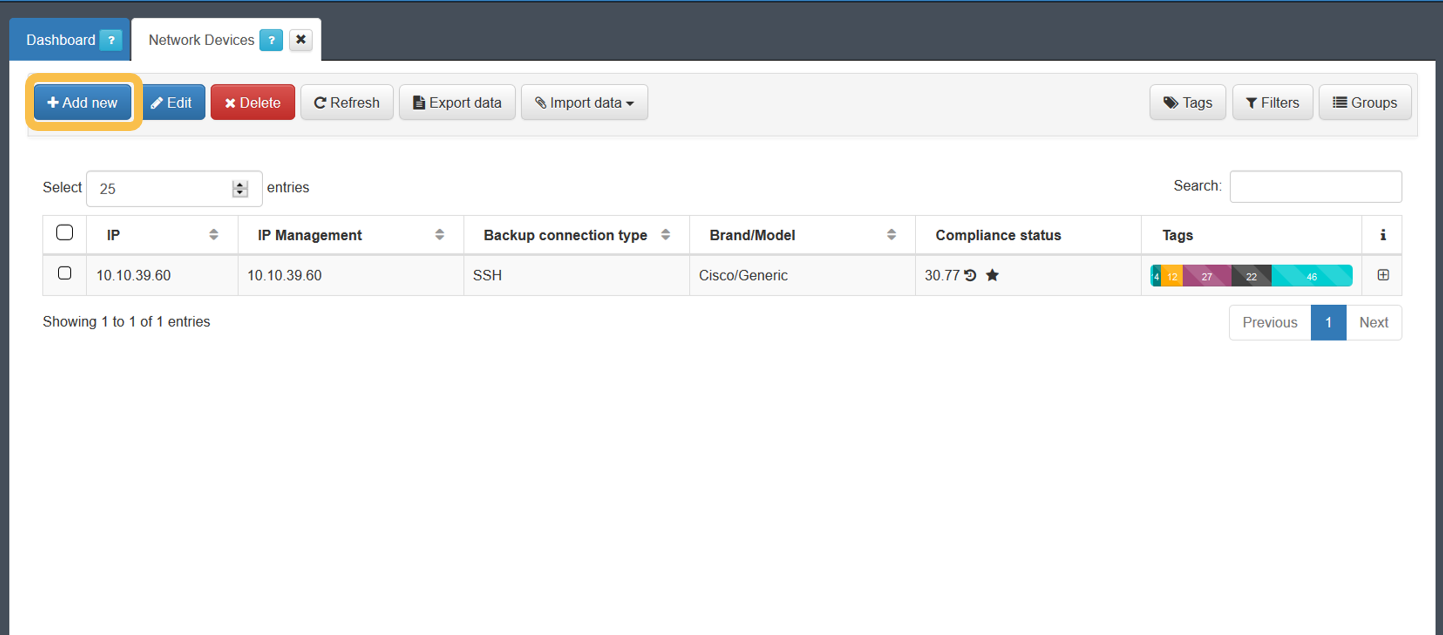
To register a new device, simply use the Add new button and complete the information on the form. After completing all the necessary information, we will press the Accept button on the form to save the configured network device.
By default, the device’s configuration will be applied to the one we have defined. This default configuration is found in Configuration -> Configuration Vars -> NetDev. The sections we will find here are the same ones we can find when configuring any of the devices.
The minimum information that must be filled in is indicated below.
4.5.5.3.1. General
In this tab, it is required to fill in at least the following fields.
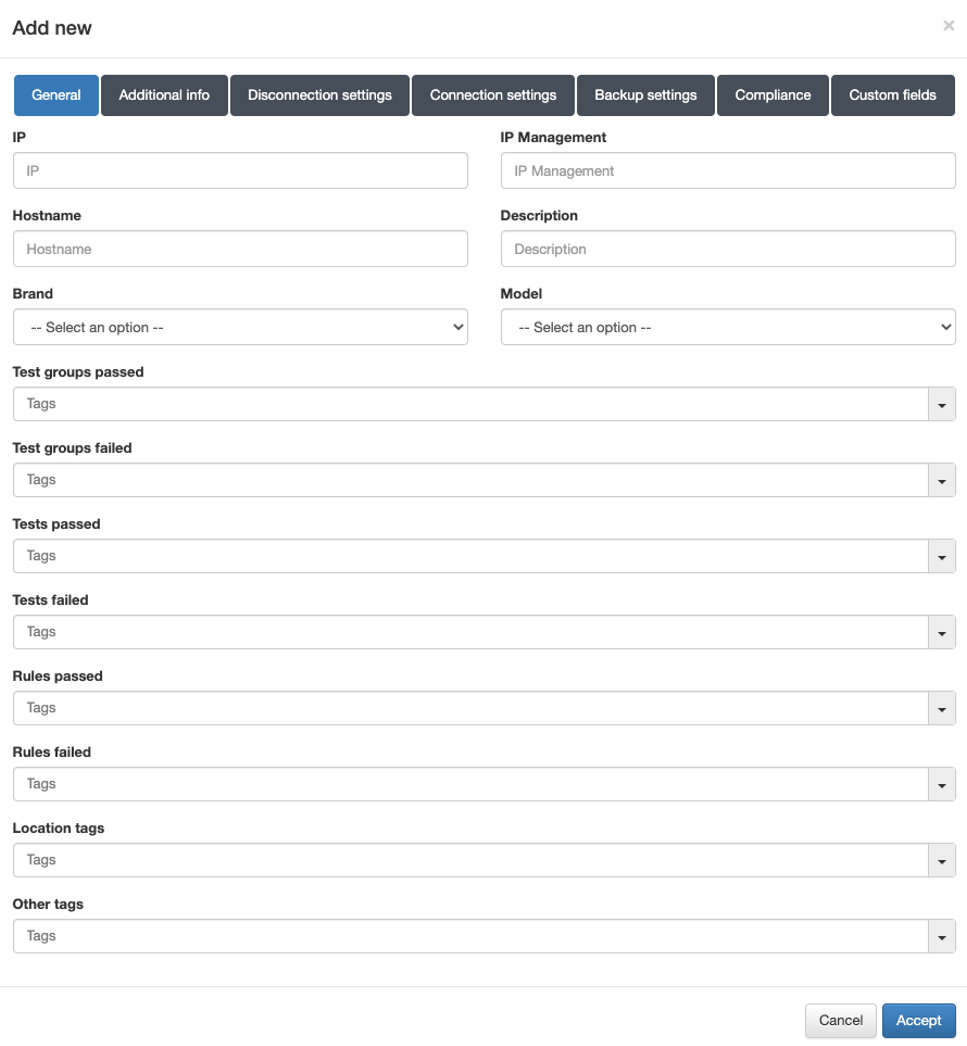
IP: IP address that identifies the device.
The IP address is only for identification (to see it in the device table).
Hostname: Hostname that identifies the device.
Brand / Model: Brand and model of the device.
It is important to correctly define the brand and model since these will be used to determine the behavior of the system in terms of communication with these devices.
4.5.5.3.2. APs Management controller
When there are many APs centrally controlled by a controller in the network, it is necessary to add the controller as a network device in the CMDB and additional information for each of the APs in the CMDB.
For these APs, apart from the minimum information detailed above, it will be necessary to add the information corresponding to IP Management:
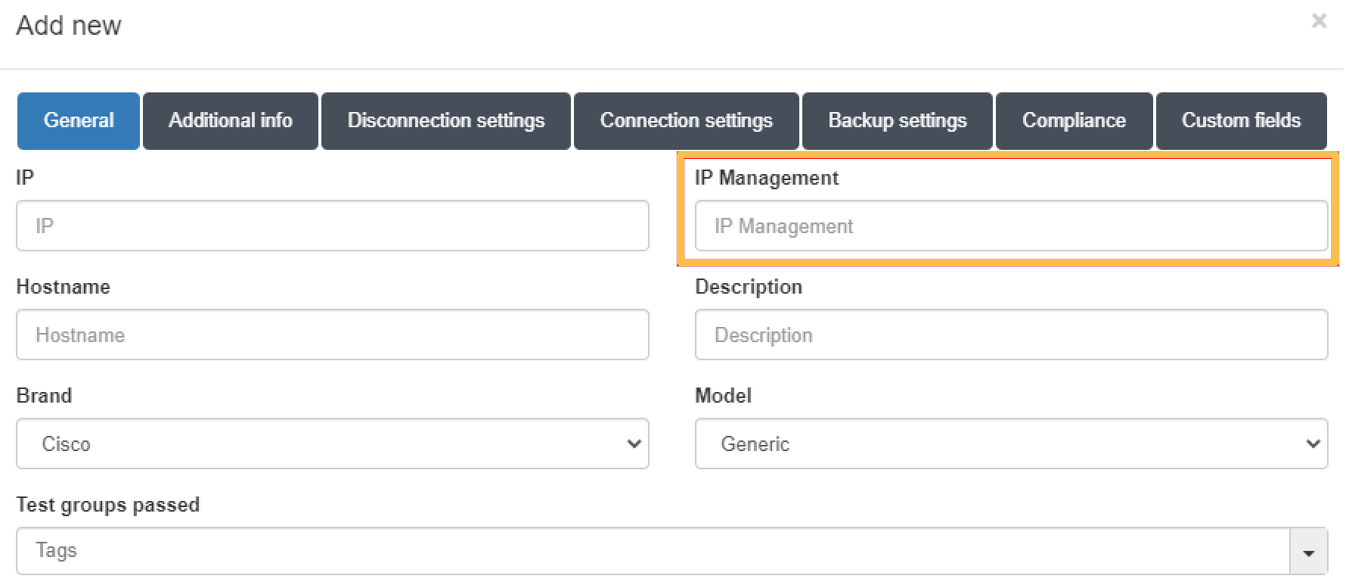
This IP must correspond to the IP associated with the controller that manages the AP.
4.5.5.3.3. Disconnection settings
In the “Disconnection settings” section, the configuration of the Toggle Port functionality is defined. This functionality allows you to force a disconnect from an authenticated session. This allows us, for example, to carry out a re-evaluation of the policies in case they have been modified, and the application of VLANs, ACLs, etc. to the session.
There are two methods of session disconnection:
CoA (Change of Authorization): CoA is a Radius mechanism that allows us to disconnect a specific session without the need to modify the port status (enable/disable) of the network device.
SNMP: Using SNMP, the interface where the device has been authenticated is disabled and enabled. This causes the device to have to re-authenticate and subsequently evaluate policies on the system.
Depending on the type of network device we have the following options:
Wired: SNMP or CoA
Wireless: CoA
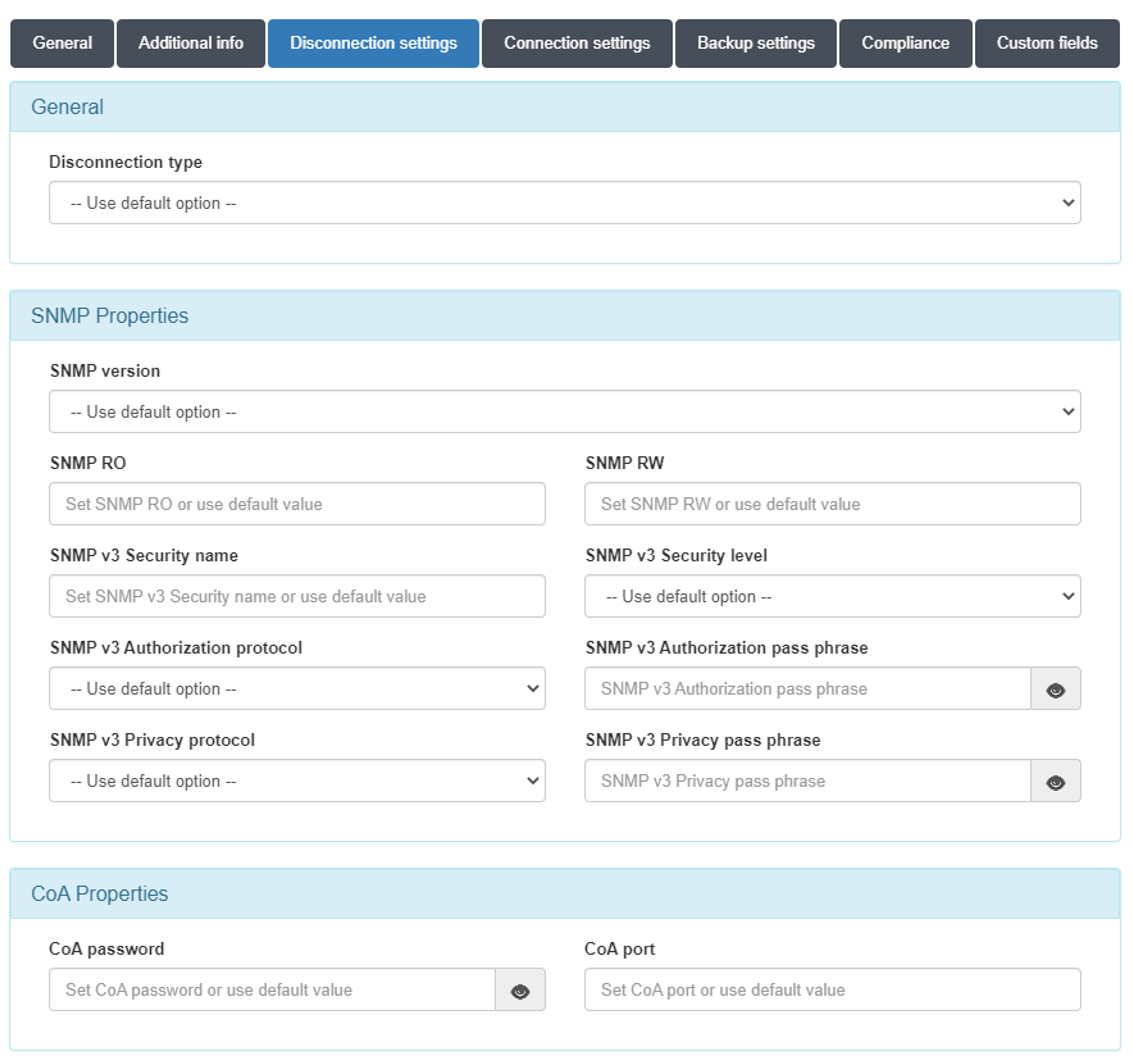
Disconnect type:
Use default option: The configuration defined in “Configuration vars” will be applied.
CoA: Use of CoA to perform session disconnections.
SNMP: Use of SNMP to perform session disconnections.
SNMPProperties
SNMP version: Version used for SNMP messages. The required attributes for each of the versions are:
V1 (not recommended):
SNMP RO: SNMP community with read permissions.
SNMP RW: SNMP community with write permissions.
V2c:
SNMP RO: SNMP community with read permissions.
SNMP RW: SNMP community with write permissions.
V3 (recommended):
SNMP v3 Security name: SNMP username.
SNMP v3 Security level: Security level (noAuthNoPriv/authNoPriv/authPriv).
Depending on the selection, it will be necessary or not to configure some of the following attributes.
SNMP v3 Authorization protocol: Authorization protocol (MD5/SHA).
SNMP v3 Authorization pass phrase: Password for authorization.
SNMP v3 Privacy protocol: Privacy protocol (DES/AES).
CoAProperties
CoA password: Password defined in the network device to authenticate CoA requests.
CoA port: Port used for communication. (Usually 3799).
If you do not perform any of the configurations, those defined in Configuration -> Configuration Vars -> NetDev will be used.
4.5.5.4. Manage captive sponsors
In ON Captive -> Captive sponsors, we will be able to add, remove and edit the different sponsors.
The main function of a sponsor will be to validate requests from the users that want to register through a captive workflow. Once a user goes through a workflow where sponsor e-mail validation is required, a validation mail will be send to all the configured sponsors, so they will have to validate the user request and allow them to gain access to the network.
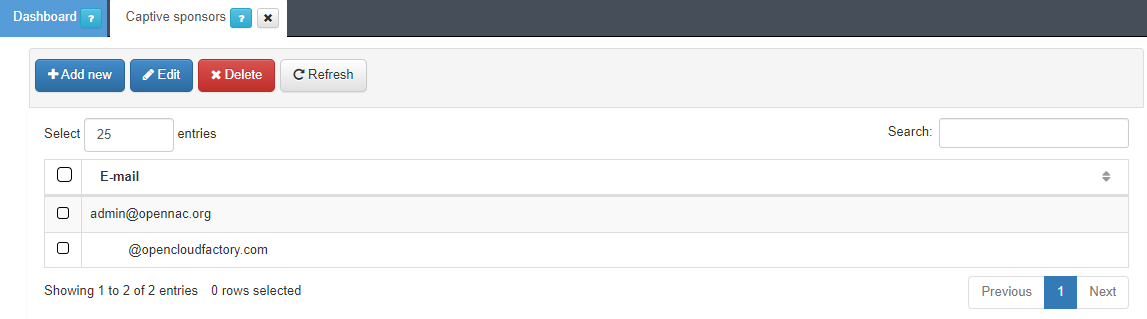
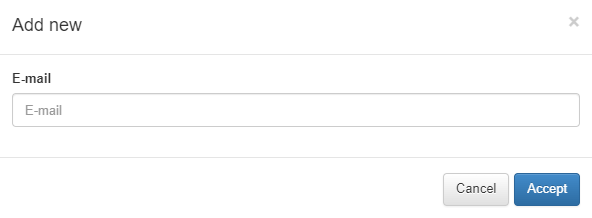
To add a new sponsor, click on the Add new button, a pop up window will appear. Introduce the desired mail and click accept.
4.5.5.5. Create a new captive workflow
A workflow is an authentication process that can be defined in ON Captive -> Captive workflows.
We will find five different templates. Two of them are BYOD templates, one fore wire (dot1x-registered-users) and the other for Wi-Fi (webauth-registered-users).
4.5.5.5.1. Wired workflow
To create a wired workflow, we need to set the following parameters. We will fill the parameters on the General tab:
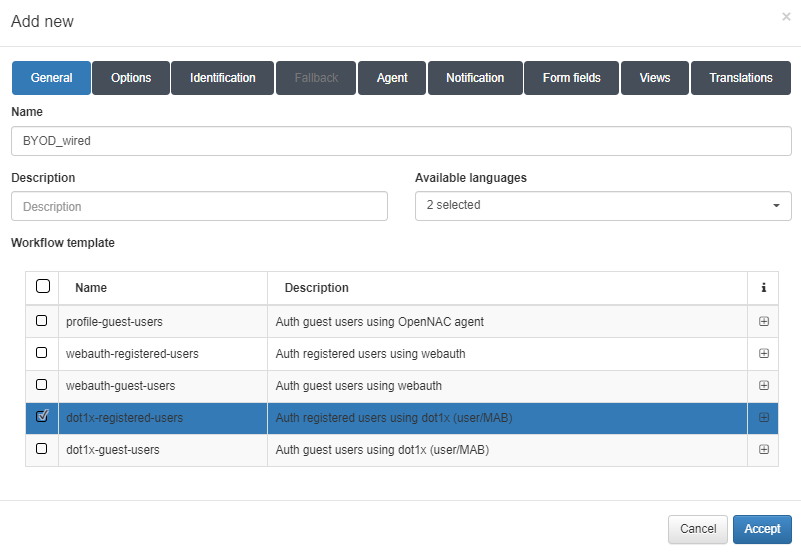
Name: Name of the workflow.
Description: Workflow description.
Available languages: Select all languages in which the workflow can be displayed.
Template: Workflow template. We will find two templates for the Guest use case, one for wire and the other for Wi-Fi. We will also find two templates for the BYOD use case, one for wire and the other for Wi-Fi. And finally, we will find one for the OpenNAC agent.
In this case, we have selected the dot1x-registered-users template because we want a wired workflow for the BYOD use case.
In the Options tab, we can find the following parameters to be configured:
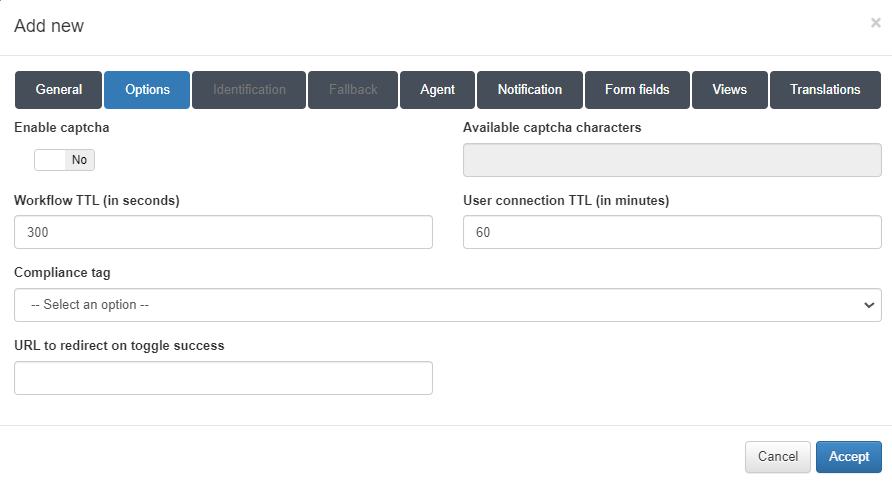
Enable captcha: Permits to enable a captcha in the workflow.
Available captcha characters: All the characters that are in this field, can be on the captcha.
Workflow TTL (in seconds): Seconds that limits the workflow duration.
User connection TTL (in minutes): Maximum minutes of a connection.
Compliance tag: Tag that needs to match to get access to the network. If the tag don’t match, it will show why the user don’t have access.
URL to redirect on toggle success: URL to redirect the registered user when the workflow is finished.
In the Identification tab, we have two possible types to configure, the user/password type, and the SAML type.
For the user/password type we have a double factor authentication that can be Email and SMS.
For the E-mail double factor authentication we can find the next parameters to configure:
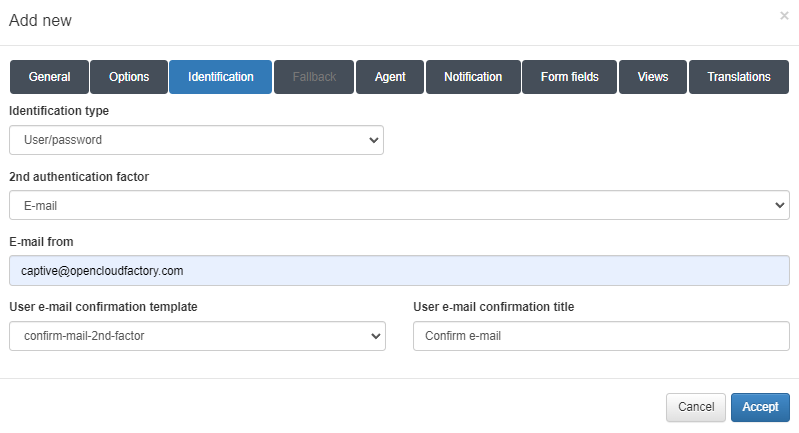
Identification type: Type of identification, in this case is going to be user/password.
2nd authentication factor: Double factor authentication type.
E-mail from: E-mail address that will send the mail to the user.
User e-mail confirmation template: Template of the E-mail.
User e-mail confirmation title: Tittle for the mail.
For the SMS double factor authentication we can find the next parameters to configure:
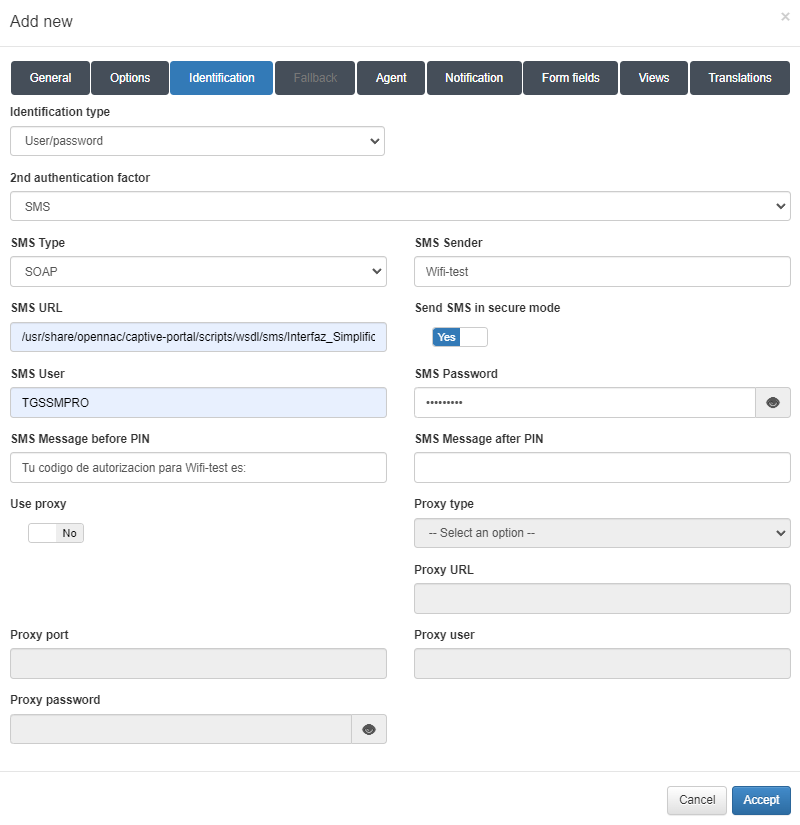
Identification type: Type of identification, in this case is going to be user/password.
2nd authentication factor: Double factor authentication type, in this case is going to be SMS.
SMS Type: Type of SMS, in this case is going to be SOAP.
SMS Sender: Sender that will send the SMS.
SMS URL: URL of the SMS.
Send SMS in secure mode: Enables SMS secure mode.
SMS User: User for the SMS.
SMS Password: Password for the SMS user.
SMS Message before PIN: Text that will go before the PIN.
SMS Message after PIN: Text that will go after the PIN.
Use proxy: Enables to use proxy and activates proxy fields.
Proxy type: Selects the proxy types, HTTP or HTTPS.
Proxy URL: URL for the proxy.
Proxy port: Port for the proxy.
Proxy user: User fot the proxy.
Proxy password: Password for the proxy user.
For the SAML type we have the next configuration:
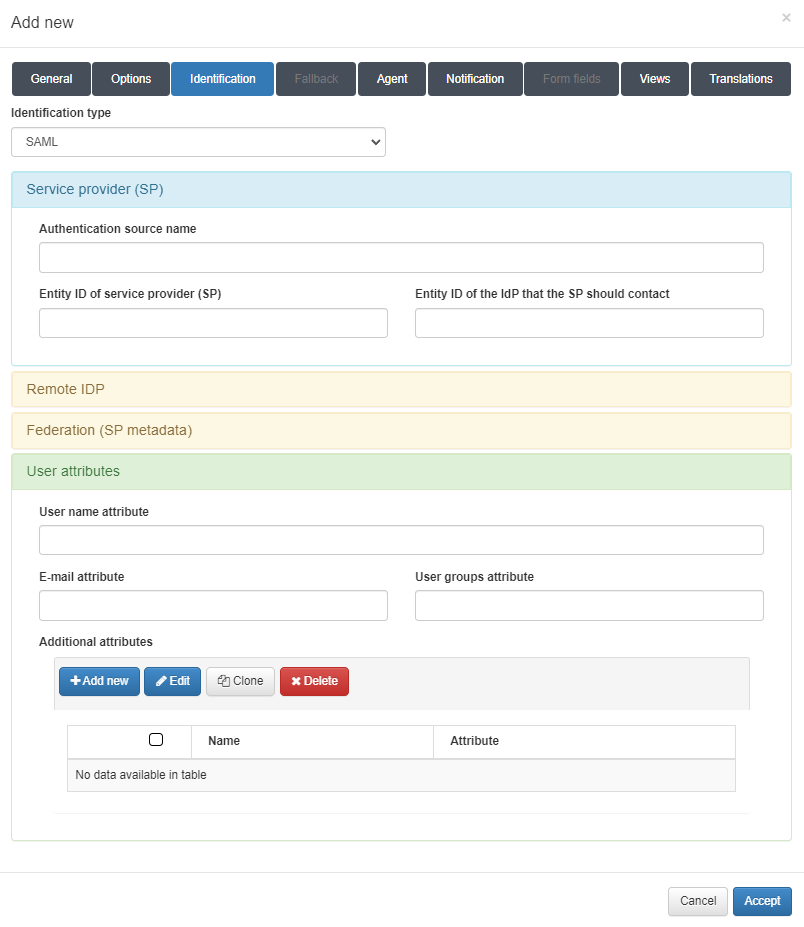
The first module is called Service provider (SP) and includes the following fields:
Authentication source name: SP name.
Entity ID of the service provider (SP): URL of the SP. In this case, the core acts as an SP, that is why the entity ID is the core domain.
Entity ID of the IdP that the SP should contact: URL of the IDP that will contact the SP.
The second module is called Remote IDP and includes the following field:
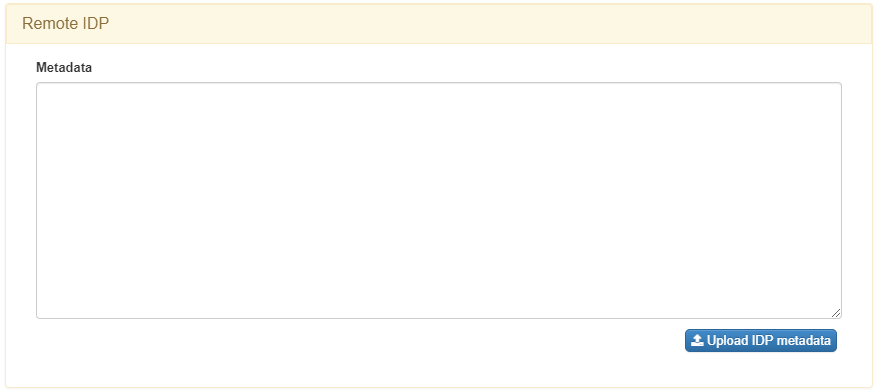
Metadata: Metadata of the IDP. The metadata you should enter here can be found in the IDP.
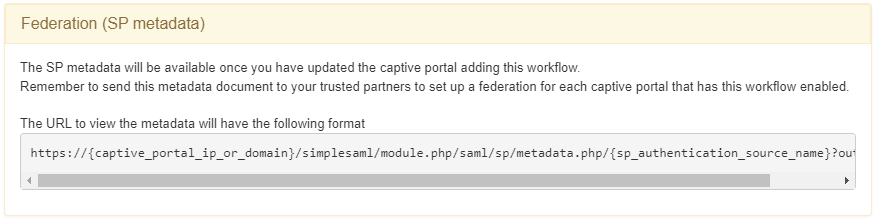
The third module is called Federation (SP metadata) and we can find the link to get access to our SP metadata. We will only need to replace the captive_portal_ip_or_domain variable with the correct one when browsing the metadata.
Finally, the fourth module is called User attributes and includes the following fields:
User name attribute: Attribute that will return a user specific username.
E-mail attribute: Attribute that will return a user specific email.
User groups attribute: Attribute that will return a user specific groups.
Additional attributes: Permits to add new attributes with the specific item we want to get.
In the Agent tab we can enable the ON agent for that workflow.
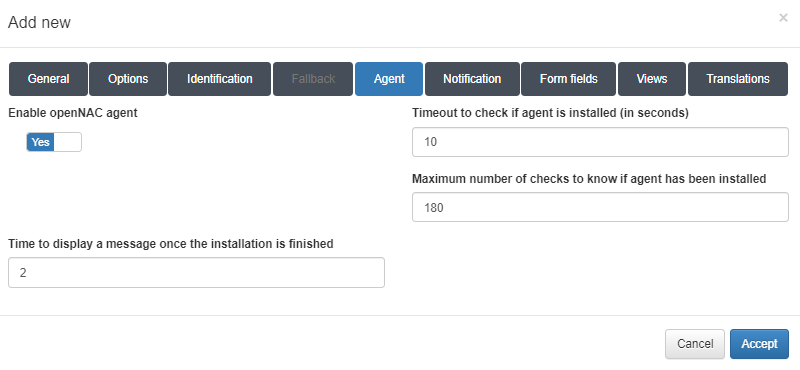
Enable OpenNAC agent: Enables the ON agent.
Timeout to check if agent is installed (in seconds): Timeout to check if an agent is installed.
Maximum number of checks to know if agent has been installed: Maximum number of checks for an agent installation.
Time to display a message once the installation is finished: Time to display a message when the installation is finished.
In the Notification tab we can enable notifications to the user.

Notification type: Password for the SMS user.
E-mail template: Text that will go before the PIN.
E-mail title: Text that will go after the PIN.
E-mail from: Enables to use proxy and activates proxy fields.
E-mail to: Selects the proxy types, HTTP or HTTPS.
Use sponsor as e-mail to: Enables sending the notification to the sponsors.
Use captive sponsors list: Enables the use of the sponsor list in On Captive -> Captive Sponsors. If it is not enabled, we need to fill the next fields:
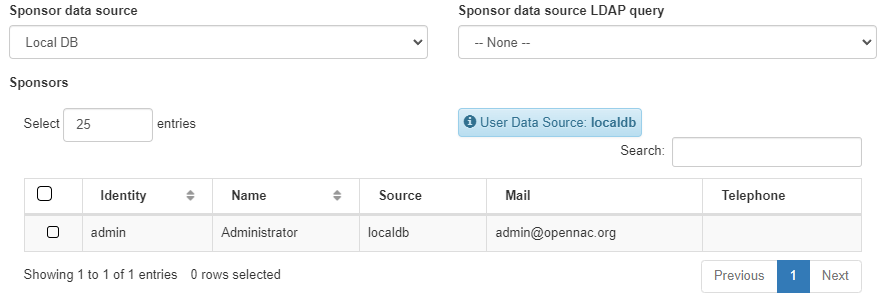
Sponsor data source: Source for the sponsors list.
Sponsor data source LDAP query: LDAP query for the sponsors list source.
Sponsors: Sponsors that can validate the E-mails.
In the Form fields tab we can create forms that ask for fields in the workflow.
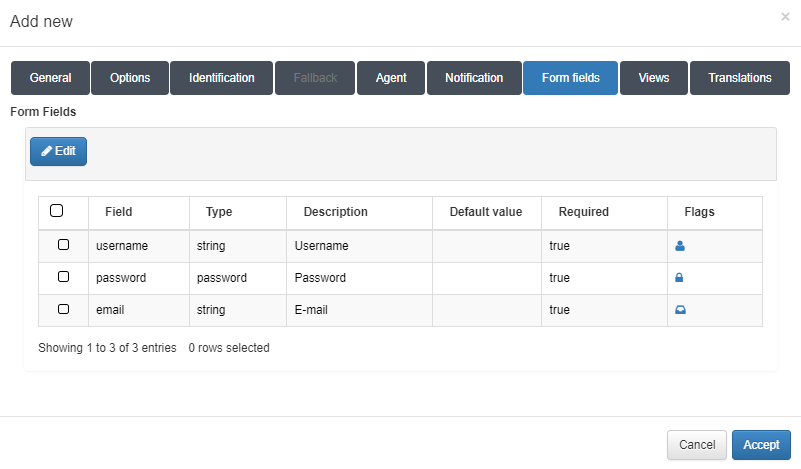
To add one form, click on the Add new button:
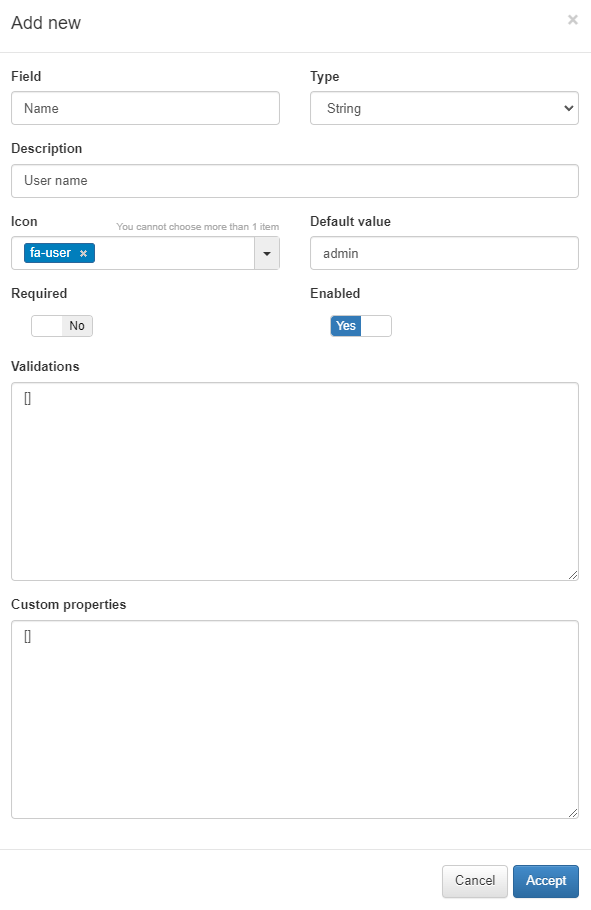
Field: The name of the field.
Type: This pop up menu have the set of data types corresponding to the form filed being created. The type selected must match with the type of information filled by the user. For example, if the information is an username, the type must be String, if the information is a password, then the type must be password, and so on.
Description: A meaningful description about the purpose of the form field.
Icon: The icon image that will be displayed on the column Flags of the form field. It helps to visually quickly guess what is the corresponding type of information.
Default value: (for what information?)
Required: Define if this form field must necessarily be filled by the user.
Enabled: Define if the form filed is enabled and will be displayed on the authentication screen along with other fields.
Validations: The type of validation to be performed by the ON Captive module during the authentication process to ensure if the information is really what is being expected on this particular form field.
Custom properties: Specific additional properties which can be necessary for validation of certain types of submitted data and/or to be further verified.
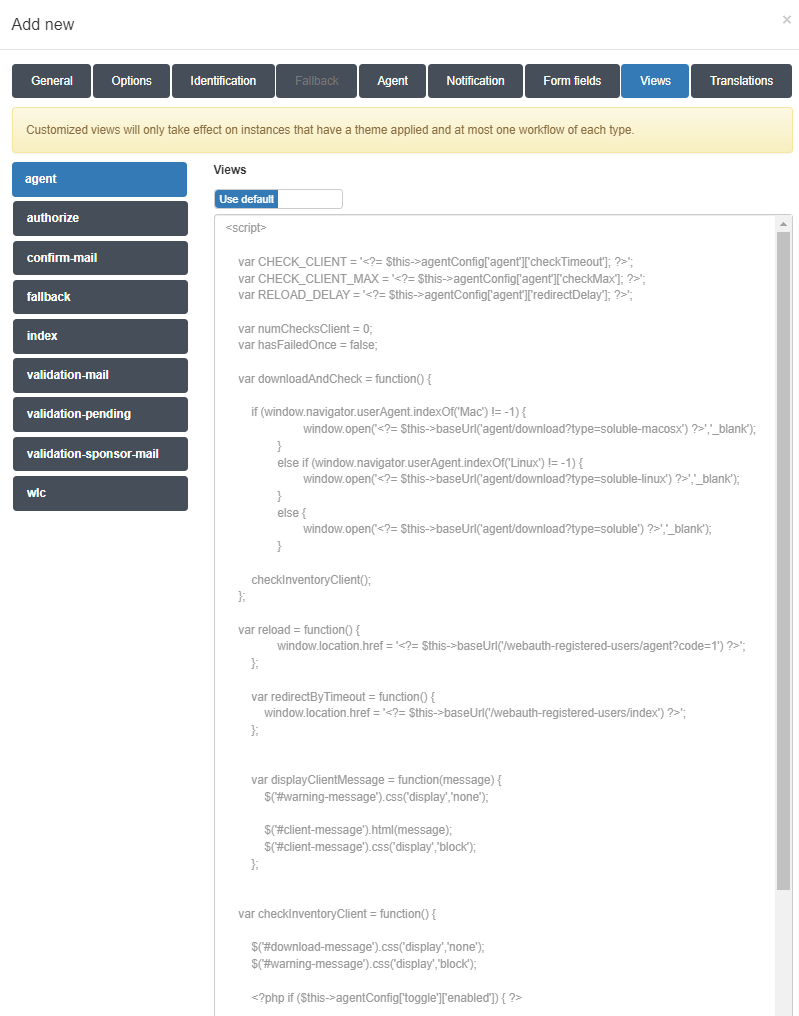
The Views section allow the insertion of custom code which will change the presentation layer behavior of the captive portal Web elements, according the specifics needs of the customer. In order to allow the insertion of code for each view, click on the toggle switch button which by default is on the Use Default position. It will change to Set Custom, this allowing you to insert the custom view code.
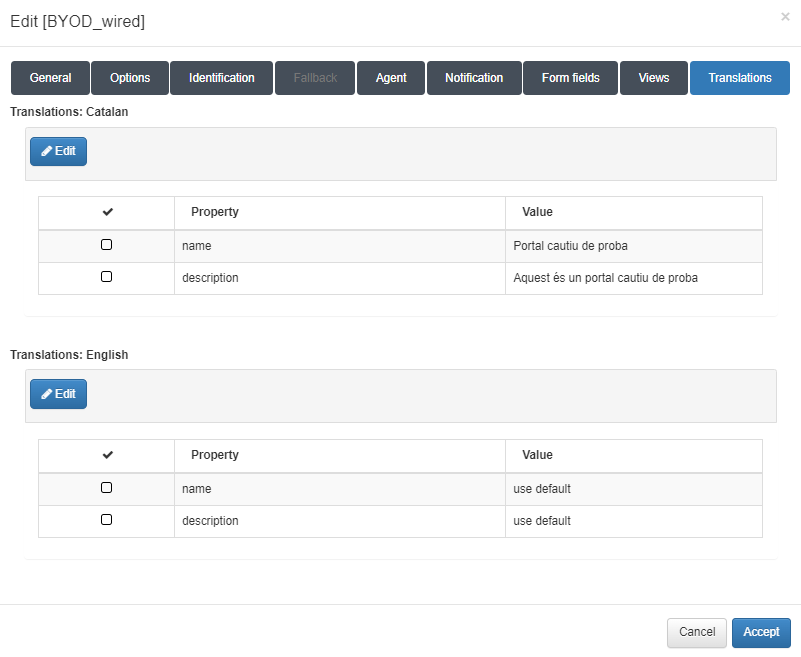
Finally, the Translations section permits adding translations for the workflow name and description in the workflow presentation. The languages we will find are the selected in General section.
4.5.5.5.2. Wi-Fi workflow
To create a Wi-Fi workflow, we need set the next parameters. First of all we will fill the parameters on the General tab:
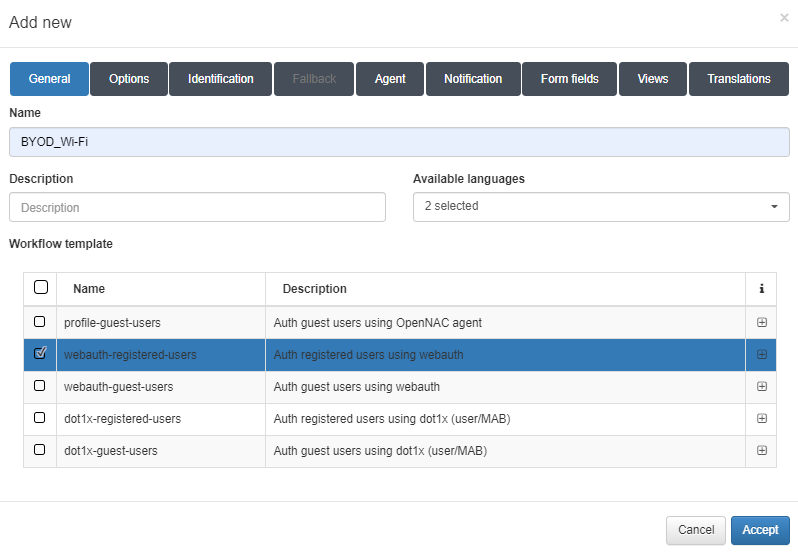
Name: Name of the workflow.
Description: Workflow description.
Available languages: Select all languages in which the workflow can be displayed.
Template: Workflow template. We will find two templates for the Guest use case, one for wire and the other for Wi-Fi. We will also find two templates for the BYOD use case, one for wire and the other for Wi-Fi. And finally, we will find one for the OpenNAC agent.
In this case, we have selected the webauth-registered-users template because we want a Wi-Fi workflow for the BYOD use case.
In the Options tab we can find the next parameters to configure:
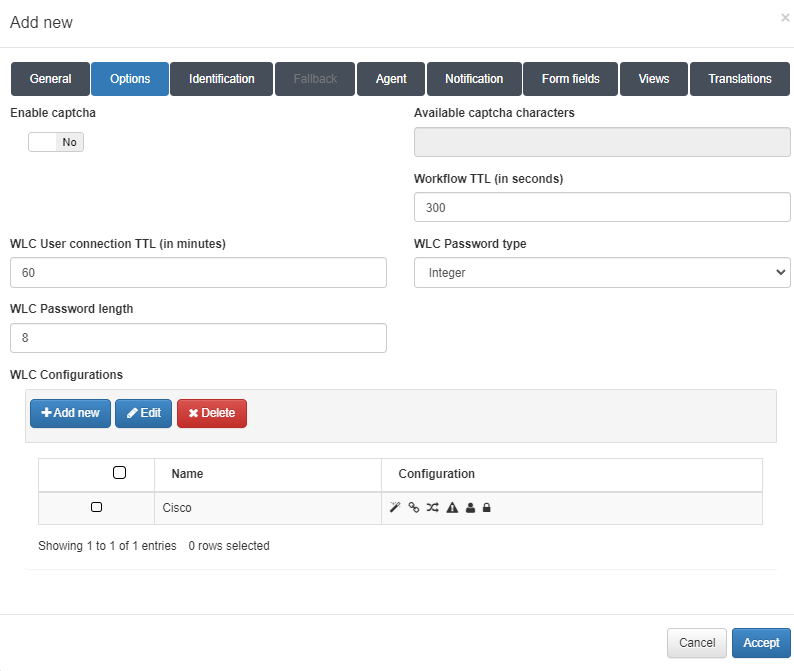
Enable captcha: Allows to enable a captcha in the workflow.
Available captcha characters: All the characters that are in this field, can be on the captcha.
Workflow TTL (in seconds): Seconds that limits the workflow duration.
WLC User connection TTL (in minutes): Maximum minutes of a WLC connection. It need to be synchronized with the WLC TTL, to avoid desynchronization.
WLC Password type: Type of the WLC password.
WLC Password length: WLC password length.
WLC Configurations: WLC type configuration. To add a new one, click on the Add new button:
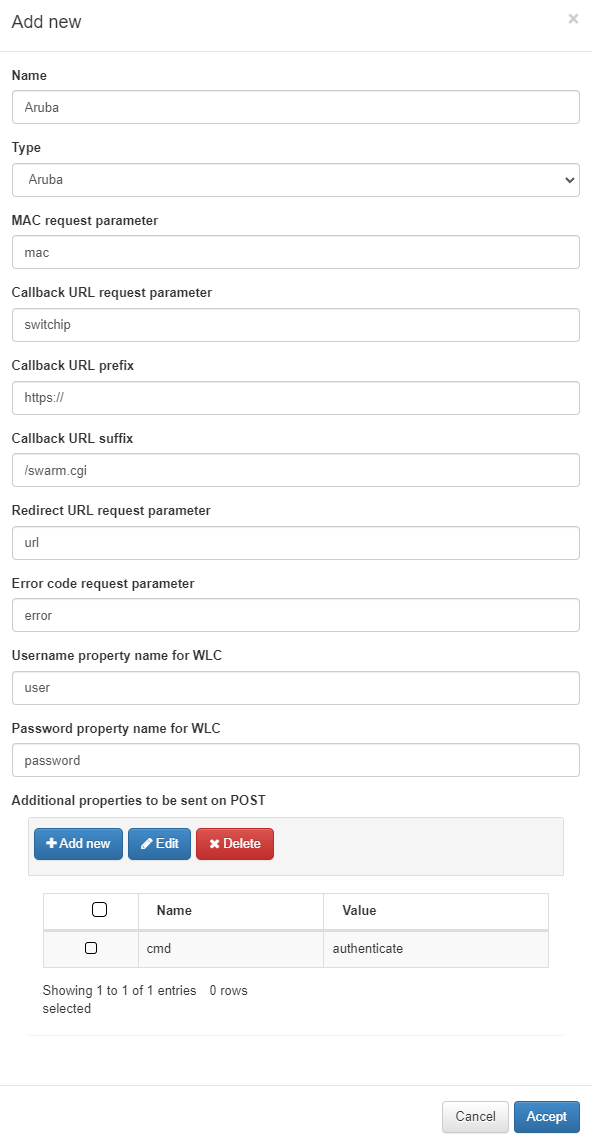
Name: Name for the WLC configuration.
Type: Type of configuration. We can select three templates (Aruba, Cisco and Meraki) or select Other to insert a custom one.
MAC request parameter: Parameter for MAC request.
Callback URL request parameter: URL for the request parameter callback.
Callback URL prefix: URL for the prefix callback.
Callback URL suffix: URL for the sufix callback.
Redirect URL request parameter: URL for the request parameter redirect.
Error code request parameter: URL for the request parameter error code.
Username property name for WLC: WLC username.
Password property name for WLC: Password fot the WLC username.
Additional properties to be sent on POST: Permits to add new properties to the POST.
In the Identification tab we have two types possible to configure, the user/password type, and the SAML type.
For the user/password type we have a double factor authentication that can be Email and SMS.
For the E-mail double factor authentication we can find the next parameters to configure:
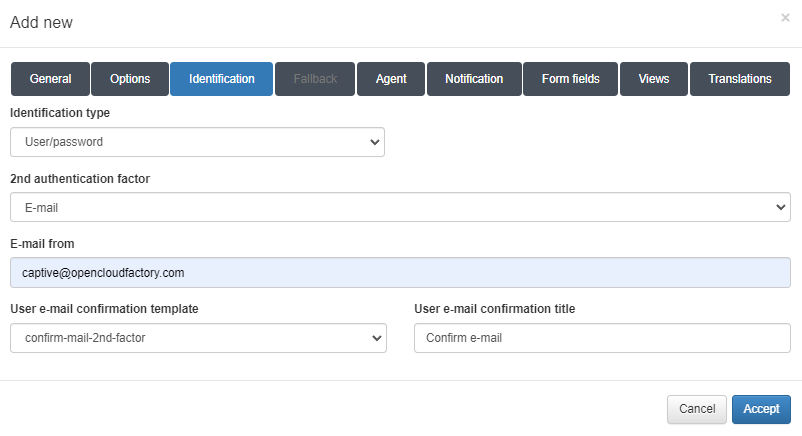
Identification type: Type of identification, in this case is going to be user/password.
2nd authentication factor: Double factor authentication type.
E-mail from: E-mail address that will send the mail to the user.
User e-mail confirmation template: Template of the E-mail.
User e-mail confirmation title: Tittle for the mail.
For the SMS double factor authentication we can find the next parameters to configure:
Identification type: Type of identification, in this case is going to be user/password.
2nd authentication factor: Double factor authentication type, in this case is going to be SMS.
SMS Type: Type of SMS, in this case is going to be SOAP.
SMS Sender: Sender that will send the SMS.
SMS URL: URL of the SMS.
Send SMS in secure mode: Enables SMS secure mode.
SMS User: User for the SMS.
SMS Password: Password for the SMS user.
SMS Message before PIN: Text that will go before the PIN.
SMS Message after PIN: Text that will go after the PIN.
Use proxy: Enables to use proxy and activates proxy fields.
Proxy type: Selects the proxy types, HTTP or HTTPS.
Proxy URL: URL for the proxy.
Proxy port: Port for the proxy.
Proxy user: User fot the proxy.
Proxy password: Password for the proxy user.
For the SAML type we have the next configuration:
The first module is called Service provider (SP) and includes the following fields:
Authentication source name: SP name.
Entity ID of the service provider (SP): URL of the SP. In this case, the core acts as an SP, that is why the entity ID is the core domain.
Entity ID of the IdP that the SP should contact: URL of the IDP that will contact the SP.
The second module is called Remote IDP and includes the following field:
Metadata: Metadata of the IDP. The metadata you should enter here can be found in the IDP.
The third module is called Federation (SP metadata) and we can find the link to get access to our SP metadata. We will only need to replace the captive_portal_ip_or_domain variable with the correct one when browsing the metadata.
Finally, the fourth module is called User attributes and includes the following fields:
User name attribute: Attribute that will return a user specific username.
E-mail attribute: Attribute that will return a user specific email.
User groups attribute: Attribute that will return a user specific groups.
Additional attributes: Permits to add new attributes with the specific item we want to get.
In the Agent tab we can enable the OpenNAC agent for that workflow.
Enable OpenNAC agent: Enables the OpenNAC agent.
Timeout to check if agent is installed (in seconds): Timeout to check if an agent is installed.
Maximum number of checks to know if agent has been installed: Maximum number of checks for an agent installation.
Time to display a message once the installation is finished: Time to display a message when the installation is finished.
In the Notification tab we can enable notifications to the user.
Notification type: Password for the SMS user.
E-mail template: Text that will go before the PIN.
E-mail title: Text that will go after the PIN.
E-mail from: Enables to use proxy and activates proxy fields.
E-mail to: Selects the proxy types, HTTP or HTTPS.
Use sponsor as e-mail to: Enables sending the notification to the sponsors.
Use captive sponsors list: Enables the use of the sponsor list in On Captive -> Captive Sponsors. If it is not enabled, we need to fill the next fields:
Sponsor data source: Source for the sponsors list.
Sponsor data source LDAP query: LDAP query for the sponsors list source.
Sponsors: Sponsors that can validate the E-mails.
In the Form fields tab, we can create forms that ask for fields in the workflow.
To add one form, click on the Add new button:
Field: The name of the field.
Type: This pop up menu have the set of data types corresponding to the form filed being created. The type selected must match with the type of information filled by the user. For example, if the information is an username, the type must be String, if the information is a password, then the type must be password, and so on.
Description: A meaningful description about the purpose of the form field.
Icon: The icon image that will be displayed on the column Flags of the form field. It helps to visually quickly guess what is the corresponding type of information.
Default value: (for what information?)
Required: Define if this form field must necessarily be filled by the user.
Enabled: Define if the form filed is enabled and will be displayed on the authentication screen along with other fields.
Validations: The type of validation to be performed by the ON Captive module during the authentication process to ensure if the information is really what is being expected on this particular form field.
Custom properties: Specific additional properties which can be necessary for validation of certain types of submitted data and/or to be further verified.
Finally, the Views section allow the insertion of custom code which will change the presentation layer behavior of the captive portal Web elements, according the specifics needs of the customer. In order to allow the insertion of code for each view, click on the toggle switch button which by default is on the Use Default position. It will change to Set Custom, this allowing you to insert the custom view code.
Finally, the Translations section permits adding translations for the workflow name and description in the workflow presentation. The languages we will find are the selected in General section.
4.5.5.6. Create a new captive domain
In ON Captive -> Captive domains we will be able to create a new group of workflows.
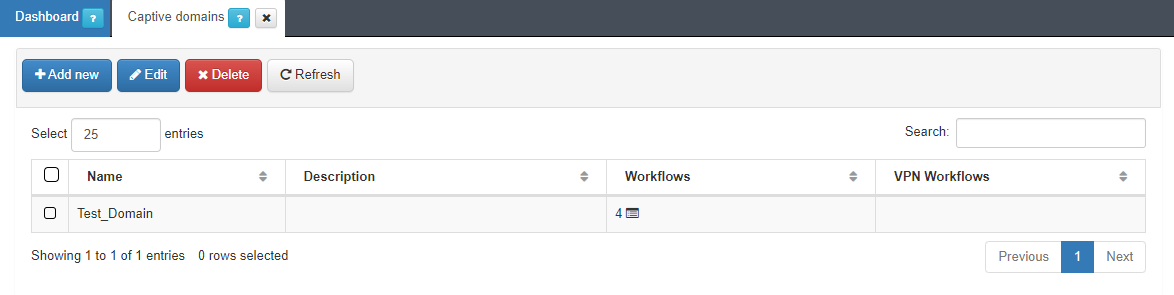
To create a new Captive domain, click on the Add new button to open the corresponding dialogue:
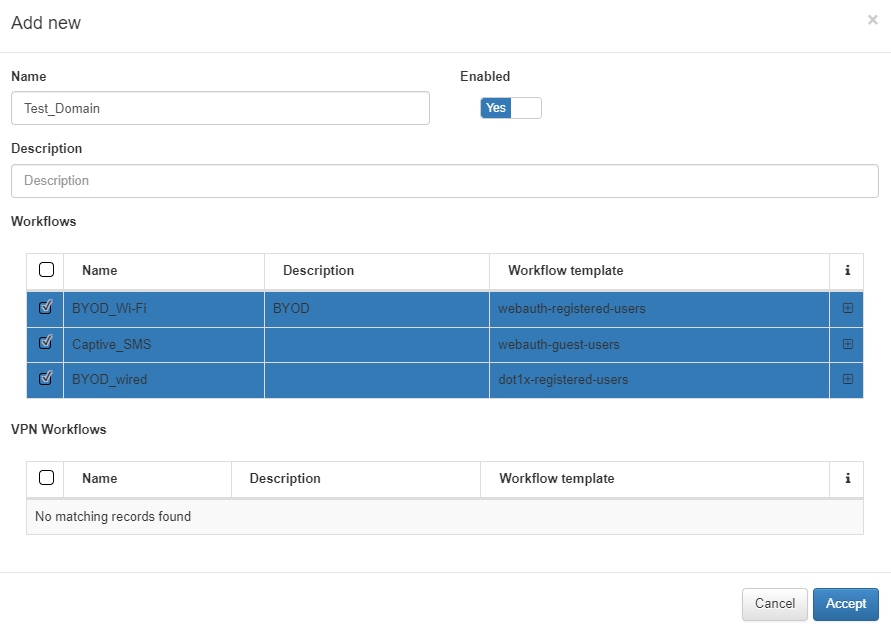
Name: The chosen name of this new Captive domain.
Enabled: This option defines if this Captive domain is active for use or not.
Description: A meaningful description about this now domain.
Workflows: Here you must to select one or more Captive workflows previously created.
VPN Workflows: Here you must to select one or more Captive VPN workflows previously created.
We will select the BYOD_Wi-Fi workflow created previously and other workflows to join the Test_Domain.
To finish the creation of the new Captive domain, which will be used on the next steps, click on the button Accept.
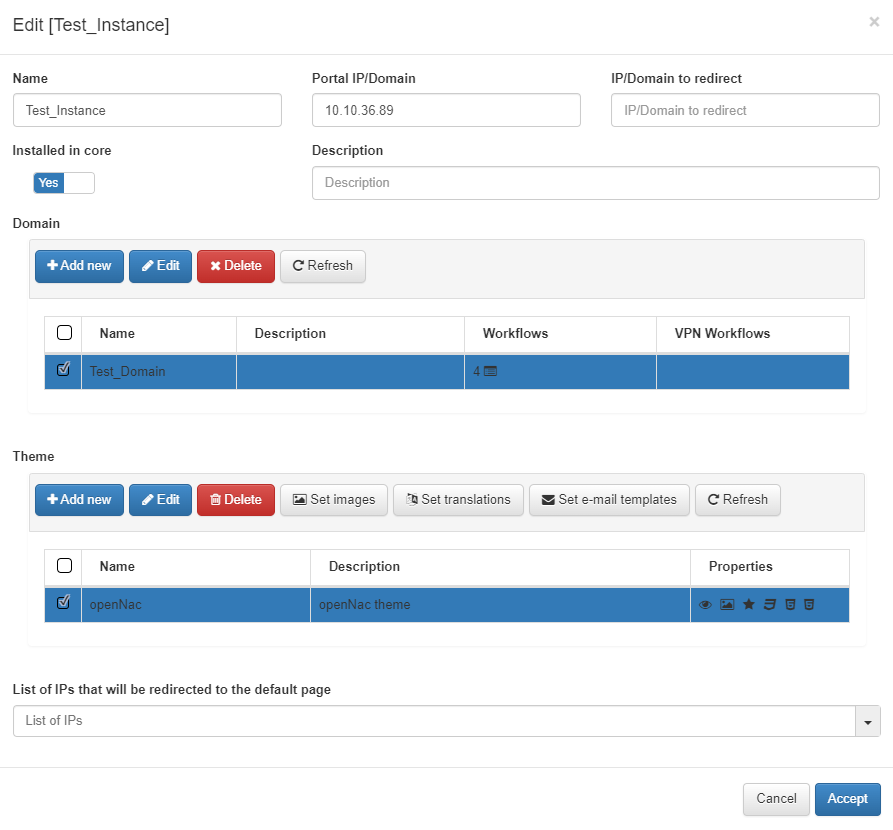
4.5.5.7. Create a new captive instance
In ON Captive -> Captive instances we will be able to create a new instance for the captive domain.
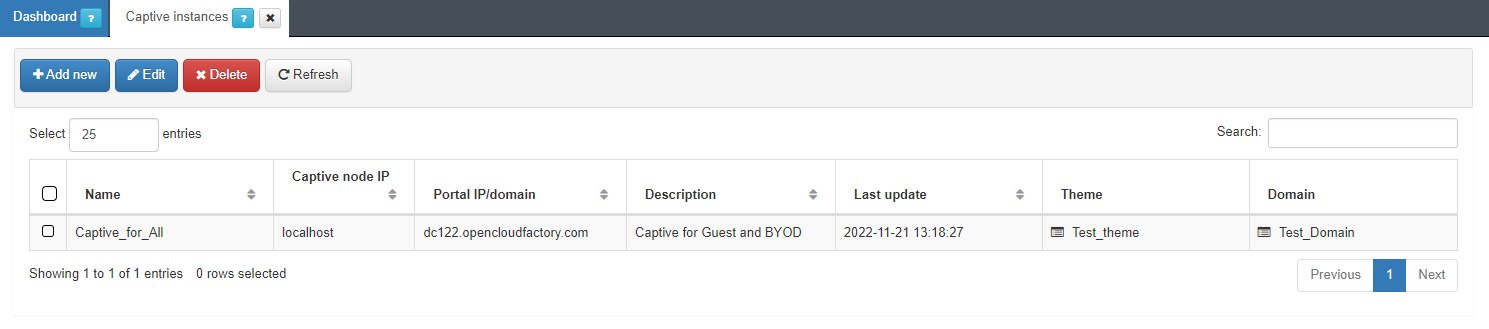
To create a new Captive instance, click on the Add new button to open the corresponding dialogue. The following configurations must be performed in order to get a working Captive instance which will be built over the configurations described on the previous topics:
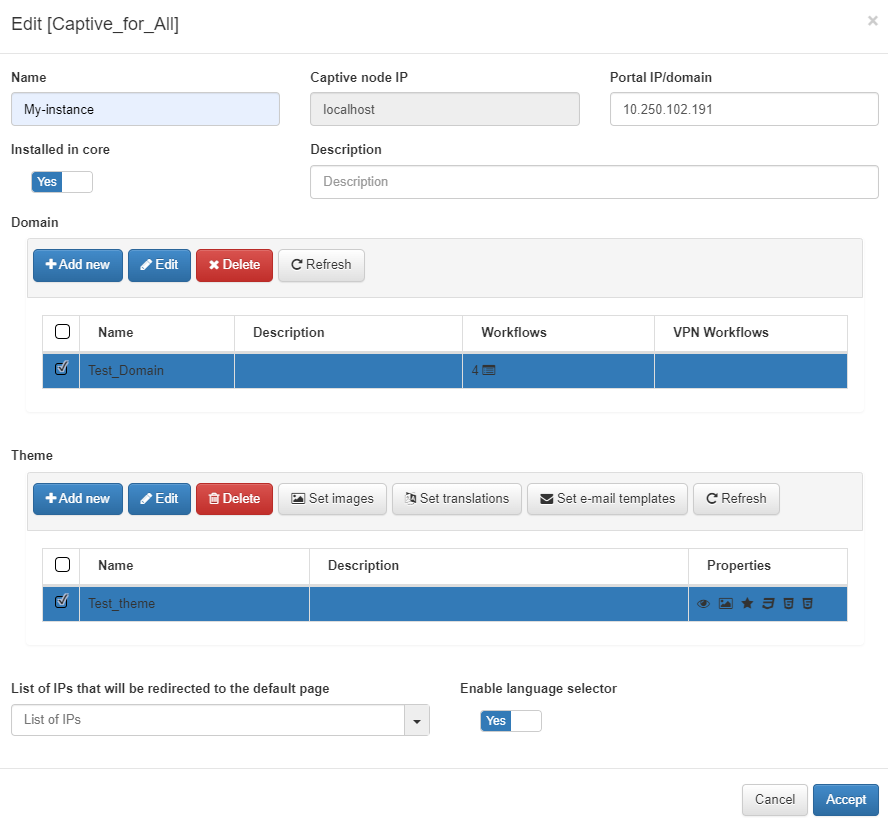
Name: The name of the new captive instance being created.
Captive node IP: The IP address for the Captive node.
Portal IP/Domain: The IP address or FQDN of the server running the openNAC Captive Portal. It can be the same IP of the ON Core server, if the captive portal will be running on this server along with ON Core or the address can be one of a separate server dedicated to run the openNAC Captive Portal.
Installed in core: Set to yes if the Captive Portal is running on the ON Core
Description: A meaningful description about this new Captive instance.
Domain: Select a previously created captive domain you want to associate with this new captive instance.
Theme: Select a captive theme. If there is not any theme select, a default one will be applied.
List of IPs that will be redirected to the default page: The IP or IPs that will be redirected
Enable language selector: Enables the language selector in the Captive portal instance. The shown languages depend on the languages configured inside ON Captive -> Captive themes in the General section, with the corresponding translations in Translations section. If this selector is not enabled, the language will be the browser language.
4.5.5.8. Creation of wired policies
It is necessary to add different policies for the wired BYOD use case. This policies are added in ON NAC -> Policies. The policies to be configured are the following:
Note
The order is important. It goes from most restrictive to less.
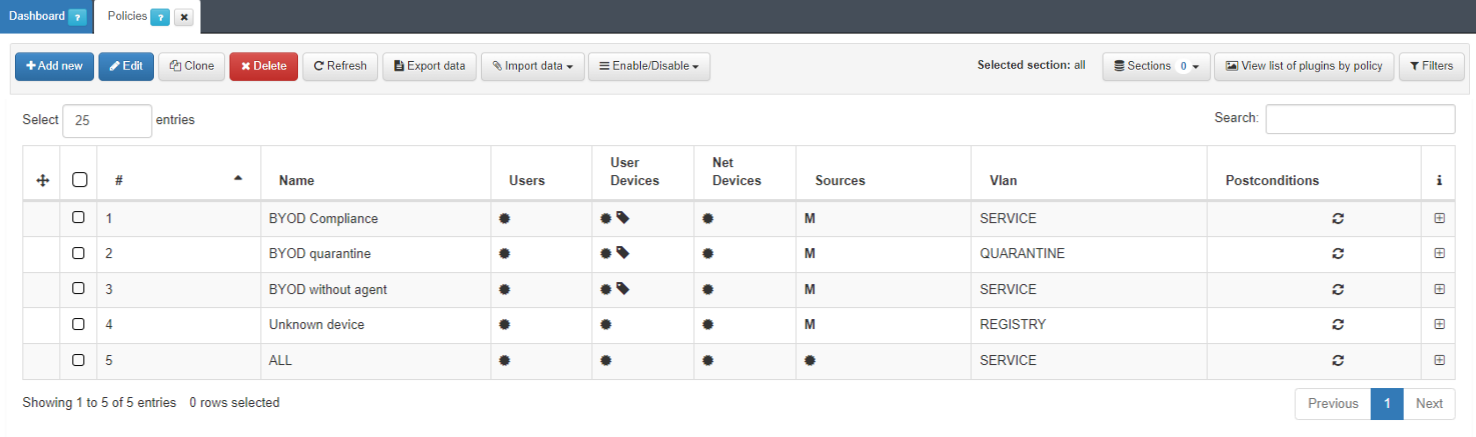
4.5.5.8.1. Unknown device
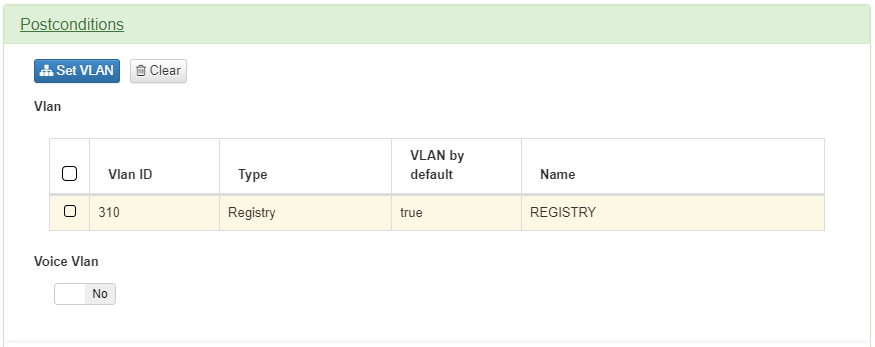
The first policy to configure is the Unknown device. This policy matches all the devices connected by wire that don’t pass any of the other policies.

It is necessary to set MAB at Preconditions: Source.
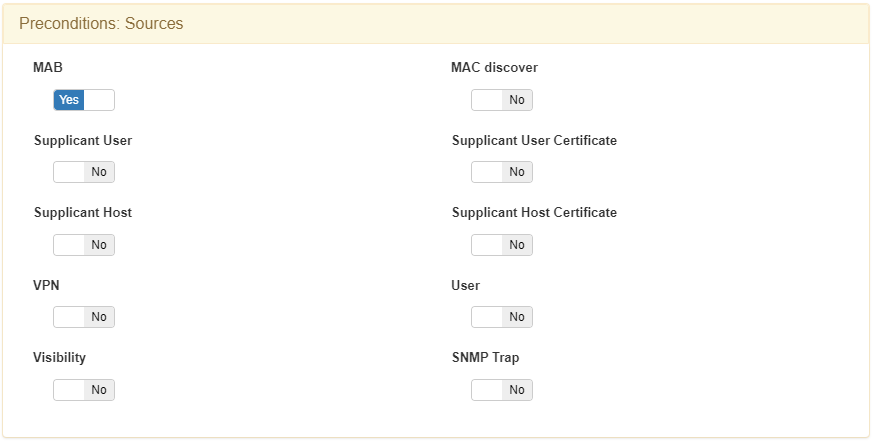
It sends the device to a VALN of type Registry, because it needs to be registered.
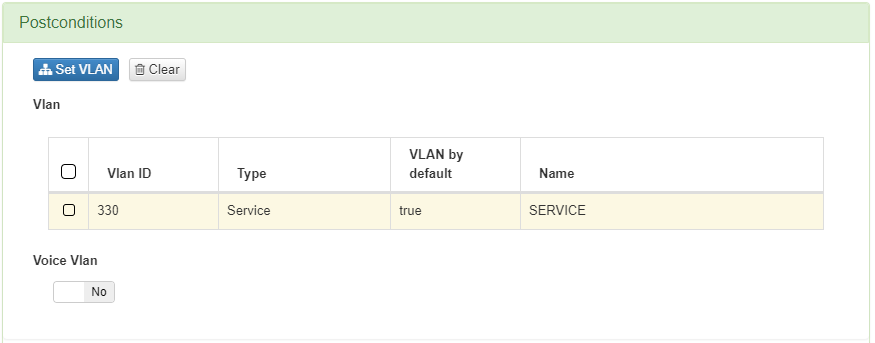
4.5.5.8.2. BYOD Compliance
The next policy to configure is the BYOD Compliance. This policy matches all the devices connected by wire that passed the BYOD workflow with compliance.
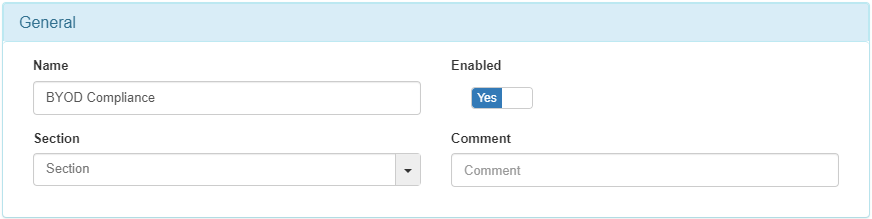
For the device to be compliant, the device needs to have the different tags:

ONC_WEBAUTH_APPROVED: Indicates that the workflow is finished.
EPC_FULL_COMPLIANCE: Compliance tag that needs to match with the captive portal configuration.
ONC_CAPTIVE_REGISTERED: Indicates that is a BYOD workflow
It is necessary to set MAB at Preconditions: Source.
It sends the device to a VLAN of type Service, to give access to the device.
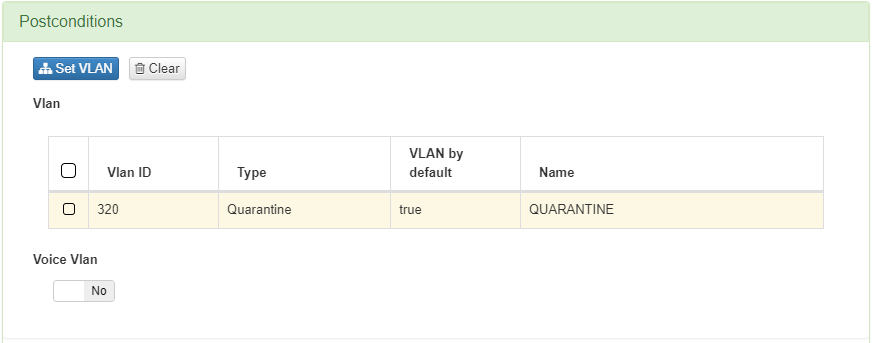
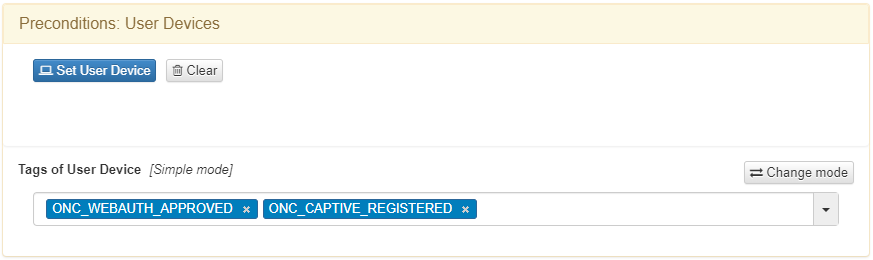
4.5.5.8.3. BYOD quarantine
The next policy to configure is the BYOD quarantine. This policy matches all the devices connected by wire that passed the BYOD workflow with agent authentication.
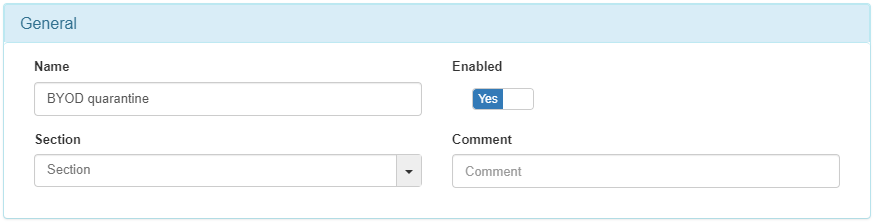
A device should have the following tags after the Agent authentication is enabled:
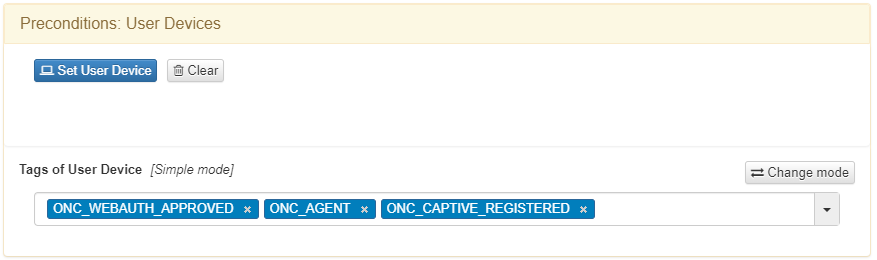
ONC_WEBAUTH_APPROVED: Indicates that the workflow is finished.
ONC_AGENT: Indicates that agent authentication is fine.
ONC_CAPTIVE_REGISTERED: Indicates that is a BYOD workflow
It is necessary to set MAB at Preconditions: Source.
It sends the device to a VLAN of type Quarantine, to notify the device of missing requirements to be compliant.
4.5.5.8.4. BYOD without agent
The next policy to configure is the BYOD without agent. This policy matches all the devices connected by wire that passed the a BYOD workflow.

The tags that a device would have after a workflow are the following:
ONC_WEBAUTH_APPROVED: Indicates that the workflow is finished.
ONC_CAPTIVE_REGISTERED: Indicates that is a BYOD workflow
It is necessary to set MAB at Preconditions: Source.
It sends the device to a VLAN of type Service, to notify the device of missing requirements to be compliant.
4.5.5.9. Creation of Wi-Fi policies
It is necessary to add different policies for the BYOD use case with Wi-Fi. This policies are added in ON NAC -> Policies. The policies to be configured are the following:
Note
The order is important. It goes from most restrictive to less.
4.5.5.9.1. Unknown device
The first policy to configure is the Unknown device. This policy matches all the devices connected by Wi-Fi that don’t pass any of the other policies.
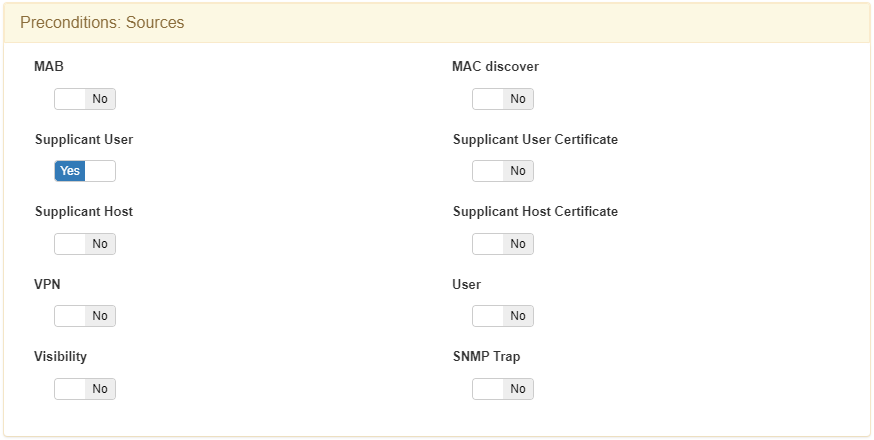
It is necessary to set Supplicant User at Preconditions: Source.
It sends the device to a VLAN of type Registry, because it needs to be registered.
4.5.5.9.2. BYOD Compliance
The next policy to configure is the BYOD Compliance. This policy matches all the devices connected by Wi-Fi that passed the BYOD workflow with compliance.
If the device needs to be compliant, it needs to have the different tags:
ONC_WEBAUTH_APPROVED: Indicates that the workflow is finished.
EPC_FULL_COMPLIANCE: Compliance tag that needs to match with the captive portal configuration.
ONC_CAPTIVE_REGISTERED: Indicates that is a BYOD workflow
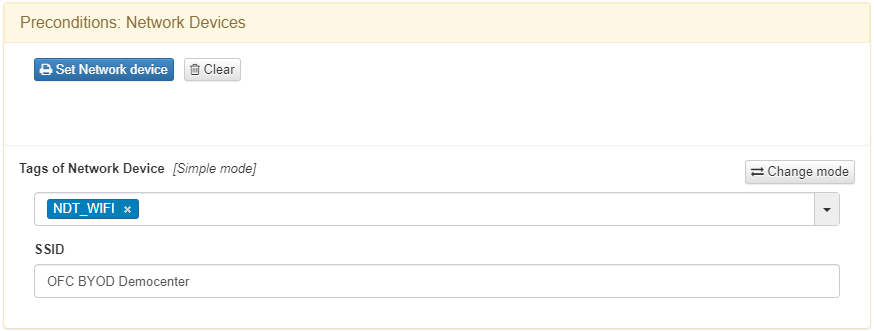
It is necessary to set the NDT_WIFI tag, that filters by network device type, and the SSID of the WLC at Preconditions: Network Devices.
It is necessary to set Supplicant User at Precondition: Source.
It sends the device to a VLAN of type Service, to give access to the device.
4.5.5.9.3. BYOD quarantine
The next policy to configure is the BYOD quarantine. This policy matches all the devices connected by Wi-Fi that passed the BYOD workflow with agent authentication.
A device should have the following tags after the Agent authentication is enabled:
ONC_WEBAUTH_APPROVED: Indicates that the workflow is finished.
ONC_AGENT: Indicates that agent authentication is fine.
ONC_CAPTIVE_REGISTERED: Indicates that is a BYOD workflow
It is necessary to set the NDT_WIFI tag, that filters by network device type, and the SSID of the WLC at Preconditions: Network Devices.
It is necessary to set Supplicant User at Preconditions: Source.
It sends the device to a VLAN of type Quarantine, to notify the device of missing requirements to be compliant with.
4.5.5.9.4. BYOD without agent
The next policy to configure is the BYOD without agent. This policy matches all the devices connected by Wi-Fi that passed the a BYOD workflow.
The tags that a device would have after a workflow are the following:
ONC_WEBAUTH_APPROVED: Indicates that the workflow is finished.
ONC_CAPTIVE_REGISTERED: Indicates that is a BYOD workflow
It is necessary to set the NDT_WIFI tag, that filters by network device type, and the SSID of the WLC at Preconditions: Network Devices.
It is necessary to set Supplicant User at Preconditions: Source.
It sends the device to a VLAN of type Service, to notify the device of missing requirements to be compliant.
It sends the device to a VLAN of type Service, to notify the device of the missing requirements for compliance
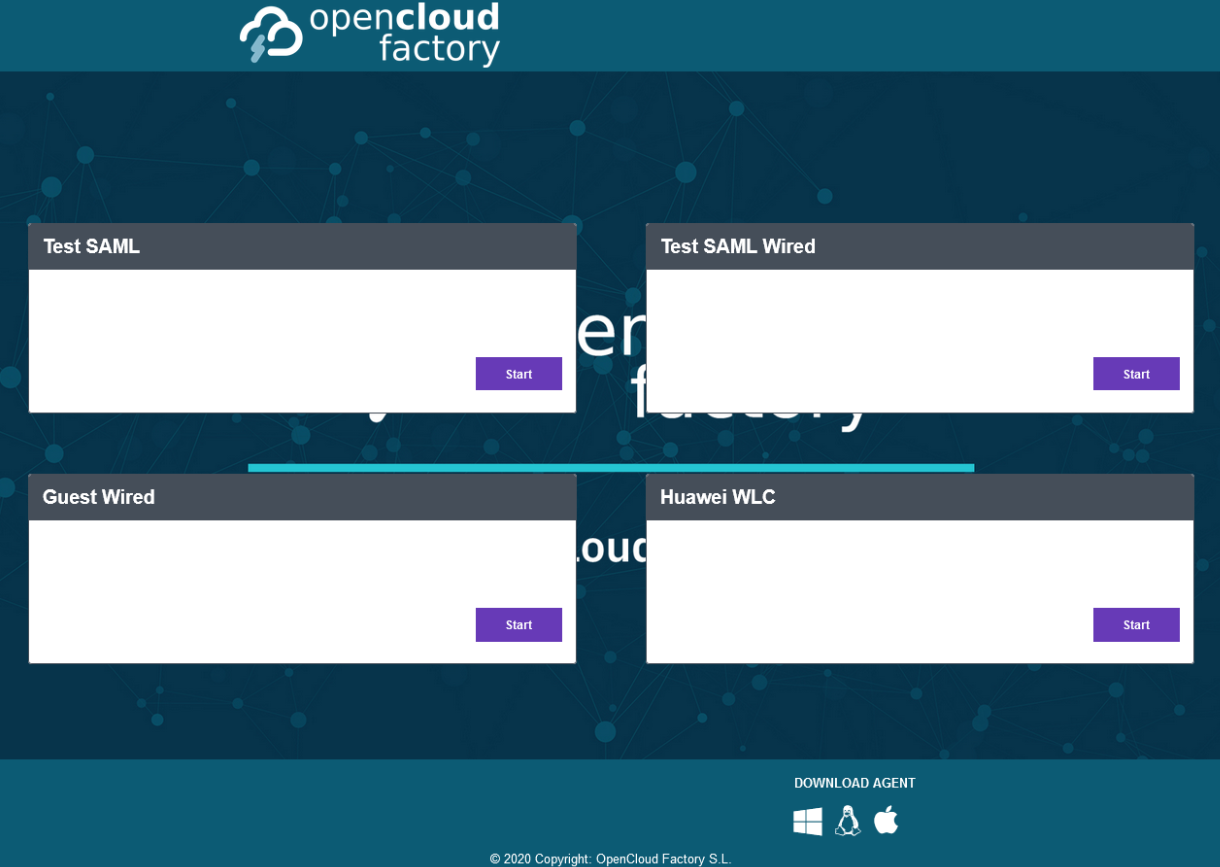
4.5.5.10. Create a new captive theme
In ON Captive -> Captive themes we will be able to create and modify different themes that will affect to the appearance in the captive portal web.
In the ON Captive menu, click on the Captive themes tab and there you can create and modify different themes that will affect to the appearance of the Captive Portal web.
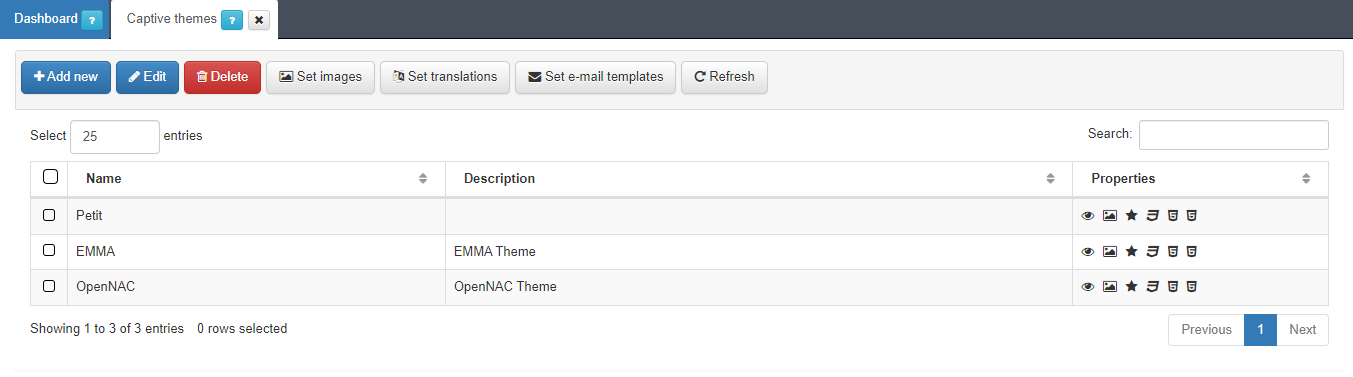
To create a new Captive theme, click on the Add new button, a pop up window will appear and you’ll be able to modify multiple parameters.
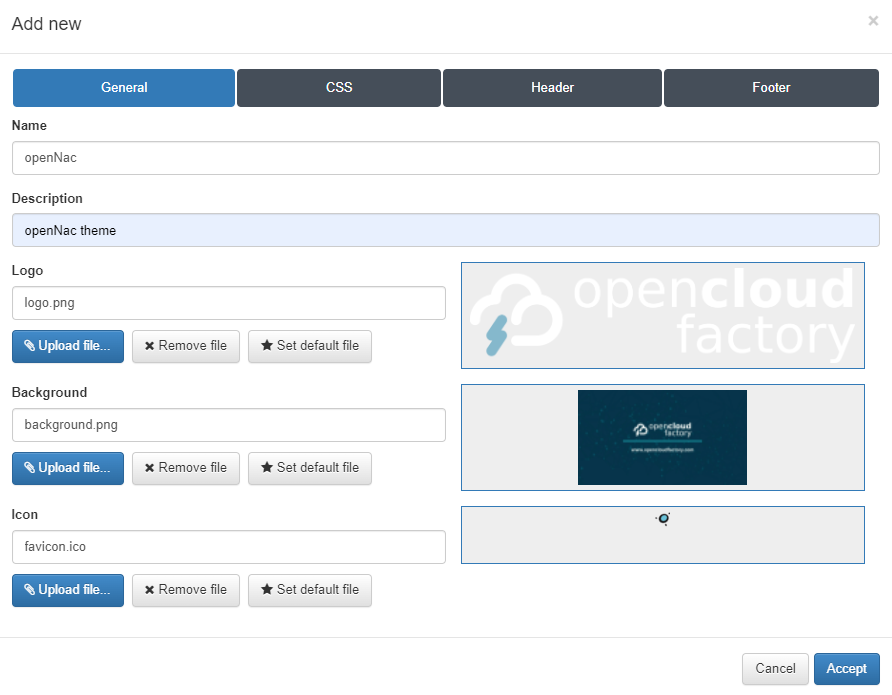
By default, the window displays the configurations related to the General tab:
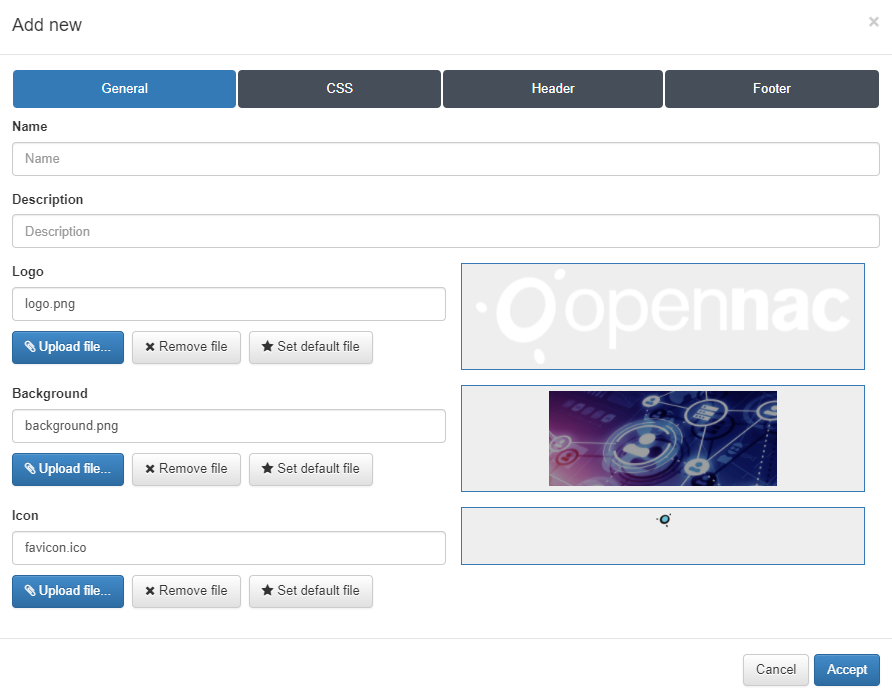
Name: Enter with the name of this Captive theme;
Description: Type a meaningful description for this theme;
Logo: This field defines what .png image will be used as the logo for this new captive theme. By default, the logo.png file is already configured and it corresponds to the default OpenNac logo.
Background: This field defines what .png image will be used as the background for this new captive theme. By default, the background.png file is already configured and it corresponds to the default OpenNac background.
Icon: This field defines what .ico image will be used as the favicon for this new captive theme. By default, the favicon.ico file is already configured and it corresponds to the default OpenNac favicon. The favicon is displayed on the user’s browser address bar, just before the URL.
In the case of the customer wants to use its own logo, which meets the visual identity of the organization, there are three buttons for each field that allow change the images:
Upload file: Permit pick the desired logo image and upload it this Captive logo. The preview of the image will be displayed within the square of the right side of the field.
Remove file: Useful if you want to remove this element.
Set default file: Defines the chosen file as default for the creation of new themes.
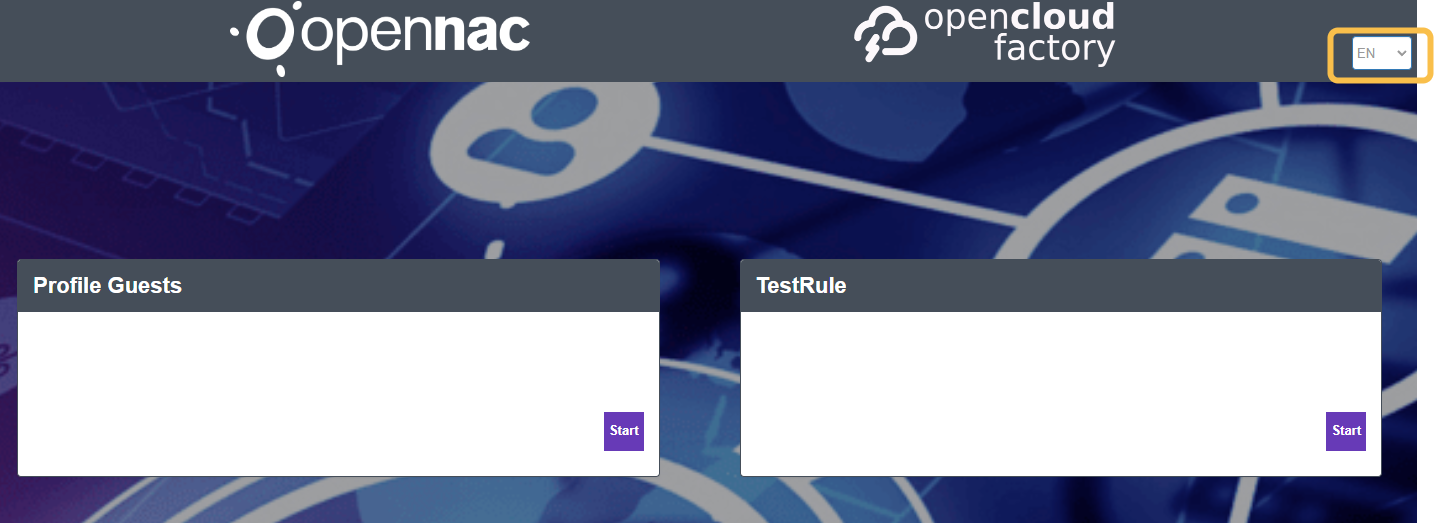
We will custom it with the following images:
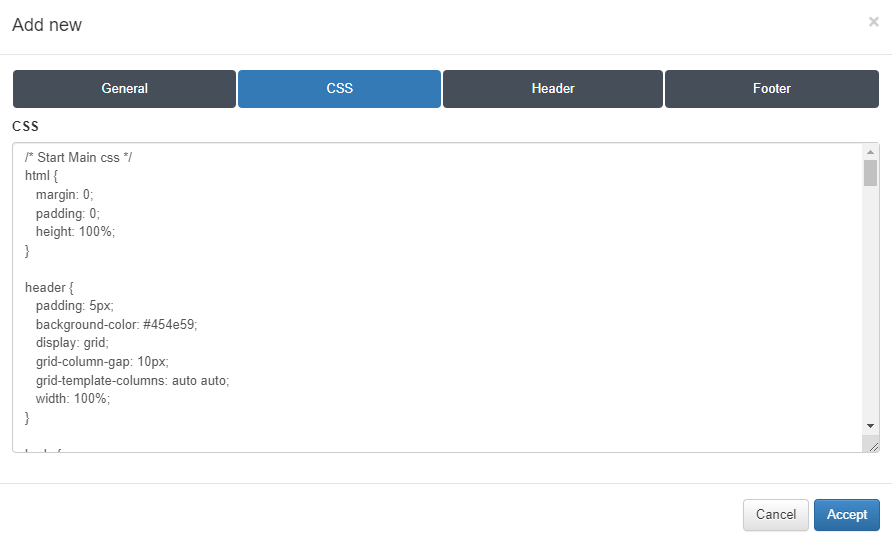
In the second tab, CSS, we can insert a CSS code to modify the Captive web portal as we desire.
In the Header tab we will be able to insert a custom HTML code for the header of the Captive theme.

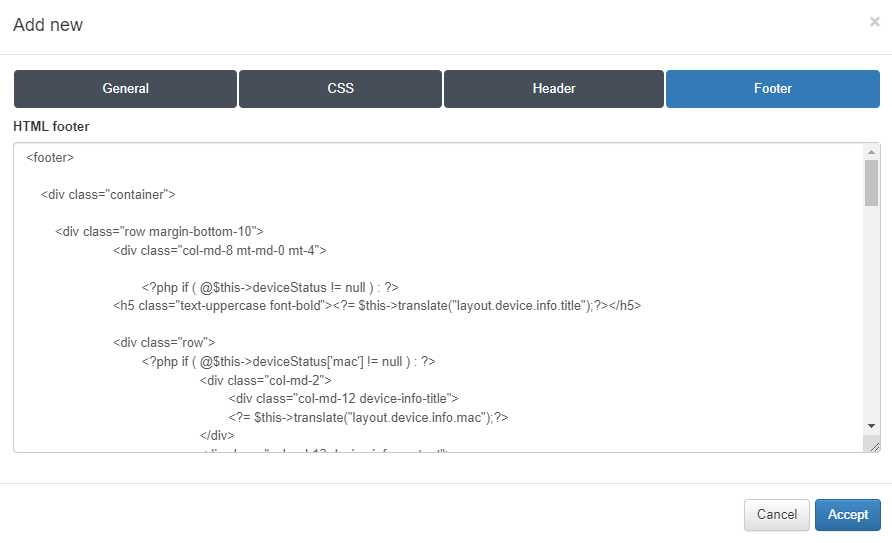
In the Footer tab we will be able to insert a custom HTML code for the footer of the Captive theme.
To finish the creation of the new Captive domain, which will be used on the next steps, click on the button Accept.
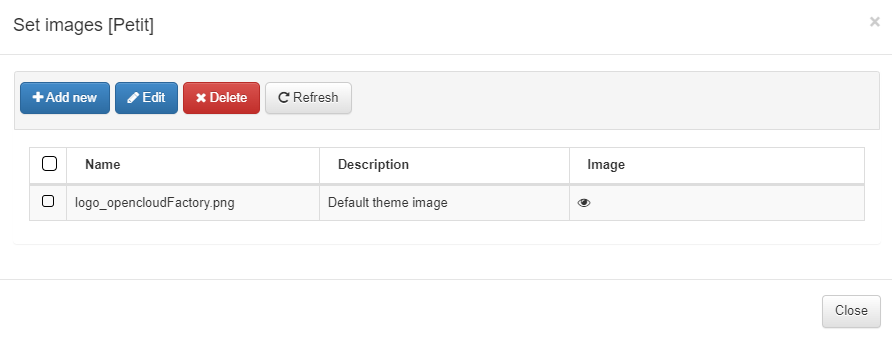
To upload the images that we want to use when we configure a theme, we can select an already created theme, and click the Set images button.
Once the pop up window appears, we will see all the images that have already been uploaded, we will be able to edit the existing images and see a preview by clicking on the eye icon.
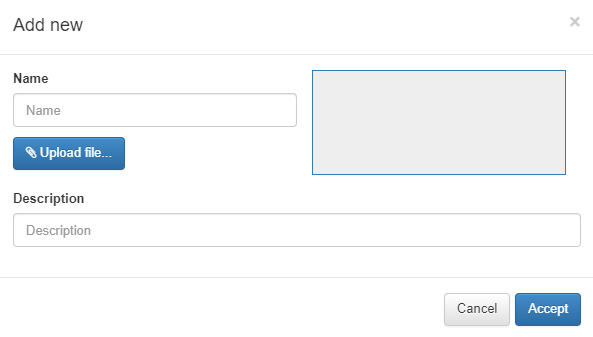
To upload a new image, click on the Add new button, a new dialogue will appear. Here we can set a name and a description and select the image that we want to upload.
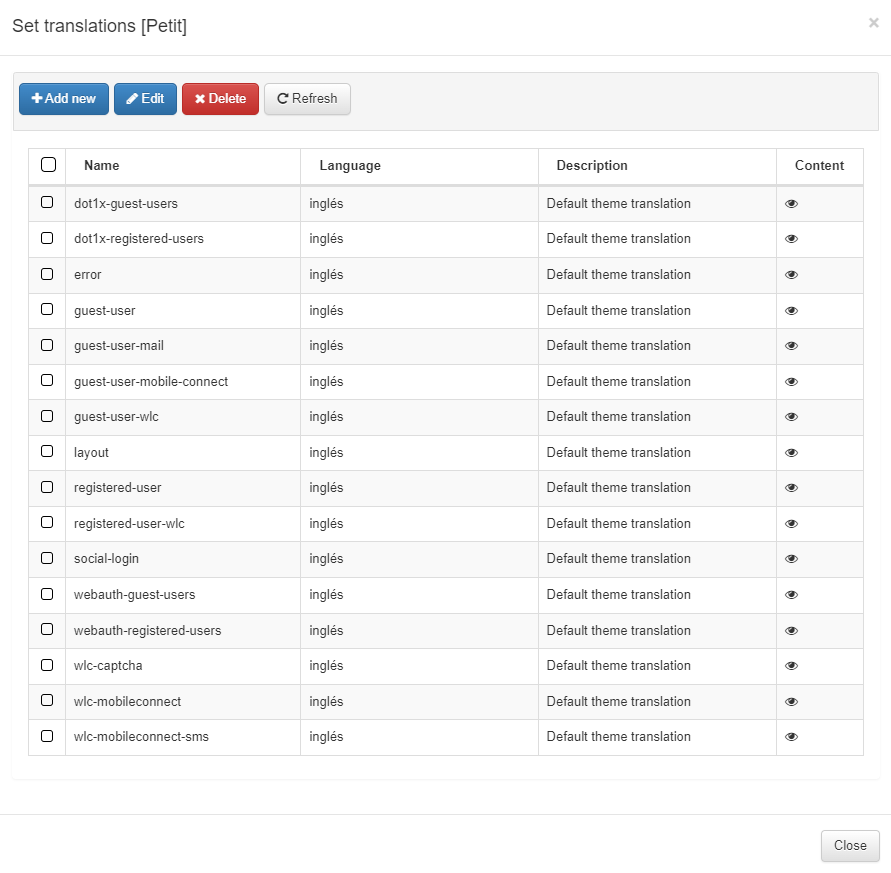
We can also set different translations or adapt the actual text from the different captive portal workflows and it’s sections. To modify it, we can select an already created theme, and click the Set translations button.
Once the pop up window appears, we will see all the translations for the different modules that are already done. We can edit the existing ones and see a preview of their content by clicking on the eye icon.
To translate a new section, click on the Add new button and a new window will appear. In the name filed, we can select all the different modules that can be translated. Once we select the module that we want to translate, the content of the module, variables and the associated text will appear on the content field, so we will have to translate the text associated to the variables to the desired language. The next step will be to select the language to which we are going to translate the selected module. Also, we will be able to add a description.
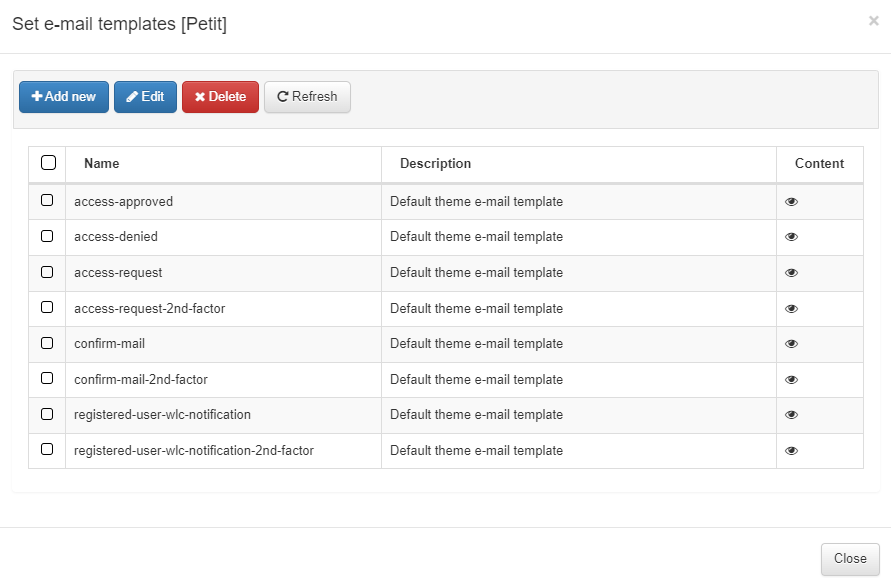
We can also set different e-mail templates or adapt the actual ones by configuring the HTML code that is send via e-mail from the different captive portal workflows. To modify it, we can select an already created theme, and click the Set e-mail templates button.
Once the pop up window appears, we will see all the already templates for the different workflows, we will be able to edit the existing ones and see a preview of the content by clicking on the eye icon.
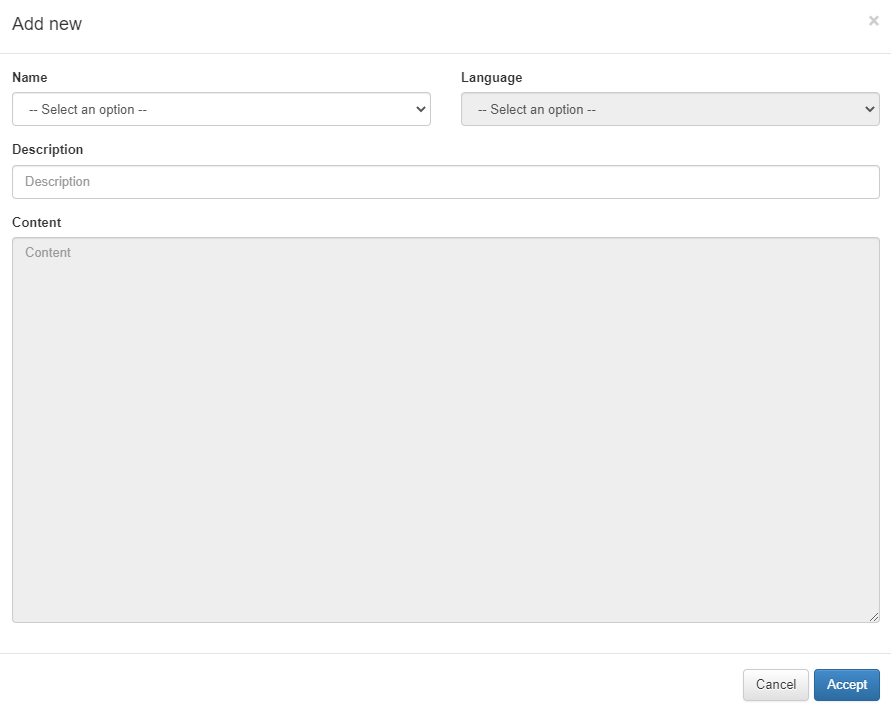
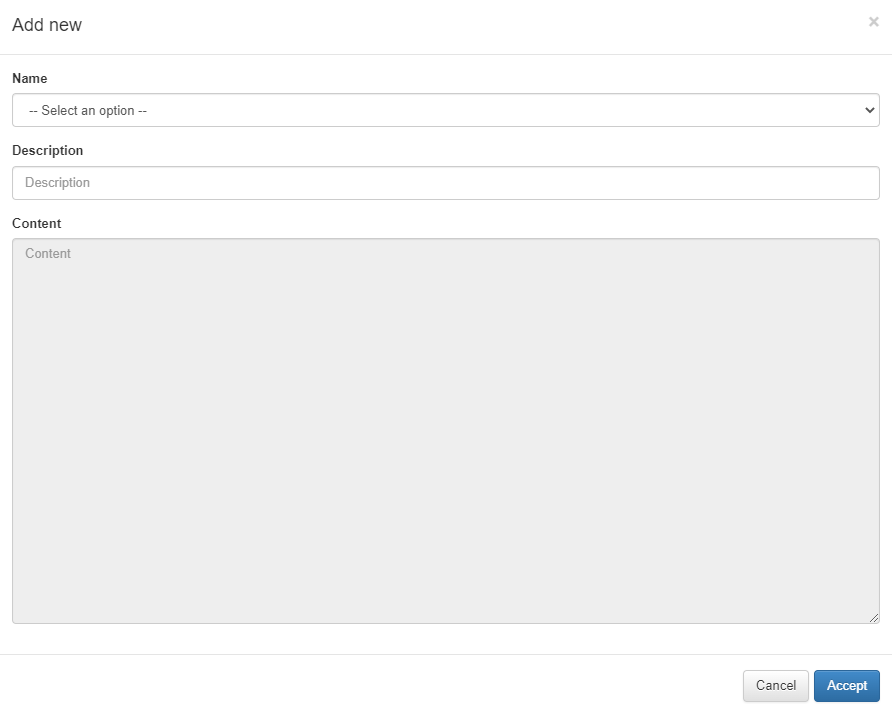
To configure a new email template, click on the Add new button, a new dialogue will appear. In the name filed, we can select all the different modules that can be configured. Once we select the module that we want to modify, the content of the module, variables and the associated text will appear on the content field in HTML format so we can modify it. Also, we will be able to add a description.
To select the created theme to an instance, we need to go to the instance created in ON Captive -> Captive instances and select the theme:
Then, if we go to the captive portal again, we will see the new theme applied.