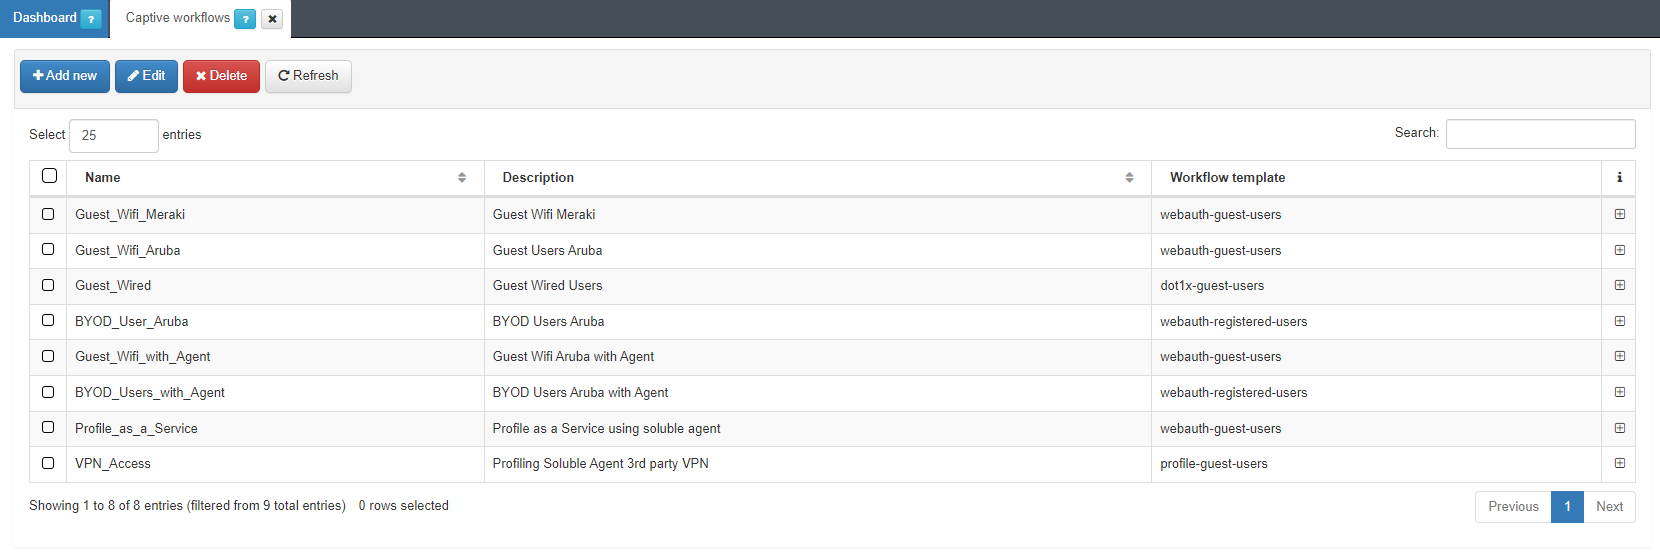
3.1.7.3. Captive Workflows
In the ON Captive menu, open the Captive workflows tab by clicking on the option Captive workflows.
To create the new Captive workflow, click on the Add new button to open the following window:
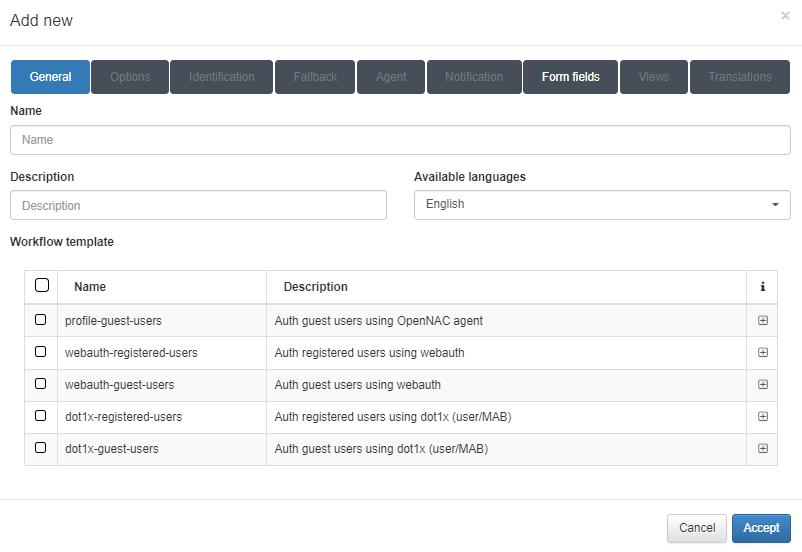
The captive portal workflows have different configuration tabs:
General
Options
Identification
Fallback
Agent
Notification
Form fields
Views
Translations
You will need to navigate through these options to make sure you get the correct configuration.
3.1.7.3.1. General
In the General tab, we can configure aspects such as the name of the workflow or the template used. The tab displays the following fields:
Name: Enter the name of this Captive workflow.
Description: Type a meaningful description for this workflow.
Available languages: Select all languages in which the workflow will be displayed.
Workflow template: Select one of the available templates. There are other workflows to configure in Captive VPN workflows.
To go over the next tabs, we have to select a workflow and the available tabs will be highlighted.
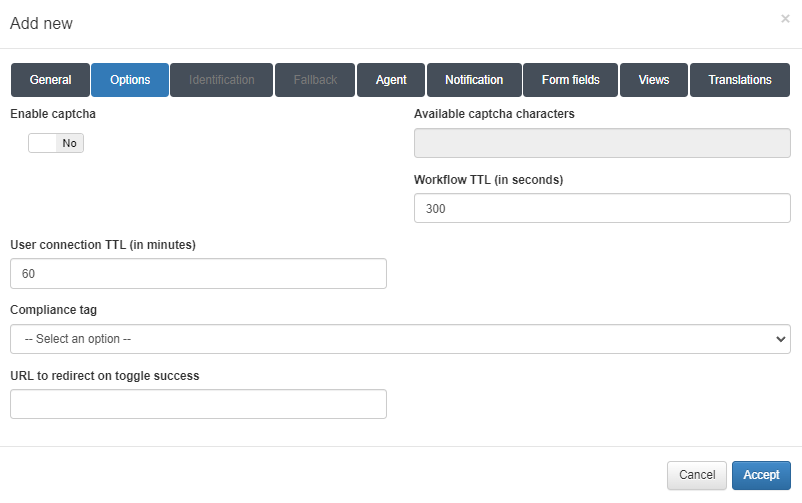
3.1.7.3.2. Options
Click on the Options tab to show the options inherited from the template. These options will control the behavior of the workflow and some of them must be adjusted according to the requisites of the customer’s environment where the OpenNAC Enterprise ON Captive is being deployed, and there they can be modified. The options are in name/value following the JSON syntax. Some important options normally used in real-world scenarios will be explained in the section Captive VPN workflows.
3.1.7.3.3. Identification
In Identification, we will select the type of identification of the captive portal’s flow as well as the (optional) 2FA. This tab displays the following fields:
Note
Depending on the type of workflow selected, we will have some types of identification or others.
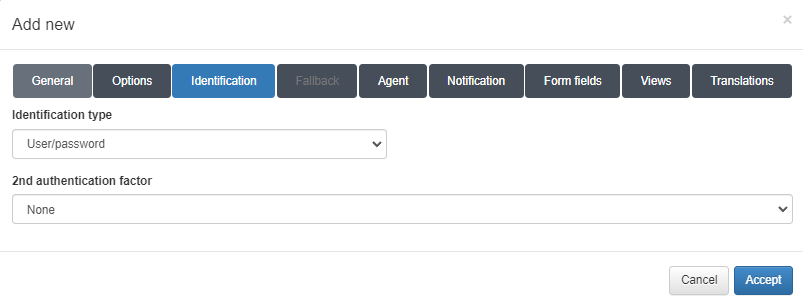
Identification type: Captive Portal Flow Identification Type Selection.
2nd authentication factor: If required, we select the two-factor authentication type (2FA).
We can find the following options for identification:
None: No identification is required
User/password: Simple identification by username and password.
E-mail: Identification by e-mail to the user.
E-mail from: Address from where the identification e-mails will be sent.
User e-mail confirmation template: Template used for confirmation emails.
User e-mail confirmation title: Title of the confirmation e-mail.
Access request must be validated by a sponsor: Require sponsor verification for user identification.
Maximum time for the sponsor to validate the request (in seconds): Maximum time of the sponsor to validate the identification.
Access request e-mail template: Request email template.
Access request e-mail title: Title of the request e-mail.
Access approved e-mail template: Access approval e-mail template.
Access approved e-mail title: Title of the access approval e-mail.
Access denied e-mail template: Access denial e-mail template.
Access denied e-mail title: Title of the access denial e-mail.
Send validation request to all sponsors: Check to send the request to all the sponsors of the captive portal.
Use captive sponsors list: Use of the list of sponsors for the e-mail.
SMS: Identification by SMS to the user
SMS Type: Type of SMS message.
SMS Sender: From where the SMS message will be sent.
SMS URL: Web address included in the SMS message.
Send SMS in secure mode: Choose if we want to send the SMS in secure mode.
SMS User: SMS user.
SMS password: SMS password.
SMS Message before PIN: SMS message before the PIN.
SMS Message after PIN: SMS message after the PIN.
Use proxy: Check if we want to use a proxy to send the SMS message.
Proxy type: Type of SMS Proxy.
Proxy URL: URL address of the SMS Proxy.
Proxy port: Port used by the SMS Proxy.
Proxy user: User of the SMS Proxy.
Proxy password: SMS proxy password.
SAML: Identification by SAML Remote IDP
The first module is called Service provider (SP) and has the next fields:
Authentication source name: SP name.
Entity ID of the service provider (SP): URL of the SP. In this case, the core acts as an SP, which is why the entity ID is the core domain.
Entity ID of the IdP that the SP should contact: URL of the IDP that will contact the SP.
The second module is called Remote IDP and has the next field:
Metadata: Metadata of the IDP. This metadata should be found on the IDP.
The third module is called Federation (SP metadata) and we can find the link to get access to our SP metadata. We only will the need to substitute the variable captive_portal_ip_or_domain for the correct one when we browse the metadata.
Finally, the fourth module is called User attributes and has the next fields:
User name attribute: Attribute that will return a user-specific username.
E-mail attribute: Attribute that will return a user-specific email.
User groups attribute: Attribute that will return a user-specific groups.
Additional attributes: Permits to add new attributes with the specific item we want to get.
3.1.7.3.4. Fallback
In the Fallback tab, we can configure an alternative identification method in case the first method fails. This option is only compatible with some primary identification methods.
3.1.7.3.5. Agent
In the Agent tab, we will select the behavior of the use of the agent in the flow of the captive portal. This section displays the following fields:
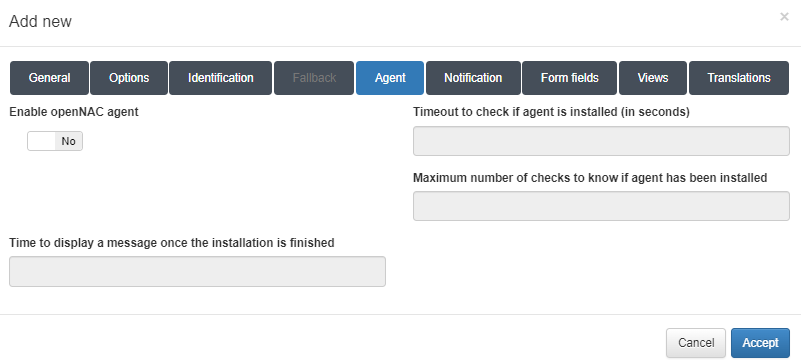
Enable openNAC agent: Activate the use of the OpenNAC Enterprise Agent for the captive portal flow.
Timeout to check if agent is installed (in seconds): Waiting time to verify if the agent is installed on the client device.
Maximum number of checks to know if agent has been installed: Number of attempts to verify if the agent is installed on the client device.
Time to display a message once the installation is finished: Once installed, time to display the installation message.
3.1.7.3.6. Notification
In the Notification tab, we can determine which cases result in notification via any of the available types, for example, e-mail. This section displays the following fields:
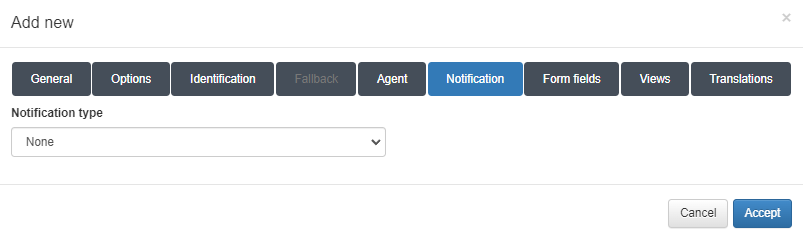
Notification type: Type of notification to be sent.
E-mail template: Template of the notification that will be sent for each action.
E-mail title: Title of the email to be sent for the selected template.
E-mail from: Title of the email to be sent for the selected template.
E-mail to: Email of the recipient of the notifications.
Use sponsor as e-mail to: When selecting this option, the receiving email will be that of the sponsor.
Use captive sponsors list: Use of the list of sponsors for the e-mail.
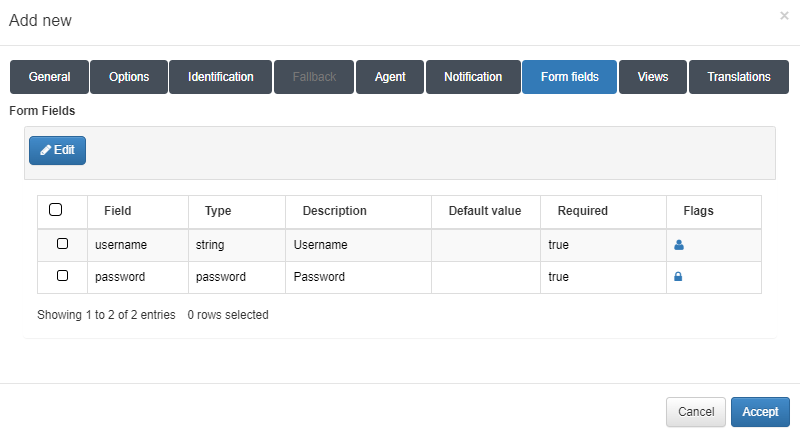
3.1.7.3.7. Form Fields
The Form Fields is an important step to be performed. Here the users enter the information necessary for the authentication process.
Note
Depending on the selected workflow template, we will have some fields or others.
The process of edition of the form fields required for the workflow is very straight. Click on Edit to open the edition window that displays the following fields:
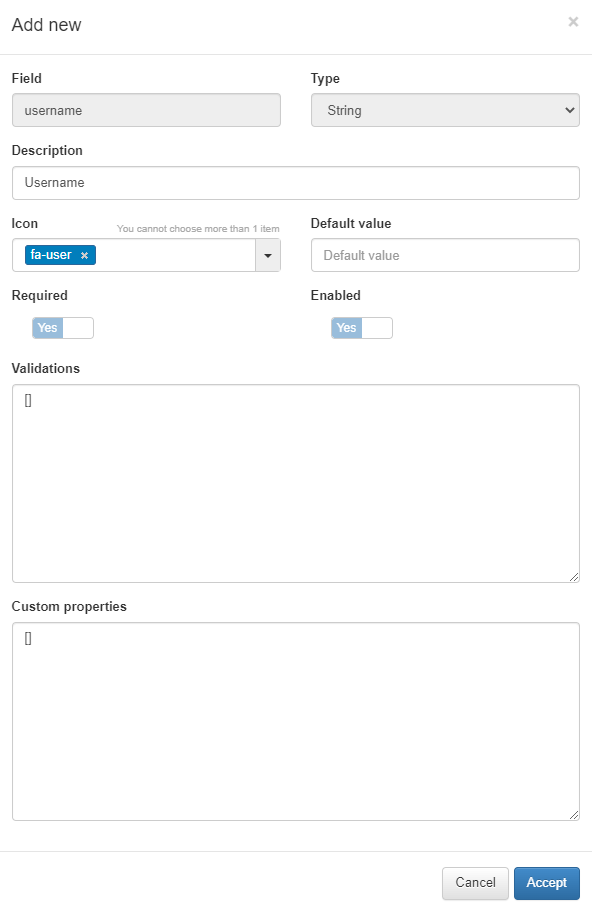
Field: The name of the field.
Type: This pop-up menu has the set of data types corresponding to the form field being created. The type selected must match the type of information filled in by the user. For example, if the information is a username, the type must be String, if the information is a password, then the type must be a password, and so on.
Description: A meaningful description of the purpose of the form field.
Icon: The icon image that will be displayed on the column Flags of the form field. It helps to quickly visually guess what the corresponding type of information is.
Default value: The value you want to be used by default.
Required: Define if this form field must necessarily be filled in by the user.
Enabled: Define if the form field is enabled and will be displayed on the authentication screen along with other fields.
Validations: The type of validation to be performed by the ON Captive module during the authentication process to ensure that the information is really what is being expected on this particular form field.
Custom properties: Specific additional properties that can be necessary for the validation of certain types of submitted data and/or to be further verified.
3.1.7.3.8. Views
The Views tab allows the insertion of custom code which will change the presentation layer behavior of the captive portal Web elements, according to the specific needs of the customer. To allow the insertion of code for each view, click on the toggle switch button which by default is on the Use Default position. It will change to Set Custom allowing you to insert the custom view code.
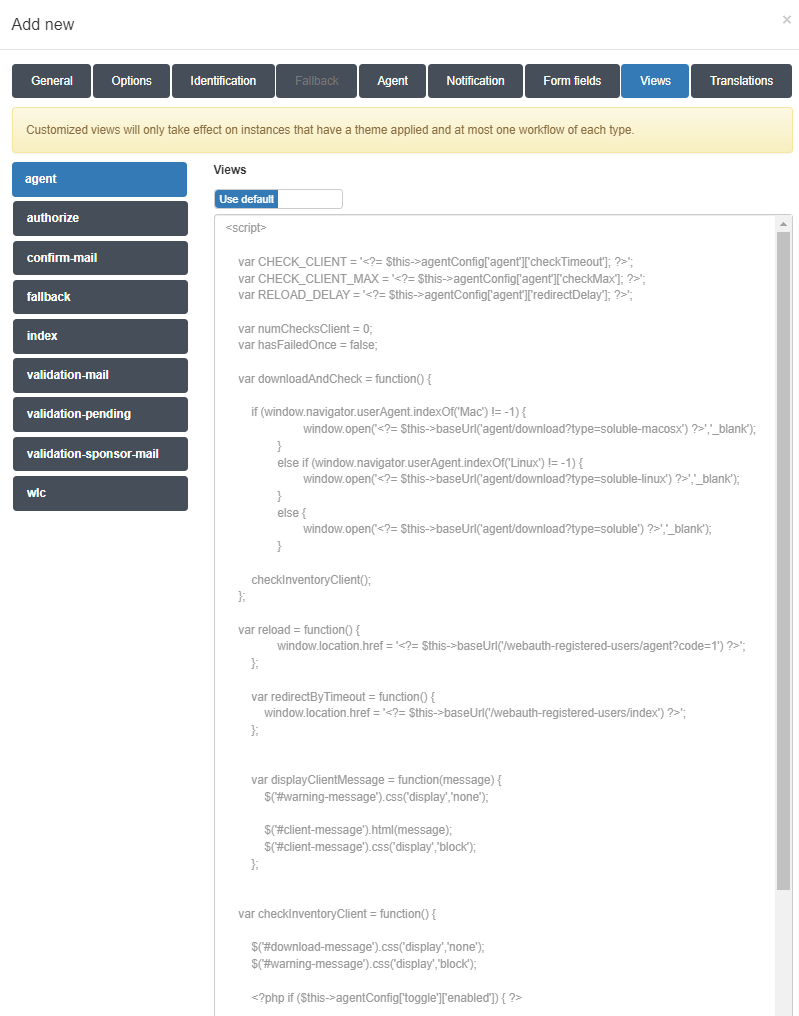
Each of the views that appear on the side menu can be modified by code.
Note
Each Captive workflow template has its own set of views and must be treated accordingly.
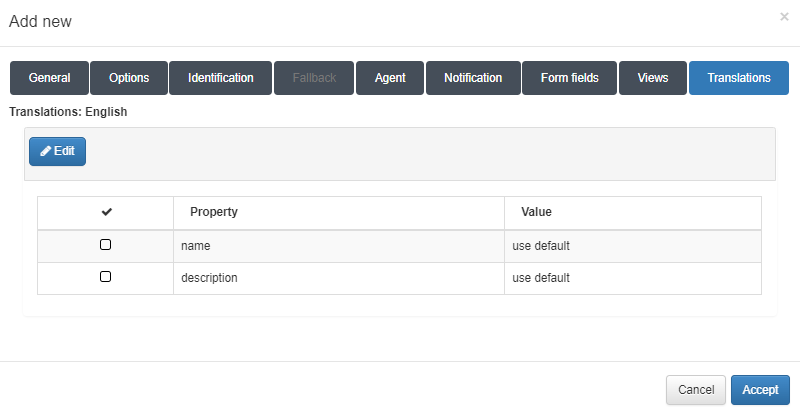
3.1.7.3.9. Translations
The Translations tab allows adding translations for the workflow name and description in the workflow presentation. The languages we will find are the ones selected in the General section.
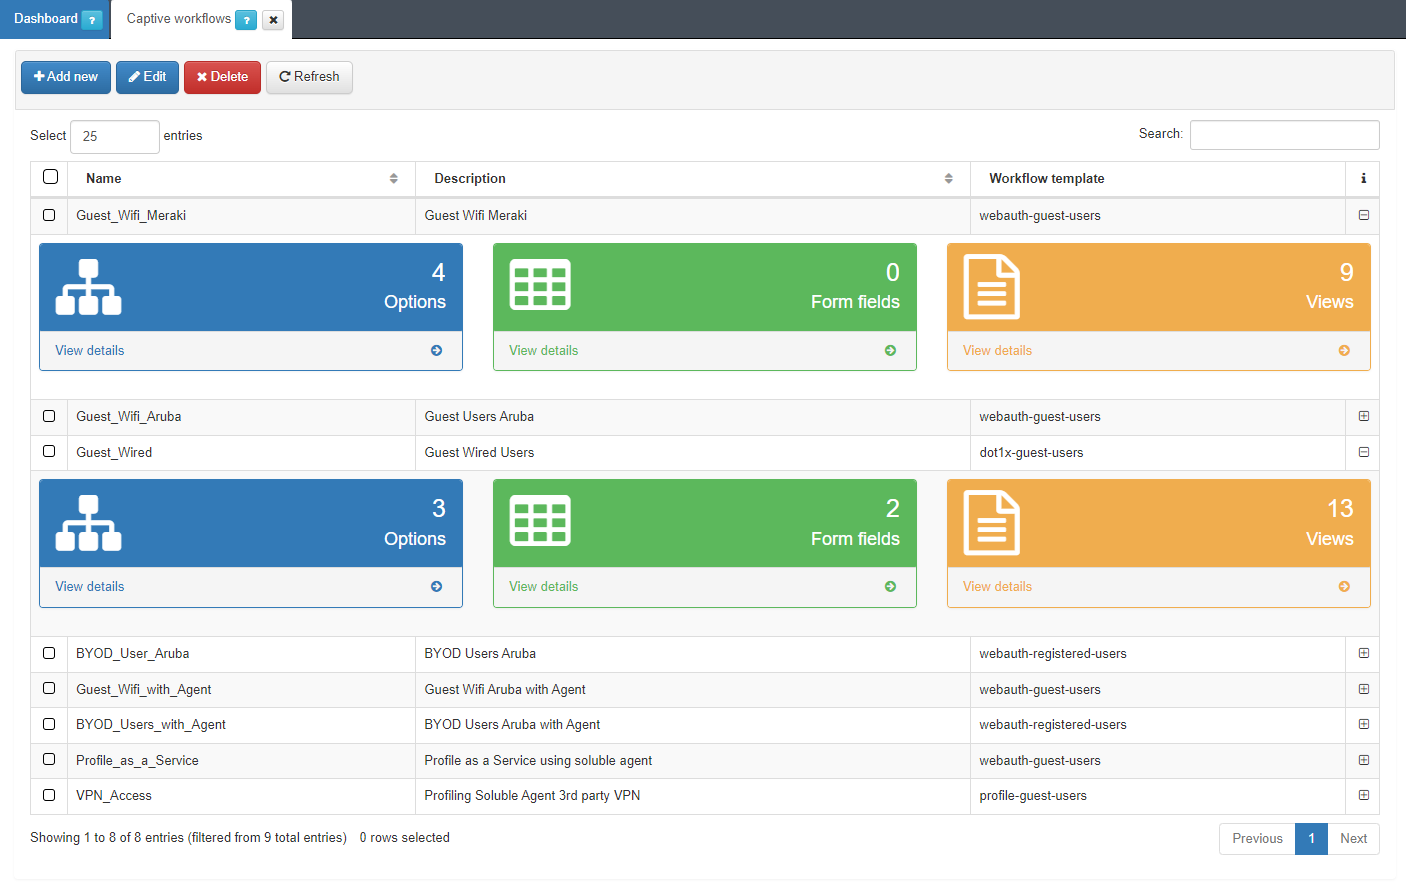
After performing all the configuration required for this new captive workflow, click on accept to create it. Now, the newly added workflow will be displayed on the grid. The details of each Captive workflow can be viewed easily by clicking on the + icon of the i column.