OpenNAC Core Installation
This page shows which steps are required to install openNAC Core instance.
Step 1. Download Image & Basic System Configuration
After the OVA image is downloaded, it should be imported into your Hypervisor.
Console Access is required to provide some basic configuration information through an initial configuration steps. After that you can access using SSH to continue configuring other parameters.
The main options to be configured before SSH access are:
- Network configuration Parameters: by default not tagging/VLANs are allowed to be included following this configuration wizard. In case is required to include VLANs this should done manually as explained bellow.
- Keyboard configuration: Please select you proper keyboard configuration from the list
- Time Zone: This is particularly important when integrating with other solutions, for example openNAC Analytics, SIEM, Active Directory to have properly defined the Time Zone and UTC.
The main options can be configured in two ways:
- Using a configuration wizard, at the first start of the virtual machine. (This is the recommended method).
- Performing the configuration manually.
Both methods are shown below:
Step 1.2. Wizard configuration (Recommended method)
The first time that VM starts the setup wizard will prompt.
Note
You can access to this wizard at any time executing setup command in the console.
The setup wizard let the user configure the basic parameters needed by openNAC after the OVA deploy.
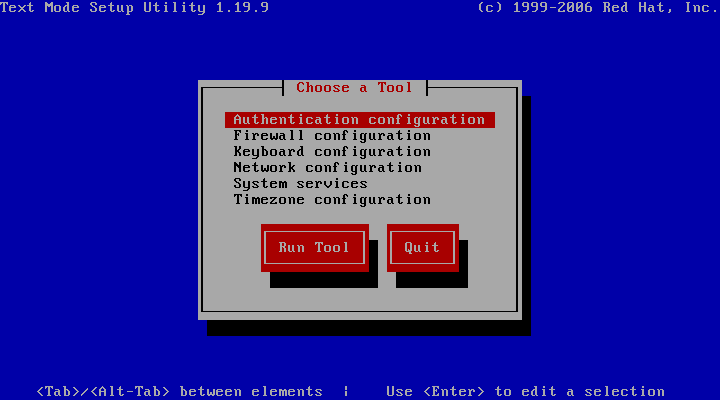
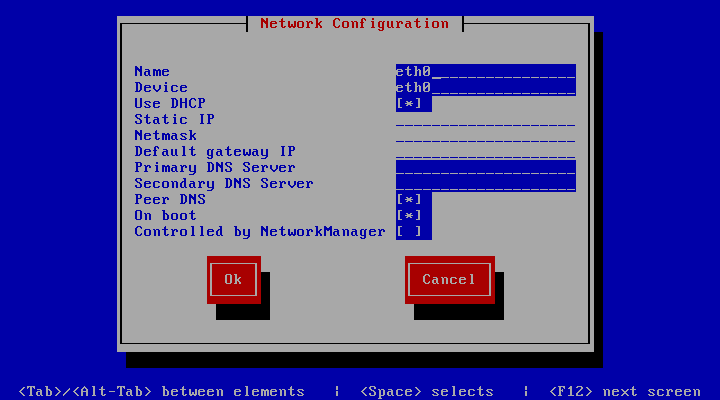
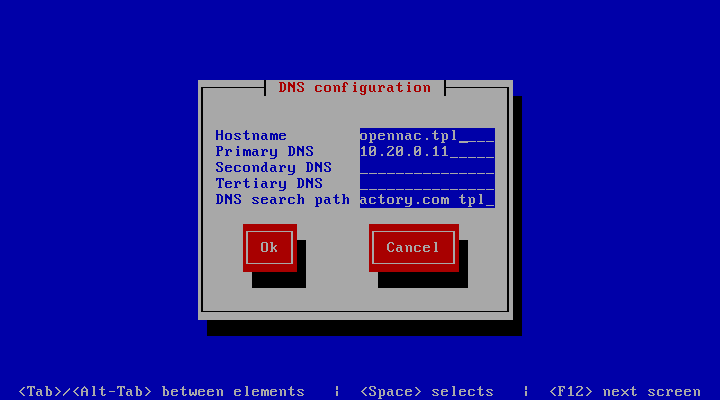
Network configuration
The network configuration let configure the device interfaces and the DNS servers.
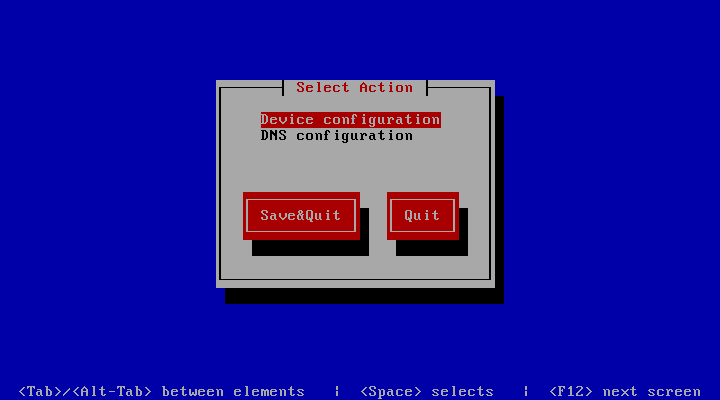
- Device configuration
To change your Device configuration select the proper option to enter to the device interface list.
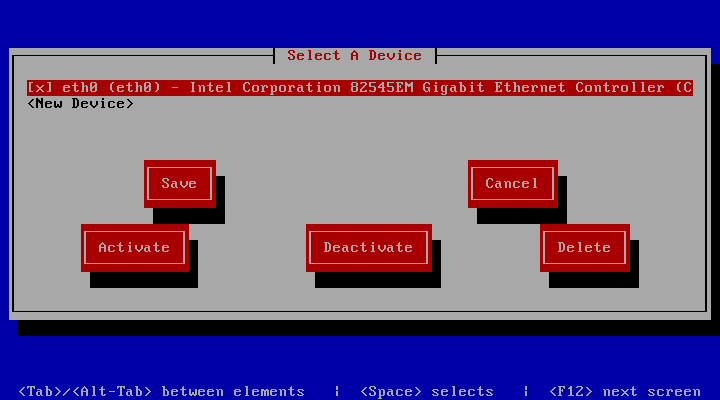
You can press enter key to modify an interface of the list.
- DNS Configuration
To change the DNS configuration select the proper option and configure your DNS servers.
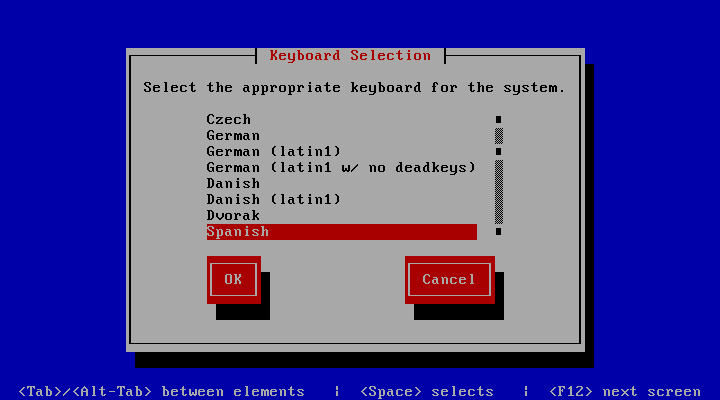
Keyboard configuration
To change the keyboard layout select Keyboard configuration option and select your keyboard layout.

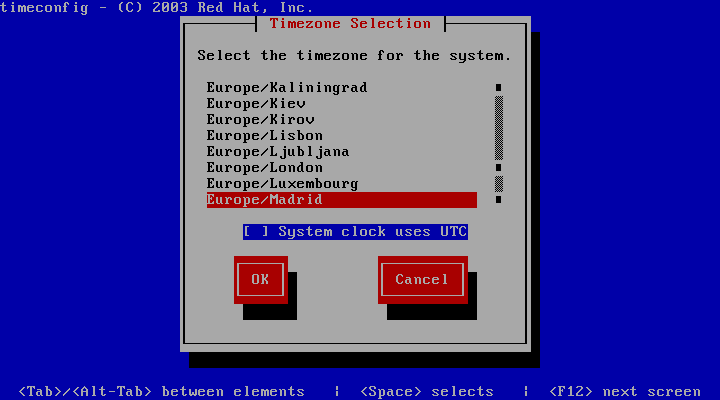
Time Zone
To change the timezone select Timezone configuration option and select your timezone.

Step 1.2. Manually configuration (Use setup wizard is recommended instead of manually configuration)
- Manually Network configuration
- Go to /etc/systemconfig/network-scripts/ifcfg-eth0 and configure your IP, for instance:
DEVICE=eth0
BOOTPROTO=none
ONBOOT=yes
NETWORK=10.0.1.0
NETMASK=255.255.255.0
IPADDR=10.0.1.27
USERCTL=no
To ensure that network configuration parameters are properly defined is recommended to restart network service and check IP configuration.
service network restart
ifconfig -a eth0
- In case openNAC needs to run in a trunk mode needs first to define an interface like explained before and later as many VLANs as needed using subinterfaces.
To define the subinterfaces you should create new interfaces configuration files with the VLAN ID desired. For instance, to configure VLAN 192 in eth0 interface:
Create the file: /etc/sysconfig/network-scripts/ifcfg-eth0.192 and type your VLAN configuration:
DEVICE=eth0.192
BOOTPROTO=none
ONBOOT=yes
IPADDR=192.168.1.1
PREFIX=24
NETWORK=192.168.1.0
VLAN=yes
Keyboard configuration
- Keyboard configuration gui command-line:
With root account type:
system-config-keyboard
- Keyboard configuration through command-line:
With root account type:
loadkeys es
Loading /lib/kbd/keymaps/i386/qwerty/es.map.gz
Time Zone
- To change time zone and the use of UTC with root account type.
timeconfig
Step 2. Access to SSH and basic configuration
We can access now to the openNAC Core Server using SSH connection using default credentials
Note
User: root
Password: opennac
Note
Remember this a default password that must be changed as soon as possible.
NTP SERVER Configuration
- NTP Server must be configured on openNAC Servers, for instance is required be synchronized because some process could fail, Active Directory joining process. Follow the next steps:
- Is required to stop NTP service before applying any NTP parameters.
service ntpd stop
- synchronize NTP server to the openNAC Servers, for instance:
ntpdate 192.168.0.1
- Modify the file /etc/ntp.conf and include the proper servers to keep configuration, for instance:
server 192.168.0.1
- Start NTP Service
service ntpd start
CHANGE HOSTS file
Go to /etc/hosts file and include the proper IP for openNAC Analytics and openNAC aggregator, in the bellow example the ip assigned is 192.168.56.253. this is required to establish communication between openNAC nodes.
vim /etc/hosts
The openNAC Analytics and openNAC aggregator are identify as onanalytics and onaggregator
cat /etc/hosts
127.0.0.1       core.opennac.domain     core   localhost localhost.localdomain localhost4 localhost4.localdomain4 core.tpl
127.0.0.1     onmaster
192.168.56.253     onanalytics
192.168.56.253     onaggregator
Step 3. Update the system
One of the recommended steps that should be carried out when the system has been just deployed is to update it to the latest version available.
The system can be upgraded using two different ways, from local or remote repository:
Step 4. Notification Checks
Define MTA/SMTP server in openNAC to allow product notifications, these notification could be related with Guest/Sponsors notifications, trigger policy rules notification and many other processes
Configuring Postfix as email relay for GMAIL
- Connect to the core using ssh.
- Update or install the required software.
yum update && yum install postfix mailx cyrus-sasl cyrus-sasl-plain
- Apply postfix configuration to /etc/postfix/main.cf.
relayhost = [smtp.gmail.com]:587
smtp_use_tls = yes
smtp_sasl_auth_enable = yes
smtp_sasl_security_options =
smtp_sasl_password_maps = hash:/etc/postfix/sasl_passwd
smtp_tls_CAfile = /etc/ssl/certs/ca-bundle.crt
relayhost - Specifies the mail relay host and port number. The host name will be enclosed in parentheses to specify that an MX lookup is not required.
smtp_use_tls - Enable (or disable) transport layer security.
smtp_sasl_auth_enable - Enable (or disable) SASL authentication.
smtp_sasl_security_options - Left empty, to ensure that incompatible security options are not used.
smtp_sasl_password_maps - Specifies the password file to use. This is the file created in the previous step.
smtp_tls_CAfile - Specifies the list of certificate authorities to use when verifying the identity of the server.
Note
If your mail service is NOT authenticated, you must also edit the myhostname attribute of the file “/etc/postfix/main.cf” with the name of your mail domain.
- Set up authentication with GMAIL. Edit or create the file /etc/postfix/sasl_passwd and configure the credentials:
[smtp.gmail.com]:587 UserName@gmail.com:Password
- Compile and hash the contents of /etc/postfix/sasl_passwd file.
postmap /etc/postfix/sasl_passwd

postmap hash:/etc/postfix/sasl_passwd
- Restart the postfix service and enable auto start.
service postfix restart && chkconfig --add postfix
Note
By default Gmail authorizes logins only secure connections. In order to enable the relay, in this example, it is necessary to change the settings in the Gmail account by enabling “Allow less secure apps”. For more information on how to do this, review the information at the following link: https://support.google.com/accounts/answer/6010255?hl=es.
- To test that the current configuration works, send a test mail.
mail -s "Test subject" recipient@domain.com < /dev/null
If your mail service is NOT authenticated, you must also edit the myhostname attribute of the file “/etc/postfix/main.cf” with the name of your mail domain.
myhostname = mydomain.tld
Configuring Postfix as email relay for Office 365
- Connect to the core using ssh.
- Update or install the required software.
yum update

yum install postfix cyrus-sasl-plain mailx
- Apply postfix configuration to /etc/postfix/main.cf.
relayhost = [smtp.office365.com]:587
smtp_sasl_auth_enable = yes
smtp_sasl_password_maps = hash:/etc/postfix/sasl_passwd
smtp_generic_maps = hash:/etc/postfix/generic
smtp_tls_security_level = may
smtp_sasl_security_options = noanonymous
relayhost - Specifies the mail relay host and port number. The host name will be enclosed in parentheses to specify that an MX lookup is not required.
smtp_sasl_auth_enable - Enable (or disable) SASL authentication.
smtp_sasl_password_maps - Specifies the password file to use. This is the file created in the previous step.
smtp_generic_maps - Optional lookup tables that perform address rewriting in the Postfix SMTP client, typically to transform a locally valid address into a globally valid address when sending mail across the Internet. This is needed when the local machine does not have its own Internet domain name, but uses something like localdomain.local instead.
smtp_tls_security_level - when a non-empty value is specified, this overrides the obsolete parameters smtp_use_tls, smtp_enforce_tls, and smtp_tls_enforce_peername.
smtp_sasl_security_options - Left empty, to ensure that incompatible security options are not used.
- Set up authentication with Office365. Edit or create the file /etc/postfix/sasl_passwd and configure the credentials:
[smtp.office365.com]:587 UserName@DomainName:Password
- Compile and hash the contents of /etc/postfix/sasl_passwd file.
postmap /etc/postfix/sasl_passwd

postmap hash:/etc/postfix/sasl_passwd
- Change permission for this file.
chown root:postfix /etc/postfix/sasl_passwd

chmod 640 /etc/postfix/sasl_passwd
- Configure generic file in order to be able to send emails as a valid user /etc/postfix/generic or if is required to change the mail from account.
/.*/ UserName@DomainName.tld (regular expression that defines everything)
- Correct the file permission, compile and hash the /etc/postfix/generic file.
chown root:root /etc/postfix/generic

chmod 0600 /etc/postfix/generic

postmap /etc/postfix/generic

postmap hash:/etc/postfix/generic
- Change alias root to your email address /etc/aliases, now all messages sent to root will get forwarded to my system reports address.
mailer-daemon:  postmaster

postmaster:     root

root:           UserName@Domain.com
- Save and exit from the file. Run command newaliases to take effect.
- Restart the postfix service.
service postfix restart
To verify that the configuration file is reasonably correct and list all configurations actually applied.
sudo postfix check
To test that the current configuration works, send a test mail.
mailx -s "Test mail" -r " SenderName <SenderUserName@DomainName>" ReceiberUserName@DomainName
To see all the mail logs and other message information check:
tail -f /var/log/maillog
Step 5. Gaining Access to Administration Portal
Now that we have IP connectivity with openNAC we can access to the Administration portal
Note
The URL https://ip_management/admin is the access to Administration Portal
openNAC solution includes a default credential. Please use it and change it as soon as possible.
Note
User: admin
Password: opennac
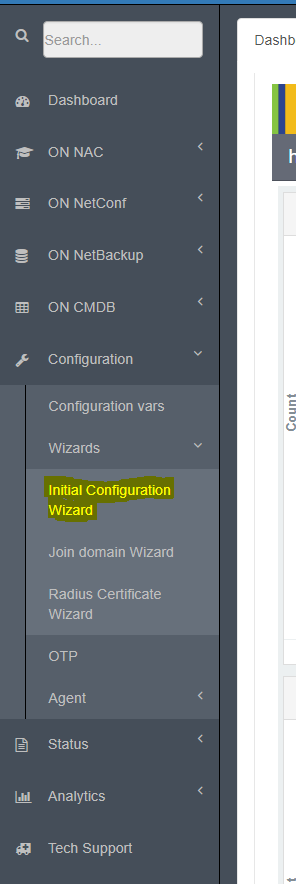
Step 6. Launching Initialization Wizard
As soon as you are in the Administration Portal the first step is to follow the Initial configuration Wizard, using this wizard define basic deployment parameters such as:
- VLAN IDs and propose assignment.(Service, quarantine, registry)
- IPs for every range.
- DHCP Scopes, openNAC can act as DHCP and this configuration wizard allows to define which IP ranges and IP configuration is sent to the endpoints.
- DNS Server for clients, Captive portal parameters and many others.
This wizard can be launched any time allowing to the product administrator to define initial configuration when needed:
Step 7. Joining to Active Directory
As soon as the Initial configuration is completed, is recommended to link openNAC Core instance to an Active Directory using AD Wizard
Note
The AD integration only allows us to be part of one domain, NTP Server is required to be configured on openNAC server.
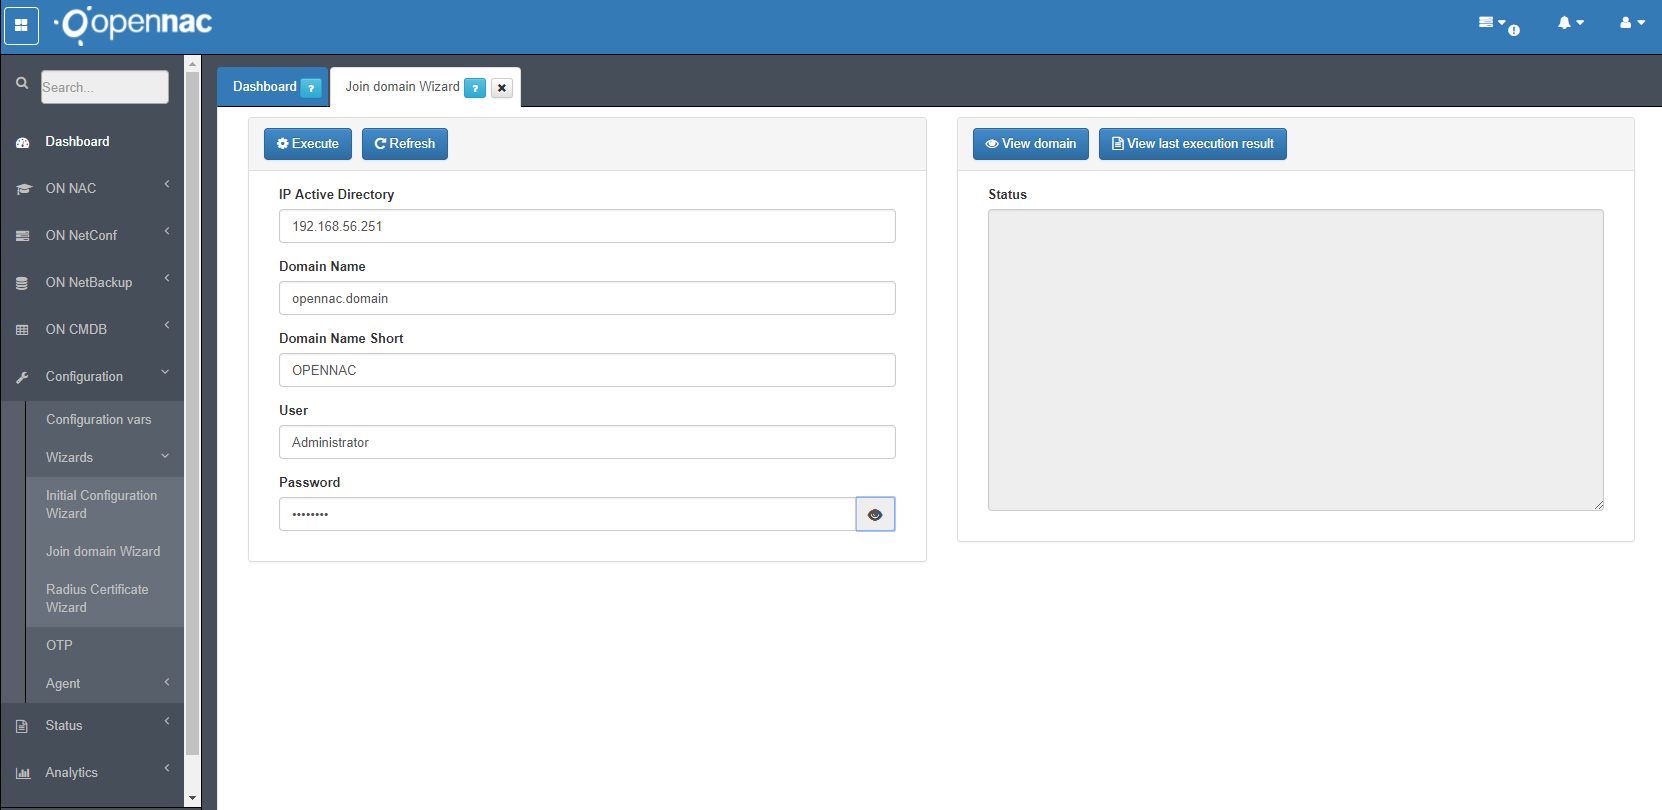
Open the ON Core web console and execute the Join domain Wizard, go to Configuration –> Join domain Wizard. Fill the blanks with the AD Server details, and click on Execute button.
You have to be sure that the time and date configuration for ON Core and AD Server is the same or very similar, if you get some time issue please review Time Issues.
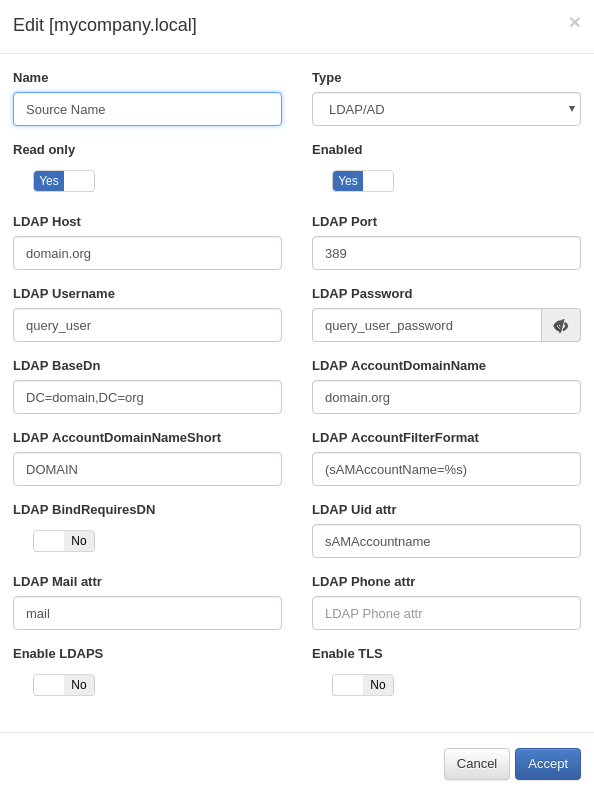
Include the AD on User Data Source configuration. In openNAC management portal go to ONCMDB -> User Data Sources and Add new, use the following values.
Note
In case there are Multiple Active Directories you can add them using ‘,’ separator in LDAP Host field.
For issues in this procedure review Join Domain Troubleshooting
In case it is necessary to use LDAPS, continue on this link to perform this configuration Configure LDAPS
Step 8: Allow NETWORK devices
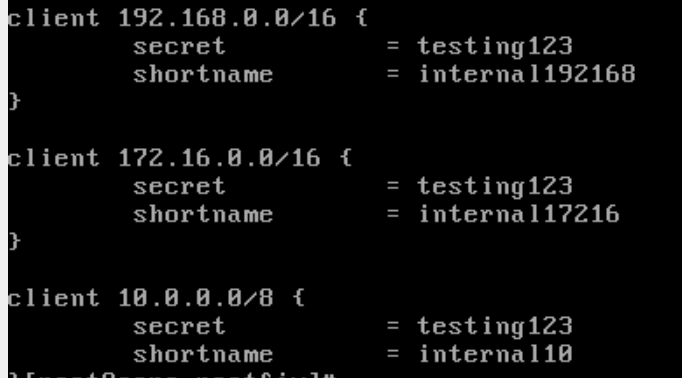
The first step to allow communication between Network devices such as switches, VPNs, Wireless LAN controller or access point is to define a common preshared key.
Note
Default password must be changed. We include a default password to provide an easy lab environment deployment, by default all the NETWORK included on RFC 1918 are allowed.
After perform the changes restart the radius service.
service radiusd restart
Step 9: Default parameters definition
Major of these parameters are introduced when initial wizard is launched.
In Configuration –> Configuration vars, some default and configuration properties should be managed, please go to the configuration vars section
- Go to Generic tab and define the connection between Core and Analytics, Kibana IP is the ip for Analytics Server.
- Go to Notifications: Please configure notifications information, for instance source email address and message content. Please go to the following section
- Go to User Portal: Please configure user portal information, to understand registry portal parameters go to user portal section
Step 10: HealthCheck Configuration
Configure HealthCheck for this role, keep in mind if this is Core Master or Secondary. HealthCheck Configuration
Step 11. Use case Selection
As soon as you have the environment and initial configuration in place is required to Understand Use Cases Benefits.
As soon as detected and identify the proper use case this should be configured on openNAC servers.
Check the following section to choose the target use case. Use Cases Implementation