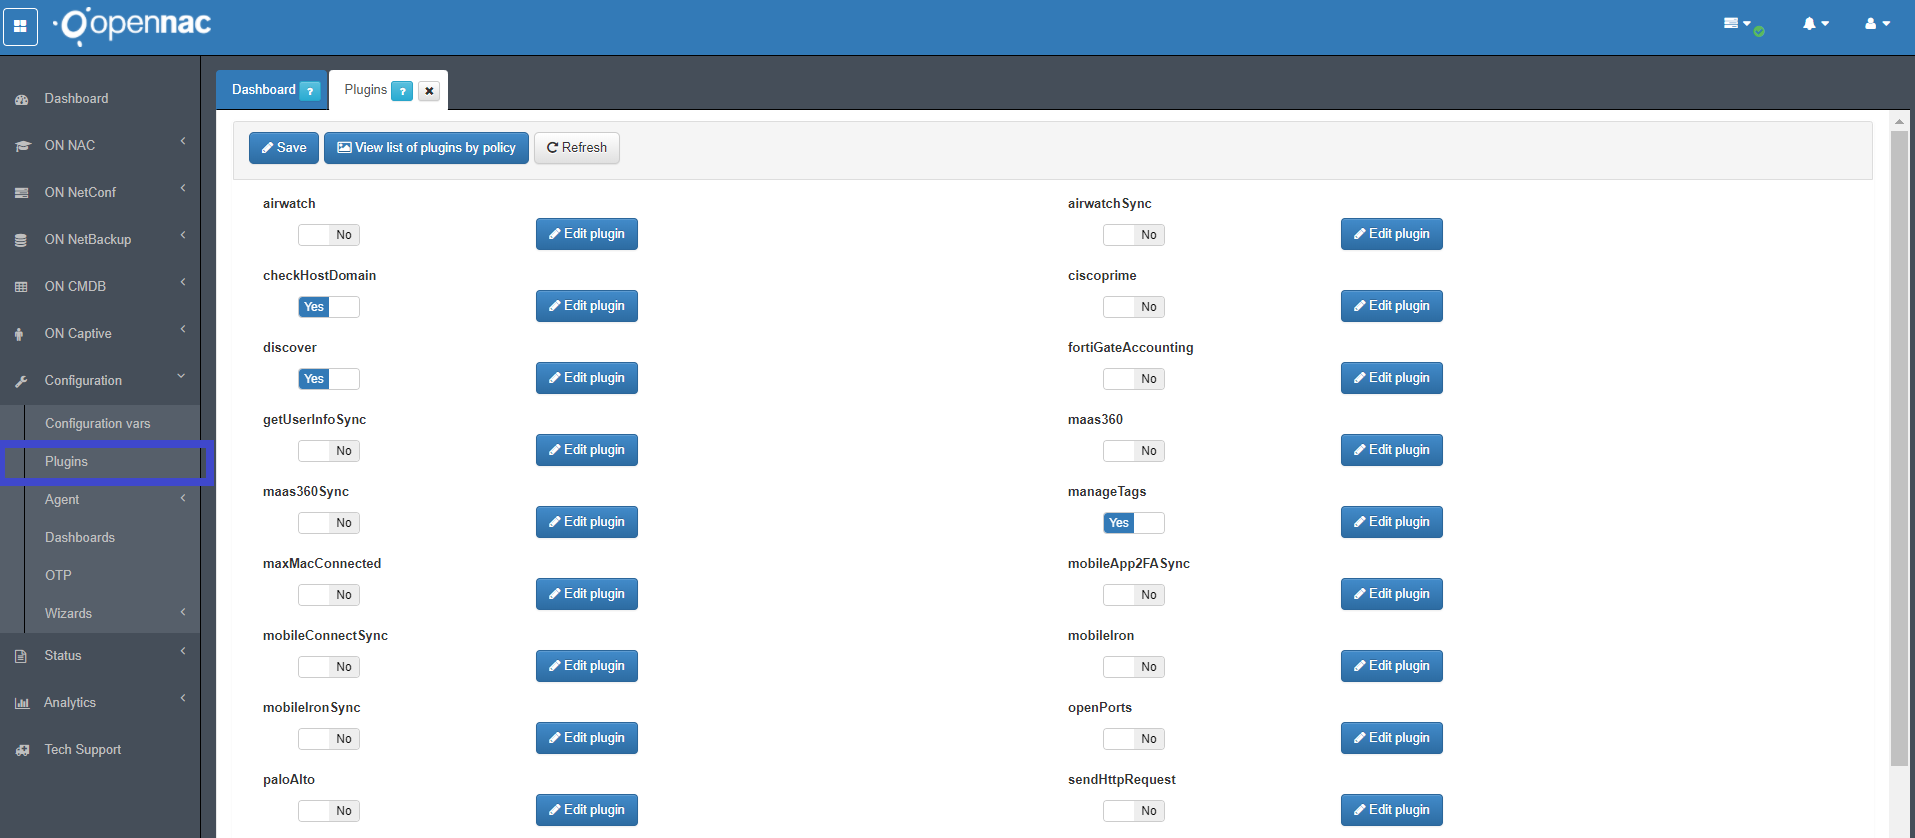
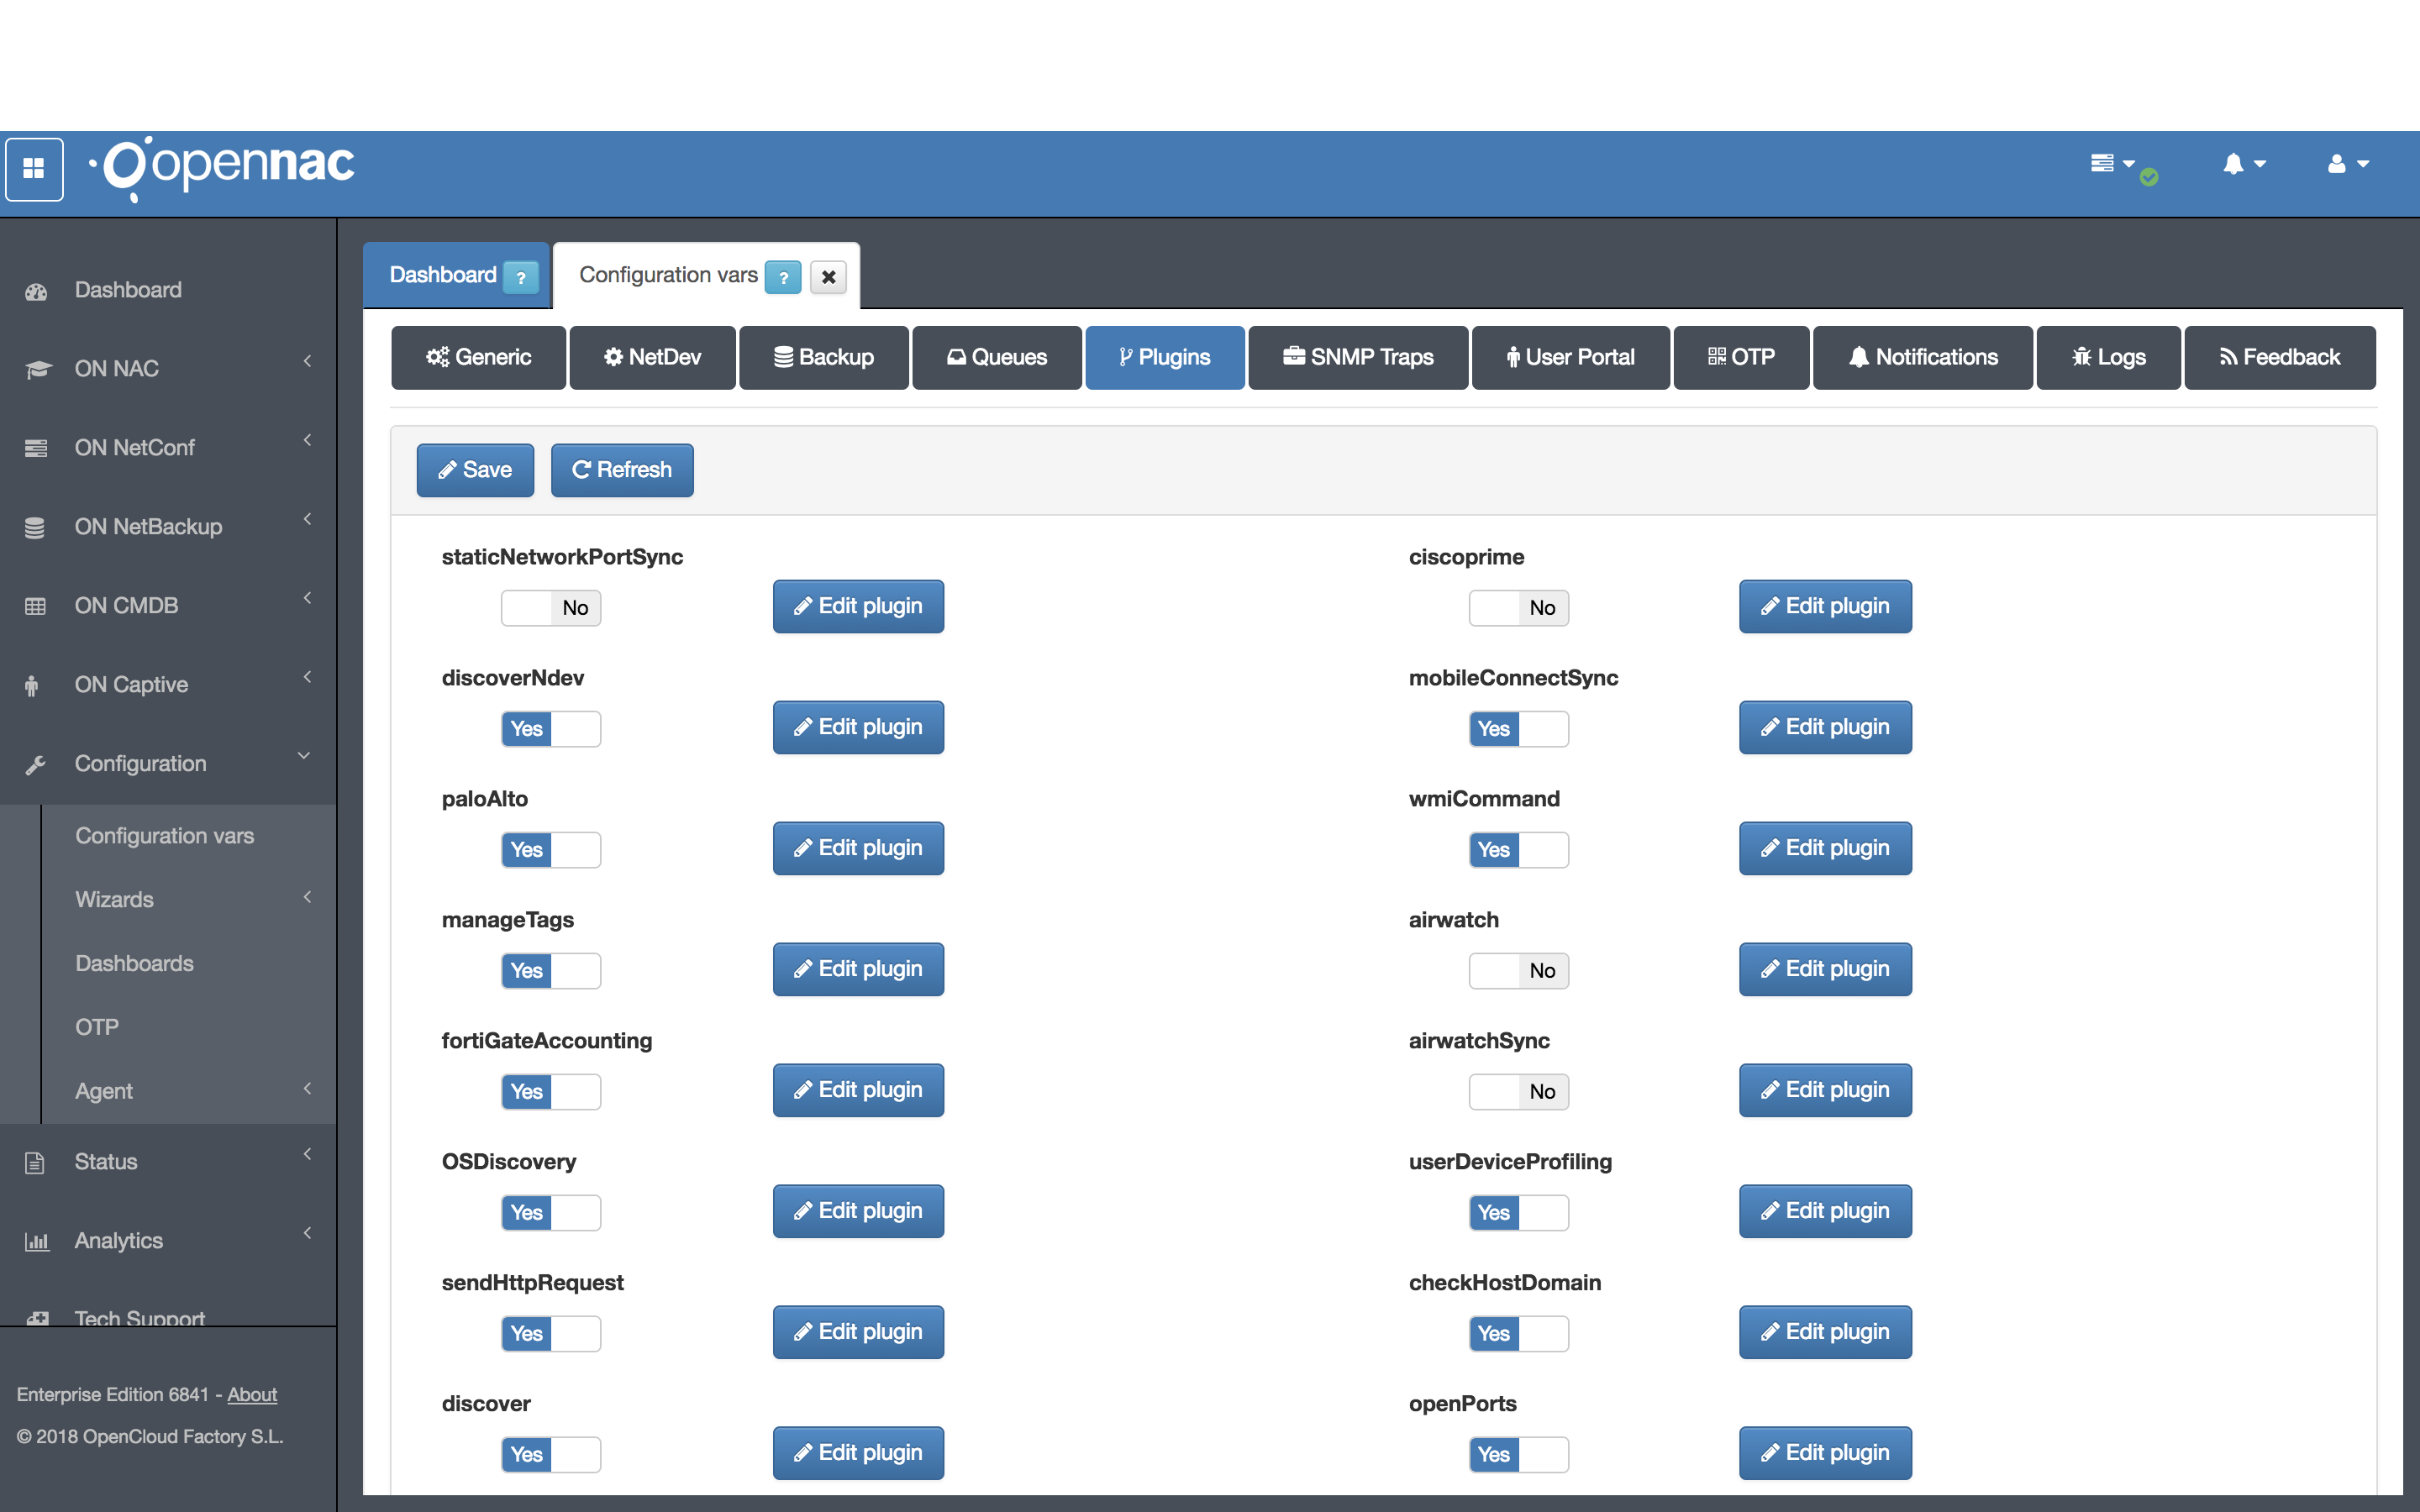
Plugins
Going to Configuration -> Configuration var -> Plugins at the TAB plugins is possible to set the default configuration parameters for Plugins, these are default values but remember that ON NAC -> Policies in each policy is possible to defined specific parameters.
Note
To see the any plugin as an option in policy postconditions is required to enable it in the configuration vars first.
Additional log information
You can enable the verbose log information from openNAC admin UI, in section Configuration -> Configuration vars -> Logs. Once the Verbose Mode has been enabled, you have to restart the workers in order to provide the new log level:
service opennac restart
All plugins are executed in asynchronous mode, using workers, so the log is stored in /var/log/opennac/opennac-job.log file, and it can be viewed from openNAC server command line or from openNAC admin UI “Status / File Log Viewer”.
Note
Enable “Verbose Mode” in logs could generate a huge increase of their size, so be careful with free disk space in “/var/log” volume.
Plugin openPorts
The openPorts plugin provides the ability to scan and discover open ports on devices requesting network access by authenticating through Opennac, helping the profiling process detecting which UDP and TCP ports are open.
Whenever a device’s authentication matches with a policy rule where this plugin is enabled, a nmap process is started and it will scan the open ports of that user device, according to the globally defined set of ports in plugin configuration or defined in the custom parameters in the rule itself, which will take precedence over the global configuration. At the end of the scan, the plugin will automatically create user device tags for the defined set of ports and apply those tags to that device being authenticated.
Later these tags can be included in a policy rule, which will come before the rule where the plugin is activated, in order to grant access to the network to the devices that have the set of open ports discovered by the plugin.
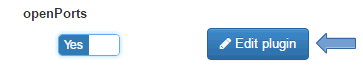
To activate the openPorts plugin, click on the “Yes / No” button just below the plugin name. By default the plugin is disabled (“No” position). By clicking on the selection button, it will change to the “Yes” position.
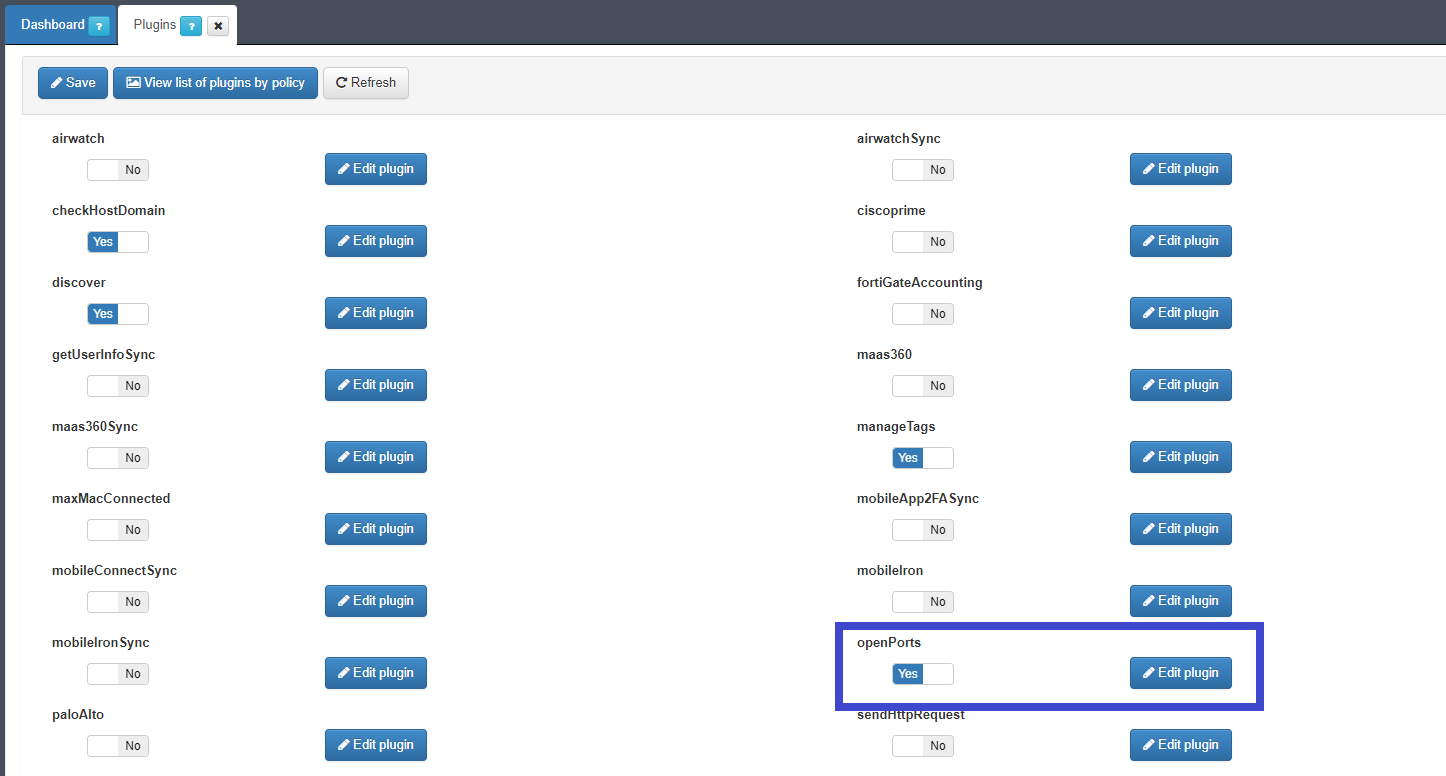
With the selection button in the “Yes” position, the global configuration dialog for the plugin can be displayed with a click on the “Edit Plugin:
In the “openPorts” dialog box, the list of target ports of the plugin scan must be defined:
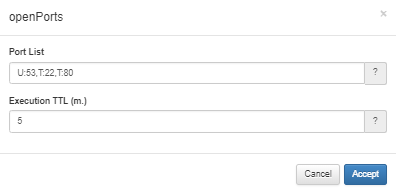
In the “Port List” field, the ports and their respective protocols that will be targeted by the plugin are defined. In the example shown in the image above, the protocol type is represented by a letter, being “U” for UDP protocol and “T” for TCP followed by “:” (colon) and port number. Each protocol:port pair must be separated from the other by commas, without any blanks. Therefore:
U:53 -> 53/udp port T:22 -> 22/tcp port T:80 -> 80/tcp port
The “Execution TTL (m.)” Field must be filled with the interval, in minutes, between periodic port scans that will be performed by the plugin. In this example, the value 5 is five minutes. For testing or debugging purposes, 5 minutes do not pose any problem, however, in production environment with large number of devices being authenticated this is not indicated. The recommendation is that this value in minutes corresponds to a certain amount of hours, for example 600 to 10 hours between scans.
To save these settings click on the “Accept” button.
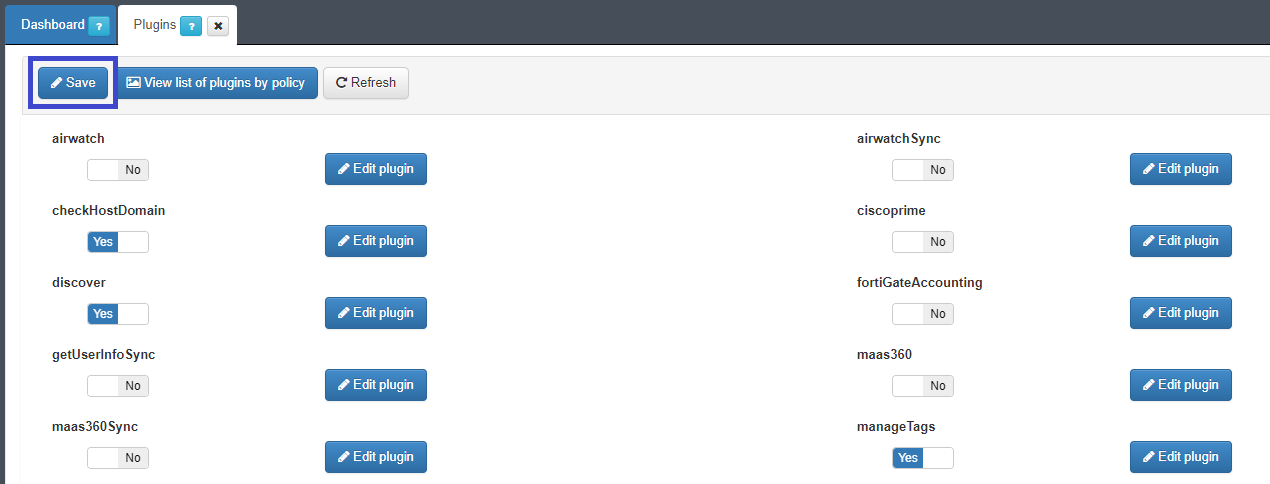
The activation of the plugin is then finished by clicking on the “Save” button, which is just above the list of plugins, on the left side:
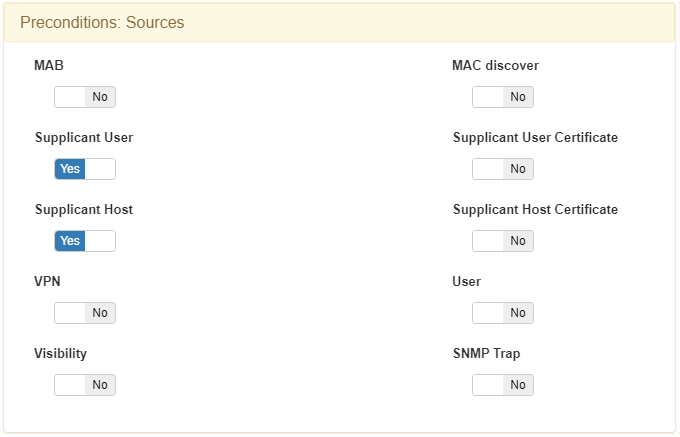
After activation, the plugin can now be configured in the rules of the policy. For further information regarding policies configuration go to openNAC Policies section. The policy must be configured normally, in this case taking into account that if this is a rule for 802.1x supplicant authentication, only the “Supplicant User” and “Supplicant Host” authentication sources must be enabled in the “Preconditions: Sources” configuration section:
Still in the configuration of the new policy rule, in the “Postconditions” -> “Plugins” section, in the drop-down menu, select the “openPorts” plugin:
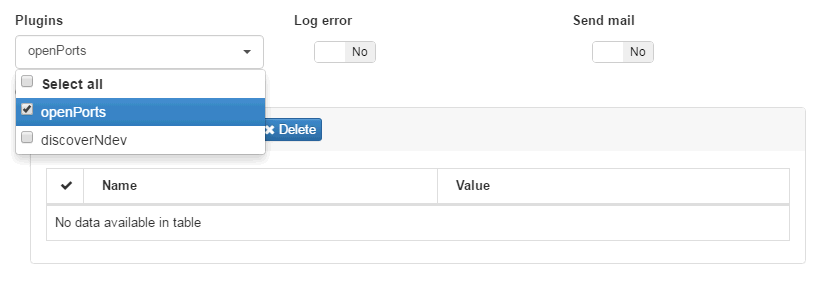
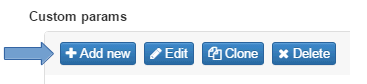
If the plugin is selected and no custom parameter is defined in “Custom params”, the plugin will assume that the target port of the scan is the one that was globally assigned during activation of the plugin that was previously done. Following our example, we will define a custom port set for this new rule being created, creating a new “Custom param”. You should click on the “Add new” button:
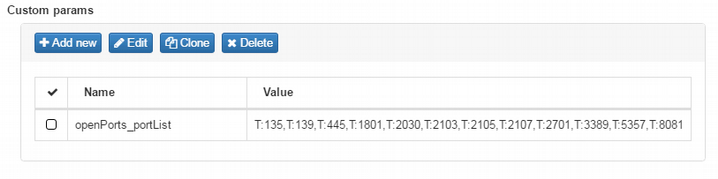
You will see the “Add new” dialog box containing the “Name” and “Value” fields. The “Name” field must be filled exactly with the name openPorts_portList and the field “Value” should contain the list of protocol/port pairs, as previously explained in the plugin activation topic:
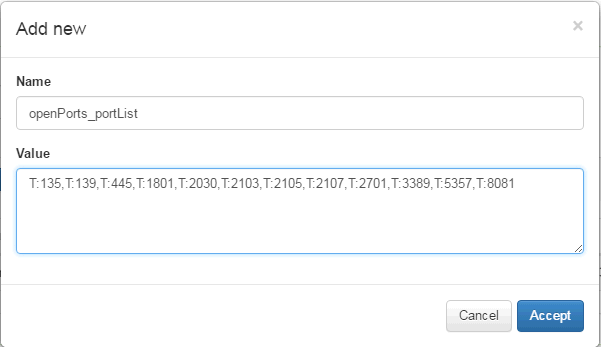
To finish adding the new parameter, click on the “Accept” button.
The completion of the creation of this rule with the plugin activated and configured must be done by clicking on the “Accept” button at the end of the configuration window.
This rule should be moved and positioned just below the rule that will authenticate the devices that receive the plugin tag. The rule with the plugin enabled will create the tags and mark with them the user devices, while the previous rule will only authenticate the devices that previously received the tags from the rule with the plugin configured.

In the above example, the “802.1x” rule is configured to authenticate supplicant devices already marked with tags and the “802.1x Open Ports” rule is the rule where the openPorts plugin has actually been activated.
Whenever a supplicant device requests authentication on the network, if it does not have the tags inserted by the plugin, the request will match the “802.1x Open Ports” rule so that the plugin performs the scan and then inserts the tags.
The next time this device reauthenticates, the request will match the “802.1x” rule precisely because the device has already received the tags through the subsequent rule.
The exhibition of the status of devices being tagged by the plugin can be easily achieved by creating a corresponding business profile. In our example, we created business profile “802.1x Open Ports” linked to the rule “802.1x Open Ports”:
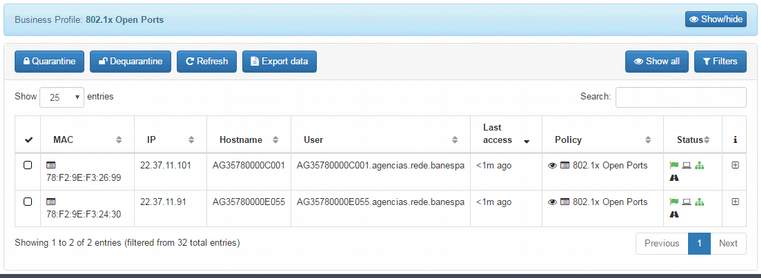
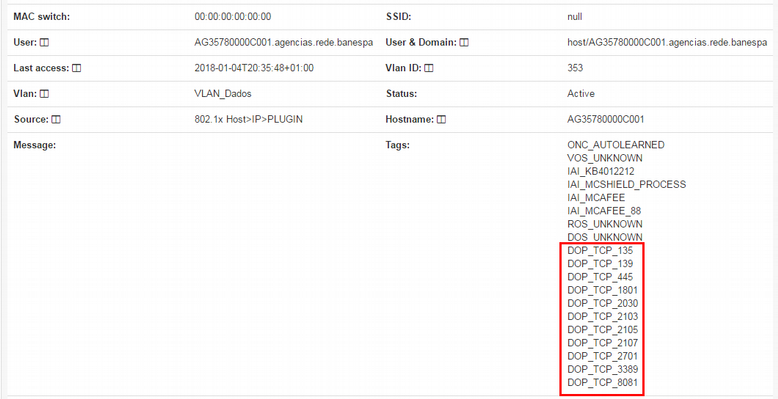
By expanding the details of one of the network devices being displayed in this business profile, you can see that the tags were automatically added to the authenticated device:
The next authentication request will match the “802.1x” rule because it is configured as an authentication precondition where the device must be tagged with the tags inserted by the plugin.
An example was used using the 802.1x authentication method, however, the same applies to the rules of the policy that originates from the MAB method, and the rule positioning strategy is also the same.
This plugin checks if the specified list of ports are opened in user device using NMAP utility.
If the analyzed port is considered “open” by NMAP, the tag related on this port is added, otherwise the tag is removed.
The tag associated with a port is in the following format “protocol_portNumber”, so the port TCP/80 has the associated tag “TCP_80” and the UDP/53 has the associated tag “UDP_53”.
Note
This plugin requires NMAP utility, so the utility path has to be defined in /usr/share/opennac/api/application/configs/application.ini properties file, with the nmap.path property. If this property is not defined, the default path (“/usr/bin/nmap”) would be used.
Properties
This plugin has some properties to be managed using openNAC administration Portal at Configuration -> Configuration Vars -> Plugins.
- Port List: List of ports to be analyzed, separated by commas, in format “portType:port” where portType is “U” (UDP) or “T” (TCP). Ex: U:53,T:22,T:80
- Execution TTL (m.): During this period, indicated in minutes, no more executions are done over the same client.
Custom properties
The port list to be checked can be overwritten by each policy defining a Custom param. The custom param has to be named openPorts_portList and its value has to be the port list to be analyzed with all user devices matching this policy.
Note
Maximum number of ports to be managed by the plugin is 99 in total. If you exceed this number an error is produced in plugin execution an the user device tags won’t be updated.
Plugin fortiGateAccounting
We can find the configuration and the activation flag of the fortiGateAccounting plugin in “Configuration -> Plugins”
Description
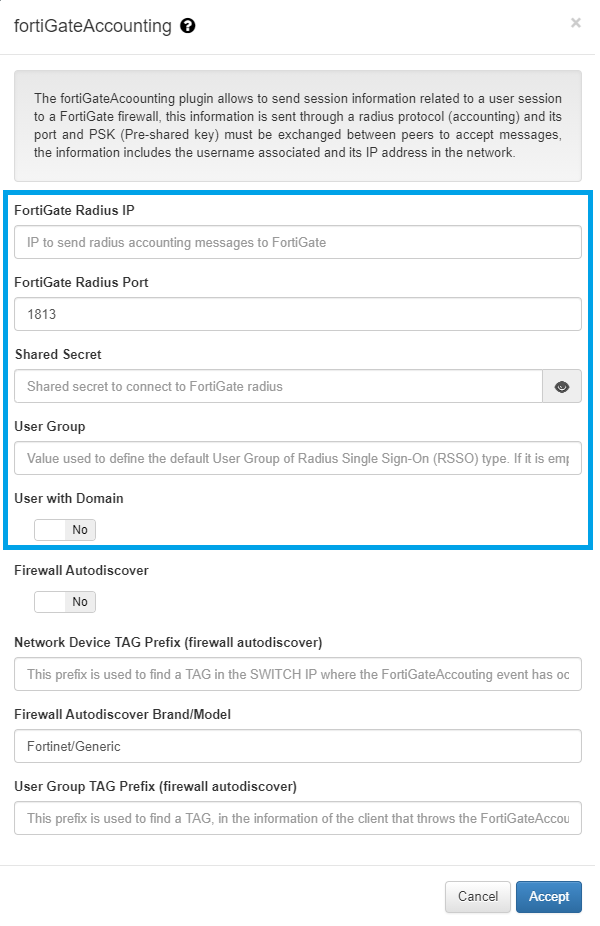
This plugin allows to send session information to a fortiGate firewall, this information is sent through a radius protocol and its port and PSK (Preshared key) must be exchanged between peers to accept messages, the information includes the username associated and its IP address in the network.
This plugins allows that as soon as user gain access to the network through openNAC network access policies is registered its information in the FortiGate Firewalls to allow access and unified network policies inside the openNAC management.
For that is used a User Group, for instance can be defined a fortiGateAccounting_UserGroup, this means that the information is registered in and User Group that belongs to the Fortigate platform. In case that the user accessing to the network use a Domain and send this information in the events is required to be defined.
This plugin allows send to a FortiGate firewall information related on the username associated with an IP address.
This information is sent by accounting radius protocol based on Fortinet document: FortiGate RADIUS Single Sign-On (RSSO) with Windows Server 2008 Network Policy Server (NPS) (http://docs.fortinet.com/uploaded/files/2345/fortios-radius-single-sign-nps-523.pdf)
Variables explanation:
This plugin has some properties to be managed using openNAC admininistration Portal, in section at Configuration -> Configuration Vars -> Plugins.
- FortiGate Radius IP: IP to send radius accounting messages to FortiGate
- FortiGate Radius Port: Port to send radius accounting messages to FortiGate
- Shared Secret: Shared secret to connect to FortiGate radius
- User Group: Value used to define the default User Group of Radius Single Sign-On (RSSO) type. If it is empty, not user group is used.
- User with Domain: It indicates if username sent to FortiGate has to include the domain name in case it is included in user request.
Custom properties
The fortiGateAccounting plugin allows you send a custom user group for all users who match the policy, overwriting the default user group specified in general plugin properties.
To provide this custom user group, you have to define a Custom param in the policy. The custom param has to be named fortiGateAccounting_UserGroup and its value has to be the user group associated with all users who match this policy
To continue the configuration on the FortiGate NGFW please review NGFW FortiGate Configurations.
(Feature) fortiGateAccounting Firewall Autodiscover
Description
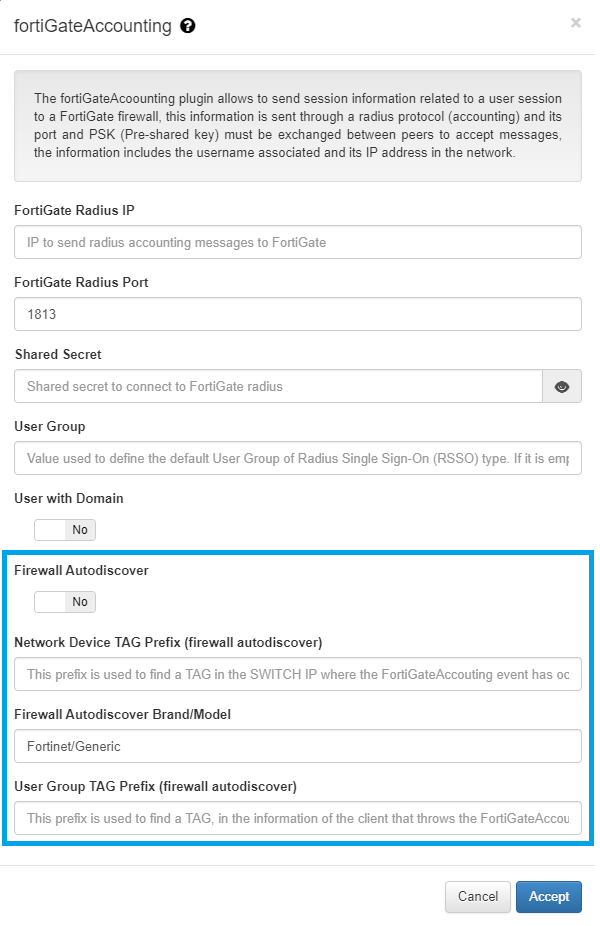
The fortiGateAccounting plugin has the feature Firewall Autodiscover that allows the user to dynamically discover which Fortinet Firewall is associated to the switch that processes a user event. This will be evaluated in every event that executes this Plugin.
A new IP event in openNAC finally executes the Plugin fortiGateAccounting. This event will have a “switchIP” field registered. The switch IP has a Network Device associated with its tags. Using the field “NetworkDevice TAG prefix” a TAG will be found.
Example:
- The “NetworkDevice TAG prefix” is ‘LBD’
- The Switch IP has the TAG LBD_OFICINA_01.
- So, the ND TAG prefix ‘LBD’ will match the TAG ‘LBD_OFICINA_01’
Using the tag found and the field Firewall autodiscover Brand/Model, a search through all Network Devices will be done. When the first NetworkDevice that matches these filters is located, its IP will be used as the ‘FortiGate Radius IP’ of the Plugin.
The FortiGate Radius IP found will be stored, as a TAG, in the Switch IP of the event with the following format [ICT_FGA_{firewallIP} which means Internal Cache TAG _ FortiGate Accounting _ IP firewall]. In further events, the search process explained above will not be done if this TAG is found in a Switch IP.
Ultimately, the field “userGroup TAG prefix” will be used to find a TAG inside the client tags. Once the TAG matches the prefix, it will be used as userGroup field.
Example:
- The user has the tag ‘EPT_DESKTOP’.
- The “userGroup TAG prefix” is ‘EPT’.
- So, the userGroup will be EPT_DESKTOP because ‘EPT’ matches ‘EPT_DESKTOP’.
Variables explanation:
- Firewall autodiscover boolean: This boolean defines if the fortiGateIP parameter should be automatically fullfilled from a NetworkDevice firewall. Default: false.
- NetworkDevice TAG prefix: This tag must match the ‘switchIP tag’ that user device use to connect to find the firewall later on. (Example: LBD).
- Firewall autodiscover Brand/Model: Define which brand and model use to locate the firewall (which already has the ‘NetworkDevice TAG prefix’). Default Fortinet/Generic.
- userGroup TAG prefix: Use this prefix as a regex to fill the userGroup field. The Tag will be found in the client event, for example EPT_DESKTOP, this TAG should be unique because only first ocurrence will be sent. Example “EPT”.
Plugin Iron Chip
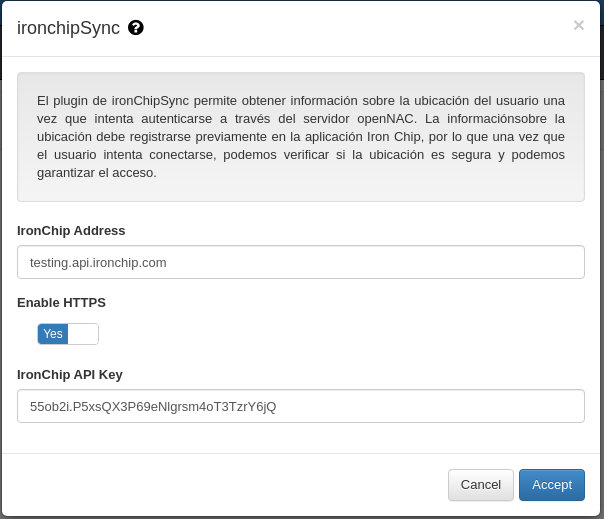
The Iron Chip plugin is used as a location based security 2FA. When a user tries to authenticate, we will add another authorization factor based on the user location.
We will first have to register some security zones throught Iron Chip App, and configure the users that will have the permissions in the configured zones.To get information about the necessary configurations form the Iron Chip App please review the Iron Chip configuration
Variables explanation:
This plugin has some properties to be managed using openNAC admininistration Portal, in section at Configuration -> Configuration Vars -> Plugins.
- IronChip Address: IP to communicate with the Iron Chip API
- Enable HTTPS: Flag to enable the HTTP or HTTPS protocol
- IronChip API Key: Key that will be associated to a secure zone, it is generated through the Iron Chip App.
When a user tries to authenticate through OpenNAC, an it’s authentication matches a policy where the Iron Chip Plugin has been enabled, authorization alert will be send to the user Iron Chip App, once the user authorizes the petiton, the mobile App will scan the location to determine if the user is in one of the secure locations that have been registered previously.
If the user is in a secure location, we will authorize it and give the acces according to the policy parameters. If the user is in a unsecure area or it has been any error with the parameters, we won’t authorize the user, so it will be rejected. We can see two execution examples:


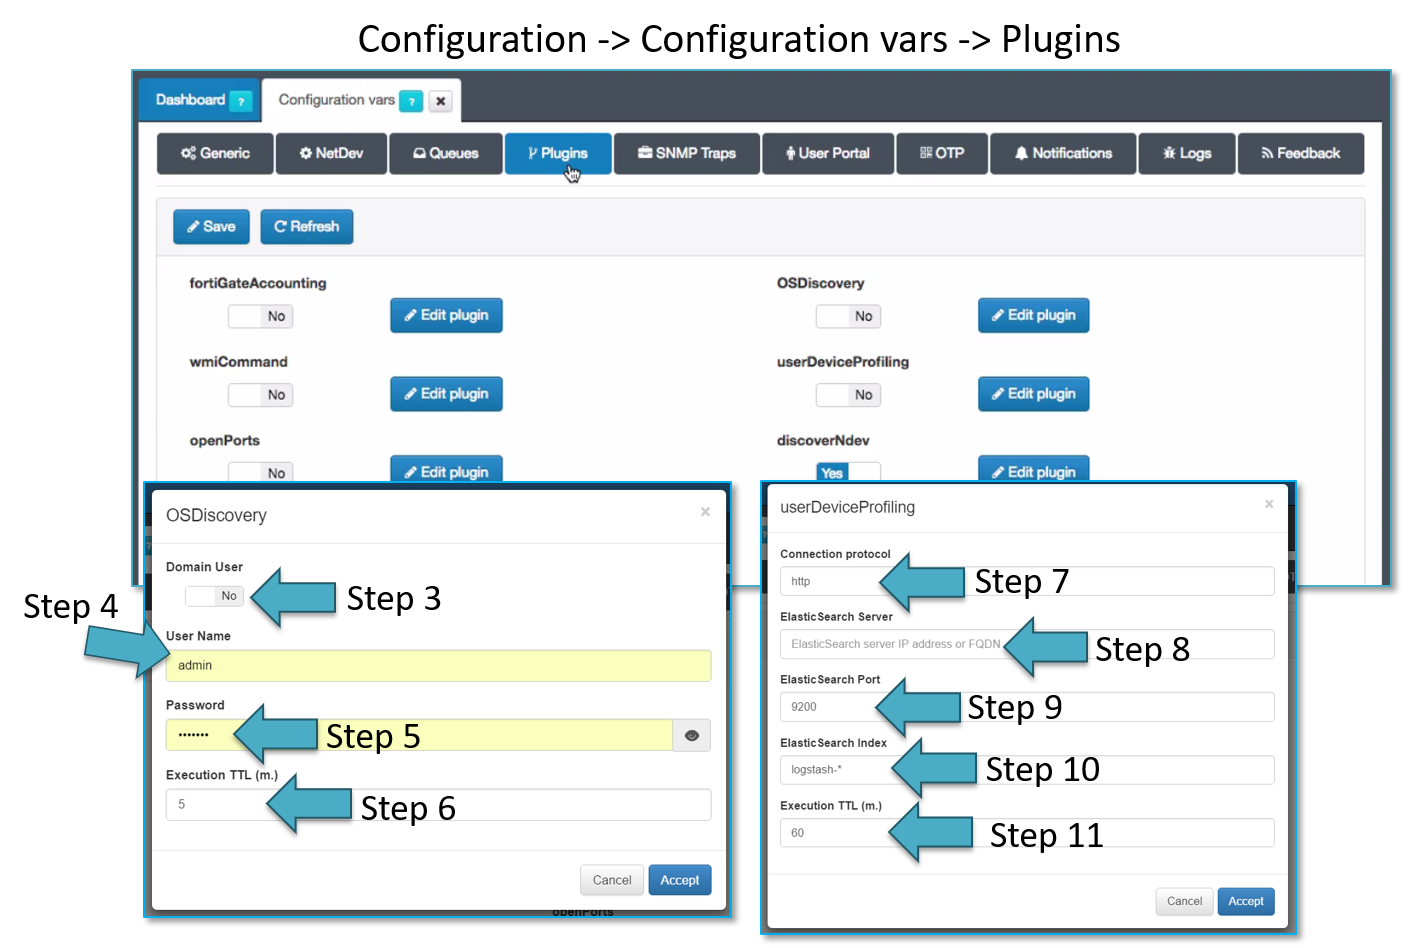
Plugin UserDeviceProfiling
This plugin allows to search information from openNAC Core to openNAC Analytics, all decoded information from openNAC sensor and other events are enriched and collected in the analytics and those can be used by openNAC Core components.
Connection to the openNAC Analytics can be done using http or https as shown by Step 7
IP for openNAC Analytics must be defined as shown by Step 8
TCP Port must be defined, having a default value of 9200 as shown by Step 9
The information collected by openNAC analytics are stored and saved in indexes, by default all the indexes names starts with logstash and by default all the indexes will be queried as shown by Step 10.
Plugins execution TTL allows to define when this process take place, it runs every 60 minutes by default as shown by Step 11.
To see the plugin at the policy postconditions configuration is required to enable it in the configuration vars first.
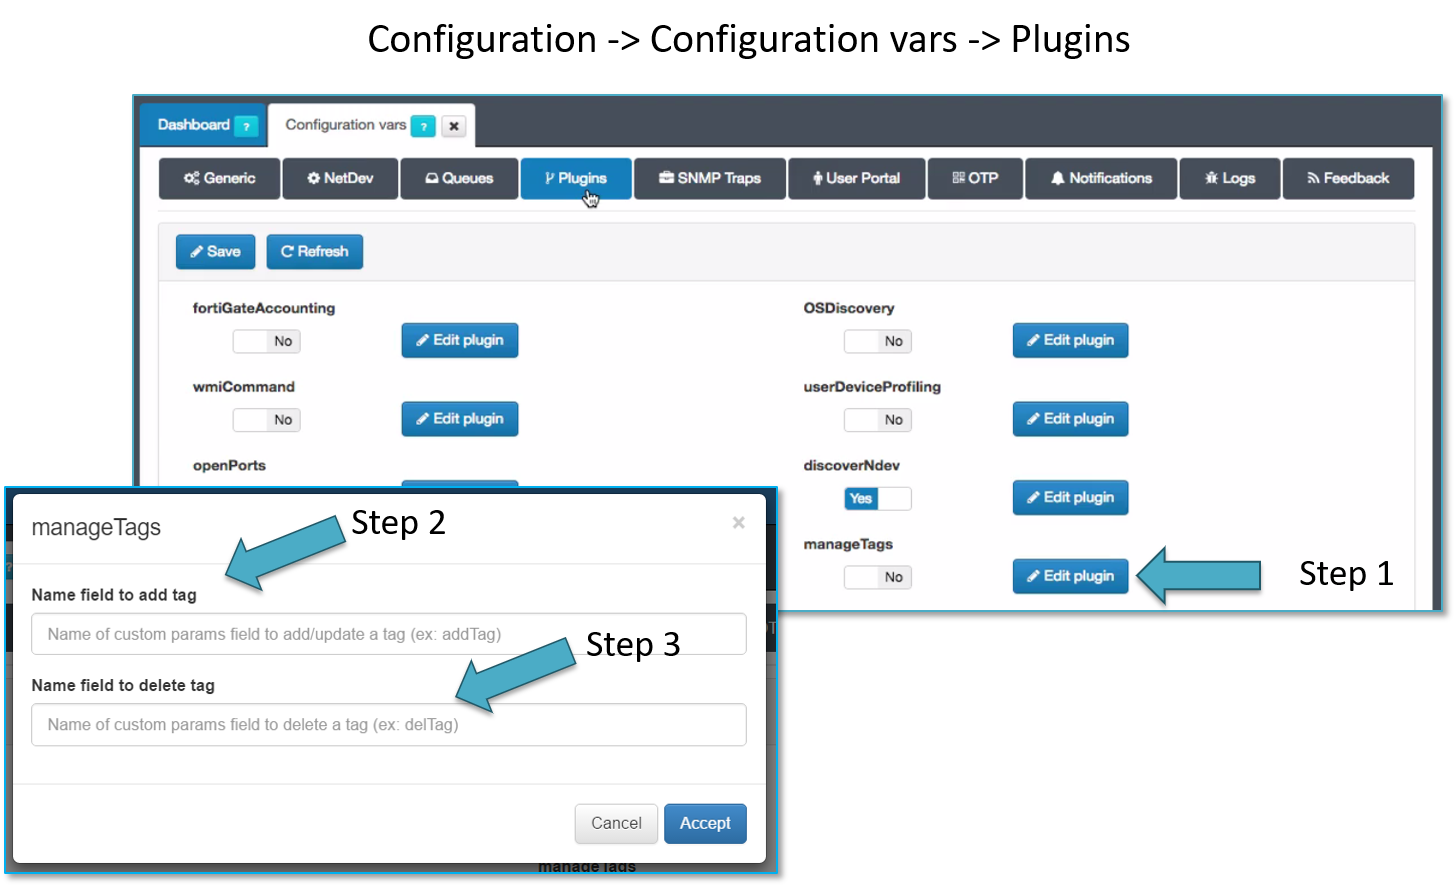
Plugin ManageTags
This plugin allows add/update or delete the tags associated with the user device that are being managed by the openNAC policy, remember that these tags includes a TTL and can be modified through this process.
Can be updated or added tags as shown by Step 3, also is possible to delete tags as shown by Step 4.
addTag and delTag1 are valid values and can be used.
This plugin allows add/update or delete a list of tags to the related user device.
Properties
This plugin has some properties to be managed using openNAC Adminsitration Portal , in section at Configuration -> Configuration Vars -> Plugins.
- Name field to add tag: Name of custom params field to add/update a tag (ex: addTag)
- Name field to delete tag: Name of custom params field to delete a tag (ex: delTag)
Custom properties
The manageTags plugin requires a list of tags to be add/update or delete when the policy is matched, defined in Custom param. Based on the properties defined previously, you have to use the name field indicated concatenated with a number up to 99, as a custom param name and the tag to be managed (add/update or delete) as the custom param value.
In case you are using the default name fields (addTag and delTag), some valid custom params would be: - addTag - addTag1 - addTag02 - addTag38 - delTag - delTag1 - delTag02 - delTag38
Note
You can use the same “index” value for an add and a delete tag, if you want.
When “addTag” is used, the tag is associated with the user device, if this tag was previously associated, the timestamp is updated in order to manage the time to live (TTL) of this relationship and avoid to be purged when this time is exceeded.
..note:
Maximum number of tags to be managed by the plugin is 99 in total. If you exceed this number an error is produced in plugin execution an the user device tags won't be updated.
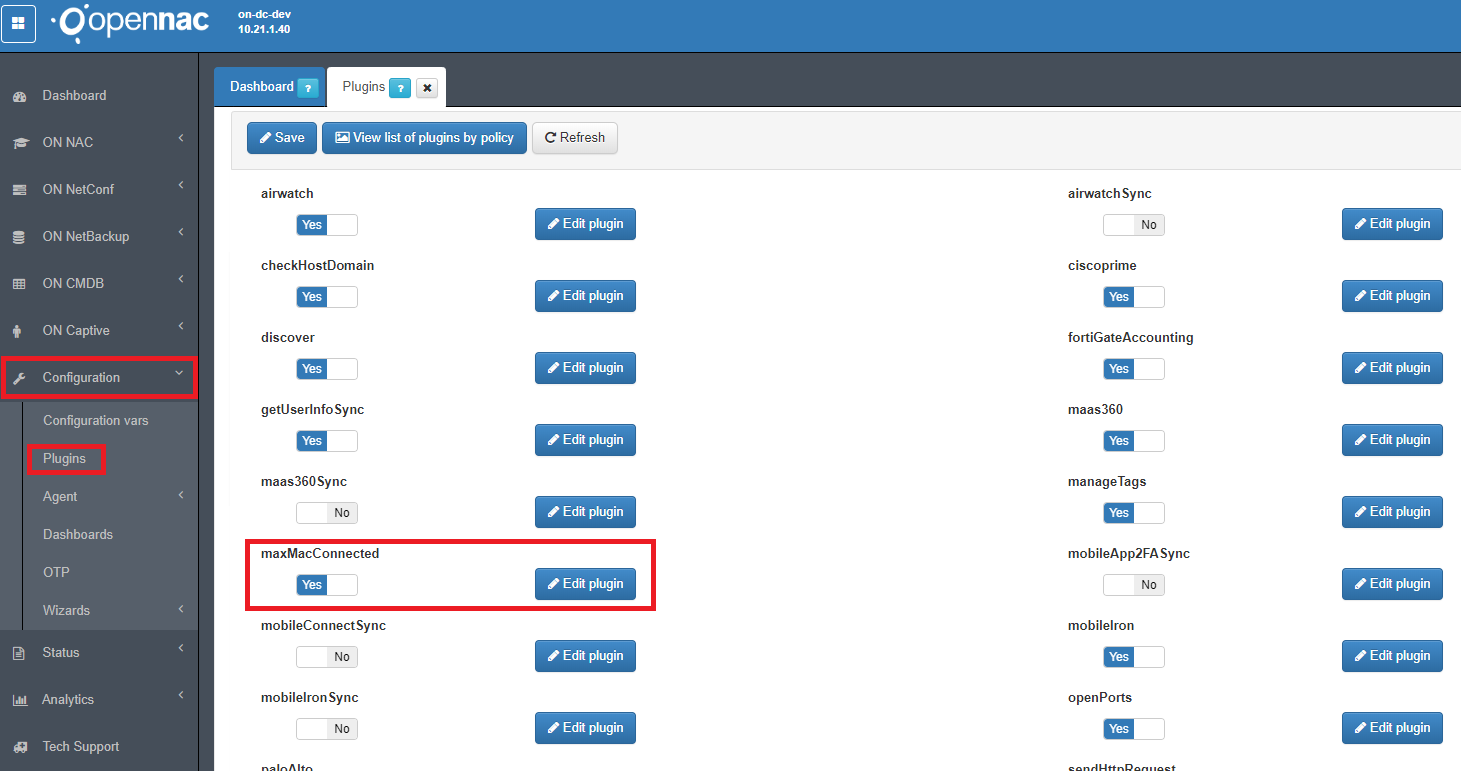
Plugin maxMacConnected
The Maximum Mac Connected Plugin is new since August 2020.
It is designed to enable the option for customers that have the need to be notified when a switch port exceeds a specific number of MAC addresses connected.
It works with the following TAGS:
MME_SWITCH : Only used if enabled the option 'Exclude tag' in plugin configuration. It's function is to avoid plugin execution for a switch, so it won't matter the maximum amount of MACs.
MME_PORT_<switch-port> : Only used if enabled the option 'Exclude tag' in plugin configuration. It's function is to avoid plugin execution for a specific port in a switch. Therefore, on the port specified in the tag, the plugin will not run and will not check the maximum number of MAC connections.
For example
MME_SWITCH
MME_PORT_50012
How to use it:
First of all, you need to activate the maxMacConnected plugin. Go to Configuration –> Plugins and click the “Edit plugin” by the side of the maxMacConnected plugin.
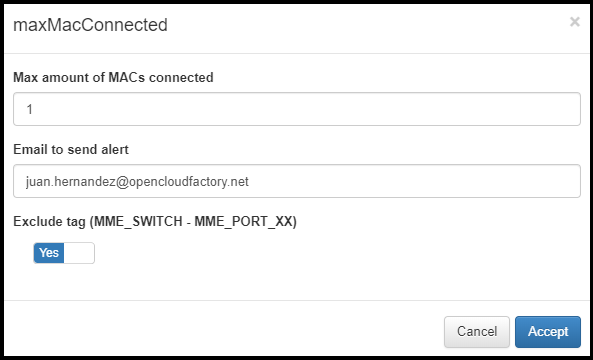
In the pop-up window, select the options as better suitted for your needs:
- Max amount of MACs connected
The maximum amount of MACs connected to a switch port so there are no notifications. When this value is exceeded, then it will be notified by email. To receive this alert, it is important to know that the option “Exclude tag” must be deactivated and the device must not learn these tags, because the plugin would not execute and the maximum connections check would not be done.
- Email to send alert
The email where the alert will be received when the maximum number of connections is exceeded for a switch port and the plugin exclusion is not used.
- Exclude tag (MME_SWITCH - MME_PORT_XX)
If the MME_ TAGS are used or not.
MME_SWITCH TAG: In the event that the network device has this tag and the exclude tag option is enabled in plugin configuration, the connection will be allowed directly without going through any other verification process. In other words, this tag is used as a way to bypass the maxMacConnected plugin for that switch.
MME_PORT_50012 TAG: In the event that the network device has this tag (having exclude tag option enabled in plugin configuration) and the connection is on port 50012, the connection will also be allowed directly without running the plugin.
After configuring as we want, click in the Accept Button.
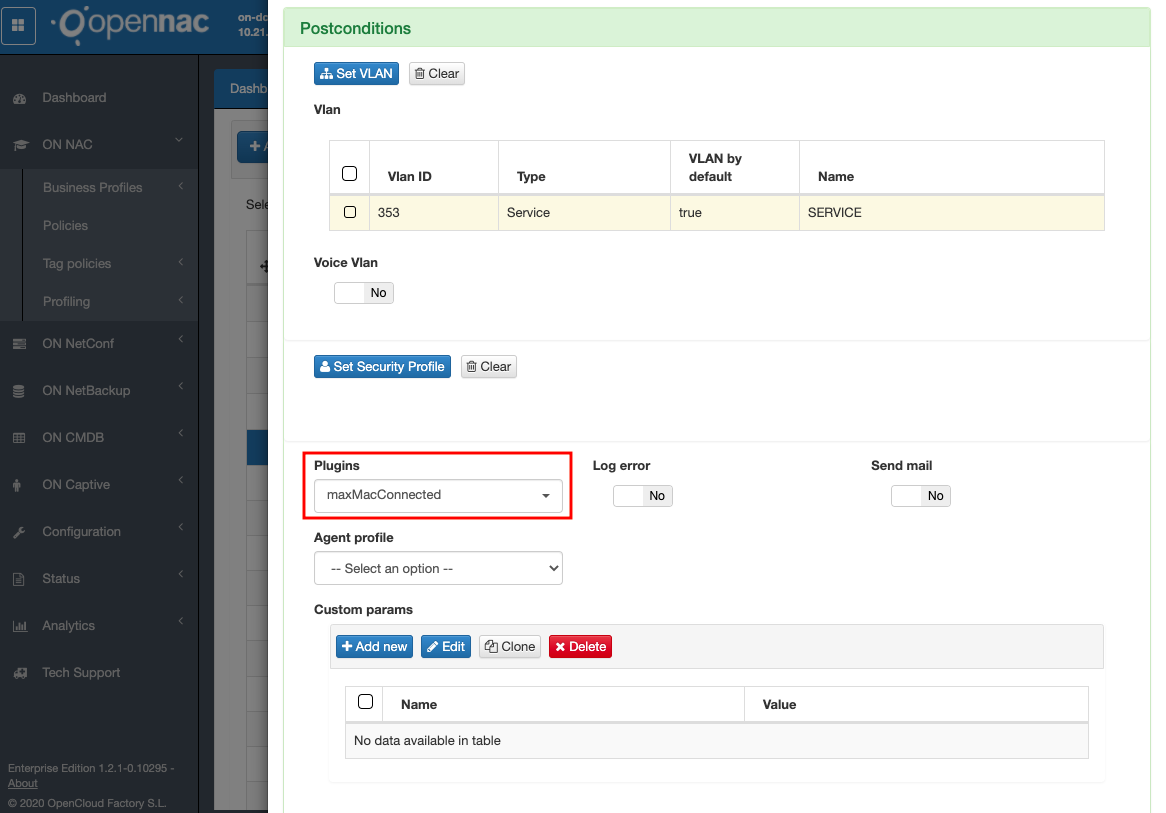
Now, change the maxMacConnected plugin from “No” to “Yes” and click in the Save button, at the top of the screen.
Now the work for configure this plugin has been done, so now you can use it into a policy.
Go to ON NAC –> Policies and edit an existing or add a new policy.
An alert will be sent if all of the following conditions are applied:
- Email is configured.
- Exclude tag option is disabled in plugin configuration, or it is enabled but there are no exclude tags assigned to that switch or port of the connection.
- The new counter of MACs connected to the switch port is higher than the maximum macs configured in plugin configuration.
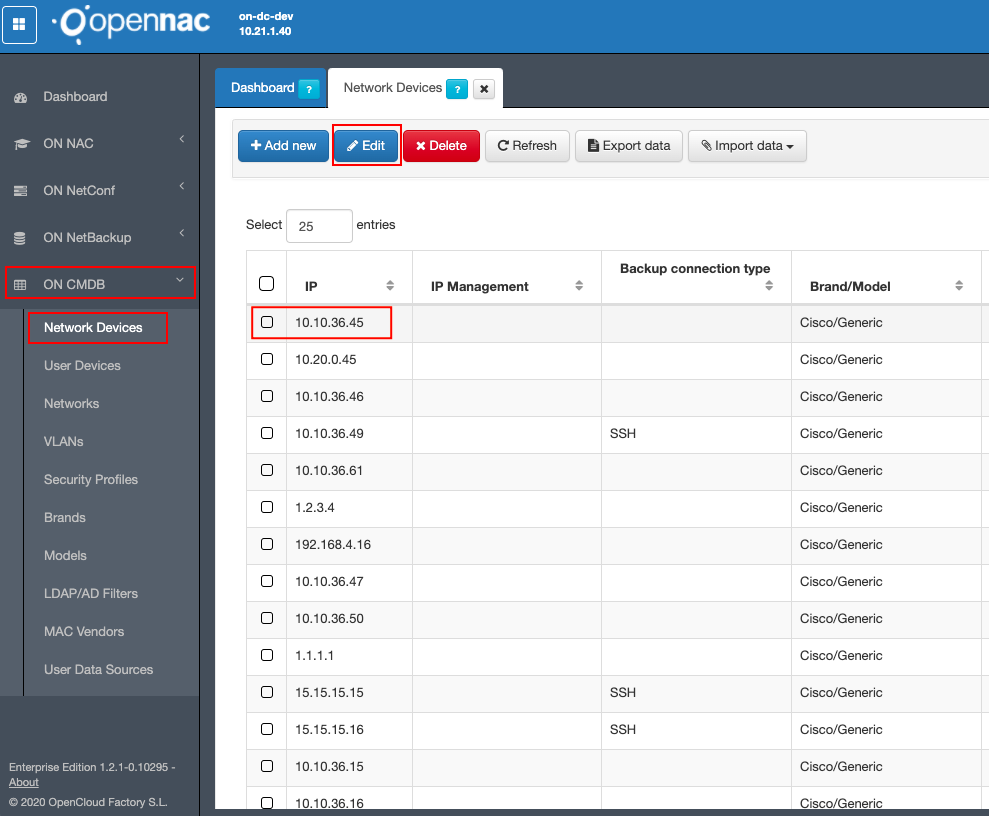
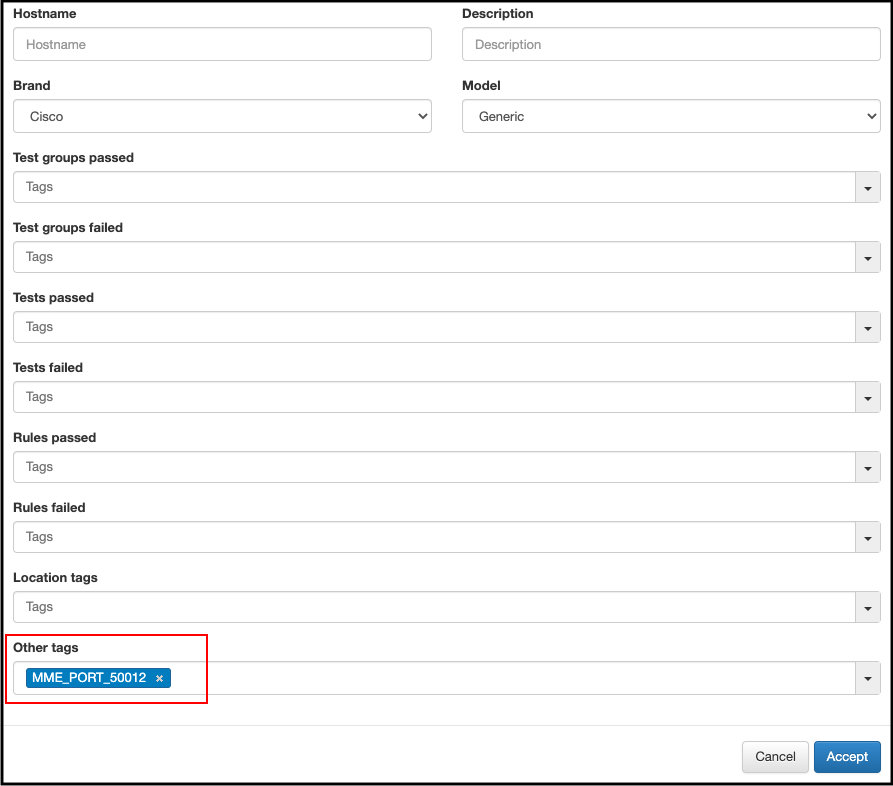
Adding the exclude tags to a network device
We can add the MME_ plugin exclusion tags if we configure them on a network device. To do this, we have to go to ON CMDB -> Network Devices as shown in the following images.
Plugin Operation Diagram:
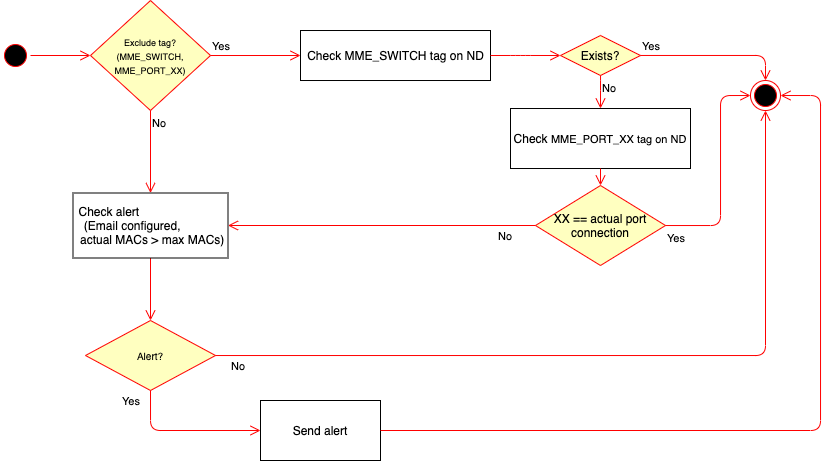
Firstly, the plugin checks if has the exclude tag option enabled in it’s configuration. If true, it will check if the network device where connection has been received has any exclude tag that affects to this switch or port. If there are, the plugin won’t be executed. If not, it will check for alert.
If the network device don’t have any of the MME_ TAGS, the next step is to check alert. It will be sent if email is configured in plugin configuration, as we said before, and the number of actual MACs connected to that switch port is higher than the maximum MACs configured.
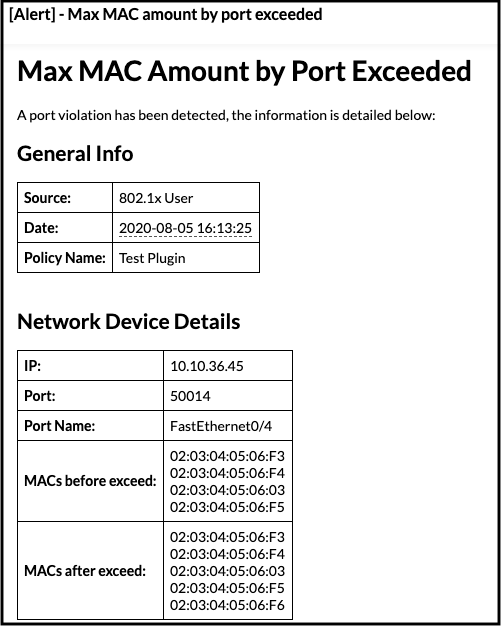
Alert:
An alert to the email configured in the plugin configuration (if configured) can be sent (if met conditions) as the following format:
Discover
This plugin use the devices asset’s ip address to gain visibility over its. Discover plugin executes a nmap and snmpwalk commands over discover assets.
One of the most important plugin is name Discovery, to configure it define the following parameters.
The plugging discover all the devices using snmp protocol, this tries to use the communities defined, this plugging use plenty of different types of scans, TCP, UDP, ICMP, extract banner and get fingerprints over operating system and services, there is a TTL that specify the number of minutes when the plugging is executed.
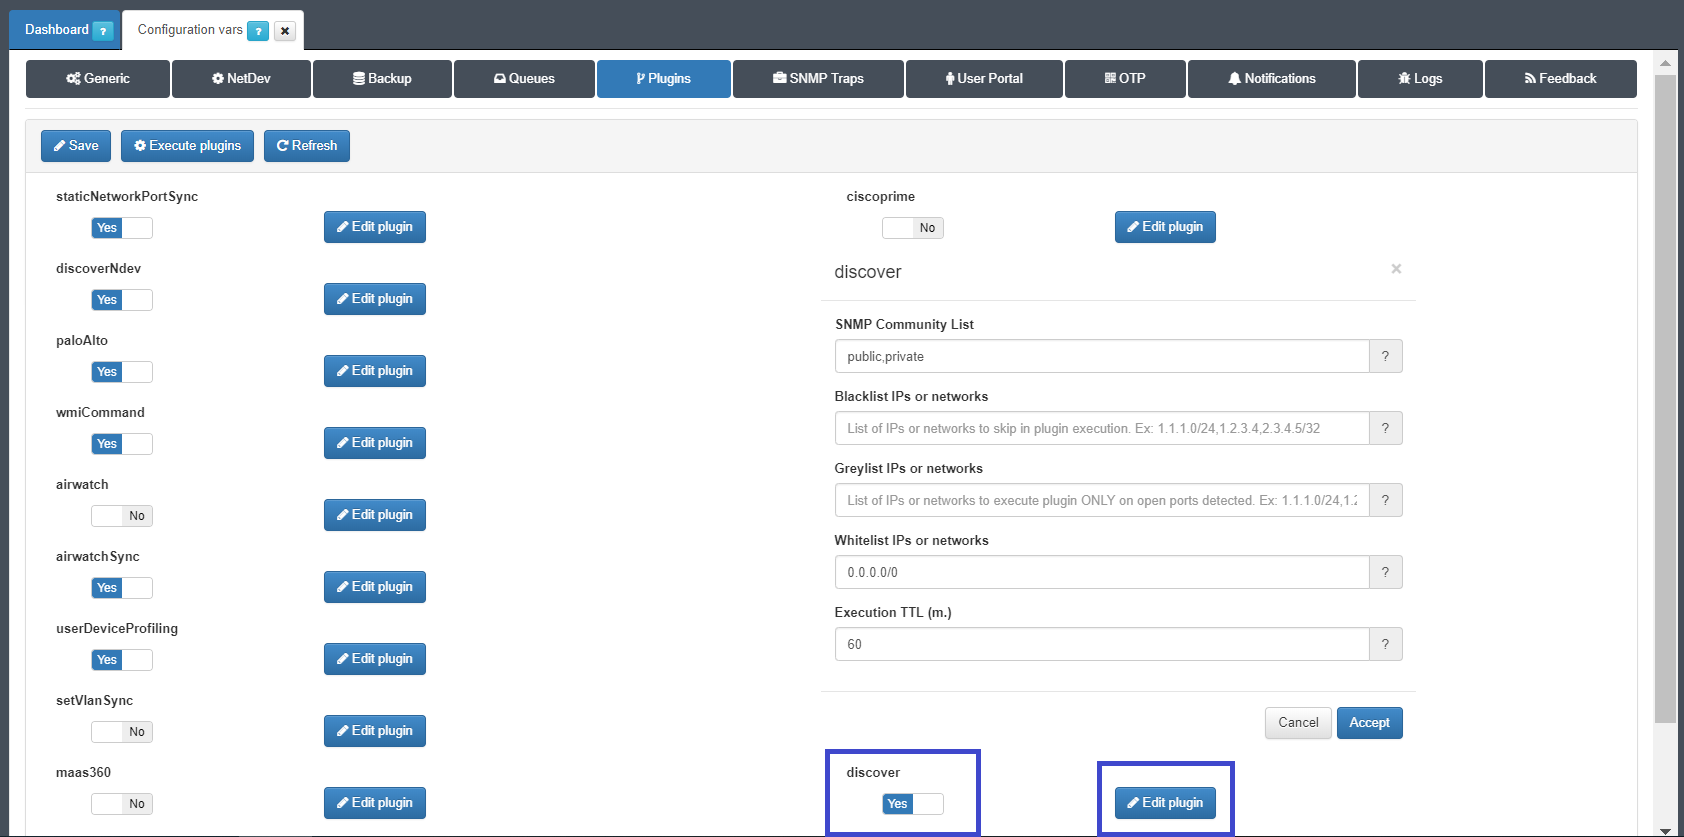
Allowlist: an IP range, or a set of comma separated IP range that should be scanned by the plugin, if the received IP is included in the network lists, the plugin will execute. In case CIDR dont appear will consider /32.
Example:
172.16.1.0/24 , 10.10.36.113/32, 1.2.3.4
Denylist: an IP range, or a set of comma separated IP range that should not be scanned by the plugin, if the received IP is included in the network lists, the plugin will NOT execute.
Example:
172.16.1.0/24 , 10.10.36.113/32, 1.2.3.4
GreylistIP: an IP range, or a set of comma separated IP range that should not be scanned by the plugin, if the received IP is included in the network list, the plugin just run over the defined ports as open ports using tags “DOP_” (Device Open Ports), for example using the network performance information collected by sensor. this functionality allows to discover “banners” in the known ports through a “soft” scan.
Note
This fields can be empty, in that case doesn’t apply.
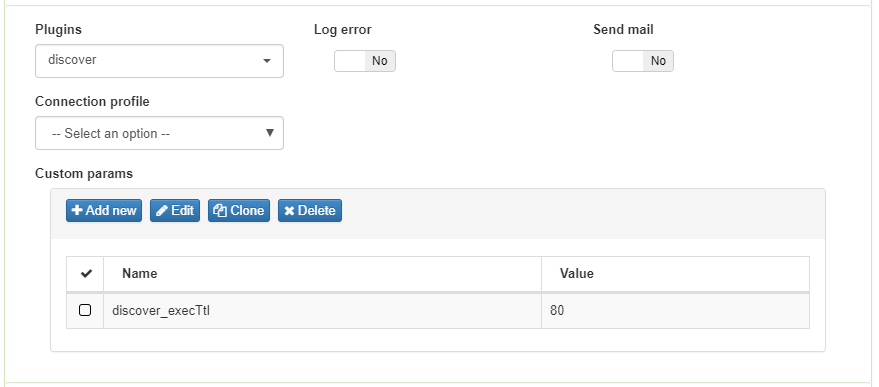
Administrators can overwrite this parameters using a single policy rule in section “custom params”, using custom param can be modified the default value of community or ttl using the follow variable:
- discover_communityList
- discover_execTtl
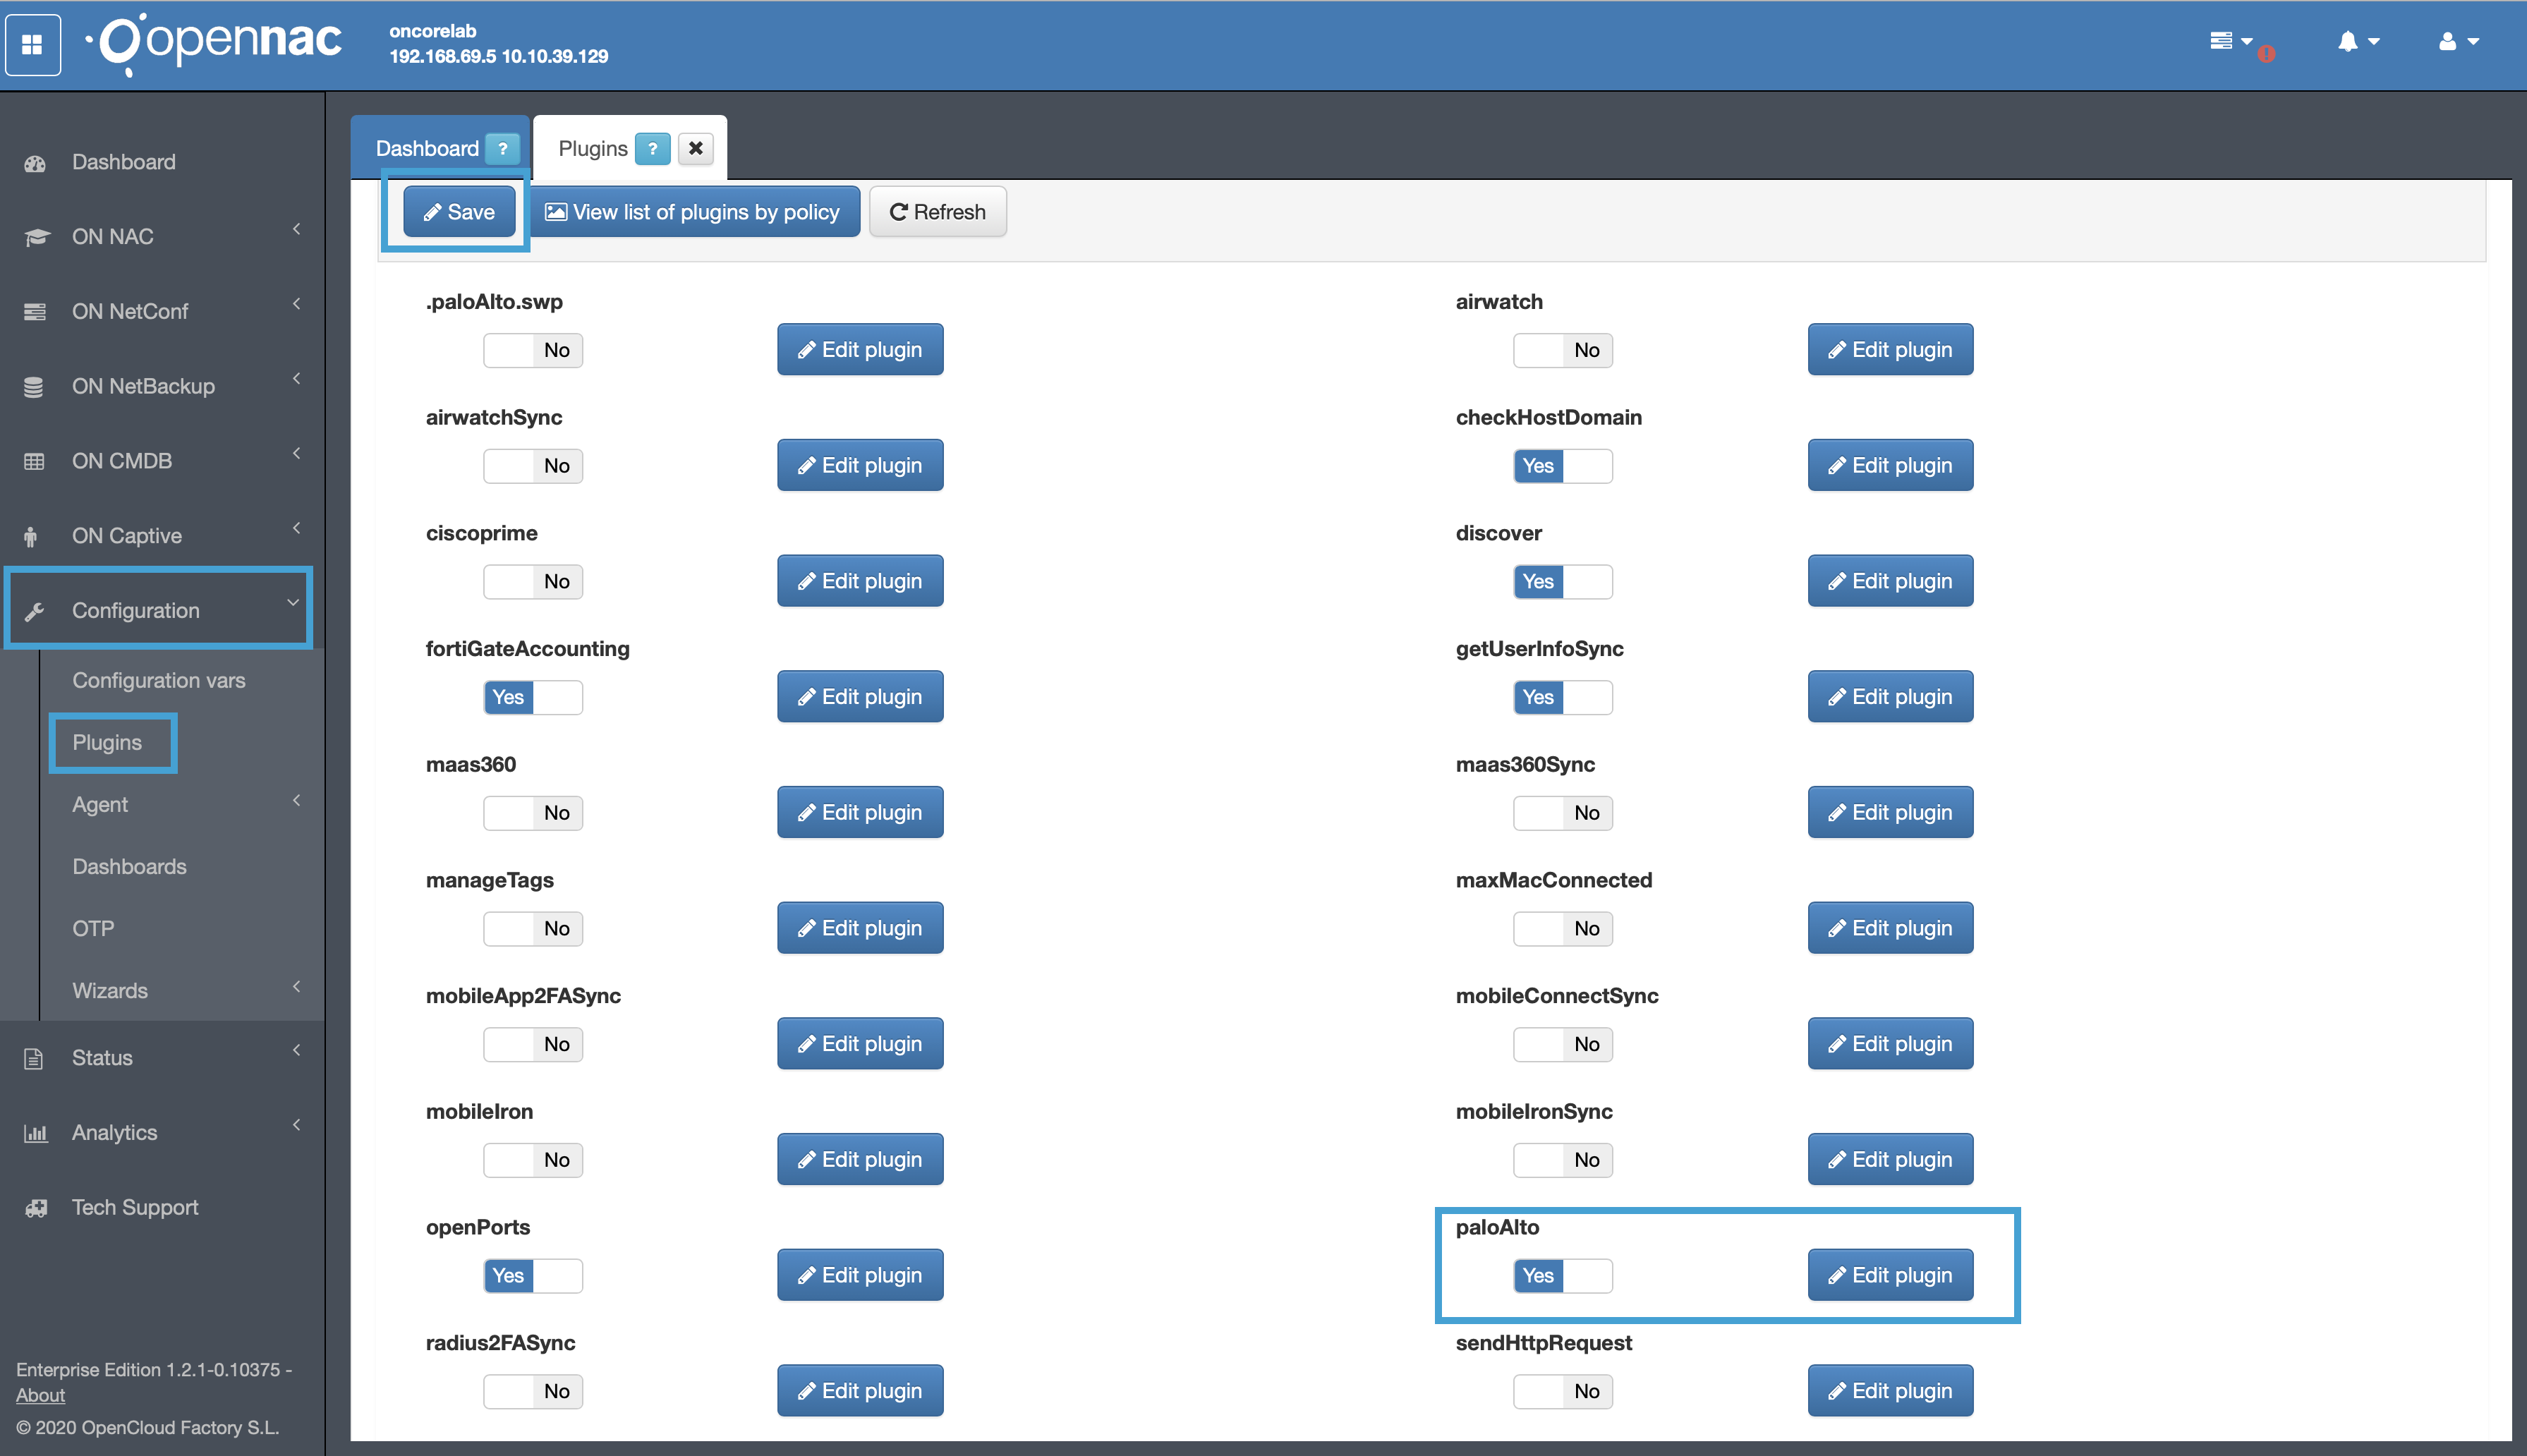
Plugin Palo Alto
This plugin allows send to Palo Alto Networks firewall information related on the username associated with an IP address.
To start, you notify to firewall the username associated with an specific IP address, and this relationship is active until a logout is received or during the “user session timeout” indicated in plugin properties (after that time, without a new notify, the relationship expires). A part from that, you associate the IP address with a Palo Alto dynamic tag, so in Palo Alto firewall you can define a Dynamic Address Group and use it in Palo Alto policies (https://www.paloaltonetworks.com/documentation/60/pan-os/newfeaturesguide/virtualization-features/dynamic-address-groups).
Properties
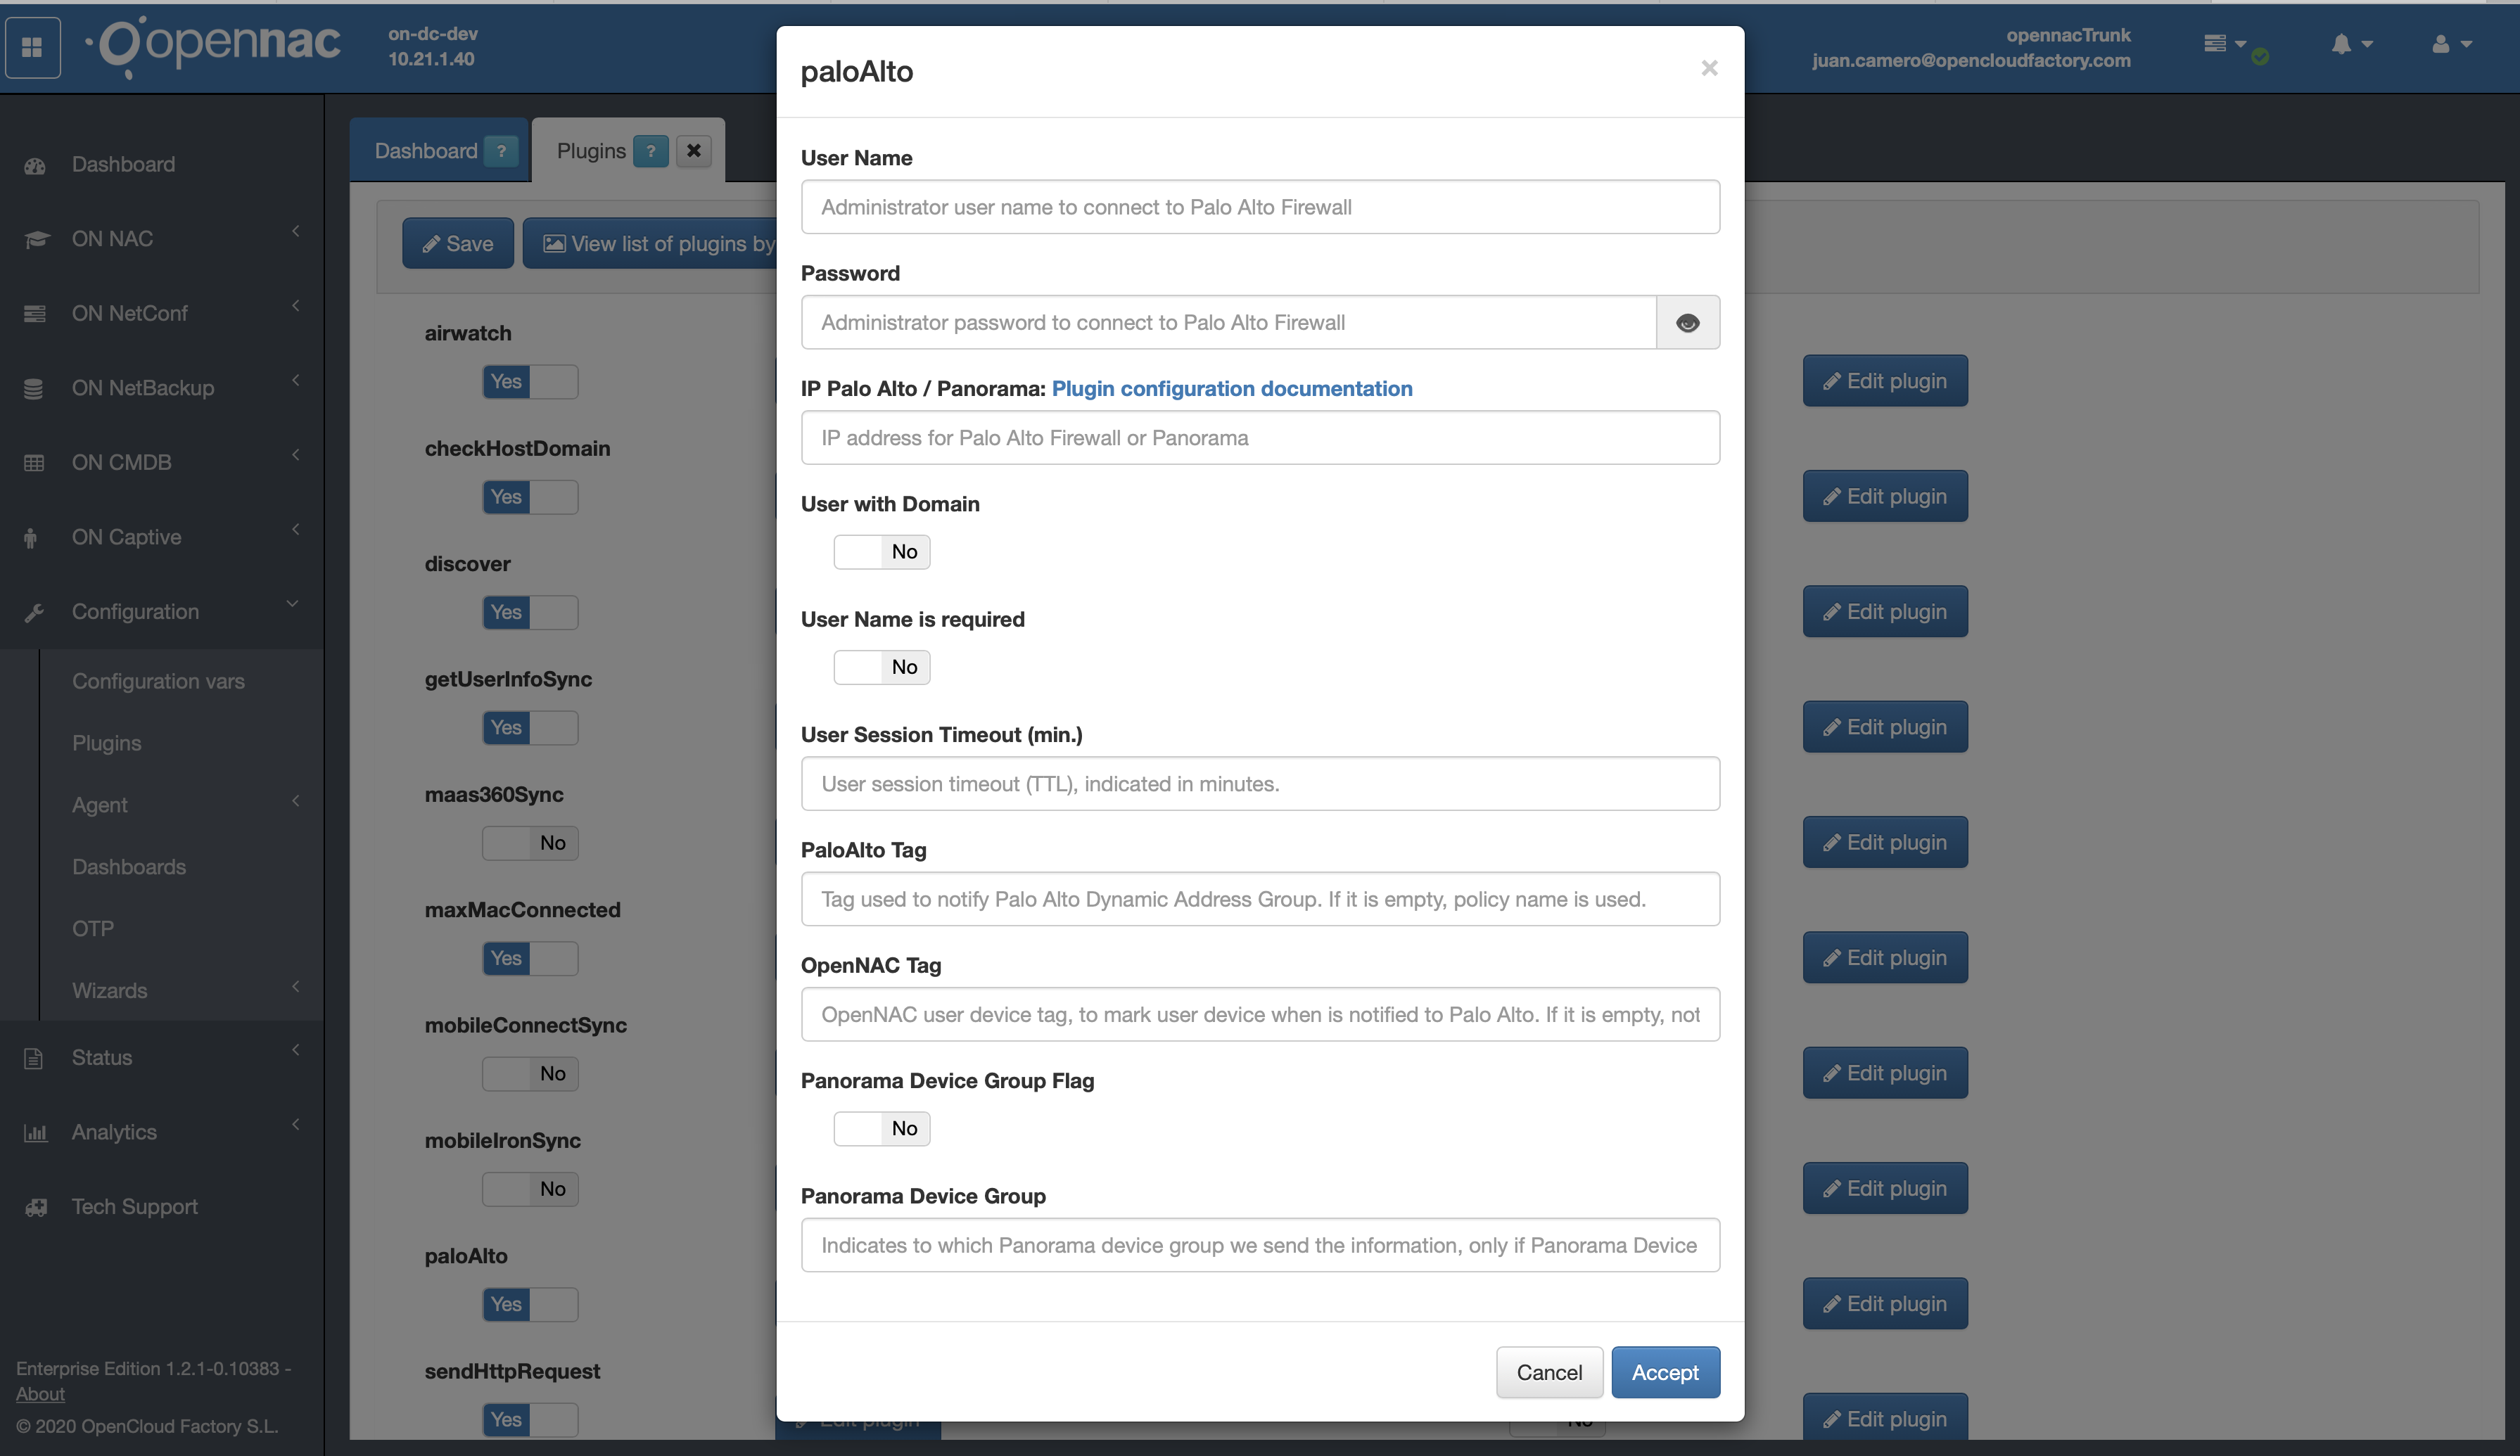
This plugin has some properties to be managed using openNAC administration Portal at Configuration -> Configuration Vars -> Plugins.
- User Name: Administrator user name to connect to Palo Alto Firewall
- Password: Administrator password to connect to Palo Alto Firewall
- IP Palo Alto: IP address for Palo Alto Firewall
- User with Domain: It indicates if user name sent to Palo Alto has to include the domain name in case it is included in user request.
- User Session Timeout (min.): User session timeout (TTL), indicated in minutes.
- openNAC Tag: openNAC user device tag, to mark user device when is notified to Palo Alto. If it is empty, not tag is used.
Note
To connect to Palo Alto, only a user with “XML API – User-ID Agent” rights is required, so “Web UI” and “Command Line” rights can be disabled.
PaloAlto NGFW technologies includes an API that needs to have a credentials to be accessed
In case that Palo Alto is integrated with Active Directory or LDAP servers is required, in case other types of users are used this must be indicated, this means that user session information is exchange between PaloAlto and openNAC allowing to define sessions timeout to force to be authenticated and also use the User Device tags when Palo Alto is notified.
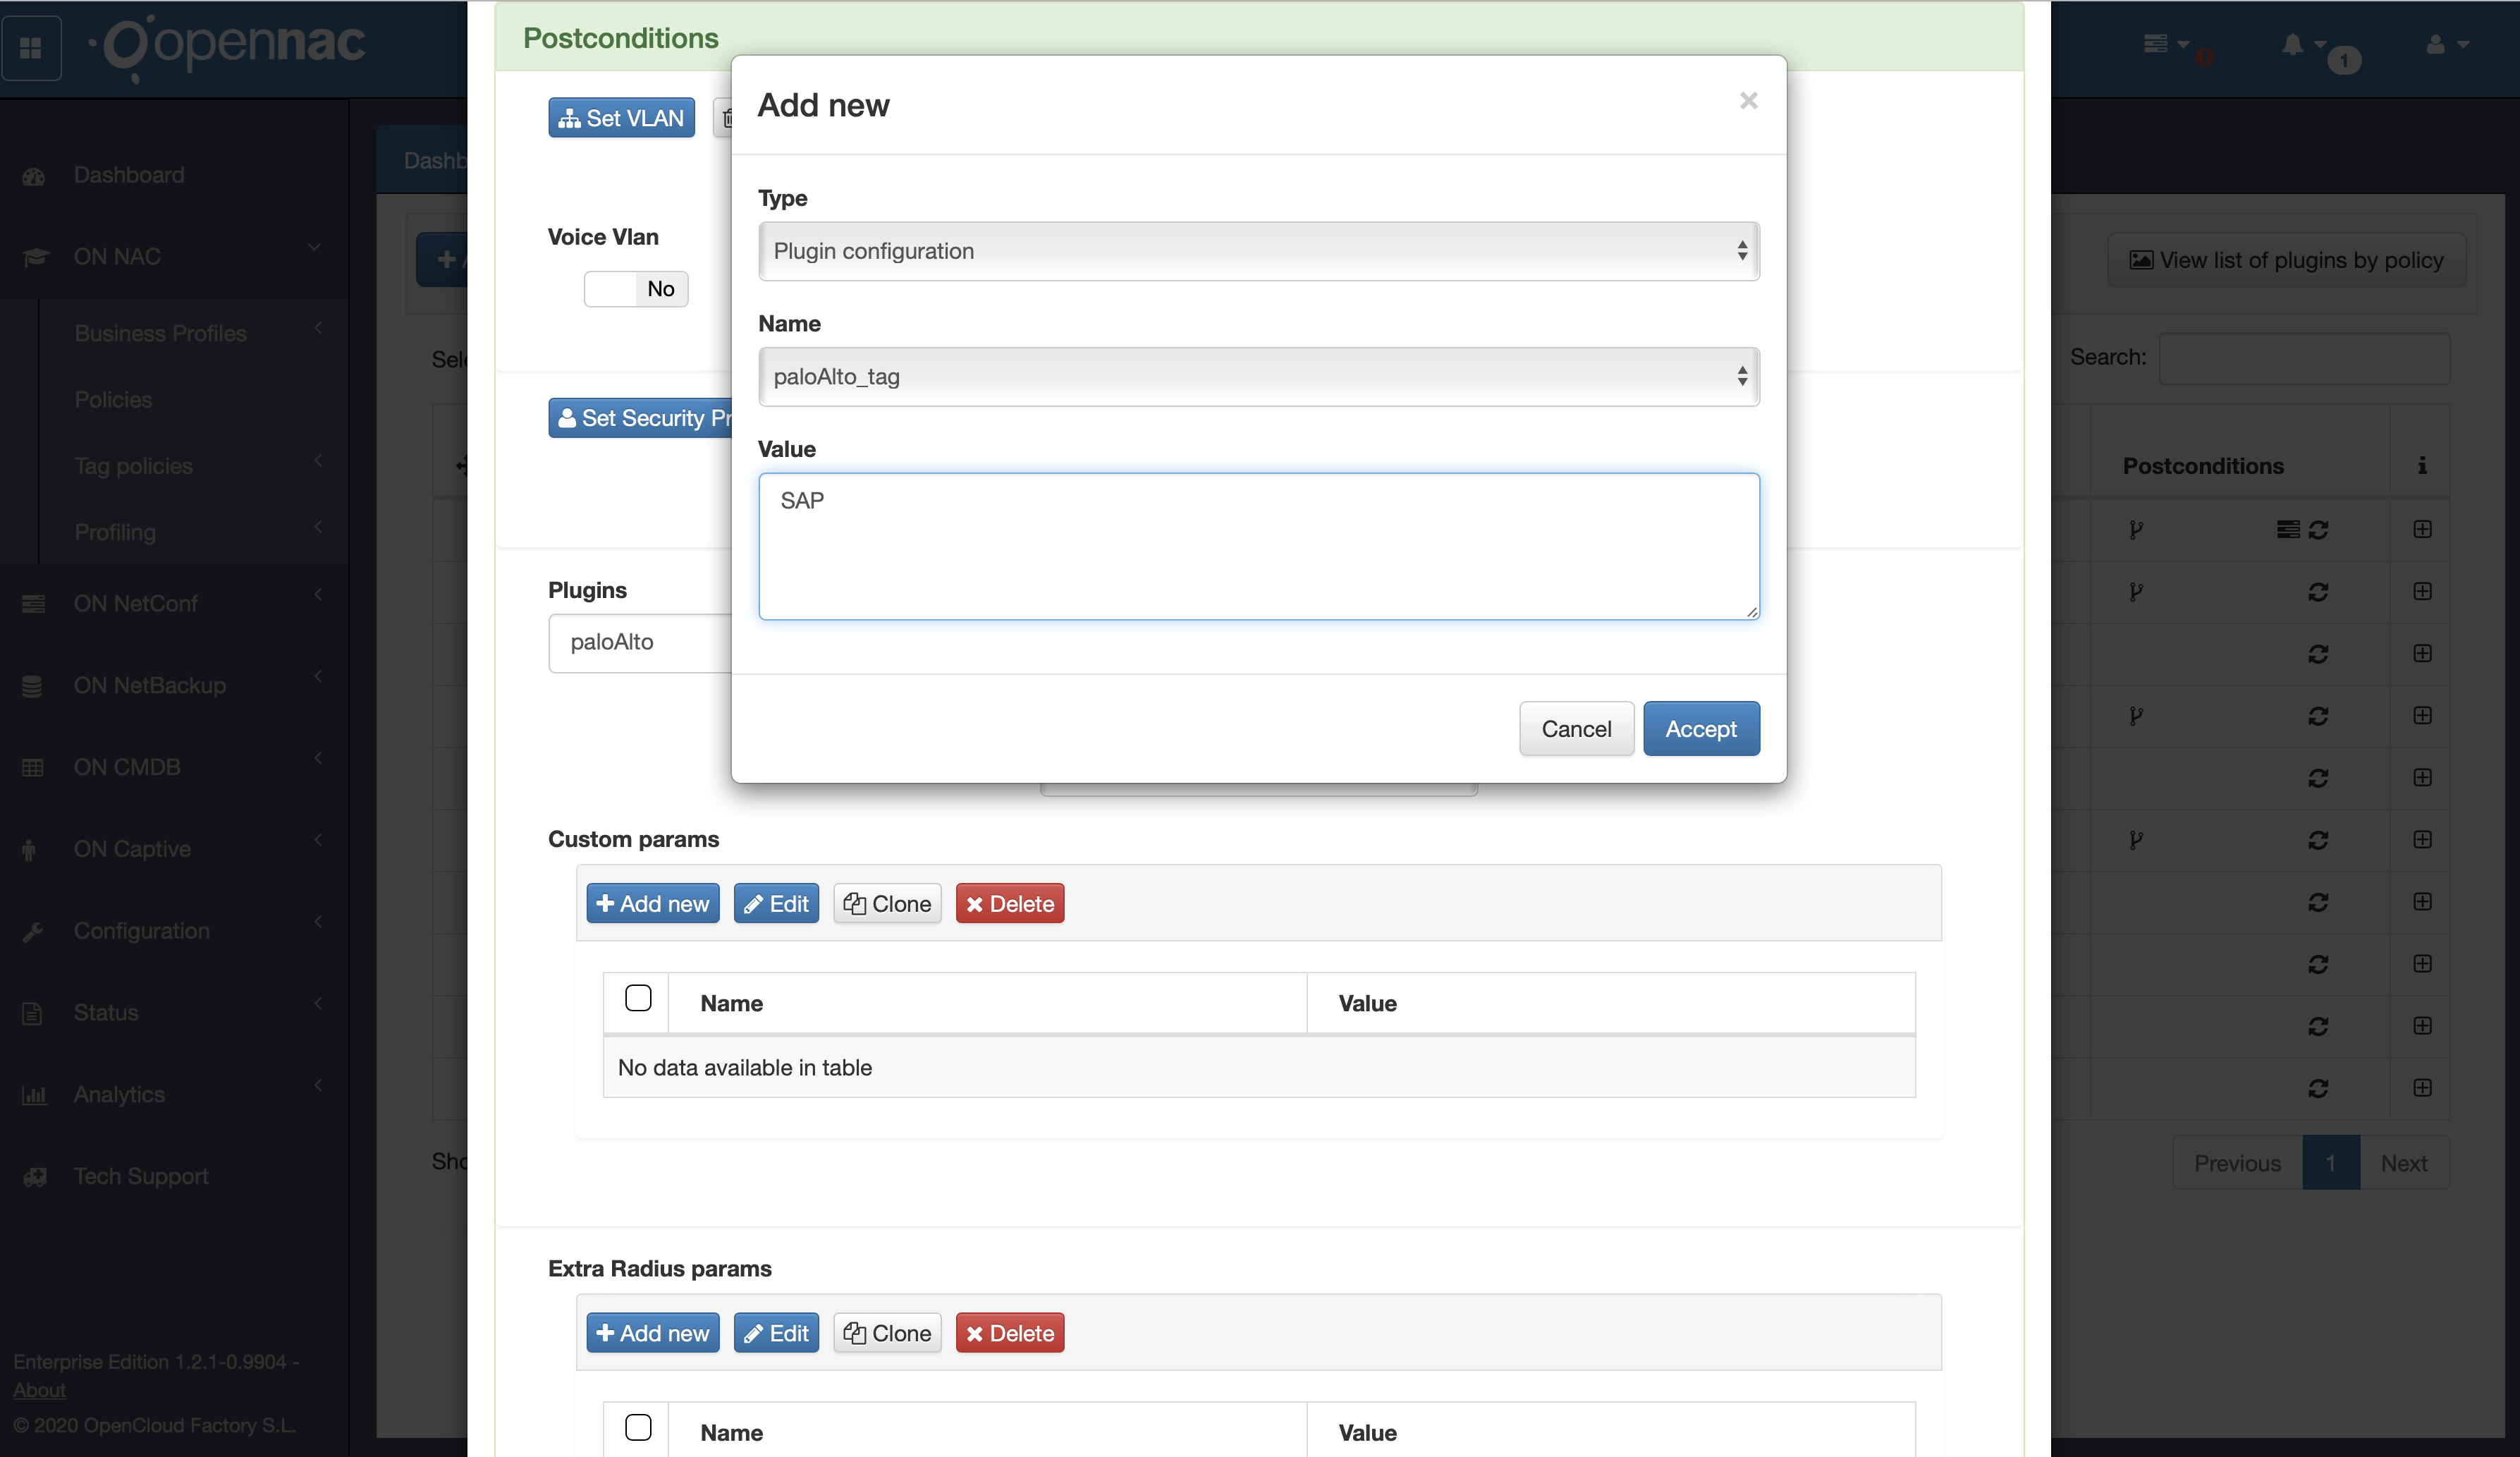
Important: paloAlto_tag is sent using custom parameter within policy engine as part of postcondition in the policy rule.
Custom properties
Some properties can be overwritten by each policy, in order to apply different configurations depending on the policy applied. These properties would be configured in each openNAC policy in Custom params.
- The Palo Alto dynamic tag to be sent will be defined by custom parameter paloAlto_tag, and its value has to be the dynamic address tag used in Palo Alto Dynamic Address Group. In case there is no custom param defined for “paloAlto_tag” the openNAC policy name will be used (if there is spaces in policy name, they are replaced by an underscore character).
- The timeout used, in user login, is defined in general plugin properties, but its value can be modified in the policy, using the custom parameter paloAlto_timeout, indicated in minutes.
- The openNAC tag defined in general plugin properties could be modified by policy if it’s required. So if you want assign an specific openNAC tag to user device, when plugin is applied, you can use the custom parameter paloAlto_opennac_tag, where the value of the custom parameter will be the tag.
Note
Take in consideration some performance tricks of Palo Alto Dynamic Address Groups:
- If the Dynamic Address Group is not used in a Palo Alto policy, the tag is not updated and the IP addresses sent to Palo Alto are ignored.
- Within 60 seconds of the API call, the firewall registers the IP address and associated tags, and automatically updates the membership information for the dynamic address group(s), so this registration could not be immediate.
Enable Palo Alto plugin
Customizing Palo Alto Firewall
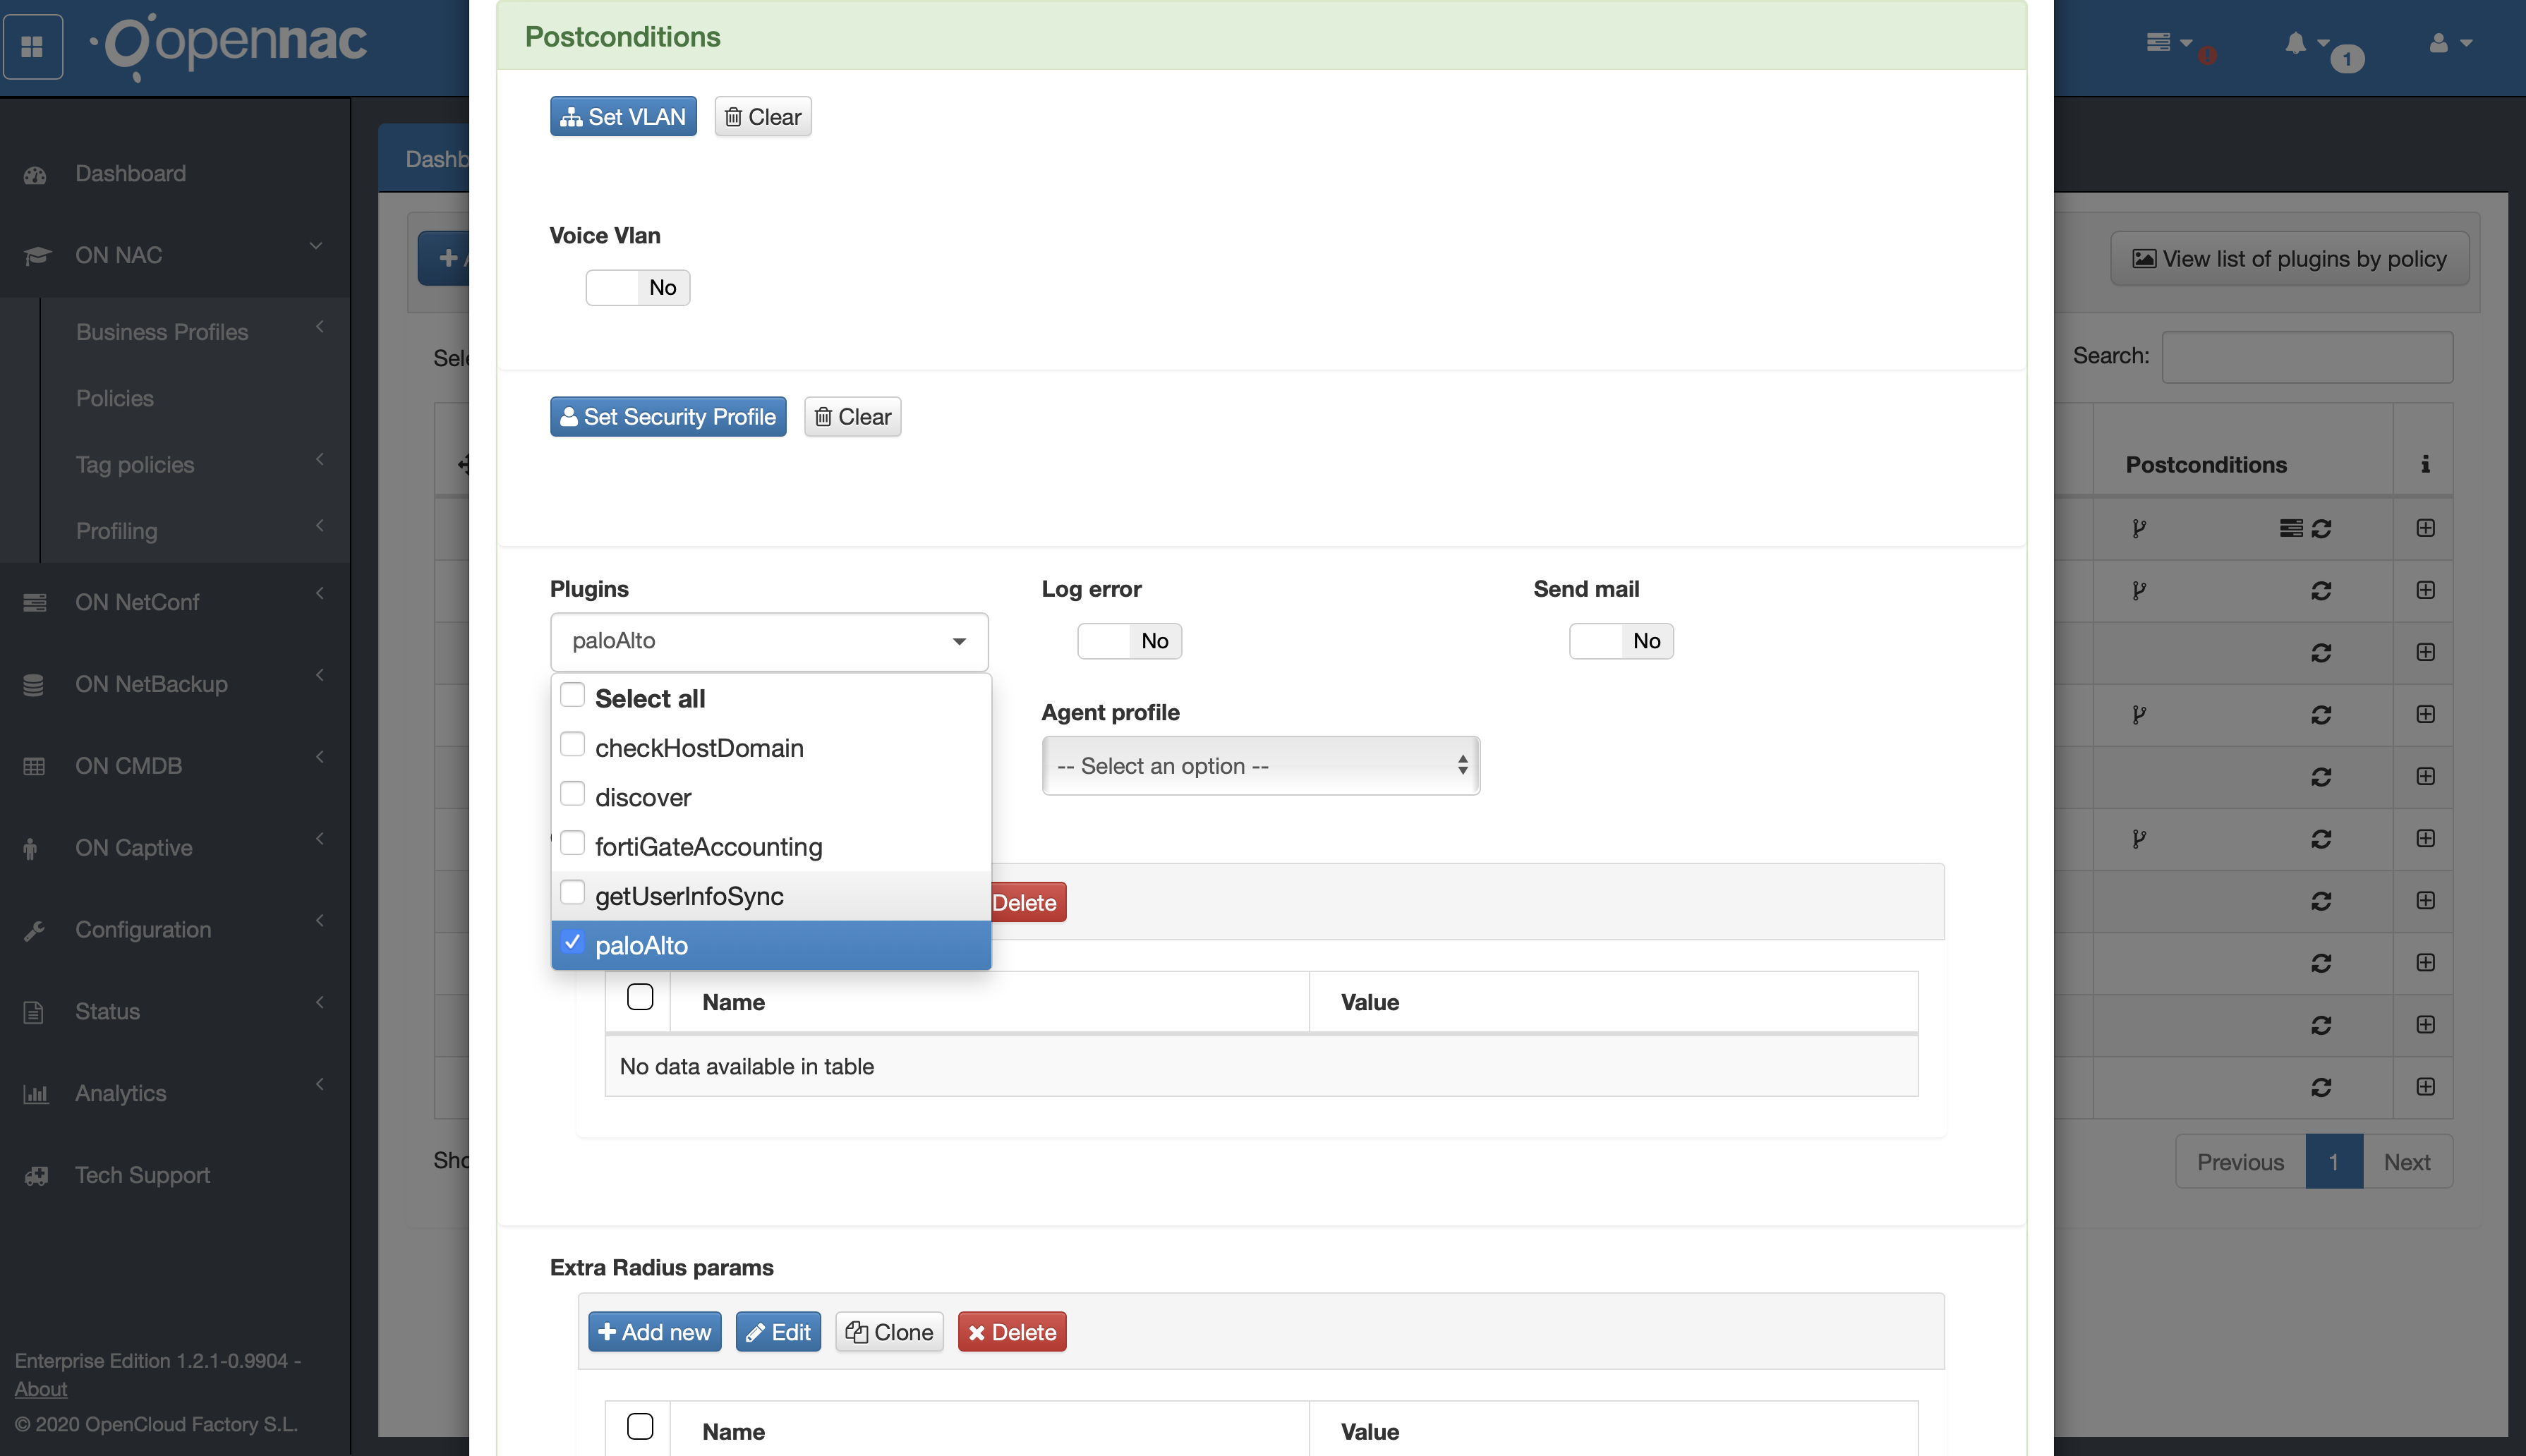
Including Palo Alto into policy.
Creating tag via Palo Alto Plugin
To continue the configuration on Palo Alto NGFW please review NGFW Palo Alto Configurations.
Opennac Cisco Prime Plugin
The plugin Cisco Prime allows obtaining information about client devices connected to a WiFi network managed by the Cisco Prime infrastructure and converts it into user device tags. Cisco Prime infrastructure provides complete lifecycle management of converged wired and wireless networks, and hold a wide range of information about connected client devices, which that can be utilized, for example for query and reporting through Opennac Analytics.
The information provided by the plugin meet the need of complementary information that can not be obtained from radius authenticaiton or accounting packages sent by the WLC controller.
At this time, the Cisco Prime plugin extract from the Cisco Prime infrastructure the following client information related to the access point through which the client connected to the WiFi network:
- Access Point IP Address – The IP address of the access point.
- Access Point Mac Address – The MAC address of the access point.
- Access Point Name – The name of the access point.
This information is then converted into user device tags with CPC prefix. This prefix means CISCO PRIME CLIENT.
Configuration
In Configuration –> Configuration vars –> Plugins, en able the Cisco Prime plugin as shown in the Step 1:
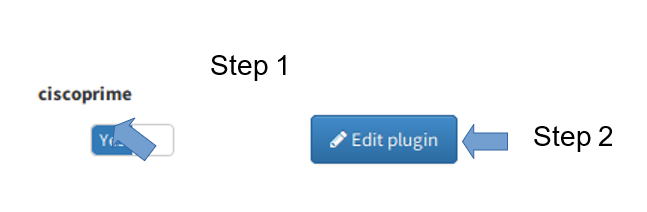
Step 2 – Click on the button “Edit plugin” to open the configuration dialog:
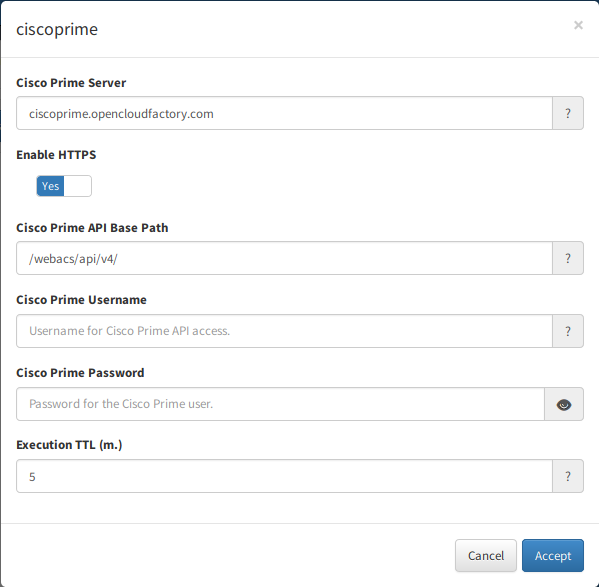
Step 3 – Cisco Prime Server – IP or dns name for Cisco Prime API server.
Step 4 – Enable HTTPS – Either we need to use HTTPS or HTTP to connect to the Cisco Prime API. The default is “Yes”.
Step 5 – Cisco Prime API Base Path – Cisco Prime API base path which will be part of the URL. The default value is /webacs/api/v4. Modern versions of the API are v4. Change it only if a different version is used.
Step 6 – Cisco Prime Username – Username for Cisco Prime API access.
Step 7 – Cisco Prime Password – Password for Cisco Prime API access.
Step 8 – Execution TTL – During this period, indicated in minutes, no more executions are done over the same client.
Step 9 – The configurations are saved by clicking on the button “Accept”.
After enable this plugin in a policy, when a client managed by the Cisco Prime infrastructure authenticates and match with this policy, the plugin will query the API and assign the TAGs corresponding to the information obtained.
The resulting tags device will be displayed in the “Tags” section of the status details for that user device and should look like:
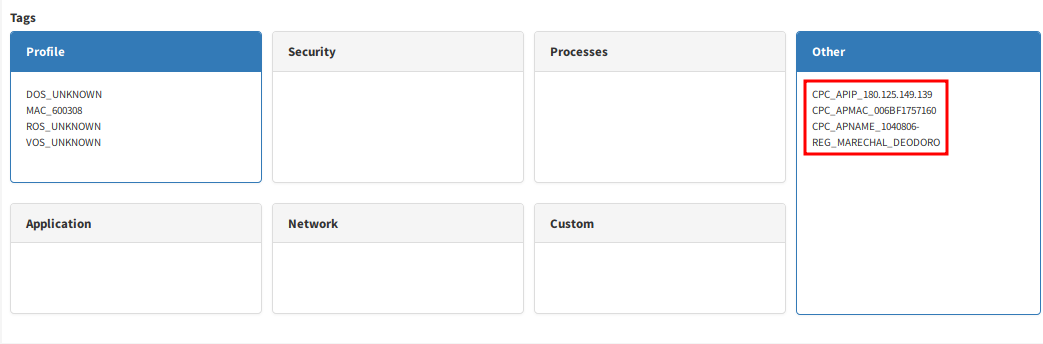
In this example, three tags were created:
- CPC_APIP_180.125.149.139 – The tag informs that the IP address returned by the access point information for this user device is 180.125.149.139.
- CPC_APMAC_006BF1757160 – The tag informs that the MAC address returned by the access point information for this user device is 00:6B:F1:75:71:60.
- CPC_APNAME_1040806-REG_MARECHAL_DEODORO – The tag informs that the access point name returned by the access point information for this user device is 1040806-REG_MARECHAL_DEODORO.
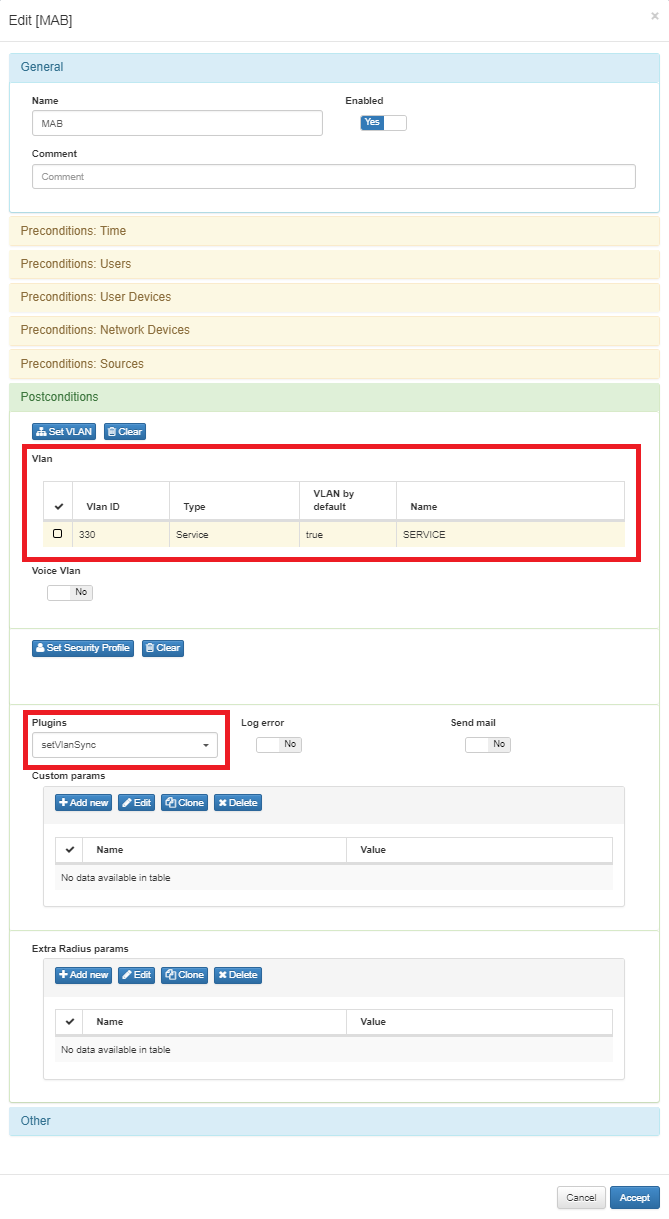
Set VLAN Plugin
The setVlanSync plugin uses the tag engine of openNAC to give users different access depending on which port of the network device they are connected to. It will read tags from the network device (SVP_PORT_<PORTNUMBER>_<VLANNUMBER> or SVP_GENERAL_<VLANNUMBER>) and depending on which port they are connected to, the device will be given access to a VLAN or another.
Initial Configuration
This section explains the initial configuration of the items used in this documentation. Keep in mind that that VLANs configuration are only an example and you will probably have different VLANs numbers and different configurations.
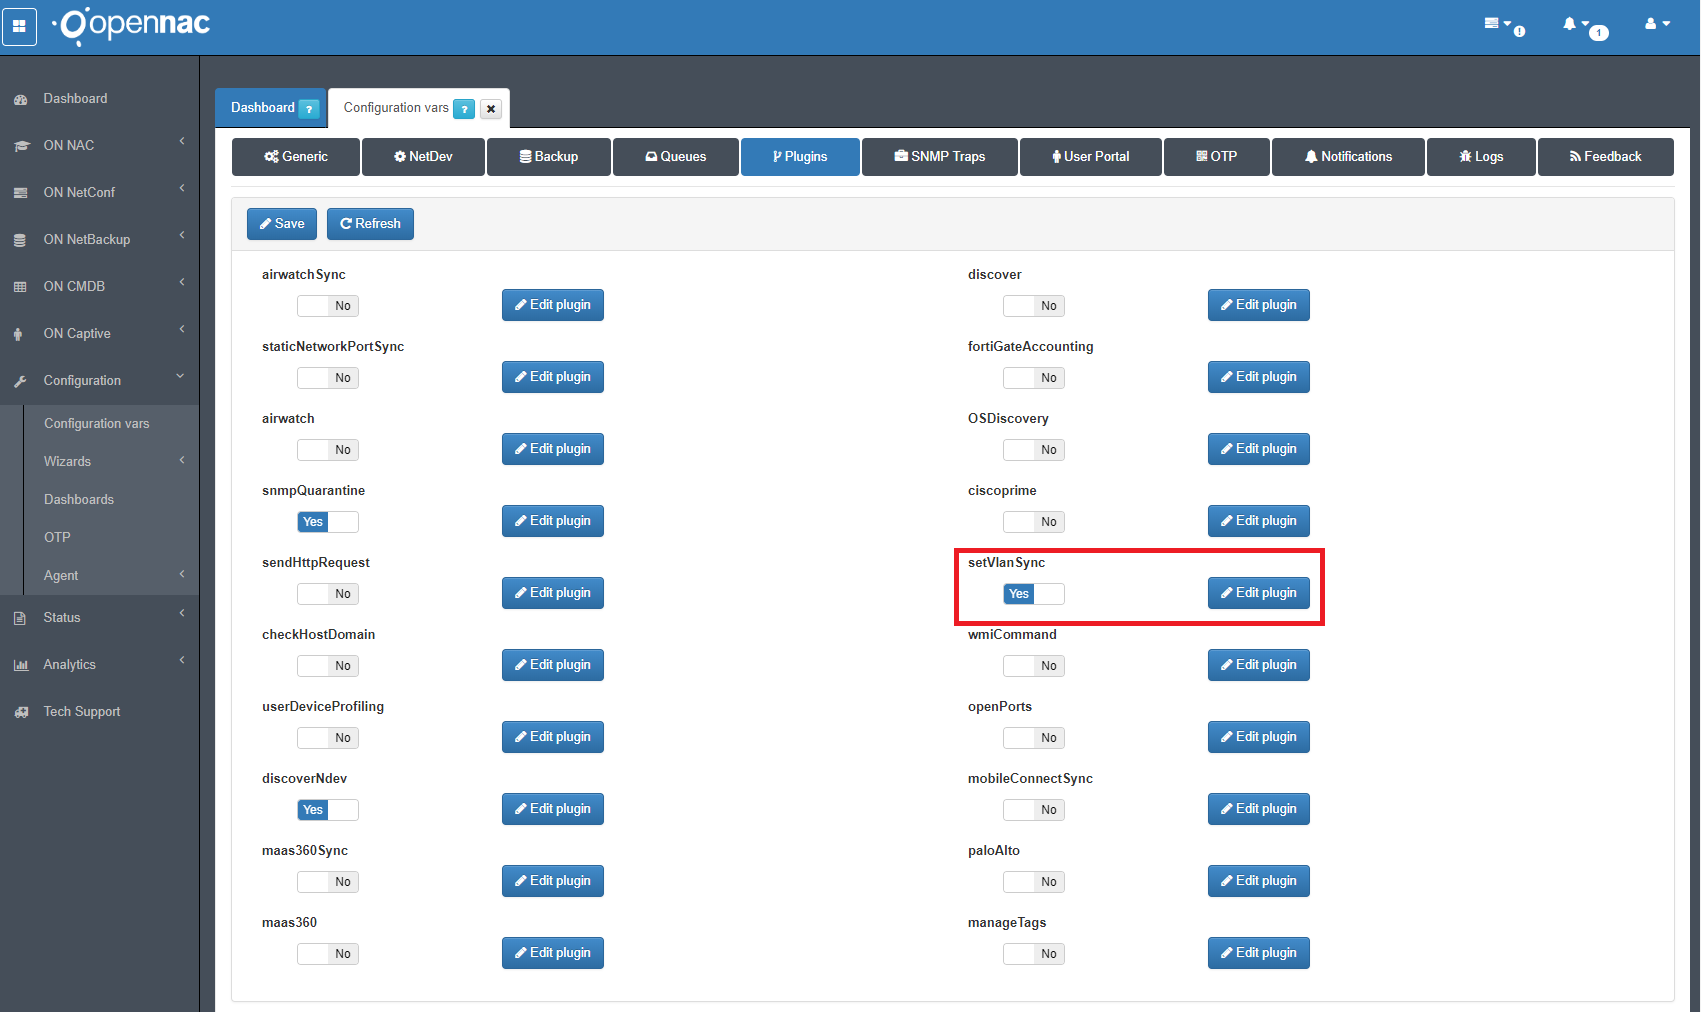
Activate plugin
The plugin “setVlanSync” must be activated at openNAC configuration
Policy
A policy should be created with a VLAN number and the plugin active.
The VLAN number configured in the policy will be assigned to the user device if the switch configuration doesn’t affect to the user device.
Plugin functionality
Switch TAG configuration
Two types of tags can be configured in the switch to assign a VLAN to an user device based on port number or on general switch configuration.
The tags are:
- SVP_PORT_$PORTNUMBER_$VLANNUMBER –> The VLAN $VLANNUMBER will be assigned to the user device if that device is connected to the $PORTNUMBER of this switch
- SVP_GENERAL_$VLANNUMBER –> The VLAN $VLANNUMBER will be assigned to the user device if the port where the user device is connected does not have a specific SVP_PORT tag.
Note
If the SVP_GENERAL tag does not exist in the switch and the port has not a specific SVP_PORT tag, the VLAN number configured in the policy will be assigned to the user device.
Plugin messages
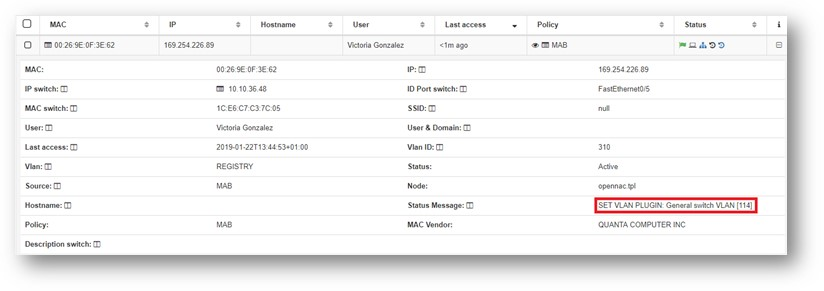
The user devices affected by the plugin will have a specific message in their “Status Message”. The possible messages are:
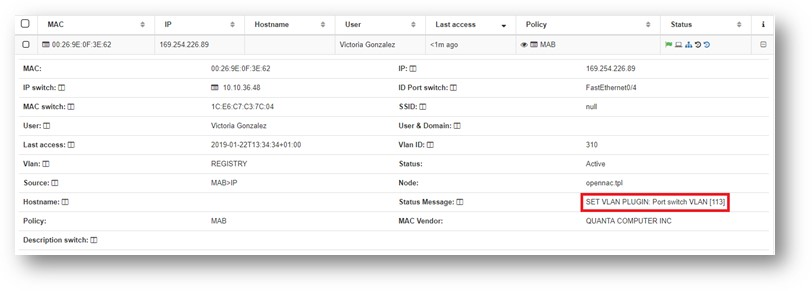
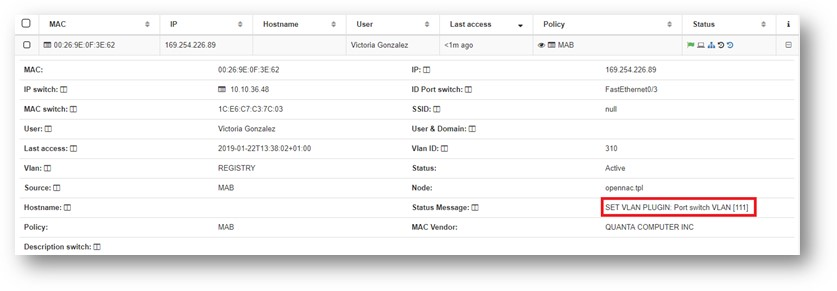
- SET VLAN PLUGIN: Port switch VLAN [$vlanNumber] –> The switch has a “SVP_PORT” tag configured for the port number where the user device connected and the $vlanNumber was assigned.
- SET VLAN PLUGIN: General switch VLAN VLAN [$vlanNumber] –> The switch has not a “SVP_PORT” for the port number where the user device connected, but has a “SVP_GENERAL” tag, so the $vlanNumber was assigned
- SET VLAN PLUGIN: Policy VLAN [$vlanNumber] –> The switch has not a “SVP_PORT” for the port number where the user device connected and has not a “SVP_GENERAL” tag, so the Policy $vlanNumber was assigned.
Plugin execution example
The plugin will be executed each time that the user device matches with the policy created before.
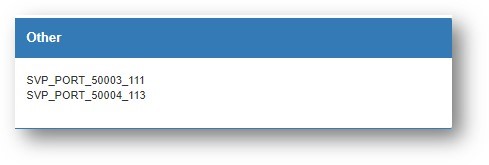
For the next examples, the switch has the next tags:
- SVP_PORT_50003_111 –> Assign VLAN 111 if the user device connects to port 3
- SVP_PORT_50004_113 –> Assign VLAN 113 if the user device connects to port 4
Note
The reference number of the interface (ex:50003 or 50004) has to be checked in a log file in the opennac-poleval.log from core server
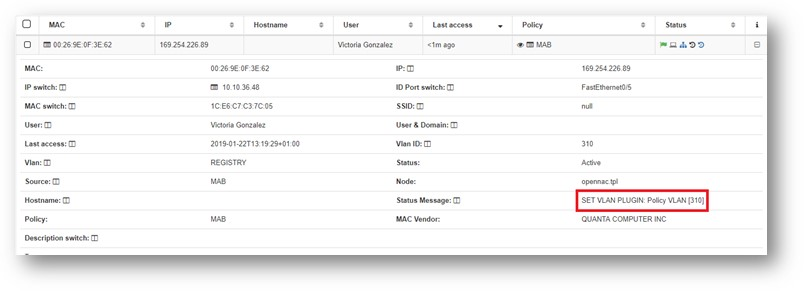
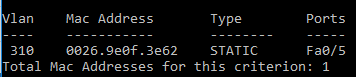
User device connects to port 5
Note that:
- Port 5 has not a specific configuration (SVP_PORT_50005 TAG).
- The switch has not a general configuration (SVP_GENERAL TAG).
The policy VLAN will be assigned to the user device:
User device connects to port 4
Note that:
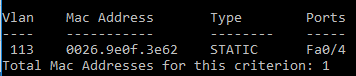
- Port 4 has a specific configuration (SVP_PORT_50004_113 TAG).
The VLAN 113 will be assigned to the used device because the port number 4 has a tag with that VLAN configured.
User device connects to port 3
Note that:
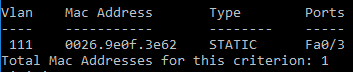
- Port 3 has a specific configuration (SVP_PORT_50003_111 TAG).
The VLAN 111 will be assigned to the used device because the port number 3 has a tag with that VLAN configured.
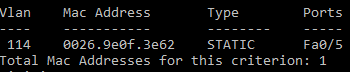
User device connects to port 5 with SVP_GENERAL tag
A new tag (SVP_GENERAL_114) will be added to the switch configuration for this example.
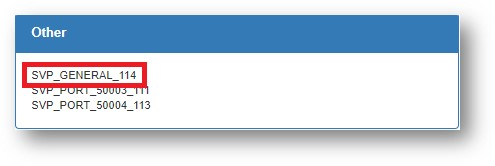
Note that:
- Port 5 has not a specific configuration (SVP_PORT_50005 TAG).
- The switch HAS a general configuration (SVP_GENERAL_114 TAG).
The general VLAN configured by tag in the switch will be assigned to the user device:
Note
For more information about this plugin TAG go to Set VLAN plugin TAG
Plugin checkHostDomain
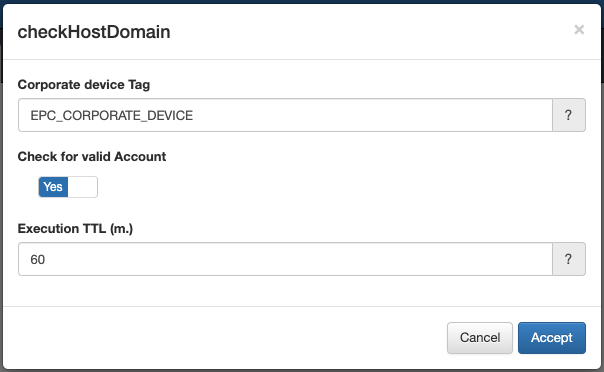
The checkHostDomain plugin verifies that the hostname exists in the domain, if this is done, it will add the tag that is configured in the options to the device.

Check for valid account feature, enables the user to validate if the account, on top of existing inside the domain, is also enabled. To do this, the user needs to enable the new option in the plugin configuration
Static Network Port Plugin
The Static Network Port or SNP Plugin is a syncronous plugin, available from openNAC’s release 6841.
It was designed to enable the option for customers that have the need to disable device mobility, sticking a device to only be able to access the network from determined port(s) of a switch.
It works with the TAG:
SNP_<switch-ip>_<switch-port>
For example
SNP_10.10.36.47_50001.
How to use it:
First of all, you need to activate the SNP Plugin. Go to Configuration –> Configuration Vars and click the “Edit plugin” by the side of the staticNetworkPluginPortSync plugin.
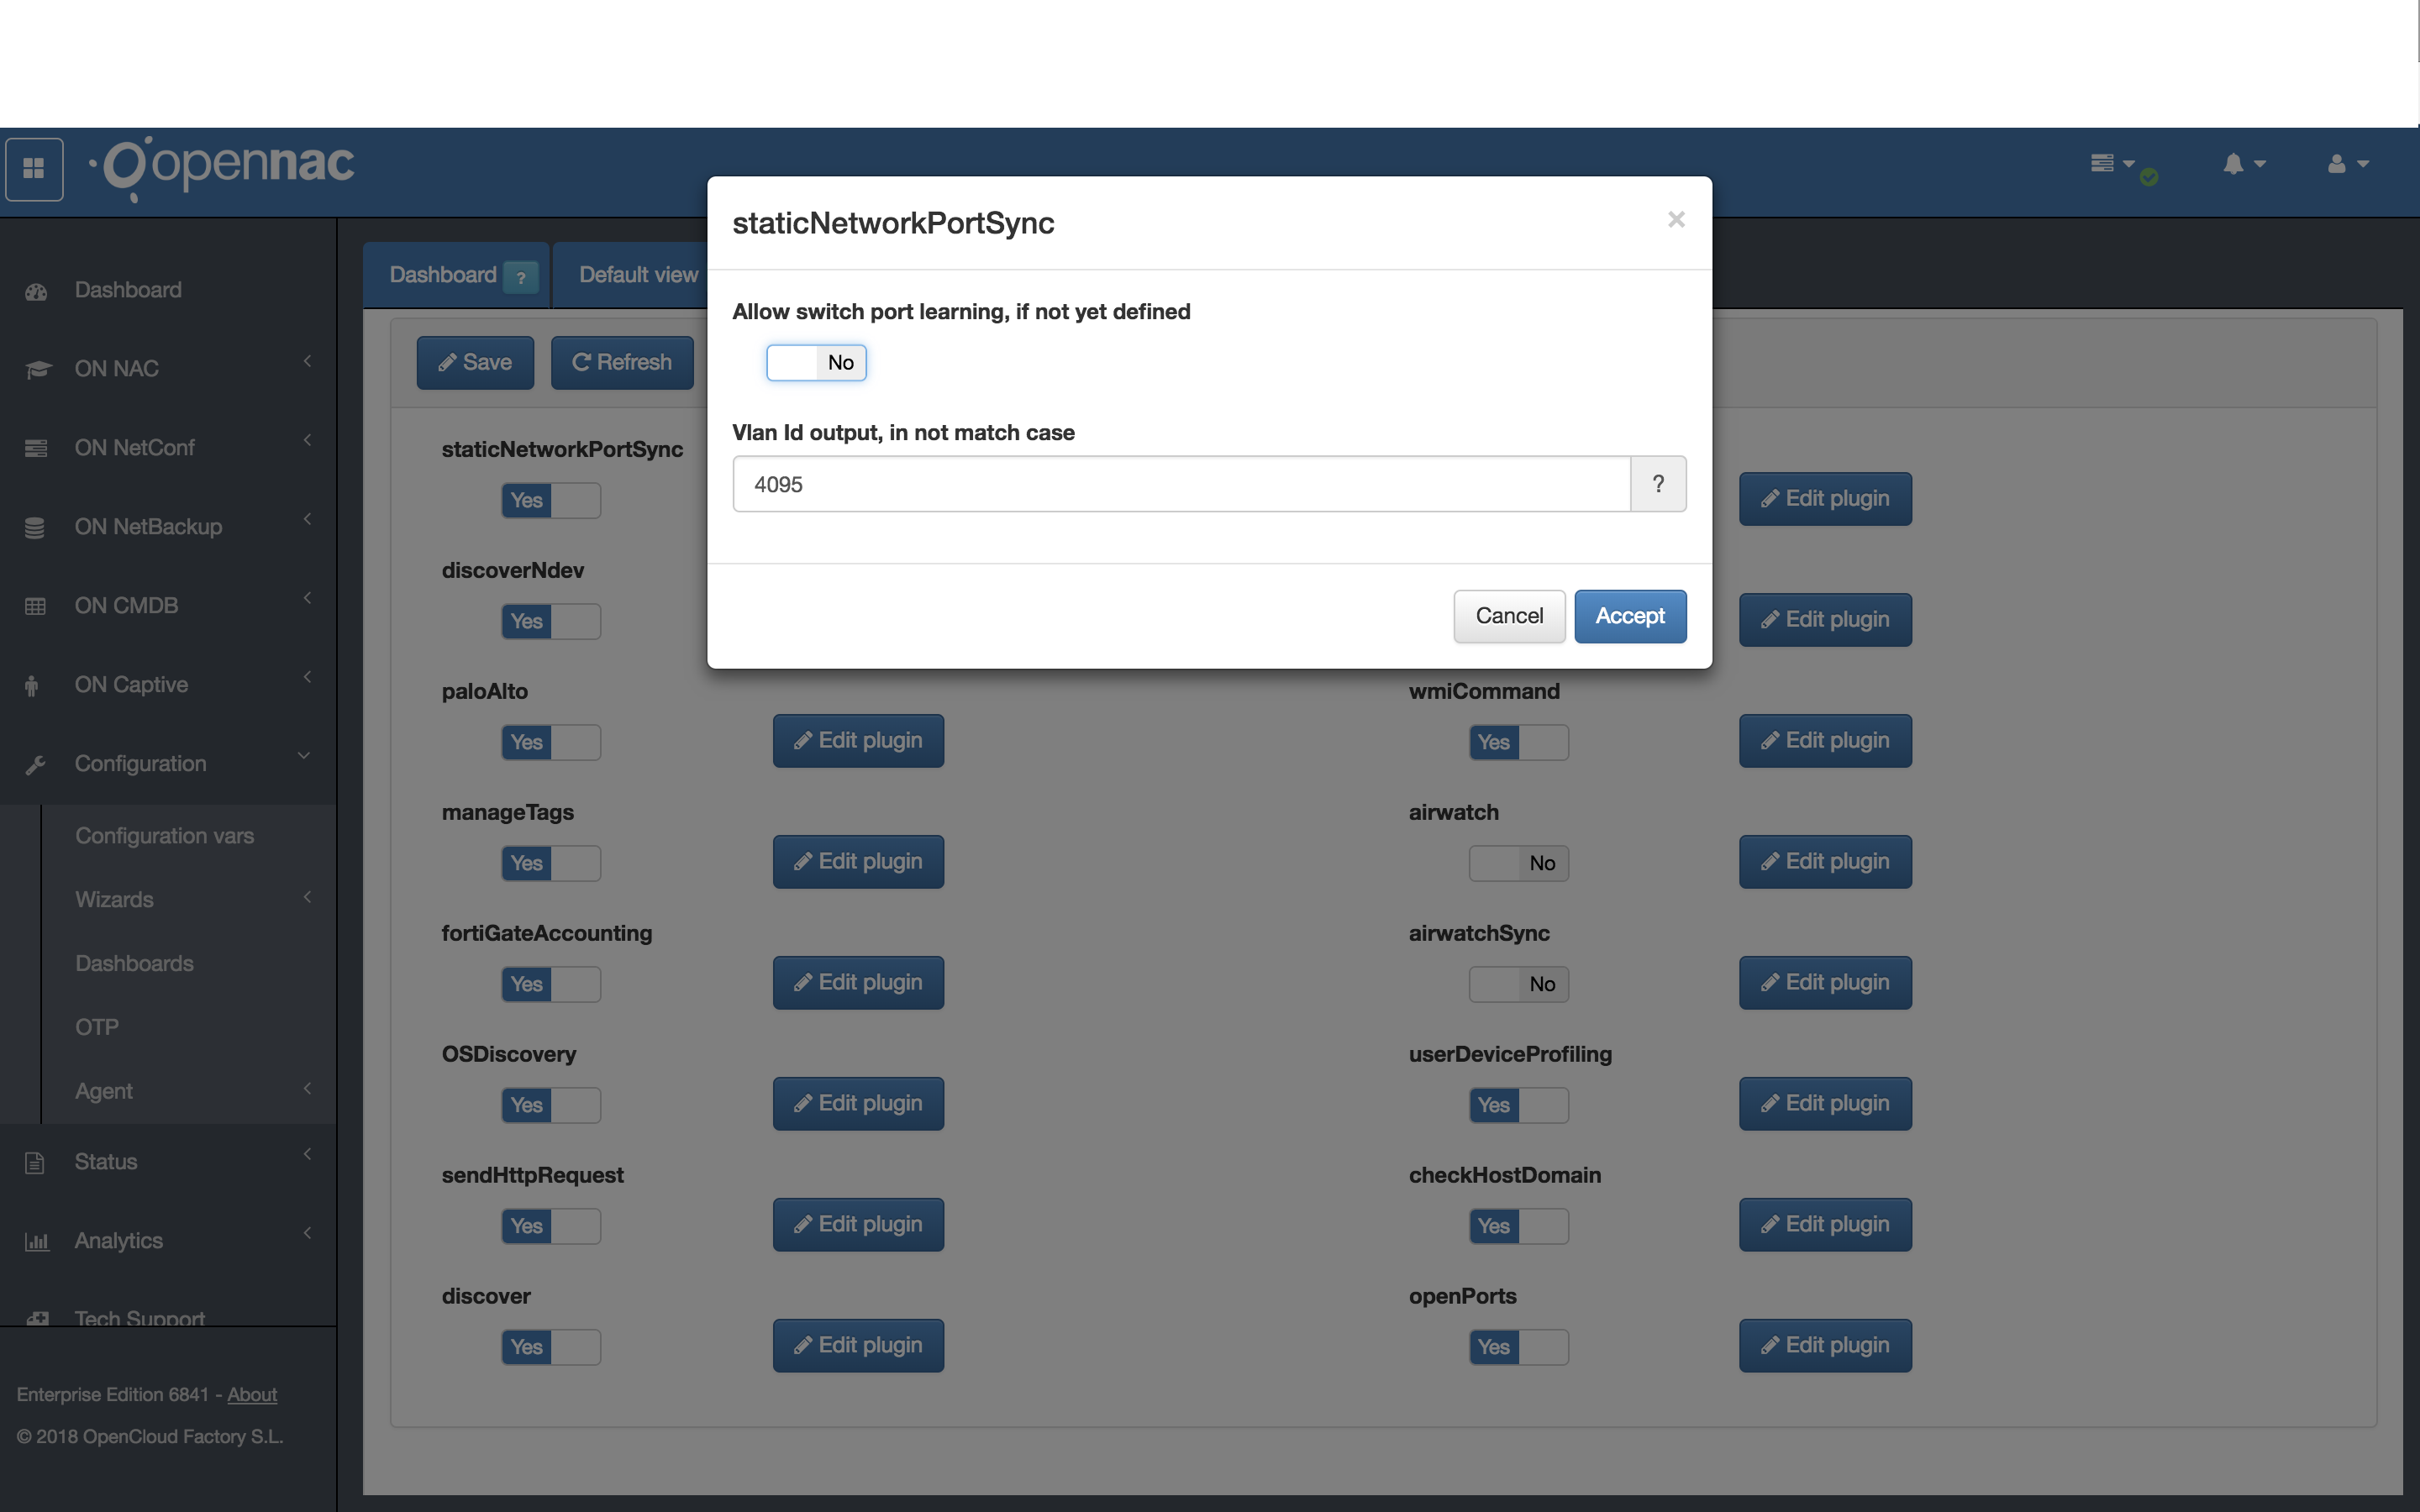
In the pop-up window, select the options as better suitted for your needs:
Allow switch port learning, if not yet defined:
YES: If a device pass through this plugin and doesn’t have the SNP_ TAG that corresponds to the switch port it is now connected, the SNP_ TAG will be added to that user device, containing the Switch IP and Switch Port where it is connected at the moment.
NO: If a device pass through this plugin and doesn’t have the SNP_ TAG that corresponds to the switch port it is now connected, the device will be sent to the VLAN defined for “not match” (set below).
Vlan ID output, in not match case:
The VLAN that should be sent to the switch in case the device isn’t in the SNP_ it should be or in case the device does not have the SNP_ TAG and we have defined to not allow the switch port learning.
After configuring as we want, click in the Accept Button.
Now, change the staticNetworkPortSync plugin from “No” to “Yes” and click in the Save button, at the top of the screen.
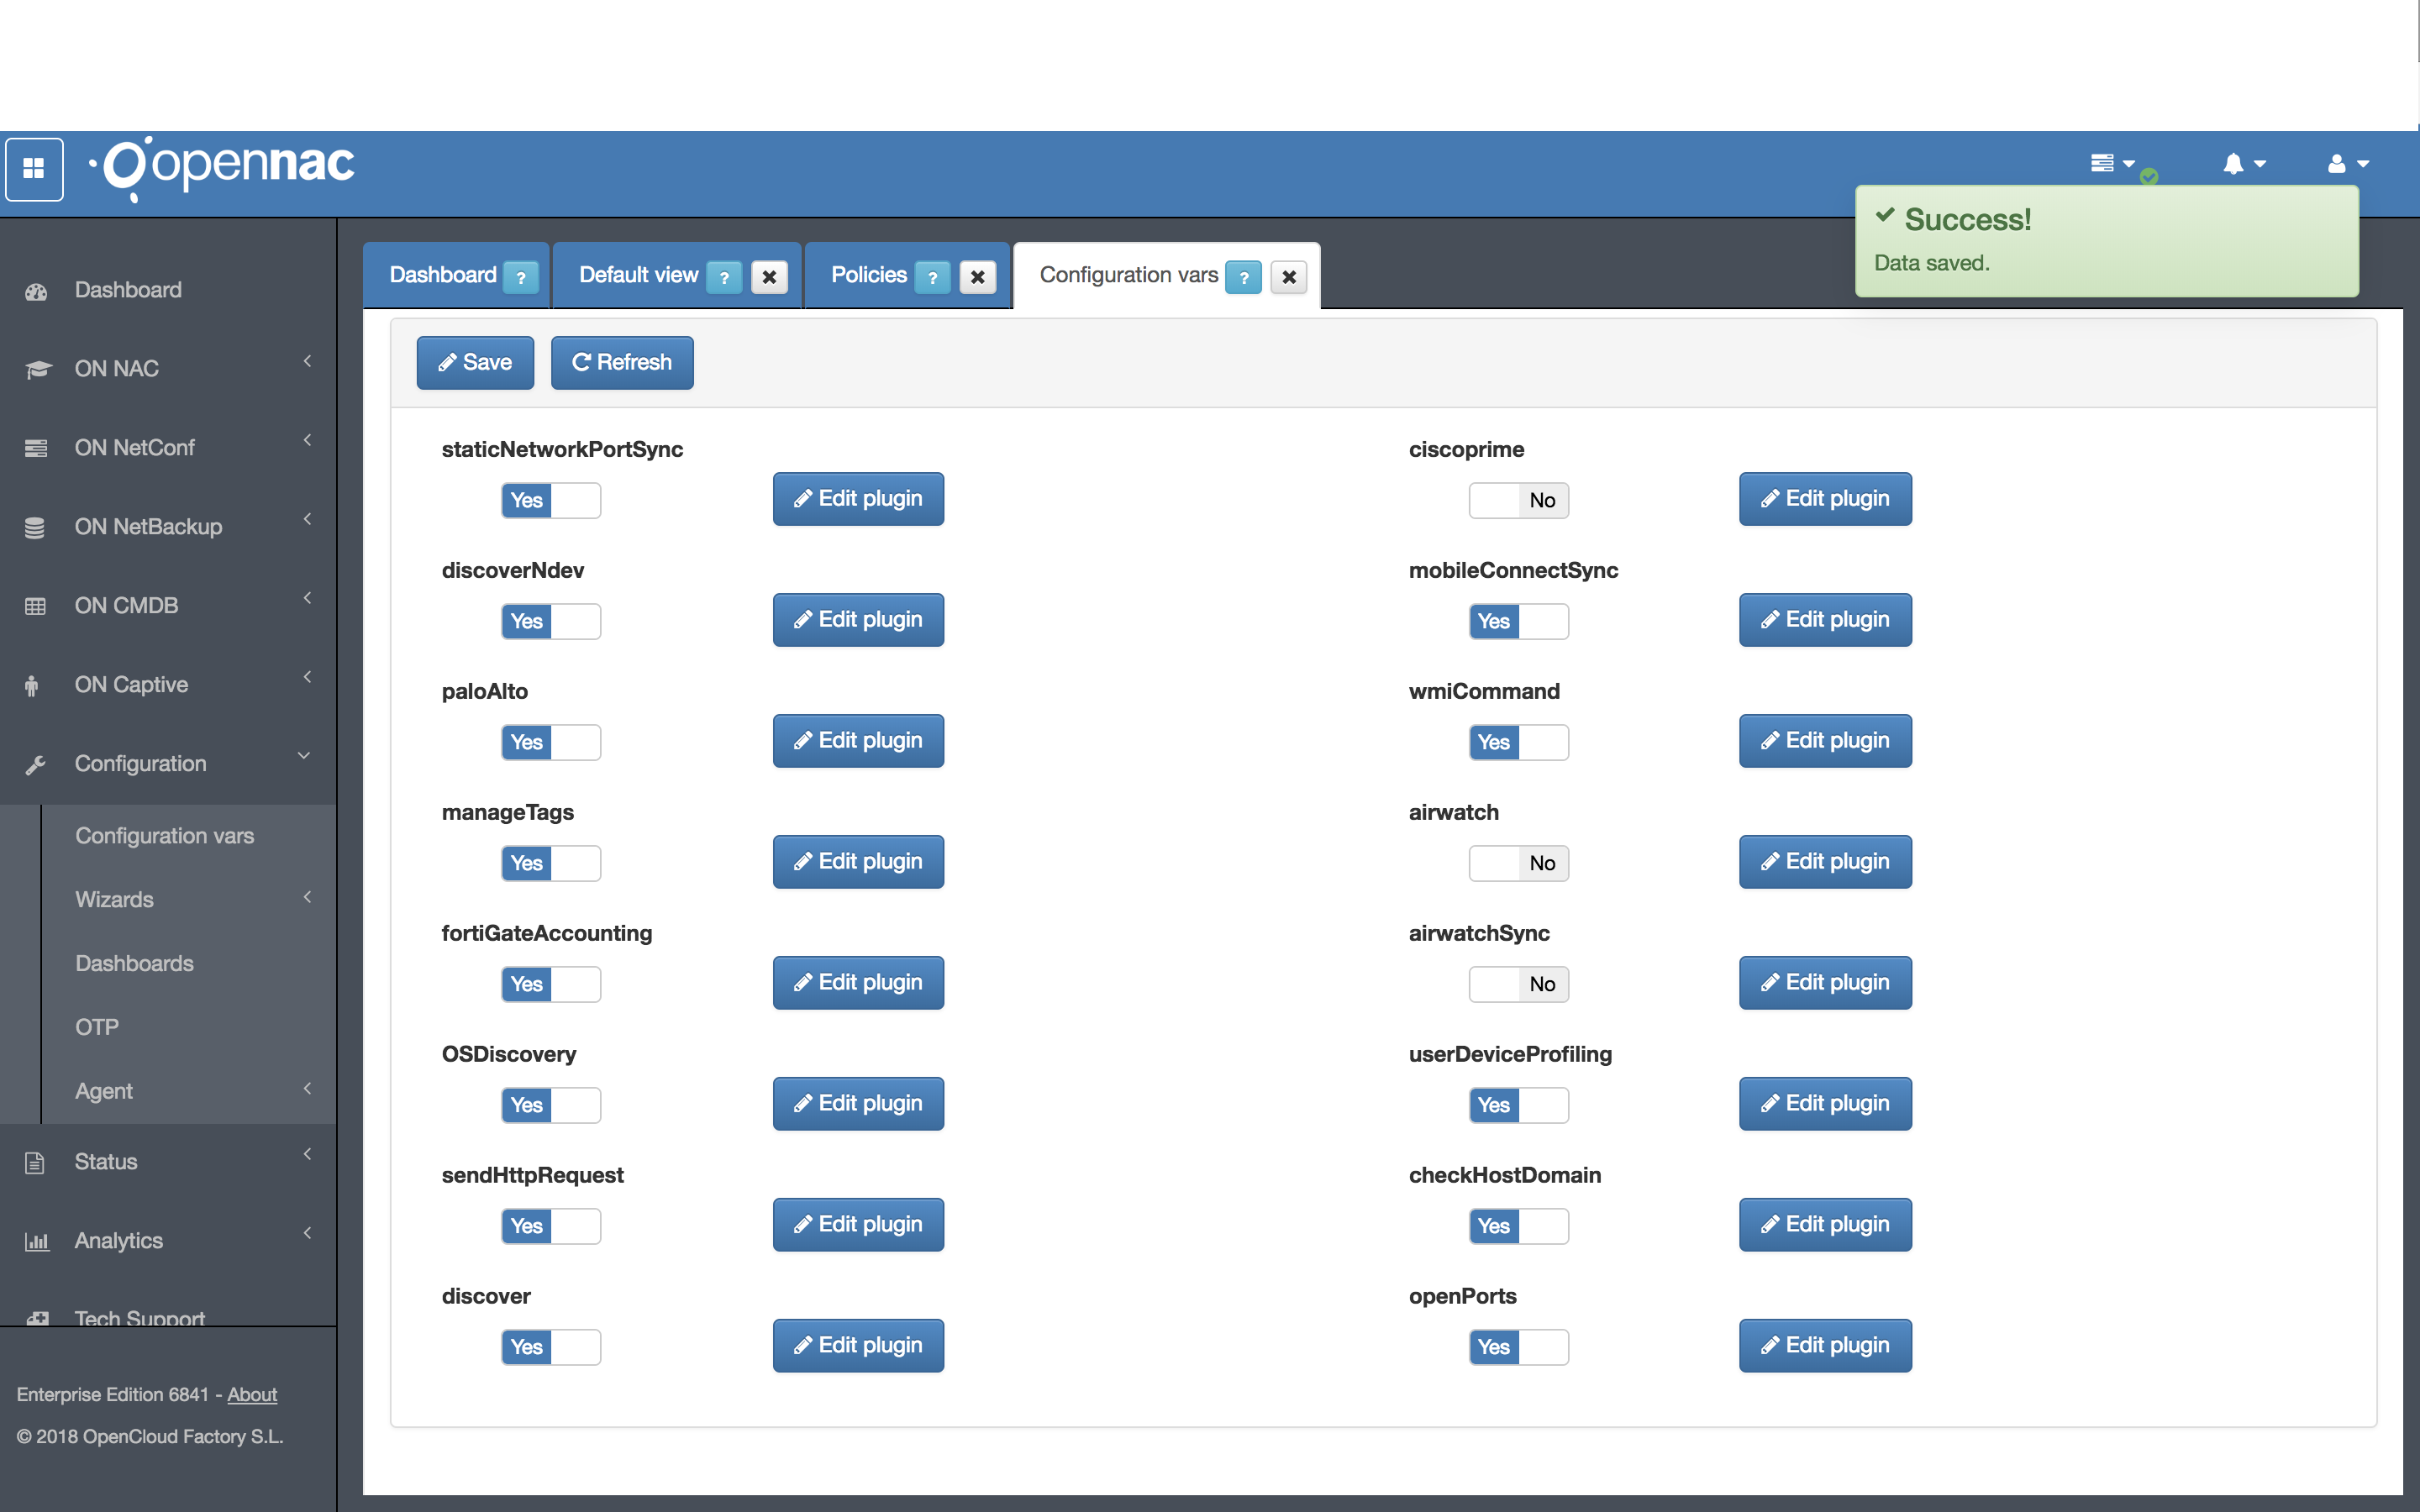
Now the work for configure this plugin has been done, so now you can use it into a policy.
Go to ON NAC –> Policies and edit an existing or add a new policy.
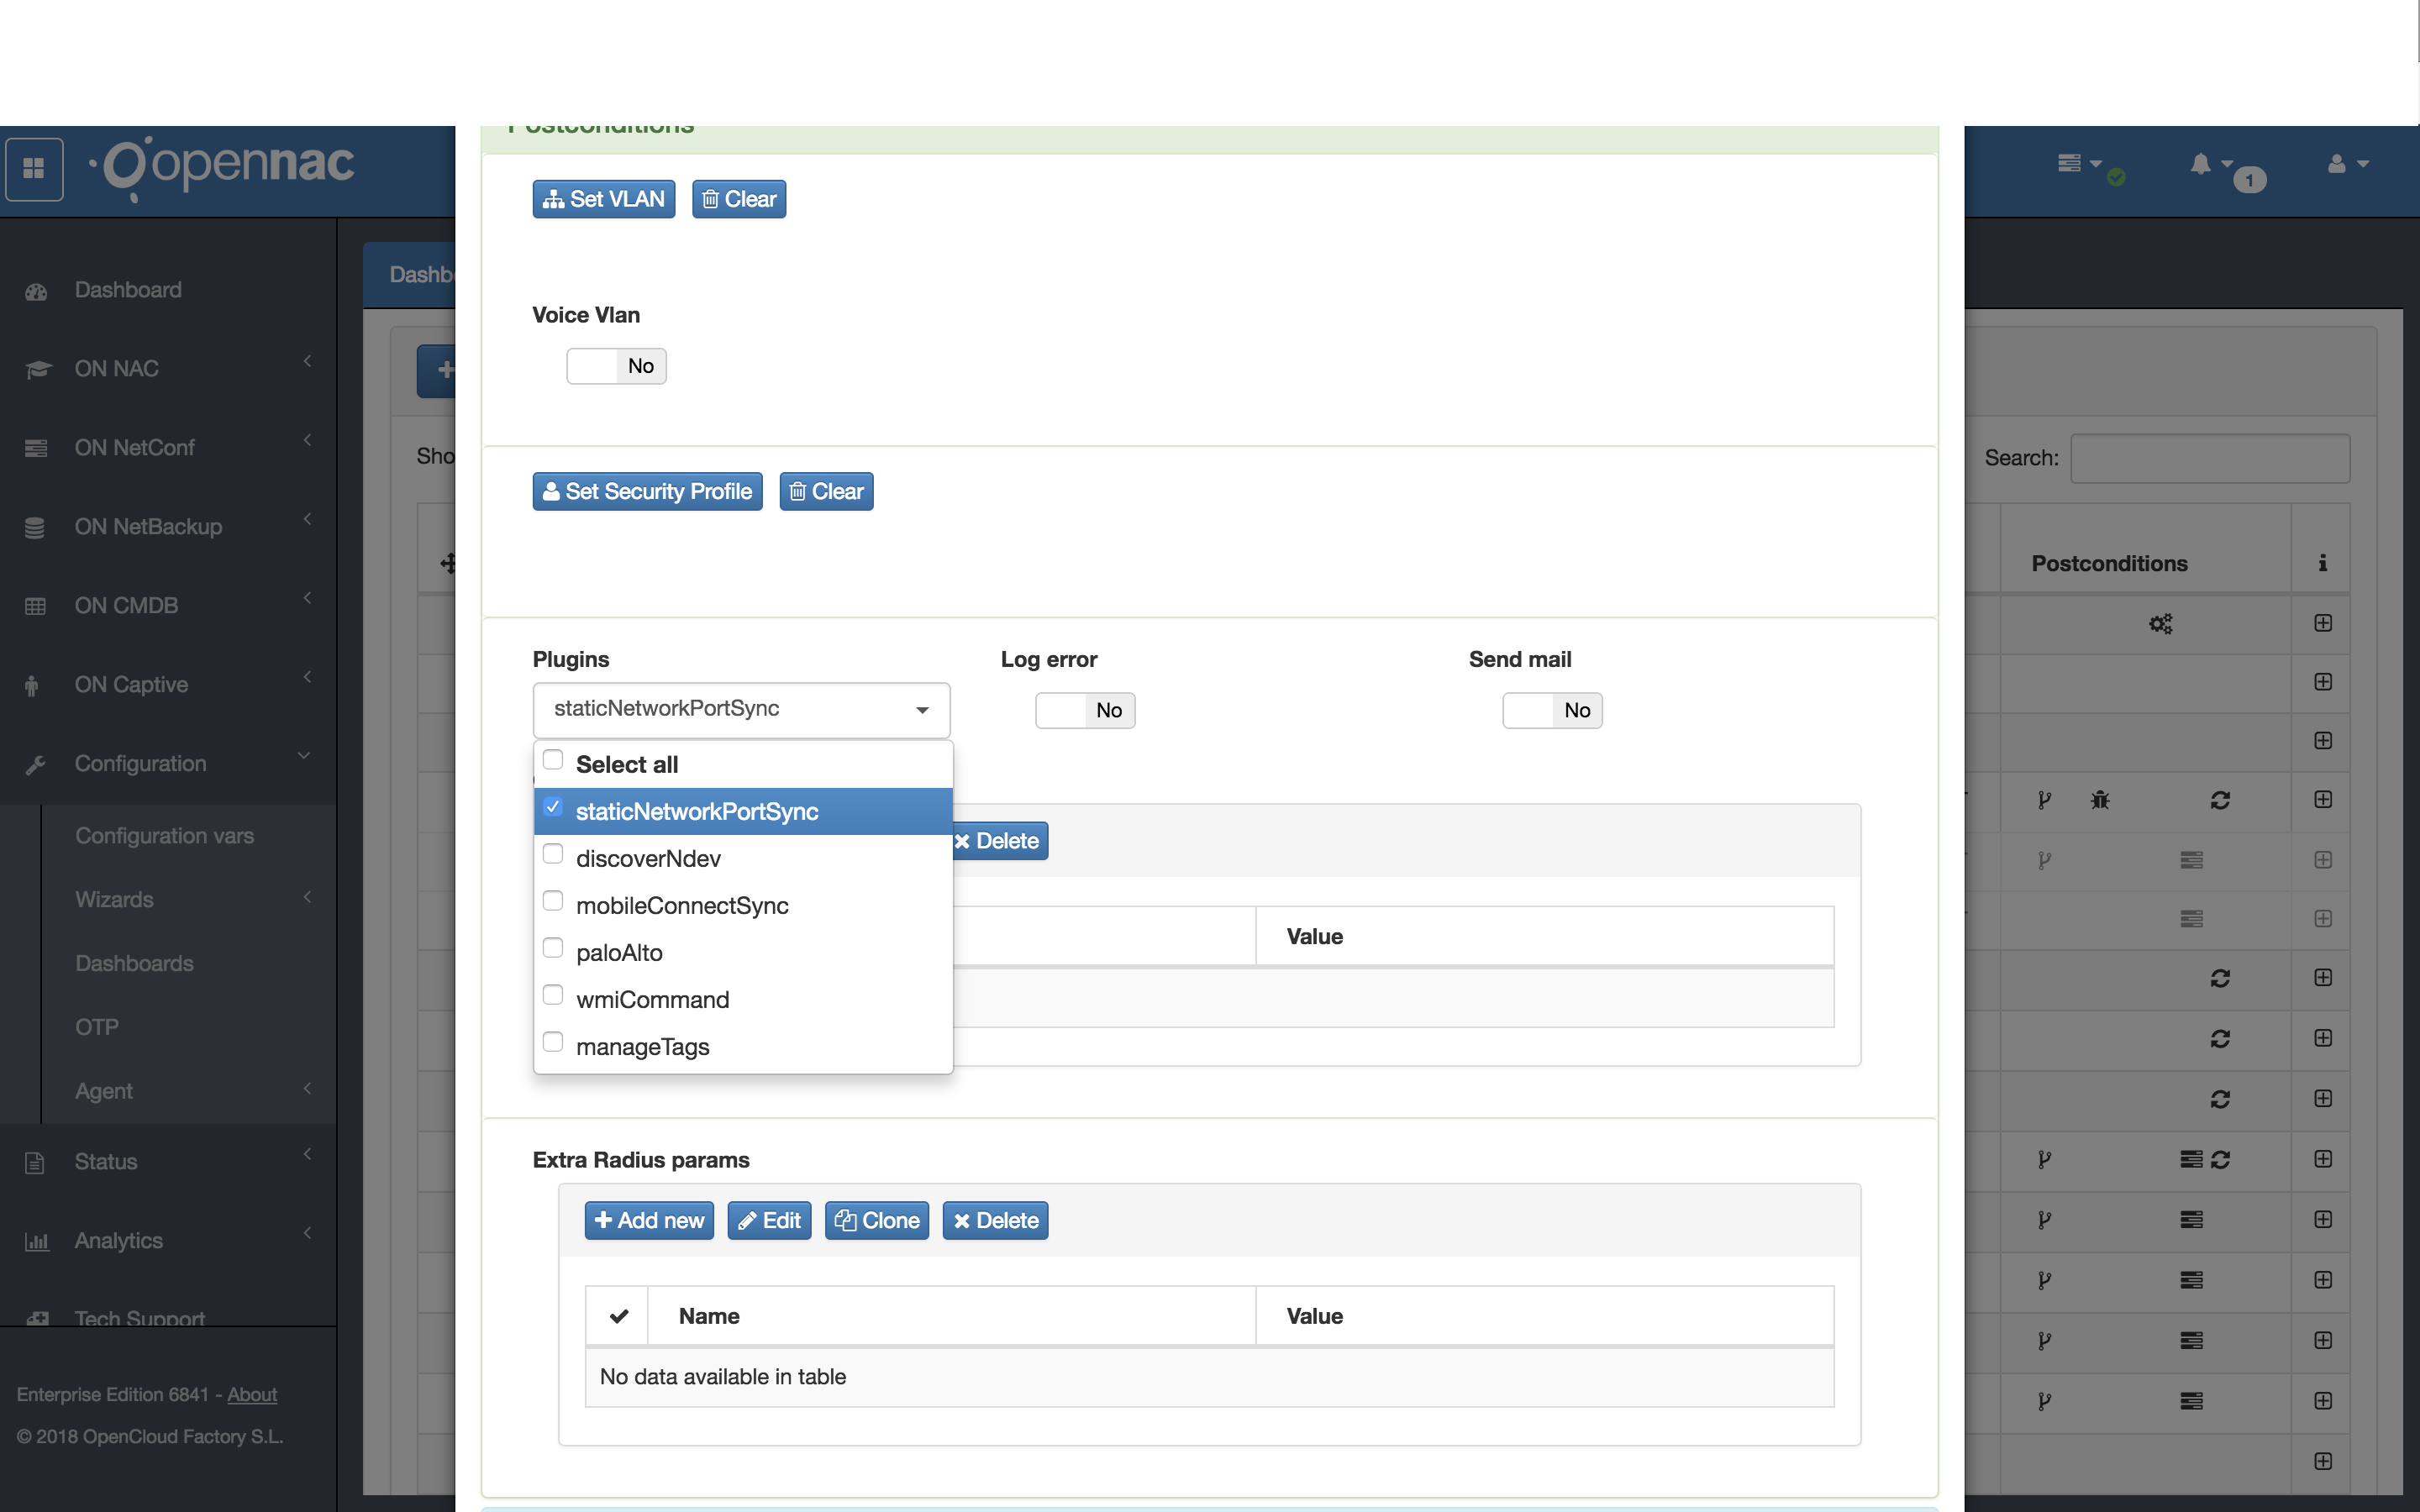
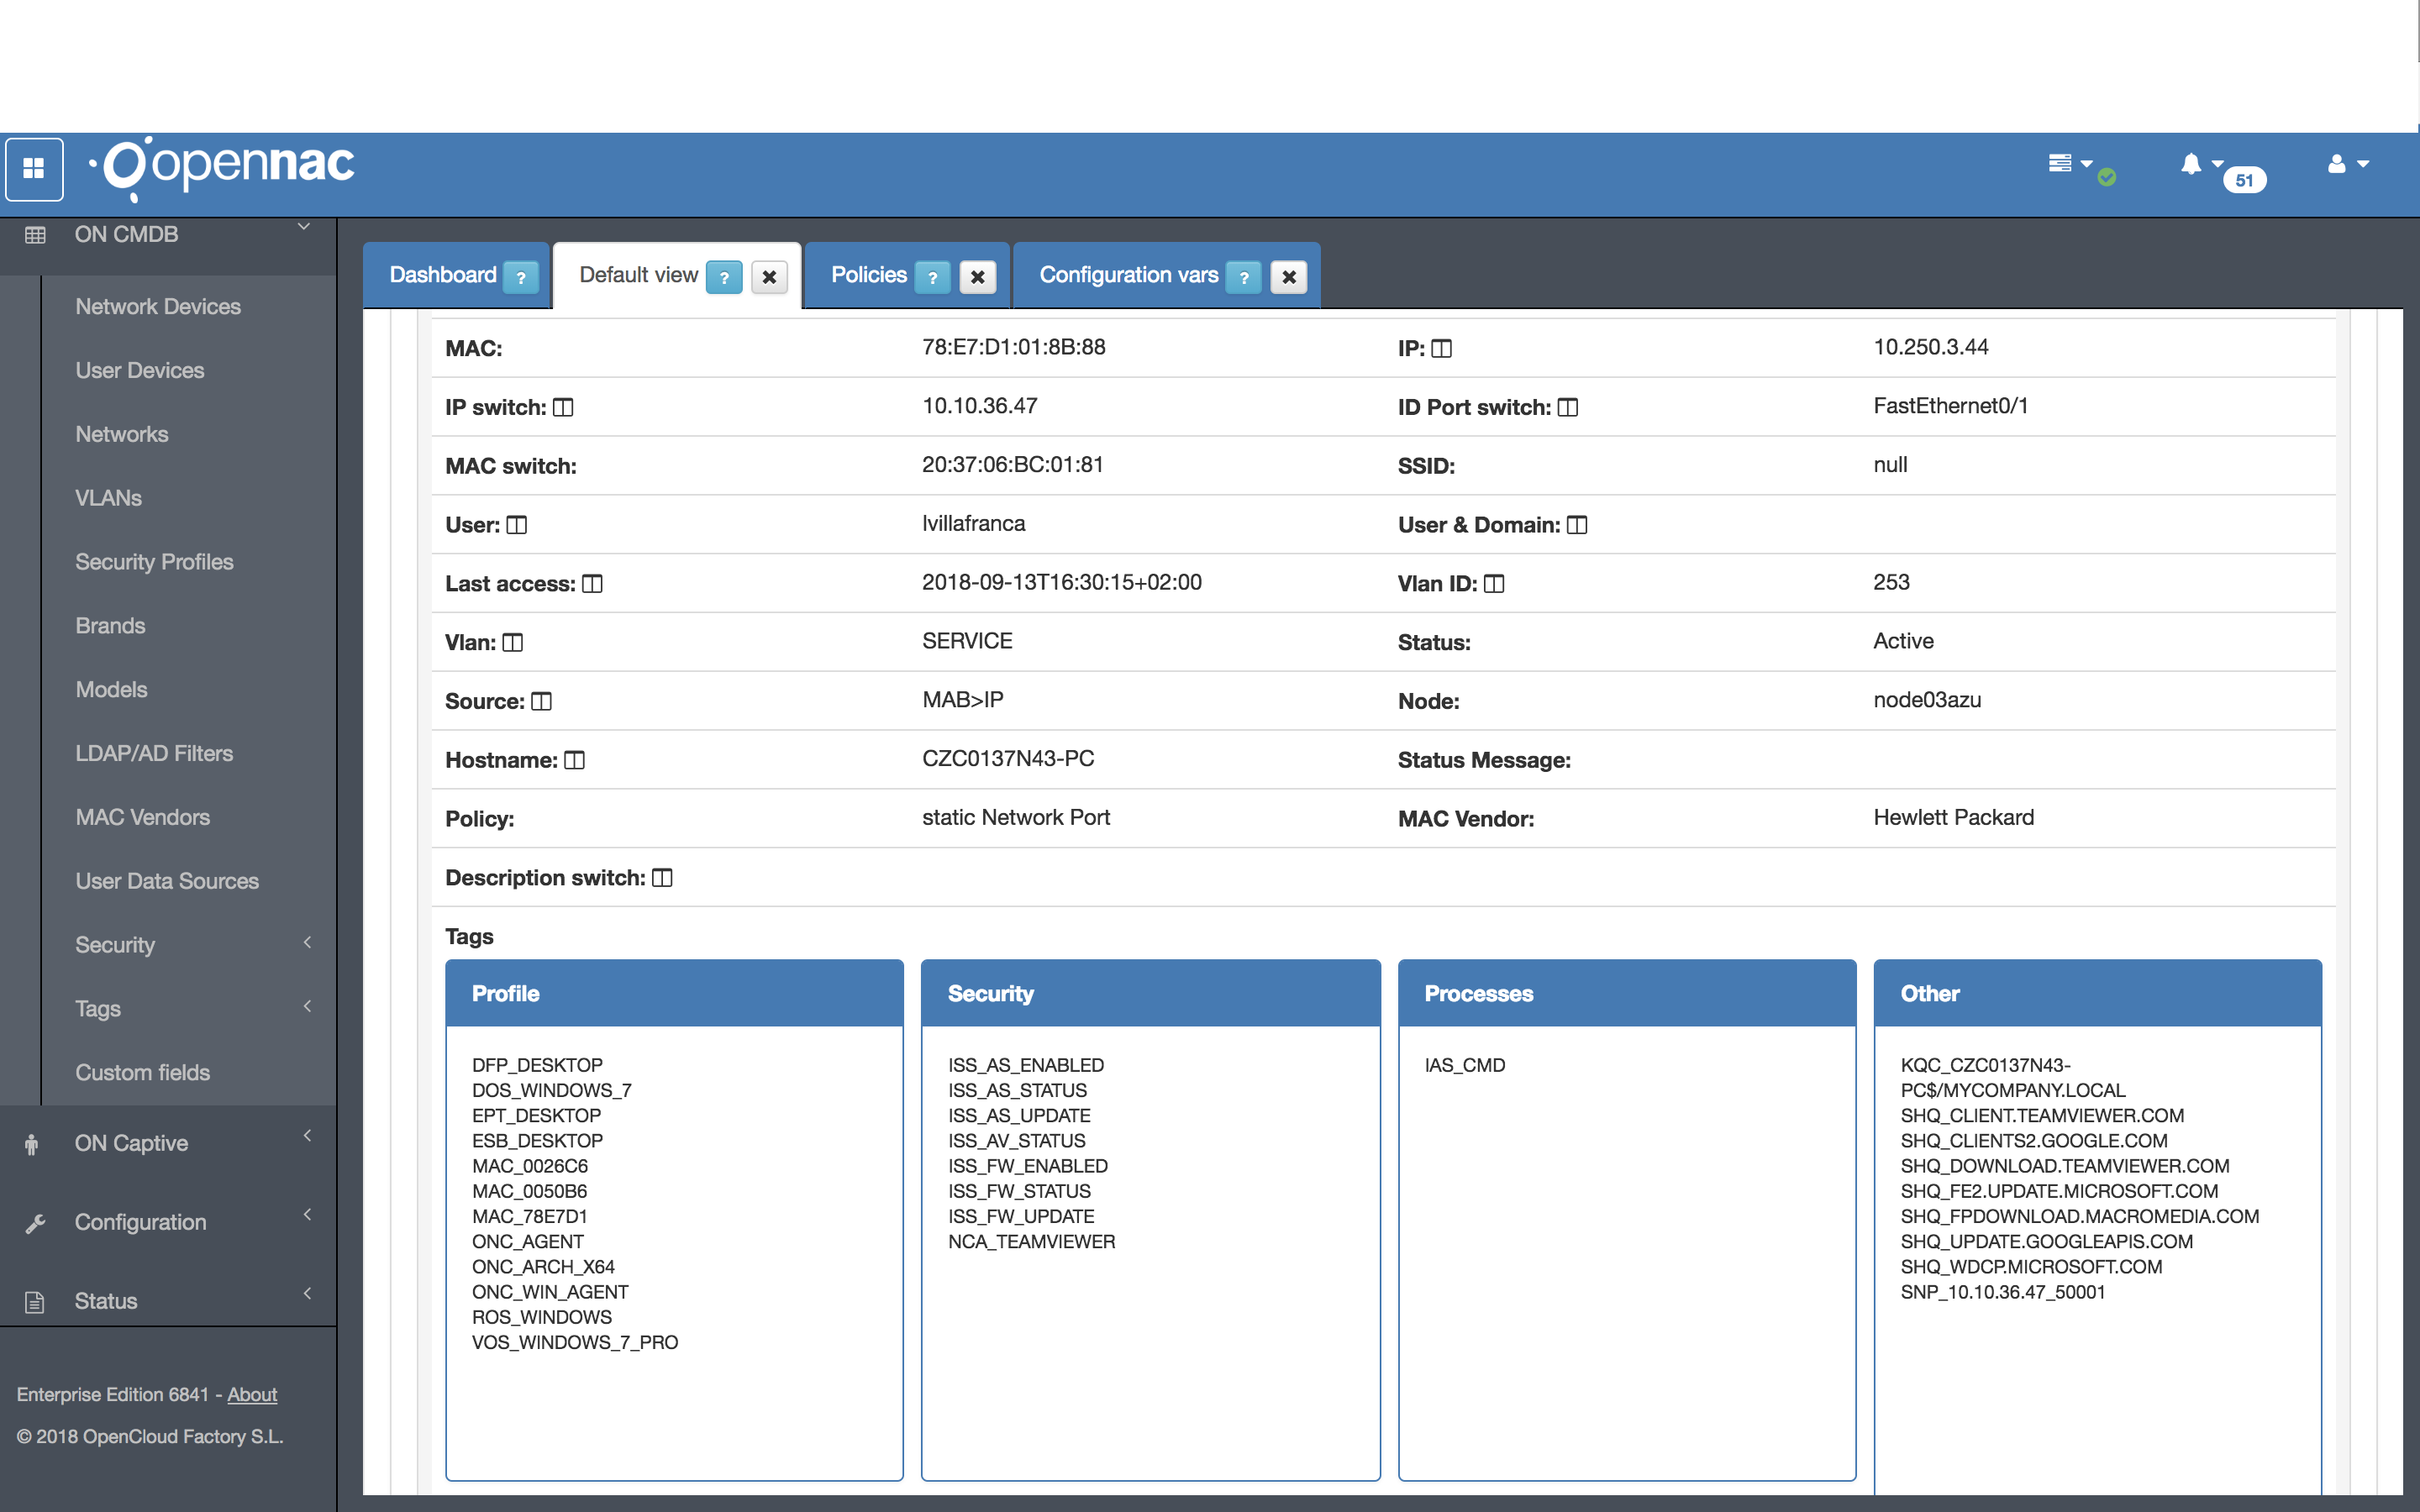
Now, when a user device matches this policy postconditions, the TAG SNP_ will be validated in order to enable the user device access.
Access to Service VLAN, because the IP Switch and Port are the same as defined in the SNP_10.10.36.47.50001:
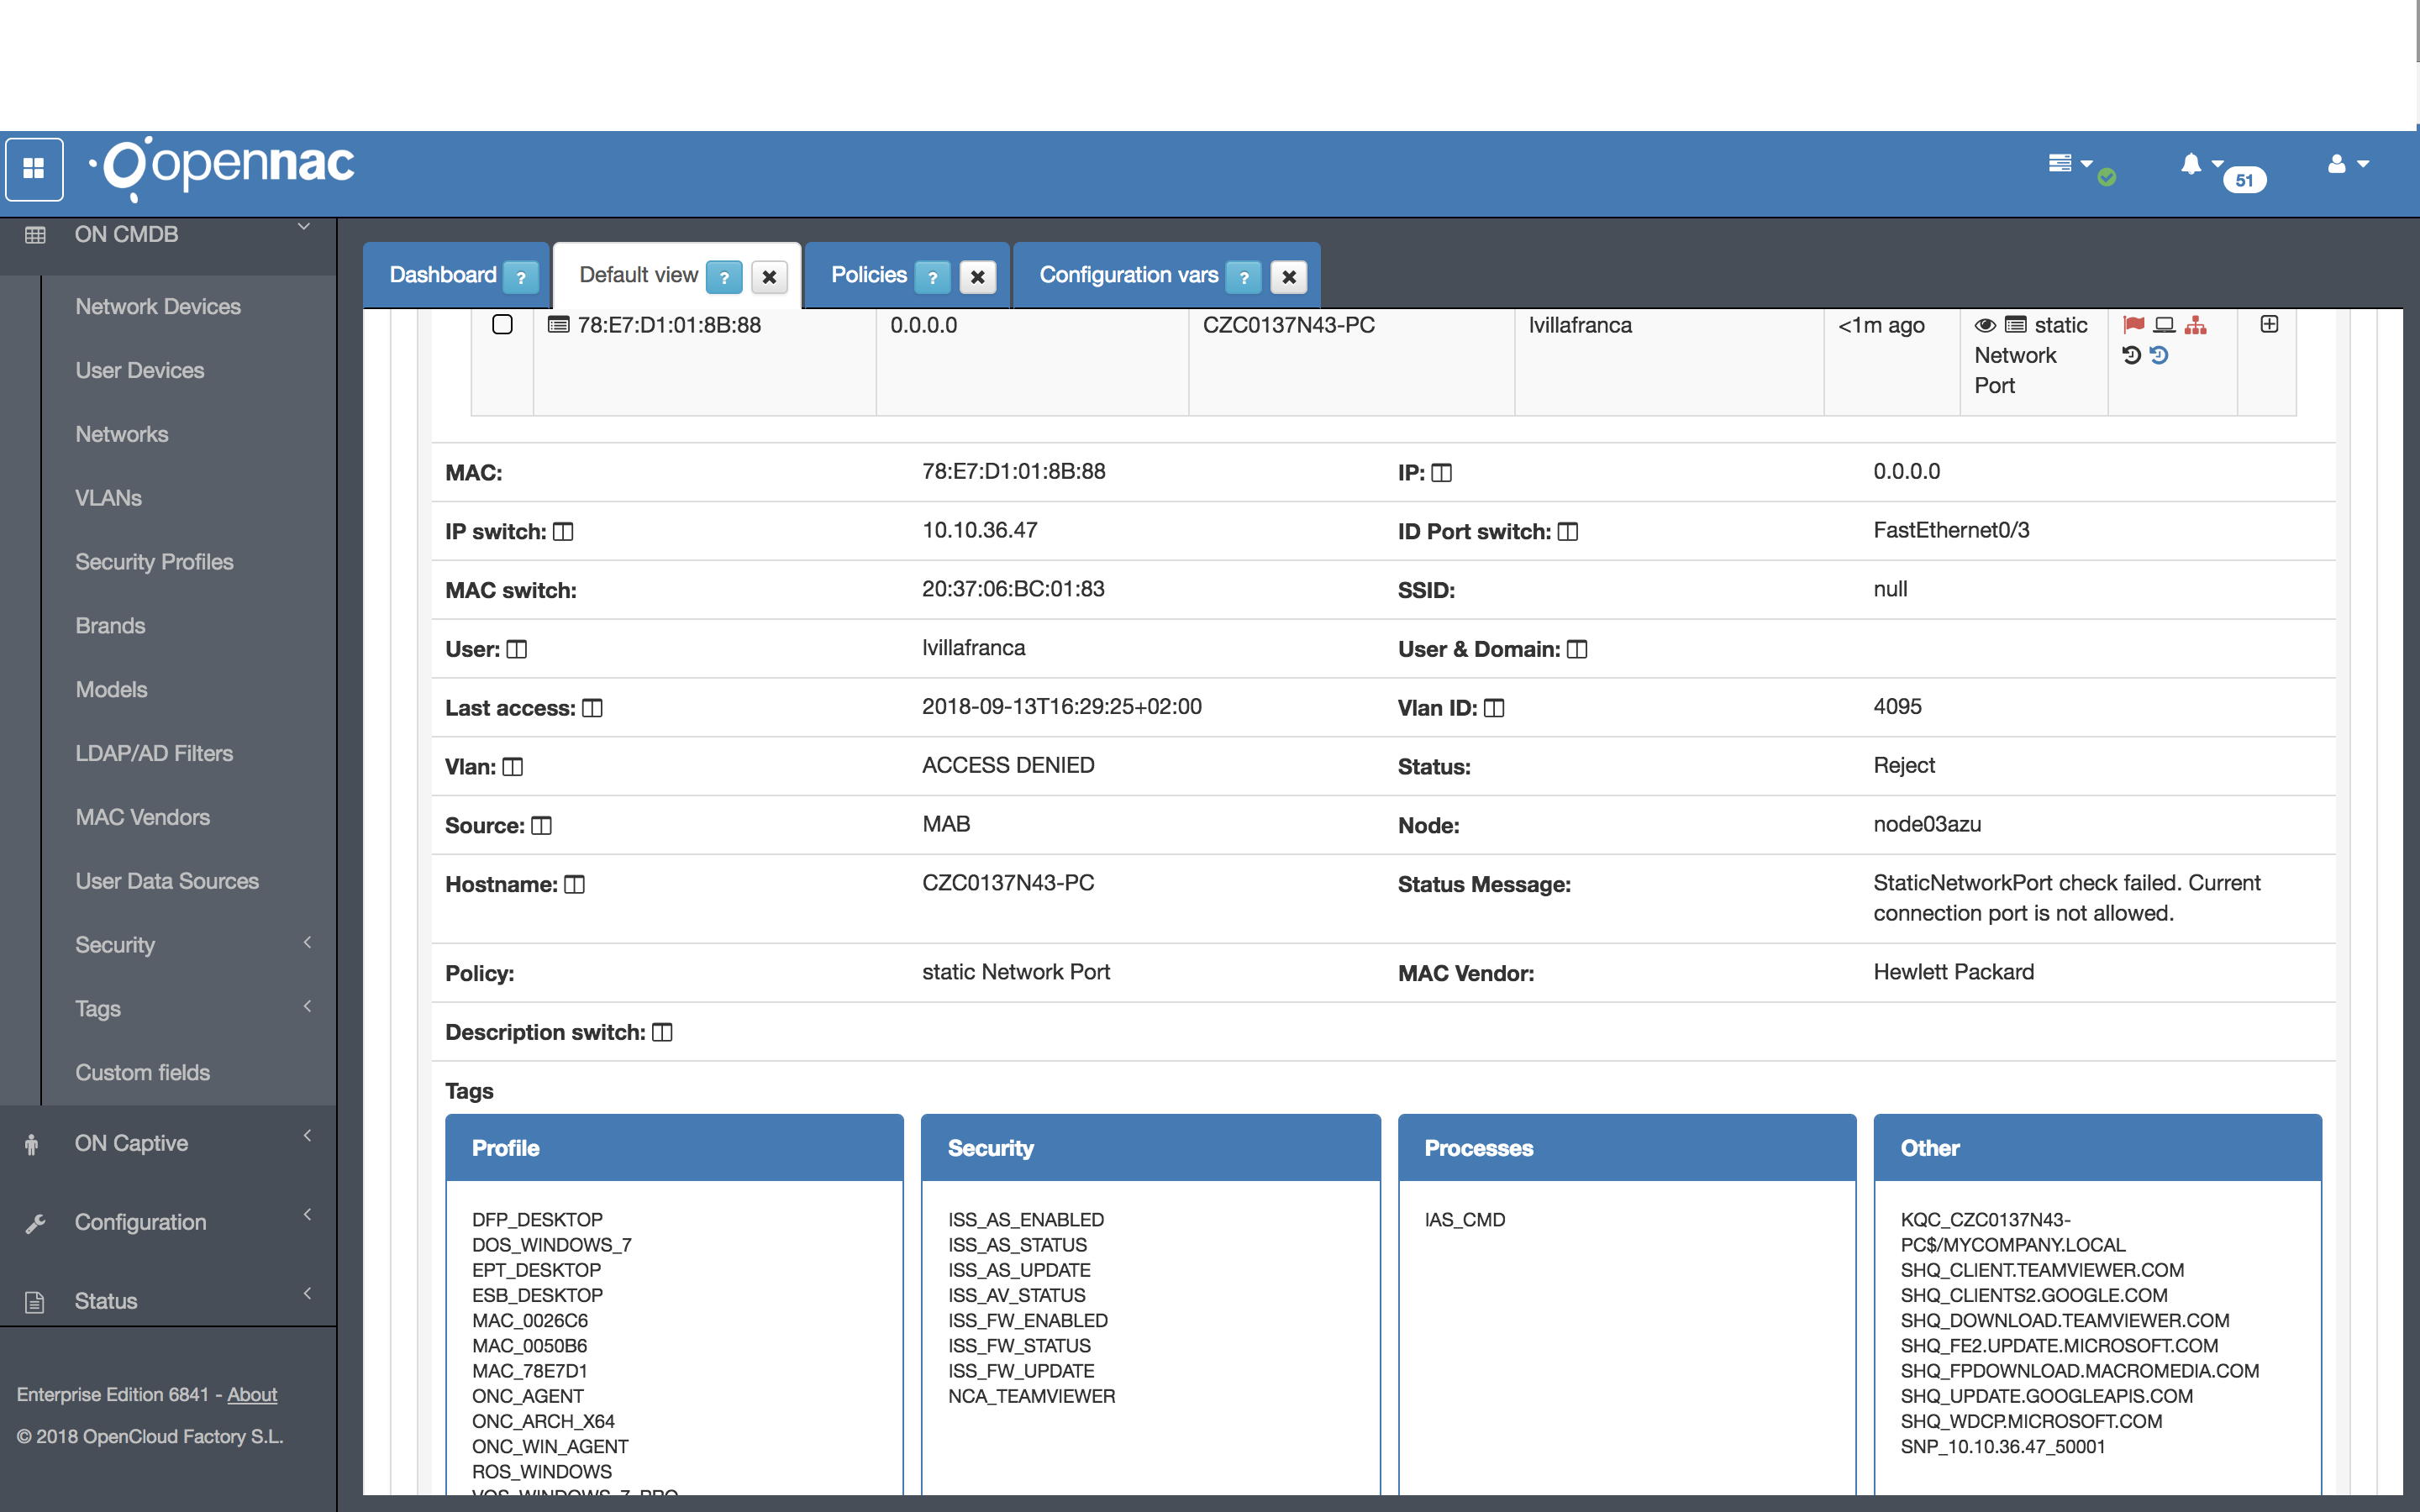
Access Rejected, because the IP Switch and Port aren’t the same as defined in the SNP_10.10.36.47.50001:
Plugin SNMP Quarantine
The snmpQuarantine plugin, combined with a correct switch configuration (enabling it in all ports that want to be used with the plugin), allows openNAC to communicate with the switch via SNMP v1 to quarantine the port where the quarantined user has been connected. A tag will be added to the user device indicating the switch and port that have been quarantined (SQP_<SWITCH>_<PORT>) and another one to the network device indicating the port that has been quarantined, the MAC that triggered the quarantine and its original VLAN (SQP_<MACADDRESS>_<PORT>_<VLAN>)
Initial configuration
This section explains the initial configuration of the items used in this documentation. Keep in mind that that VLANs configuration are only an example and you will probably have different VLANs numbers and different user devices.
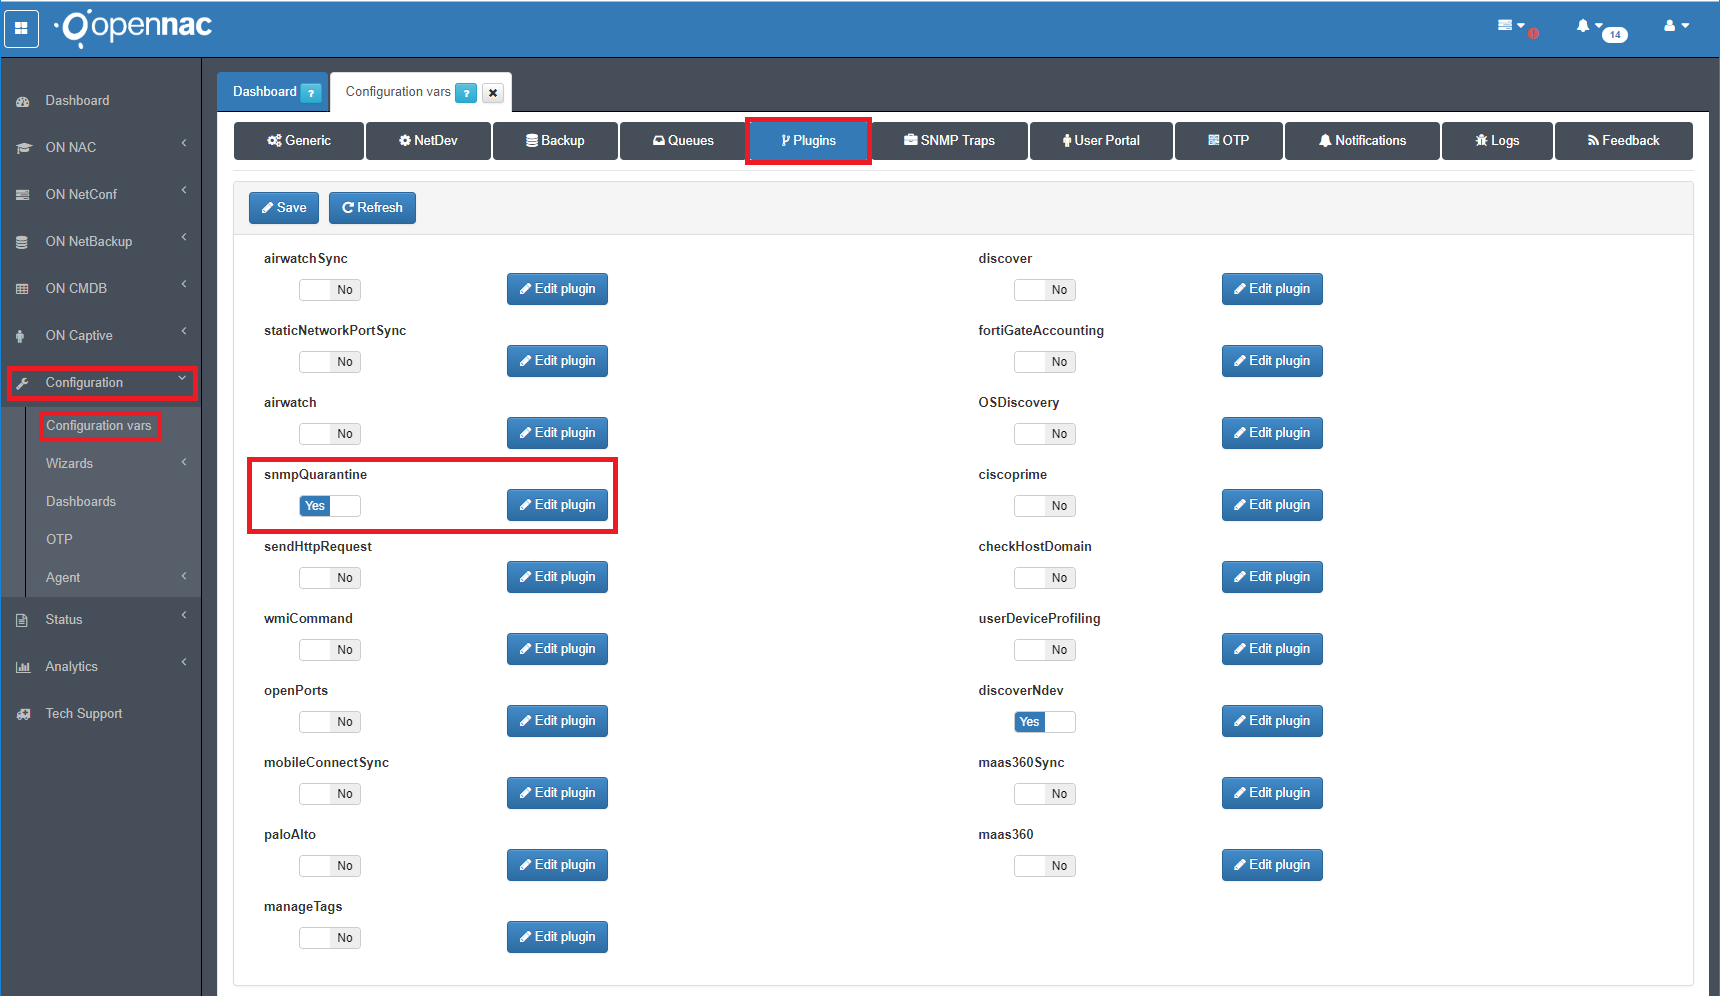
Activate plugin (openNAC)
The plugin “snmpQuarantine” must be activated at openNAC configuration
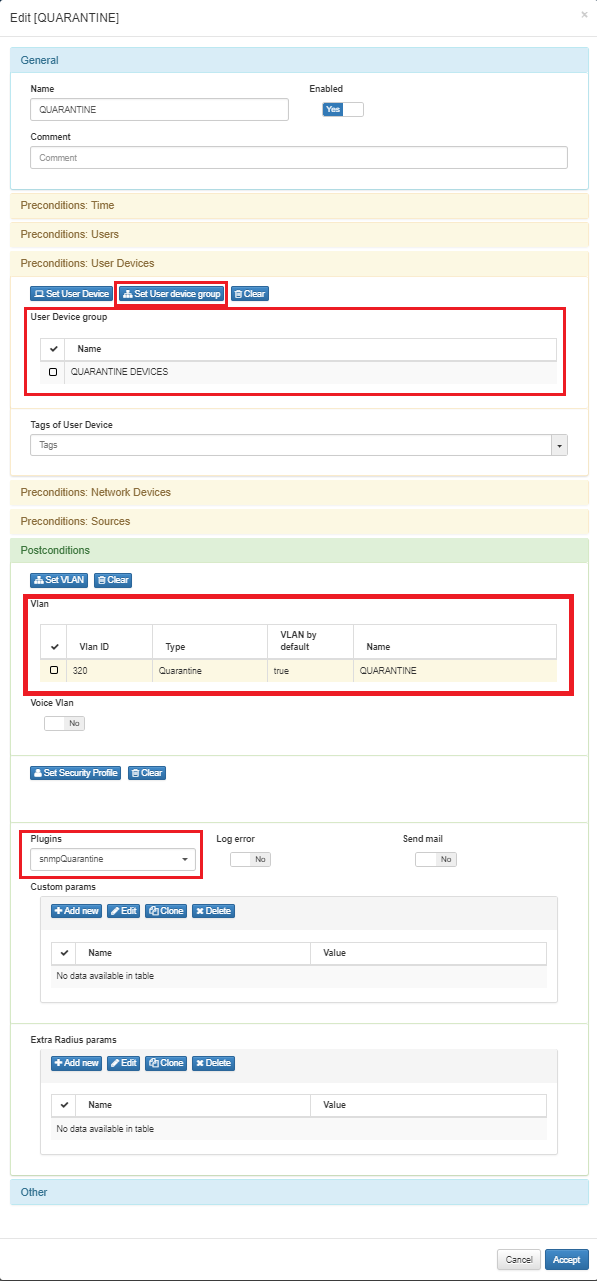
Quarantine policy (openNAC)
Quarantine policy should be created with “QUARANTINE DEVICES” as user device precondition, with the quarantine VLAN that you will use to quarantanize the switch port, and with the plugin “snmpQuarantine” configured. This quarantine policy MUST be at the top of the policy list.
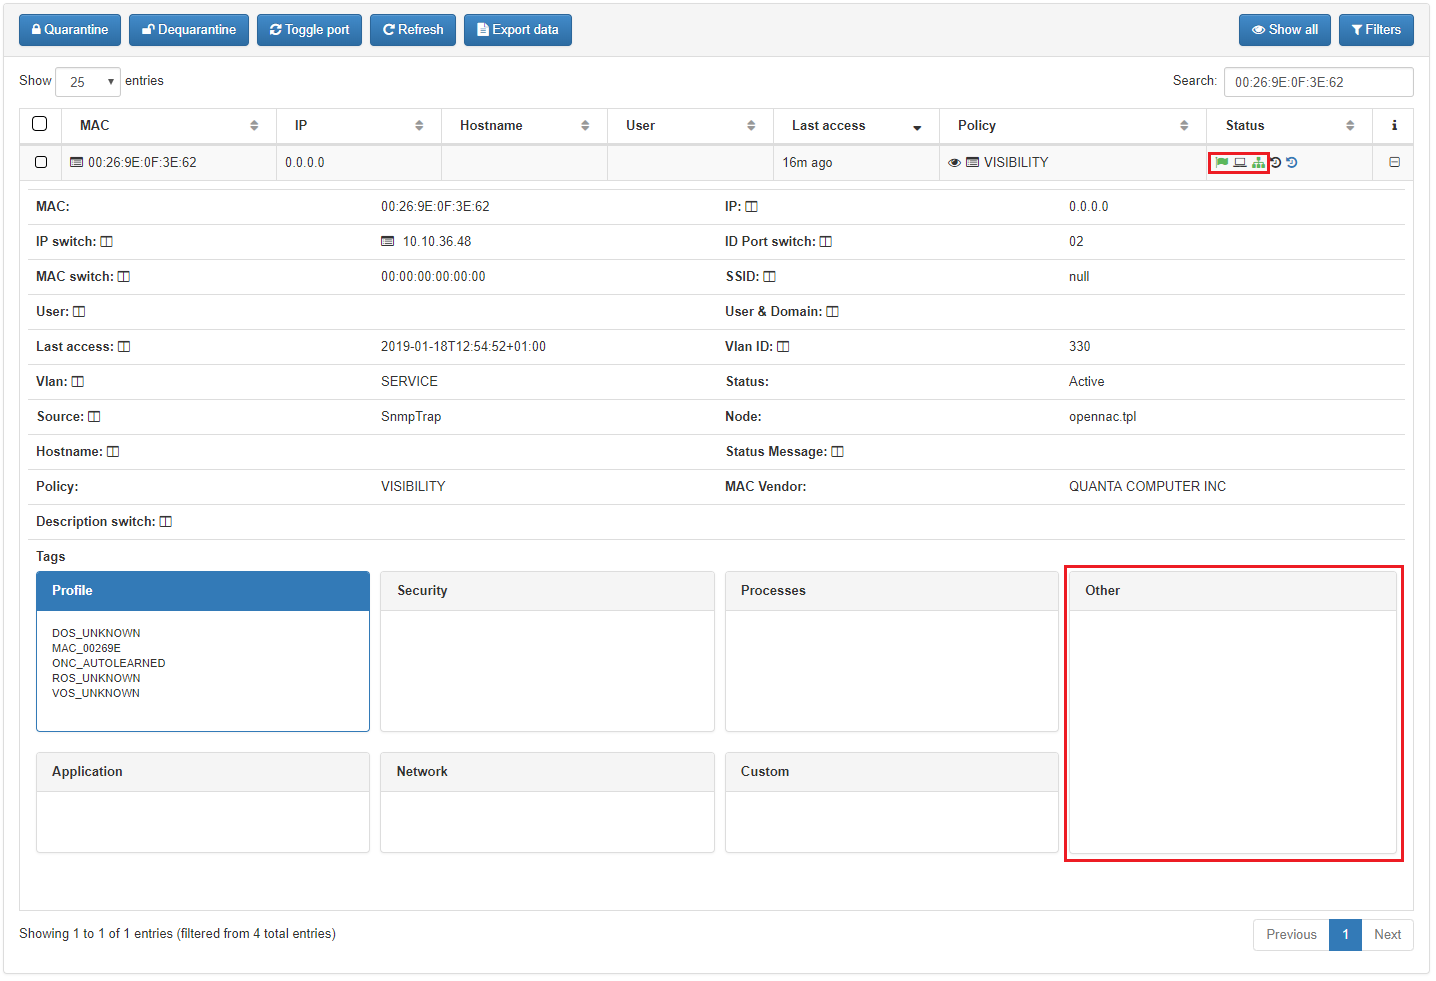
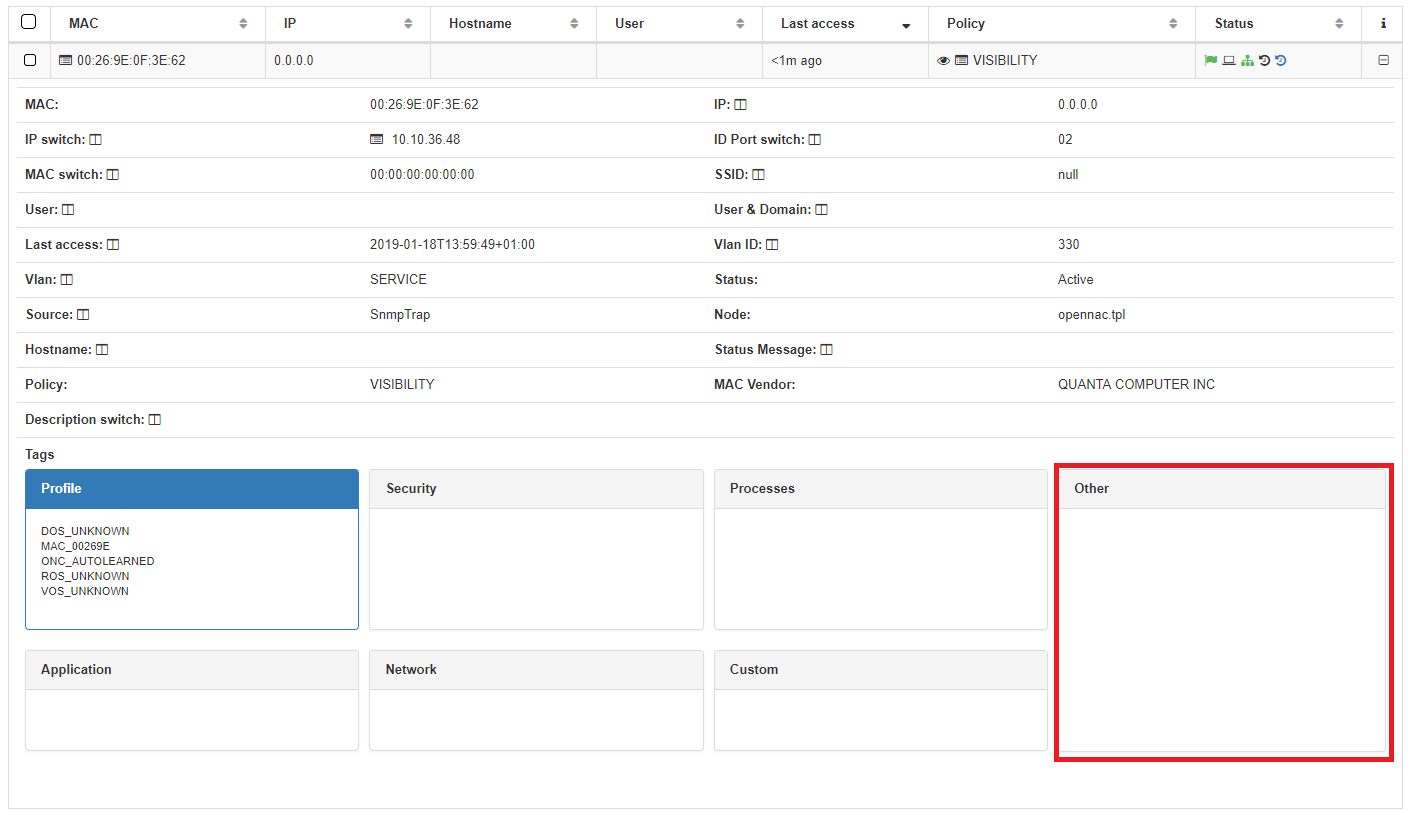
User device (openNAC)
The user device that will be used in this documentation was learned by SNMP Trap and is in ACTIVE mode at SERVICE VLAN. You can check that the “Other” tag section is empty
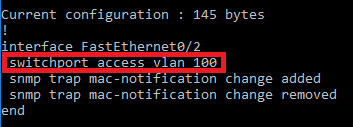
Switch configuration (physical)
The switch must have the general SNMP configuration, and each port that you want to use with the plugin should be configured to use SNMP and with the correct access VLAN. In this documentation the port 2 will be used with the VLAN number 100.

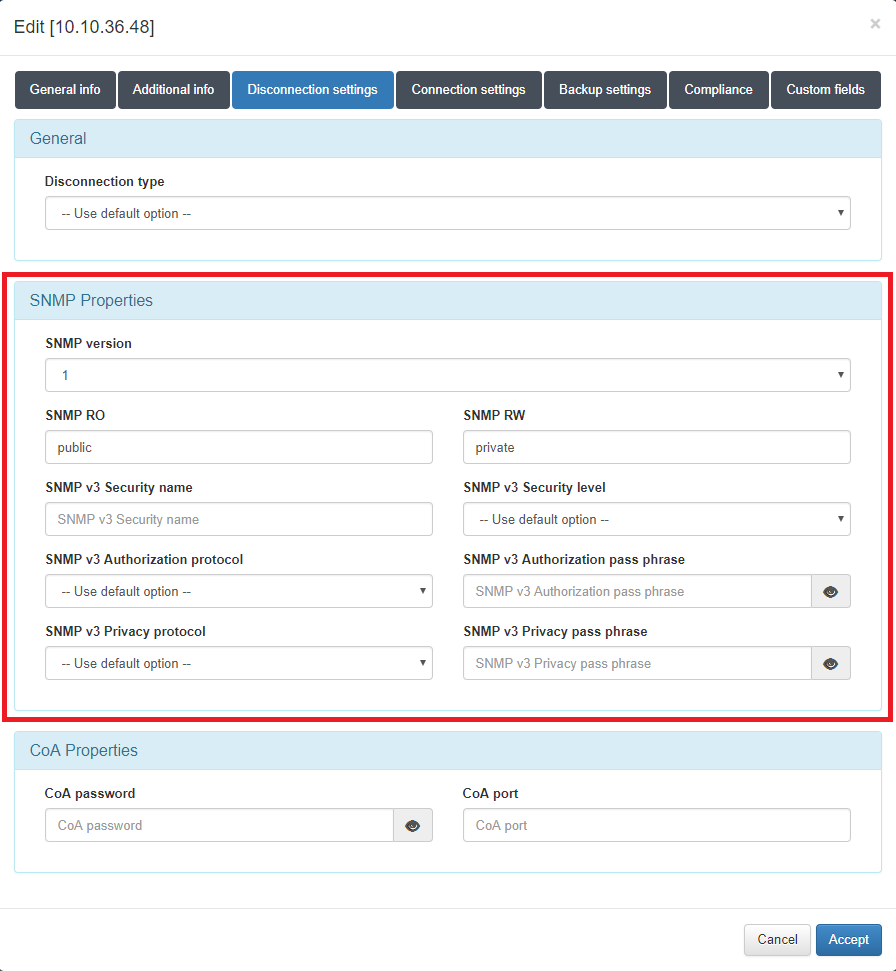
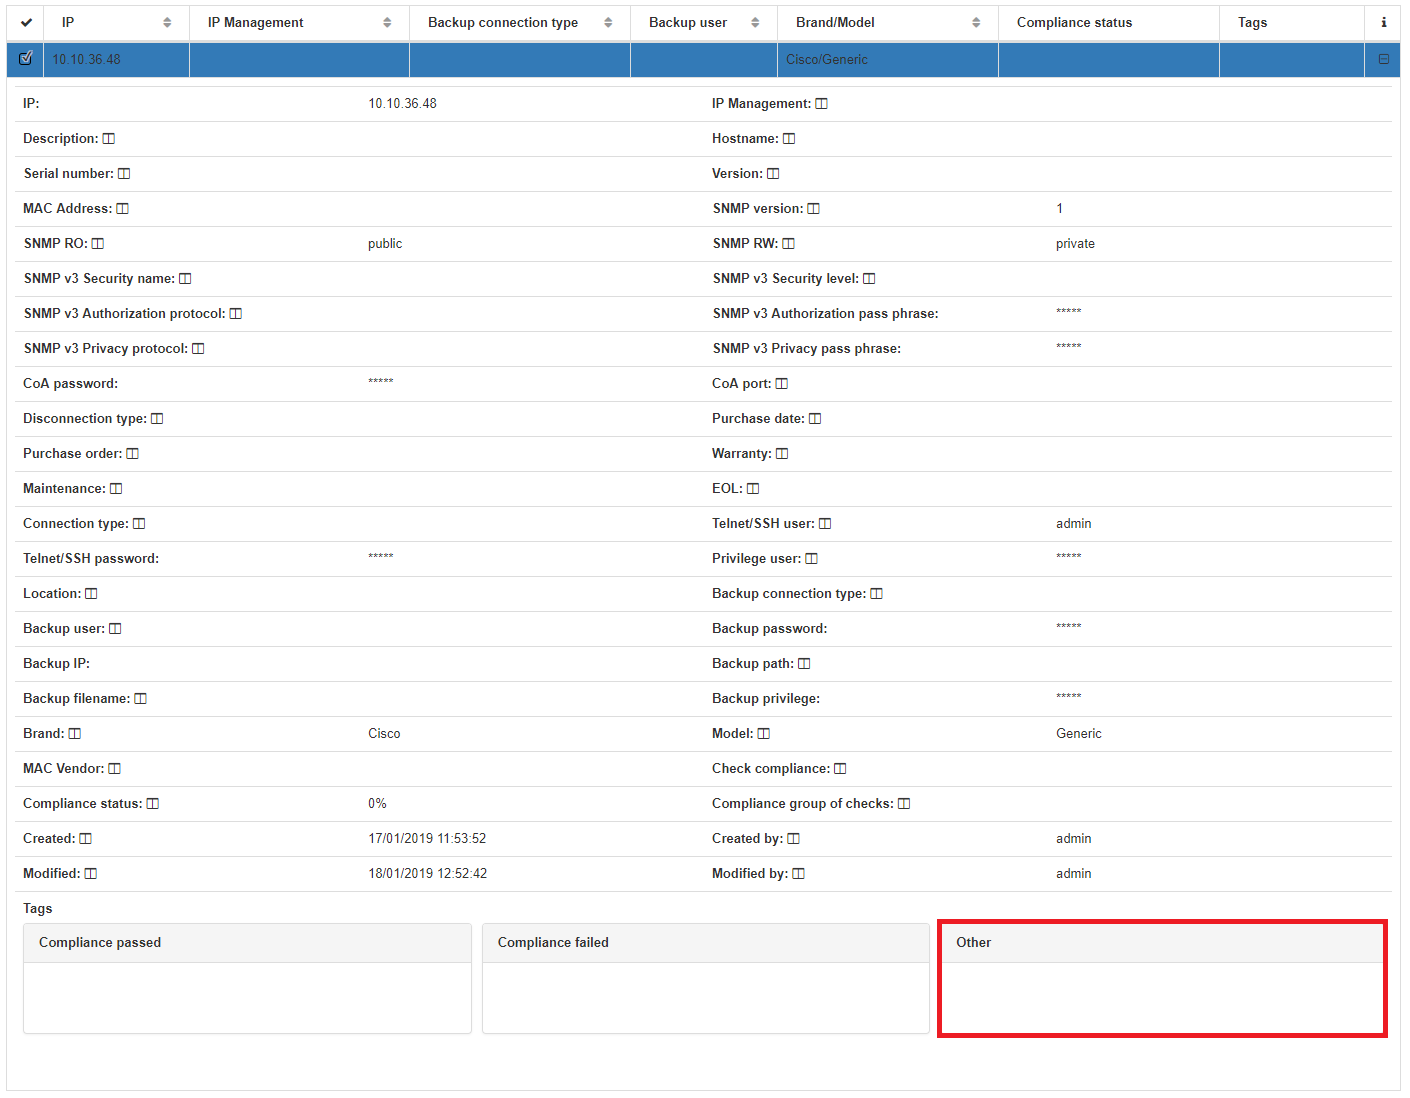
Switch configuration (openNAC)
The switch should have SNMP configured with the correct communities, and the SNMP version MUST be configured as version 1.
Plugin functionality
The plugin will be executed each time that the user device enters to (or exit from) the quarantine policy created before.
Quarantine the user device
To quarantine the user device, you should select the desired user device and click on “Quarantine” button.

After the quarantanize process some tags will be generated and the access VLAN at the switch will be changed.
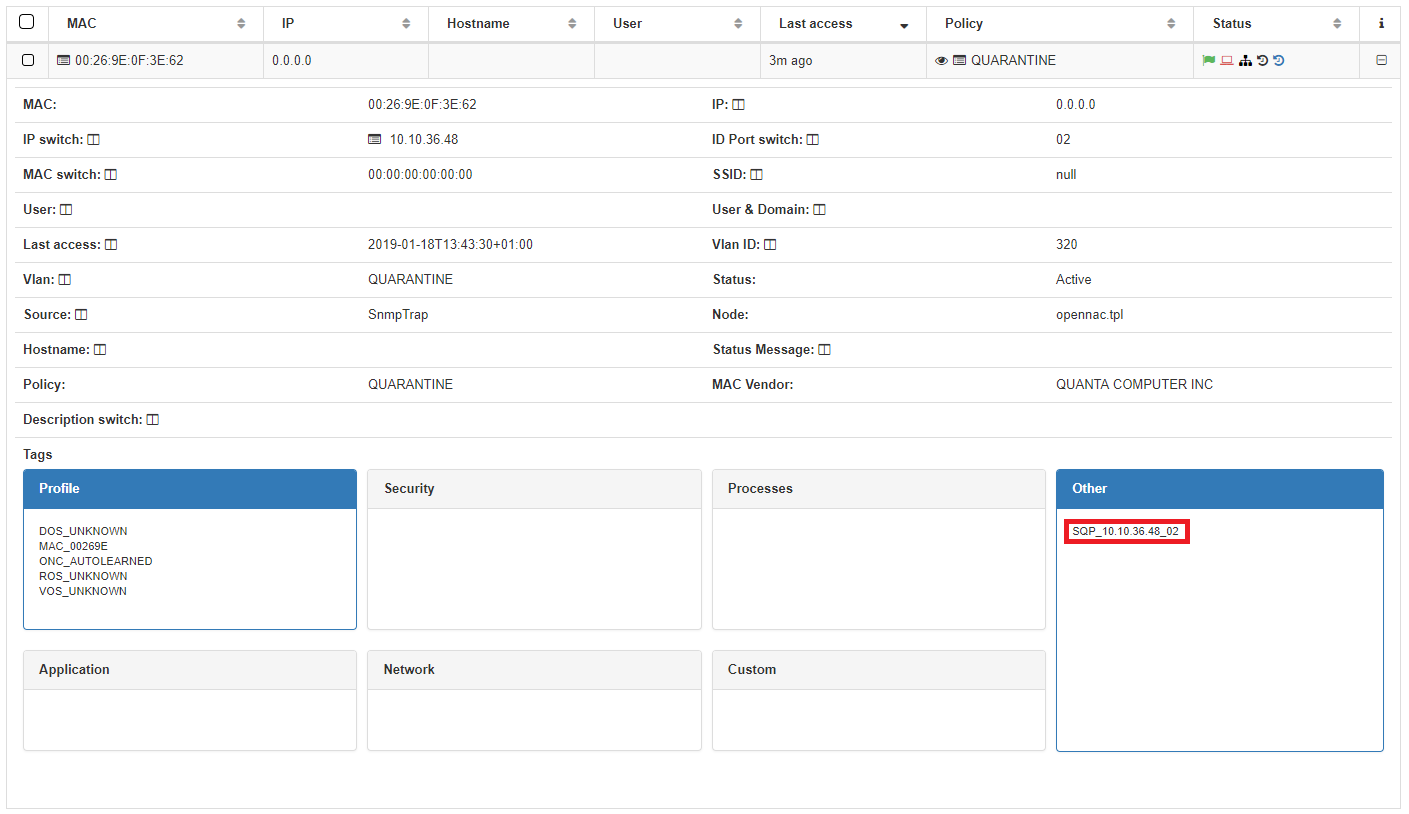
User Device Tag
SQP tag will be generated with the switch IP and switch port where the user device was put in quarantine
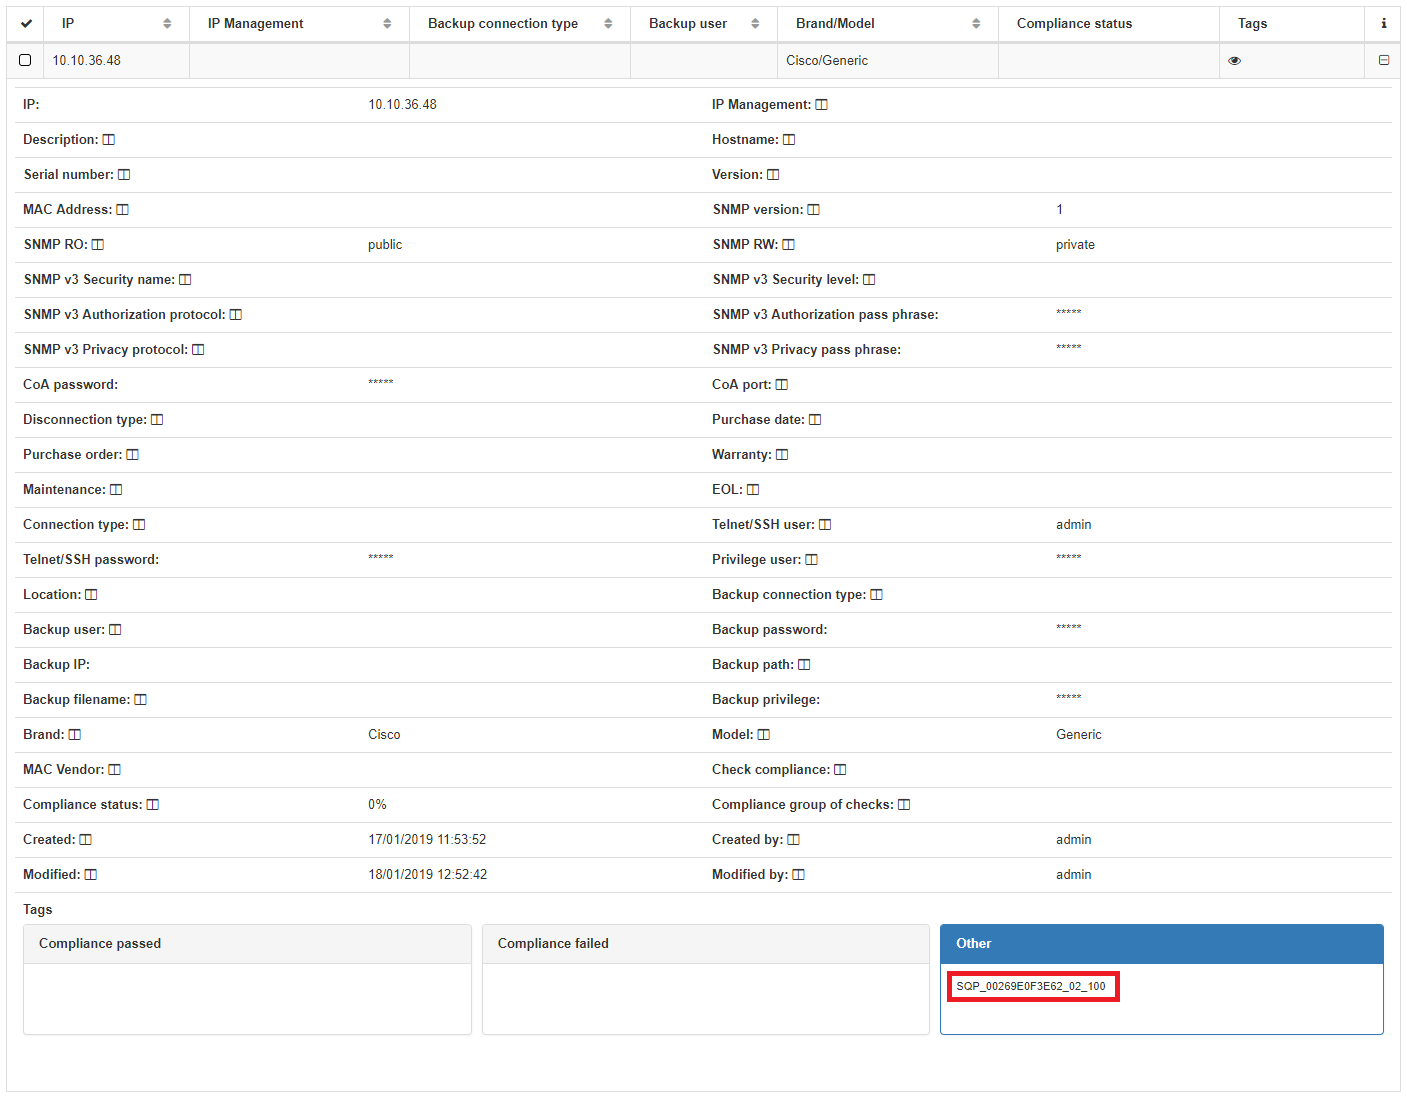
Network Device Tag
SQP Tag will be generated with the user device MAC which triggers the plugin, the switch port blocked and the original VLAN.
Switch VLAN
The switch VLAN configured is changed to quarantine VLAN

Dequarantine the user device
To dequarantine the user device, you should select the desired user device and click on “Dequarantine” button.

User Device Tag
SQP tag will be deleted.
Network Device Tag
SQP tag will be deleted.
Switch VLAN
The switch VLAN configured is reverted to the original VLAN
Note
For more information about plugin TAG go to SNMP Plugin TAG
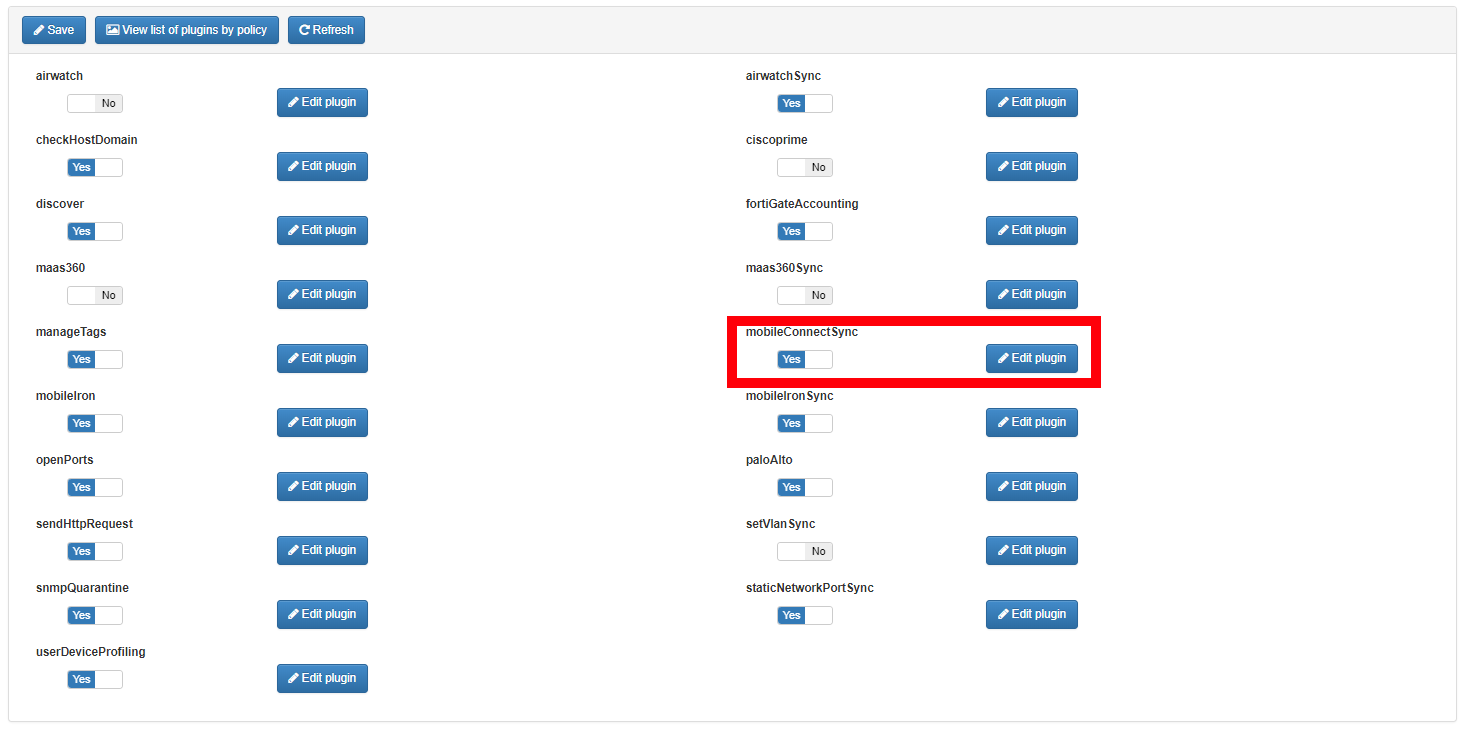
Plugin mobileConnectSync
The mobileConnectSync plugin is used to perform the double authentication factor to verify the identity of the user through his phone.
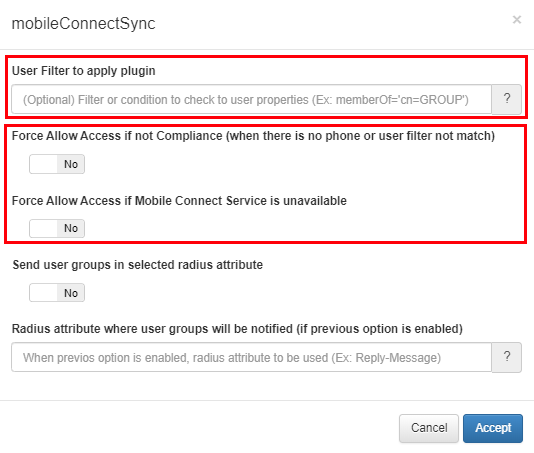
The User Filter to apply plugin field makes a query to the ldap in the execution of the plugin during the authentication process to verify that the user exists within the desired group or organizational unit. Check the Microsoft documentation about search in ldap https://docs.microsoft.com/en-us/windows/win32/adsi/search-filter-syntax
The options Force Allow Access if not Compliance (when there is no phone or user filter not match) and Force Allow Access if Mobile Connect Service is unavailable allow you to decide the behavior of the plugin during the authentication process before the cases described in them.
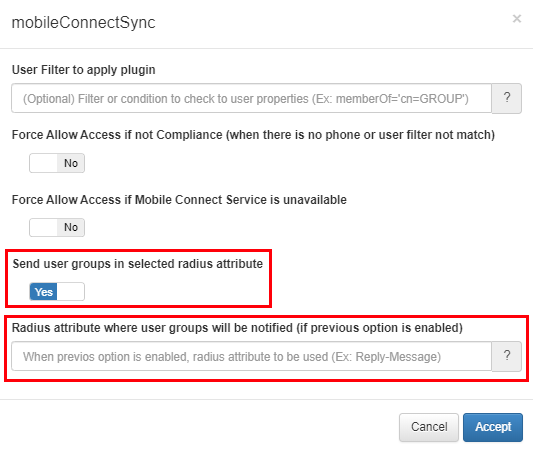
The option ** Send user groups in selected radius attribute ** in a radius attribute to choose, allows you to return the list of groups of the AD of the user who is connecting.
This functionality allows you to return the significant part of the name of each group in the radius attribute.
If the radius attribute chosen is “Reply-Message”, and the list of groups of a user were: CN = Corp_User, OU = Users, DC = Acme, DC = local CN = Dev_User, OU = Users, DC = Acme, DC = local
In the answer radius package (ACCESS-ACCEPT), the following attributes would come: Reply-Message = Corp_User Reply-Message = Dev_User
To configure the plugin, you must check the option “Send user groups in selected radius attribute” and specify the name of the radius attribute in the field “Radius attribute where user groups will be notified (if previous option is enabled)”, as Shows the attached screenshot:
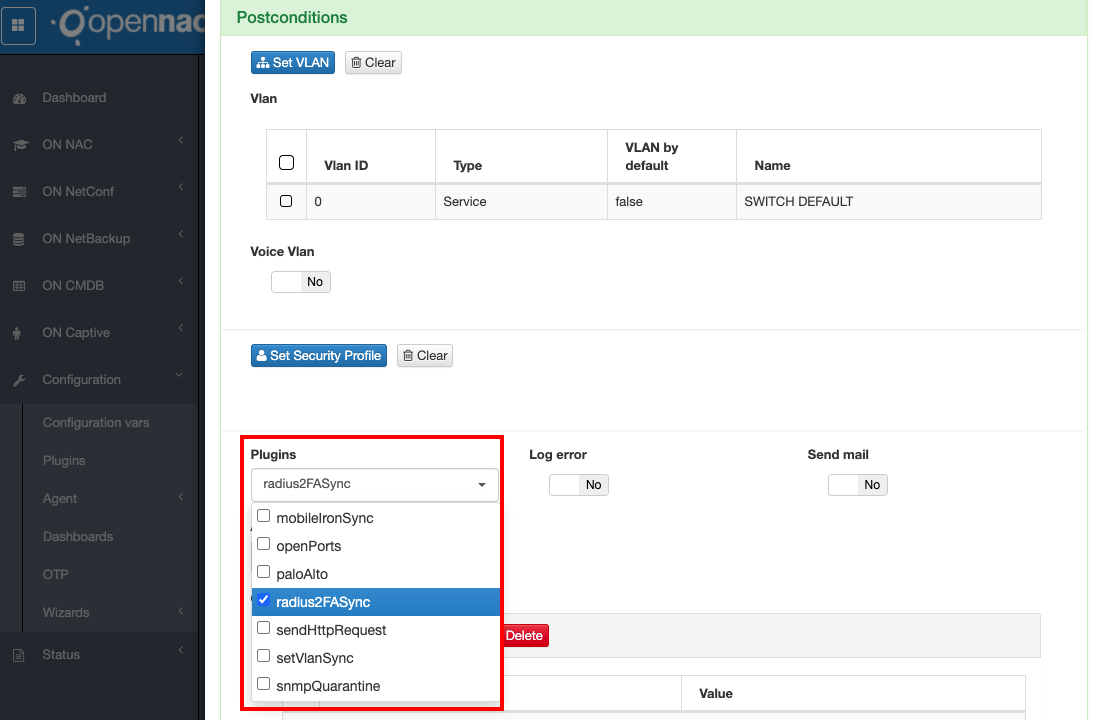
Plugin radius2FASync
The Radius two factor authentication Plugin goes hand in hand with a Symantec system, which uses a second radius that acts as 2FA and is in charge of managing the process of obtaining this second factor.
The plugin will be used to validate VPN connections with or without OTP, adding a double authentication factor to have more security.
How to use it:
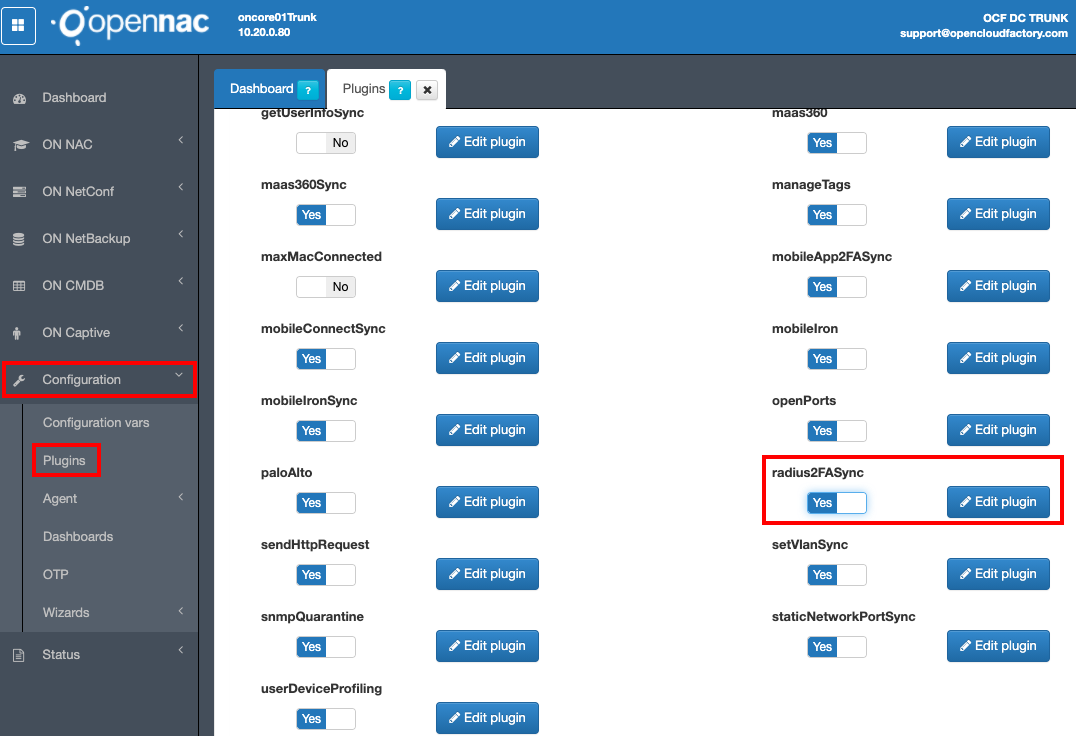
First of all, you need to activate the radius2FASync plugin. Go to Configuration –> Plugins and click the “Edit plugin” by the side of the radius2FASync plugin.
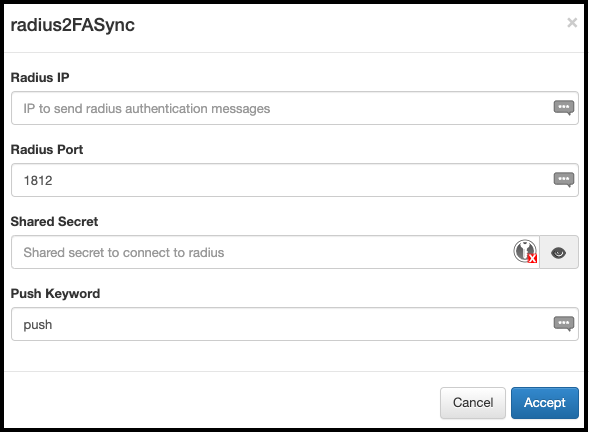
In the pop-up window, select the options as better suitted for your needs:
- Radius IP
IP of the second radius in charge of managing the 2FA.
- Radius Port
Port of the second radius in charge of managing the 2FA.
- Shared Secret
The shared secret is a preshared key of the radius to be able to connect to it.
- Push Keyword
This word will be used to tell the symantec system (which is in this second radius) that you want to login using 2FA.
After configuring as we want, click in the Accept Button.
Now, change the radius2FASync plugin from “No” to “Yes” and click in the Save button, at the top of the screen.
Now the work for configure this plugin has been done, so now you can use it into a policy.
Go to ON NAC –> Policies and edit an existing or add a new policy.
Plugin Operation Diagram:
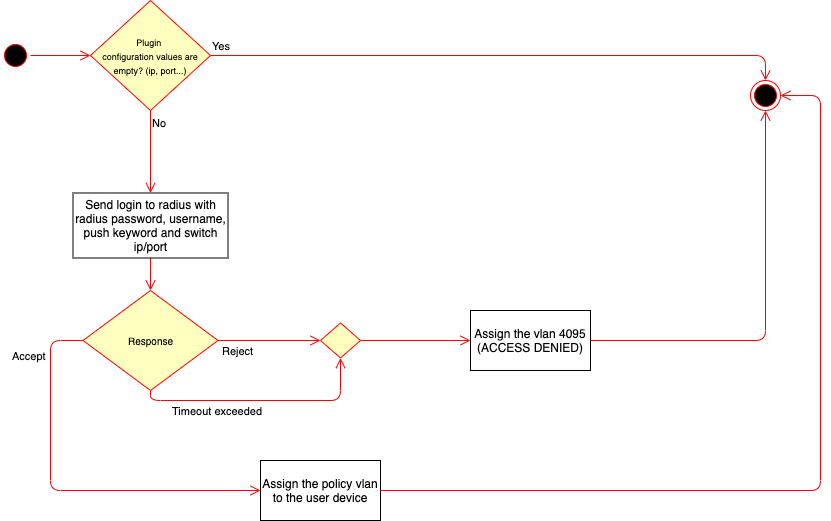
Firstly, the plugin checks if there are no empty values in it’s configuration. If true, it will send a login request to that second radius that will manage the 2FA.
The plugin will wait for a response from the login request sent, and it may be rejected, timeout, or accept. In the case of accept, the vlan configured in the policy used by the plugin will be assigned to the user’s device. In the case that it is not accept, the vlan of access denied will be assigned.
During the execution process of the radius2FA plugin, an application is used for the user to validate the connection or enter the OTP. This is not processed by the plugin itself, since the radius configured for this 2FA process is in charge.
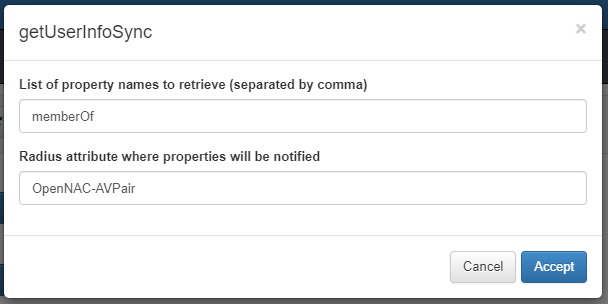
Plugin getUserInfoSync
The getUserInfoSync plugin performs a connection to the configured LDAP server to retrieve property names of the connected user and notify these to the radius server via a custom parameter name.
To configure the plugin, two fields must be configured:
- List of property names to retrieve: This will be the list of properties that will be consulted to the LDAP about the user.
- Radius attribute where properties will be notified: This is the customized parameter with which the information will be sent to the radius server.
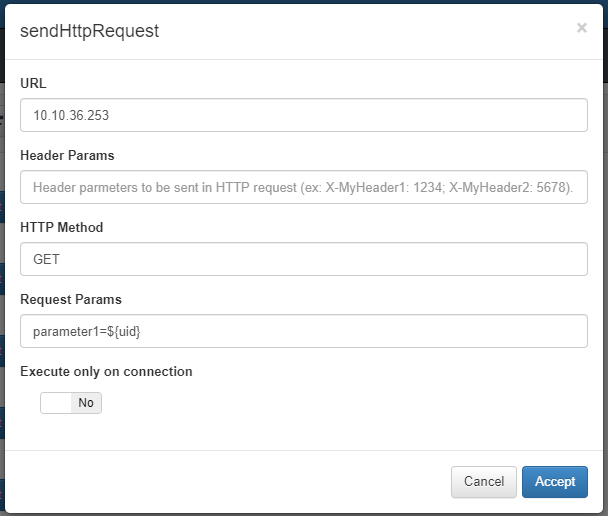
Plugin sendHttpRequest
The sendHttpRequest plugin is used to send HTTP requests of any kind to a desired host every time a user device enters that policy. This is totally customizable; it can be sent everytime there policy evaluation on said device or only when it connects.
To configure the plugin, two fields must be configured:
- URL: Url where the information collected by the plugin will be sent.
- Header Params: Header Params that will be sent in the HTTP Request generated by the plugin.
- HTTP Method: Http method to be used, these can be GET or POST.
- Request Params: Requested parameters collected by the Http Request.
- Execute only on connnection (yes/no): In this check we can determine if the plugin is executed every time a connection is established (Yes) or every time the policy is evaluated (No).
Plugin airWatch / airwatchSync
This plugin checks if the client device exists within the vmware MDM Air Watch, if it exists, this device is considered as compliance.
Integration Advantages
The MDM software is the customer’s tool to guarantee that all of its mobile equipment will be configured and following all of its compliance guidelines.
It usually have its own agent that is able to get all of the device information, such as: IMEI, MAC Address, installed applications, configurations, etc… By being able to integrate with these kind of management solution, we gain the ability to check for device compliance without needing to install a new agent into the customer’s devices.
Environment
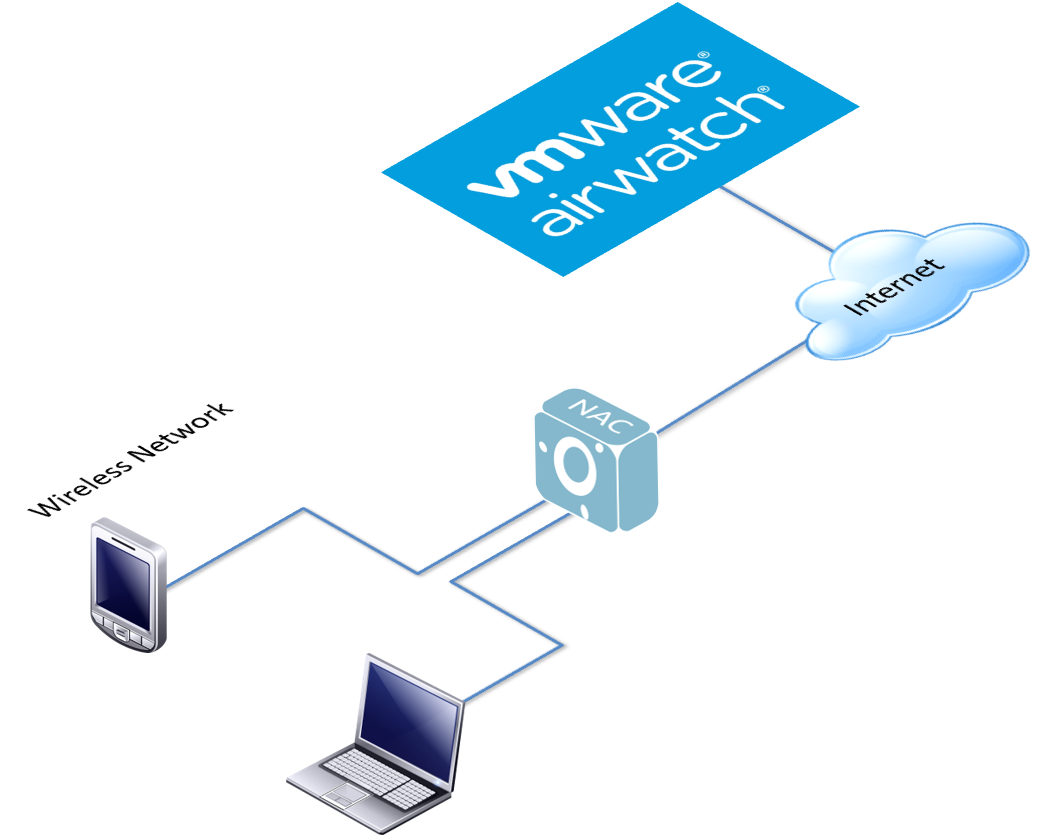
Air Watch Connection Data
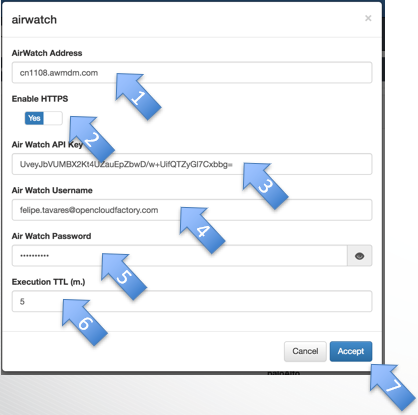
AirWatch Address: IP or DNS name for AirWatch server. Enable HTTPS: Either we need to use HTTPS or HTTP to connect to the air watch server. Air Watch API Key: Air Watch API Key with “admin” Account Type. Air Watch Username: Username for a read-only Air Watch user. Air Watch Password: Password for Air Watcher User.
Air Watch – Generate API Key
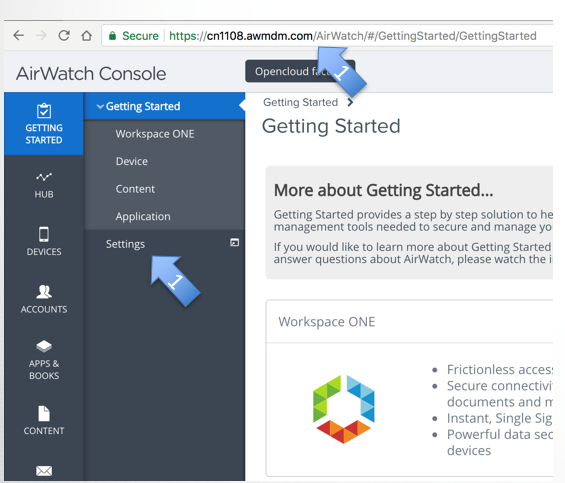
When logged in to AirWatch console, the first parameter to note down is the URL, which we will need to configurate openNAC (step 1)
(Step 2) Now, to generate the API Key, click on “Settings”.
- Inside System, click on “Advanced”
- Inside Advanced, click on “API”
- Inside API, click on “REST API”;

- Select “Authentication”
- Make sure that the “Basic” is “Enabled”
- Click on Save

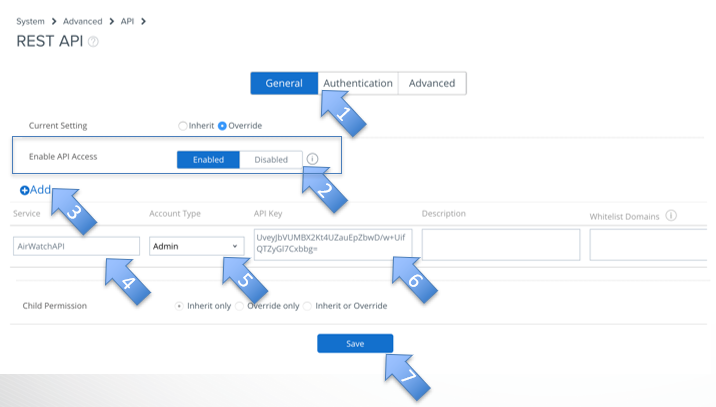
- Select “General”
- Make sure that “Enable API Access” is “Enabled”
- Click on “Add”
- Select a Service identificator (a name)
- Account Type: “Admin”
- Copy the API Key for later use, when configuring openNAC
- Click on Save
openNAC – Configure Plugin
- Configuration
- Plugins
3. Activate airwatchSync / airwatch 5.Edit Plugins
openNAC – Configure Synchronous Plugin
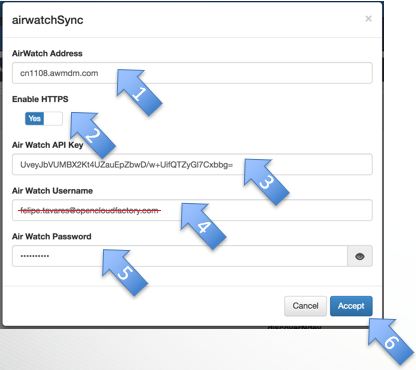
- Insert Air Watch server’s IP or DNS name
- Choose either or not to enable HTTPS
- Insert Air Watch API Key
- Insert Air Watch username
- Insert Air Watch username’s password
- Click on Accept
openNAC – Configure Asynchronous Plugin
- Insert Air Watch server’s IP or DNS name
- Choose either or not to enable HTTPS
- Insert Air Watch API Key
- Insert Air Watch username
- Insert Air Watch username’s password
- Insert the interval time for the plugin to be re-run
- Click on Accept
openNAC – Configure Policy to use the Plugin
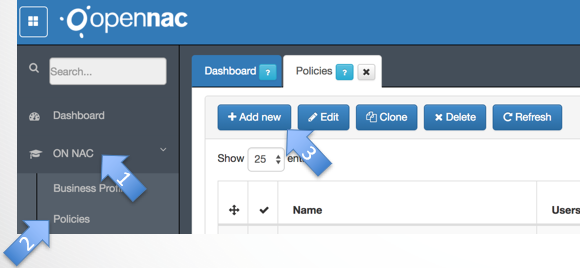
- Click on “ON NAC”
- Click on Policies
- Click on “+ Add new”
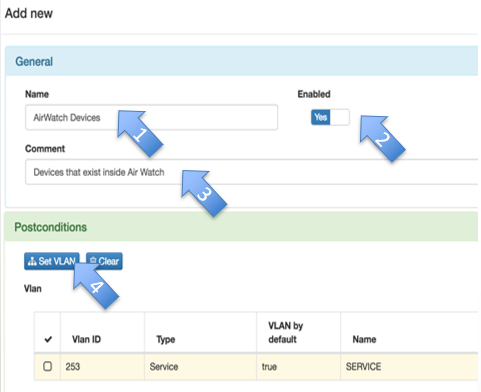
- Name: Choose a name for your policy
- Enabled: Yes
- Comment: A comment to describe what this policy does
- Set VLAN: To which VLAN the devices that fulfill this policy should be sent
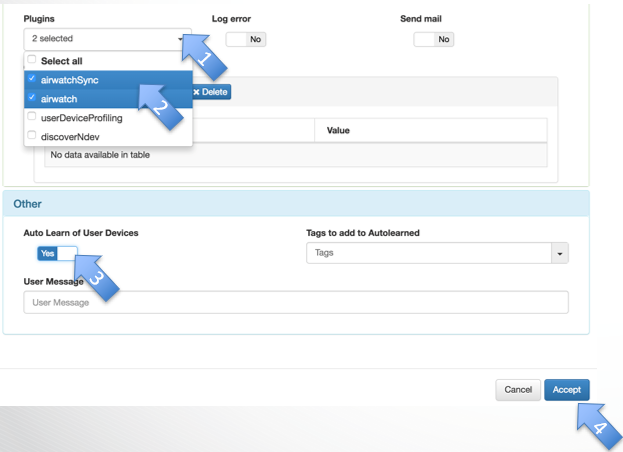
- Plugins: Click on the drop- down menu
- Select which plugins should be activated
- Auto Learn of User Devices: Yes
- Accept
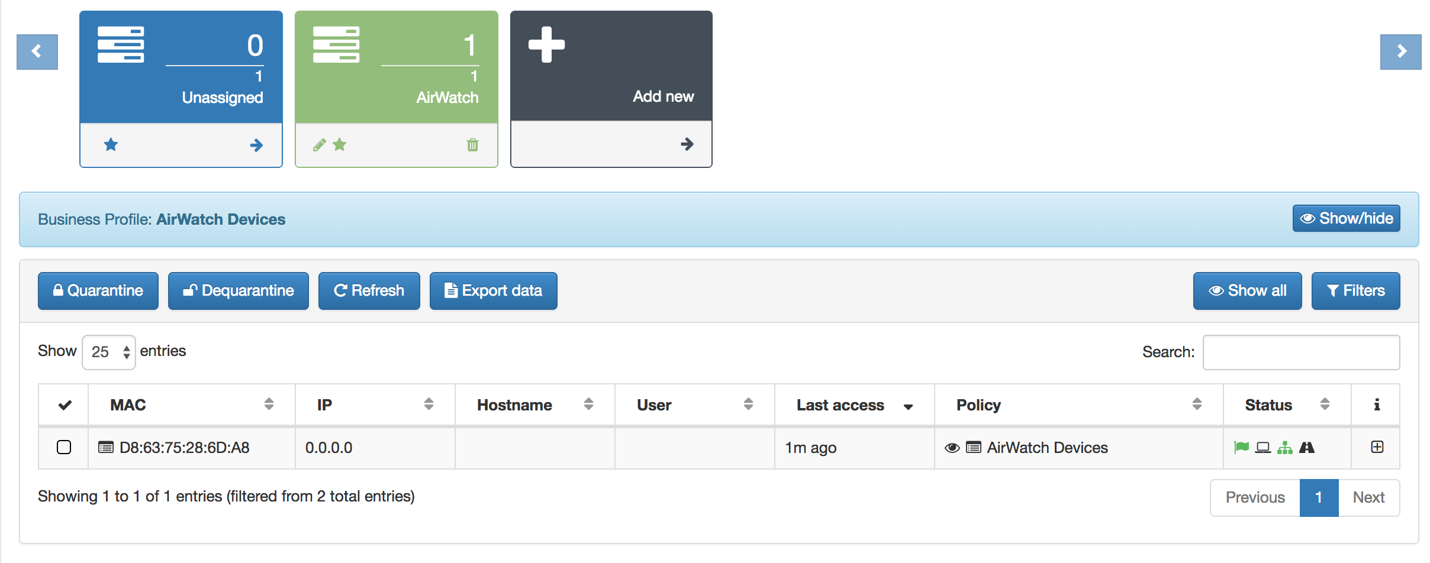
openNAC - Results
Here we can see our Business Profile “AirWatch” with one device authenticated
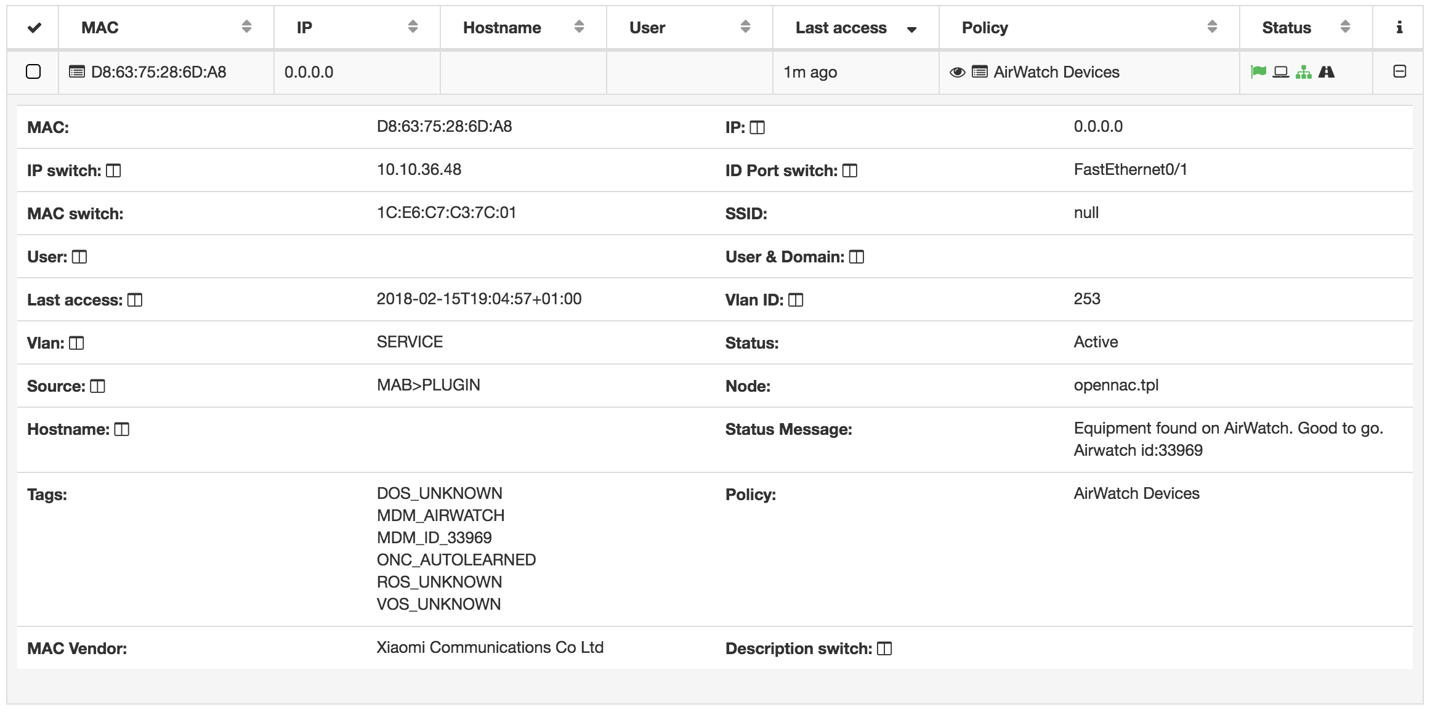
On the User Device details, we can see which the TAGs that where added, and more detailed information about the User Device
Plugin maas360 / maas360Sync
This plugin checks if the client device exists within the Maas360 MDM, if it exists, this device is considered as valid.
In the case that the device is registered in the Maas360 database, it will allow the connection and assign the MDM_ID_XXXX Tag with the id received by maas360 to the device. The tag MDM_MAAS360 will also be added to identify the type of verification.
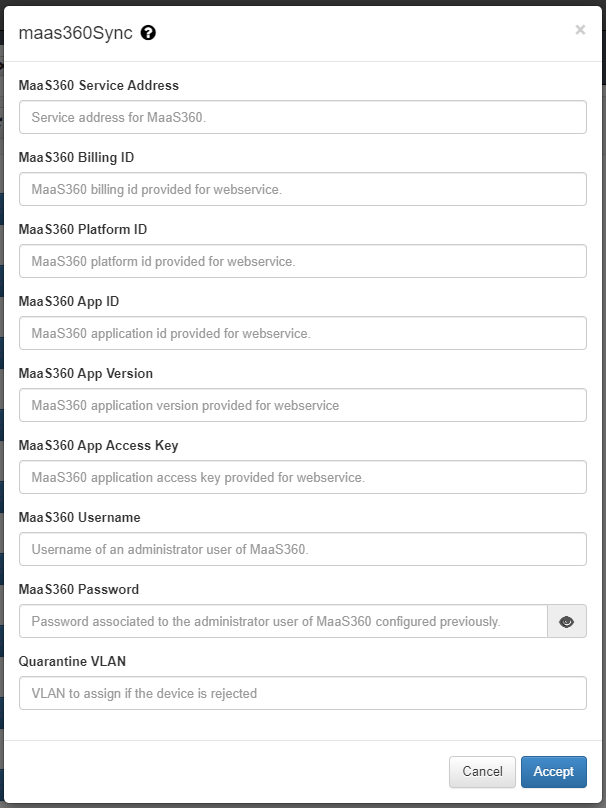
To configure the plugin, two fields must be configured:
- MaaS360 Service Address: Address of the Maas360 service where to make inquiries.
- MaaS360 Billing ID: Costumer Maas360 Billing ID.
- MaaS360 Platform ID: Platform ID of MaaS360 service.
- MaaS360 App ID: App ID provisioned in MaaS360.
- MaaS360 App Version: App Version of app provisioned in MaaS360.
- MaaS360 App Access Key: Key generated by Maas360.
- MaaS360 Username: Address of the Maas360 service where to make inquiries.
- MaaS360 Password: Maas360 service administrator user password.
- TTL(no Sync): During this period, indicated in minutes, no more executions are done over the same client.

Plugin mobileApp2FASync
The mobileApp2FASync plugin is used in the use of the mobile application to generate push notifications through firebase. This notifies the user that he has the authenticated app on his mobile.
To configure the plugin, two fields must be configured: - Firebase API key: Firebase API key used by the service. - Notification title: Title of the notification that will be sent to the user. - Message: Message that will be sent to the user through the notification. - TTL: Maximum time the user has to respond to the notification.

For the correct functioning of the plugin, we will have to adapt some timeouts to wait until obtaining the validation from the Iron Chip application. The validation process usually lasts between 15-30 seconds approximately, for longer times we will consider that there has been no response and we will close the connection, as a consequence, the user will not be verified and we will deny access. From OpenNAC we recommend adjusting the timeouts of the following files to optimize operation:
- /etc/httpd/conf.d/php.conf
In the php.conf file we will nedd to change the timeout that refers to the php execution, we will have to increment the value from 11 to 31, to give the user enought to to execute the verification. If we do not configure these value, the web connection will be close without receiving any response.
<Proxy "unix:/run/php-fpm/www.sock|fcgi://localhost" timeout=60>
</Proxy>
<Proxy "unix:/run/php-fpm/poleval.sock|fcgi://127.0.0.1" timeout=31>
</Proxy>
- /etc/php-fpm.d/poleval.conf
In the poleval.conf file we will nedd to change the timeout that refers to the poleval execution, we will have to increment the value from 10 to 30, to give the user enought to to execute the verification. If we do not configure these value, if the poleval does not have a response in 10 seconds, it will return an invalid result.
;Custom
listen = /run/php-fpm/poleval.sock
pm.max_requests = 500
pm.status_path = /statuspoleval
slowlog = /var/log/php-fpm/poleval-slow.log
request_terminate_timeout = 30
php_admin_value[memory_limit] = 128M
php_admin_value[error_log] = /var/log/php-fpm/poleval-error.log
- /etc/raddb/mods-available/opennac
In this file we will configure a parameter that refers to the api calls. If the poleval gets no response due to the apiTimeout, we will discard any information we receive after that time is up, so we will change the acceptWhenPolEvalDiscards parameter to no
# Default result when any issue is produced in openNAC policy evaluation or
# "apiTimeout" is reached
# By default, request is accept and default vlan is assigned
acceptWhenPolEvalDiscards = no;
Also we will need to configure the timeout to abort the api calls. We will have to increase this timeout to give enough time to wait for the answer from the Iron Chip app.
# Timeout to abort api call (value in seconds)
apiTimeout = 120
Finally, we need to check if the VPN service has a timeout. In case of using OpenVPN, it should be edited if possible in a frontend, but if cannot, then configure the following file. In our case, we have a Cmix and we can edit this configuration on the firewall entity directly from the web app.
- /etc/openvpn/radiusplugin-{VPN config name}.cnf
You must set retry value to 1 (to fix the problem of multiple connections when the last one is still not finalized) and increase timeout.
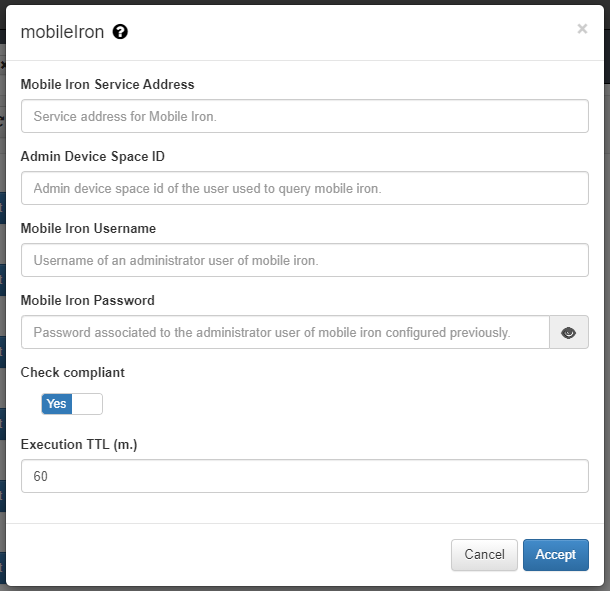
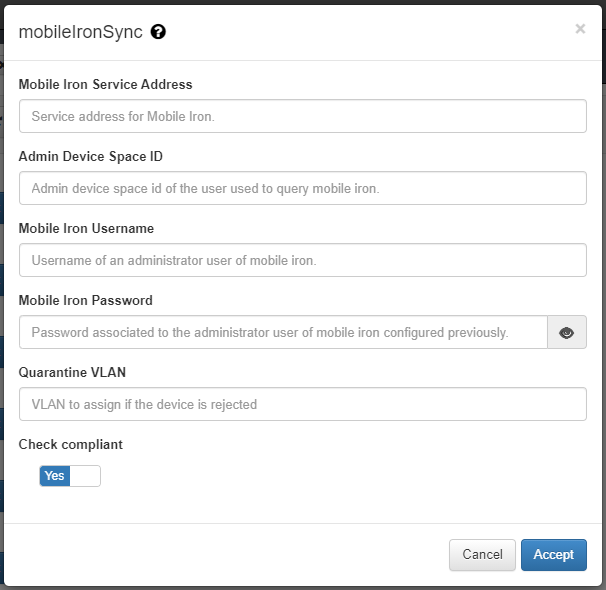
Plugin mobileIron / mobileIronSync
This plugin checks if the client device exists within the MobileIron MDM, if it exists, this device is considered as valid.This plugin also validates if the device is compliance
In the case that the device is registered in the MobileIron database, it will allow the connection and assign the ID_XXXX Tag with the id received by maas360 to the device. The tag MOBILEIRON will also be added to identify the type of verification.
- Mobile Iron Service Address: MobileIron service address where inquiries will be made.
- Admin Device Space ID: Admin Device Space ID of the MobileIron service.
- Mobile Iron Username: MobileIron platform user.
- Mobile Iron Password: MobileIron platform user password.
- Check compliant (yes/no): If compliance is checked (yes), the plugin will verify if the device is complance in MobileIron, if it is, the COMPLIANCE tag will be assigned and, if it is not, the NO_COMPLIANCE tag. If this flag is disabled (no), the plugin will remove the complance tags and will not validate this feature.
- TTL(no Sync): During this period, indicated in minutes, no more executions are done over the same client.