4.4.2.4. Administration
The administration section focuses on advanced tasks related to the ongoing management and maintenance of the system covering more complex configurations and advanced features.
Note
It is essential to have correctly deployed the necessary nodes for this use case.
In this section, you will find the following contents:
Device management:
Configuration and Parameters:
Compliance Execution:
4.4.2.4.1. Compliance Test Structure
To perform a Compliance Test on a network device, one or more Test Groups are executed to validate the defined information. The overall structure consists of several levels and relationships, which are explained below:
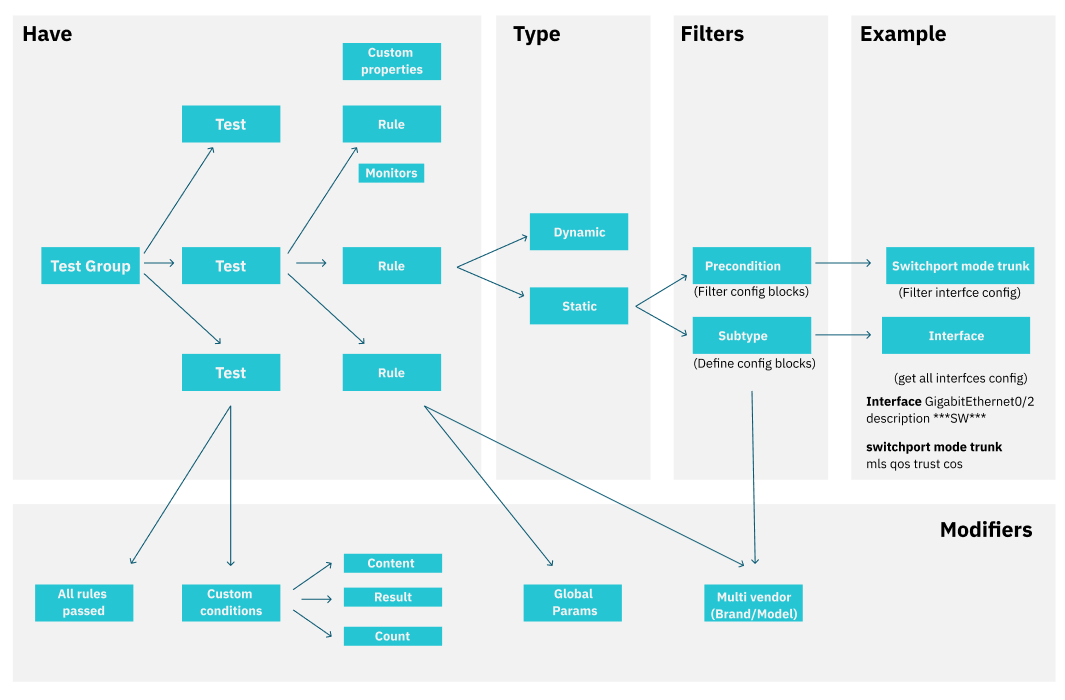
There are three main levels in this structure:
Rules
At the base level, rules are responsible for verifying specific requirements of the network device. Rules are classified into two types:
Static Rules: These rules can include parameters, subtypes (which filter the information being validated), and preconditions (which check that certain criteria are met before the rule is applied).
Dynamic Rules: These allow for more flexibility depending on the context.
Custom properties may be defined within rules to extract additional device information, which can then trigger Monitors to report relevant data.
Test
Tests group together multiple rules. They can be configured to behave differently depending on their setup. There are two main ways to validate tests:
All Rules Passed: The test is considered successful only when all the individual rules within it are satisfied.
Custom Conditions: In this case, specific criteria are set for the rules, such as validating based on certain content, results, or counts.
Test Groups
At the top level, Test Groups consist of multiple tests. They simplify the testing process by grouping several tests together for easier execution. When a Test Group is executed on a device, it evaluates the associated tests and the rules within them.
In summary, the compliance test structure involves defining rules (either static or dynamic) to check device requirements. These rules are grouped into tests, which are then organized into test groups for execution. Each test group ensures that the device complies with the set requirements based on the results of the tests and rules.
4.4.2.4.2. Register Network Devices
To begin using the Network Device Compliance (NDC) module, you need to register each network device in the system and configure the access method to retrieve its configuration.
If you wish to register multiple devices simultaneously, refer to the Bulk import of devices.
4.4.2.4.2.1. Single device registration
To register a new device:
Navigate to the ON CMDB > Network Devices section.
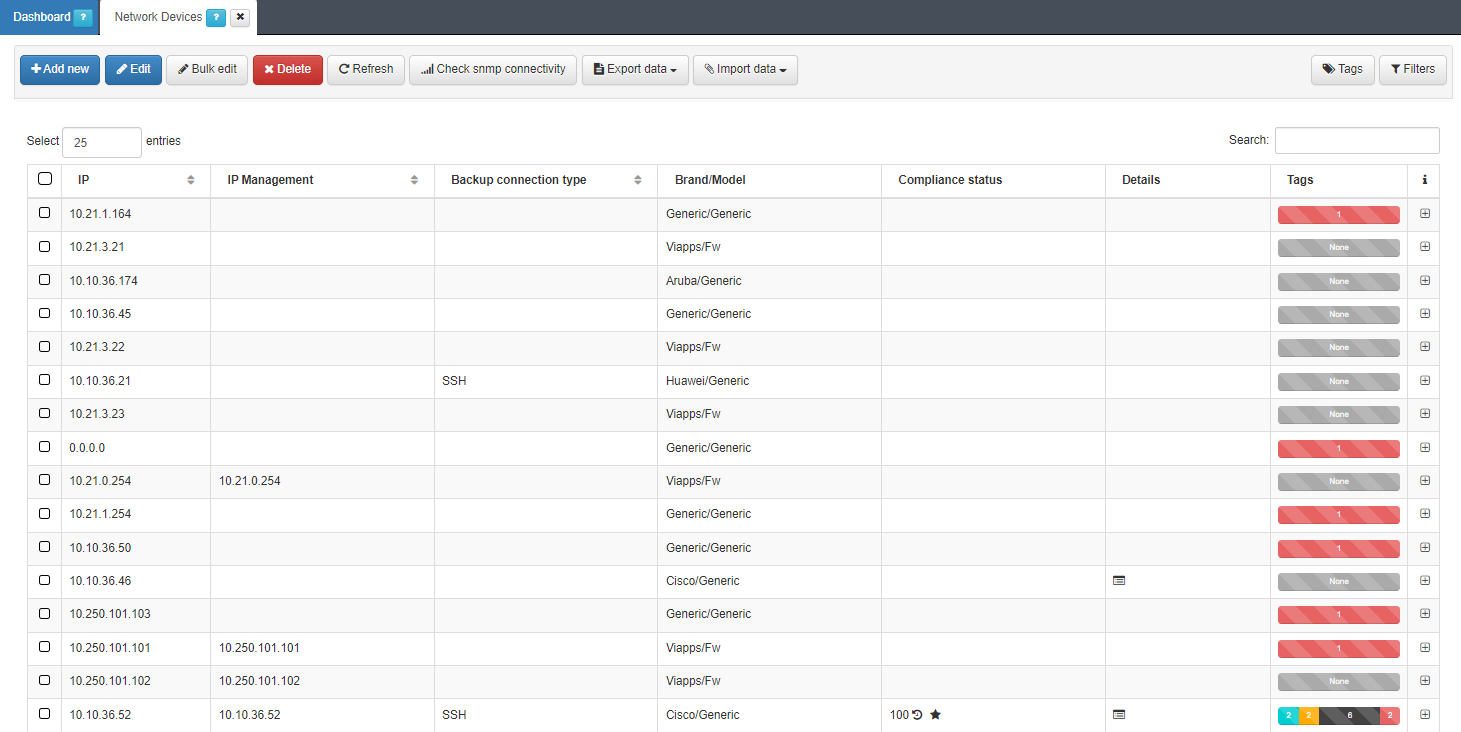
Click the Add new button to open the device registration form. Complete the necessary fields, and then click :Accept to save the device.
Required Fields for Device Registration:
4.4.2.4.2.1.1. General
In the General tab, the following fields must be completed:
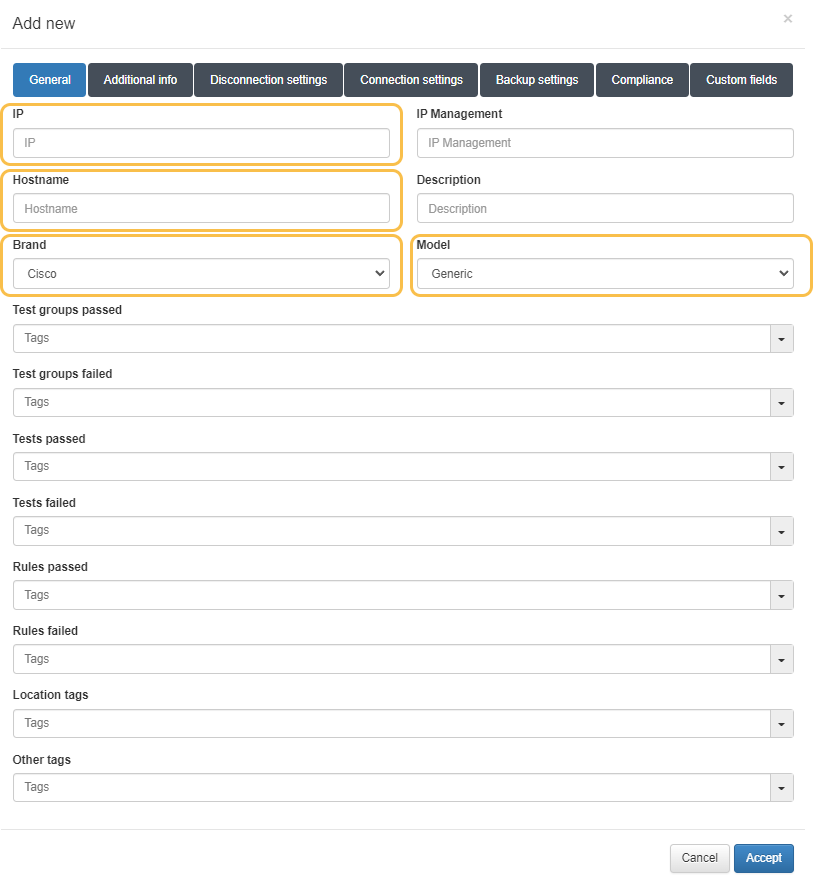
IP: The IP address that identifies the device. This is only for identification purposes within the system.
Hostname: The device’s hostname, used when retrieving device configurations via SCP.
Brand / Model: The device’s brand and model, necessary to apply the correct compliance checks for the specific device type.
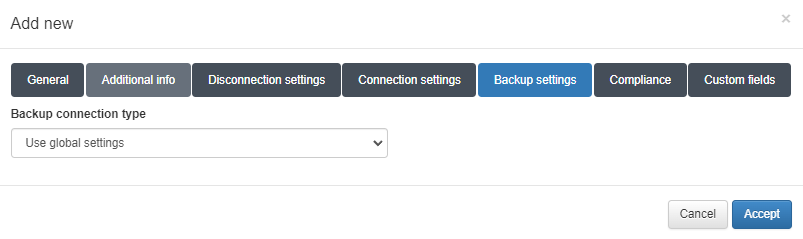
4.4.2.4.2.1.2. Backup Settings
In this tab, you configure how the system will access the network device to obtain its configuration. You can choose between two methods: SSH or SCP.
You can also use global configuration values, found under Configuration > Configuration vars in NetDev tab in Backup properties section.
Connection Methods
SSH: The system connects directly to the network device and retrieves its configuration.
SCP: The system connects to an external server where the configuration file of the network device is stored.
For both SSH and SCP, the following information must be configured:
Backup IP: The IP address from which configurations will be retrieved (the network device for SSH, or the external server for SCP).
Backup user: The username for access.
Additional SSH and SCP Configurations
For SSH:
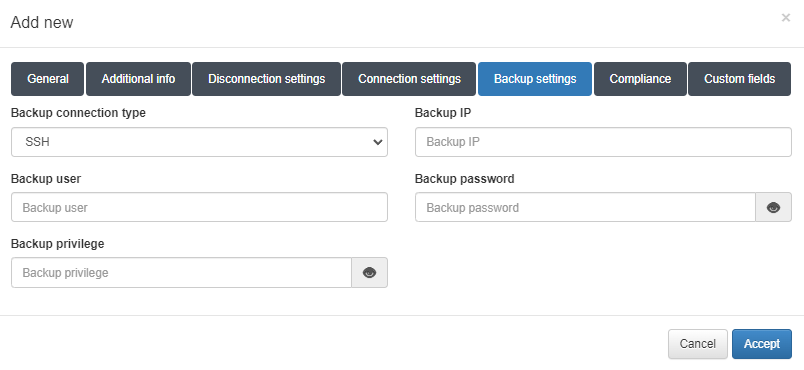
Backup privilege: The password for privileged mode access on the network device.
For SSH, you also need to configure:
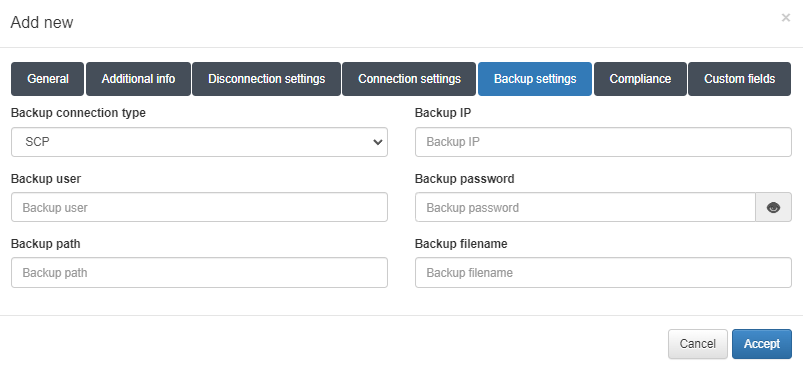
Backup path: The file path where configuration files are stored on the server (e.g., /root/backups).
Backup filename: A regular expression to identify valid file names. Use %HOSTNAME% to refer to the device’s hostname. Example: %HOSTNAME% (.*|).
In the SSH method, the system retrieves the latest configuration directly from the device. In the SCP method, it retrieves the configuration from a file stored on another server.
If using SCP, files are filtered according to the Backup filename parameter and are sorted alphabetically. The system will use the latest file (e.g., with a date suffix). Ensure that files are named in a clear order (e.g., year-month-day). Example: cisco_2019_12_21.
Example for a Switch Device:

Hostname Cisco-8p.
Backup path /root/backups/Cisco-8p. Folder with hostname Cisco-8p. Optionally, all the configuration files of different network devices can go in the same folder.
Two configuration files. Cisco-8p_2019_12_11.txt and Cisco-8p_2019_12_12.txt. The last one will be used for the tests, in this case Cisco-8p_2019_12_12.txt.
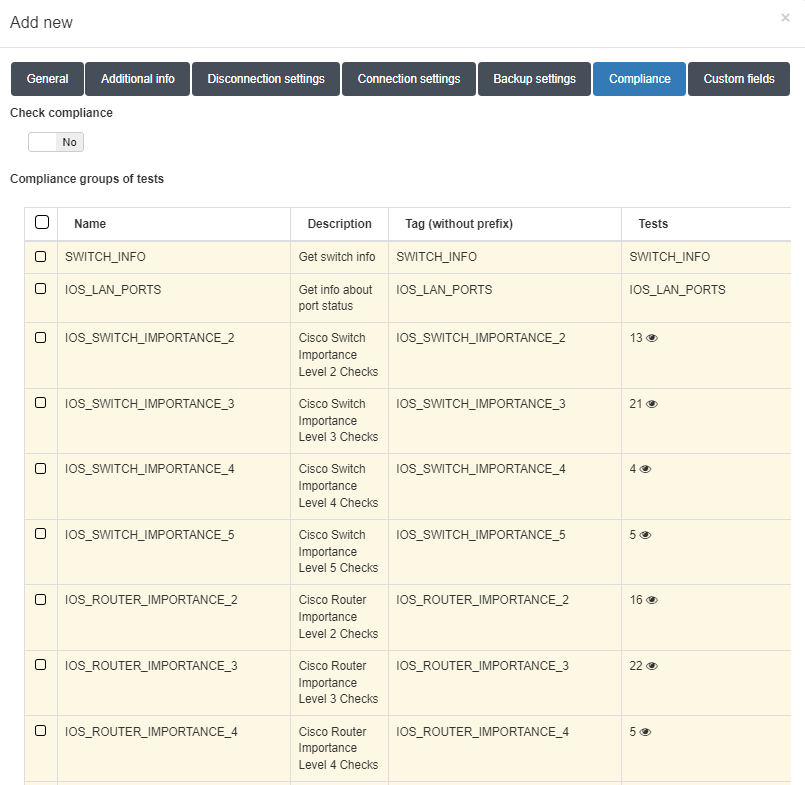
4.4.2.4.2.1.3. Compliance
To enable compliance checks for the device:
In the Compliance tab, activate the compliance feature by enabling the Check compliance flag.
Select the relevant test groups from the Compliance groups of test table.
4.4.2.4.3. Bulk Import Network Devices
To import a set of network devices into the CMDB, execute the following steps.
Export the template that you will use to add the list of devices:
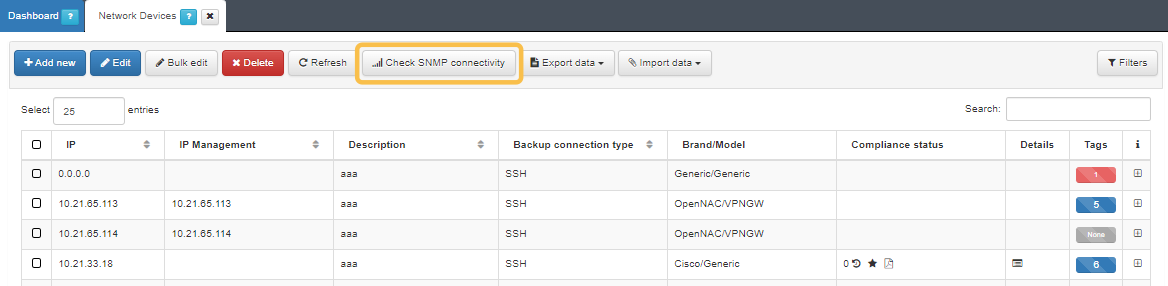
Navigate to ON CMDB > Network Devices.
Select a Network Device as model.
Export the file by clicking on the Export data button. This will generate a JSON and an XML file.
Download the CSV file generated in the previous step:
Navigate to Status > CMDB Exports:
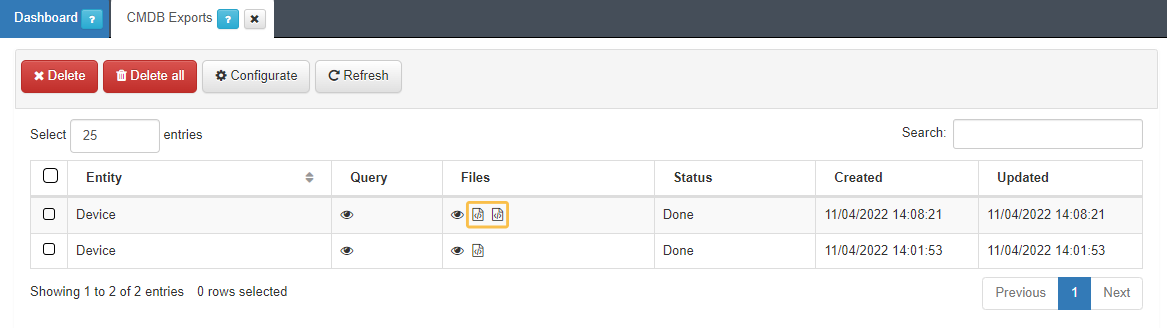
You can export the file in CSV or XLSX format.
Choose the path on the computer (by default in the Downloads folder).
Ensure that the downloaded file is completed with the data of your network devices, while considering the following points:
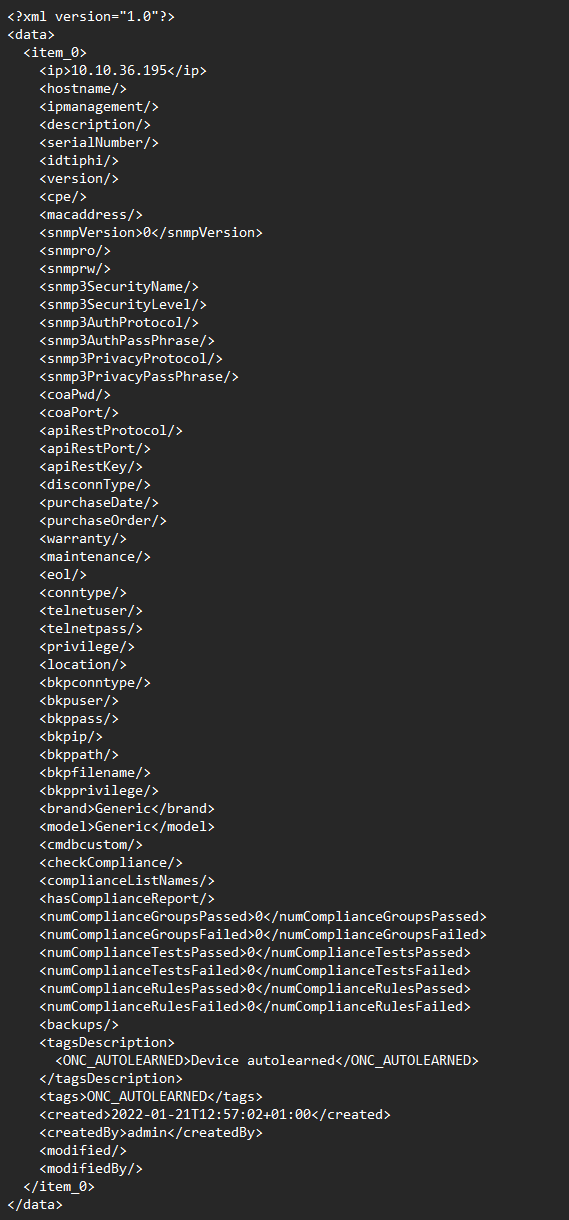
Not all fields need to be filled out.
Leave the columns id, created, createdby, modified and modifiedby blank.
The minimum information required to successfully importing a list is as follows:
IP: Indicate the access IP to the device.
Brand: Indicate the manufacturer. Choose from the list of manufacturers registered in OpenNAC displayed in the “Brand” dropdown field:
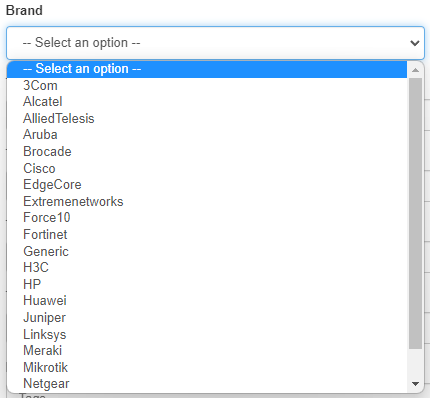
Model: Indicate the model. In this case the only possible model will be Generic. If we are not sure of the manufacturer and model we will leave both fields with Generic.
bkpconntype: SSH or SCP.
bkpuser: User to access the SCP repository or network device.
bkppass: Access password to the SCP repository or network device.
bkpip: IP address of the SCP server or network device.
bkppath: Repository directory where to locate the backups (SCP connections).
bkpfilename: Regular expression to identify the name of the file (SCP connections).
bkpprivilege: Password for Privilege EXEC mode (SSH connections).
Although the hostname of the device is not a required field, it is recommended to complete it to have each IP identified in the CMDB.
The SNMP versions registered in the system are the following:

Save the file in CSV format separated by commas.
Import the generated file:
Navigate to ON CMDB > Network Devices.
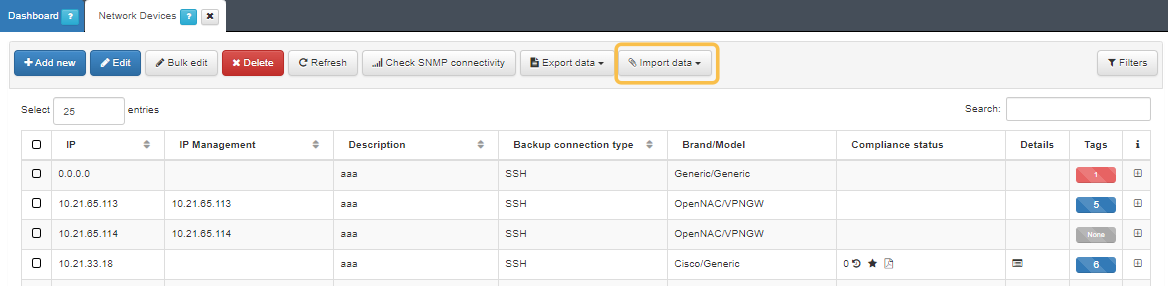
Import the file with the Import data button.
Select the file and click “Accept”.
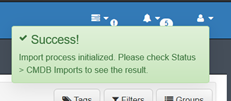
A success message should appear at the upper-right corner of the browser and the import process will be initialized:
Check the progress in Status > CMDB Imports.
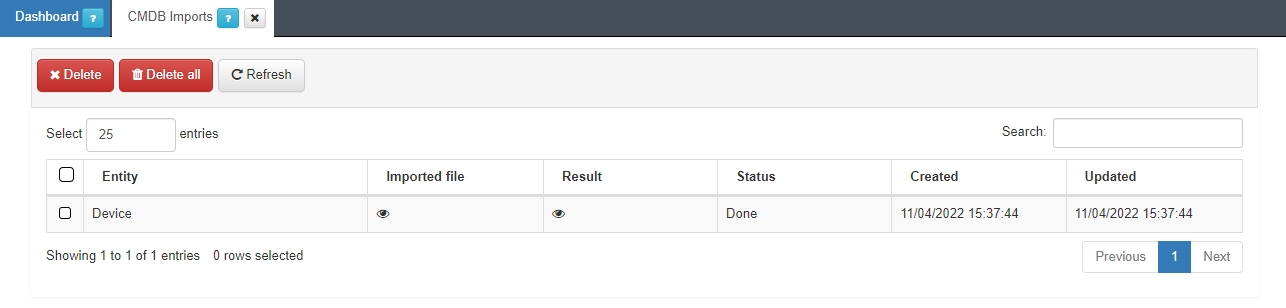
In this section, you can see the imported file, the result of the operation and the current status of the process.
In case of error:
The Status section will display Aborted:
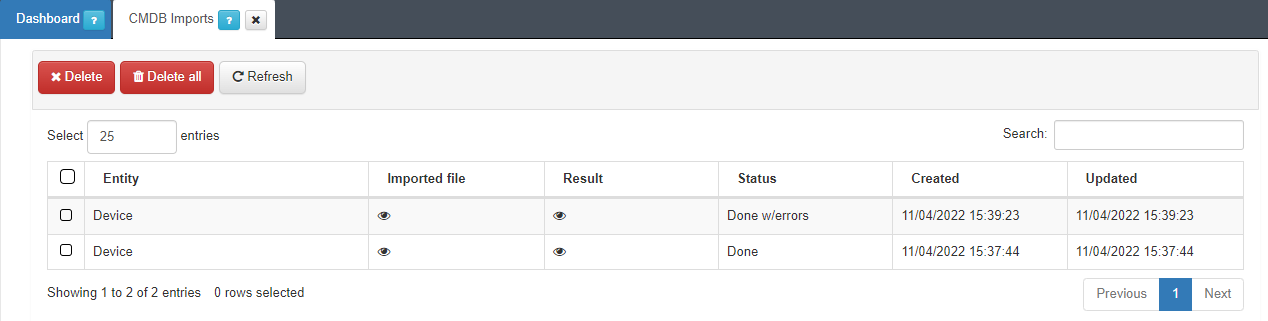
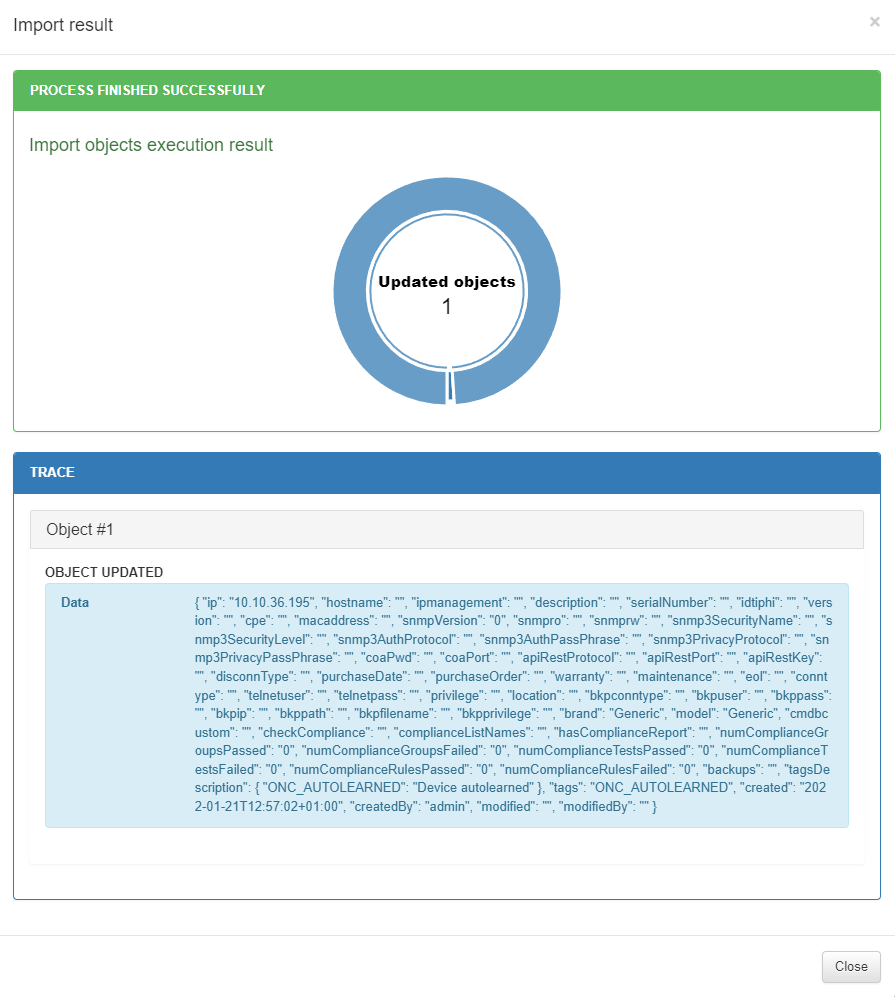
To see the failure reason, open the Result section:
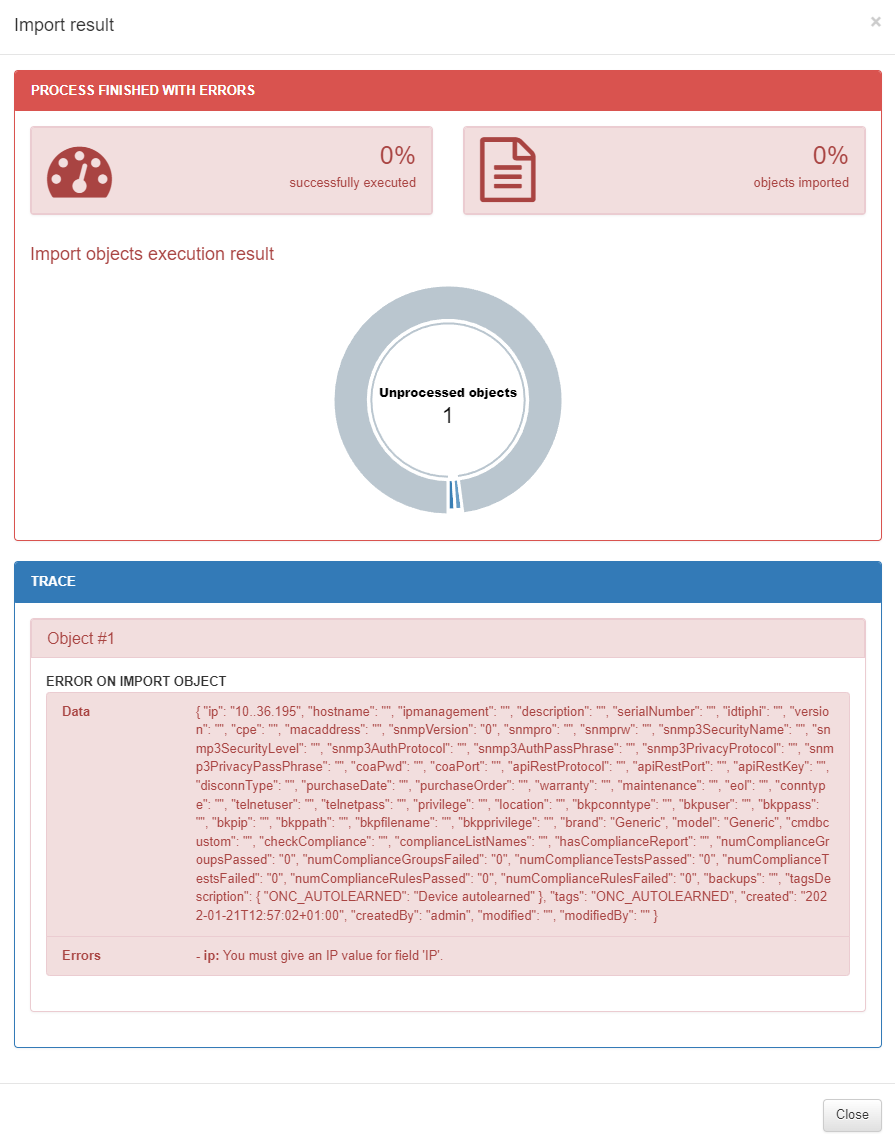
In this example, the IP field is not formatted correctly.
4.4.2.4.4. Global Parameters
Global parameters help simplify repetitive processes and accelerate the creation of new rules. To configure them, go to ON NetBackup > Network Device Compliance > NetDevice global parameters.
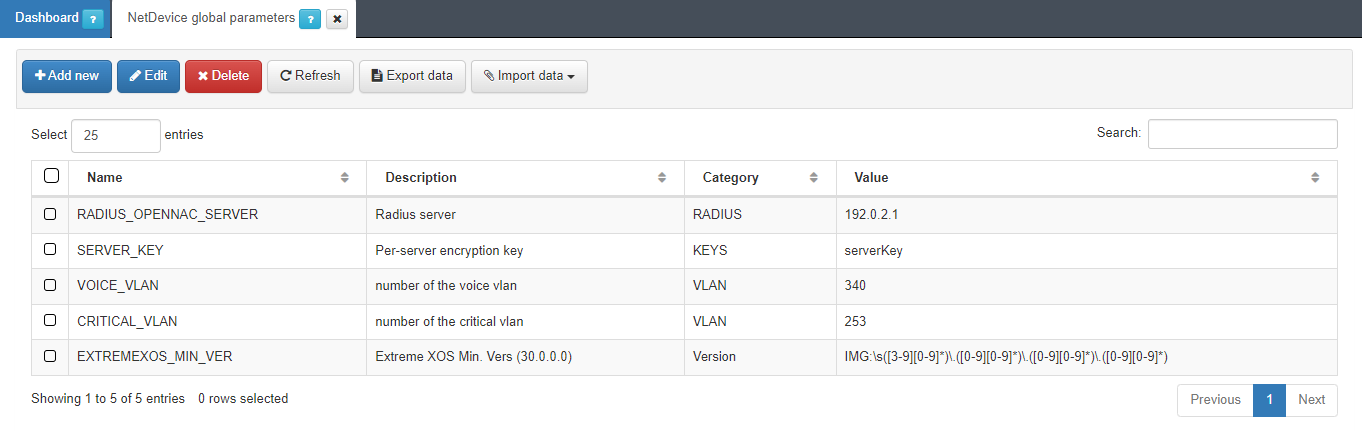
To add a new parameter, click on Add new:
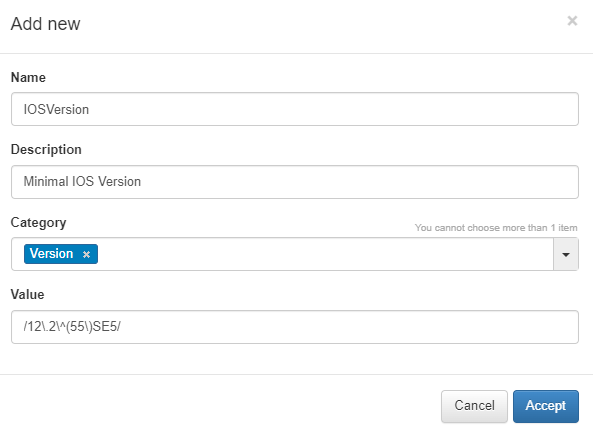
Name: Name of the new global parameter.
Description: Description of the global parameter.
Category: Category to which it belongs, you can select an existing category or create a new one.
Value: Value to be assigned to the parameter (IP, regular expression, or numerical value).
In the example above, the Global Parameter is a regular expression that, when assigned to a rule, checks the version of a network device.
Another useful example is assigning an IP address. By defining the IP in a Global Parameter, any future changes to the IP only need to be made once, and the update will automatically apply wherever the parameter is used.
4.4.2.4.5. Multiple Vendors
Different manufacturers and models of network devices have unique methods for storing configuration information, which can affect how rules operate.
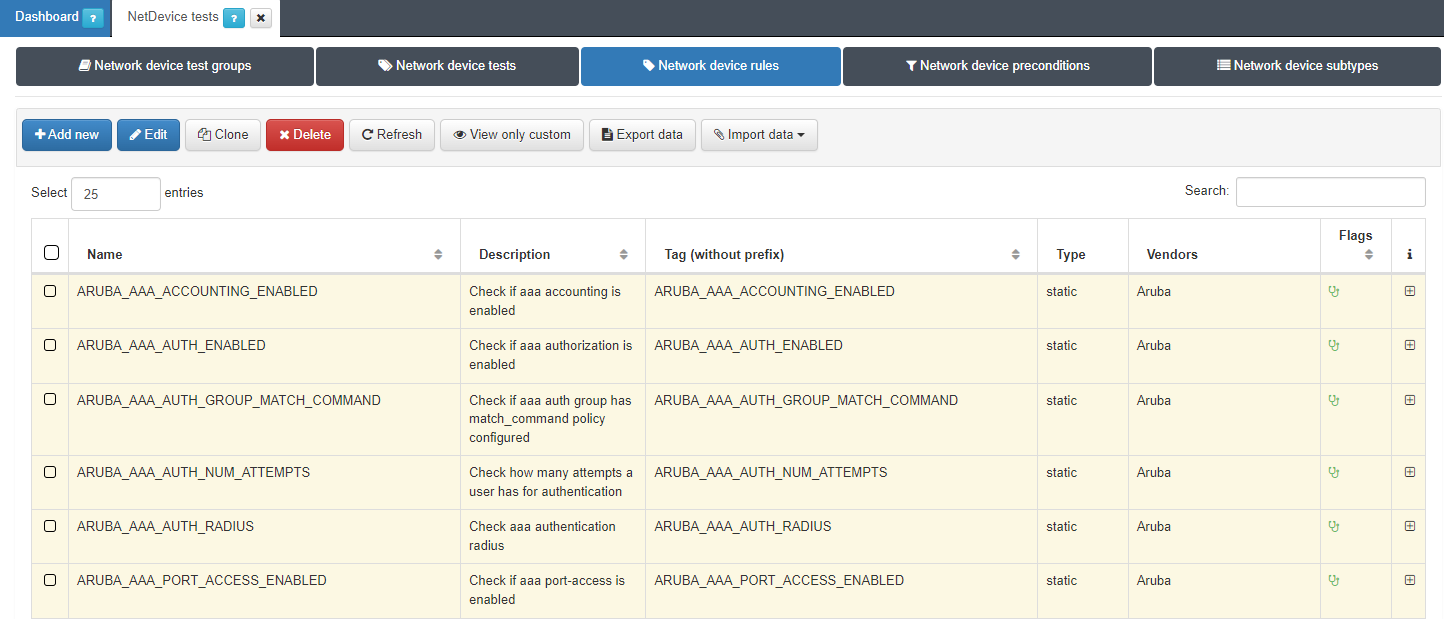
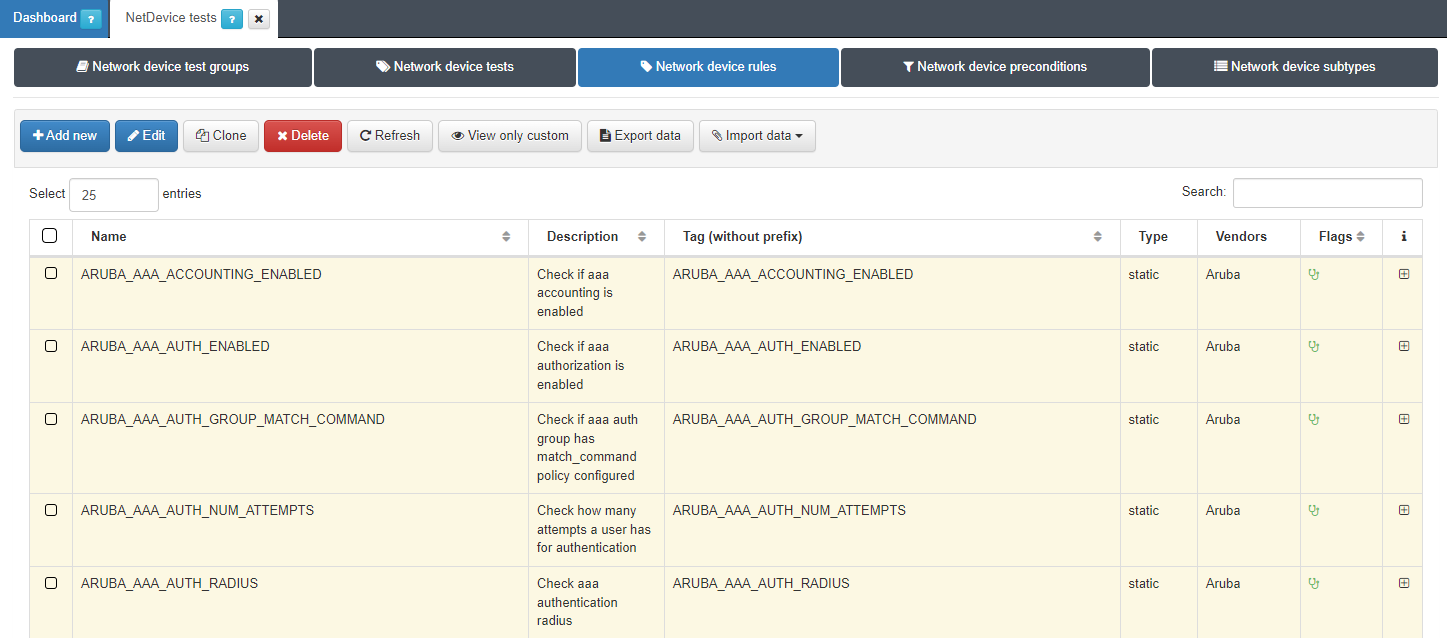
To accommodate these differences, the rules configured in ON NetBackup > Network device compliance > NetDevice tests, under the Network Device Rules section, can be customized for various brands and models.
This customization allows the same rule to be used across different devices. When creating a rule, you can specify multiple Vendors along with their corresponding configurations, including remediation actions and regular expressions.

4.4.2.4.6. Rules
This topic features instructions on how to configure Dynamic and Static rules.
4.4.2.4.6.1. Dynamic Rule
Dynamic rules are executed based on the information received from executing a specific command on the network device. This method allows collecting data that may not be present in the configuration file retrieved by static rules.
To create a new rule, go to ON NetBackup > Network Device Compliance > NetDevice test and under the Network Device rules tab, click on Add new:
Introduce the basic information for the rule:
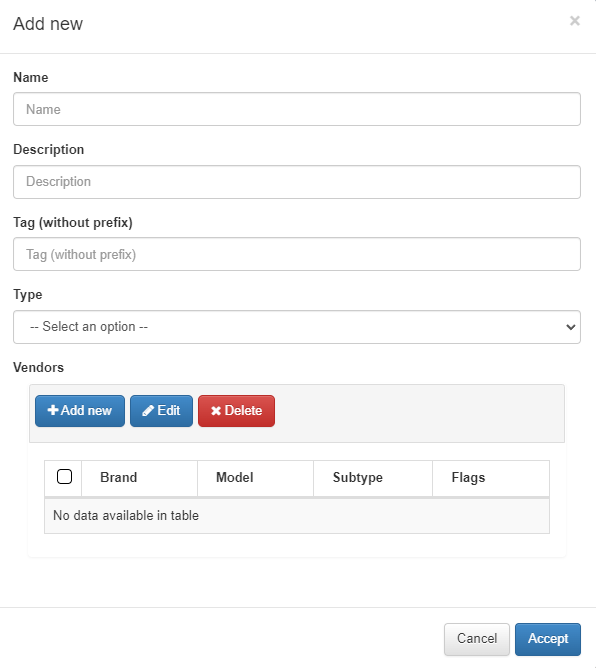
Name: Name of the dynamic rule.
Description: Brief description of the rule.
Tag: TAG that will be assigned to the network device at the end of the rule, this TAG must be defined without a prefix since it will be the system that will determine said prefix depending on the result of the rule:
Prefixes Rules:
CRP: Compliance Rule Passed.
CRF: Compliance Rule Failed.
Type: Type of rule, in this case, Dynamic.
Vendors: List of vendors compatible with this rule, we can add several (Multi-vendor).
You can add a new Vendor from this window by clicking Add new, which will display the following configuration window:
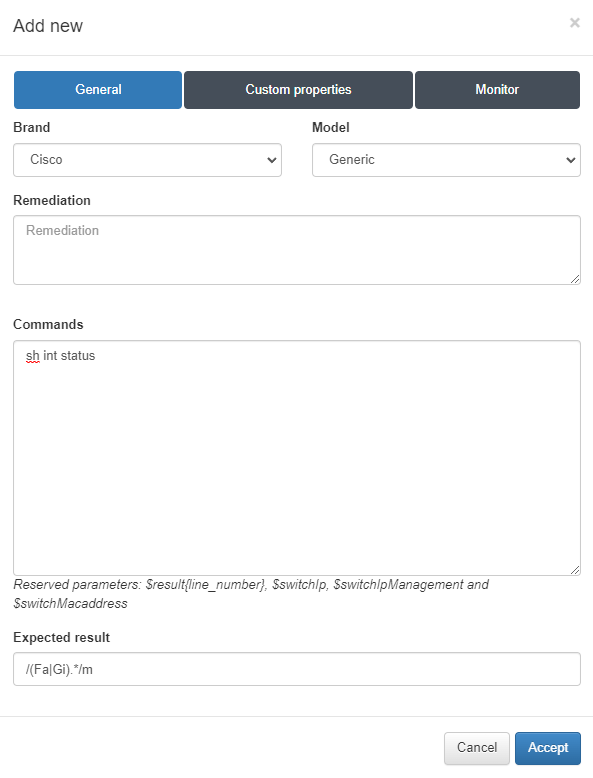
In the General tab:
Brand/Model: Specify the brand and model of the network device.
Remediation: Enter the remediation message that will be displayed if the rule fails validation. This message guides the user on the necessary actions to resolve the issue.
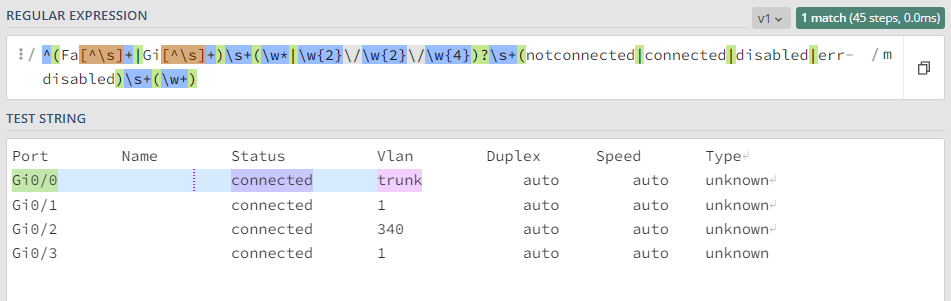
Command: Provide the command that will be sent to the device to retrieve the required information.
Expected result: Input a regular expression to validate the information if a match is found.
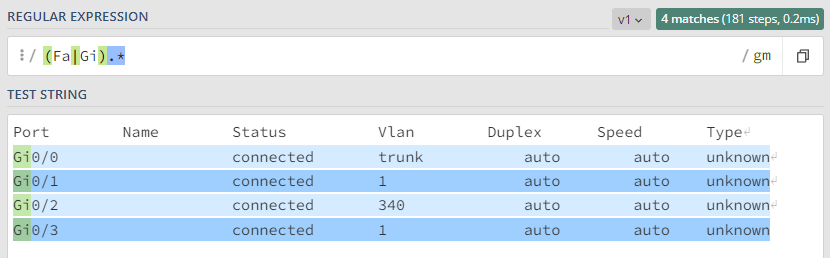
In the example above, the command will check the status of the interfaces, and the regular expression will verify that the response from the network device includes both FastEthernet and GigabitEthernet.
Here is an example of the information obtained from the sh int status command with the regular expression match “(Fa|Gi).*”.
This concludes the basic configuration of a dynamic rule. Optionally, you can add custom properties and a monitor for the rule if needed. The process for doing so is explained below.
4.4.2.4.6.1.1. Custom properties
In the Custom Properties section it is possible to retrieve data that is added to the device in the CMDB section.
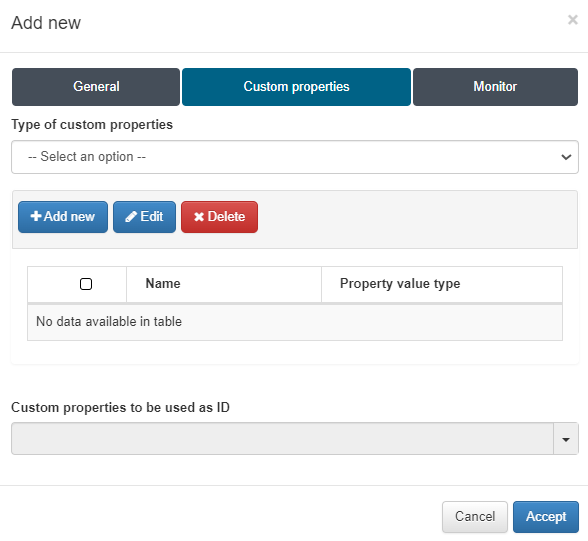
In this example, we will collect information on the number of ports on the device and identify which ones are active.
To do this, navigate to the Custom Properties tab and select the following type:
Evaluate regular expression on result set of the rule: This method allows you to analyze all the lines returned from the network device simultaneously, providing a global view. For instance, you can count how many instances of a specific parameter are present (count) or capture the information related to that parameter when it appears (match).
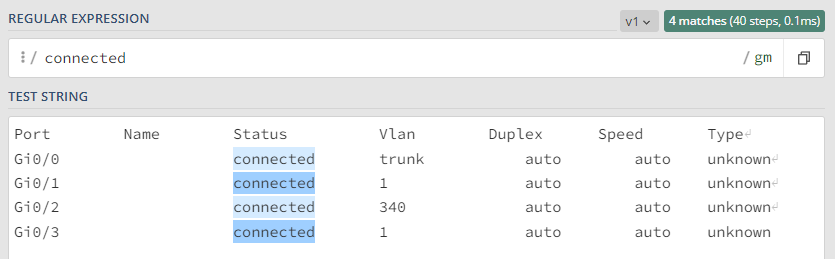
In this example, we can determine the number of active (connected) ports, but we cannot identify which specific ports are active.
Evaluate regular expression on each line of the rule: This method executes the regular expression line by line on the results. For each line that meets the expected criteria outlined in the general section, additional information can be extracted using another regular expression. The analysis is performed sequentially, allowing us to pinpoint the specific line where the expression is satisfied and identify the corresponding information.
In this example, we can retrieve information for each interface individually.
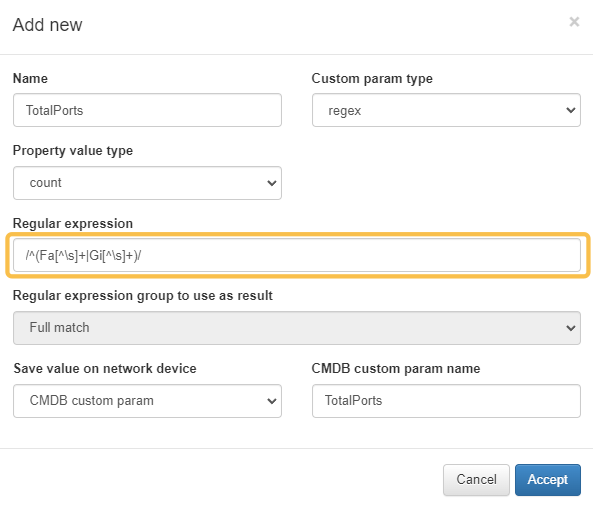
Click on Add new to add the custom properties.
There are two Custom param types: Regex and Operation.
Regex: By using regex, we can extract information from the configurations retrieved from the network device. This data can be stored as device information (CMDB) and/or utilized to perform operations or define custom test conditions.
Expression for the total number of ports:
Expression for the number of active ports:
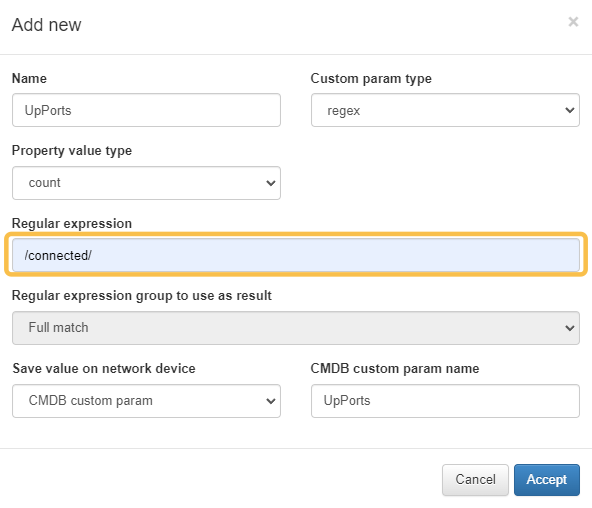
Besides the regex expression, complete the following fields:
Name: The name of the custom property.
Property value type: Choose between Match (to save the captured content) or Count (to save how many times it appears).
Regular Expression: The regex used to capture the desired information.
Regular expression group: If the regular expression returns multiple groups, specify which group to save.
Save value on network device: Define where the captured information will be stored in the CMDB, either in a predefined field (e.g., IP address, hostname) or in a custom CMDB parameter, which will be automatically generated and populated.
CMDB custom param name: If you selected “CMDB custom param” in the previous step, enter the name of the custom parameter where the information will be stored.
Operation: The operation type allows performing calculations or operations using the values obtained from the tests. The resulting data can be stored in the device’s CMDB record.
For example, calculating the Percentage of Active Ports:
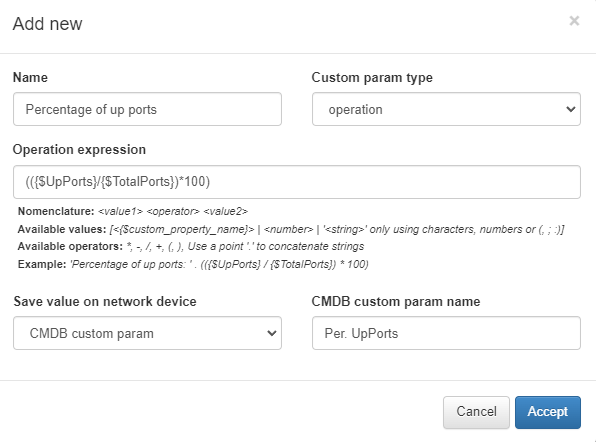
In the tab that appears, complete the following fields:
Save value on Network Device: Specify where this information will be stored in the CMDB, either in a predefined field (e.g., IP address, hostname) or in a custom CMDB parameter that will be automatically generated and populated with the obtained data.
CMDB custom Param Name: If you chose “CMDB custom param” in the previous step, provide the name of the custom parameter where the information will be saved.
4.4.2.4.6.1.2. Monitor
Finally, in the Monitor tab, you can set up an alert if a specific condition, based on the custom properties defined earlier, is met.
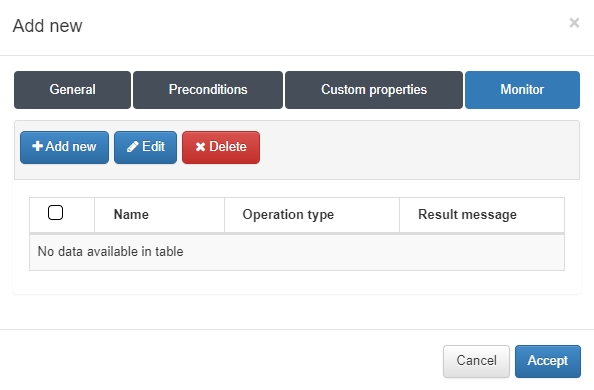
In this example, we click Add new and configure an alert if the number of active ports exceeds 85% of the total available ports:
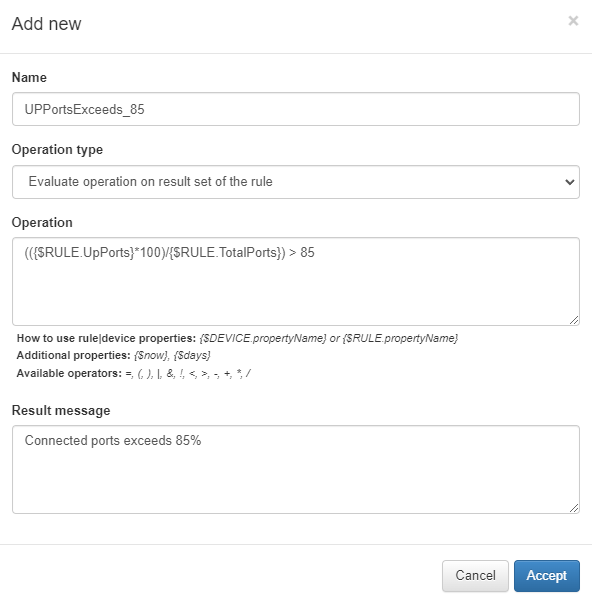
Name: The name of the monitor.
Operation type:A brief description of the monitor’s purpose.
Evaluate operation on result set of the rule: The operation is evaluated on the entire result set.
Evaluate operation on each line of the rule: The operation is evaluated line by line.
Operation: Operation that the monitor will perform to check if the condition to display the warning message is met.
To define the operation, one or more conditions must be created using the values from the custom properties collected. The following syntax is used to work with this data:
{$RULE. propertyName}: Retrieves information extracted by the rule.
{$DEVICE. propertyName}: Retrieves device information stored in the CMDB (e.g., hostname, maintenance date).
Note
You can use the .days parameter to convert information into days, such as {$DEVICE.maintenance.days}. Additionally, the {$now} property gets the current date, and the {$days} parameter converts the current date into days format.
Result message: The warning message displayed when the operation’s condition is met.
Once finished, click Accept to save the new dynamic rule.
4.4.2.4.6.2. Static Rule
Static rules are executed based on the information retrieved from the backup of the network device. This information is crucial for performing the necessary checks.
Static rules extract data from the complete configuration of a device, enabling the creation of filters and preconditions. These elements help to refine the information we work with, making the process more efficient. The filters serve as subtypes, while the preconditions define specific criteria that further narrow down the dataset.
4.4.2.4.6.2.1. Filters: Subtypes
Subtypes are comprehensive blocks of information retrieved from the configuration of a device. For instance, when backing up a switch, we can filter the data to focus specifically on the block related to the device interfaces.
While subtypes are not mandatory for static rules, they are highly beneficial for working with targeted blocks of information.
To create a new subtype, navigate go to ON NetBackup > Network Device Compliance > NetDevice test and under the Network Device subtypes tab click Add new:
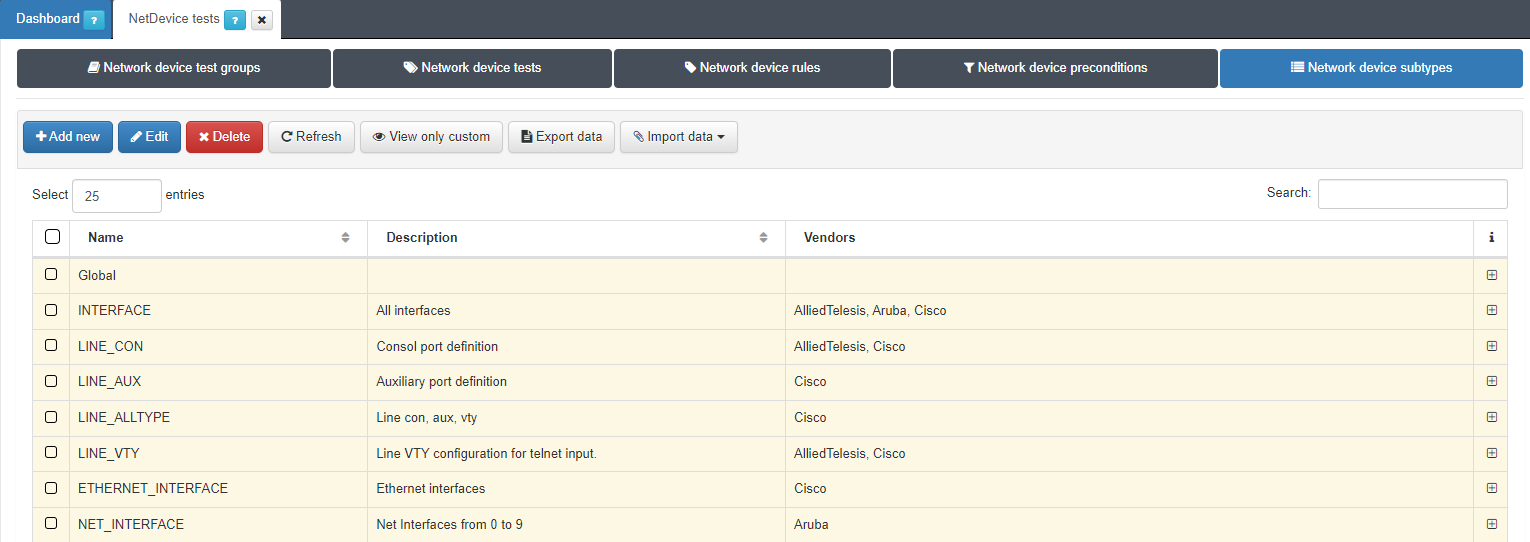
The configuration window will prompt you to provide the following information:
Name: Enter the name of the new subtype.
Description: Provide a brief description of the new subtype.
Vendors: Select the list of vendors configured for this subtype. Click on Add New to configure a new device.
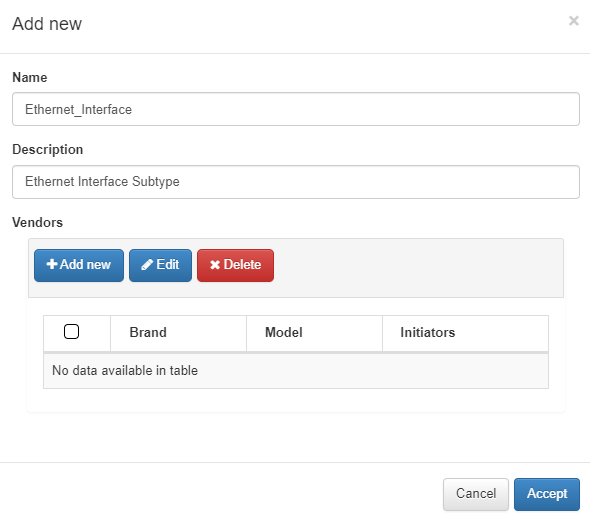
When you choose to add a new vendor, the following window will appear:
Brand/Model: Specify the brand and model of the network device to which the rule using this subtype will be applied.
Initiators: Define the initializers that indicate the beginning of the information you want to retrieve.
For example, this subtype will filter the block of Ethernet-type interfaces from the global configuration.
Once you have configured the details, click Accept to save your changes.
4.4.2.4.6.2.2. Filters: Preconditions
Preconditions are applicable only when a subtype is defined within the rule. They serve as conditions that must be met when retrieving information from devices, allowing you to filter all data according to the specified precondition.
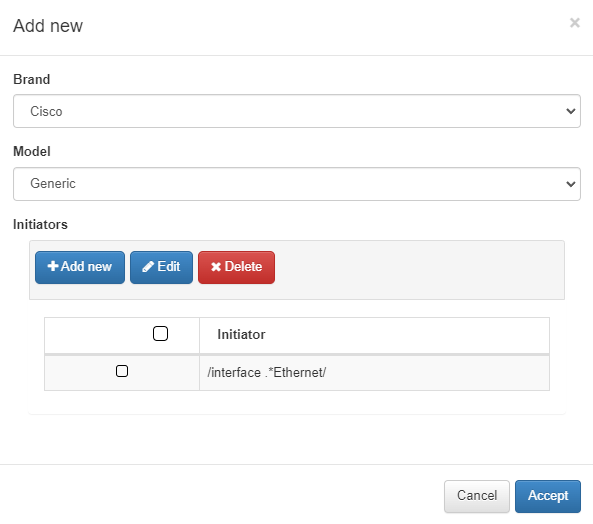
To create a new precondition, navigate to ON NetBackup > Network Device Compliance > NetDevice test and in the Network Device Preconditions tab, click on Add new:
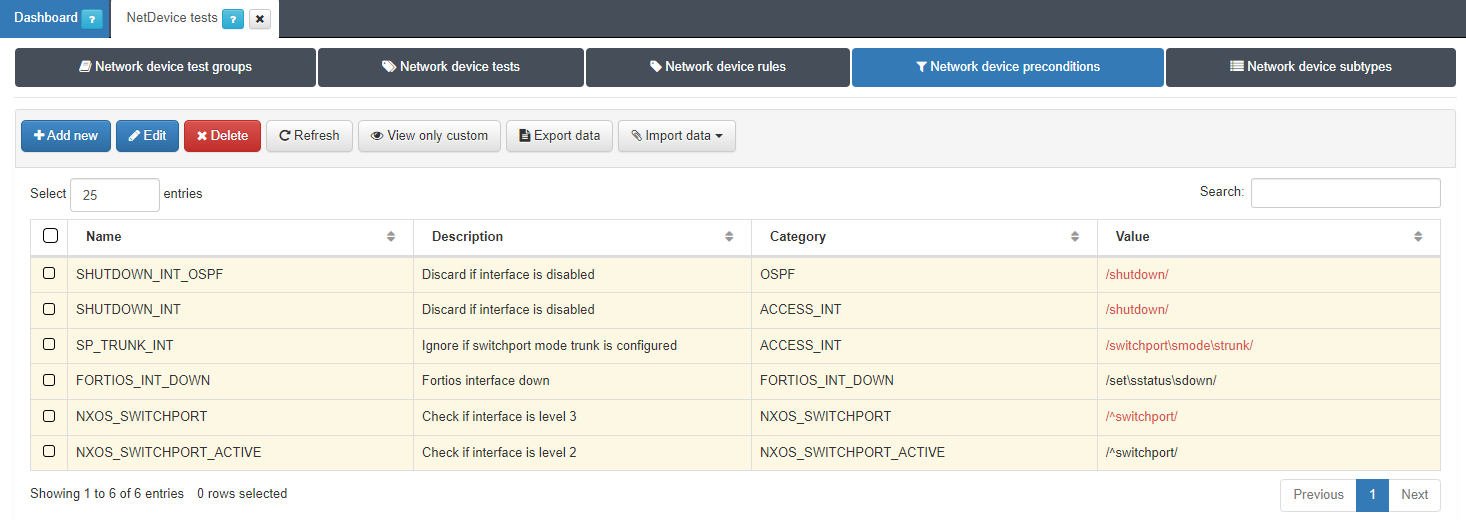
A pop-up window like to the one below will appear:
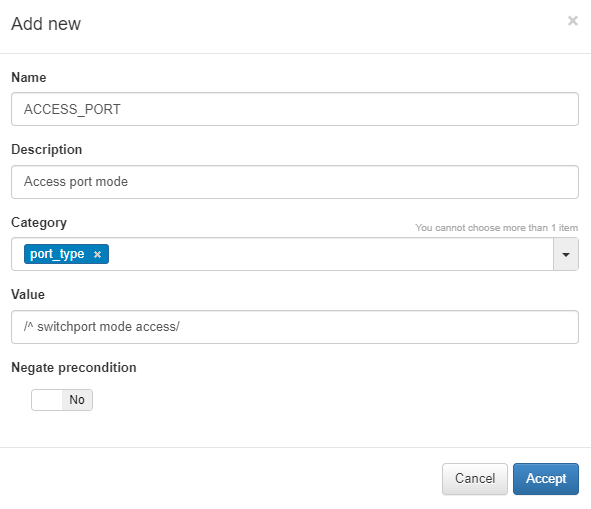
Name: Enter the name of the new global parameter.
Description: Provide a description for the global parameter.
Category: Select the category to which the parameter belongs; you can choose an existing category or create a new one.
Value: Specify the value to be assigned to the parameter (e.g., IP address, regular expression, numerical value, etc.).
Negate Precondition: You have the option to negate the precondition, making it valid when the previously defined regular expression is not met.
4.4.2.4.6.2.3. Static rule creation
To create a new static rule, navigate to ON NetBackup > Network Device Compliance > NetDevice test and in the Network Device rules tab, click Add new:
A pop-up window like to the one below will appear:
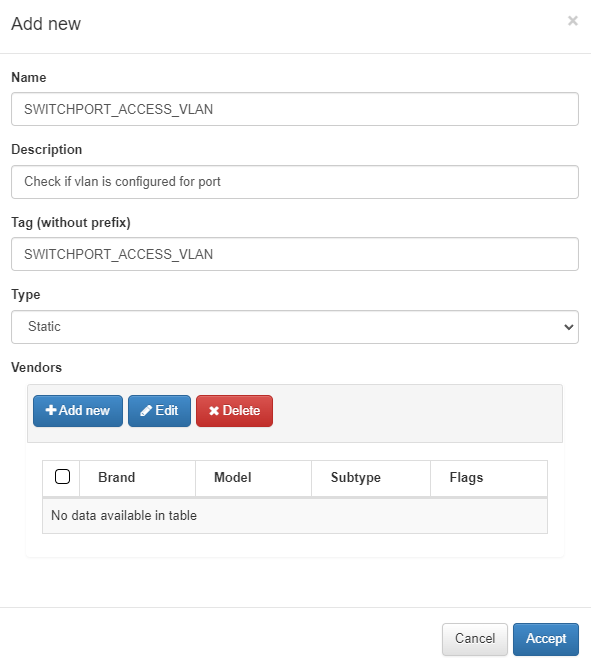
Name: Enter the name of the static rule.
Description: Provide a brief description of the rule.
Tag: Assign a TAG to the network device at the end of the rule. This TAG should be defined without a prefix, as the system will determine the prefix based on the rule’s result:
Prefixes Rules:
CRP: Compliance Rule Passed.
CRF: Compliance Rule Failed.
Type: Specify the type of rule; in this case, it will be Static.
Vendors: Select the list of vendors compatible with this rule. You can add multiple vendors (multi-vendor support).
When adding a new vendor, the following window will appear:
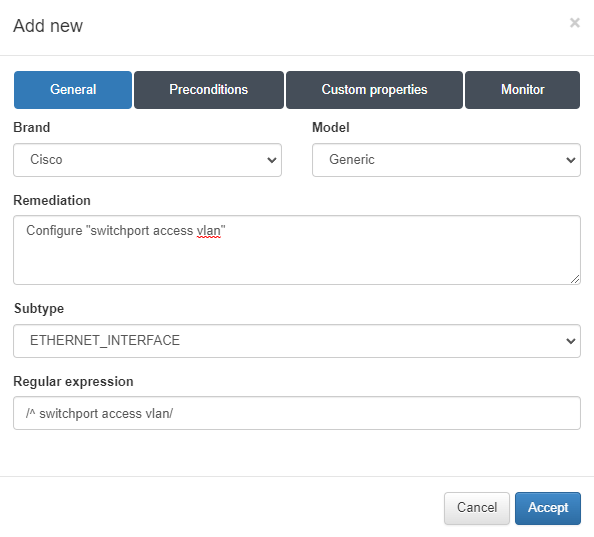
Brand/Model: Choose the brand and model of the device.
Remediation: Enter the remediation message that will be displayed if this rule is not valid.
Subtype: Optionally, select a previously defined subtype; for example, to collect information related to the interface configuration (ETHERNET_INTERFACES).
Regular Expression: Specify the regular expression that will verify compliance with the rule.
If a subtype has been defined, you can add a precondition in the Preconditions tab. You can select a precondition that has been previously defined or create a new one:
In case of having defined a subtype, in the next Preconditions tab, we can add a precondition that has been previously defined or we can create a new one.
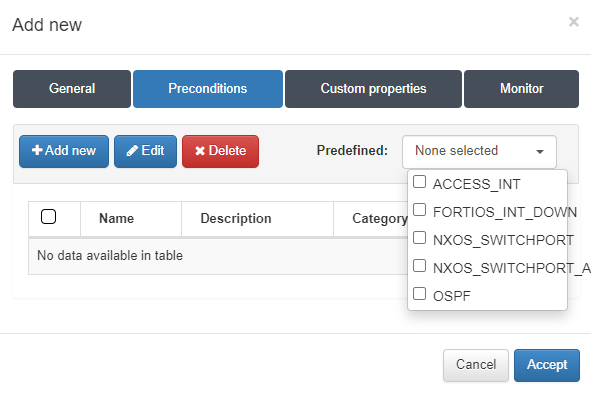
In this case, we will use a previously created precondition. Select the group of your interest under the “Predefined” selector. All preconditions assigned to the selected group will be applied. Click Accept to save.
At this point, the rule has all the necessary configurations to run. Optionally, you can add Custom properties and Monitor as needed.
4.4.2.4.7. Test
As mentioned earlier, Tests are a collection of rules. Follow the steps below to create a new Test:
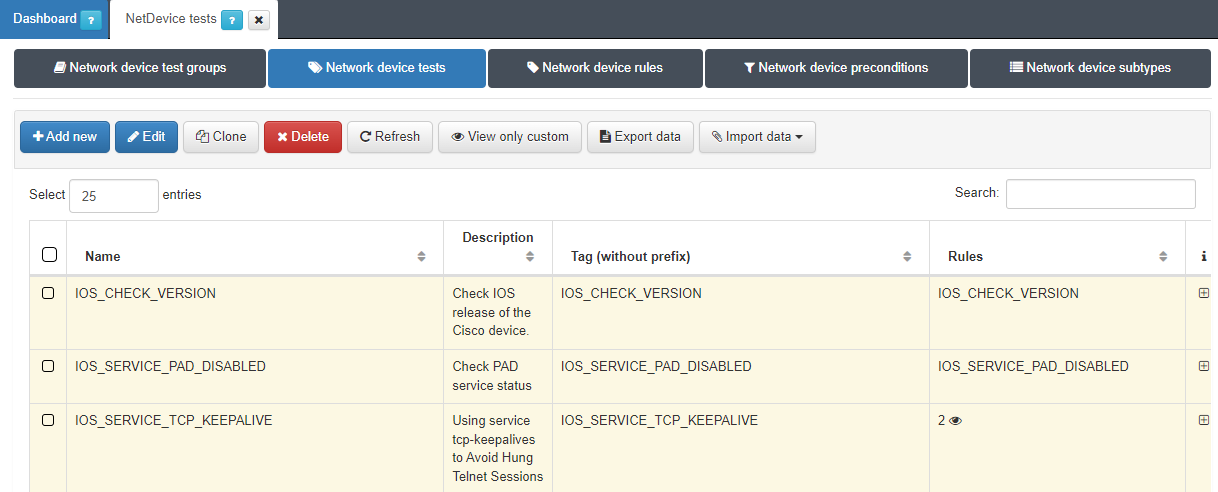
Navigate to ON NetBackup > Network Device Compliance > NetDevice test, and in the Network Device test tab, click Add new:
You will be prompted to provide the following information:
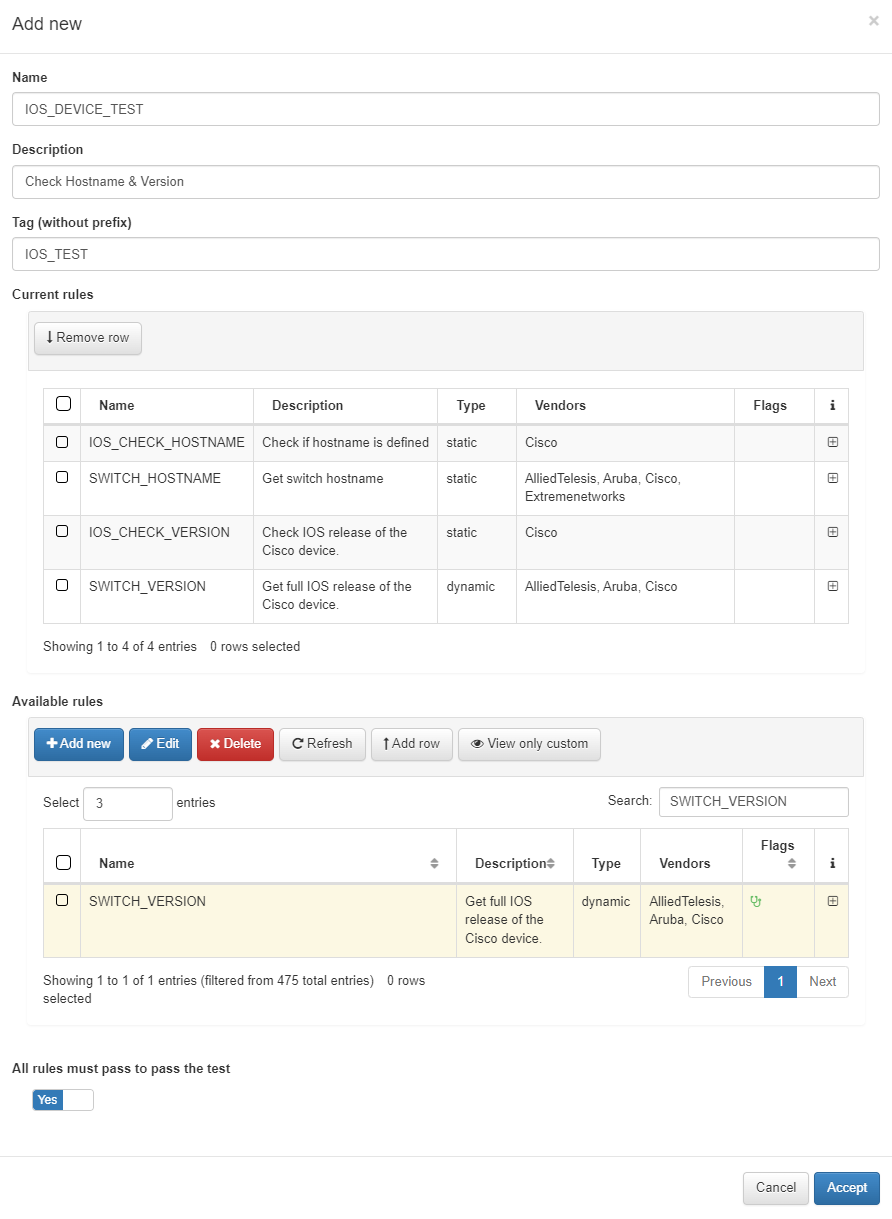
Name: Enter the name of the new Test.
Description: Provide a brief description of the Test.
Tag: Assign a TAG that will be associated with the network device at the end of the test. This TAG should be defined without a prefix, as the system will determine the appropriate prefix based on the test’s outcome:
Test prefixes:
CTP: Compliance Test Passed.
CTF: Compliance Test Failed.
Available Rules: Select all the rules you want to include in the Test. After selecting the rules, click Add Row. If you’re adding rules from different pages, make sure to click Add Row before navigating to a new page.
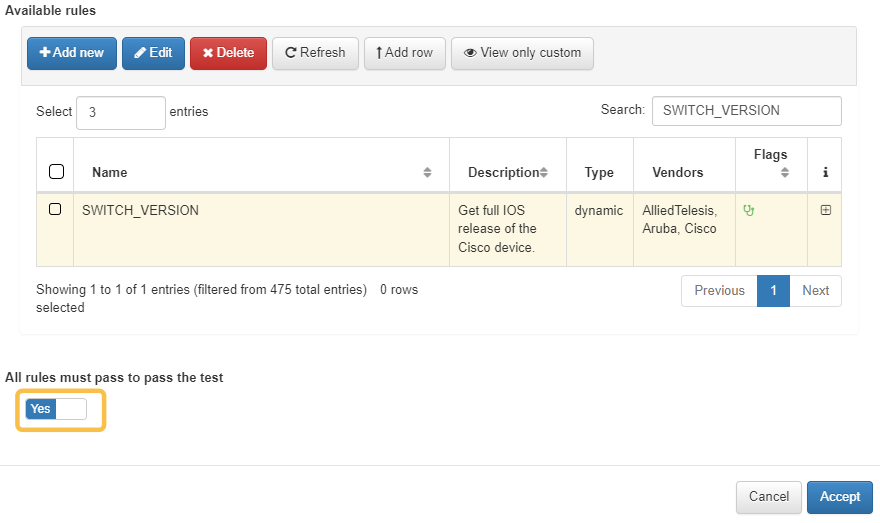
All Rules Must Pass to Pass the Test: You can either specify custom conditions for test validation or simply set the condition that all rules must pass for the test to be marked as successful.
4.4.2.4.7.1. All rules passed
If the All rules must pass to pass the test flag is enabled while creating a test, the test will only be marked as successful if the network device complies with all the rules executed. If any of the rules fail, the entire test will be considered failed.
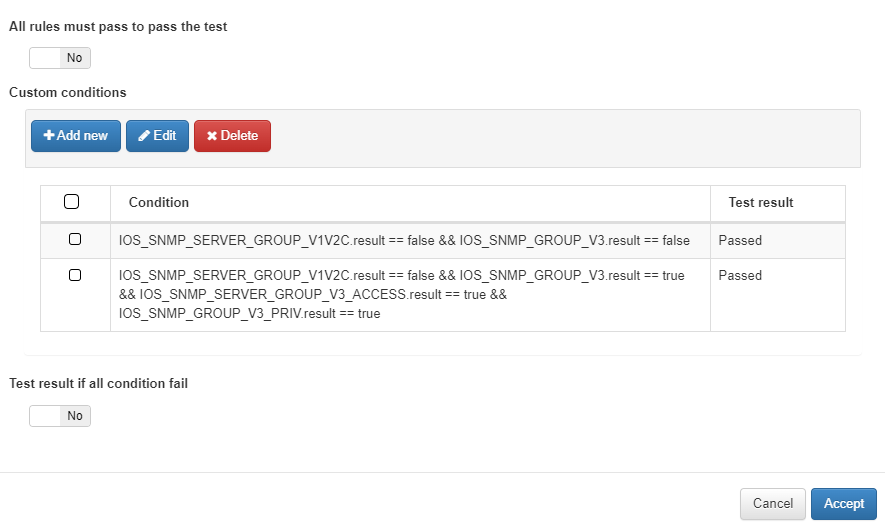
4.4.2.4.7.2. Custom Conditions
There may be instances where you don’t need the test to be validated by the success of all rules, and instead, need custom behavior for the test. In the case of disabling the All rules must pass to pass the test flag, the Custom conditions section will appear, allowing you to define specific validation conditions by clicking on Add new.
The conditions you create will be evaluated in the order they are listed, from top to bottom. As soon as one condition is met, its corresponding result will be returned, and the remaining conditions will not be evaluated.
You can also use Global Parameters within your Custom Conditions expressions.
By enabling the Test result if all conditions fail flag, you define the behavior of the test if none of the custom conditions are met. If you select Failed, the test will be considered unsuccessful when no conditions are met. Alternatively, if you select Passed, the test will be marked as successful even if none of the conditions are satisfied.
Example:

Condition: This is the expression used to validate the result of the custom condition.
The structure of a condition is based on an operation between two values from the rules. Several types of values can be used in conditions:
{rule_name}.result: Retrieves the result (true/false) of the evaluated rule.
{rule_name}.count: Retrieves the number of matches found by the rule.
{rule_name} content: Retrieves the content extracted by the rule.
{rule_name}.{CustomPropertyName}: Retrieves the value of a custom property extracted by the rule.
Operators you can use include ==, !=, >, <, >=, <=
Variables can operate on Booleans, numbers, or Strings.
Test result: Choose whether the condition’s outcome will be considered as a pass or a fail.
For example, the condition checks whether both SNMP server group v1/v2c and SNMP server group v3 are not configured:
IOS_SNMP_SERVER_GROUP_V1V2C.result == false
This condition is true if the rule’s result (i.e., whether SNMP v1 and v2c are disabled) is false.
If this condition is met, the test result will be marked as a pass.
4.4.2.4.8. Test Groups
Test Groups represent the highest organizational level within the Network Device Compliance (NDC) framework. They consist of multiple predefined tests, serving to organize and categorize tests based on their focus areas (e.g., IP configuration, RADIUS server settings, SSH). The primary purpose of these groups is to streamline the execution and management of compliance checks by grouping related tests together for easier administration.
To create a Test Group, execute the following steps:
Navigate to ON NetBackup > Network Device Compliance > NetDevice test and in the Network device test Groups tab, click Add new:
Provide the following details in the pop-up window:
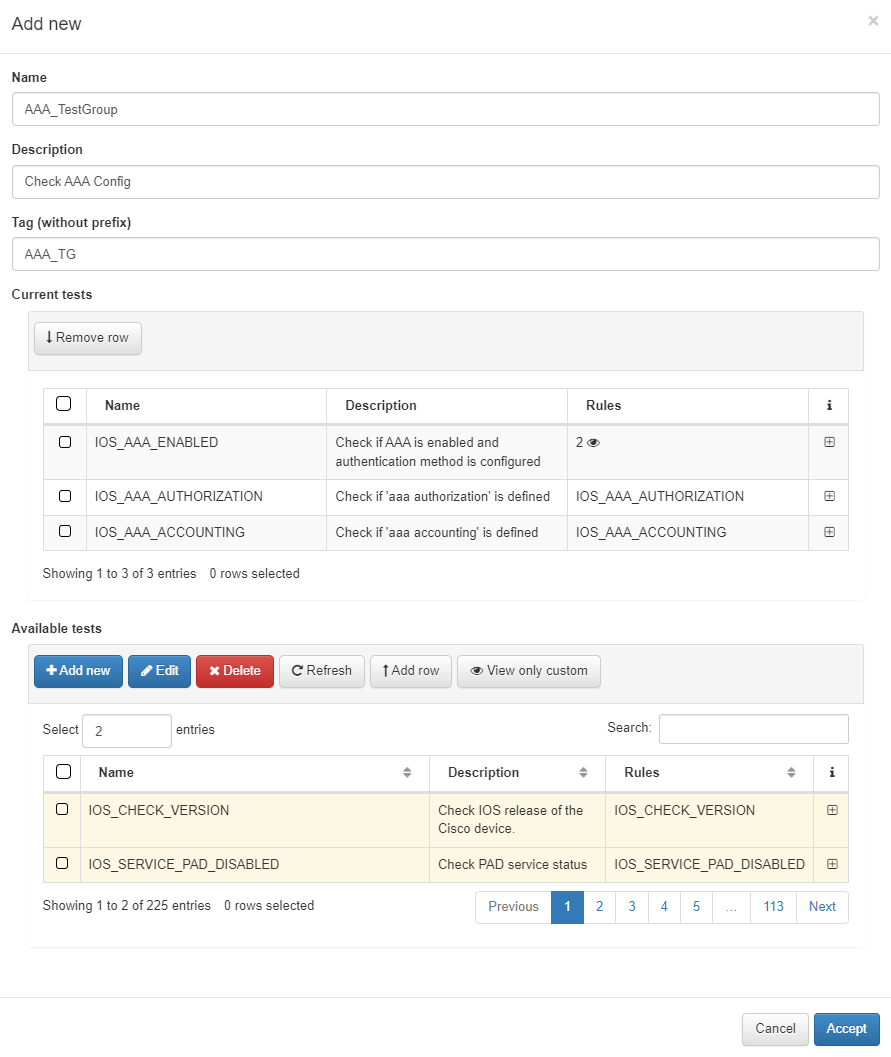
Name: The name of the new Test Group.
Description: A brief description of the Test Group, summarizing its purpose or focus.
Tag: A tag assigned to the network device at the end of the Test Group’s execution. You don’t need to define a prefix for this TAG; the system will automatically assign one based on the result of the group execution:
Test Group Prefixes:
CGP: Compliance Group Passed.
CGF: Compliance Group Failed.
Available test: Select the tests you want to include in the Test Group. After choosing the desired tests, click Add row. If you need to select tests from multiple pages, make sure to click Add row before navigating to the next page.
After configuring the above settings, click Accept to save the newly created Test Group.
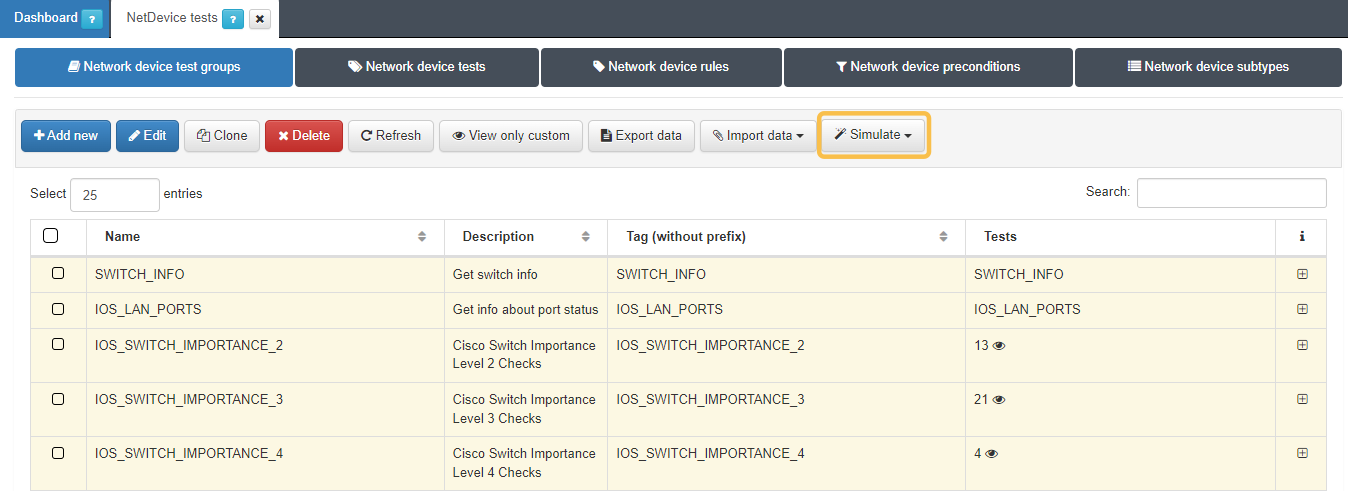
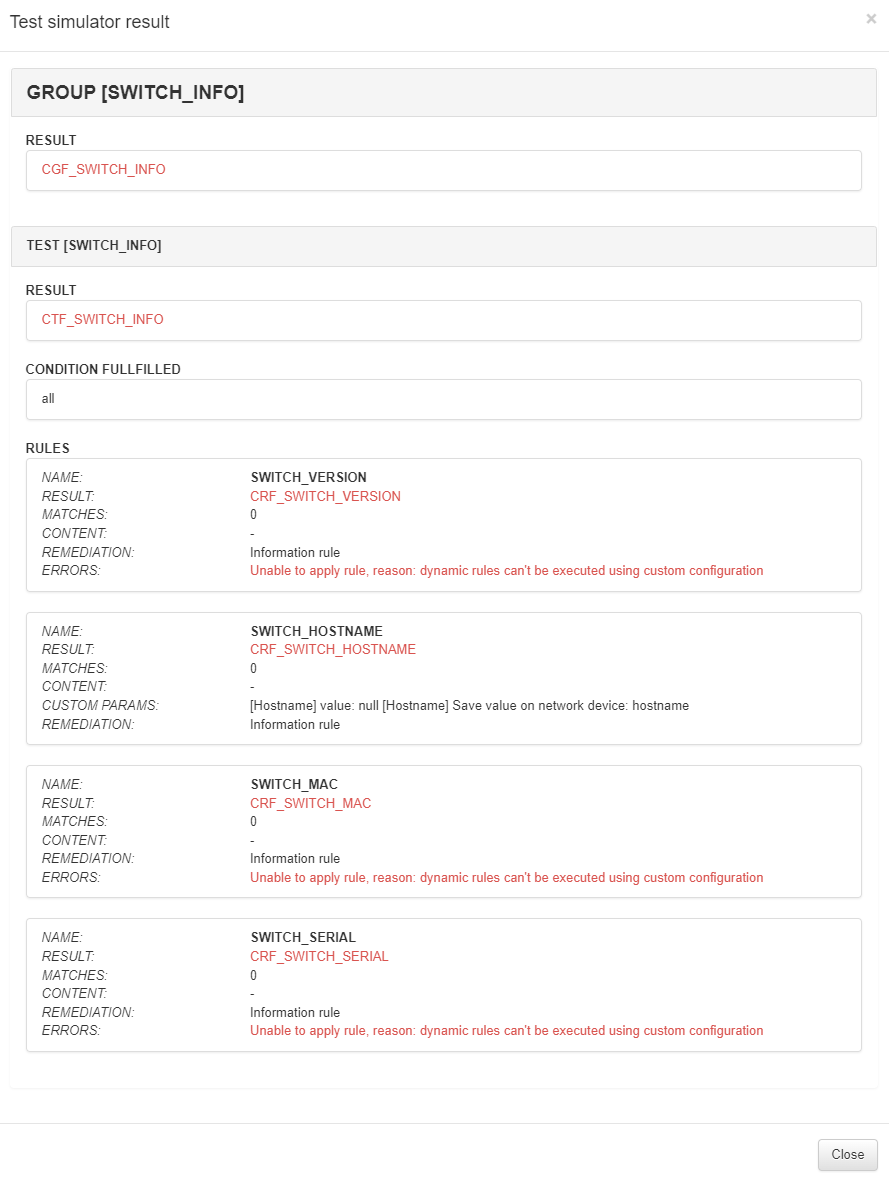
4.4.2.4.9. Compliance Simulation
You can manually simulate the behavior of compliance tests by using configuration files from network devices. This feature allows you to test how well your compliance rules and tests perform without needing to interact directly with live devices.
Navigate to ON NetBackup > Network Device Compliance > NetDevice test. In the Network Device Test Groups tab, you will see the Simulate option:
Choose the specific tests you want to run by selecting them from the main table, them choose between two options:
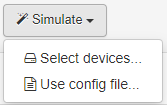
Select devices: Choose a network device from the CMDB that has already been configured for test execution.
Use config file: Upload a configuration file previously obtained from a network device.
In this mode, dynamic rules (rules that require interaction with the live device, such as sending commands) will NOT be executed, as the system can only work with the static information in the file.
Once the simulation is complete, the results will be displayed in a new window:
4.4.2.4.10. Schedule Tests
To schedule or immediately run a group of tests configured for a network device, you need to create a NetBackup Scheduler. The scheduler allows you to automate the execution of compliance tests at specific intervals or to run them manually.
Navigate to ON NetBackup > NetBackup Scheduler.
Click on the Add new button to create a new scheduled task and configure the options as follows:
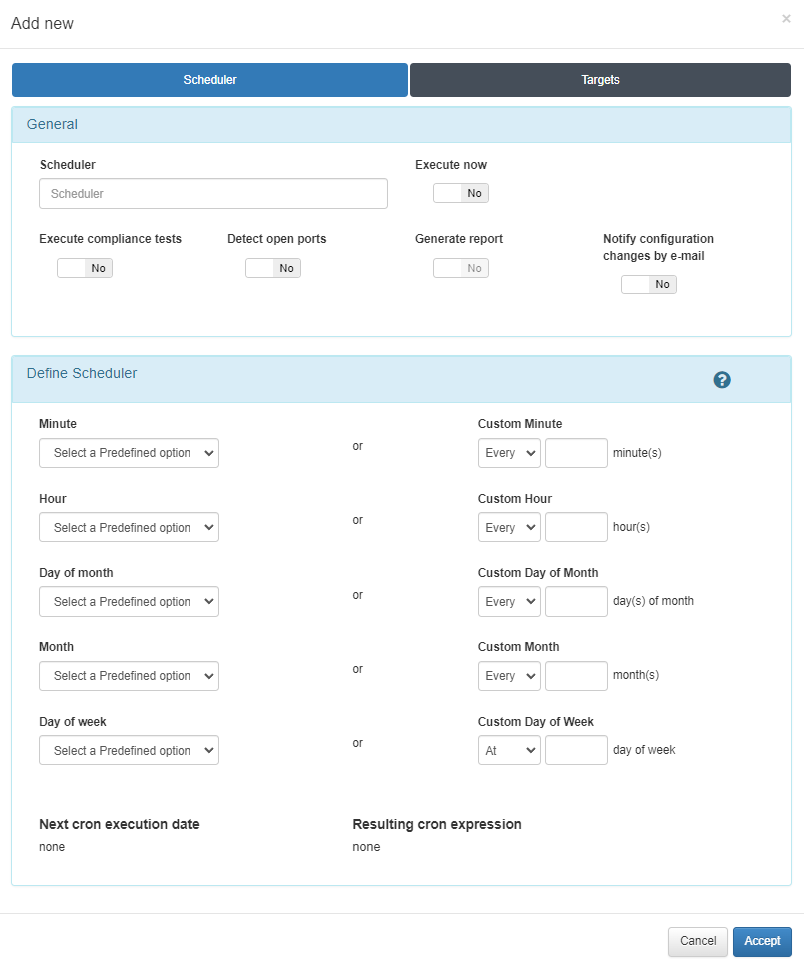
General settings
Scheduler: Provide a descriptive name for the scheduled task.
Execute now: Check this option to run the test immediately.
Execute compliance test: Check this box to enable the compliance test execution.
Define Scheduler
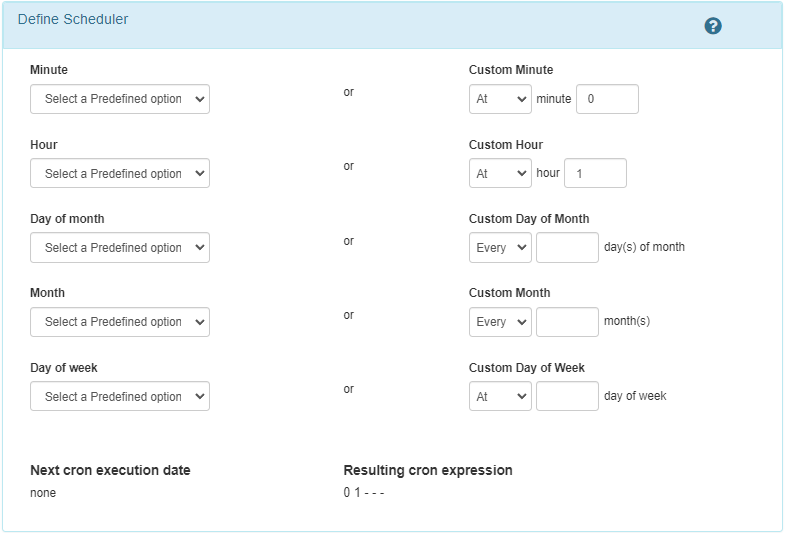
To set up a recurring schedule, configure the time and frequency in the Define Scheduler section. The configuration follows a cron format where you define the exact timing for the test run:
Minute: Specify the minute (0-59) when the test will be run.
Hour: Specify the hour (0-23) when the test will be executed.
Day of the month: Set the day of the month (1-31) for execution.
Month: Choose the month (1-12) for the test.
Day of the week: Select the day of the week (0 = Sunday to 6 = Saturday).
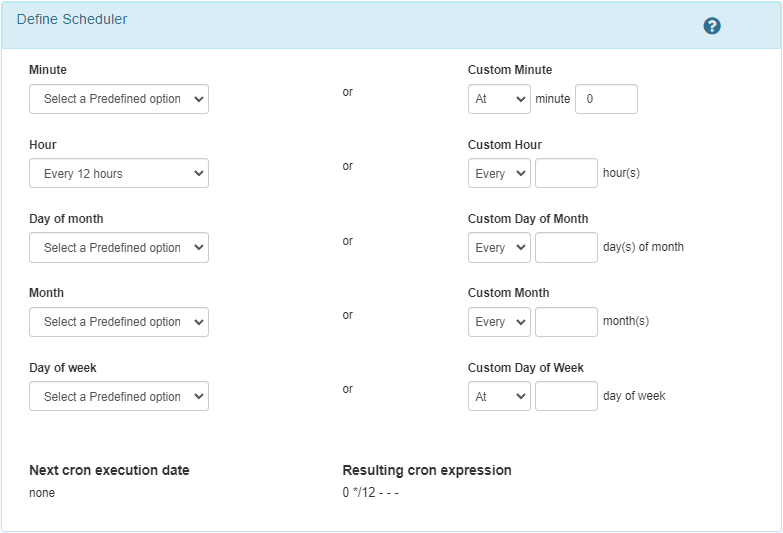
In the second column, you can define custom intervals for each of the above options.
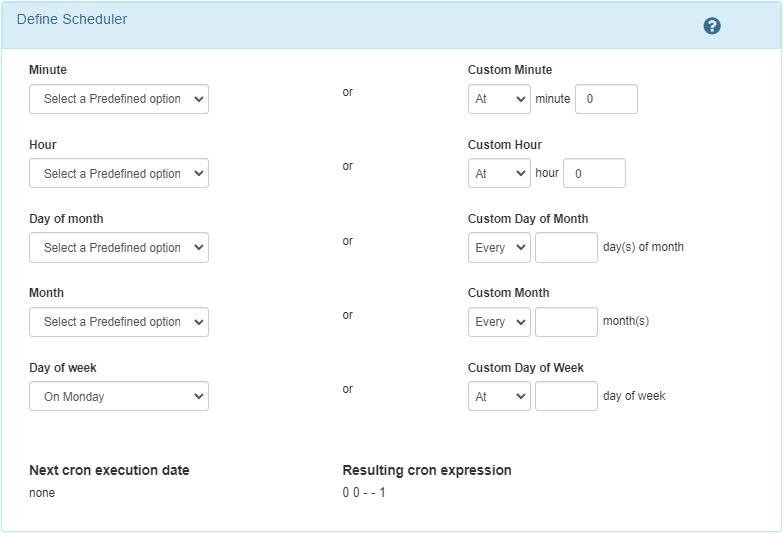
Example Configurations
Execution every 12 hours:
Execution daily at 1:00 AM:
Execution every Monday:
Select Devices to Test
In the Targets tab, choose the network devices on which you want to run the tests. You can manually select devices or use the Targets by tag section to run tests on all devices that contain the specified tags. This allows you to automate testing across multiple devices without manual selection.

Save the Scheduler
Once the network devices are selected and the scheduler is configured, save the scheduler. If you selected Execute now, the process will begin shortly, and you will start seeing information displayed on the graphs.
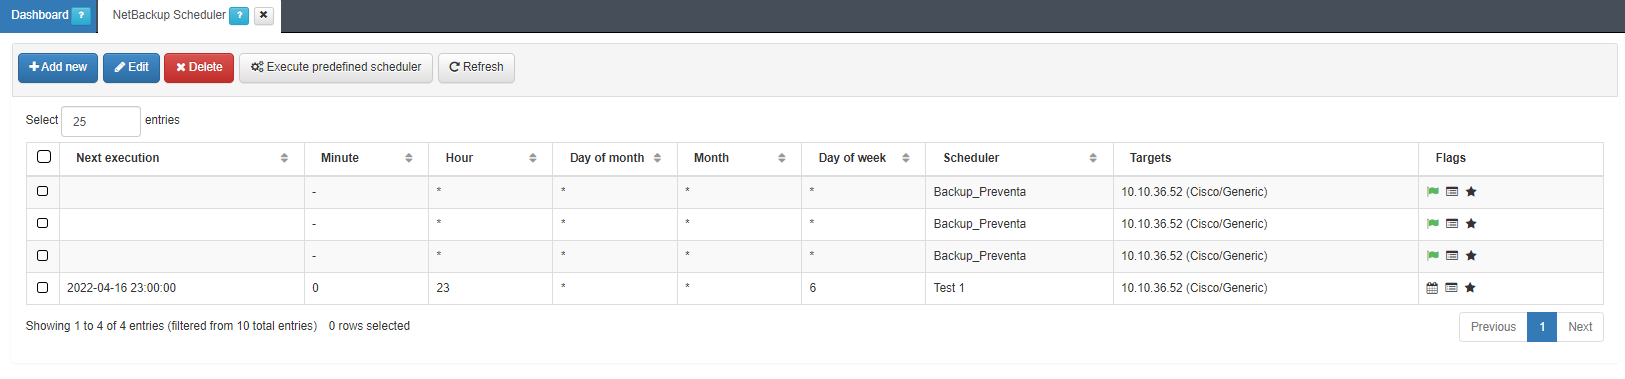
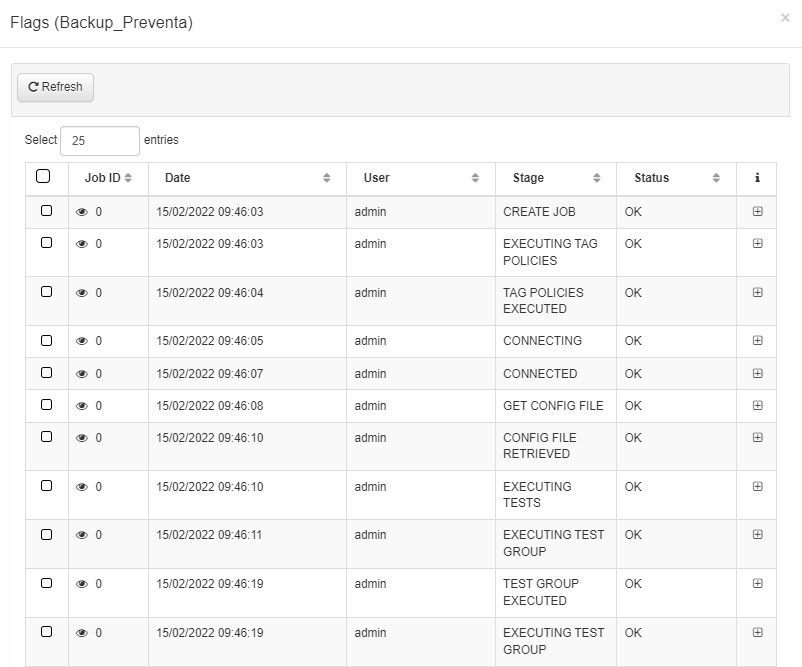
View Results and Logs
After the test is executed, the results will be available under the Flags column. The flag icon will indicate whether the test was successful.
Click on the View Logs icon to access detailed logs of the test execution in a pop-up window.
Additional Features
The configuration can be saved locally and viewed under ON NetBackup > View Backups.
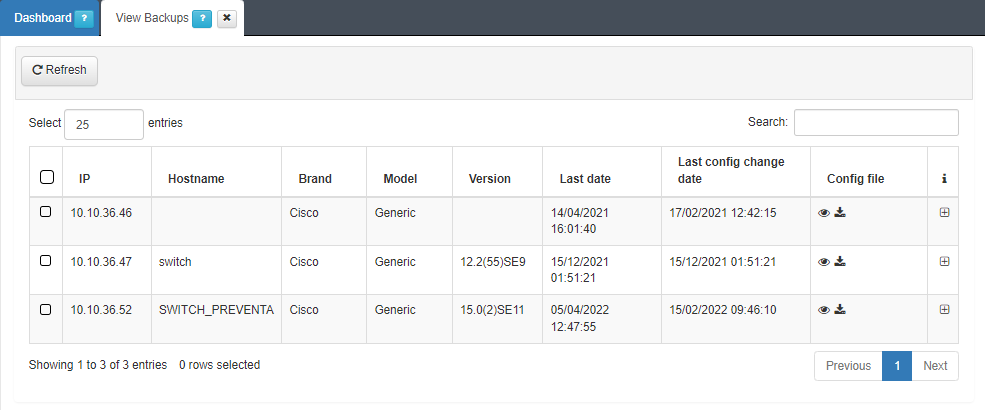
Download or view configuration files from the Config file column by using the download
 or eye icon
  , respectively.
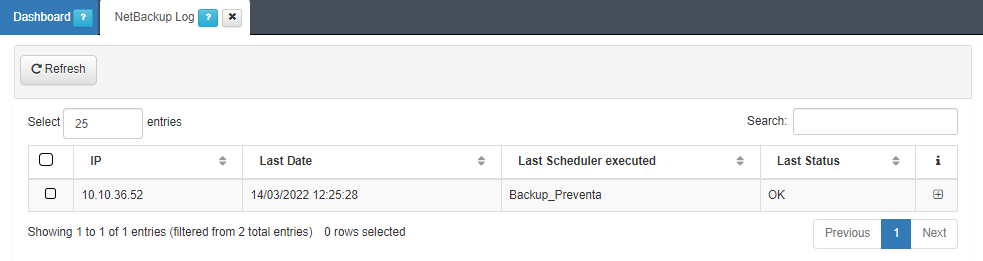
Logs of the NetBackup execution can be viewed in ON NetBackup > NetBackup Log, where all executions will be grouped by the network device’s IP.