4.4.2.4. Administration
The administration section focuses on advanced tasks related to the ongoing management and maintenance of the system covering more complex configurations and advanced features.
Note
It is essential to have correctly deployed the necessary nodes for this use case.
4.4.2.4.1. Compliance Test structure
To perform a Compliance test on a network device, one or more Test Groups will be executed to validate the information that has been defined.
The Test Groups are made up of several tests, and these are made up of different rules, each one of them with its specific functions and properties.
The structure and relationships of the different elements that make up a Compliance test are detailed below:

There are three main levels in the evaluation of network devices:
Rules: It is the lowest element, the rules are the ones that are in charge of verifying the requirements of the network devices, there are different types of rules
Test: The Tests are groups of rules, these Tests can have different behaviors depending on their configuration.
Test Groups: Test Groups.
We can find two types of rules: Static and Dynamic. In these rules, you can define Custom properties that allow you to obtain, based on the result obtained, certain information about the device and the “Monitors” that will report monitoring messages based on relevant information obtained in the results of the rules.
Static rules can contain additional parameters, subtypes, and preconditions. The subtypes are responsible for filtering the information to be validated and the preconditions will verify that certain aspects are met before checking the rule.
These rules should be grouped under Test. These tests not only act as hubs for rules, but are also configured to have different behaviors between them. To modify the behavior of a test, the validation condition is configured.
There are two ways to validate a test, the first is “All rules passed” where a test will only be considered valid when all the rules that make it up are true. The other behavior option is the “Custom conditions”. With the custom conditions we can define what is the result that we expect to validate a rule. We can validate rules by content, result or by count.
Finally, we have the Test Groups, these are simply groups of different tests to make it easier to work with them. The test groups are the ones that will be executed on the devices evaluating the rules and the tests that compose them.
4.4.2.4.2. Rules
The rules are the basic element in the Network Device Compliance, these are the ones that will do the checks, we have two types of rules, Dynamic and Static.
4.4.2.4.2.1. Global Parameters
The global parameters are defined in order to simplify repetitive processes and speed up the creation of new rules. These parameters are found in ON NetBackup –> Network Device Compliance –> NetDevice global parameters.
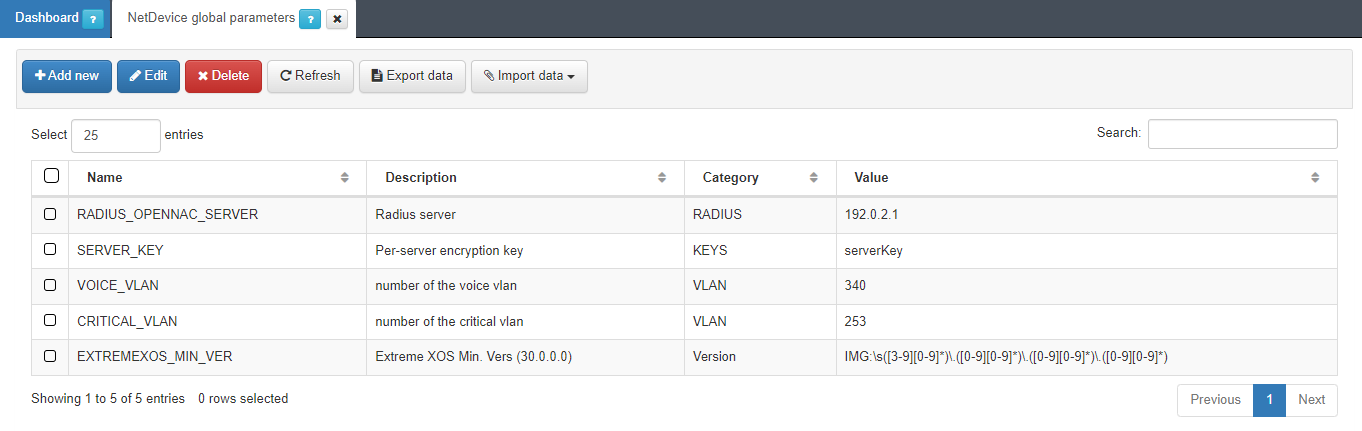
If you want to add a new one, click on Add new. A pop-up window will open where we must enter the following parameters:
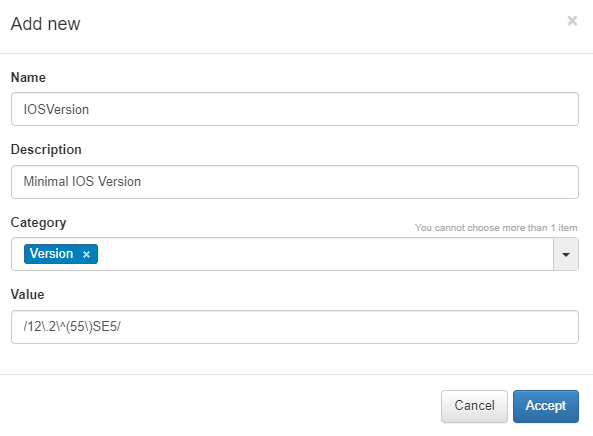
Name: Name of the new global parameter.
Description: Description of the global parameter.
Category: Category to which it belongs, we can select an existing one or create a new one.
Value: Value to be assigned to the parameter (IP, regular expression, numerical value…).
In this case, the Global Parameter created is a regular expression that, if assigned to a rule, will check the version of a network device.
Another useful example is the definition of an IP. In this way, whenever it is necessary to modify the IP, we will only have to do it in the Global Parameter and it will be updated wherever this parameter is being used.
4.4.2.4.2.2. Multi Vendor
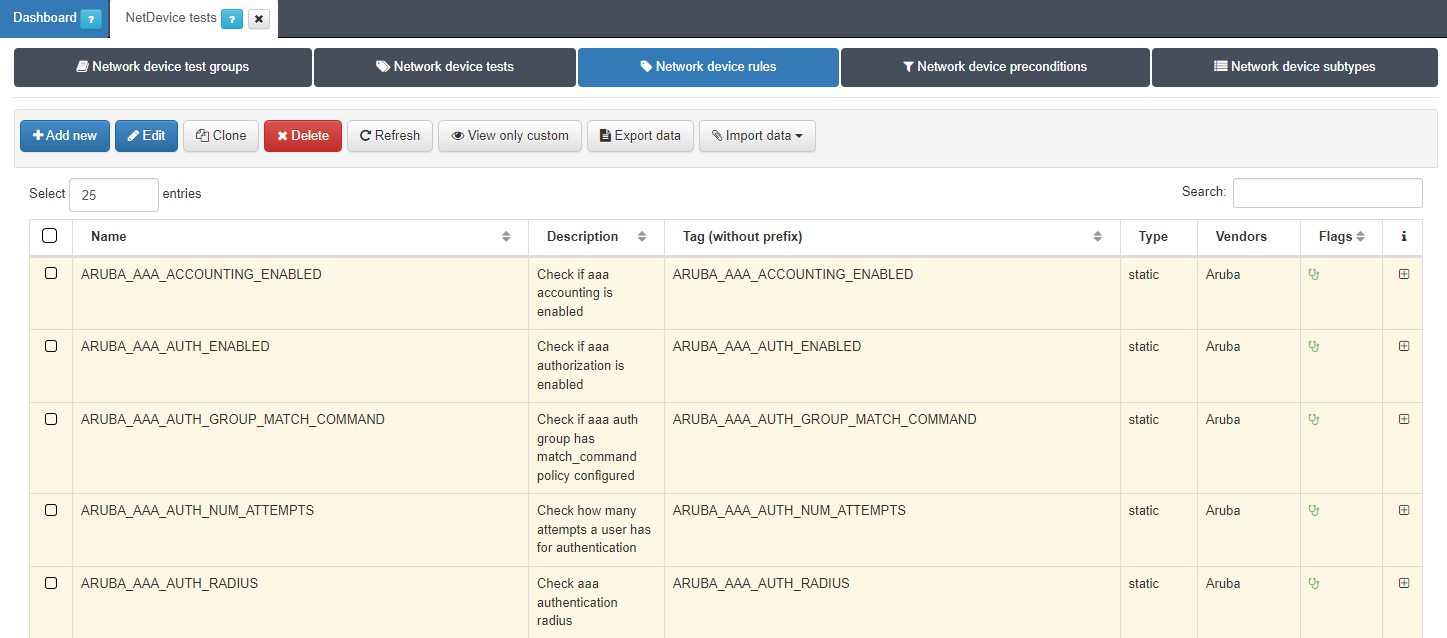
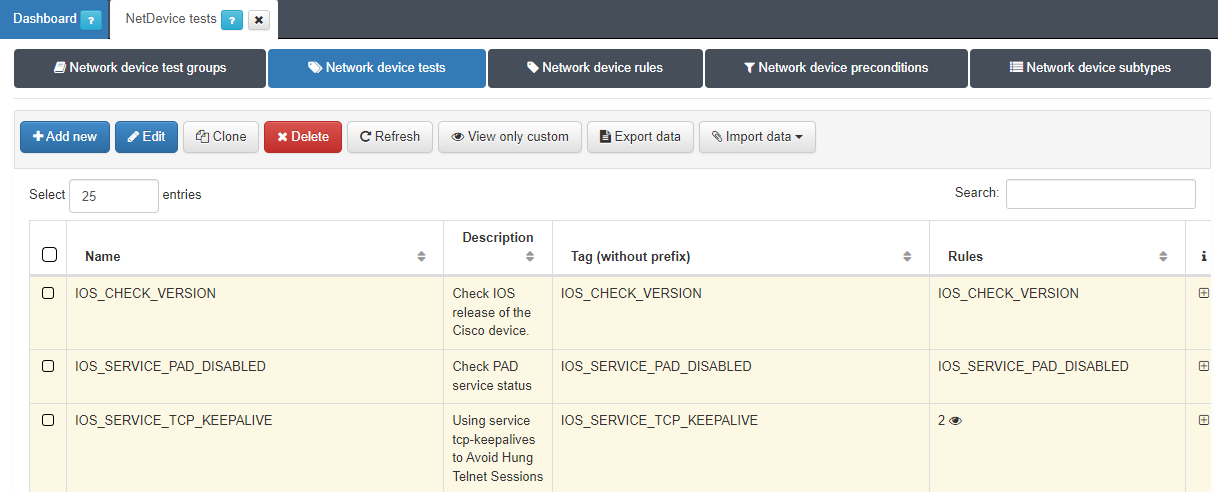
Each manufacturer and model of network devices have their way of saving their configuration information and that is why the rules will not work the same for all of them. That is why the rules configured in ON NetBackup -> Network device compliance -> NetDevice tests, in the Network device rules section, have the option to be configured for different brands and models.
This allows us to use the same rule on different devices. For this, when creating a rule, you can define more than one Vendor, with its respective configuration (remediation, regular expression).
4.4.2.4.2.3. Rule Type: Dynamic
Dynamic rules are executed from the information we receive when executing a specific command on the network device, this makes it easier for us to obtain information that is not found in the configuration file that we retrieve using a static rule.
4.4.2.4.2.3.1. Dynamic rule creation
To create a new rule we go to ON NetBackup –> Network Device Compliance –> NetDevice test and in the Network Device rules tab, click on Add new:
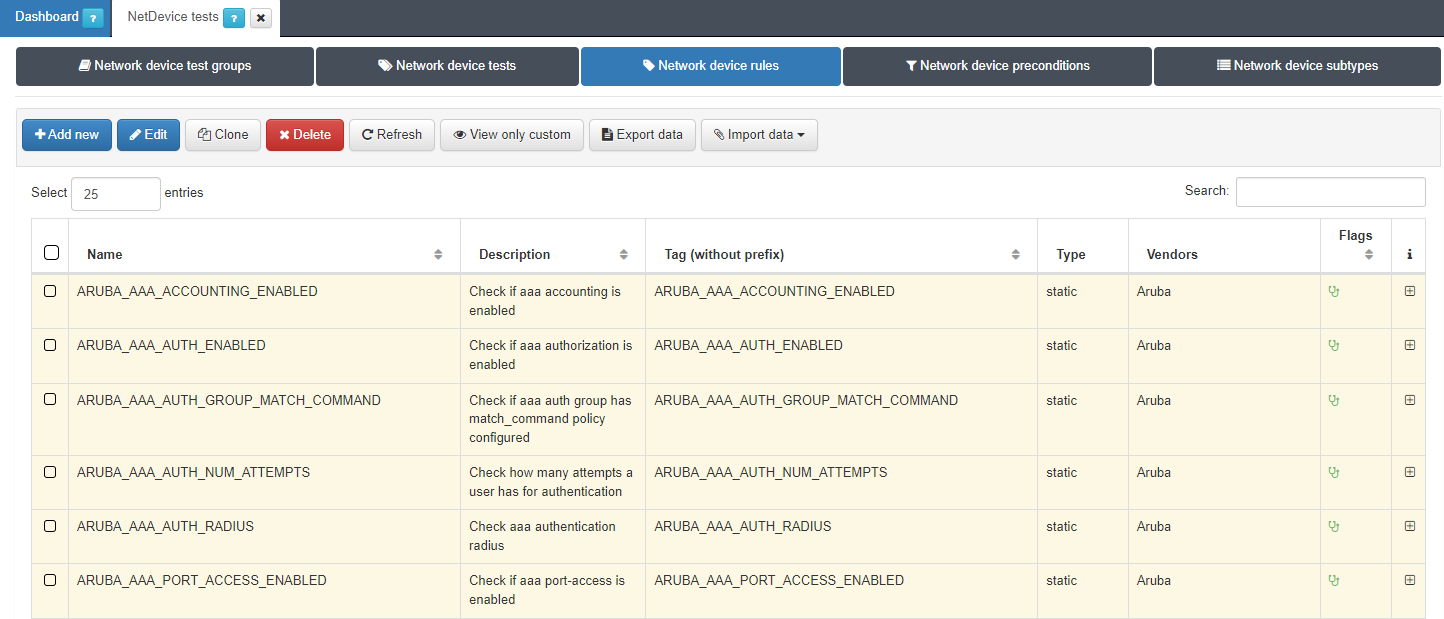
When configuring a new rule, we must first enter the basic information for this rule:
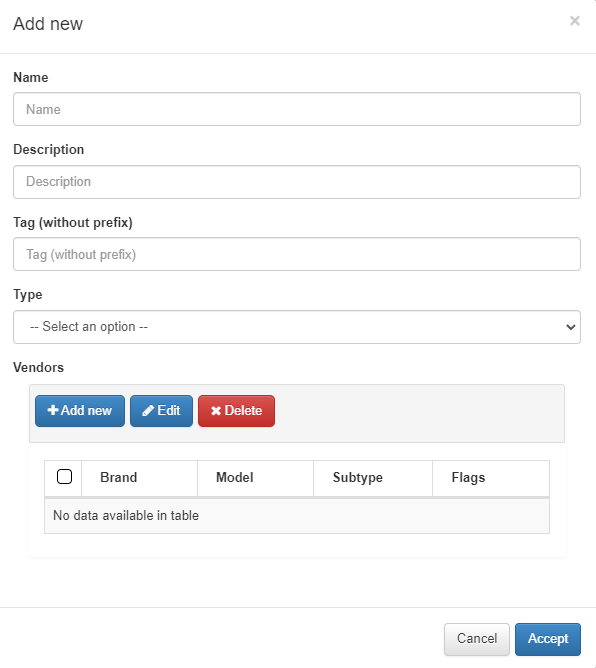
Name: Name of the dynamic rule.
Description: Brief description of the rule.
Tag: TAG that will be assigned to the network device at the end of the rule, this TAG must be defined without a prefix since it will be the system that will determine said prefix depending on the result of the rule:
Prefixes Rules:
CRP: Compliance Rule Passed.
CRF: Compliance Rule Failed.
Type: Type of rule, in this case, Dynamic.
Vendors: List of vendors compatible with this rule, we can add several (Multi-vendor).
When adding a new vendor, a new pop-up window will appear.
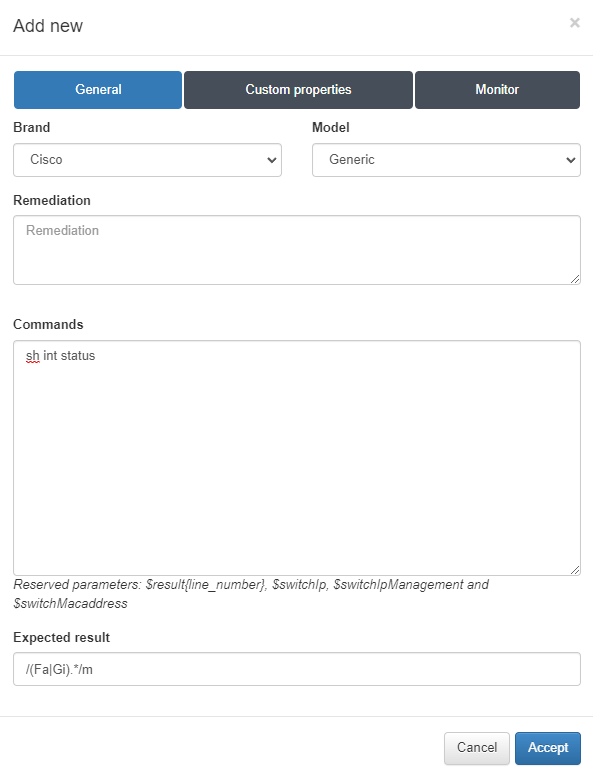
In the General tab:
Brand/Model: brand and model of the network device.
Remediation: remediation message that will be displayed if the rule is not validated so that the user can carry out the corresponding actions to solve it.
Command: command that will be sent to the device so that it returns the information we need.
Expected result: regular expression that will validate the information in case of matching.
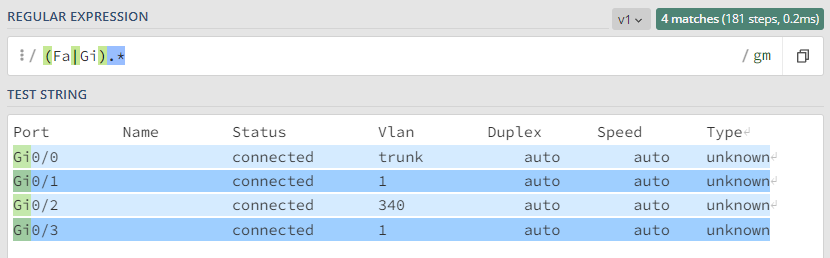
In this example, the command will get the status of the interfaces, and the regular expression will verify that the response from the network device contains FastEthernet and GigabitEthernet.
We can see an example of the information obtained from the sh int status command with the regular expression match “(Fa|Gi).*”
At this point, we would already have the basic configuration of a dynamic rule, optionally it is possible to add custom properties and a monitor for the rule, if necessary, the process is explained below.
4.4.2.4.2.3.2. Custom properties
In the Custom Properties section it is possible to retrieve data that is added to the device in the CMDB section.
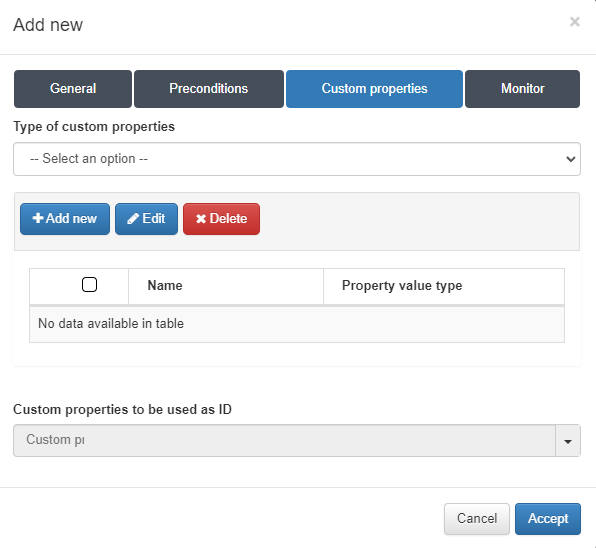
In this case we are going to collect the number of ports of the device and the number of them that are active.
To do this, in the Custom Properties section we select the type:
Evaluate regular expression on result set of the rule: With this method, we will be able to obtain information at a global level, that is, we will analyze all the lines that we obtain from the network device at once, the reading is done vertically. In this way, we can, for example, quantify the number of times a parameter exists (count) or, when said parameter exists, save the information (match).
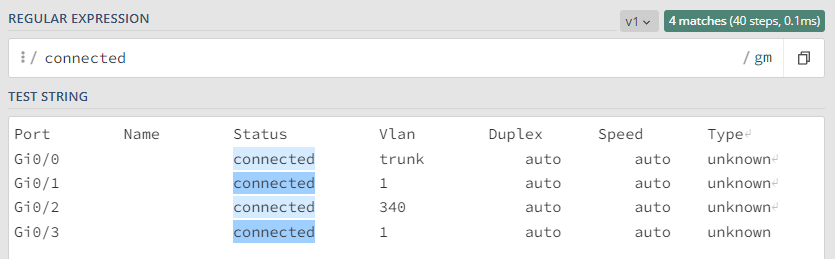
In this example, we can know the number of ports that are active (connected) but we cannot know which ones are.
Evaluate regular expression on each line of the rule: With this method, the regular expression is executed line by line of the result. It means that for each line that meets the expected result of the general section, information can be extracted with another regular expression. The reading is done one by one, horizontally. This allows us to identify in which specific line said expression is fulfilled and to identify who it corresponds to.
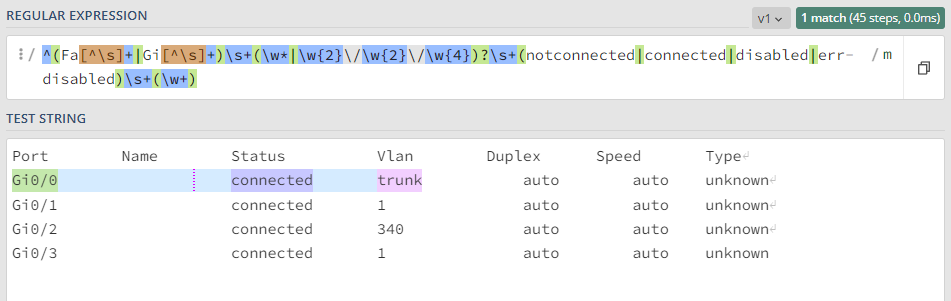
In this example we can obtain the information for each of the interfaces separately.
Click on Add new to add the custom properties.
We have two options depending on the type of Custom param type:
Regex: Through the use of regex we can extract information from the configurations obtained from the network device. This information may be stored as device information (CMDB) and/or used to perform operations or custom test conditions.
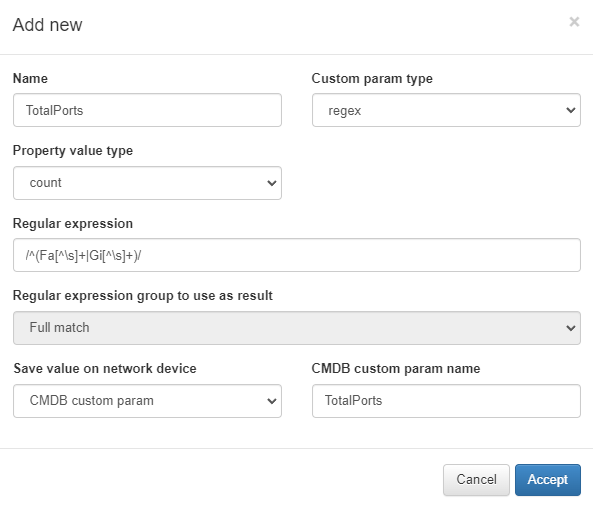
Number of total ports:
Number of active ports:
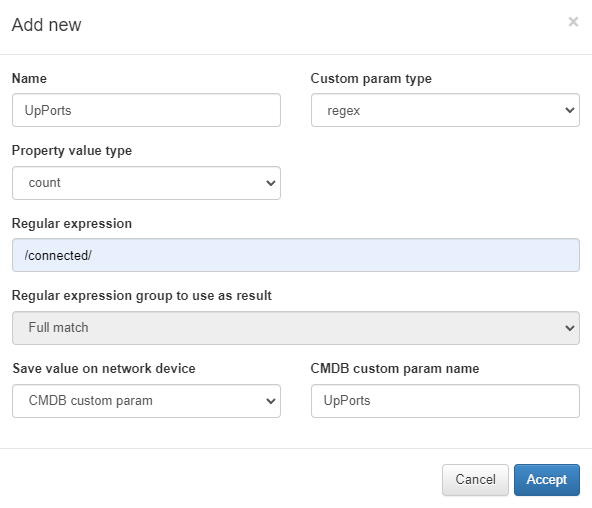
In the tab that appears, enter the following information:
Name: Name of the custom property.
Property value type: it can be Match (save content) or Count (save the number of times it appears).
Regular Expression: regular expression that will allow capturing the information.
Regular expression group: From the total of the regular expression match, we select the regular expression group that we want to save if it is defined.
Save value on network device: we define where this information will be stored in the CMDB, in a predefined field (IP, hostname…) or in a CMDB custom param that will be automatically generated and filled with the information obtained.
CMDB custom param name: Name of the CMDB custom param where the information obtained in case of selecting “CMDB custom param” in the previous point will be saved.
Operation: Through the operation type we can perform operations with the different values that we have obtained from the tests. The results can be stored in the CMDB information of the device.
Percentage of active ports:
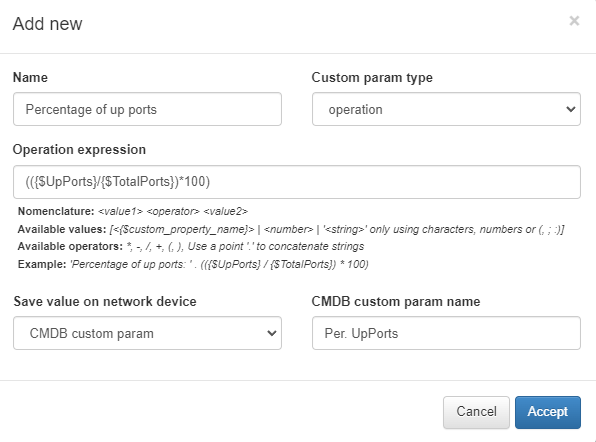
In the tab that appears, enter the following information:
Save value on network device: we define where this information will be stored in the CMDB, in a predefined field (IP, hostname…) or in a CMDB custom param that will be generated automatically and filled with the information obtained.
CMDB custom param name: Name of the CMDB custom param where the information obtained in case of selecting “CMDB custom param” in the previous point will be saved.
4.4.2.4.2.3.3. Monitor
Finally, in the Monitor section, we can configure an alert if a certain condition based on the previously defined custom properties is met.
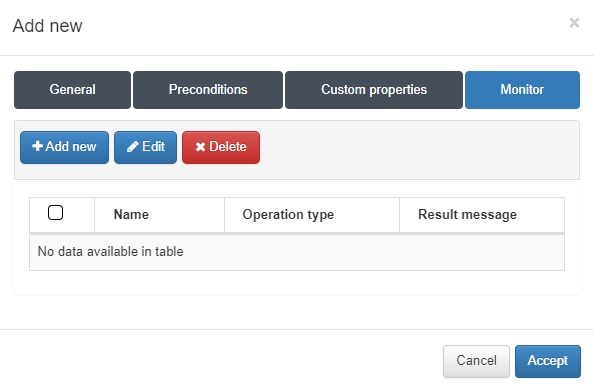
In this case, we will define an alert if the total number of active ports exceeds 85% of the total number of ports. Click on Add new and a new window will appear.
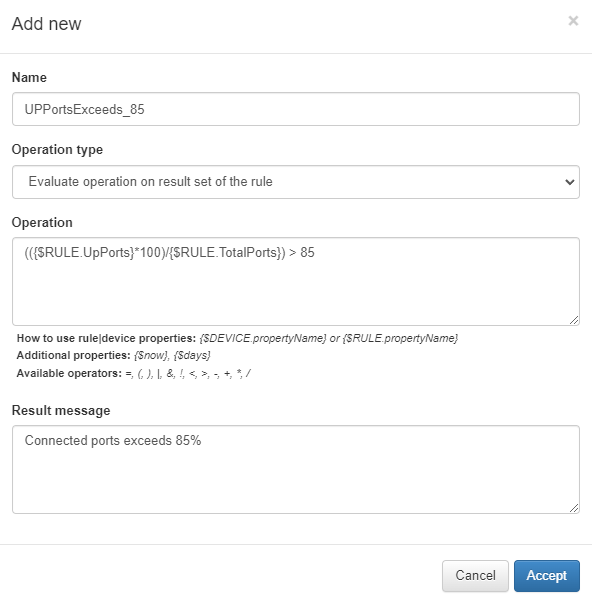
Name: Name of the monitor.
Operation type: Description of the monitor.
Evaluate operation on result set of the rule: the operation is evaluated on the total of the result obtained.
Evaluate operation on each line of the rule: the operation is evaluated line by line of the result obtained.
Operation: Operation that the monitor will perform to check if the condition to display the warning message is met.
To define the operation, we must define one or several conditions that use the values of the custom properties that we have obtained. To work with this information, we must use the following nomenclature:
{$RULE. propertyName}: We obtain information extracted by the rule.
{$DEVICE. propertyName}: We obtain device information, stored in the CMDB (hostname, maintenance date…).
It is possible to use the .days parameter to try to convert the information in days format, for example: {$DEVICE.maintenance.days}. Additionally, we have the properties {$now} to obtain the current date and the parameter {$days} to obtain the current date in days format.
Result message: Warning message that will be displayed if the operation is valid.
Once it is finished, we can save the new dynamic rule.
4.4.2.4.2.4. Rule Type: Static
The static rules are executed from the information that we retrieve from the backup of the network device and it is with this information that the pertinent checks will be carried out.
Static rules retrieve information from the total configuration of a device, which is why there is the possibility of creating filters and preconditions that allow us to reduce the information with which we are going to work. These filters are the subtypes and the preconditions.
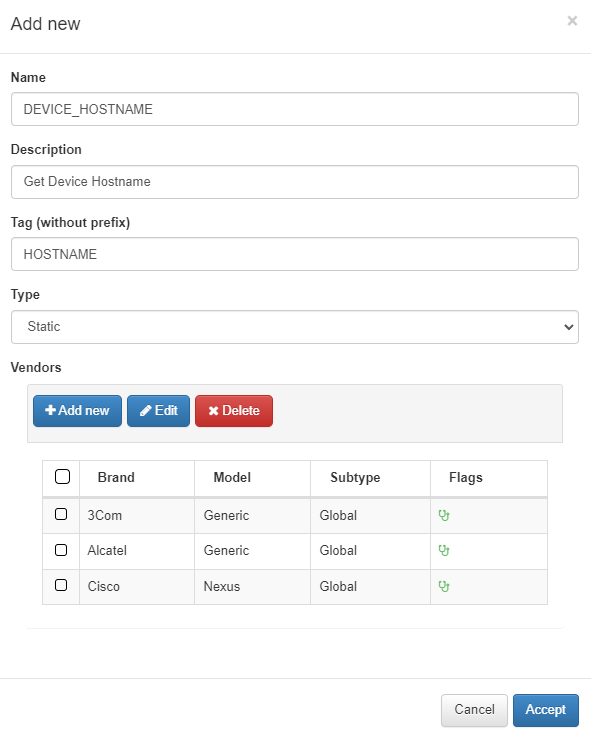
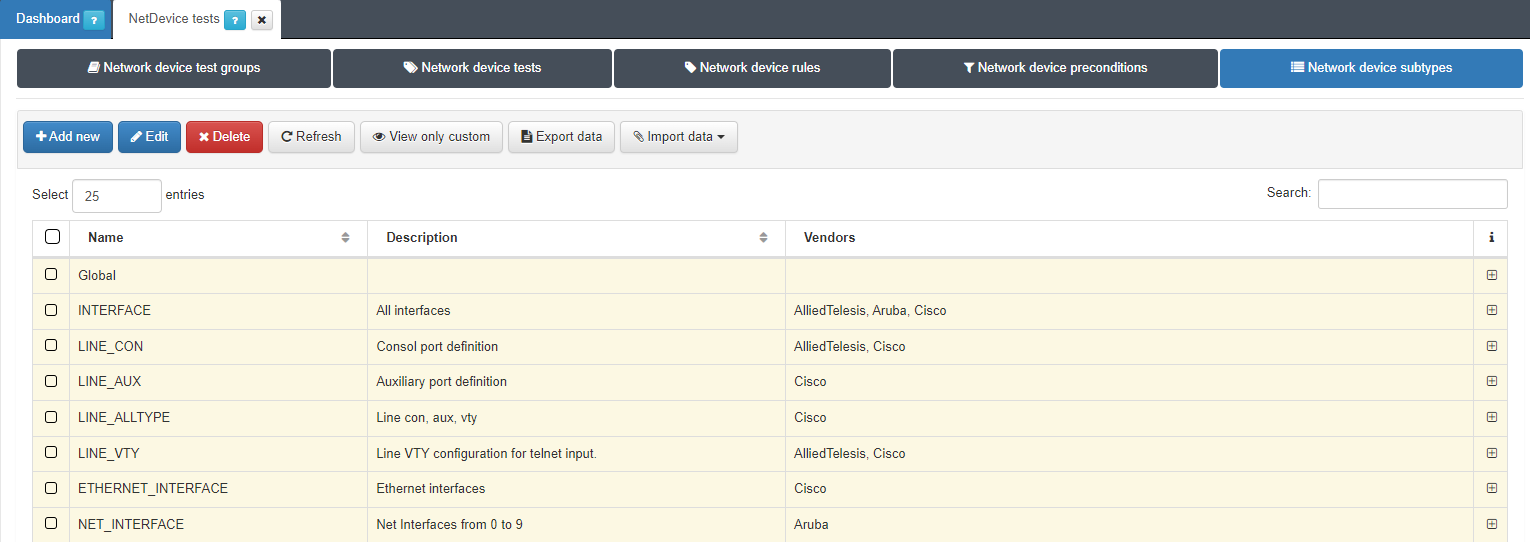
4.4.2.4.2.4.1. Filters: Subtypes
Subtypes are complete blocks of information that are obtained when retrieving the configuration of a device. For example, when obtaining a switch backup, we can filter the block of information related to the device interfaces.
Subtypes are not a mandatory requirement of static rules, but they can be very useful for working with specific blocks of information.
To create a new subtype we go to ON NetBackup -> Network Device Compliance -> NetDevice test and in the Network Device subtypes tab we select Add new:
In the pop-up tab, we will be asked for the following information:
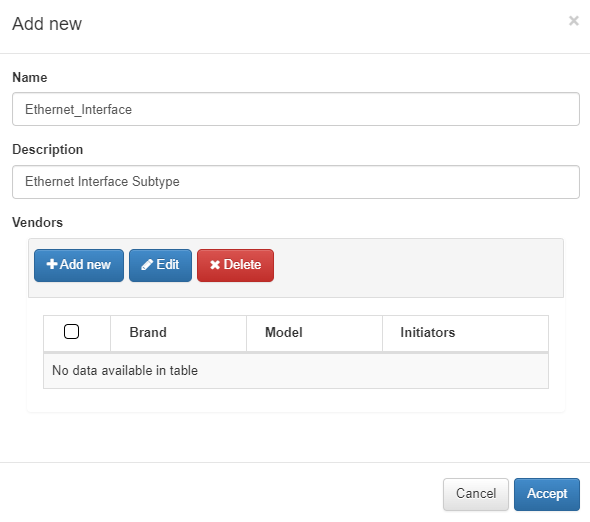
Name: name of the new subtype.
Description: description of the new subtype.
Vendors: list of vendors configured for this subtype, click on Add new to configure a new device.
When adding a new vendor the following window will appear:
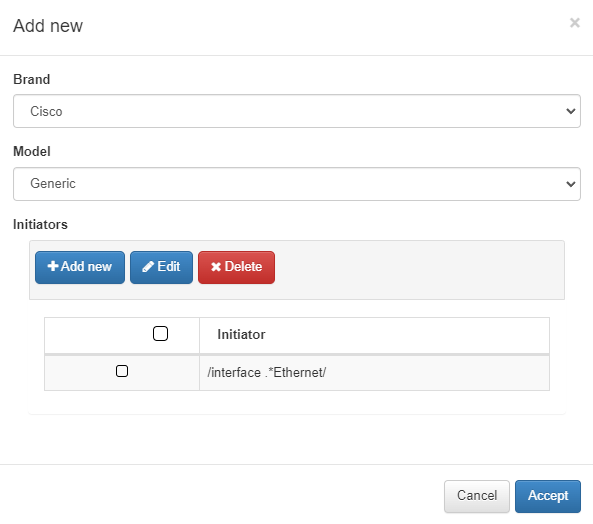
Brand/Model: brand and model of the network device to which the rule using this subtype is going to be applied.
Initiators: initializers that mark the start of the information we want to retrieve.
In this example, the subtype will filter the block of Ethernet-type interfaces from the global configuration.
Once configured, press Accept to save.
4.4.2.4.2.4.2. Filters: Preconditions
The Preconditions will be useful only when we have a subtype defined in the rule, they are conditions that must be fulfilled when obtaining information from the devices, that is, with the preconditions we will filter all that information that meets said precondition.
To create a new subtype we go to ON NetBackup -> Network Device Compliance -> NetDevice test and in the Network Device preconditions tab, click on Add new:
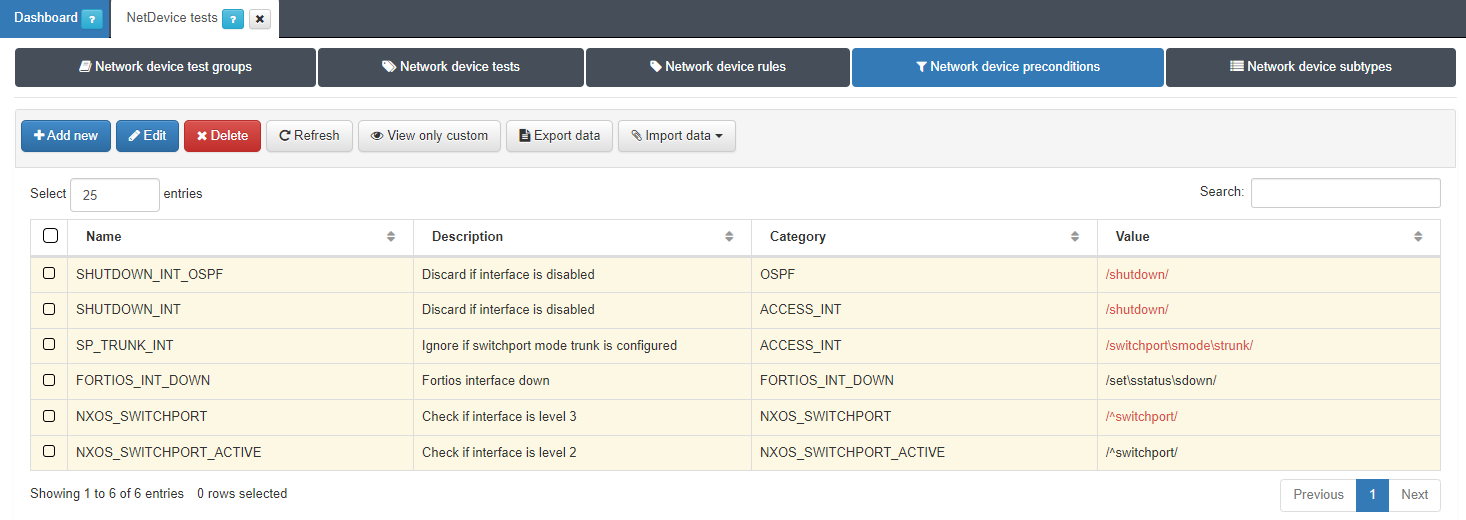
A pop-up window like the one shown below will appear:
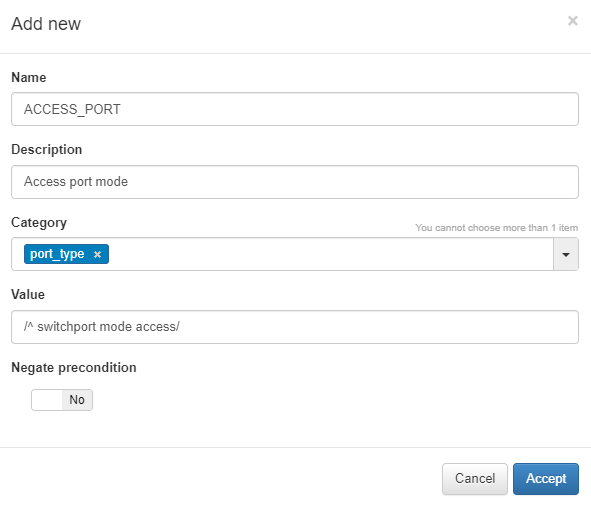
Name: Name of the new global parameter.
Description: Description of the global parameter.
Category: Category to which it belongs, we can select an existing one or create a new one.
Value: Value to be assigned to the parameter (IP, regular expression, numerical value…).
Negate Precondition: We have the option to negate the precondition so that the precondition is valid when the regular expression that we have previously defined is not met.
4.4.2.4.2.4.3. Static rule creation
To create a new static rule we go to ON NetBackup -> Network Device Compliance -> NetDevice test and in the Network Device rules tab, click on Add new:
A pop-up window like the following one will appear:
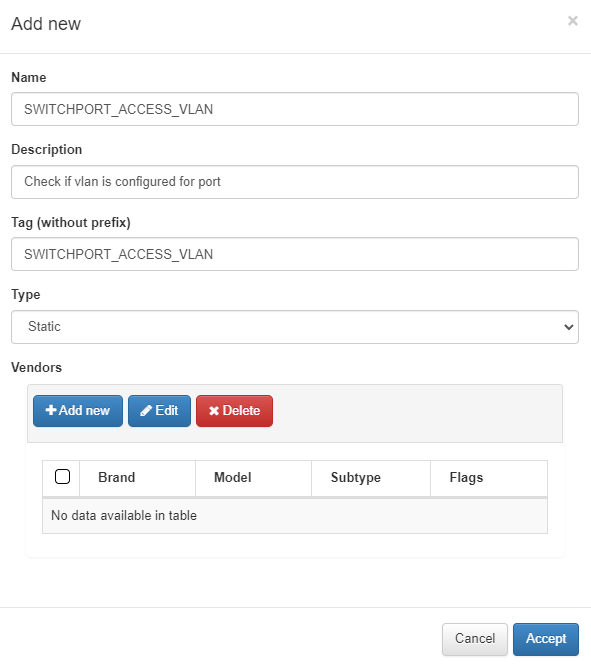
Name: Name of the static rule.
Description: Brief description of the rule.
Tag: TAG that will be assigned to the network device at the end of the rule, this TAG must be defined without a prefix since it will be the system that will determine said prefix depending on the result of the rule:
Prefixes Rules:
CRP: Compliance Rule Passed.
CRF: Compliance Rule Failed.
Type: Type of rule, in this case Static.
Vendors: List of vendors compatible with this rule, we can add several (Multi-vendor)
When adding a new vendor, the following window will appear:
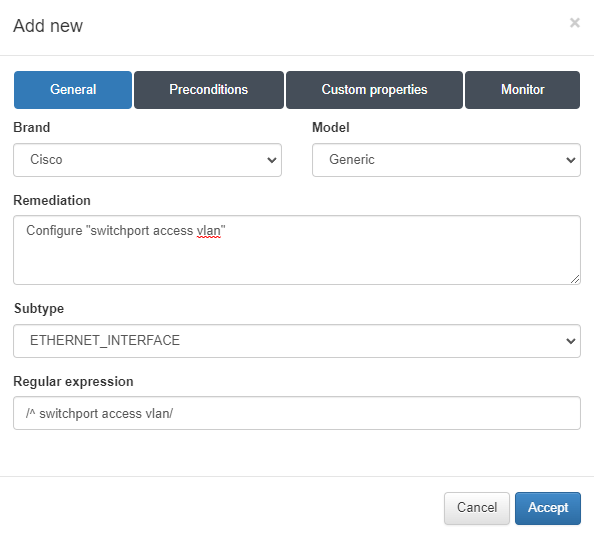
Brand/Model: We select the brand and model of the device.
Remediation: Remediation message that will be displayed if this rule is not valid.
Subtype: Optionally we can select a previously defined subtype, in this case we want to collect information related to the interface configuration (ETHERNET_INTERFACES).
Regular expression: Regular expression that will verify compliance with the rule.
In case of having defined a subtype, in the next Preconditions tab, we can add a precondition that has been previously defined or we can create a new one.
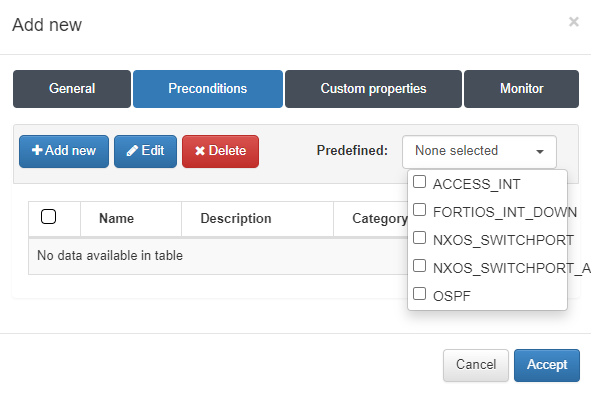
In this case we will use a previously created precondition, for this we display the predefined section and select the group that interests us. All the preconditions assigned to the selected group will be applied, we click on Accept to save.
At this point the rule already has all the necessary configuration to run, optionally Custom properties and Monitors could be added.
4.4.2.4.3. Test
With the groups, we can group a set of rules and define conditions for the validation of the test.
The steps to follow to create a Test are detailed below:
First we go to ON NetBackup -> Network Device Compliance -> NetDevice test and in the Network Device test tab, click on Add new:
In the pop-up tab we will enter the following information:
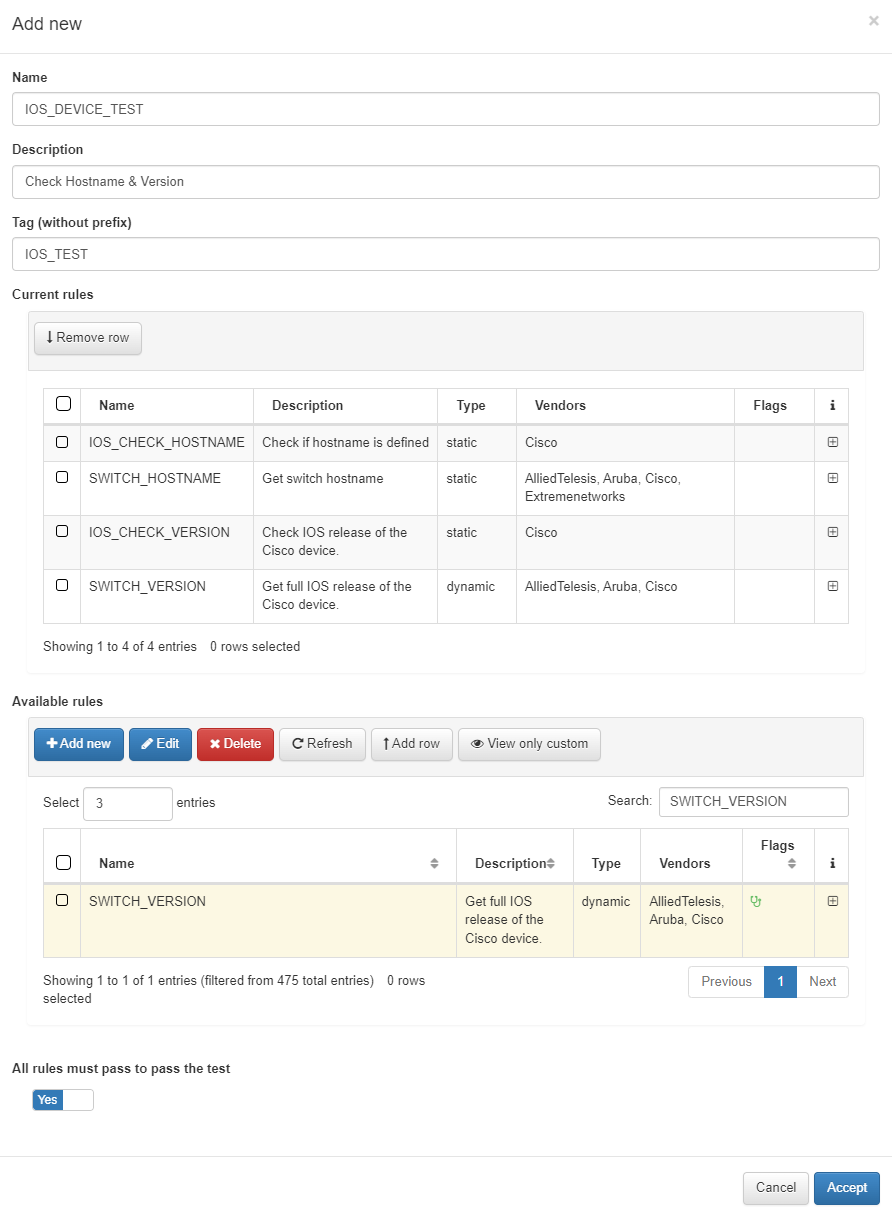
Name: Name of the new Test.
Description: Brief description of the Test.
Tag: TAG that will be assigned to the network device at the end of the test. This TAG must be defined without a prefix since it will be the system that will determine said prefix depending on the test result:
Test prefixes:
CTP: Compliance Test Passed.
CTF: Compliance Test Failed.
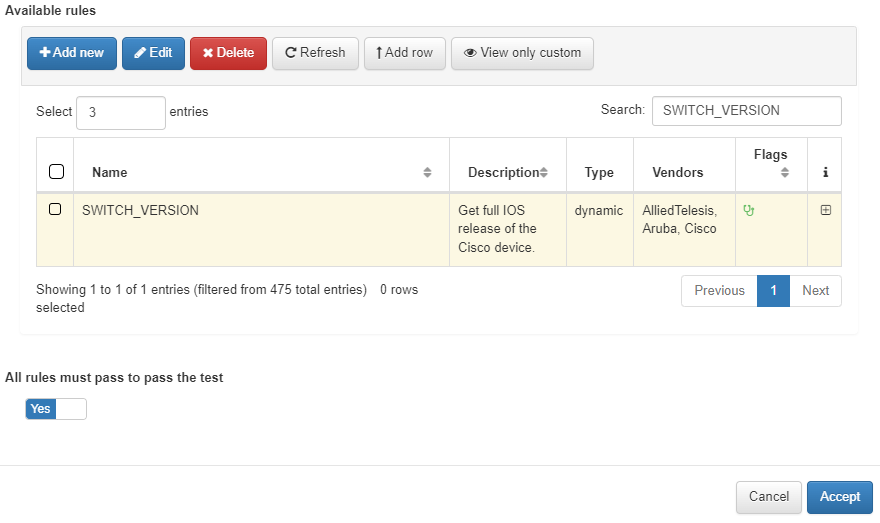
Available rules: Select all those rules that you want to include in the test that you are creating. After selecting the rules, press Add row. If we want to add rules from different pages we must press Add row before making the page change.
All rules must pass to pass the test: We can assign custom conditions for the verification of the test or we can simply define that all the rules must be valid to pass the test.
4.4.2.4.3.1. All rules passed
The tests are sets of rules, for the validation of a test all the rules that compose it must be executed and we must choose the behavior of the test to define the result of the test.
If when creating a test, we activate the All rules must pass to pass the test option, the test will only be valid if the network device complies with all the rules that have been executed in that test and if If any of the rules fail, the test will be considered failed.
4.4.2.4.3.2. Custom Conditions
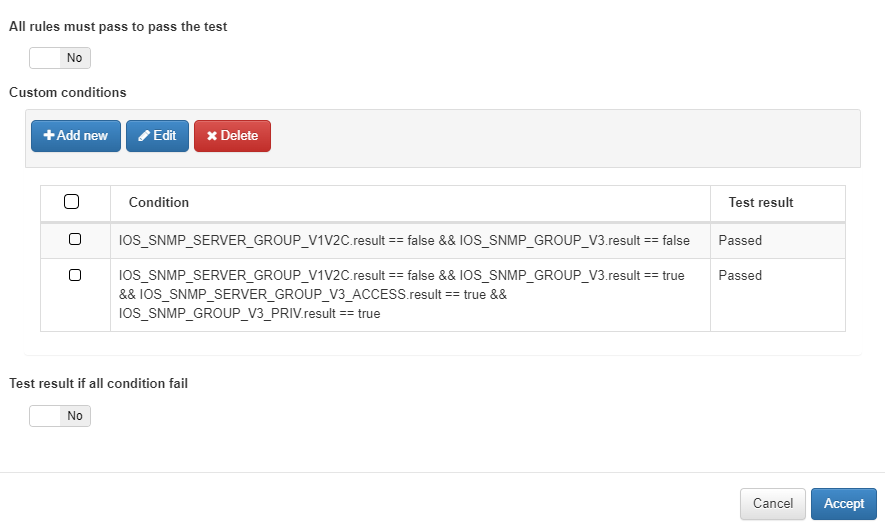
It is possible that, in a certain test, we do not want the validation to be fulfilled with the fulfillment of all the rules and we need a custom behavior for the test. In the case of unchecking the All rules must pass to pass the test option, the Custom conditions section will appear where we can add the validation conditions by clicking on Add new.
The conditions that we add will be evaluated from top to bottom, in order of creation. At the time these conditions are evaluated, if any of these are met, the result defined in the condition will be returned and the following will not be evaluated.
It is possible to use Global Parameters in the expressions of the Custom Conditions.
In the Test result if all condition fail check, we will decide the behavior of the test in case none of the previously defined conditions is valid. Thus, if we select Failed, since none of the conditions are met, the test will be considered failed and if, on the contrary, we select Passed, if all the conditions have failed, the test will be considered valid.
Example:
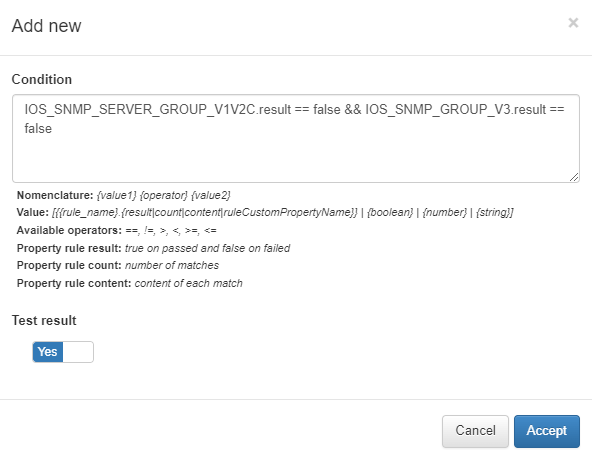
Condition: Expression that will validate the result of the custom condition.
The nomenclature of a condition is based on the operation between two values of the rules, we can obtain different types of values:
{rule_name}.result: We obtain the result (true/false) of the evaluated rule.
{rule_name}.count: We get the number of matches that the rule has made.
{rule_name} content: We get the content that the rule has extracted.
{rule_name}.{CustomPropertyName}: We get the value of the custom property that has been extracted.
The operators that we can use are ==, !=, >, <, >=, <=
Variables can operate on Booleans, numbers, or Strings.
Test result: We choose whether, when the condition is met, it will be considered passed or failed.
In this condition, it will be verified that both the SNMP server group v1 and v2c and the SNMP server group v3 are not configured, for example:
IOS_SNMP_SERVER_GROUP_V1V2C.result == false -> this condition will be true if the result of the rule (IOS_SNMP_SERVER_GROUP_V1V2C) is false, that is, SNMP v1 and v2c are disabled.
If this condition is met, the result will be successful (Test result =Yes).
4.4.2.4.4. Test Groups
The Test Groups are the highest level in what corresponds to the NDC, these are made up of different tests that have been previously defined. These groups have no purpose beyond grouping these tests by type (IP, radius server configuration, ssh…) so that it is easier to organize the execution of compliance.
To create a Test Group, execute the following steps:
First, go to ON NetBackup -> Network Device Compliance -> NetDevice test and in the Network device test Groups tab, click on Add new:
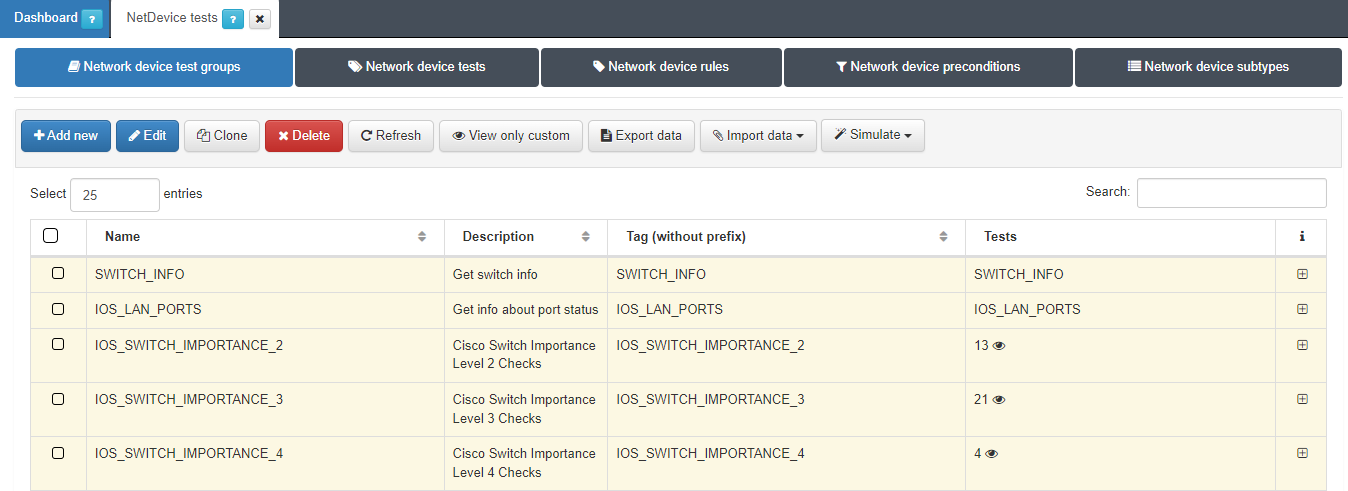
In this pop-up tab, configure the information detailed below:
Name: name of the new Test group.
Description: brief description of the Test group.
Tag: TAG that will be assigned to the network device at the end of the test group, this TAG must be defined without a prefix since it will be the system that will determine said prefix depending on the test result:
Test Group Prefixes:
CGP: Compliance Group Passed.
CGF: Compliance Group Failed.
Available test: we select all those rules that we want to include in the test that we are creating, to do this once we have selected all those that we want to include and press “Add row”. If we want to add tests from different pages, we must press “Add row” before making the page change.
Finally, click Accept to save the new group.
4.4.2.4.5. Compliance Simulation
It is possible to simulate the behavior of the compliance tests manually by using network device configuration files. To do this, we will access ON NetBackup -> Network Device Compliance -> NetDevice test and in the Network device test Groups tab an option called Simulate will appear:
To use it we must previously select all those tests that we want to execute, once selected we click on Simulate and we can choose between two options:
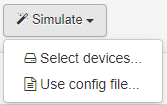
Select devices…: With this option we must select an existing network device in the CMDB and previously configured to enable the test execution.
Use config file…: With this option we will have to upload a configuration file that has previously been obtained from a network device. In this case, the dynamic rules that the tests may contain will NOT be executed since the commands cannot be sent to the network device.
Once the execution of the simulation is finished, a new window will appear with the following results:
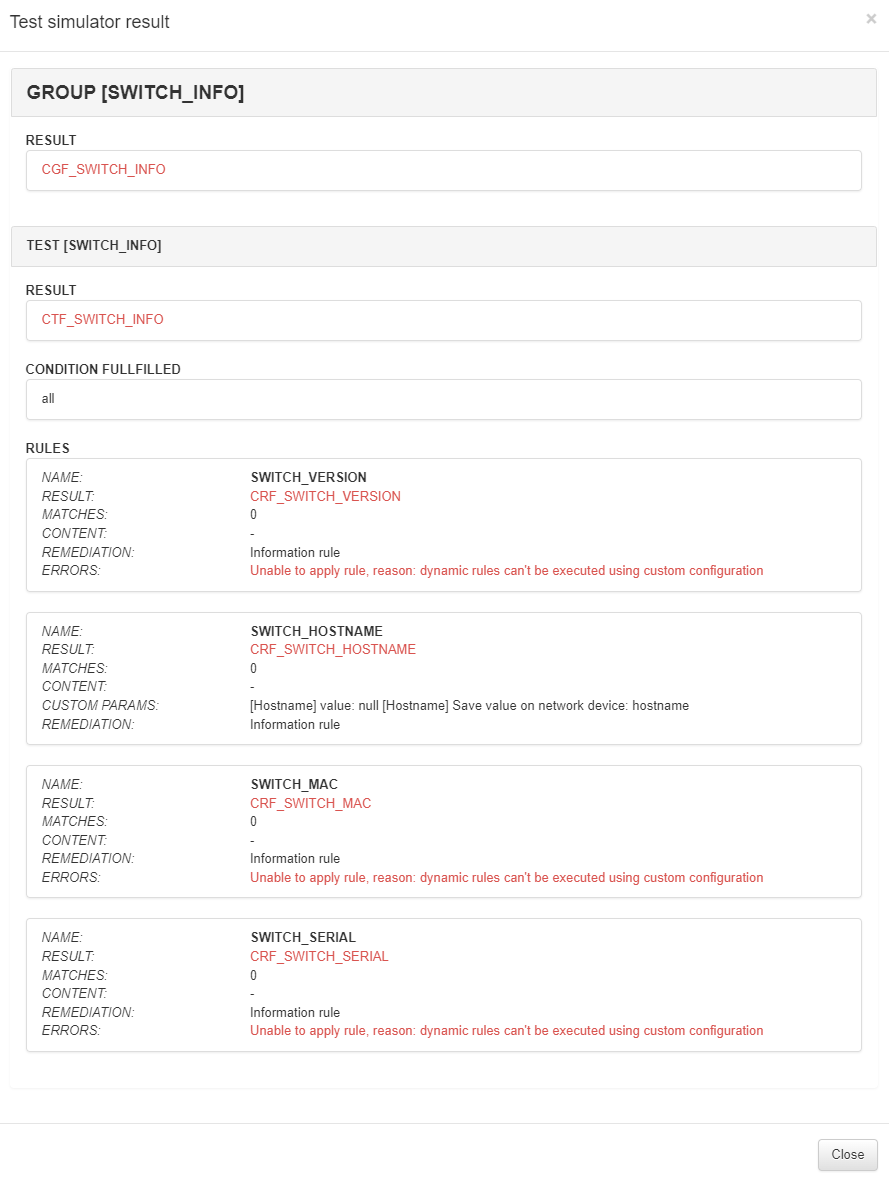
4.4.2.4.6. Create a new network device
To use the Network Device Compliance (NDC) module, first you need to register a new network device in the system and configure the access method to obtain the configuration of the device.
If you want to register a predefined group of devices, consult Bulk import of devices.
4.4.2.4.6.1. Single device registration
To create a new network device, go to the ON CMDB -> Network Devices section.
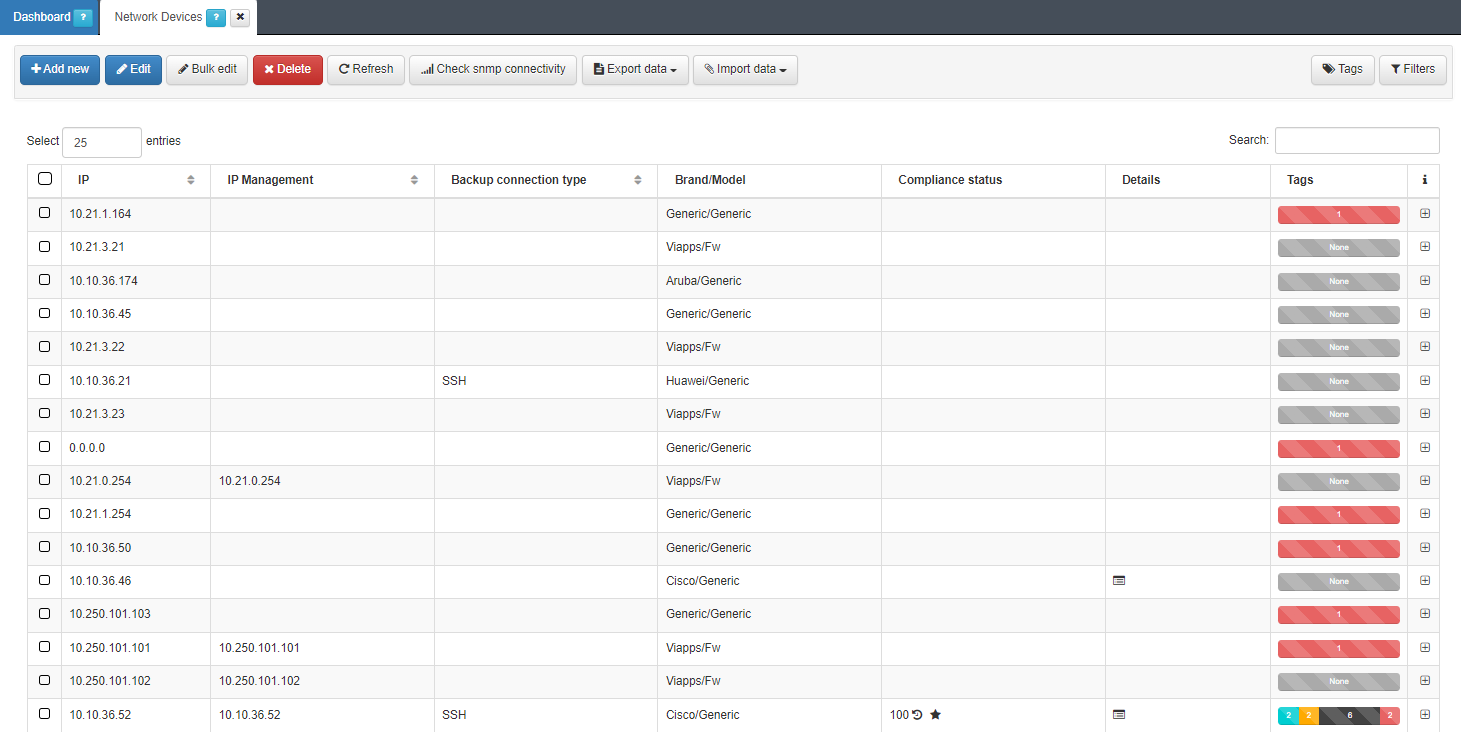
To register a new device, use the Add new button and complete the information on the form. After completing all the necessary information, we will click on the Accept button on the form to save the configured network device.
The minimum information that must be filled in is indicated below.
4.4.2.4.6.1.1. General
In this tab, it is required to complete the following fields as a minimum.
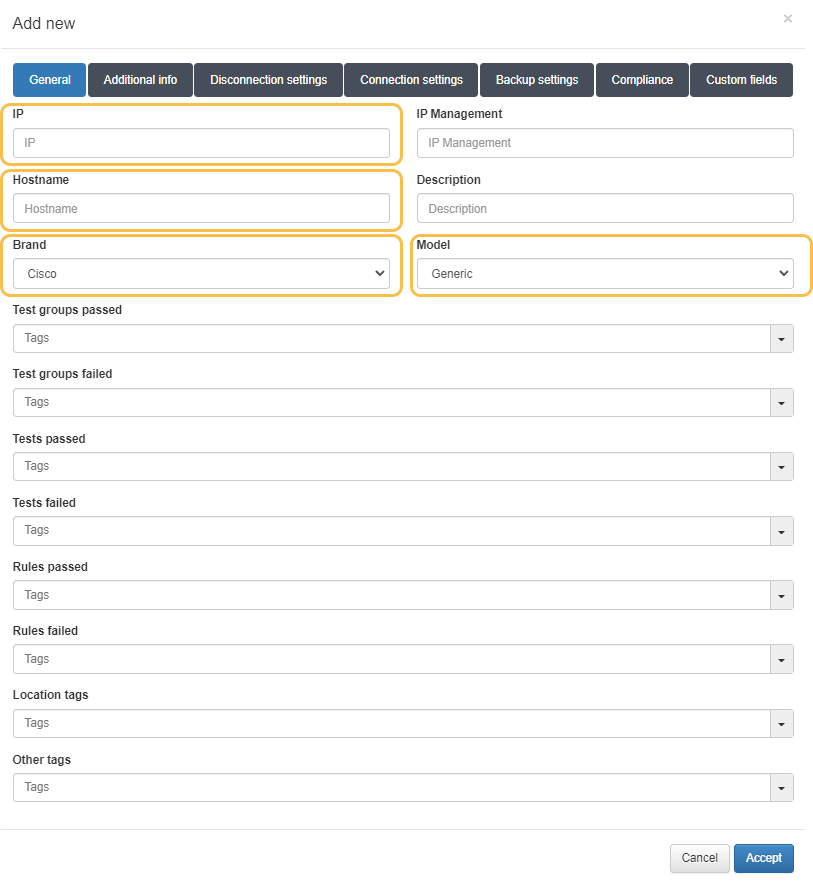
IP: IP address that identifies the device. The IP address is only for identification (to see it in the device table) since it will have to be reconfigured in the Backup settings.
Hostname: Hostname that identifies the device. The hostname will be used in the case of wanting to obtain the device configurations through SCP.
Brand / Model: Brand and model of the device. The brand and model will be used to use the appropriate checks for each type of network device.
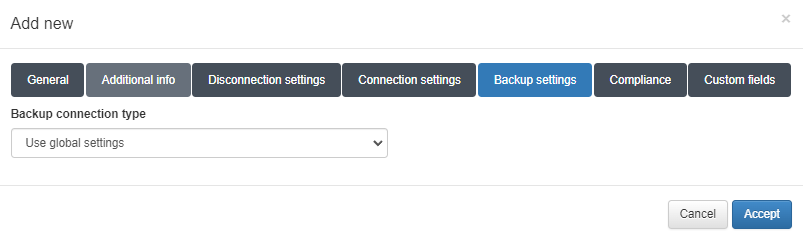
4.4.2.4.6.1.2. Backup settings
In this tab, you must inform the type of connection (SSH or SCP), and depending on the type selected, it will be necessary to fill in different fields, some of them being common. It can also be configured to use the global configuration values located in Configuration -> Configuration vars in NetDev tab in Backup properties section.
The difference between SSH and SCP connection type is:
SSH: The system connects against the network device and retrieves a fresh copy of the configuration.
SCP: the system connects against an external repository to locate the configuration file of the network device.
For both SSH and SCP we need to configure:
Backup IP: IP address from where the configurations will be obtained. Network device in case of SSH and server with the files in the SCP case.
Backup user: Access user.
Backup password: Access password.
For ssh we also need to configure:
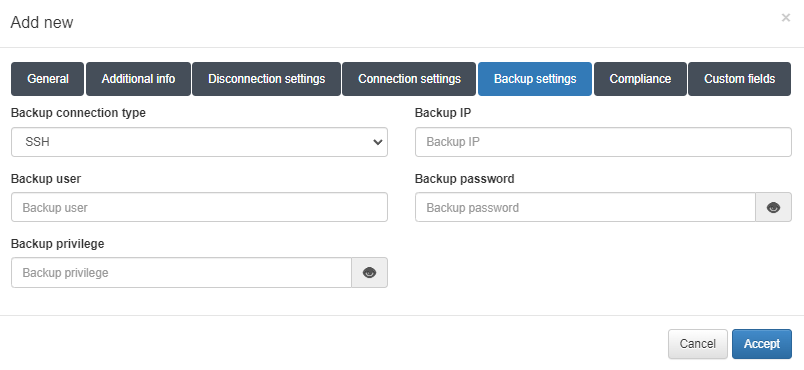
Backup privilege: Password for access to privileged mode on the network device.
For ssh we also need to configure:

Backup path: Path where the configuration files are stored on the server. Example: /root/backups
Backup filename: Regular expression to detect valid file names. The variable %HOSTNAME% can be used to refer to the hostname of the device configured in the General info tab. Example: %HOSTNAME%(.*|)
In the SSH connection type, the backup is obtained directly from the network device, while in the SCP connection type, it is obtained from another server, in which the configuration file has previously been added.
In the case of SCP, the configuration files, previously filtered using the previously configured Backup filename parameter, are sorted alphabetically to use the last one. Therefore, if there is more than one configuration file per device (for example, to save history), the date must be added in the year-month-day format in the name. Example: cisco_2019_12_21.
In the following image you can see an example for a switch with the following characteristics:

Hostname Cisco-8p.
Backup path /root/backups/Cisco-8p. Folder with hostname Cisco-8p. Optionally, all the configuration files of different network devices can go in the same folder.
Two configuration files. Cisco-8p_2019_12_11.txt and Cisco-8p_2019_12_12.txt. The last one will be used for the tests, in this case Cisco-8p_2019_12_12.txt.
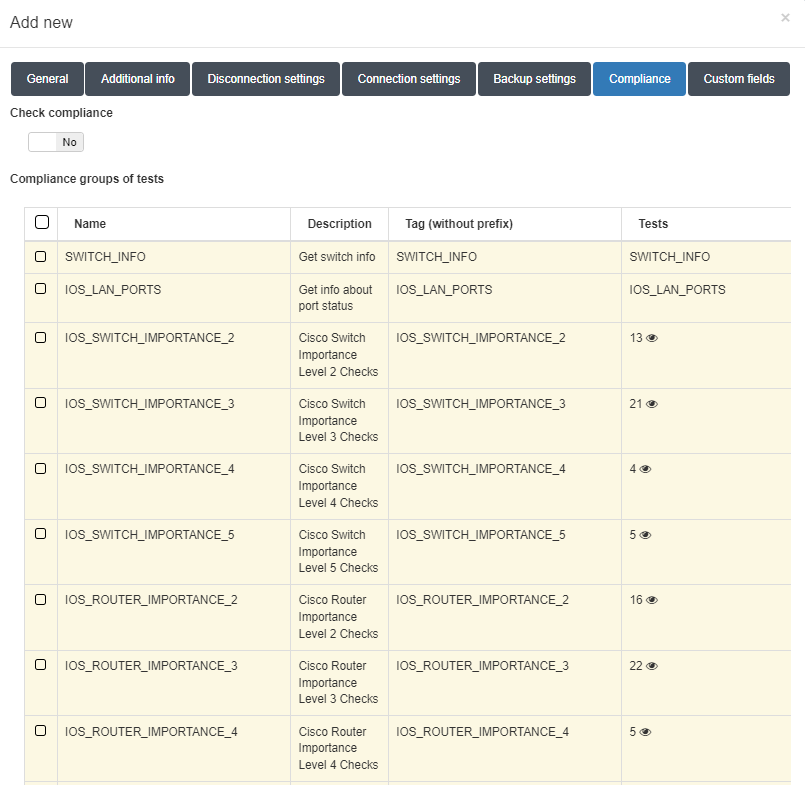
4.4.2.4.6.1.3. Compliance
In this tab, you have to activate the compliance of the device by checking the Check compliance option and selecting the test groups that you want to run by selecting them in the Compliance groups of test table.
4.4.2.4.7. Run tests on the network device
To schedule or run the group of tests previously configured on the network device at the moment, it is necessary to create a NetBackup Scheduler.
To do this, you must enter the management screen by accessing ON NetBackup -> NetBackup Scheduler.
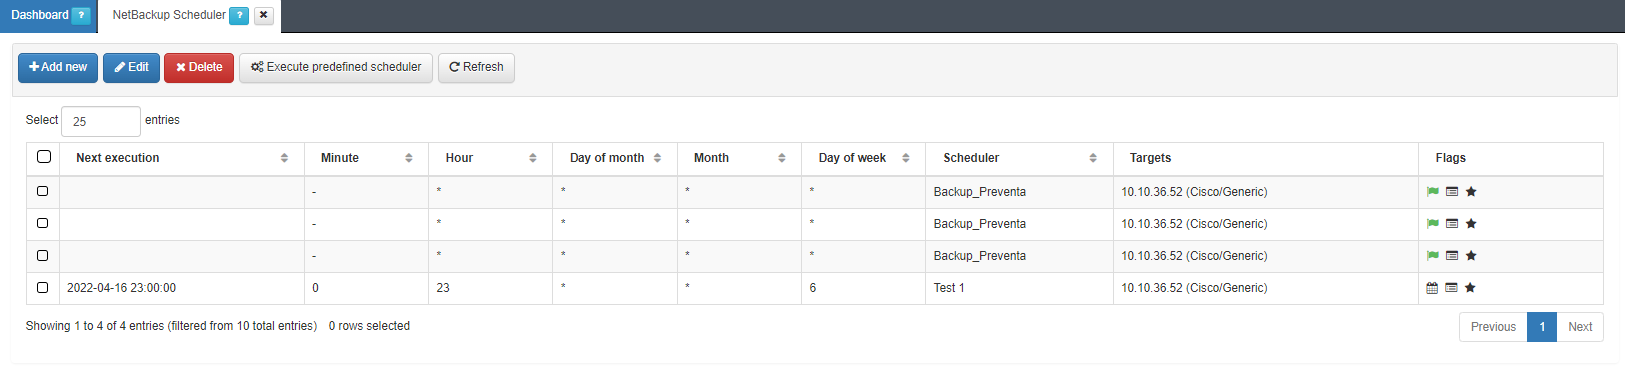
Once on the previous screen, you need to add a new element with the Add new button.
In the form that appears, you can configure a recurring test run with the desired frequency or run the test at the moment by checking the Execute now option.
In addition, you must check the Execute compliance test option to activate the execution of these and give the element a name.
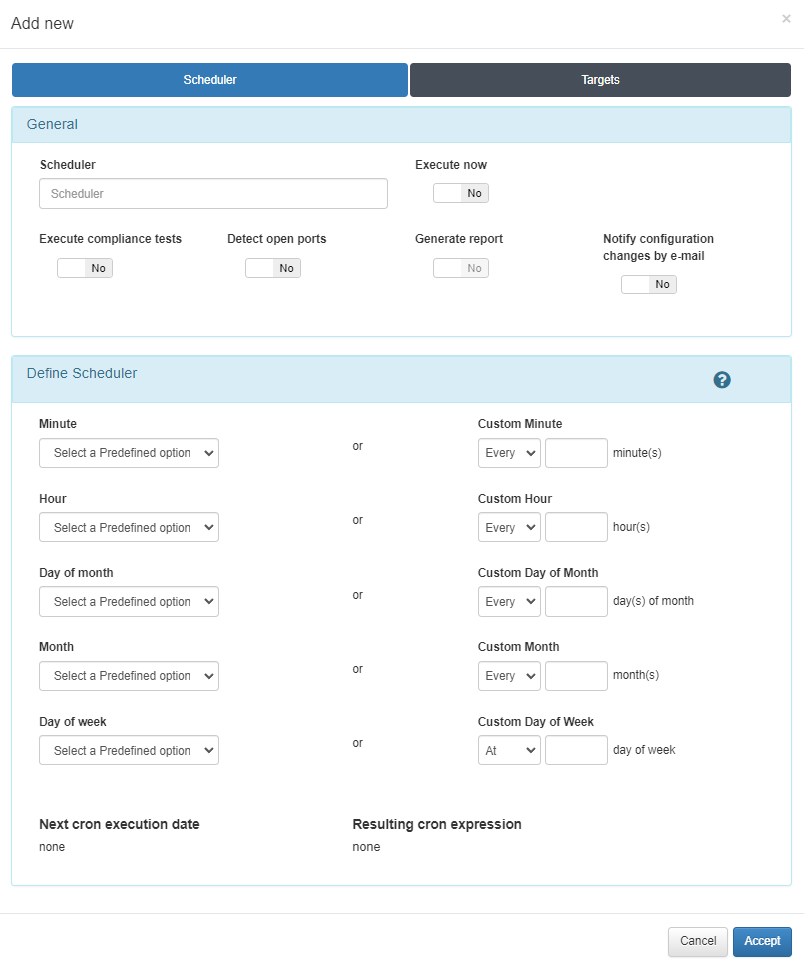
To program the execution on a recurring basis we must use the Define Scheduler section. In this section we will define the frequency with which these tests will be carried out. The programming of these tests is based on the cron tool. Below, it will be detailed how its configuration should be carried out:
In a first column we find the configuration related to the execution time value. In the slider bars, we will determine the minute, hour, day of the month, month and/or day of the week in which the task will be executed:
Minute: The exact minute in which the process will be executed to carry out the tests. Range from 0 to 59.
Hour: The exact time that the process will be executed to carry out the tests. Range from 0 to 23.
Day of the month: The exact day of the month in which the process will be executed to carry out the tests. Range from 1 to 31.
Month: The exact month in which the process will be executed to carry out the tests. Range from 1 to 12.
Day of the week: The exact day of the month on which the process will be executed to carry out the tests. Range from 0 (Sunday) to 6 (Saturday).
In the second column we can define the execution frequency for each of the previous points in a personalized way.
Examples:
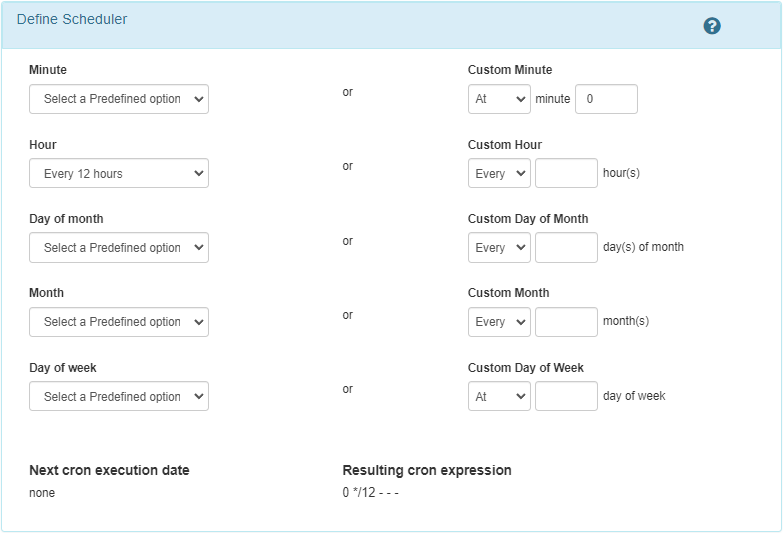
Execution every 12h:
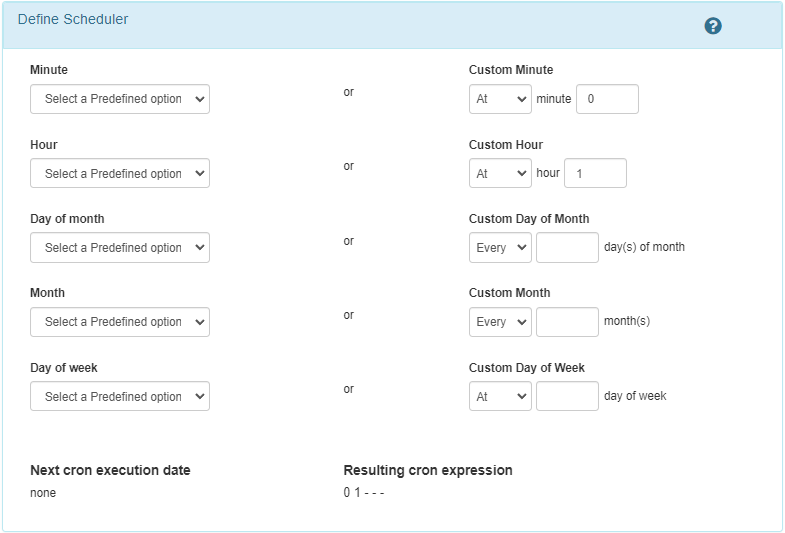
Execution every day at 1AM:
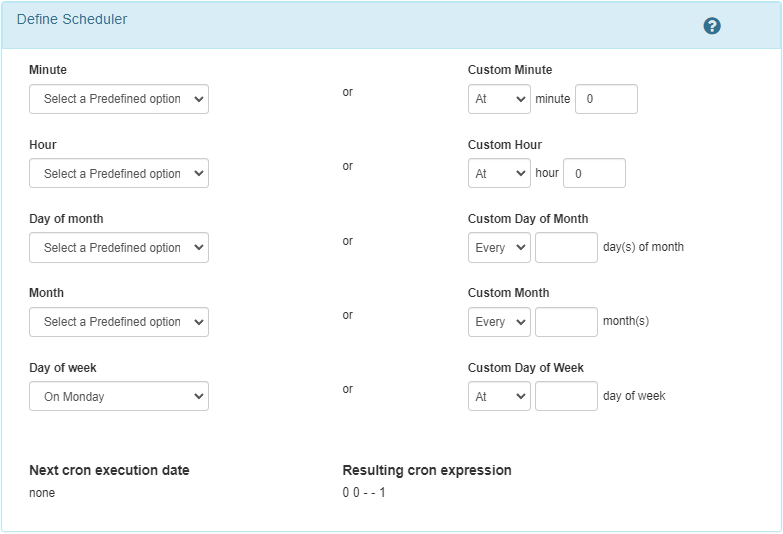
Execution every monday:
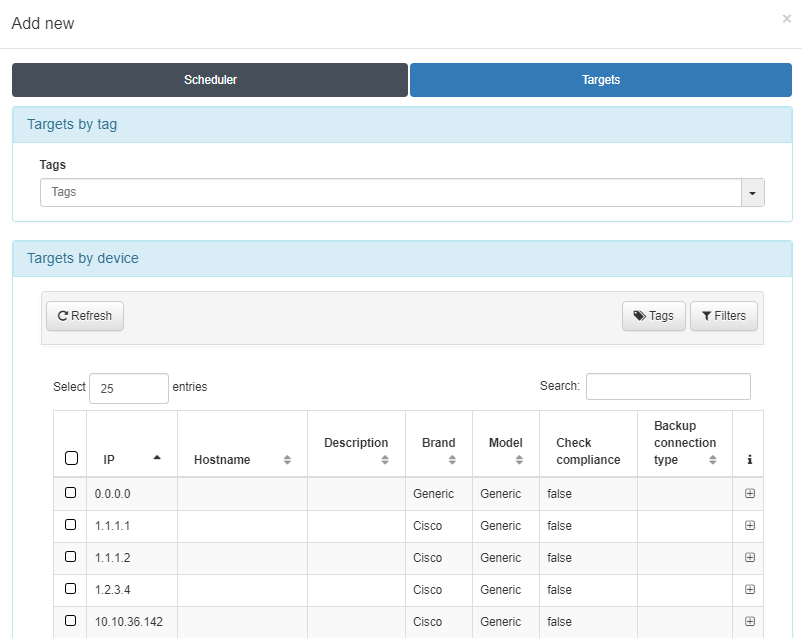
Before saving the configuration, you must select the network device on which you want to run the tests from the Targets tab. It is possible to run the test on all the devices that contain one of the Tags that are included in the Targets by tag section. In this way we can run the tests on several devices without having to manually select them.
Once the network devices have been selected, the scheduler can be saved.
When the scheduler runs (a few minutes later if you have selected Execute now) it will start displaying information on the graphs.
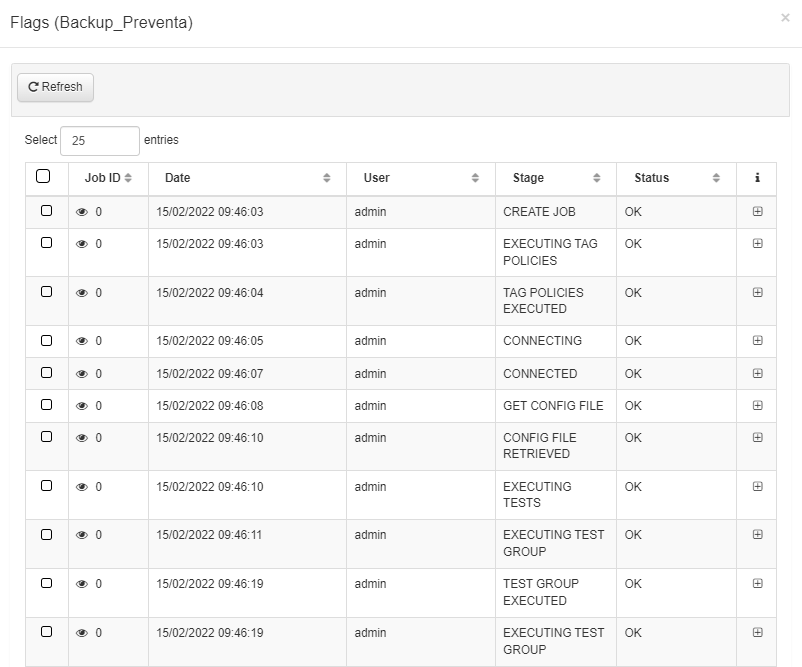
In the Flags section we will be able to visualize the result of the execution. The flag icon will indicate if the process has been executed satisfactorily. If we press the View Logs icon, a pop-up window will appear with the log corresponding to this Schedule.
The configuration will be saved locally and the configuration of the devices can be viewed in ON NetBackup -> View Backups.
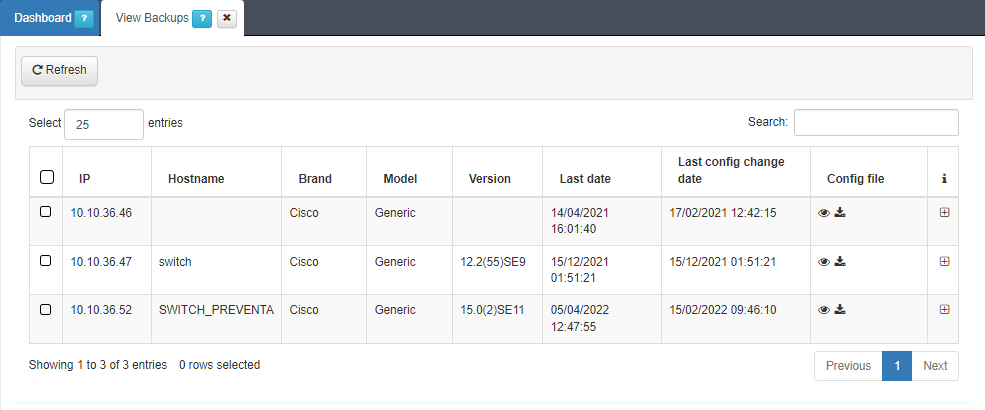
In the Config file column, it will be possible to download the configuration file or view it by pressing the download icon or the eye icon, respectively.
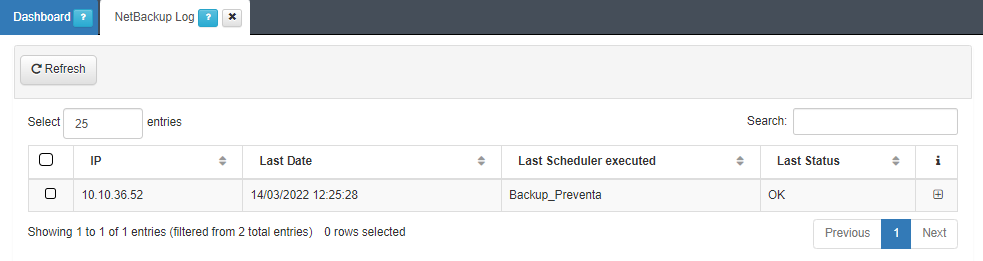
Likewise, the NetBackup execution log will be saved in ON NetBackup -> NetBackup Log grouping all executions by network device IP.
4.4.2.4.8. Bulk import of devices
To import a set of network devices in the CMDB we must execute the following steps.
First of all, it is necessary to export the template that we will use to add the list of devices:
Go to ON CMDB -> Network Devices.
We select a Network Device as model.
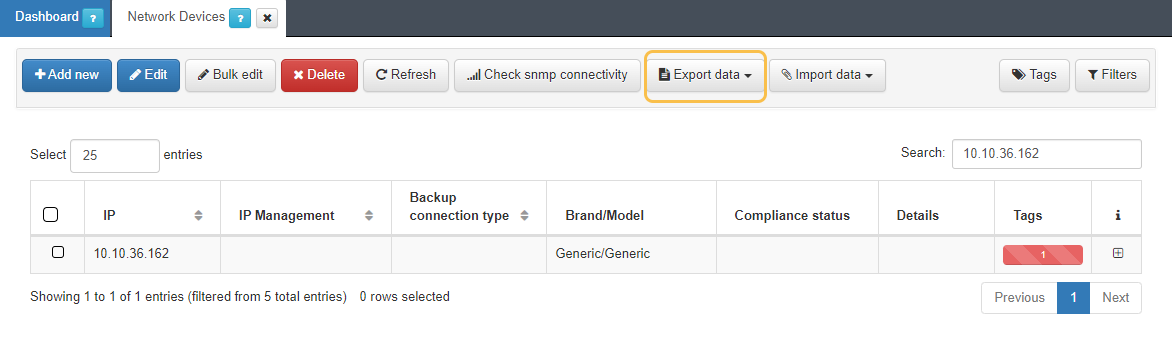
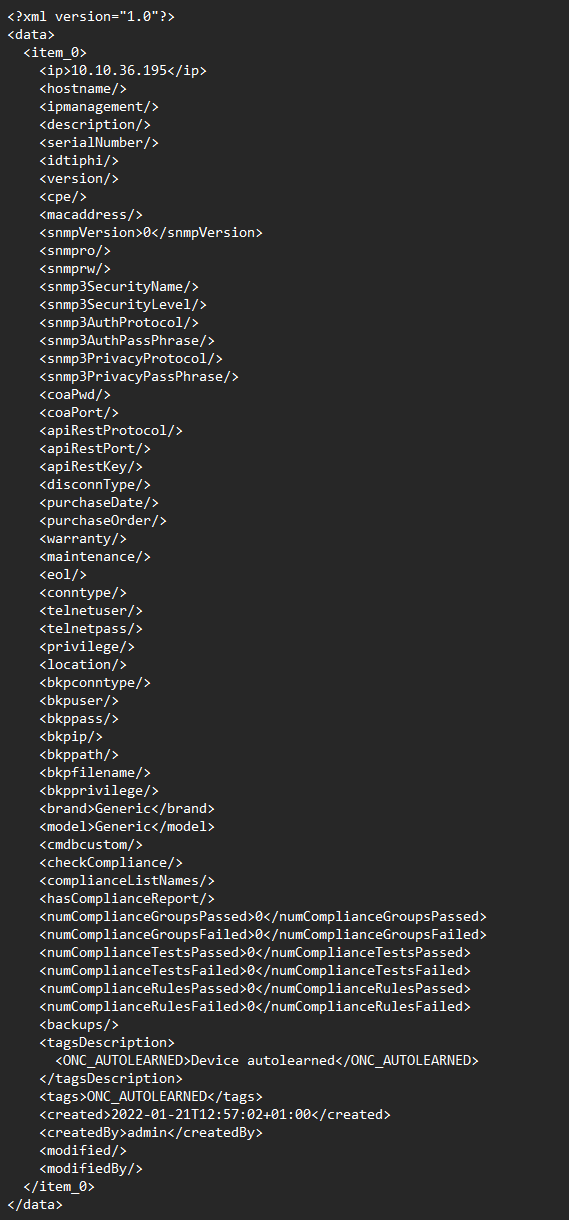
We export the file with the Export data button. With this action we generate a JSON and a XML file.
Download the CSV file generated in the previous step:
Go to Status -> CMDB Exports:
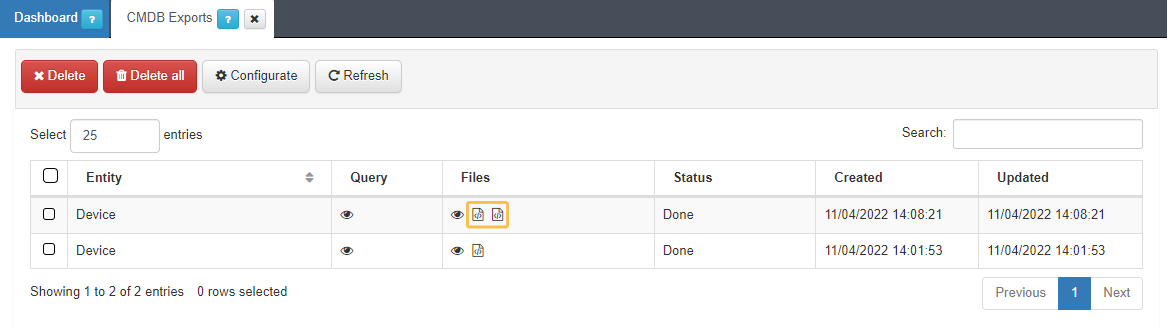
You can export both the file in CSV or XLSX format.
Choose the path on the computer (by default in Download).
Complete the downloaded file with the data of the network devices. The following points must be taken into consideration:
Not all fields must be filled out.
Leave the columns id, created, createdby, modified and modifiedby blank.
The minimum information required to successfully import a list is as follows:
IP: Indicate the access IP to the device.
Brand: Indicate the manufacturer. The list of manufacturers registered in the system is as follows:

Model: Indicate the model. In this case the only possible model will be Generic. If we are not sure of the manufacturer and model we will leave both fields with Generic.
bkpconntype: SSH or SCP.
bkpuser: User to access the SCP repository or network device.
bkppass: Access password to the SCP repository or network device.
bkpip: IP address of the SCP server or network device.
bkppath: Repository directory where to locate the backups (SCP connections).
bkpfilename: Regular expression to identify the name of the file (SCP connections).
bkpprivilege: Password for Privilege EXEC mode (SSH connections).
Although the hostname of the device is not a required field, it is recommended to complete it to have each IP identified in the CMDB.
The SNMP versions registered in the system are the following:

Save the file in CSV format separated by commas.
Import the generated file:
Go to ON CMDB -> Network Devices.
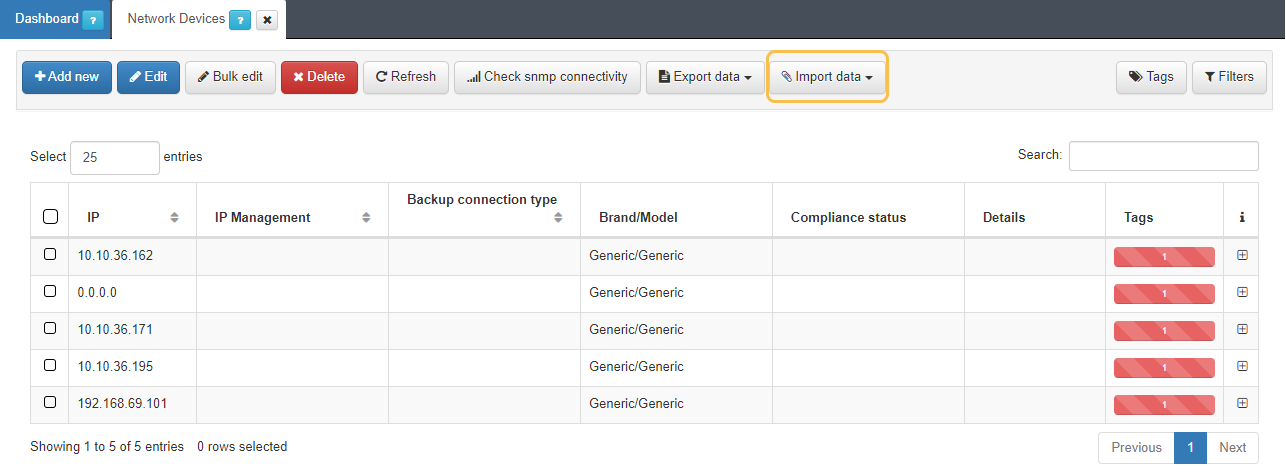
Import the file with the Import data button.
Select the file and accept.
A success message should appear at the top right of the browser:
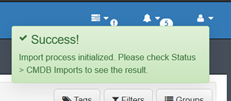
The import process will be initialized, we can see the process in Status -> CMDB Imports.
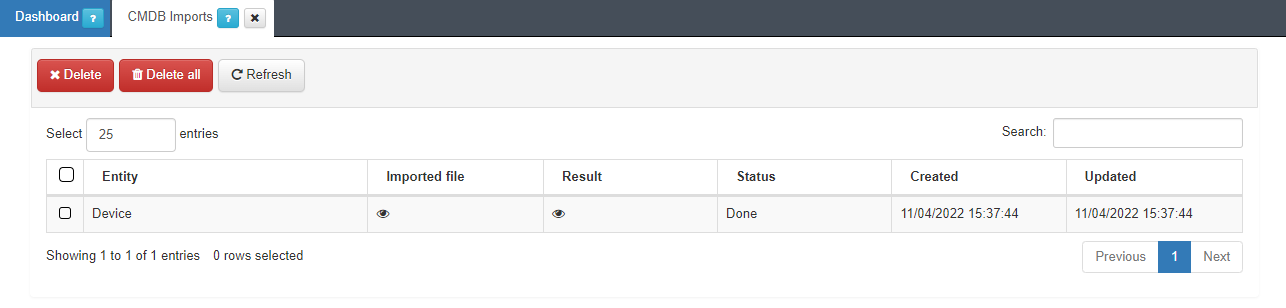
In this section, we can see the file that has been imported, the result of the operation and the current status of the process.

In case of error:
The Status section will display Aborted:
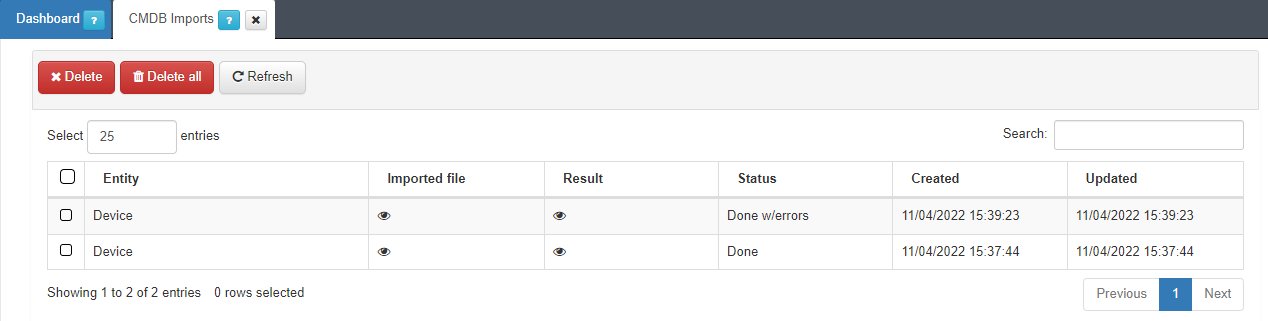
To see the failure reason, open the Result section:
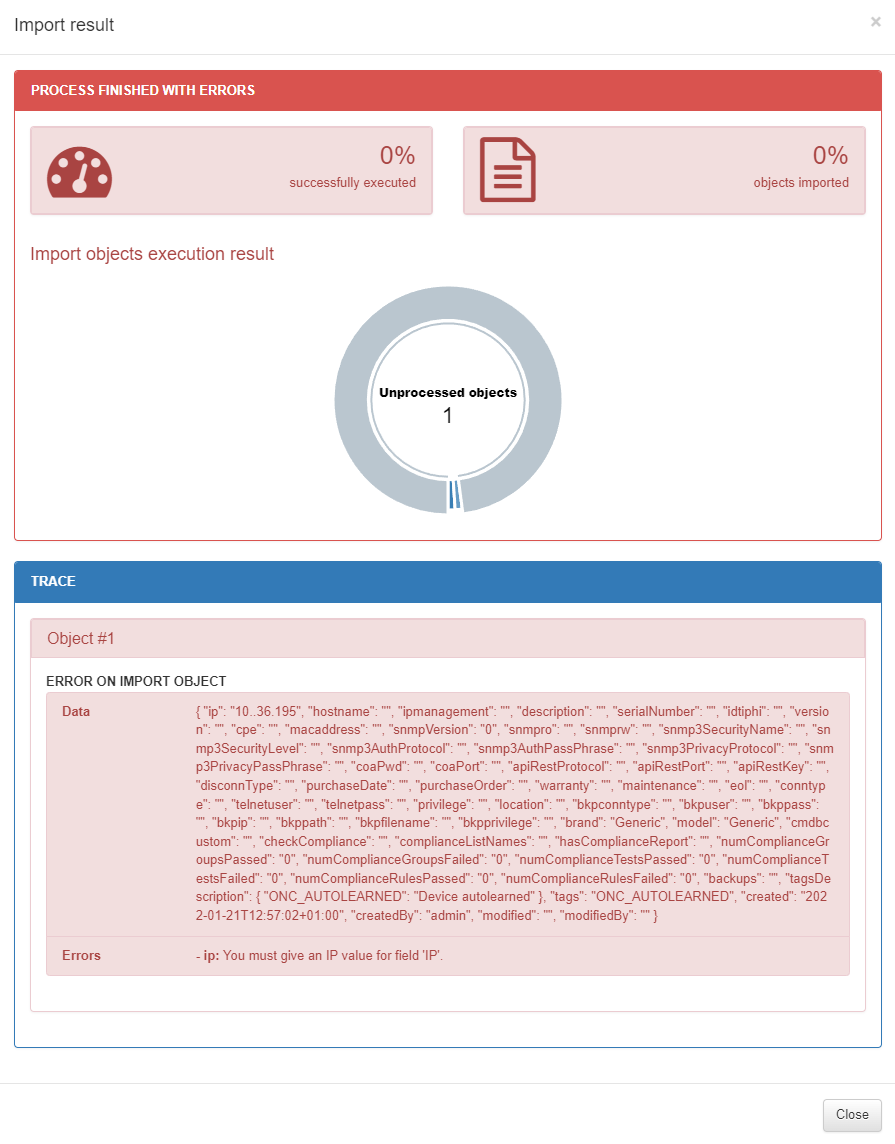
In this example, the IP field is not formatted correctly.