4.4.1.4. Administration
The administration section focuses on advanced tasks related to the ongoing management and maintenance of the system covering more complex configurations and advanced features.
Note
It is essential to have correctly deployed the necessary nodes for this use case.
This section will explain the End Point Compliance use case applied through the UD Tag Policies and the UD Tag application requirements. Both are cases applied to User Devices.
Through these two functions, you can control user devices access to the network, based on conditions such as parameters of the device itself, elements that it has installed and running, versions of applications installed, etc.
Important
To fulfill this use case, user devices must have the Agent installed. For information on how to install the agent, see the Agent Deployment section.
4.4.1.4.1. ON Agent
The Agent will report the following information:
Detailed Software Inventory
Detailed hardware inventory
Detailed Inventory of Processes
Status of security components (AV, Firewalls, etc.)
VPN integration
Others
You can visualize the information mentioned above in the ON Agent > Agent Payloads section. In this window, you can see payload details received from the Agent installed in a client. For each of these received payloads, you can also see the solution’s response in the same window.
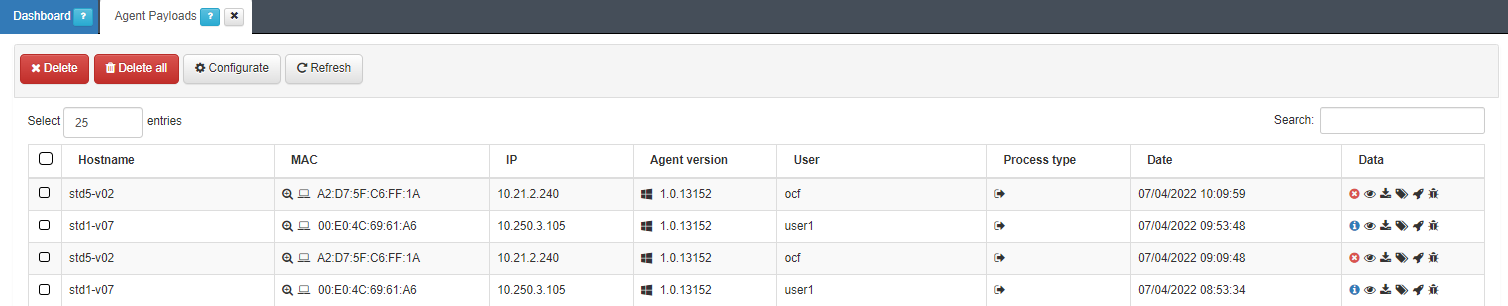
In the Data column we can see the different blocks of information available in the Payload.
4.4.1.4.2. UD Tag Policies
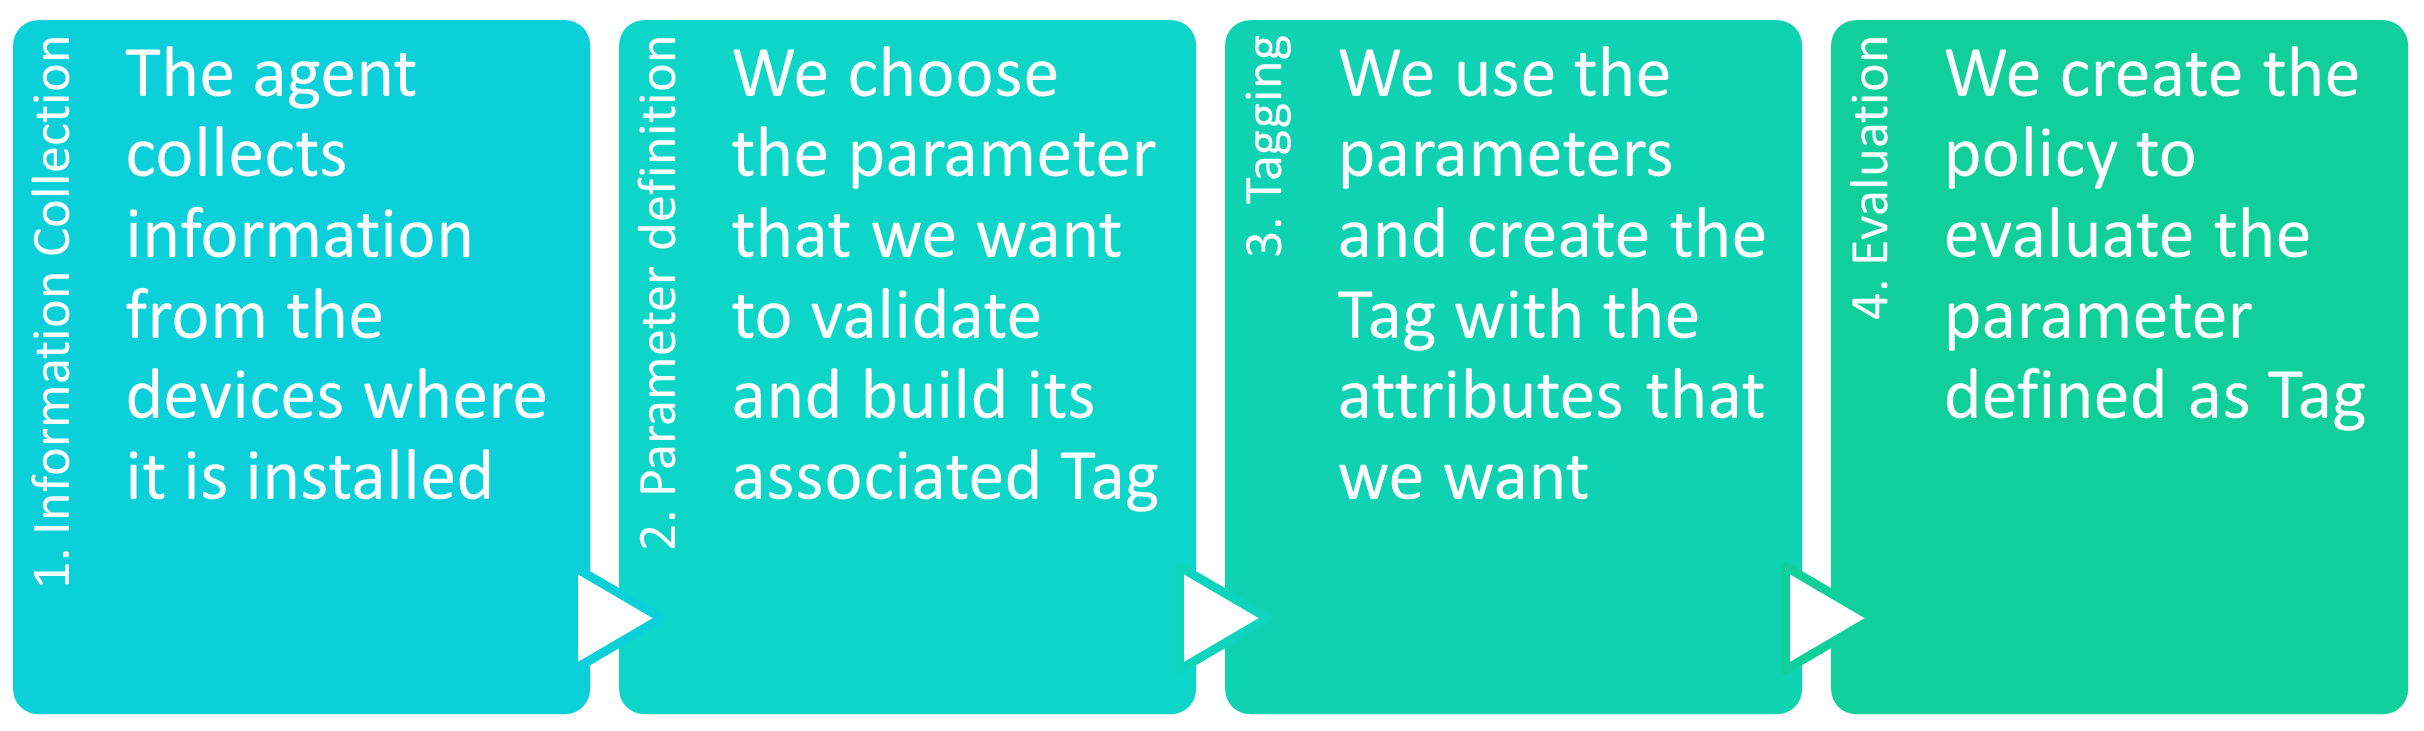
We will start with the case of the UD Tag Policies. In this case, custom tags are created to use them later in the policy evaluation process.
When creating a Tag, we have two possible options:
Parameter-Based Tag Policies: Create a Tag based on a specific parameter of the device.
Tag Policies Using Logical Expressions: Employ the device’s existing tags to create a new tag through logical expressions.
4.4.1.4.2.1. Parameter-Based Tag Policies
To implement this functionality, first, select the specific parameter that you want to validate, using the information obtained by the Agent. This can be useful if, for example, we wanted to check that device drivers are up to date. With this parameter, we can control if the device that connects has that specific driver updated.
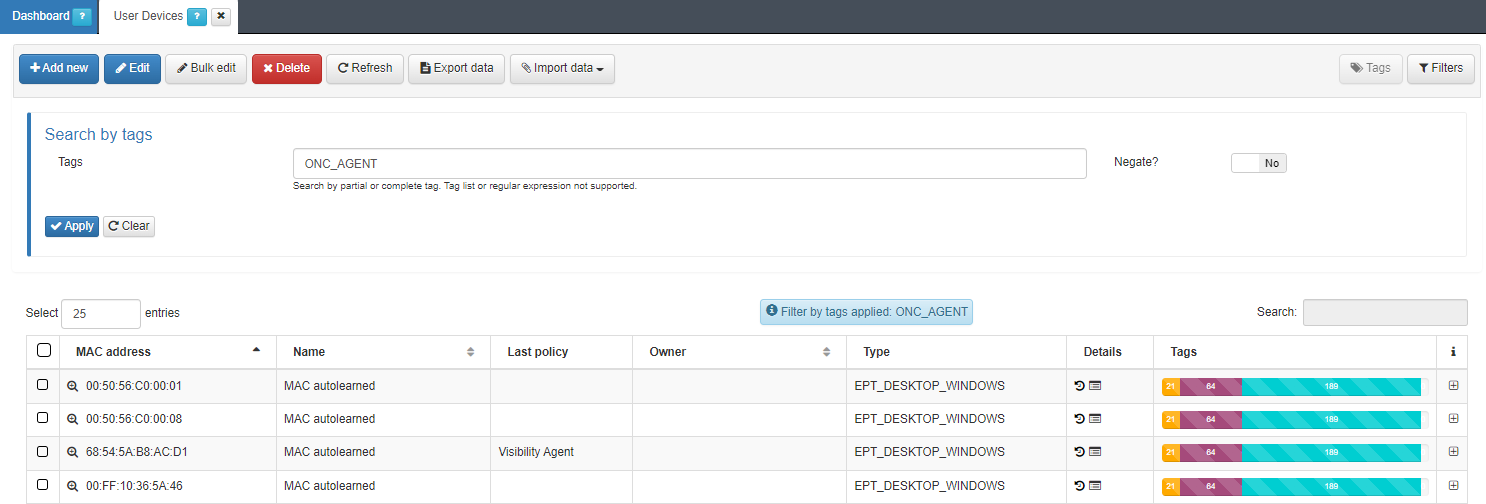
The first step is to review the information obtained by the system and decide the parameter that you want to verify. To do this we go to ON CMDB > User Devices, in this window we will see the data of all the devices registered.
In our case we are interested in filtering by parameters obtained by the Agent. For this reason, click on Filters and select the option to filter the devices by Tags. As we are interested in those who have an Agent, filter by the ONC_AGENT tag:
It is necessary to know the route of said parameter for the configuration of the UD Tag Policy by specific parameters. To do this, from the desired device, click on the Inventory icon in the Details column. It will open a new window where you can see a record of the user’s last payloads..
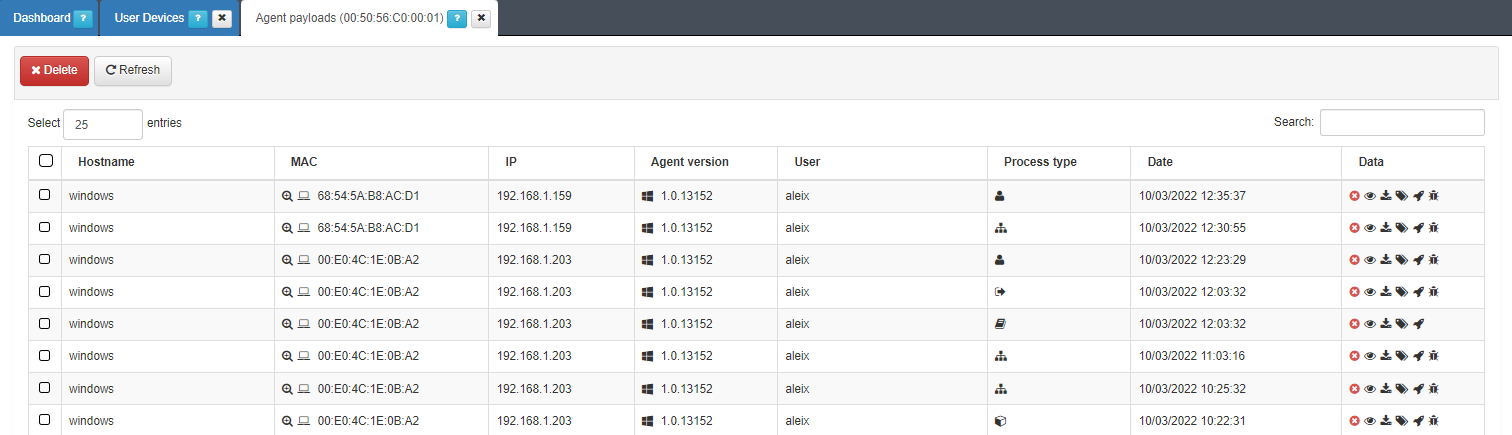
By clicking on the eye icon on the Data column, we can see a list with the different device parameters and their values.

Once you choose the parameter you want, go to ON Agent > Agent Configuration > Multiplatform agent rules and click on Add new.
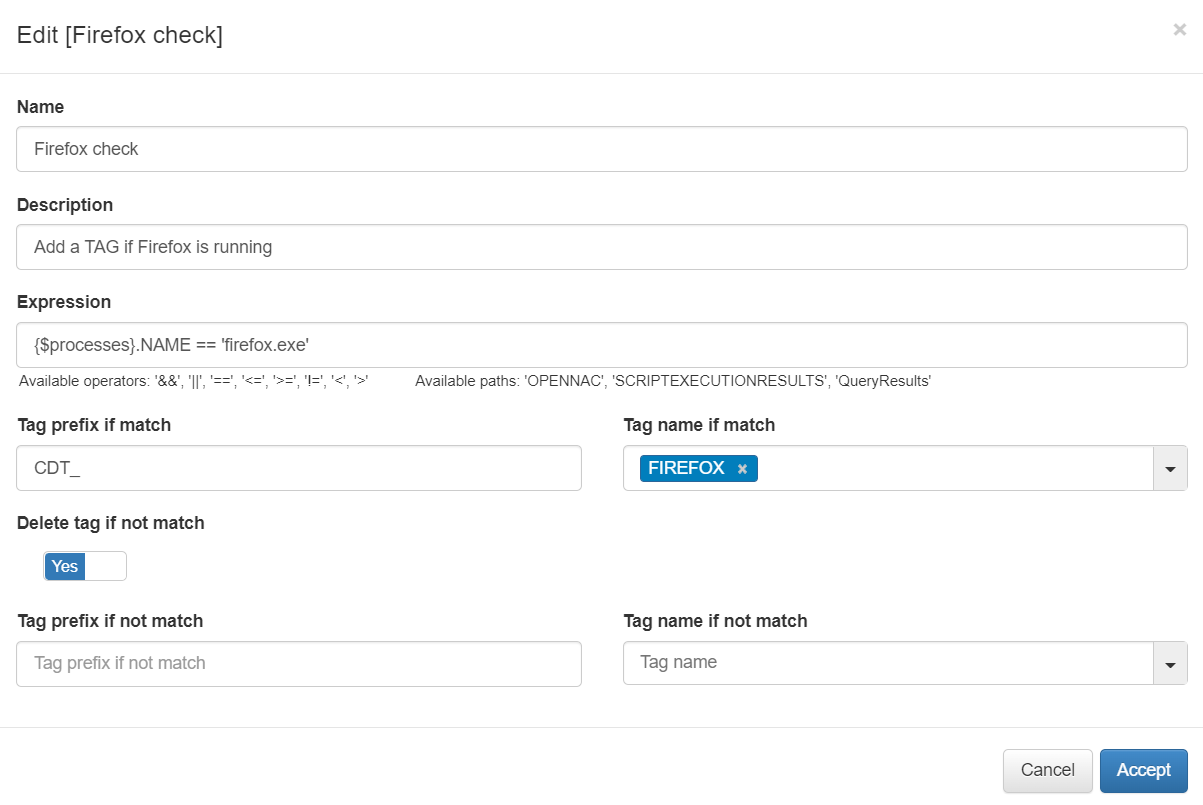
In the pop-up window, define the Expression field that sets the filter that matches the rule. Then you can set a tag to the user device if the rule is matched or not.
The next step is to define Tag in the database. To do this we have to go to ON CMDB -> Tags -> Tags of User Devices and click Add new.
Note
If a device satisfies the conditions defined in a rule during session evaluation, and the associated tag is not manually assigned in the Configuration Management Database (CMDB), the system will automatically add the tag to the CMDB for that device.
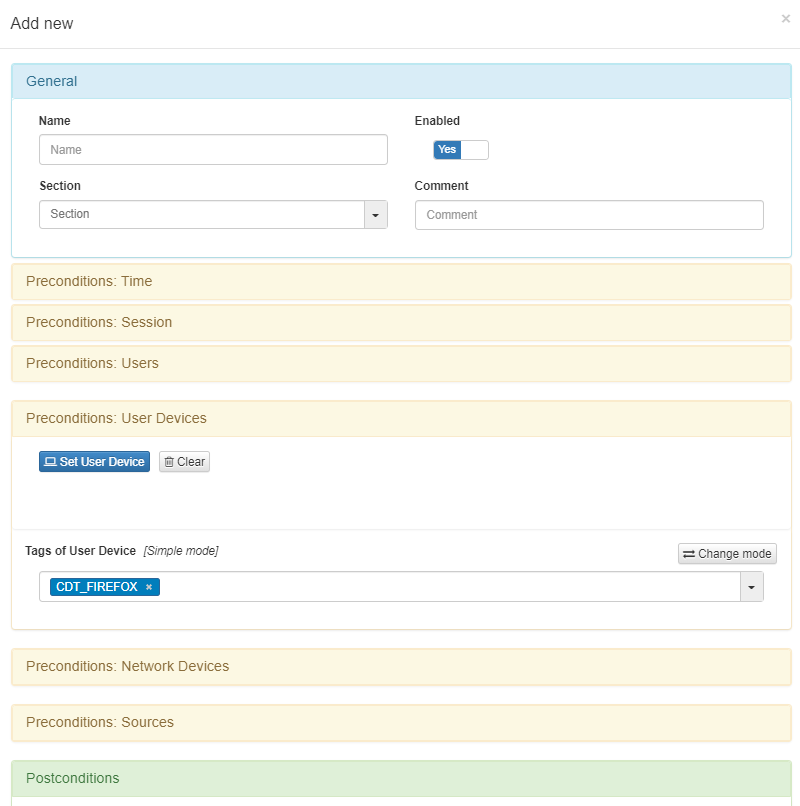
Once the Tag is created and registered in the CMDB, we can apply the Tag to the access policies in ON NAC > Policies at the Preconditions: User devices module:
4.4.1.4.2.2. Tag Policies based on Logical Expressions
To implement this functionality, you can utilize a combination of predefined tags, merging various parameters to create a new tag.
We recommend to use of the Tag EPC_ (EndPoint Compliance) to create compliance groupings. For example:
EPC_WIN_COMPLIANCE: Windows devices are verified to comply with security patches by each version.
EPC_APP_COMPLIANCE: It is verified that the installed applications meet the security requirements.
EPC_SECURITY_COMPLIANCE: It is verified that the security features (AV, Firewall, etc.) comply with security requirements
EPC_FULL_COMPLIANCE: It is verified that all compliance EPCs are met.
EPC_SECURITY_COMPLIANCE_ANY: It is verified Security Compliance with Any Security Solution.
The first step is to decide which predefined Tags and parameters we want to use to create our new Tag. We need to go to ON NAC -> Tag Policies -> UD Tag policies. We click on Add new and we will see the following window.

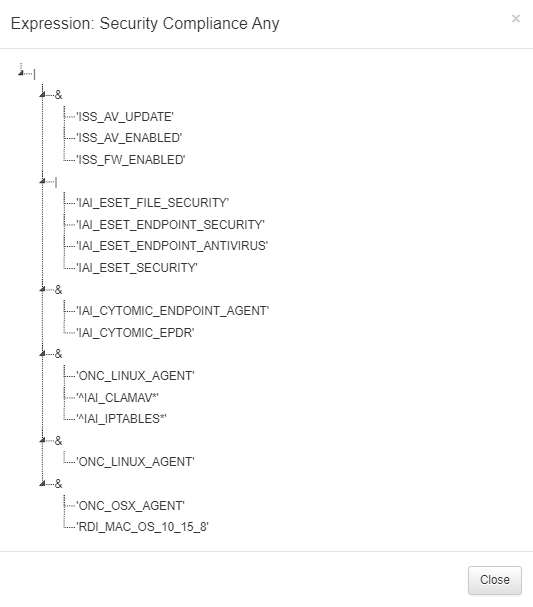
In this example, the Tag “EPC_SECURITY_COMPLIANCE_ANY” is configured.
Name: Name of the Tag.
Tag: Tag format.
Expression: Conditions to be met to create the Tag.
There are several ways to create such expressions.
( ) We use parentheses to group expressions and parameters.
| We use this character to create an OR operation between parameters.
& We use this character to create an AND operation between parameters.
, We use the comma to separate the evaluation parameters.
‘ ‘ We use single quotes to declare parameters.
In the example we create the following expression:
(|,(&,'ISS_AV_UPDATE','ISS_AV_ENABLED','ISS_FW_ENABLED'),(|,'IAI_ESET_FILE_SECURITY','IAI_ESET_ENDPOINT_SECURITY','IAI_ESET_ENDPOINT_ANTIVIRUS','IAI_ESET_SECURITY'),(&,'IAI_CYTOMIC_ENDPOINT_AGENT','IAI_CYTOMIC_EPDR'),(&,'ONC_LINUX_AGENT','^IAI_CLAMAV*','^IAI_IPTABLES*'),(&,'ONC_LINUX_AGENT'),(&,'ONC_OSX_AGENT','RDI_MAC_OS_10_15_8'))
Search tag (assistant): Assistant that allows us to consult other Tags already created.
Comment: Tag description.
Enable: Enables the Tag.
Once we have configured the rule, we will be able to visualize the configuration of the expression in a drop-down format if we click on the eye icon in the Expression column.
As we can see, depending on the version of Windows installed (RDI_*), we must comply with the security patches set for that version (IAI_KB*)
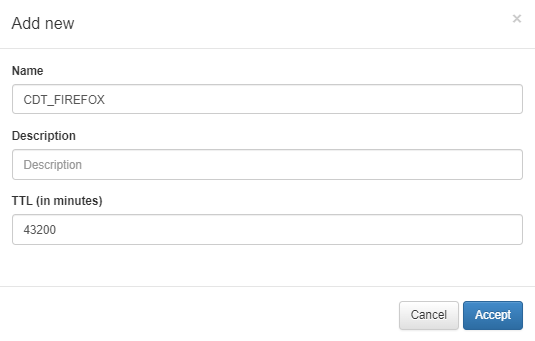
The second step is to define the details of the previously created Tag. To do this we have to go to ON CMDB -> Tags -> Tags of User Devices and click on Add new:
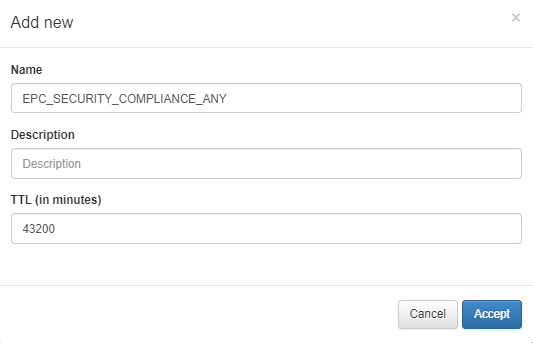
Name: Name of the previously defined Tag.
Description: Description of the Tag.
TTL: Tag To Live. Once the Tag has been assigned to a user device, when the lifetime has elapsed, the Tag will be removed from the device.
Note
If the tag is not manually added to the CMDB, when a device matches a rule when evaluating a session, it is automatically added to the CMDB.
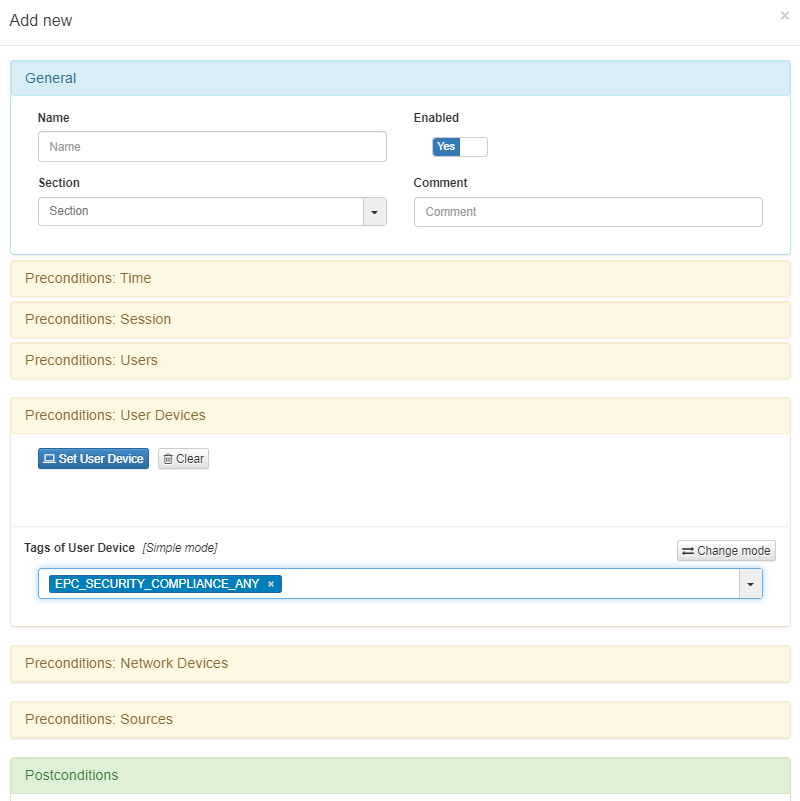
Once the Tag is created and registered in the CMDB, we can apply the Tag to the access policies in ON NAC -> Policies at the Preconditions: User devices module:
4.4.1.4.3. UD Tag application requirements
As explained at the beginning, we can also implement the compliance module using as requirements the versions of apps installed on the user device.
To do this, we need to go to ON NAC -> Tag Policies -> UD Tag application requirements and click on Add new:
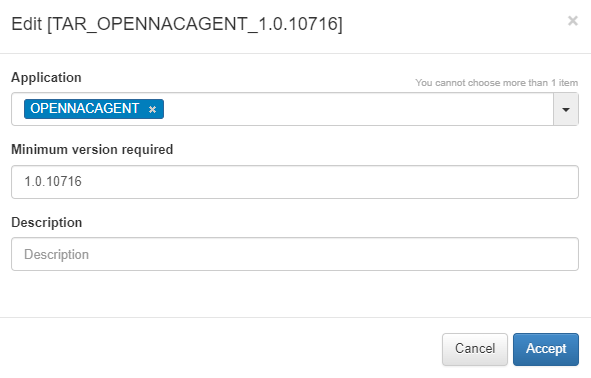
Application: Name of the application that we want to control (The same that is used in the Tags IAI_<Name Application>).
Minimum version required: The minimum version number we want for the application. Checking it is always done with the logical operator > (greater than).
Description: Description of the condition.
Once the condition has been created, we can see how the respective entry is generated, following the format TAR_<Application Name>_<version>.
When the condition is defined, in the next full payload received by the tool, in case the application does not meet the requirements, the user device will be assigned a tag with the following format NCA_APPLICATION_NAME (No Compliance Application).
4.4.1.4.4. Profiling
Column types: Allows to manage (add, edit, or remove) the components used by user device profiling.
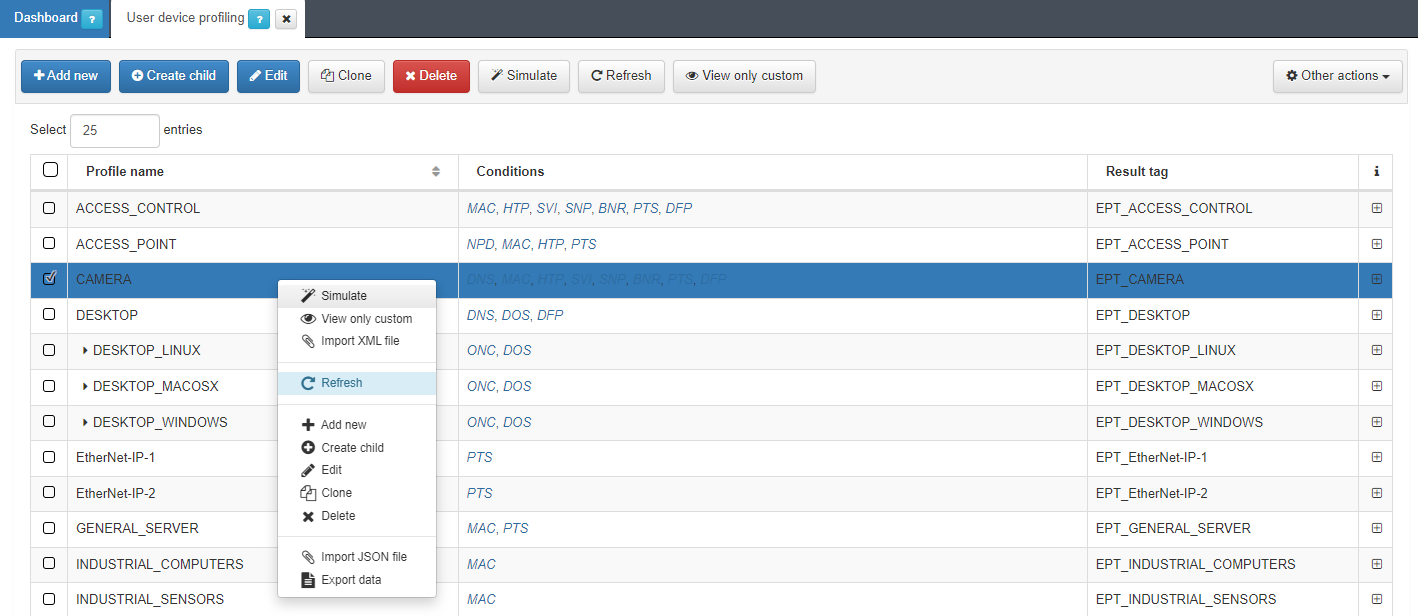
4.4.1.4.5. User device profiling
In this section, the user can create, edit, clone, delete, and simulate tags for endpoints discovered in the network. Also, administrators can import profiles from a JSON file. Based on this evaluation, OpenNAC Enterprise will insert a tag indicating the type of the device with the aspect “EPT_<device type>”
Note
When traversing this section, only continue traversing one of the hierarchies if at least one rule of the main hierarchy has been met. For example, EPT_DESKTOP_WINDOWS will be checked if at least one rule of EPT_DESKTOP is satisfied.
In addition, Parent Profile (PP<hierarchy level>_) and Parent Device Profile (PDP) tags will be added to tag different levels of the hierarchy, for example EPT_DESKTOP_WINDOWS will create PP1_DESTKOP, PP2_DESKTOP_WINDOWS, and PDP_DESKTOP.
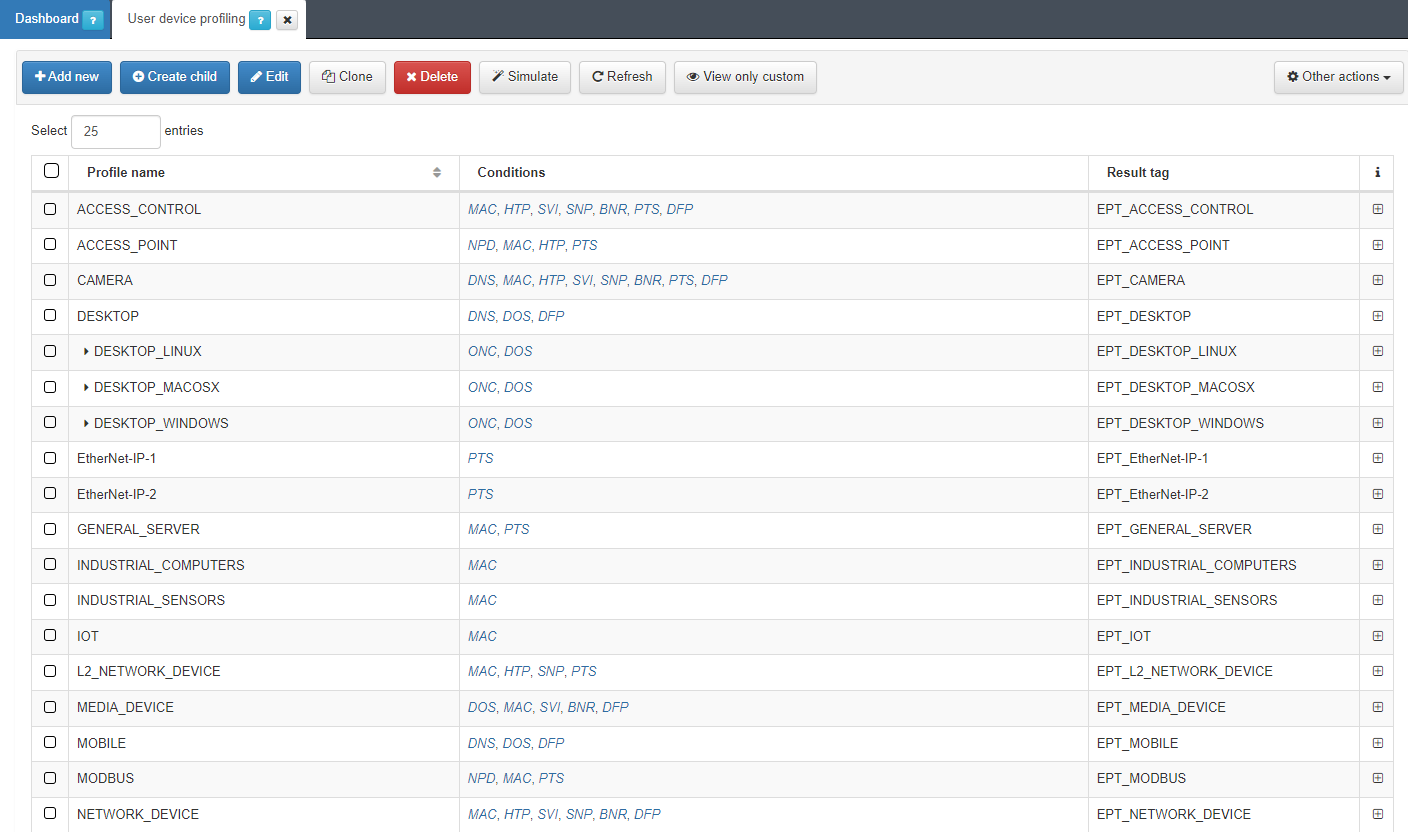
It is recommended to keep intuitive names to identify the profile’s reason. We can expand the information of each profile by clicking on the + icon:
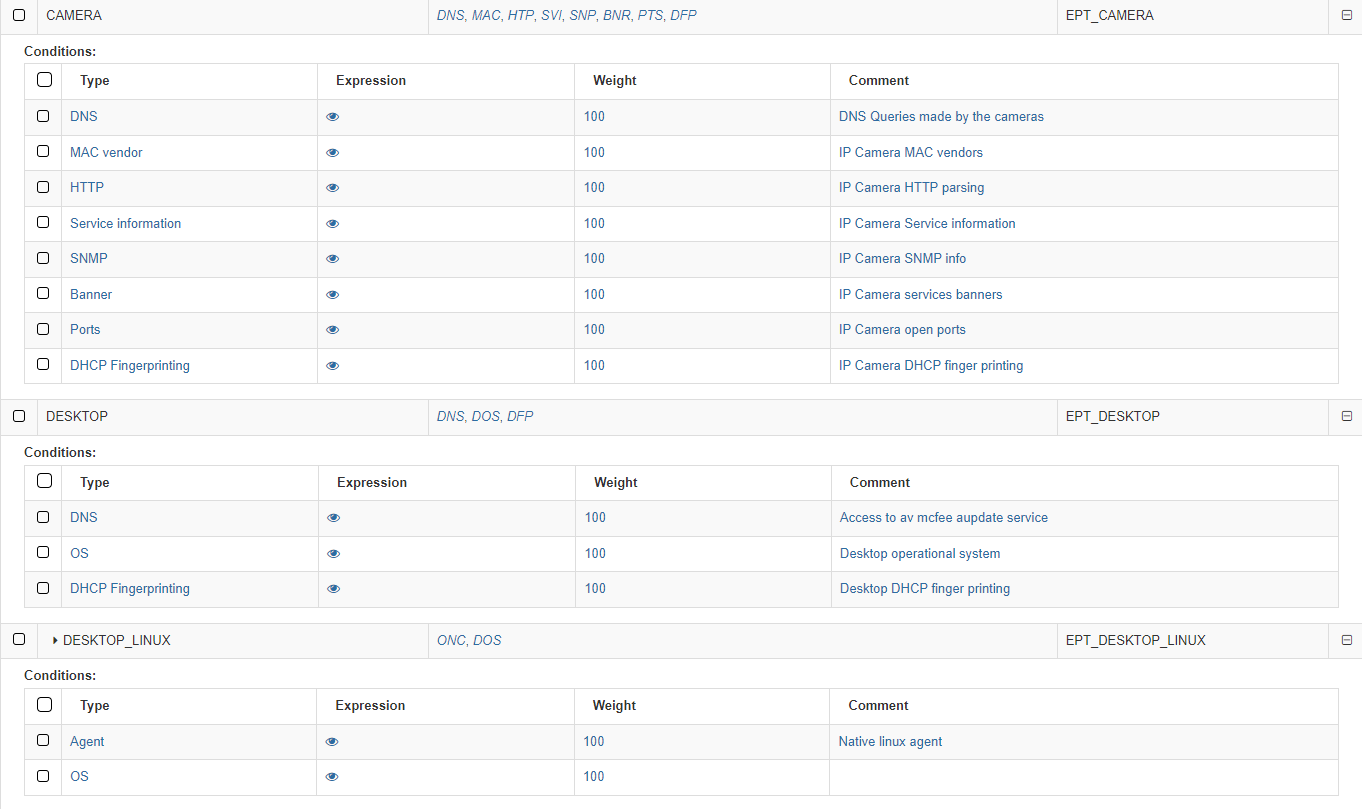
The first column on conditions shows the Type. The following list shows examples of mechanisms and methods used to identify the type of asset discovery and how it is going to be categorized:
Banner: OpenNAC Enterprise uses the banner discovered by the scanner used.
DHCP Fingerprint: OpenNAC Enterprise uses the DHCP Fingerprint capability to identify the asset type. DHCP Fingerprint is a profiling technic that allows you to identify the type of assets based on DHCP messages and its behavior.
HTTP: Information harvested by an HTTP request to the asset discovered -customized streams can be included to identify assets.
MAC Vendor: OpenNAC Enterprise can use the OUID associated with the MAC Vendor in order to discover asset typology. There may be general manufacturers (components) but in some cases, these are specific to the type of device. This system performs a weak identification since it is relatively easy to change or spoof the MAC on a device (MAC Spoofing)
Ports: OpenNAC Enterprise can use the open ports by the asset to identify the asset types.
Service Information: OpenNAC Enterprise uses the service information identified by the OpenNAC Enterprise Scanner (based on nmap), that provides the asset associated with a service.
SNMP: OpenNAC Enterprise can get and use SNMP information from the assets, additional information such as communities and OID can be used and defined.
OS: OpenNAC Enterprise uses the device operating system to get a better profiling.
Network protocol: OpenNAC Enterprise identifies the network protocol used by the device.
DNS: The DNS queries made by the device are used by OpenNAC Enterprise.
Agent: The native agent attributes allows OpenNAC Enterprise to get better profiling.
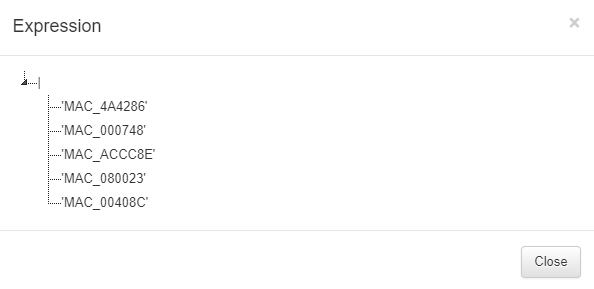
The second column Expression allows us to see the expression used by clicking on the eye icon. by the product to identify the assets types. For example an “or” (|) between some MACs:
The expressions used for creating rules must be written using the following specifications:
parameters: Elements that make up the expressions (Tags).
( ): Parentheses are used to group expressions and parameters.
|: The OR character (logical operational) to indicate that any of the parameters are valid.
&: We use the AND character (logical operational) to indicate that the parameters are sums, meaning they all have to be fulfilled.
!: We use the NOT character (logical operational) to indicate that it should not contain the parameter.
,: The comma is used to indicate and separate the new parameter to analyze.
‘ ‘: Parameters are declared in quotes. For example:
Must contain all parameters = (&,’MAC_B2C7BE’,’EPC_CORPORATE_DEVICE’)
Must contain one of the parameters = (|,’MAC_B2C7BE’,’EPC_CORPORATE_DEVICE’)
Must not contain the following parameter = (!,’MAC_B2C7BE’)
The third column Weight defines a number from 0 to 100 that indicates the weight we want to apply to that condition.
The last one, Comment, shows the comments associated with the mechanism.
For each profile, we can see the tag that will associate with the device that matches the conditions.
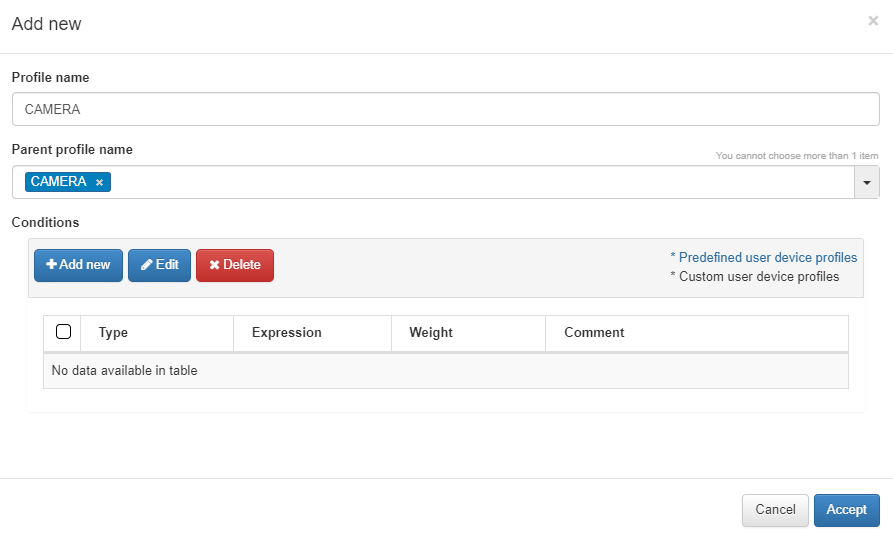
To add a new rule, click on Add new:
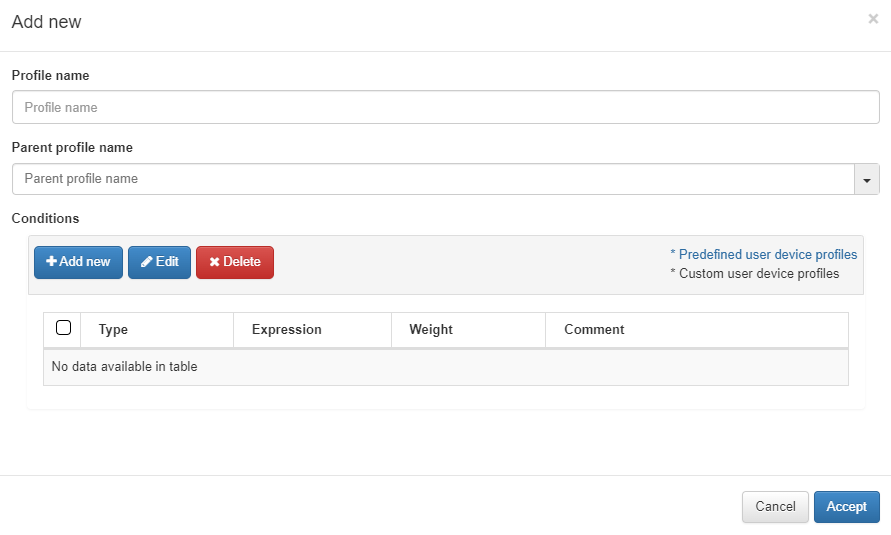
The parameters that should be configured are the following:
Profile name: Name of the profile that corresponds to the tag that will be added to the device if it matches (EPT_<profile name>). When defining the name, it is not necessary to add the EPT prefix since it will be added automatically.
Parent profile name: In the case of a “child” rule (explained below), we select the name of the parent rule that it belongs to.
Conditions: The next step will be to configure the conditions for our rule. Some of them will already be predefined, but if not, we can configure them at our convenience. If we already have one configured, we can select and edit it if not, to create a new one click on Add new and a window like the following one will open.
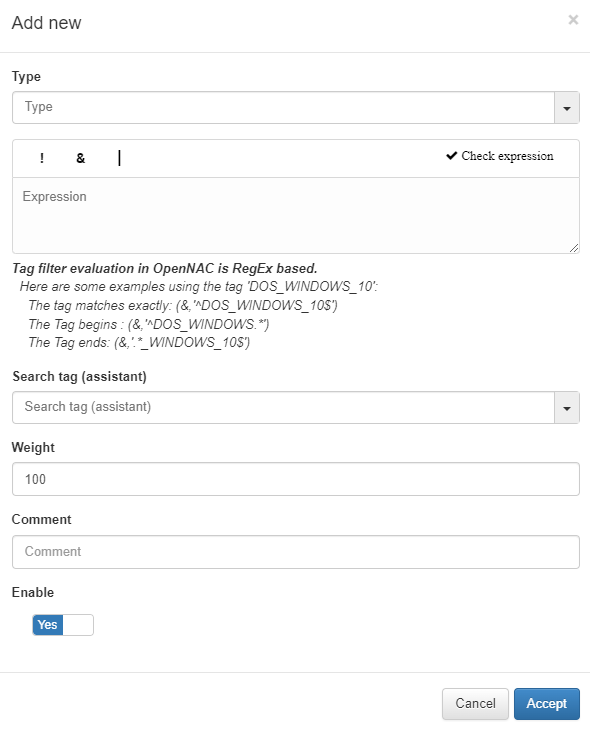
Type: The list with all the options that we have configured in the Column Types section. This field will indicate what type of condition it is and what it verifies.
Expression: Logical expression to be evaluated on each device. When this condition is executed within the rule, for these expressions we will use operators AND(&), OR(|), and NOT(!) and the operands will be those Tags that the devices should or should not have.
Search tag (assistant): We can use the tag search assistant to find those tags that we can use in the expressions. If we click on the found tags, they will be added automatically in the expression field.
Weight: This is the weight that this condition will have. At the time of evaluating them, if they coincide, said weight will be assigned to the overall score of the profiling rule. The greater the weight, the greater the importance of the condition.
Comment: To detail the behavior of this condition.
Enable: Flag to enable this condition.
As previously mentioned, another option is the creation of “Child” rules, which will be a subcategory of the rules that we have already created. They will help us to modify, add, or eliminate some extra parameters to that existing policy so it can accurately profile the discovered device.
Note
It is important to mention that the child rules will inherit all those conditions defined in their previously created parent rule.
To create a Child policy, select a created policy and click on Create child
Child rules will inherit all the rules of their parent rule, but these can overwrite them to make them more specific and identify the child device.
For the conditions, we will click on Add new and configure the same parameters as when configuring a normal rule.
The user device profile allows us to create new expressions with the tag associated, in this example EPT_CAMERA. By adding a new UD tag policy, we can see the new tag with the Search tag (assistant). For more information, read ON NAC -> Tag policies -> UD Tag Policies.
Note
Administrators can perform a user device profiling simulation for any asset in OpenNAC Enterprise CMDB by right-clicking and selecting Simulate option.
4.4.1.4.6. Column Types
Column types define the parameter to evaluate before inserting a tag into the assets.
Each existing entry in Column types will correspond to a condition type entry available in ON NAC > Profiling > User device profiling.
The user can define a tag that evaluates some open ports or the MAC vendor and later based on the result insert a tag into the devices.
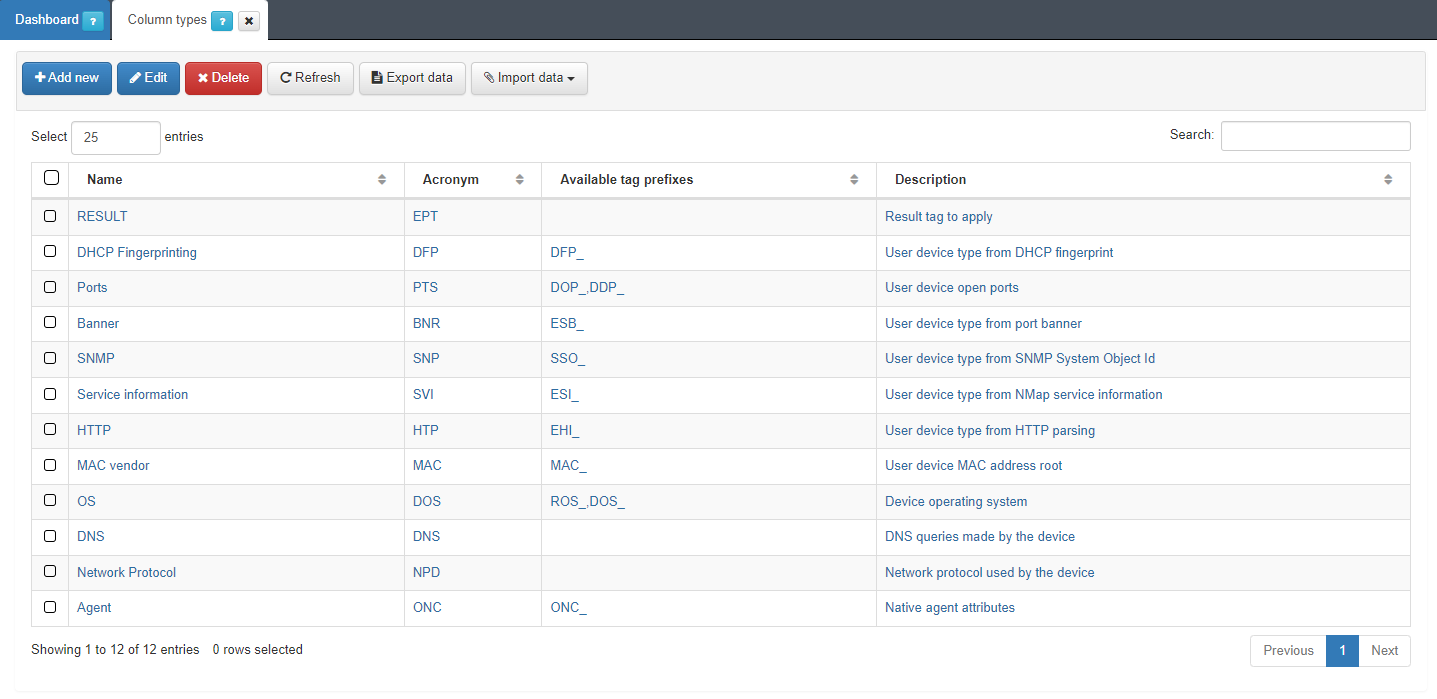
These Column Types do not add any logic to device profiling beyond the classification by condition type in the profiling rules.
To create a new parameter, click on Add new.
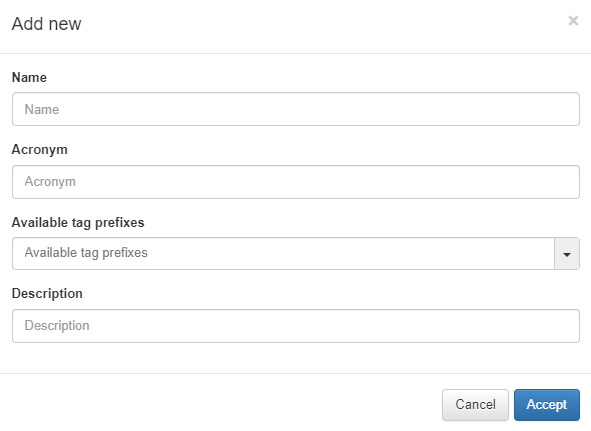
Name: Name of the new column type.
Acronym: Acronym used for this Column Type. It is recommended that it as descriptive as possible and refers to the name to avoid confusion. For example, DHCP fingerprint -> DFP.
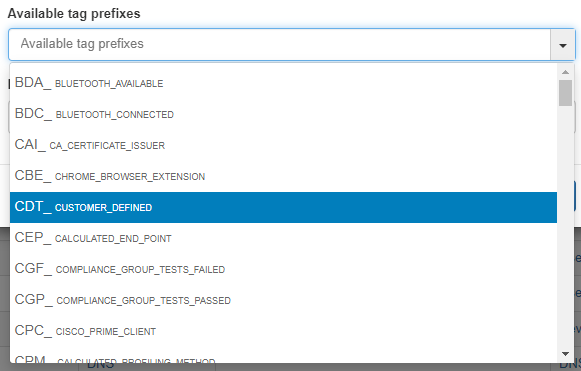
Available tag prefixes: Tags related to the type that is being defined. For example, in an operating system Column type, the Tags related to this could be ROS (Root operating System) and DOS (Device Operating System). This information is purely informative and does not imply any limitation when creating the profiling rules.
Description: description of the column type.