2.2.2.1. OpenNAC OVA Deployment Requirements
This section features de requirements steps for deploying OpenNAC from an OVA:
1. Repository Credentials
2. OVA Download
3. IP Address Assignment
4. Network Connectivity
2.2.2.1.1. Repository Credentials
Ensure you have credentials to access our public repository (https://repo-opennac.opencloudfactory.com/ova/).
2.2.2.1.2. OVA Download
Access our public repository (https://repo-opennac.opencloudfactory.com/ova/) to download the OVAs.
Understand that for configuring your environment, each node type requires its own image, which serves as the template for creating multiple instances of that node type. Before configuring the nodes, ensure that you have deployed the necessary OVAs. The repository images configure the following roles:
opennac_core_<ONCORE_FULL_VERSION>_img.ova → Principal, Worker, and Proxy roles. opennac_analytics_<ONNALYTICS_FULL_VERSION>_img.ova → Analytics, Aggregator, Aggregator+Analytics. opennac_sensor_<ONSENSOR_FULL_VERSION>_img.ova → Sensor role. opennac_captive_<ONCAPTIVE_FULL_VERSION>_img.ova → Captive role. opennac_vpngw_<ONVPNGW_FULL_VERSION>_img.ova → VPNGW role.
Once you have downloaded te OVA, you can check the Virtualization platforms section to deploy it on the desired environment.
2.2.2.1.3. IP Address Assignment
The very first step to begin a deployment is IP assignment.
Note
The name of the interfaces may change depending on the OS version, i.e.: ens18
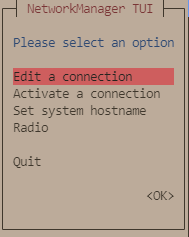
Access your deployed OVAs by CLI and provide IPs for all nodes by executing the graphical network manager:
nmtui
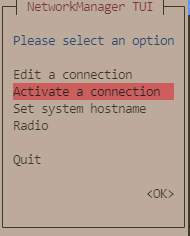
On the initial window, select Edit a connection:
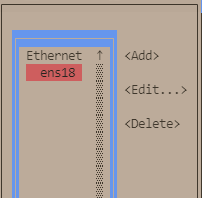
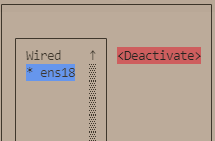
Select the interface and press Edit:
You will see the following default configuration:
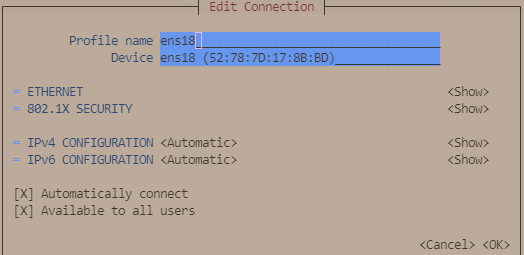
The IPv4 Configuration is set to “Automatic” by default. Change it to “Manual” and manually configure the following parameters:
Addresses: Add node IP address with netmask (<IP>/<MASK>)
Gateway: Add a default gateway
DNS Servers: Add a DNS server. We recommend using the Corporate DNS server.
Set option Require IPv4 addressing for this connection.
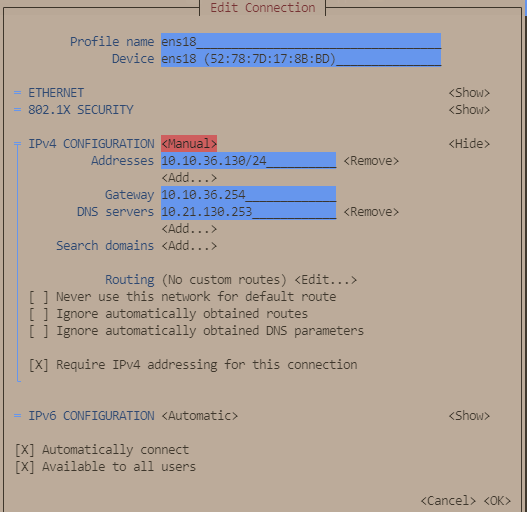
The IPv6 Configuration is set to “Automatic” by default. Change it to “Ignore”:
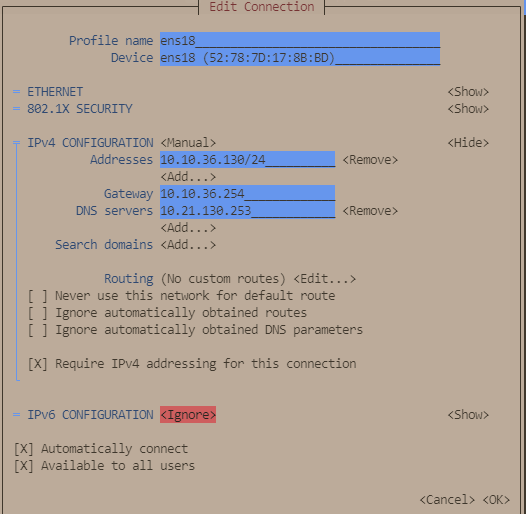
Finalize by selecting <OK> at the bottom of the view and go back to the initial menu.
Afterward, apply the changes by activating and deactivating the interface. Navigate to the Network Manager menu and choose the Activate a connection option.
Deactivate and activate interface and go back to the initial menu.
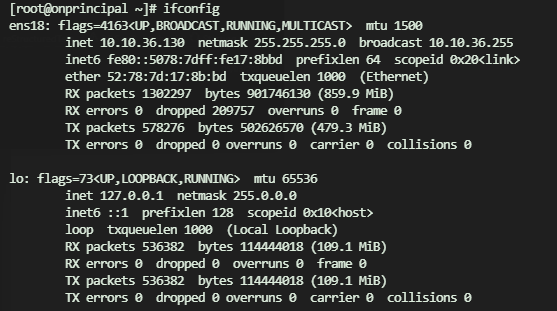
Interface is now configured and can be verified by typing the following command in CLI “ifconfig” o “ip a”:
ifconfig
2.2.2.1.4. Network Connectivity
The following flows must be allowed:
Note
Always add it at the end, i.e., delete the line, add it below:
-A INPUT -j REJECT –reject-with icmp-host-prohibited -A FORWARD -j REJECT –reject-with icmp-host-prohibited
Node |
Open Port |
Access |
|---|---|---|
principal |
22 (tcp) |
all |
67 (udp) |
all |
|
80 (tcp) |
all |
|
161 (udp) |
principal, worker |
|
443 (tcp) |
all |
|
1812 (udp) |
all |
|
1813 (udp) |
all |
|
3306 (tcp) |
worker |
|
6379 (tcp) |
worker, analytics, aggregator, analy+agg, vpngw, captive, proxy, sensor |
|
25826 (udp) |
worker, analytics, aggregator, analy+agg, vpngw, captive, proxy, sensor |
|
worker |
22 (tcp) |
all |
67 (udp) |
all |
|
80 (tcp) |
all |
|
161 (udp) |
principal, worker |
|
443 (tcp) |
all |
|
1812 (udp) |
all |
|
1813 (udp) |
all |
|
proxy |
22 (tcp) |
all |
161 (udp) |
principal, worker |
|
1812 (udp) |
all |
|
1813 (udp) |
all |
|
captive |
22 (tcp) |
all |
80 (tcp) |
all |
|
161 (udp) |
principal, worker |
|
443 (tcp) |
all |
|
analy+agg |
22 (tcp) |
all |
161 (udp) |
principal, worker |
|
5000 (tcp) |
principal, worker, vpngw |
|
5001 (tcp) |
sensor |
|
5601 (tcp) |
principal, worker |
|
9200 (tcp) |
principal, worker, analytics |
|
9300 (tcp) |
analytics |
|
analytics |
22 (tcp) |
all |
161 (udp) |
principal, worker |
|
5601 (tcp) |
principal, worker |
|
9200 (tcp) |
principal, worker, aggregator |
|
9300 (tcp) |
analytics |
|
aggregator |
22 (tcp) |
all |
161 (udp) |
principal, worker |
|
5000 (tcp) |
principal, worker, vpngw |
|
5001 (tcp) |
sensor |
|
sensor |
22 (tcp) |
all |
67 (udp) |
all |
|
161 (udp) |
principal, worker |
|
vpngw |
depends on what we set up in the shorewall |
2.2.2.1.5. Repository Credentials
Note
It is necessary to access the repo-opennac.
Check you have access to the repository by trying to download the following file:
[root@onprincipal ~]# wget --user "repo_user" --ask-password  https://repo-opennac.opencloudfactory.com/1.2.5/opennac-v1.2.5.repo
Password for user ‘repo_user’:
--2024-03-05 13:56:26--  https://repo-opennac.opencloudfactory.com/1.2.5/opennac-v1.2.5.repo
Resolving repo-opennac.opencloudfactory.com (repo-opennac.opencloudfactory.com)... 10.21.160.10
Connecting to repo-opennac.opencloudfactory.com (repo-opennac.opencloudfactory.com)|10.21.160.10|:443... connected.
HTTP request sent, awaiting response... 200 OK
Length: 388 [application/x-troff-man]
Saving to: ‘opennac-v1.2.5.repo’

opennac-v1.2.5.repo                                         100%[===========================================================================================================================================>]     388  --.-KB/s    in 0s

2024-03-05 13:56:26 (9.39 MB/s) - ‘opennac-v1.2.5.repo’ saved [388/388]
Once you verify you can access the repository, you can delete this file:
[root@onprincipal ~]# rm opennac-v1.2.5.repo
rm: remove regular file 'opennac-v1.2.5.repo'? y