2.8. OpenNAC Hardening
Enhancing security measures is essential in today’s digital landscape, and we are committed to fortifying our systems to safeguard your workflows.
To enhance browsing session security, we have strengthened HTTPD session cookies by enforcing the SameSite attribute in Apache. This adjustment ensures that session cookies are set with the SameSite attribute configured to “Strict”, significantly reducing the risk of Cross-site request attacks. This security measure applies to the oncore, oncaptive, onvpngw, and onanalytics nodes.
Additionally, our updates incorporate a hardening process. Hardening involves securing a system by reducing its surface of vulnerability. Starting from version 1.2.5, OpenNAC Enterprise automatically includes this security step during update processes by running a hardening playbook on all nodes in your environment.
2.8.1. Hardening playbook
The hardening playbook applies 82 hardening rules, which are described at the end of this section. However, there are also 3 additional strict remediation rules related to passwords that can be manually applied if desired.
This section outlines the manual process for applying hardening to the OpenNAC Enterprise nodes and also provides an explanation for each security rule, including its reasoning.
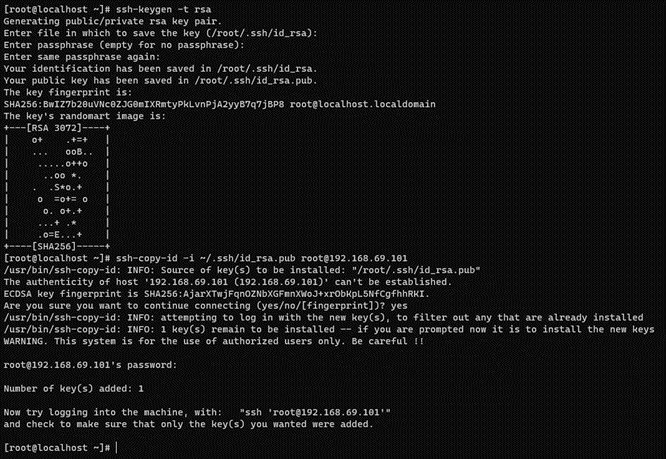
2.8.1.1. Creating and copying the SSH key pair
Note
Perform the following steps on the ON Core Principal node.
If you do not have an SSH key, execute the following command on the console:
ssh-keygen -t rsa -C ansibleKey
Answer all questions with an “Enter” to use default values. If the SSH key pair already exists and you want to overwrite it, you will be asked if you want to overwrite it, and you should answer the question with “y”.
Now copy the generated public key to the nodes:
ssh-copy-id -i ~/.ssh/id_rsa.pub root@<nodes_IP>
Where <nodes_IP> are the IPs of all the available nodes, ON Principal itself, ON Worker, ON Proxy, ON VPNGW, ON Captive, ON Analytics, ON Aggregator, ON Anly+Agg and/or ON Sensor.
Note
When copying the keys, it’s crucial to do so for all nodes, including the ON Core Principal itself from where the operation is executed.
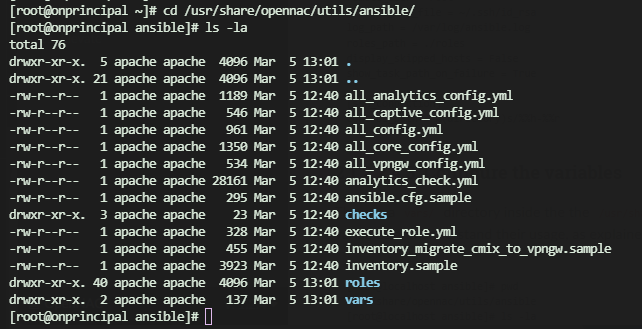
2.8.1.2. Provisioning Ansible
You can find the Ansible configuration playbooks in the directory located at the following path on the ON Core Principal node:
cd /usr/share/opennac/ansible
ls -la
2.8.1.3. Build the inventory file
Use the servers’ IPs to populate the inventory. Have your list of node IPs prepared for ease of configuration.
First, copy the inventory.sample to the inventory and then edit the file (using a tool like Vim, for instance) to add the IPs as shown below. Always check the .sample file first for any potential updates.
cd /usr/share/opennac/ansible
cp inventory.sample inventory
vim inventory
You will see the following file:
; This is the file where you must declare your server names and IP addresses

; The general syntax followed is:
; [group]
; <hostname> ansible_ssh_host=<SSH_IP> private_ip_address=<PRIVATE_IP> role_opennac=<role>
; The extra parameter zone_id only goes in analytics servers when configuring an ELK HA architecture

; The hostname chosen will be changed on the server
; In some cases, public and private IP may be the same
; The role_opennac can be one of these: [ aggregator | analytics | analy+agg | sensor | principal | proxy | worker | vpngw ]


[principal]

;onprincipal ansible_ssh_host=192.168.69.101 private_ip_address=10.10.39.101 role_opennac=principal

[worker]

;for a single worker
;onworker ansible_ssh_host=10.10.36.120 private_ip_address=192.168.69.120 role_opennac=worker

;for more than one worker
;onworker01 ansible_ssh_host=10.10.36.121 private_ip_address=192.168.69.121 role_opennac=worker
;onworker02 ansible_ssh_host=10.10.36.122 private_ip_address=192.168.69.122 role_opennac=worker
;onworker03 ansible_ssh_host=10.10.36.123 private_ip_address=192.168.69.123 role_opennac=worker

[proxy]

;for a single proxy
;onproxy ansible_ssh_host=10.10.36.133 private_ip_address=192.168.69.133 role_opennac=proxy

;for more than one proxy
;onproxy01 ansible_ssh_host=10.10.36.134 private_ip_address=192.168.69.134 role_opennac=proxy
;onproxy02 ansible_ssh_host=10.10.36.135 private_ip_address=192.168.69.135 role_opennac=proxy

[captive]

;for a single captive
;oncaptive ansible_ssh_host=10.10.36.140 private_ip_address=192.168.69.140 role_opennac=captive

;for more than one captive
;oncaptive01 ansible_ssh_host=10.10.36.141 private_ip_address=192.168.69.141 role_opennac=captive
;oncaptive02 ansible_ssh_host=10.10.36.142 private_ip_address=192.168.69.142 role_opennac=captive
;oncaptive03 ansible_ssh_host=10.10.36.143 private_ip_address=192.168.69.143 role_opennac=captive

[analytics]

;for a single analy+agg
;onanalytics ansible_ssh_host=192.168.69.151 private_ip_address=10.10.39.151 role_opennac=analy+agg

;for a single analytics
;onanalytics ansible_ssh_host=192.168.69.156 private_ip_address=10.10.39.156 role_opennac=analytics

;for an analytics cluster
;onanalytics01 ansible_ssh_host=10.10.36.152 private_ip_address=192.168.69.152 role_opennac=analytics zone_id=1
;onanalytics02 ansible_ssh_host=10.10.36.153 private_ip_address=192.168.69.153 role_opennac=analytics zone_id=1
;onanalytics03 ansible_ssh_host=10.10.36.154 private_ip_address=192.168.69.154 role_opennac=analytics zone_id=1

[aggregator]

;for a single aggregator
;onaggregator ansible_ssh_host=10.10.36.160 private_ip_address=192.168.69.160 role_opennac=aggregator

;for an aggregator cluster
;onaggregator01 ansible_ssh_host=10.10.36.161 private_ip_address=192.168.69.161 role_opennac=aggregator
;onaggregator02 ansible_ssh_host=10.10.36.162 private_ip_address=192.168.69.162 role_opennac=aggregator
;onaggregator03 ansible_ssh_host=10.10.36.163 private_ip_address=192.168.69.163 role_opennac=aggregator

[sensor]

;for a single sensor
;onsensor ansible_ssh_host=192.168.69.171 private_ip_address=10.10.39.171 role_opennac=sensor

;for more than one sensor
;onsensor01 ansible_ssh_host=192.168.69.172 private_ip_address=10.10.39.172 role_opennac=sensor
;onsensor02 ansible_ssh_host=192.168.69.173 private_ip_address=10.10.39.173 role_opennac=sensor

[vpngw]

;for a single vpngw
;onvpngw ansible_ssh_host=10.10.36.181 private_ip_address=192.168.69.181 role_opennac=vpngw root_ssh_password=password farm_name=farm01

;for more than one vpngw
;onvpngw01 ansible_ssh_host=10.10.36.182 private_ip_address=192.168.69.182 role_opennac=vpngw root_ssh_password=password farm_name=farm01
;onvpngw02 ansible_ssh_host=10.10.36.183 private_ip_address=192.168.69.183 role_opennac=vpngw root_ssh_password=password farm_name=farm01

[cores:children]
principal
worker
proxy

; Please note that the group "principal" must always be uncommented
Understand the structure of the inventory:
<hostname> ansible_ssh_host=<PUBLIC_IP> private_ip_address=<PRIVATE_IP> role_opennac=<role>
<hostname> ansible_ssh_host=<PUBLIC_IP> private_ip_address=<PRIVATE_IP> role_opennac=analytics zone_id=<zone_id>
<hostname> ansible_ssh_host=<PUBLIC_IP> private_ip_address=<PRIVATE_IP> role_opennac=vpngw farm_name=<farm_name> root_ssh_password=<root_ssh_password>
Where:
<hostname>: The name of the server, if it does not fit, the playbook will change it for the one you write on the inventory.
<PUBLIC_IP>: The accessible IP needed to make the SSH connection.
<PRIVATE_IP>: The internal IP needed in the servers to fill the /etc/hosts file or to communicate with each other. Sometimes you may not have this IP; in that case, fill it with the <PUBLIC_IP> as well.
<role>: The OpenNAC role needed to know, for example, what healthcheck configures. It can be one of these: [ aggregator | analytics | analy+agg | sensor | principal | proxy | worker | vpngw | captive].
<zone_id>: This special parameter only needs to be written in analytics servers when configuring an ELK HA architecture.
<farm_name> and <root_ssh_password>: These special parameters only need to be written for the vpngw role.
Note
You can add or comment servers according to your needs. Do NOT comment or delete the groups.
Do not add any extra space between strings.
After editing the inventory, remember to save before exiting the file.
The following command will help you see the hosts you have configured in your inventory. Ensure that all the nodes are set correctly.
grep -v ';\|^$' inventory
The output would look like the following one. It displays only the nodes you have in your inventory. In our example, 1 principal, 2 worker, 1 proxy, and 1 analy+agg:
As we have two workers, they should be positioned in the “for more than one worker” group, occupying the positions onworker01 and onworker02.
As the remaining nodes are single nodes, they go in the first position dedicated to single nodes.
As we have a single Analytics node and no Aggregator, this node by default is an analy+agg.
[root@rocky9base opennacansible8-1.2.5]# grep -v ';\|^$' inventory
[principal]
onprincipal ansible_ssh_host=10.21.65.219 private_ip_address=10.21.65.219 role_opennac=principal
[worker]
onworker01 ansible_ssh_host=10.21.65.235 private_ip_address=10.21.65.235 role_opennac=worker
onworker02 ansible_ssh_host=10.10.36.122 private_ip_address=192.168.69.122 role_opennac=worker
[proxy]
onproxy ansible_ssh_host=10.21.65.202 private_ip_address=10.21.65.202 role_opennac=proxy
[captive]
[analytic]
onanalytics ansible_ssh_host=10.21.65.228 private_ip_address=10.21.65.228 role_opennac=analy+agg
[aggregator]
[sensor]
[vpngw]
[cores:children]
principal
worker
proxy
2.8.1.3.1. Build the Ansible configuration file
Similar to the inventory setup:
Copy the
ansible.cfg.samplefile toansible.cfgand then edit it to include the path to your private_key_file (the ssh key that you previously have copied to the server).Indicate the path to your inventory file.
There are more variables in this file you may want to change, but these are the recommended and basic ones. Always check the .sample file first for any potential updates.
cd /usr/share/opennac/ansible
cp ansible.cfg.sample ansible.cfg
If you have modified the inventory path or the SSH Key is not the default one, edit the file by executing the following command. Otherwise, leave the default values.
vim ansible.cfg
ansible.cfg.sample file:
[defaults]
timeout = 30
inventory = inventory
host_key_checking = False
remote_user = root
private_key_file = ~/.ssh/id_rsa
log_path = /var/log/ansible.log
roles_path = ./roles
display_skipped_hosts = False
show_task_path_on_failure = True

[ssh_connection]
control_path = %(directory)s/%%h-%%r
2.8.1.4. Launch the playbooks
Make sure to launch Ansible within a screen. This is to ensure continuity in case the connection to the Principal is lost.
To launch the playbooks, on the ON Core Principal server, go to the following path:
cd /usr/share/opennac/ansible
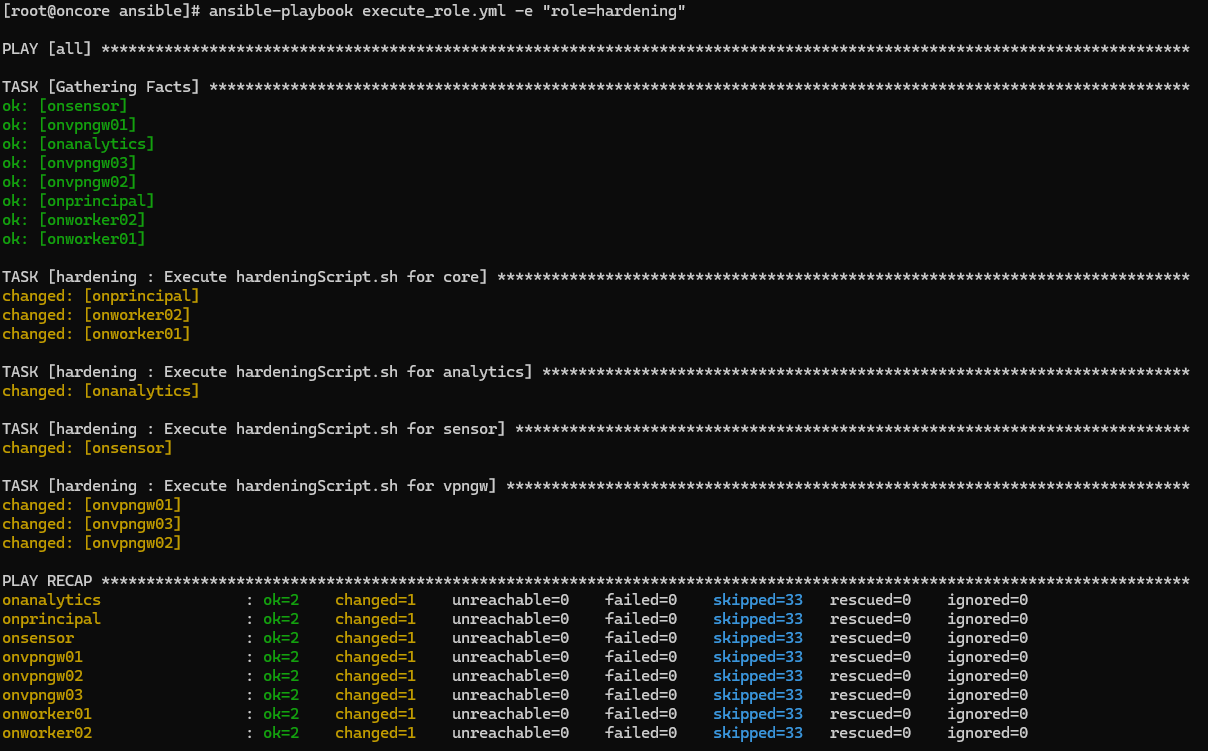
By running the following command, it will apply the hardening to all the nodes you have previously stated in your inventory:
ansible-playbook execute_role.yml -e "role=hardening"
As mentioned at the beginning of this section, the three strict remediation rules available will not be applied by default. If you intend to execute them, you need to run the hardening script with the strict variable:
ansible-playbook execute_role.yml -e "role=hardening strict_hardening=true"
The execution output should be similar to the following:
2.8.1.5. Hardening rules applied
This section outlines all the hardening rules implemented by executing the hardening script.
1. Require Re-Authentication When Using the sudo Command
The hardening implemented re-authentication with a default timestamp_timeout value set to 5 minutes. Re-authentication is necessary to ensure users access only authorized resources or perform allowed tasks.
2. Enable authselect
The hardening configured user authentication setup to use the authselect tool. Authselect simplifies system authentication configuration by offering pre-defined profiles. This minimizes manual configuration errors and ensures compatibility with various use-cases.
3. Modify the System Login Banner
The hardening configured the system login banner, modifying the content in /etc/issue. It replaced the default text with a message that aligns with the local site policy. Displaying a standardized and approved usage notification before providing access to the operating system ensures compliance with legal standards and regulations.
4. Modify the System Login Banner for Remote Connections
The hardening configured the system login banner, modifying the content in /etc/issue.net. Displaying a standardized and approved usage notification before providing access to the operating system ensures compliance with legal standards and regulations.
5. Modify the System Message of the Day Banner
The hardening configured the system message banner, modifying the content in /etc/motd. Displaying a standardized and approved usage notification before providing access to the operating system ensures compliance with legal standards and regulations.
6. Lock Accounts After Failed Password Attempts
The hardening configured the system to lock out accounts after a number of incorrect login attempts. By restricting the number of unsuccessful login attempts, the risk of unauthorized system access through password guessing is reduced.
7. Set Lockout Time for Failed Password Attempts
The hardening configured the system to lock out accounts during a specified time period after a number of incorrect login attempts. By restricting the number of unsuccessful login attempts, the risk of unauthorized system access through password guessing is reduced.
8. Ensure PAM Enforces Password Requirements - Minimum Different Categories
The hardening configured the enforcement of password requirements in four different classes: upper-case characters, lower-case characters, digits, and special characters. Utilizing a complex password enhances the effort and resources needed to compromise it.
9. Ensure PAM Enforces Password Requirements - Minimum Length
The hardening configured the enforcement of minimum characters required in a password (14 characters). The shorter the password, the easier it is to compromise.
10. Set Password Maximum Age
The hardening configured the password maximum age for new accounts (45 days). Any password can eventually be cracked. Therefore, passwords need to be changed periodically.
11. Set Password Minimum Age
The hardening configured the password minimum age for new accounts (2 days). Implementing a minimum password lifetime prevents frequent password changes to defeat the password reuse or history enforcement requirement.
12. Set Password Warning Age
The hardening configured the number of days (10 days) before password expiration when users will receive a warning. Establishing the password warning age allows users to schedule password changes conveniently.
13. Enforce usage of pam_wheel for su authentication
The hardening configured the enforcement of the usage of pam_wheel for su authentication, so only users who are members of the wheel group can run commands with altered privileges through the su command. Limiting access to su command is considered a good security practice.
14. Set Interactive Session Timeout
The hardening configured a timeout (300 seconds) to ensure that all user sessions will terminate based on inactivity. Ending an inactive session minimizes the chance for unauthorized individuals to exploit unattended management sessions on the console or console port.
15. Ensure the Default Bash Umask is Set Correctly
The hardening ensured the correct configuration of the default umask for users of the Bash. Incorrectly configured umask settings may lead to files having overly permissive permissions, allowing unauthorized users to read or modify them.
16. Ensure the Default Umask is Set Correctly in login.defs
The hardening ensured the correct configuration of the default umask in the login.defs. Incorrectly configured umask settings may lead to files having overly permissive permissions, allowing unauthorized users to read or modify them.
17. Ensure the Default Umask is Set Correctly in /etc/profile
The hardening ensured the correct configuration of the default umask within the /etc/profile.d directory. Incorrectly configured umask settings may lead to files having overly permissive permissions, allowing unauthorized users to read or modify them.
18. Ensure auditd Collects Information on Exporting to Media (successful)
The hardening ensured that the audit system collects media exportation events for all users and root. Unauthorized data exportation to external media may lead to an information leak, exposing classified information.
19. Record Attempts to Alter Process and Session Initiation Information
The hardening configured the system to monitor any attempts to manually modify files related to storing process information. Modifying these files manually could suggest suspicious behavior, like an attacker trying to erase evidence of an intrusion.
20. Ensure auditd Collects System Administrator Actions
The hardening configured the audit system to collect administrator actions for all users and root. System administrators’ activities need to be audited to maintain a record of system operations and ensure accountability.
21. Record Events that Modify User/Group Information - /etc/group
The hardening configured the system to to capture events that modify account changes on the /etc/group file. These monitors will notify system administrator(s) of any changes. Any unexpected alterations involving users, groups, or other modifications should be examined for legitimacy.
22. Record Events that Modify User/Group Information - /etc/gshadow
The hardening configured the system to to capture events that modify account changes on the /etc/gshadow file. These monitors will notify system administrator(s) of any changes. Any unexpected alterations involving users, groups, or other modifications should be examined for legitimacy.
23. Record Events that Modify User/Group Information - /etc/security/opasswd
The hardening configured the system to to capture events that modify account changes on the /etc/security/opasswd file. These monitors will notify system administrator(s) of any changes. Any unexpected alterations involving users, groups, or other modifications should be examined for legitimacy.
24. Record Events that Modify User/Group Information - /etc/passwd
The hardening configured the system to to capture events that modify account changes on the /etc/passwd file. These monitors will notify system administrator(s) of any changes. Any unexpected alterations involving users, groups, or other modifications should be examined for legitimacy.
25. Record Events that Modify User/Group Information - /etc/shadow
The hardening configured the system to to capture events that modify account changes on the /etc/shadow file. These monitors will notify system administrator(s) of any changes. Any unexpected alterations involving users, groups, or other modifications should be examined for legitimacy.
26. Record Attempts to perform maintenance activities
The hardening configured the system to verify the operating system audits activities performed during non-local maintenance and diagnostic sessions. If activities involving non-local administrative access or diagnostic sessions aren not recorded, it would be difficult to assess and investigate potential attacks.
27. Record Events that Modify the System’s Discretionary Access Controls - chmod
The hardening configured the system to collect file permission changes for all users and root, monitoring the chmod system call, which is used to change file permissions. When file permissions are altered, it might mean a user is trying to access information they should not have access to.
28. Record Events that Modify the System’s Discretionary Access Controls - chown
The hardening configured the system to collect file permission changes for all users and root, monitoring the chown system call, which is used to change file ownership.When file permissions are altered, it might mean a user is trying to access information they should not have access to.
29. Record Events that Modify the System’s Discretionary Access Controls - fchmod
The hardening configured the system to collect file permission changes for all users and root, monitoring the fchmod system call, which is used to change file permissions. When file permissions are altered, it might mean a user is trying to access information they should not have access to.
30. Record Events that Modify the System’s Discretionary Access Controls - fchmodat
The hardening configured the system to collect file permission changes for all users and root, monitoring the fchmodat system call, which is used to change file permissions. When file permissions are altered, it might mean a user is trying to access information they should not have access to.
31. Record Events that Modify the System’s Discretionary Access Controls - fchown
The hardening configured the system to collect file permission changes for all users and root, monitoring the fchown system call, which is used to change file permissions. When file permissions are altered, it might mean a user is trying to access information they should not have access to.
32. Record Events that Modify the System’s Discretionary Access Controls - fchownat
The hardening configured the system to collect file permission changes for all users and root, monitoring the fchownat system call, which is used to change file permissions. When file permissions are altered, it might mean a user is trying to access information they should not have access to.
33. Record Events that Modify the System’s Discretionary Access Controls - fremovexattr
The hardening configured the system to collect file permission changes for all users and root, monitoring the fremovexattr system call, which is used to change file permissions. When file permissions are altered, it might mean a user is trying to access information they should not have access to.
34. Record Events that Modify the System’s Discretionary Access Controls - fsetxattr
The hardening configured the system to collect file permission changes for all users and root, monitoring the fsetxattr system call, which is used to change file permissions. When file permissions are altered, it might mean a user is trying to access information they should not have access to.
35. Record Events that Modify the System’s Discretionary Access Controls - lchown
The hardening configured the system to collect file permission changes for all users and root, monitoring the lchown system call, which is used to change file permissions. When file permissions are altered, it might mean a user is trying to access information they should not have access to.
36. Record Events that Modify the System’s Discretionary Access Controls - lremovexattr
The hardening configured the system to collect file permission changes for all users and root, monitoring the lremovexattr system call, which is used to change file permissions. When file permissions are altered, it might mean a user is trying to access information they should not have access to.
37. Record Events that Modify the System’s Discretionary Access Controls - lsetxattr
The hardening configured the system to collect file permission changes for all users and root, monitoring the lsetxattr system call, which is used to change file permissions. When file permissions are altered, it might mean a user is trying to access information they should not have access to.
38. Record Events that Modify the System’s Discretionary Access Controls - removexattr
The hardening configured the system to collect file permission changes for all users and root, monitoring the removexattr system call, which is used to change file permissions. When file permissions are altered, it might mean a user is trying to access information they should not have access to.
39. Record Events that Modify the System’s Discretionary Access Controls - setxattr
The hardening configured the system to collect file permission changes for all users and root, monitoring the setxattr system call, which is used to change file permissions. When file permissions are altered, it might mean a user is trying to access information they should not have access to.
40. Record Unsuccessful Access Attempts to Files - creat
The hardening configured the system to to monitor unsuccessful access attempts to create (creat) files. Failed attempts to access files might suggest malicious behavior on a system.
41. Record Unsuccessful Access Attempts to Files - ftruncate
The hardening configured the system to to monitor unsuccessful access attempts to truncate (ftruncate) files. Failed attempts to access files might suggest malicious behavior on a system.
42. Record Unsuccessful Access Attempts to Files - open
The hardening configured the system to to monitor unsuccessful access attempts to open files. Failed attempts to access files might suggest malicious behavior on a system.
43. Record Unsuccessful Access Attempts to Files - openat
The hardening configured the system to to monitor unsuccessful access attempts to open (openat) files. Failed attempts to access files might suggest malicious behavior on a system.
44. Record Unsuccessful Access Attempts to Files - truncate
The hardening configured the system to to monitor unsuccessful access attempts to truncate files. Failed attempts to access files might suggest malicious behavior on a system.
45. Record Attempts to Alter Logon and Logout Events - faillock
The hardening configured the system to monitor the faillock file to watch for unattempted manual edits of files involved in storing logon events. Changing these files manually might suggest suspicious behavior, like someone trying to erase proof of unauthorized access.
46. Record Attempts to Alter Logon and Logout Events - lastlog
The hardening configured the system to monitor the lastlog file to watch for unattempted manual edits of files involved in storing logon events. Changing these files manually might suggest suspicious behavior, like someone trying to erase proof of unauthorized access.
47. Configure auditd max_log_file_action Upon Reaching Maximum Log Size
The hardening configured the system to rotate the log files, discarding the oldest one when log files reach their maximum size. Rotating logs automatically reduces the risk of the system unexpectedly running out of disk space.
48. Configure Accepting Router Advertisements on All IPv6 Interfaces
The hardening configured the system to disable IPv6 router advertisements acceptance on all network interfaces. A malicious router advertisement message could lead to a man-in-the-middle attack.
49. Disable Accepting ICMP Redirects for All IPv6 Interfaces
The hardening configured the system to disable acceptance of IPv6 redirect messages on all network interfaces. A malicious ICMP redirect message could lead to a man-in-the-middle attack.
50. Disable Kernel Parameter for Accepting Source-Routed Packets on all IPv6 Interfaces
The hardening configured the system to disable acceptance of IPv6 source routing on all network interfaces. Source-routed packets enable the sender of the packet to specify the route it should take through routers, potentially bypassing network security measures.
51. Disable Accepting Router Advertisements on all IPv6 Interfaces by Default
The hardening configured the system to disable acceptance of IPv6 router advertisements on the default network interface. A malicious ICMP redirect message could lead to a man-in-the-middle attack.
52. Disable Kernel Parameter for Accepting ICMP Redirects by Default on IPv6 Interfaces
The hardening configured the system to disable acceptance of IPv6 redirect messages on the default network interface. A malicious ICMP redirect message could lead to a man-in-the-middle attack.
53. Disable Kernel Parameter for Accepting Source-Routed Packets on IPv6 Interfaces by Default
The hardening configured the system to disable acceptance of IPv6 source routing on the default network interface. Source-routed packets enable the sender of the packet to specify the route it should take through routers, potentially bypassing network security measures.
54. Disable Accepting ICMP Redirects for All IPv4 Interfaces
The hardening configured the system to disable acceptance of IPv4 redirect messages on all network interfaces. A malicious ICMP redirect message could lead to a man-in-the-middle attack.
55. Disable Kernel Parameter for Accepting Source-Routed Packets on all IPv4 Interfaces
The hardening configured the system to disable acceptance of IPv4 source routing on all network interfaces. Source-routed packets enable the sender of the packet to specify the route it should take through routers, potentially bypassing network security measures.
56. Enable Kernel Parameter to Log Martian Packets on all IPv4 Interfaces by Default
The hardening configured the system to enable logging of martian packets on the default network interface. The appearance of “martian” packets (which have invalid addresses), along with spoofed, source-routed, and redirected packets, may indicate malicious network activity.
57. Enable Kernel Parameter to Use Reverse Path Filtering on all IPv4 Interfaces
The hardening configured the system to enable reverse path filtering on all network interfaces. Enabling reverse path filtering means dropping packets with source addresses that should not have been received on the interface where they were received.
58. Disable Kernel Parameter for Accepting Secure ICMP Redirects on all IPv4 Interfaces
The hardening configured the system to disable secure handling of IPv4 redirect messages on all network interfaces. Allowing “secure” ICMP redirects from default gateways has limited legitimate purposes. It should be turned off unless absolutely necessary.
59. Disable Kernel Parameter for Accepting ICMP Redirects by Default on IPv4 Interfaces
The hardening configured the system to disable acceptance of IPv4 redirect messages on the default network interface. ICMP redirect messages tell hosts about better routes. A rogue message could lead to a man-in-the-middle attack. This feature should be turned off unless absolutely necessary.
60. Enable Kernel Parameter to Log Martian Packets on all IPv4 Interfaces by Default
The hardening configured the system to enable logging of martian packets on the default network interface. The appearance of “martian” packets (which have invalid addresses), along with spoofed, source-routed, and redirected packets, may indicate malicious network activity.
61. Enable Kernel Parameter to Use Reverse Path Filtering on all IPv4 Interfaces by Default
The hardening configured the system to enable reverse path filtering on the default network interface. Enabling reverse path filtering means dropping packets with source addresses that should not have been received on the interface where they were received.
62. Configure Kernel Parameter for Accepting Secure Redirects By Default
The hardening configured the system to disable secure handling of IPv4 redirect messages on the default network interfaces. Allowing “secure” ICMP redirects from default gateways has limited legitimate purposes. It should be turned off unless absolutely necessary.
63. Enable Kernel Parameter to Ignore ICMP Broadcast Echo Requests on IPv4 Interfaces
The hardening configured the system to enable ignoring of ICMP echo requests sent to broadcast addresses on all network interfaces. Answering broadcast (ICMP) echoes assists in mapping networks and creates a vulnerability for amplification attacks.
64. Enable Kernel Parameter to Ignore Bogus ICMP Error Responses on IPv4 Interfaces
The hardening configured the system to enable ignoring of certain invalid ICMP error responses on all network interfaces. Ignoring bogus ICMP error responses decreases log size, but it may result in some activity going unlogged.
65. Enable Kernel Parameter to Use TCP Syncookies on Network Interfaces
The hardening configured the system to enable TCP SYN cookies. Syncookies verify valid connection attempts by tracking them until confirmed, ensuring the system can continue serving legitimate requests during an attack.
66. Disable Kernel Parameter for Sending ICMP Redirects on all IPv4 Interfaces
The hardening configured the system to disable the sending of IPv4 redirect messages on all network interfaces. ICMP redirect messages let routers tell hosts about better routes. These messages might disclose parts of the network’s layout from the route table. Only systems functioning as routers should send ICMP redirects.
67. Disable Kernel Parameter for Sending ICMP Redirects on all IPv4 Interfaces by Default
The hardening configured the system to disable the sending of IPv4 redirect messages on the default network interfaces. ICMP redirect messages let routers tell hosts about better routes. These messages might disclose parts of the network’s layout from the route table. Only systems functioning as routers should send ICMP redirects.
68. Disable Kernel Parameter for IP Forwarding on IPv4 Interfaces
The hardening configured the system to disable IPv4 forwarding on the system, meaning the system will not act as a router. Routers usually use routing protocol daemons to share network layout details. Enabling this when unnecessary might expose system network data to the network.
69. Verify nftables Service is Disabled
The hardening configured the system to disable the nftables service. Using both firewalld and nftables simultaneously can cause conflicts because nftables is one of the backends used by firewalld for managing firewall rules.
70. Disable Mounting of squashfs
The hardening configured the system to prevent the squashfs kernel module from being loaded. Removing support for unnecessary file systems lowers the system’s vulnerability to local attacks.
71. Disable Mounting of udf
The hardening configured the system to prevent the udf kernel module from being loaded. Removing support for unnecessary file systems lowers the system’s vulnerability to local attacks.
72. Disable Modprobe Loading of USB Storage Driver
The hardening configured the system to prevent automatic loading of the USB storage driver. USB storage devices such as thumb drives can be used to introduce malicious software.
73. Disable Core Dumps for SUID programs
The hardening configured the system to restrict the ability to dump core files. Core dumps of setuid programs often contain sensitive information.
74. Set SSH Client Alive Count Max
The hardening configured the ClientAliveCountMax option to set an SSH client timeout. This ensures a user login will be terminated as soon as the ClientAliveInterval is reached.
75. Enable SSH Warning Banner
The hardening enabled the SSH warning banner. The warning message reminds users of policies during login and helps take legal action against attackers.
76. Install usbguard Package
The hardening installed the USBGuard package. USBGuard is a tool for controlling access to USB devices on a system, allowing administrators to define policies for which devices are allowed or blocked based on USB device attributes.
77. Enable the USBGuard Service
The hardening enabled the USBGuard service. For USB device authorization policies to take effect on all USB devices, the usbguard service needs to be active.
78. Generate USBGuard Policy
The hardening generated a USBGuard policy. USBGuard must be configured to allow connected USB devices to function correctly, preventing the system from becoming inaccessible.
79. Ensure PAM Enforces Password Requirements - Authentication Retry Prompts Permitted Per-Session
The hardening configured the number of retry prompts that are permitted per-session (3 prompts per session). Reducing the number of allowed password retry prompts per session may require certain software, like SSH, to reconnect.
80. Limit Users’ SSH Access
The hardening configured the type of users that can access the SSH service (root and onadm). Listing which accounts can access SSH reduces the chance of unauthorized system access.
81. Secure HTTP Vulnerabilities
The hardening configured the Apache HTTP server configuration file to adddress security vulnerabilities. This rule avoids exposing more information than necessary in HTTP requests.
82. Limit SSH Access Using Fail2Ban
The hardening rule configures Fail2Ban to limit SSH access. It prevents intrusions on a system by penalizing or blocking remote connections that attempt brute-force access.
83. Configure Crypto Policies for SSH
The hardening configured the crypto-policies-scripts package for SSH, specifying the following allowed algorithms:
key exchange algorithms
diffie-hellman-group-exchange-sha256
diffie-hellman-group16-sha512
diffie-hellman-group18-sha512
host-key algorithms
rsa-sha2-512 (3072-bit)
rsa-sha2-256 (3072-bit)
ssh-ed25519
encryption algorithms (ciphers)
aes192-ctr
aes256-ctr
aes128-ctr
message authentication code algorithms
fingerprints
ssh-ed25519: SHA256:8ixmFNNFZ7ediEN2tJJpHsyoiwNcMv3j4F2qeHKLT8w
ssh-rsa: SHA256:GxAKWPPN+G+4fTs2yx4TxM9n0g7DIBWuqMZjzir6s6k
2.8.1.5.1. Strict remediations
Strict remediation #1.
The strict hardening configured the maximum password age for all accounts to be 45 days. It means this rule will be applied not only for new accounts created as specified in rule #10, but for all accounts.
Strict remediation #2.
The strict hardening configured the minimum password age for all accounts to be 2 days. It means this rule will be applied not only for new accounts created as specified in rule #11, but for all accounts.
Strict remediation #3.
The strict hardening configured the number of days (10 days) before password expiration when all users will receive a warning. It means this rule will be applied not only for new accounts created as specified in rule #12, but for all accounts.