5.10.3. Elastic Stack Certificates Configuration
Since communication between Elastic stack nodes is usually carried out over the network, it is possible to implement the TLS protocol through certificates to secure said connection.
In order to keep the information that is sent between the nodes of the system secure, it is advisable to send said information through encrypted channels.
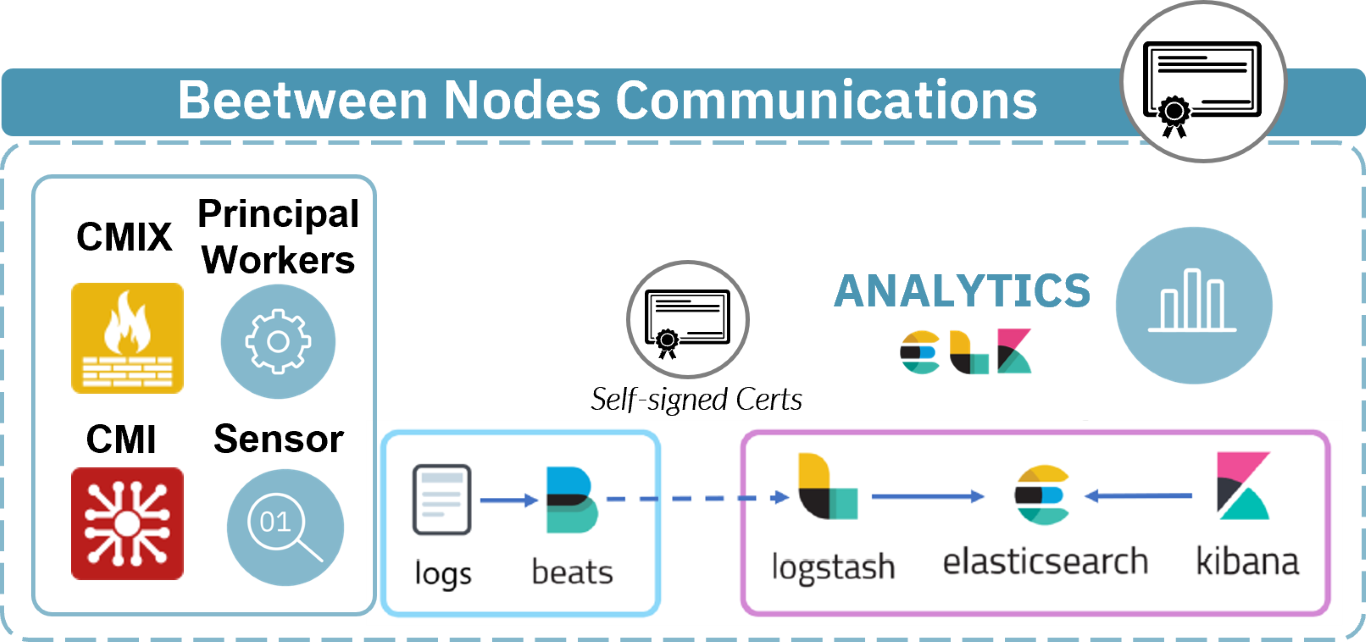
There are two main communication channels between the Filebeat service and the Logstash service that we need to encrypt to keep secure information. These are the communications between ON Core, ON Analytics and ON sensor and the communications between CMI and VPN Gateway.
The ON Analytics node can have two roles, ON Analytics or ON Aggregator. Since the ON Aggregator role is who manages the Logstash service, it will be the one that will receive the pertinent modifications.
In this section we will explain how to configure it to ensure that the information sent is encrypted:
5.10.3.1. Communications between ON Core, ON Sensor and ON Analytics
5.10.3.1.1. ON Analytics
If it does not exist, create the “certs” directory in /etc/logstash/ to store the certificates:
mkdir /etc/logstash/certs
If not installed, install unzip:
dnf install unzip
Create a CA to sign the server certificates:
/usr/share/elasticsearch/bin/elasticsearch-certutil ca --out /etc/logstash/certs/ca.zip --pass <ca.pass> --days <days> --pem
ca.pass: Definition of the password value that the generated CA will have.
days: Number of days of validity of the certificates and the CA. Example: 1095
Note
In some versions of elasticsearch (like 7.2.X) some warnings like “WARNING: An illegal reflective access operation has occurred” may appear. This notice does not affect the configuration process.
If our client already has certificates signed by a commercial or private CA, we could use it to issue subsequent certificates. However, in this case, we are generating a new one from the Elasticsearch tool.
Extract the .zip folder in /etc/logstash/certs/:
unzip /etc/logstash/certs/ca.zip -d /etc/logstash/certs/
Create the ON Aggregator certificate using the CA created above:
/usr/share/elasticsearch/bin/elasticsearch-certutil cert --ca-cert /etc/logstash/certs/ca/ca.crt --ca-key <ca.pass>
/etc/logstash/certs/ca/ca.key --ca-pass <ca.pass> --name server_onaggregator --dns onaggregator --out
/etc/logstash/certs/server_onaggregator.zip --pass <onaggregator.cert.pass> --pem
ca.pass: Password value of the previously generated CA.
onanalytics.cert.pass: Definition of the value of the password that the generated certificate will have.
Extract the files from ca.zip in /etc/logstash/certs/:
unzip /etc/logstash/certs/server_onaggregator.zip -d /etc/logstash/certs/
Decrypt the .key file:
openssl rsa -in /etc/logstash/certs/server_onaggregator/server_onaggregator.key -out
/etc/logstash/certs/server_onaggregator/server_onaggregator.key -passin pass:<cert.pass>
Convert the rsa file to pkcs8:
openssl pkcs8 -topk8 -inform PEM -outform PEM -nocrypt -in /etc/logstash/certs/server_onaggregator/server_onaggregator.key -out /etc/logstash/certs/server_onaggregator/server_onaggregator_pkcs8.key
Create the ON Sensor certificate using the CA created above:
/usr/share/elasticsearch/bin/elasticsearch-certutil cert --ca-cert /etc/logstash/certs/ca/ca.crt --ca-key
/etc/logstash/certs/ca/ca.key --ca-pass <ca.pass> --name client_onsensor --dns onsensor --out
/etc/logstash/certs/client_onsensor.zip --pass <onsensor.cert.pass> --pem
ca.pass: Password value of the previously generated CA.
onsensor.cert.pass: Definition of the value of the password that the generated certificate will have.
Extract the files from ca.zip in /etc/logstash/certs/:
unzip /etc/logstash/certs/client_onsensor.zip -d /etc/logstash/certs/
Decrypt the .key file:
openssl rsa -in /etc/logstash/certs/client_onsensor/client_onsensor.key -out
/etc/logstash/certs/client_onsensor/client_onsensor.key -passin pass:<cert.pass>
Convert the rsa file to pkcs8:
openssl pkcs8 -topk8 -inform PEM -outform PEM -nocrypt -in /etc/logstash/certs/client_onsensor/client_onsensor.key -out
/etc/logstash/certs/client_onsensor/client_onsensor_pkcs8.key
Create the certs folder in ON Sensor remotely:
ssh onsensor 'mkdir /etc/filebeat/certs/'
Send the certificates to the /certs/ folder of ON Sensor:
scp /etc/logstash/certs/ca/ca.crt /etc/logstash/certs/client_onsensor/client_onsensor_pkcs8.key
/etc/logstash/certs/client_onsensor/client_onsensor.crt onsensor:/etc/filebeat/certs/
Create the ON Core certificate using the CA created above:
/usr/share/elasticsearch/bin/elasticsearch-certutil cert --ca-cert /etc/logstash/certs/ca/ca.crt --ca-key
/etc/logstash/certs/ca/ca.key --ca-pass <ca.pass> --name client_oncore --dns oncore --out /etc/logstash/certs/client_oncore.zip --pass <oncore.cert.pass> --pem
ca.pass: Password value of the previously generated CA.
oncore.cert.pass: Definition of the value of the password that the generated certificate will have.
Extract the .zip folder in /etc/logstash/certs/:
unzip /etc/logstash/certs/client_oncore.zip -d /etc/logstash/certs/
Decrypt the .key file:
openssl rsa -in /etc/logstash/certs/client_oncore/client_oncore.key -out /etc/logstash/certs/client_oncore/client_oncore.key -passin pass:<cert.pass>
Convert the rsa file to pkcs8:
openssl pkcs8 -topk8 -inform PEM -outform PEM -nocrypt -in /etc/logstash/certs/client_oncore/client_oncore.key -out
/etc/logstash/certs/client_oncore/client_oncore_pkcs8.key
Create the certs folder in ON Core remotely:
ssh oncore 'mkdir /etc/filebeat/certs/'
Send the certificates to the /certs/ folder of ON Core:
scp /etc/logstash/certs/ca/ca.crt /etc/logstash/certs/client_oncore/client_oncore_pkcs8.key
/etc/logstash/certs/client_oncore/client_oncore.crt oncore:/etc/filebeat/certs/
Configure the Logstash of ON Aggregator by adding the following lines in the file /etc/logstash/conf.d/000_input.conf.
It is important to modify the port number used for communication between ON Core and ON Analytics. By default, this is configured in port 5000 and we will have to modify it so port 5003 is used.
input {
beats {
    port => 5003
    type => syslog
    client_inactivity_timeout => "600"
    ssl => true
    ssl_certificate_authorities => ["/etc/logstash/certs/ca/ca.crt"]
    ssl_certificate => "/etc/logstash/certs/server_onaggregator/server_onaggregator.crt"
    ssl_key => "/etc/logstash/certs/server_onaggregator/server_onaggregator_pkcs8.key"
    ssl_verify_mode => "force_peer"
}
beats {
    port => 5001
    type => beats
    client_inactivity_timeout => "600"
    ssl => true
    ssl_certificate_authorities => ["/etc/logstash/certs/ca/ca.crt"]
    ssl_certificate => "/etc/logstash/certs/server_onaggregator/server_onaggregator.crt"
    ssl_key => "/etc/logstash/certs/server_onaggregator/server_onaggregator_pkcs8.key"
    ssl_verify_mode => "force_peer"
}
tcp {
    port => 5002
    type => syslog
 }
}
Restart the Logstash service:
systemctl restart logstash
5.10.3.1.2. ON Core
Configure ON Core Filebeat service, add the following lines in the /etc/filebeat/filebeat.yml file and verify that the Logstash server is defined with its hostname and not its IP.
As in the ON Analytics Logstash configuration, here we must modify the port used for the communication, this must coincide with the one defined in the Logstash service, 5003.
output.logstash:
    hosts: ["onaggregator:5003"]
    ssl.certificate_authorities: ["/etc/filebeat/certs/ca.crt"]
    ssl.certificate: "/etc/filebeat/certs/client_oncore.crt"
    ssl.key: "/etc/filebeat/certs/client_oncore_pkcs8.key"
We restart Filebeat services:
systemctl restart filebeat
5.10.3.1.3. ON Sensor
To configure ON Sensor’s Filebeat service, add the following lines to the /etc/filebeat/filebeat.yml file and verify that the Logstash server is defined with its hostname and not its IP.
output.logstash:
    hosts: ["onaggregator:5001"]
    ssl.certificate_authorities: ["/etc/filebeat/certs/ca.crt"]
    ssl.certificate: "/etc/filebeat/certs/client_onsensor.crt"
    ssl.key: "/etc/filebeat/certs/client_onsensor_pkcs8.key"
We restart Filebeat services:
systemctl restart filebeat
5.10.3.2. Communications between CMI and VPN Gateway
5.10.3.2.1. CMI
If it doesn’t exist, create the “certs” directory in /etc/logstash/ to store the certificates:
mkdir /etc/logstash/certs
If not installed, install unzip:
dnf install unzip
Create a CA to sign the server certificates:
/usr/share/elasticsearch/bin/elasticsearch-certutil ca --out /etc/logstash/certs/ca.zip --pass <ca.pass> --days <days> --pem
ca.pass: Definition of the password value that the generated CA will have.
days: Number of days of validity of the certificates and the CA. Example: 1095
(If we have our own CA, we could use it to issue subsequent certificates. In this case, we are generating a new one from the Elasticsearch tool).
Extract the .zip folder in /etc/logstash/certs/:
unzip /etc/logstash/certs/ca.zip -d /etc/logstash/certs/
Create the CMI certificate using the CA created earlier:
/usr/share/elasticsearch/bin/elasticsearch-certutil cert --ca-cert /etc/logstash/certs/ca/ca.crt --ca-key
/etc/logstash/certs/ca/ca.key --ca-pass <ca.pass> --name server_cmi --dns cmi --out /etc/logstash/certs/server_cmi.zip --pass <cmi.cert.pass> --pem
ca.pass: Password value of the previously generated CA.
onanalytics.cert.pass: Definition of the value of the password that the generated certificate will have.
Extract the files from ca.zip in /etc/logstash/certs/:
unzip /etc/logstash/certs/server_cmi.zip -d /etc/logstash/certs/
Decrypt the .key file:
openssl rsa -in /etc/logstash/certs/server_cmi/server_cmi.key -out /etc/logstash/certs/server_cmi/server_cmi.key -passin pass:<cert.pass>
Convert the rsa file to pkcs8:
openssl pkcs8 -topk8 -inform PEM -outform PEM -nocrypt -in /etc/logstash/certs/server_cmi/server_cmi.key -out
/etc/logstash/certs/server_cmi/server_cmi_pkcs8.key
Create the VPN Gateway certificate using the CA created above:
/usr/share/elasticsearch/bin/elasticsearch-certutil cert --ca-cert /etc/logstash/certs/ca/ca.crt --ca-key
/etc/logstash/certs/ca/ca.key --ca-pass <ca.pass> --name client_VPN Gateway --dns VPN Gateway --out /etc/logstash/certs/client_VPN Gateway.zip --pass <VPN Gateway.cert.pass> --pem
ca.pass: Password value of the previously generated CA.
VPN Gateway.cert.pass: Definition of the value of the password that the generated certificate will have.
Extract the files from ca.zip in /etc/logstash/certs/:
unzip /etc/logstash/certs/client_VPN Gateway.zip -d /etc/logstash/certs/
Decrypt the .key file:
openssl rsa -in /etc/logstash/certs/client_VPN Gateway/client_VPN Gateway.key -out /etc/logstash/certs/client_VPN Gateway/client_VPN Gateway.key -passin pass:<cert.pass>
Convert the rsa file to pkcs8:
openssl pkcs8 -topk8 -inform PEM -outform PEM -nocrypt -in /etc/logstash/certs/client_VPN Gateway/client_VPN Gateway.key -out
/etc/logstash/certs/client_VPN Gateway/client_VPN Gateway_pkcs8.key
Send the ca.crt and the certificates folder to the ON Sensor node:
ssh VPN Gateway 'mkdir /etc/filebeat/certs/'
scp /etc/logstash/certs/ca/ca.crt /etc/logstash/certs/client_VPN Gateway/client_VPN Gateway_pkcs8.key
/etc/logstash/certs/client_VPN Gateway/client_VPN Gateway.crt VPN Gateway:/etc/filebeat/certs/
Configure the CMI Logstash by adding the following lines in the /etc/logstash/conf.d/10-syslog.conf file:
beats {
    port => 5002
    type => syslog
    client_inactivity_timeout => "600"
    ssl=>true
    ssl_certificate_authorities => ["/etc/logstash/certs/ca/ca.crt"]
    ssl_certificate => "/etc/logstash/certs/server_cmi/server_cmi.crt"
    ssl_key => "/etc/logstash/certs/server_cmi/server_cmi_pkcs8.key"
    ssl_verify_mode => "force_peer"
}
Restart the Logstash service:
systemctl restart logstash
5.10.3.2.2. VPN Gateway
Configure ON Sensor Filebeat service, add the following lines in /etc/filebeat/filebeat.yml file and verify that the Logstash server is defined with its FQDN and not its IP.
output.logstash:
    hosts: ["cmi:5002"]
    ssl.certificate_authorities: ["/etc/filebeat/certs/ca.crt"]
    ssl.certificate: "/etc/filebeat/certs/client_VPN Gateway.crt"
    ssl.key: "/etc/filebeat/certs/client_VPN Gateway_pkcs8.key"
Restart Filebeat services:
systemctl restart Filebeat
5.10.3.3. Authenticate SSL connections between CMI and VPN Gateway nodes
Base installations use self-signed certificates to establish the TLS 1.2 connection between the CMI management node and the node VPN Gateway service which ensures connection encryption, but does not authenticate the connection. To authenticate the connections, it will be necessary to implement the following actions to install trusted certificates.
Trusted certificates will be signed by a CA that can be:
Issued by a recognized entity.
By our own organization.
Generated for the scope of the CMI and the nodes.
5.10.3.3.1. Generate the own CA of the CMI
Note
If we already have a CA, we can skip to step 2.
In the CMI, we define a series of variables to use in the environment:
export CA_DIR=/etc/pki/tls/viapps
export DAYS=3650
export CA_PASS="CHANGEME"
We generate our CA. It is convenient to change the Subject data to those corresponding to our organization:
# We create the folder where we will store the certificates
mkdir -p ${CA_DIR}/certs/ca
# Generate a new Key for the CA
openssl genrsa -out ${CA_DIR}/certs/ca/ca-key.pem 3076
# Generate the new CA
openssl req -new -x509 -sha256 -nodes -days ${DAYS} \
-subj '/C=ES/ST=ES/L=Barcelona/O=IT/CN=VIAPPS CA Root/emailAddress=ca@viapps.org' \
-key ${CA_DIR}/certs/ca/ca-key.pem -out ${CA_DIR}/certs/ca/ca-cert.pem
5.10.3.3.2. Import the CA
We copy the certificate of the CA (own or of the entity that generates the certificates) in the following route to be able to import it to the system and that the connections can be validated:
# We copy the CA to the directory of trusted CAs
cp ${CA_DIR}/certs/ca/ca-cert.pem /etc/pki/ca-trust/source/anchors/
#We update the list of trusted CAs
update-ca-trust extract
update-ca-trust
5.10.3.3.3. Generate server certificates
The certificates must be generated for the domain name of each of the nodes registered in the CMI and the fqdn it has to be resolvable from the CMI, either through the system’s dns or by making the appropriate entries in /etc/hosts. Example:
10.10.36.160 dnssec.viapps.org
If we do not have certificates issued by a trusted entity, we will generate them manually and sign them with the CA created in step 1:
export server=<VPN_Gateway_Server_DNS/fqdn>
openssl req -newkey rsa:3076 -sha256 -days 3600 -nodes \
-subj "/C=ES/ST=ES/L=Barcelona/O=IT/CN=${server}/emailAddress=adm@viapps.org" \
-keyout ${server}-key.pem -out ${server}-req.pem
openssl x509 -req -in ${server}-req.pem -days 3600 -CA ${CA_DIR}/certs/ca/ca-cert.pem -CAkey ${CA_DIR}/certs/ca/ca-key.pem\
-CAcreateserial -out ${server}-cert.pem
4. Configure the certificate on the VPN Gateway server We will copy both the certificate <VPN_Gateway_Server_DNS/fqdn>-cert.pem and the private key <VPN_Gateway_Server_DNS/fqdn>-key.pem of the certificate to the VPN Gateway server. The path where we must copy the files will be:
/etc/httpd/ssl/
Next, we access the VPN Gateway and modify the web server configuration:
# vim /etc/httpd/conf.d/vaf-VPN Gateway.conf
Where we will edit both the route and the name of the certificates as well as the name of the server, which will be the same that we have put to the server, as in the following example:
SSLCertificateFile /etc/httpd/ssl/${server}-cert.pem
SSLCertificateKeyFile /etc/httpd/ssl/${server}-key.pem
ServerName ${server}
And we reload the Apache service to apply the changes:
systemctl reload httpd
At this moment, we validate that the service has loaded correctly and that we can manage the server from the CMI.
We will repeat the previous steps for all the VPN Gateway servers we have.
5.10.3.3.4. Enable validation in the CMI
At this point, it is necessary to do execute two steps: - Change connections from ip to hostname of all nodes - Enable server certificate verification.
5.10.3.3.4.1. Change connections from IP to hostname of all nodes
From the CMI console we will connect to mysql and update the URI field of each of the nodes as in the following example:
[root@cmi-dev ~]# mysql -u root -p virtualapp
MariaDB [virtualapp]> select NAME, URI, ID from APPLIANCES;
+----------------------+--------------------- ---------------------+
| NAME | URIs |
+----------------------+--------------------- ---------------------+
| fw02.opencloudfactory.com | https://10.10.36.109:10443/VPN Gateway-api |
| fw03.opencloudfactory.com | https://10.10.36.158:10443/VPN Gateway-api |
| dns.org.da | https://10.10.36.110:10443/VPN Gateway-api |
| dnssec.viapps.org | https://dnssec.viapps.org:10443/VPN Gateway-api |
| dnssec.slv.viapps.org | https://10.10.36.107:10443/VPN Gateway-api |
+----------------------+--------------------- ---------------------+
5 rows in set (0.00 sec)
MariaDB [virtualapp]> update APPLIANCES set URI='https://dnssec.viapps.org:10443/VPN Gateway-api' where ID=37 limit 1;
Query OK, 0 rows affected (0.00 sec)
Rows matched: 1 Changed: 0 Warnings: 0
MariaDB [virtualapp]>
5.10.3.3.4.2. Enable server certificate verification
Finally, we enable the validation of the TLS certificate of the nodes:
vim /usr/share/cmi-api/application/configs/application.ini
We look at the line and change the value from false to true to end the process:
14 httpclient.curlotp.ssl.verifypeer = true
5.10.3.4. Verify secure communication between nodes
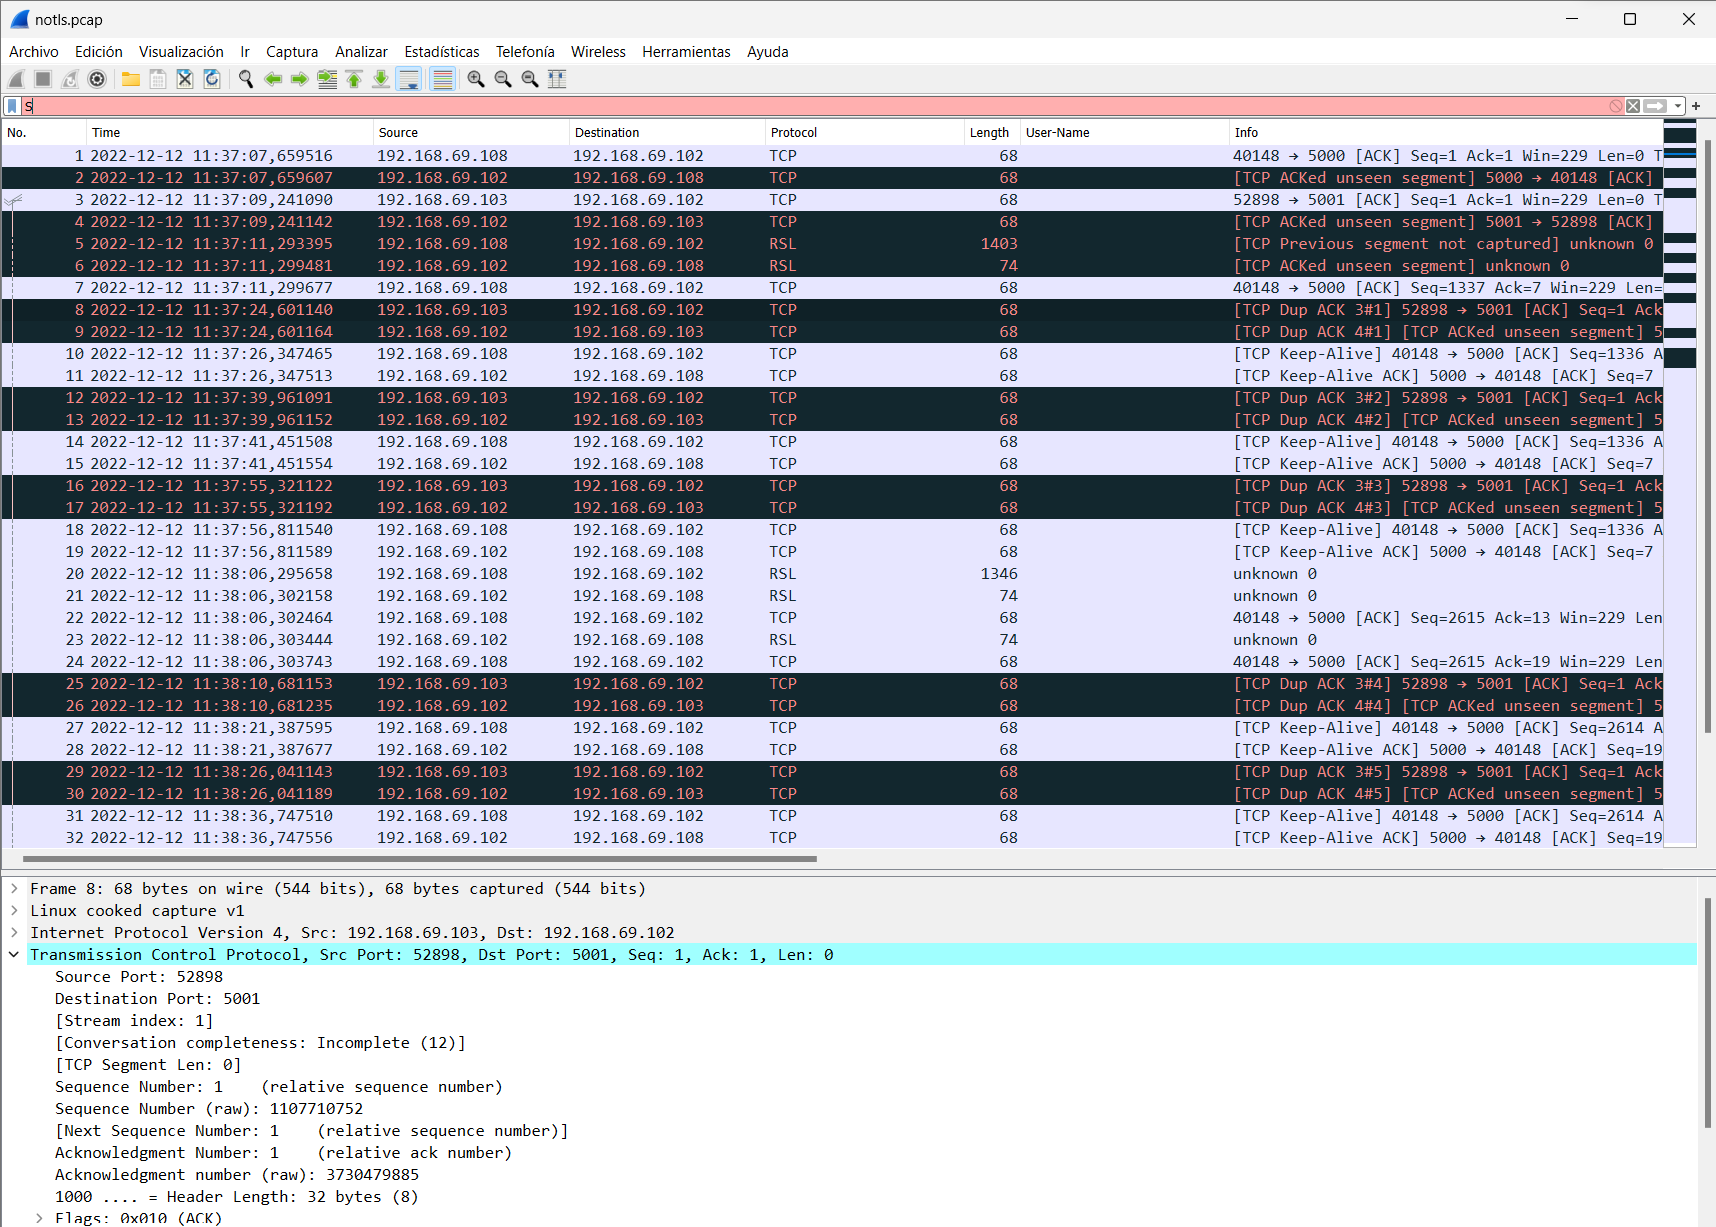
To verify the configuration made later and verify that the communication between nodes has been secured, it is possible to use a tcpdump and wireshark to see it.
tcpdump -i any port 5000 or port 5001 or port 5003 -nn -vv
Example (NON SECURE):
Example (SECURE):
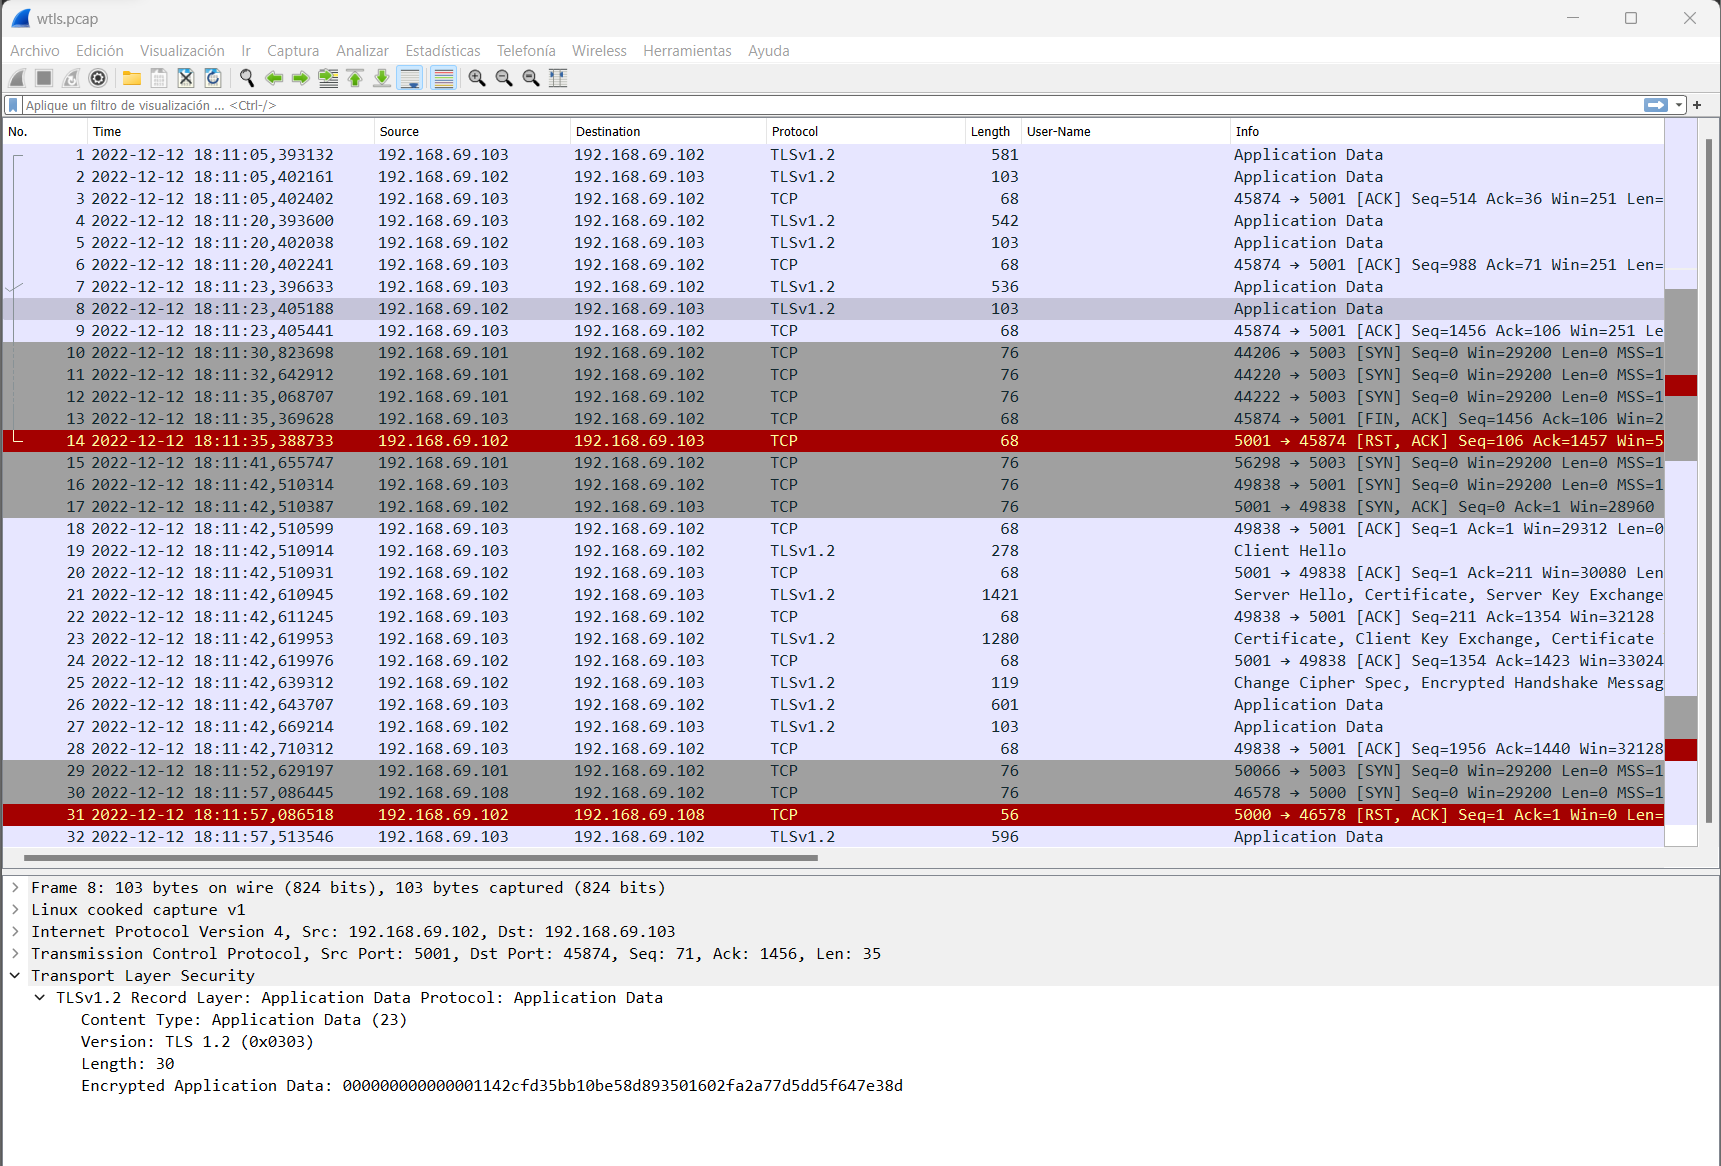
As we can see, in the capture of the secure communication we are using the TLS protocol and therefore the messages are encrypted.