4.7.2.9. Node Configuration
This section features the additional node configuration for the 2SRA use case.
To proceed with this configuration, all nodes necessary for this use case must already be deployed, following the steps in the node deployment and basic configuration section.
4.7.2.9.1. ON Sensor
This section explains how to configure the ON Sensor interface so that it can receive the information sent by the VPN gateway.
4.7.2.9.1.1. Configuring ON Sensor interface - Adapter
Access ON Sensor via SSH
Execute the script /usr/share/opennac/sensor/scripts/set_vxlan.sh
sh /usr/share/opennac/sensor/scripts/set_vxlan.sh -d <eth0> -l <172.16.1.1> -n 192.168.70.1/24
Where:
-d <eth0>: use the interface related to the IP of ON Sensor. DMZ network interface for communication with the FE.
-l <172.16.1.1>: use the ON Sensor IP previously configured. IP of the DMZ network for communication with the FE.
-n 192.168.70.1/24: network used for VXLAN communication.
Check that the FW service is stopped:
systemctl stop firewalld
systemctl disable firewalld
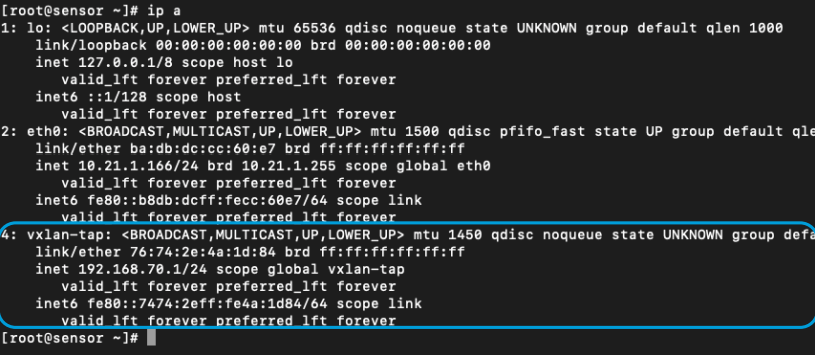
You can verify that the new virtual interface was added by running the following command
ip a
4.7.2.9.1.2. Configuring the ON Sensor Interface - VXLAN Tunnel
Access ON Sensor via SSH
Edit the file /opt/zeek/etc/node.cfg modifying the “interface” line with the vxlan-tap interface
[zeek]
type=standalone
host=localhost
interface=vxlan-tap
In the case of combining the VPN use case with the Visibility one, in the configuration of the node.cfg file, it will be necessary to configure each of the interfaces used by workers’ modules.
Warning
If this is the case, it is necessary to delete the configuration mentioned before.
##Below is an example clustered configuration. If you use this,
## remove the [zeek] node above.

[logger-1]
type=logger
host=localhost
#
[manager]
type=manager
host=localhost
#
[proxy-1]
type=proxy
host=localhost
#
[worker-1]
type=worker
host=localhost
interface=vxlan-tap
#
[worker-2]
type=worker
host=localhost
interface=ens224
Restart the service
systemctl restart zeek
4.7.2.9.2. ON Core
This section explains how to configure ON Core.
4.7.2.9.2.1. QR Code Mail Configuration
The ON Core has to be able to send users the email with the QR code needed for the 2FA (Two-Factor Authentication).
You can configure different email services. For this, you need to have the configuration data of the corporate mail service, with email account, password, server data, etc.
Here we will explain the basic configuration for SMTP Relay, and then Postfix configuration for emailing via Gmail and Office 365. In both cases will use the TCP/587 port.
4.7.2.9.3. Configuration of Web Certificates
This section explains how to configure web certificates.
4.7.2.9.3.1. Creating the web certificate in ON Core
As reflected in the prerequisites, it is necessary to have a Web SSL certificate to avoid the bad user experience of receiving notifications in the user’s web browser and accepting exceptions.
Note
If you already have a company certificate, you can skip this step. In the case of not having a company certificate, see the instructions to obtain it through Let’s Encrypt, that allows you to generate certificates for free.
Let’s Encrypt certificates last for 3 months and must be renewed, either manually or automatically, before they expire. To make the request and generate the certificate, the frontend machine needs to have Internet access and address to port 443 through the domain.
Connect to the ON Core via SSH
Install the acme.sh script
#Download and install acme.sh
curl https://get.acme.sh | sh -s email=<email_address>

#Update bash configuration
source ~/.bashrc
Stop the HAProxy service and create the certificate:
#Stop HAProxy
service haproxy stop

#Generate the certificate
acme.sh --issue --standalone -alpn -d <server_domain>
After carrying out the previous process, the certificate and its private key will have been created in a folder with the name of the domain entered when creating it: /root/.acme.sh/<server_domain>/fullchain.cer
Before entering it in the configuration, it’s necessary to create a new file that contains both the certificate and the private key. To create this single file, go to the path where the certificate was generated and execute:
#Access the directory
cd /root/.acme.sh/<server_domain>

#Combination of certificates
cat fullchain.cer <server_domain>.key > cert_emma.pem
4.7.2.9.3.2. Configuring the Web Certificate in the VPNGW
In this step, you must configure the VPNGW HAProxy service to use the previously generated HTTPS certificate.
Enter the certificate in the ON Core:
If we use a certificate generated by the company: Enter the certificate in the folder: “/etc/ssl/certs/” with the file name “cert_emma.pem” where the certificate and the corresponding key are located.
If we use a Let’s Encrypt certificate, from the FrontEnd use the file generated at the end of step 2.3.1.
Enable HTTPS configuration in HAProxy:
Uncomment (remove # from the start) the following lines inside the “FrontEnd” block of the “/etc/haproxy/haproxy.cfg” file:
#bind emmafront:443 ssl crt /etc/ssl/certs/cert_emma.pem no-sslv3 no-tlsv10 no-tls-tickets
#redirect scheme https code 301 if !{ ssl_fc }
#reqadd X-Forwarded-Proto:\ https
Restart the HAProxy service:
systemctl restart haproxy
4.7.2.9.4. ON VPNGW
This section explains how to configure the VPN Gateway.
4.7.2.9.4.1. Configuration of the HAProxy service
In this step, we will configure the HA Proxy service. This service is used to redirect web traffic from the VPN Gateway to the onprincipal component in the backend.
Edit the /etc/haproxy/haproxy.cfg file
In case you have not configured any certificate, the following lines must be commented out (add # at the beginning), this will force the use of port 80 for the connection:
#bind emmafront:443 ssl crt /etc/ssl/certs/cert_emma.pem no-sslv3 no-tlsv10 no-tls-tickets
#redirect scheme https code 301 if !{ ssl_fc }
#reqadd X-Forwarded-Proto:\ https
Remember to uncomment these lines after obtaining and configuring the certificate, so you can use port 443 with a server certificate.
To give permissions to access the Administration Portal from the public URL (not recommended) uncomment (remove # from the beginning) the following line:
#use_backend app if adminACL
Restart the service
systemctl restart haproxy