7.5. Homologation Guide
7.5.1. Introduction
This guide details the main steps we should follow in order to homologate any device and validate the correct integration with OpenNAC Enterprise. Otherwise, we cannot guarantee that the device can be used in production environments.
To carry out the homologation of the device and perform the necessary tests to verify the correct functioning and integration of the device, we must have the following components:
OpenNAC ON Core
OpenNAC ON Analytics
IP telephone
Client PC
Network device
You can check the following documents to get more information about the OpenNAC Enterprise nodes.
It will be necessary to have the manufacturer’s documentation to consult the information commands needed to configure the device.
7.5.2. Checklist
The main topics that we will have to verify are the following:
Dot1x Authentication
Supplicant User
Supplicant Host
Supplicant Certificate User
Supplicant Certificate Host
MAB Auth
Dot1x Authorization
Default VLAN
Critical VLAN
Reject VLAN
Dynamic VLAN
Voice VLAN
- ACLs
Static
Dynamic
TogglePort
- CoA
MAB
Dot1x
SNMP
SNMP Traps
Network Configuration
Network Backup
7.5.3. Dot1x Authentication
Explanation
802.1X authentication involves three parties: a supplicant (PC, telephone, etc.), an authenticator (SW, AP, WLC, etc.), and an authentication server:
The supplicant is a client device that wants to connect to a LAN/WLAN.
The authenticator is a network device that provides a data link between the client and the network and can allow or block network traffic between them, such as an Ethernet switch or wireless access point.
The authentication server receives and responds requests for network access, and can tell the authenticator if the connection is allowed or not.
Configuration
Device configuration
In the network device, we must configure a RADIUS server (authentication server), by introducing the server IP, Authentication (1812) and Accounting (1813) ports and the secret key (this key will have to match the one configured /etc/raddb/clients.conf in the ON Core) to be able to exchange information between the two parties.
Also, we will need to configure DOT1X and MAB (MAC-Auth) authentication in the desired interfaces. Sometimes, we can set the authentication order, MAB-DOT1X / DOT1X-MAB.
Check the manufacturer’s documentation about the steps to follow and the necessary parameters to apply the configuration. It may be necessary to reboot the device or perform some specific procedures to save the configuration.
OpenNAC configuration
To see every authentication source clearly, access the Administration Portal “ON NAC -> Policies” and configure multiple policies with different Preconditions: Sources, one for each source. This way, when you try to authenticate with the supplicant, you will be able to distinguish and see authentications or other events that match the different policies depending on the source that we configure in them.
Access the ANNEX: Policy configuration to get more information about how we configure the policies in the OpenNAC Enterprise Administration Portal.
Configure the 8021X on the supplicant for Supplicant User, Supplicant User Certificate, Supplicant Host and Supplicant Host, Certificate and MAB Authentication. Once you have configured the authentication method on the supplicant, enable the device interface, and try to authenticate.
As we will have configured different policies with different sources in the OpenNAC Enterprise, we will be able to detect each authentication source.
Verification
Configure the supplicant so that it can authenticate by using:
Supplicant Host
Supplicant User
Supplicant Host Certificate
Supplicant User Certificate
MAB
Enable and disable the network interface to force the authentication each time with the different configured methods.
In the OpenNAC Enterprise, check the authentication result in “ON NAC -> Business Profiles -> Default view” to make sure that you’re using the selected method for authentication. In this tab, you can see if the user device matches the correct policy and has the correct source.
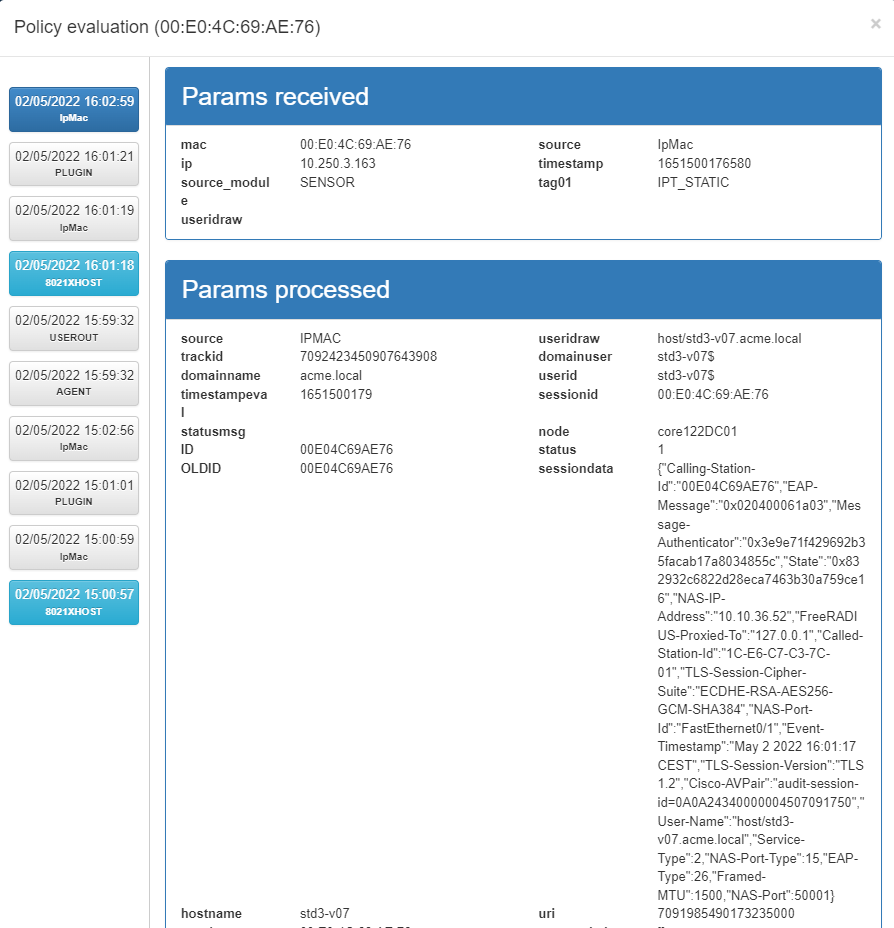
You can click on the eye to check the policy evaluation and get more information about the different events.
The received params are shown is this part. We can also see the authentication method was MAB (the last evaluation will be highlighted in blue in the left column).
Users can check the tags inserted on this asset by OpenNAC Enterprise according to this information and all the rules and preconditions that were set in the policy.
In the left side of this window, there is a blue button that contains the policy evaluation flow, showing the history of all policy evaluations of the selected user device.
As shown in the Evaluation diagram, each rule that we configured previously on “ON NAC -> Policies” is evaluated. If it does not match the expected conditions, the unmatched parameter will be highlighted in red. So the policy engine will evaluate all the policies in the list until it finds one that matches, or until it finds the policy Match All.
Troubleshooting
If we don’t see the user device we are trying to authenticate, access the ON Core via CLI and take a look in the /var/log/radius/radius.log or use the raddebug to get information about the sent or received packets. We can also check the network device for different logs to track all the packets that are sent or received.
Check if the network device has sent any packets for doxt1x or MAB authentication.
Also, we can try to see if there is traffic from the network device arriving to the ON Core.
tcpdump -i <INTERFACE> port 1812
It is also important to adjust the timeouts (reauthentication interval, supplicant-timeout, server-timeout, etc) to attend and process the different packets that will be exchanged between the RADIUS server and the network device. A wrong configuration could affect the way the packets are processed, and it will cause errors in the authentication process.
It is important to understand and configure the authentication attempts for each protocol.
In MAB authentications, it is important to receive the MAC address in the correct format, so when we receive the information in the RADIUS server, we can use it as username. Check if the device MAC format can be configured; it should be XX-XX-XXXX-XX-XX.
Capture packets in the supplicant to check if the information is arriving.
7.5.4. Dot1x Authorization
Explanation
Once the supplicant is correctly authenticated, the RADIUS server authorizes whether the supplicant is authorized or not to access the network. It assigns a VLAN to the NAS port to which the supplicant is connecting.
If the supplicant is successfully authenticated, it receives an Access-Accept packet from the authentication server and the port state changes to authorized. Then, all the packets from the authenticated supplicant are allowed through the port.
If the authentication fails, it receives an Access-Reject packet from the authentication server the port remains in the unauthorized state, but authentication can be retried depending on the parameters that we have configured for the RADIUS and Dot1x properties.
If the authentication server cannot be reached, the router can resend the request. If no response is received from the server after the specified number of attempts, authentication fails, and network access is not granted.
Depending on these casuistic, we must be able to configure one behavior or another, so we will use the VLANs for users to access one network or another.
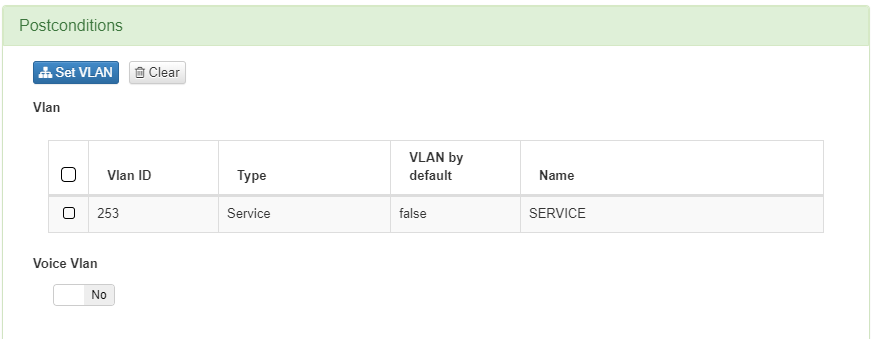
To configure the different VLANS in the OpenNAC Enterprise administration portal, access “ON NAC -> Policies”. Add a new policy or edit an existing one. Access the “Postcondittion -> Vlan field”.
7.5.5. Default VLAN (Switch Default)
Explanation
The default VLAN has no VLAN ID or tag to identify which VLAN the arriving packets originated from, so no tag will be returned on the Radius response. All packets sent to this VLAN are untagged, which is fine because the network has only one VLAN.
Configuration
Find the appropriate parameter that refers to the Default VLAN for each brand and configure it with a desired ID.
Access the administration portal “ON NAC -> Policies” and configure the Default VLAN in the postconditions tab. From OpenNAC Enterprise we refer to this VLAN assigning it the VLAN ID = 0, and we call it Switch Default VLAN.
Verification
Once the client is authenticated, check if the VLAN is correctly assigned in the device. In the client, check if the assigned IP belongs to the range of the VLAN and review in the administration portal “ON NAC -> Business Profiles -> Default view” if the VLAN and the assigned IP are OK.
7.5.6. Dynamic VLAN
Explanation
Enables an end device, after authentication, to dynamically be a member of a VLAN.
Configuration
Configure multiple VLANs in the network device.
Access the administration portal “ON NAC -> Policies” and configure that the device receives a specific VLAN in the postconditions tab.
Verification
Once the client is authenticated:
Check the client status in the network device and check if the VLAN is correctly assigned.
In the client, check if the assigned IP belongs to the range of the VLAN.
Check in the administration portal “ON NAC -> Business Profiles -> Default view” if the VLAN and the assigned IP are OK.
Repeat the process with other VLAN IDs to validate the dynamic assignment.
7.5.7. Critical VLAN (Server-fail VLAN)
Explanation
The 802.1X critical VLAN on a port, accommodates 802.1X users that have failed authentication because none of the RADIUS servers in their ISP domain are reachable. Users in the critical VLAN can access a limited set of network resources depending on the configuration. This way, even if the users have not been authenticated, they will still be assigned to a VLAN with limited access.
The critical VLAN provides limited access to a VLAN, typically only to the Internet, for 802.1X end devices during a RADIUS server timeout.
It accommodates 802.1X users that have failed authentication because none of the RADIUS servers in their ISP domain are reachable.
Configuration
In the network device, configure the parameter that refers to the critical VLAN.
Note
It is essential that the device supports this feature so that the device can be certified for production environments. If the function is not supported, the device will not be approved for use with OpenNAC.
Verification
Access the ON Core via cli and stop the RADIUS service (Radius Dead) to emulate the scenario where the RADIUS server is down.
Try to authenticate the client. Check the client status in the network device and check if it has been assigned to the configured critical VLAN.
The expected behavior would be:
A user accesses the port and fails 802.1X and Mac-Auth authentication because all the RADIUS servers are unreachable -> The network device assigns the critical VLAN to the port. The 802.1X user and all subsequent 802.1X users on this port can access only resources in the 802.1X critical VLAN.
Once the RADIUS server is up and running again, the user in the 802.1X critical VLAN passes 802.1X authentication -> The device assigns the authorization VLAN of the user to the port, and it removes the port from the 802.1X critical VLAN.
7.5.8. Reject VLAN
Explanation
Provides limited access to a LAN, typically only to the Internet, for responsive end devices that are 802.1X-enabled but that have sent the wrong credentials. This way, the RADIUS server will send an Access-Reject message. During the authentication process between the network device and the RADIUS authentication server, supplicants attempting access to the LAN are granted access and moved to a reject VLAN.
Configuration
Configure in the network device the parameter that refers to the reject VLAN.
Note
This feature is not available in all the network devices
Verification
Try to authenticate the client that is introducing wrong credentials to get an Access-reject. Check the client status on the network device and check if it has been assigned to the configured reject VLAN.
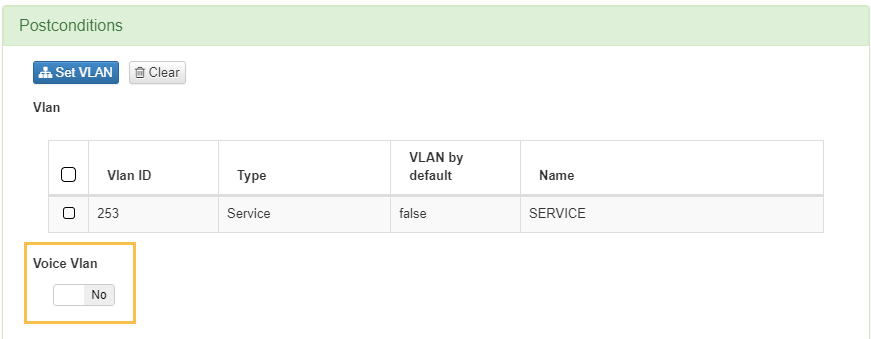
7.5.9. Voice VLAN
Explanation
The voice VLAN feature enables access ports to carry IP voice traffic from an IP phone.
The implementation of a voice VLAN on an IP telephone is vendor specific. If the phone is 802.1X-enabled, it is authenticated as any other supplicant. If the phone is not 802.1X-enabled but has another 802.1X-compatible device connected to its data port, that device is authenticated. This way, VoIP traffic can flow to and from the phone (provided that the interface is configured in single supplicant mode and not in single-secure supplicant mode).
Configuration
Configure the Voice VLAN in the network device if the feature exists.
Access the administration portal “ON NAC -> Policies” and configure in the postconditions VLAN tab a VLAN with the same ID as the configured one in the network device. On Cisco devices, you can enable the voice VLAN flag so that the device receives specific packets referenced to the voice VLAN.
Verification
Try to authenticate the client using an IP telephone. In the network device, check the client status and if it has been assigned to the configured voice VLAN.
If the VLAN assignment was not successful, check in the vendor documentation if there is a specific parameter to send a voice VLAN packet so the network device can recognize it. It should be configured internally in the OpenNAC Enterprise code.
7.5.10. ACL (Security Profiles)
Explanation
We use access control lists (ACLs) to restrict user access to host and port combinations that you specify in access control entries.
Each brand has a different way to refer to security profiles, ACLs, firewalls, filters, etc.
You can configure the Security Profiles in the OpenNAC Enterprise Administration Portal “ON CMDB -> Security profiles”.
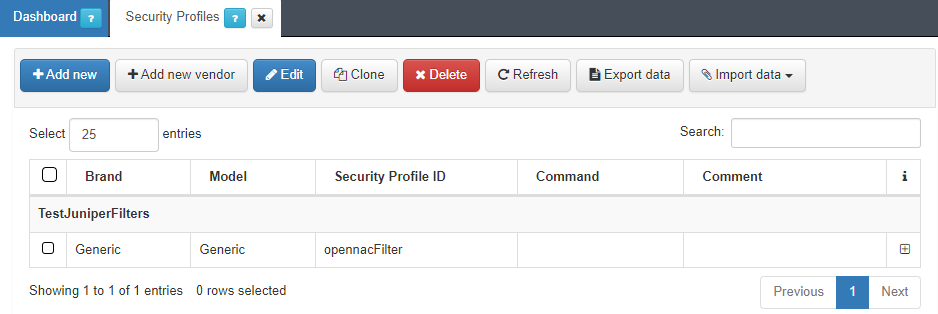
To configure this Security Profiles and send them as a RADIUS parameter for every user session, we will need to configure them in a policy. Access “ON NAC -> Policies”, find the “Postcondition -> Security Profile field” and add a new policy or edit an existing one. When a user device matches a policy with a configured Security Profile, it will be send as a RADIUS Parameter to the network device, and it will apply it to the user device.
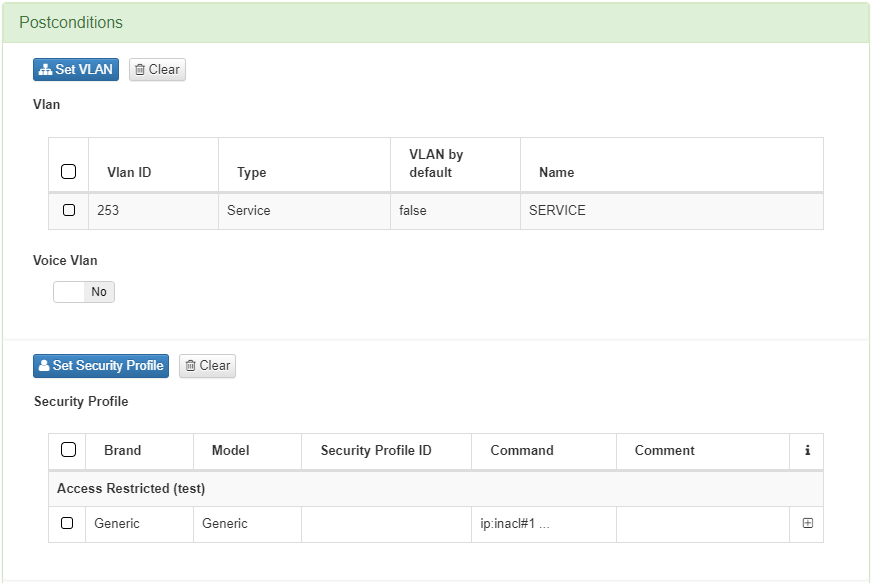
7.5.11. Static ACL
Explanation
Access the network device and configure some access rules. These rules have an ID assigned, so we can refer to them by sending some Radius Attributes from the Radius server, this action can assign ACLs specifically per the user session.
Configuration
In the OpenNAC Enterprise administration portal, when we configure a policy “ON NAC -> Policies” in the postconditions field, we can find the Security profiles field. Configure a static ACL and refer to the configured one by introducing the same ID as the rule you have configured in the network device.
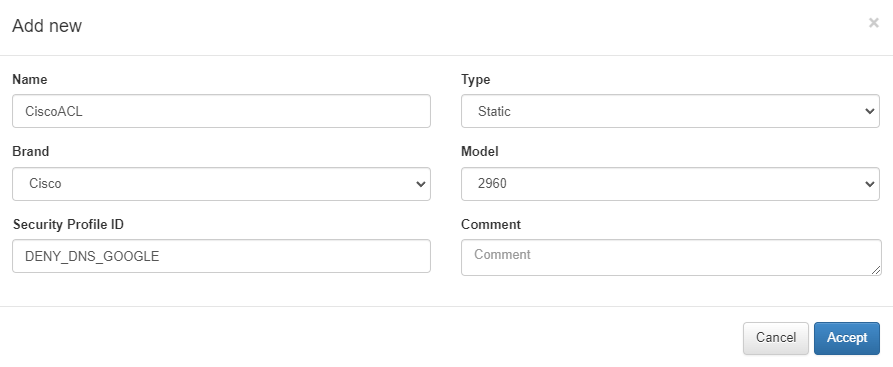
Verification
Once we have configured a Static Security profile, it will be necessary to check if they have been correctly applied. For example, if you have defined that X host cannot ping Y server, when the client is authenticated, check that the rule is correctly applied, and the client cannot ping the server. Make sure that before applying the security profile, the host can ping the server.
7.5.12. Dynamic ACL
Explanation
A Dynamic ACL creates ACLs that we configured based on attributes from the RADIUS server. Dynamic ACLs are associated with a user session.
Every vendor has its own Attributes to send these commands to the network devices.
Configuration
In the OpenNAC Enterprise Administration Portal, when we configure a policy “ON NAC -> Policies” in the postconditions field, we can find the Security profiles field. Configure a dynamic ACL by introducing the whole command for the desired rule.
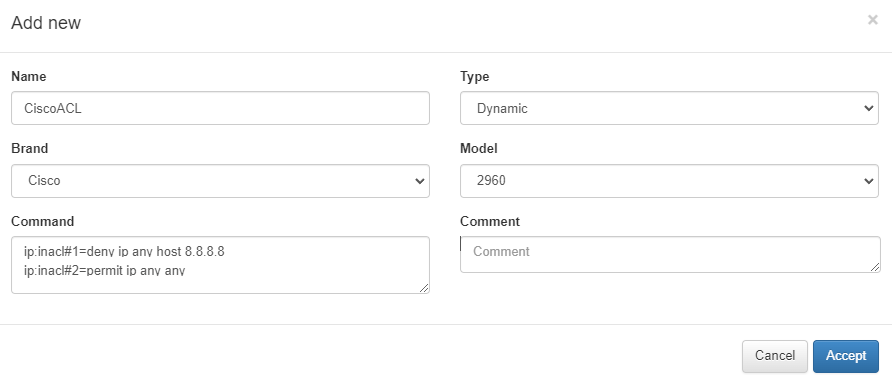
Verification
Once we have configured a Dynamic Security profile, it will be necessary to check if they have been correctly applied.
For example, if you have defined that X host cannot ping Y server, when the client is authenticated, check that the rule is correctly applied, and the client cannot ping the server. Make sure that before applying the security profile, the host can ping the server.
7.5.13. Toggle Port
Toggle port will allow us to force policy reevaluations when certain changes are made in a configuration or when we must check newly configured parameters.
From OpenNAC Enterprise we can configure two different ways to execute a toggle port to the connected devices:
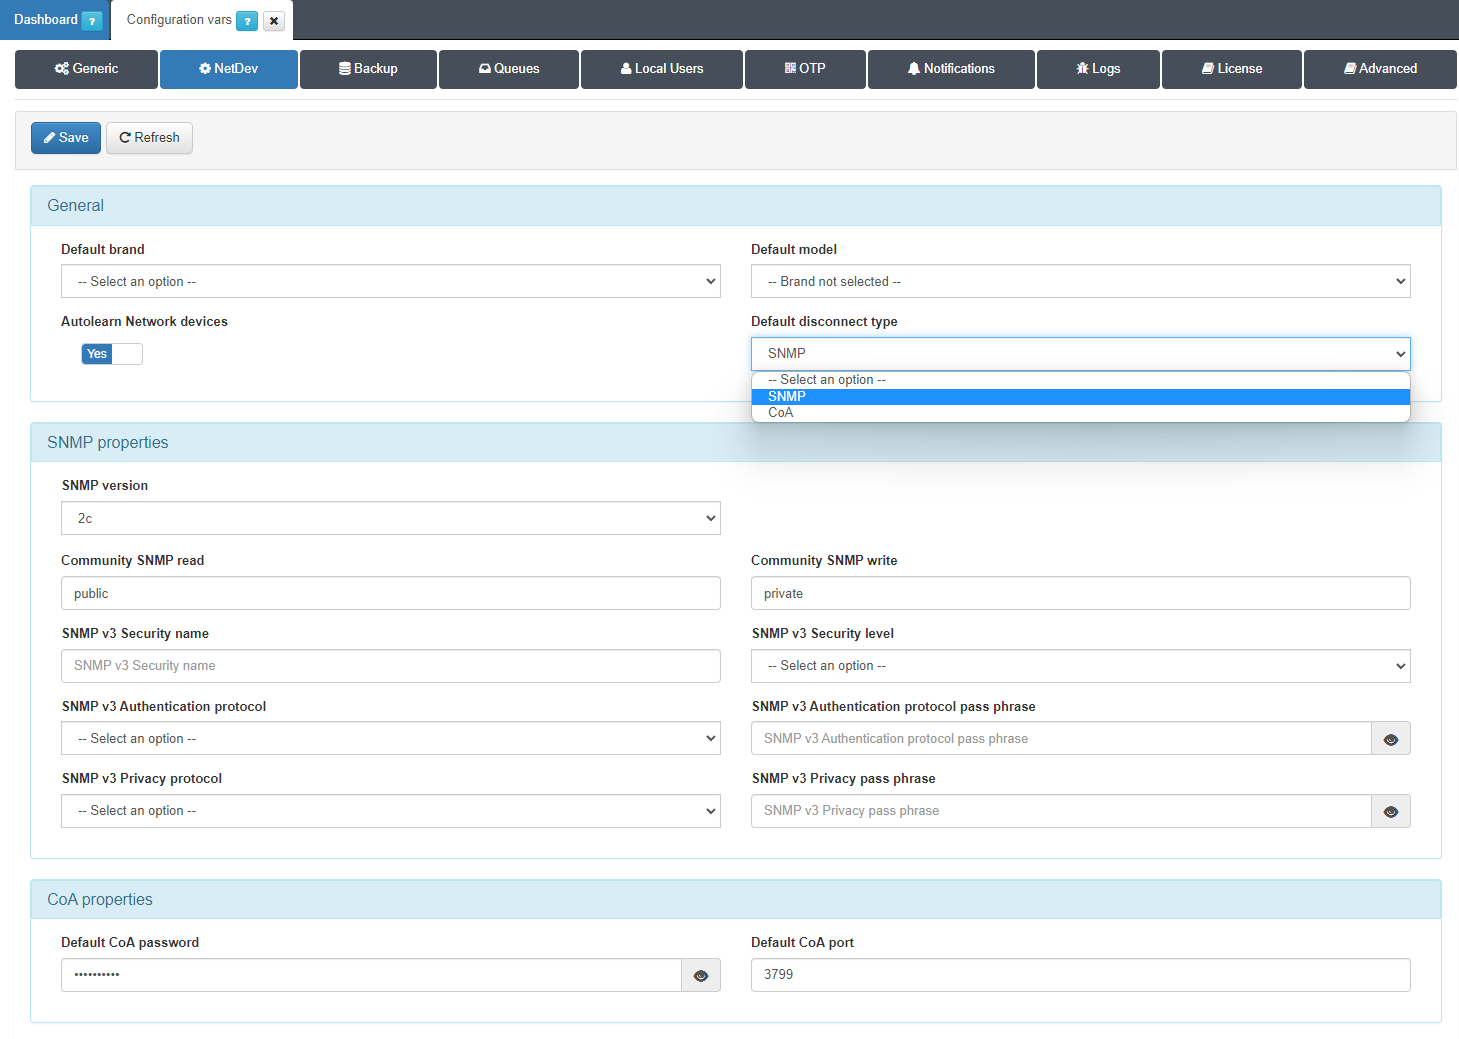
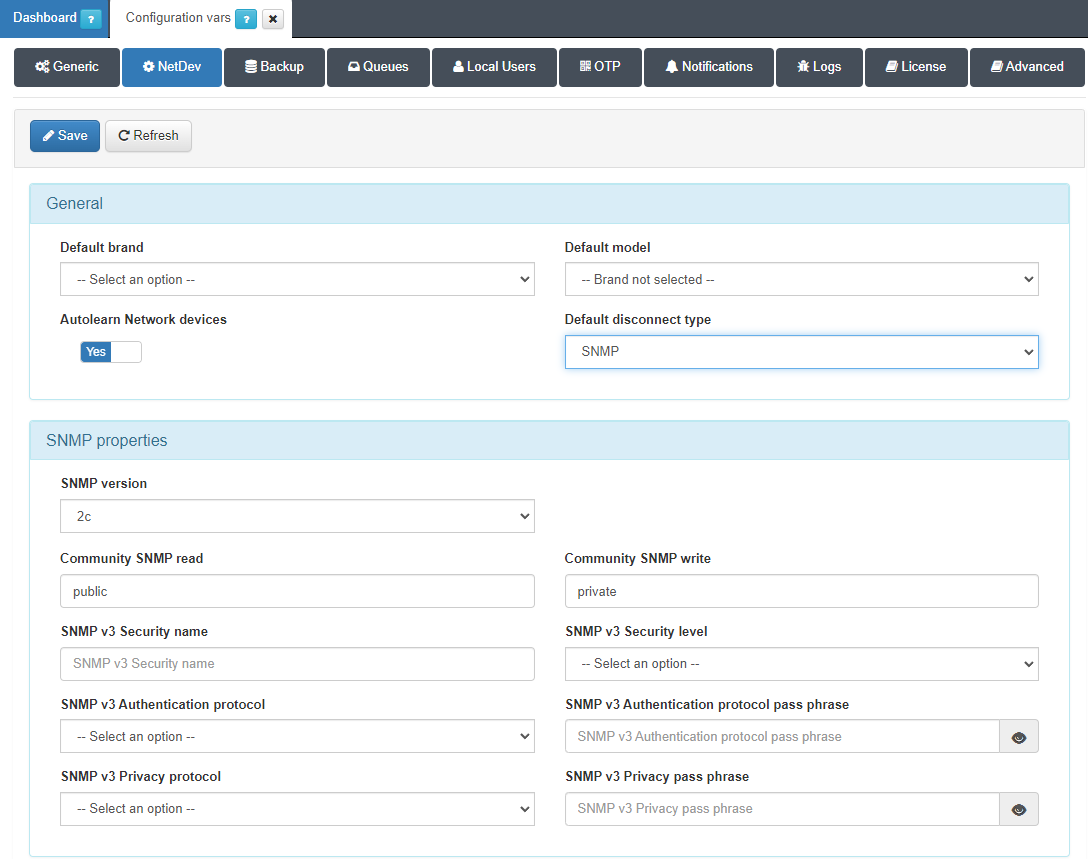
We can configure the default disconnection type on the global parameters by accessing “Configuration -> Configuration Vars -> NetDev”. This setting should be used carefully, because it is critical to select the correct Brand and Model for the configuration of every device.
To be able to manage several network device brands or configurations, OpenNAC Enterprise also allows the definition of a specific configuration for each single network device that will overwrite the default values:
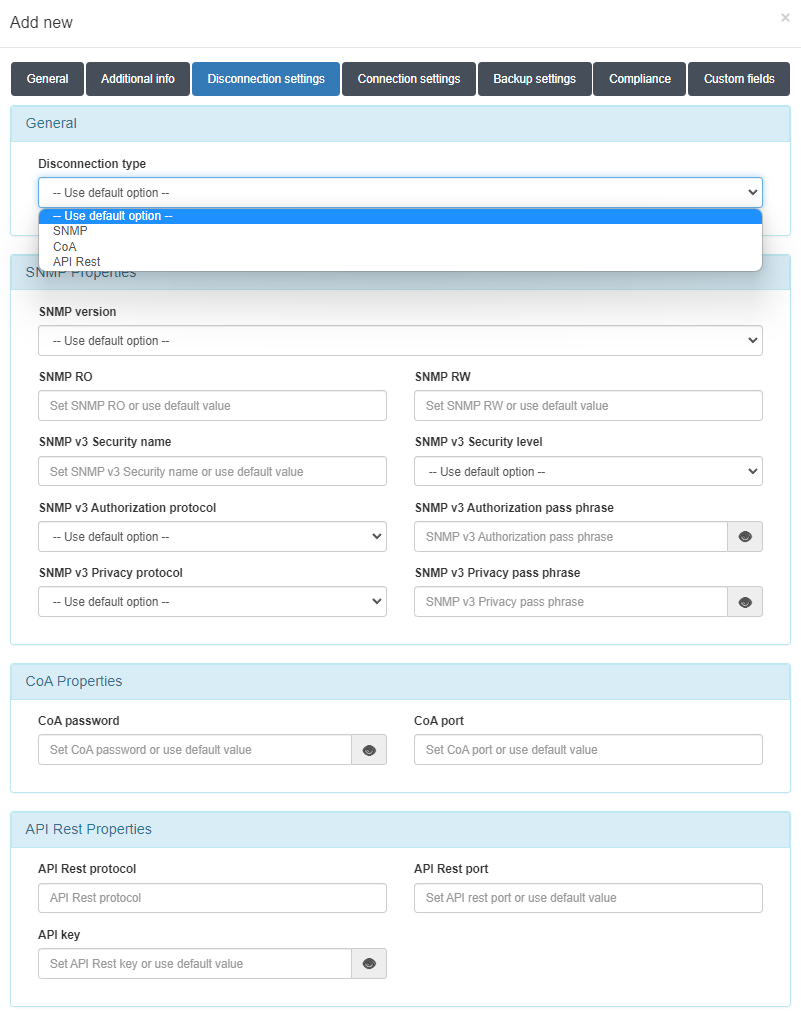
We can configure the disconnection type on the global parameters by accessing “ON CMDB -> Network Devices -> Disconnection settings”.
7.5.14. CoA
Explanation
RADIUS CoA (Change of Authorization) is a feature that allows a RADIUS server to adjust an active client session. It uses the port 3799. In some scenarios is required to force a policy reevaluation and change the type of authorization using CoA via software change.
Configuration
On the network device, configure the required parameters referring to CoA.
On the OpenNAC Enterprise Administration Portal, configure the required parameters by accessing:
“ON CMDB > Network Devices” Select and Edit the device, go to the Disconnection settings, and configure the CoA properties. Also, it is interesting to check that by configuring the default parameters, the behavior remains the same.
“Configuration -> Configuration vars -> NetDev” and configure the CoA properties. These global properties will be applied when the specific configuration for a network device is empty.
Verification
Access to the “ON NAC -> Business Profiles -> default view” and select the authenticated device. Click the toggle port button and check if the device has been disconnected. To check if the toggle port has been correctly executed, try to change the policy parameters, for example the VLAN, so when the toggle port execution is done, the user will have the new VLAN assigned.
Troubleshooting:
To check the Change of Authorization we will use the radclient to check which are the parameters the RADIUS server needs to send to the network device so it can execute the toggle port. Radclient can send arbitrary RADIUS packets to a RADIUS server, and then it shows the reply. It can be used to test changes you made in the configuration of the RADIUS server. It will also be important to check the logs or as many information as possible in the network device to check what information are we receiving o sending in each case of disconnection and connection. To get all the RADIUS parameters we will use the raddebug. Access the ON Core via cli, introduce the following command and check the corresponding logs:
raddebug -t0 -c '(NAS-IP-Address == < DEVICE_IP_ADDRESS>)'
We will need to find the Access-Request and the Accounting-Request packets. With that information, we will be able to perform different tests with the radclient.
Tue Jul 13 13:17:49 2021 : Debug: Received Access-Request packet from host 10.10.36.56 port 55587, id=206, length=142
Tue Jul 13 13:17:49 2021 : Debug: NAS-Port-Type = Ethernet
Tue Jul 13 13:17:49 2021 : Debug: Called-Station-Id = "08-55-31-89-75-A3"
Tue Jul 13 13:17:49 2021 : Debug: Calling-Station-Id = "00-0E-C6-D2-CA-27"
Tue Jul 13 13:17:49 2021 : Debug: Service-Type = Framed-User
Tue Jul 13 13:17:49 2021 : Debug: Framed-MTU = 1400
Tue Jul 13 13:17:49 2021 : Debug: EAP-Message = 0x0200000a017465737465
Tue Jul 13 13:17:49 2021 : Debug: Message-Authenticator = 0xd55ce905a4a7e33622febdcc20220bd1
Tue Jul 13 13:17:49 2021 : Debug: User-Name = "teste"
Tue Jul 13 13:17:49 2021 : Debug: Acct-Session-Id = "9d001086"
Tue Jul 13 13:17:49 2021 : Debug: EAP-Key-Name = 0x00
Tue Jul 13 13:17:49 2021 : Debug: NAS-Identifier = "MikroTik"
Tue Jul 13 13:17:49 2021 : Debug: NAS-IP-Address = 10.10.36.56
Tue Jul 13 13:17:49 2021 : Debug: Received Accounting-Request packet from host 10.10.36.56 port 51415, id=205, length=171
Tue Jul 13 13:17:49 2021 : Debug: Acct-Status-Type = Stop
Tue Jul 13 13:17:49 2021 : Debug: User-Name = "test"
Tue Jul 13 13:17:49 2021 : Debug: Acct-Session-Id = "9c001086"
Tue Jul 13 13:17:49 2021 : Debug: NAS-Port-Id = "ether4"
Tue Jul 13 13:17:49 2021 : Debug: Acct-Session-Time = 1429
Tue Jul 13 13:17:49 2021 : Debug: Acct-Input-Octets = 569586
Tue Jul 13 13:17:49 2021 : Debug: Acct-Output-Octets = 289907
Tue Jul 13 13:17:49 2021 : Debug: Acct-Input-Gigawords = 0
Tue Jul 13 13:17:49 2021 : Debug: Acct-Output-Gigawords = 0
Tue Jul 13 13:17:49 2021 : Debug: Acct-Input-Packets = 1579
Tue Jul 13 13:17:49 2021 : Debug: Acct-Output-Packets = 3270
Tue Jul 13 13:17:49 2021 : Debug: NAS-Port-Type = Ethernet
Tue Jul 13 13:17:49 2021 : Debug: Called-Station-Id = "08-55-31-89-75-A3"
Tue Jul 13 13:17:49 2021 : Debug: Calling-Station-Id = "00-0E-C6-D2-CA-27"
Tue Jul 13 13:17:49 2021 : Debug: Service-Type = Framed-User
Tue Jul 13 13:17:49 2021 : Debug: Acct-Terminate-Cause = User-Request
Tue Jul 13 13:17:49 2021 : Debug: NAS-Identifier = "MikroTik"
Tue Jul 13 13:17:49 2021 : Debug: Acct-Delay-Time = 0
Tue Jul 13 13:17:49 2021 : Debug: NAS-IP-Address = 10.10.36.56
When we have dot1x packets, we will use as User-Name parameter the authenticated username. In MAB authentications, we will use the MAC address as User-Name.
The MAC address might be in different formats, so we will have to try different combinations depending on each brand. For example: XX-XX-XX-XX-XX-XX, XX:XX:XX:XX:XX:XX, xxxxxxxx, xx-xx-xx-xx-xx-xx, etc.
Typically, the devices will need to receive a CoA when the user devices have been authenticated via DOT1X and disconnect when it has been authenticated via MAB. Check this behavior as every brand has its own parameters.
With CoA:
echo 'User-Name = "<USERNAME/MAC_ADDRESS>", NAS-IP-Address = "<DEVICE_IP_ADDRESS>", Calling-Station-Id = "<MAC_ADDRESS>", Framed-IP-Address = <DEVICE_IP_ADDRESS>' | radclient -c 1 <DEVICE_IP_ADDRESS> coa <SECRET>
With disconnect:
echo 'User-Name = "<USERNAME /MAC_ADDRESS>", NAS-IP-Address = "<DEVICE_IP_ADDRESS>", Calling-Station-Id = "<MAC_ADDRESS>", Framed-IP-Address = <DEVICE_IP_ADDRESS>' | radclient -c 1 <DEVICE_IP_ADDRESS> disconnect <SECRET>
Once we found the right combination, we will need to adapt the internal OpenNAC Enterprise code to send the right attributes to the device.
7.5.15. SNMP
Explanation
SNMP toggle port is another method to force a policy evaluation. We use a specific SNMP command to shut down and enable a physical port to force a reevaluation.
Configuration
Configure the required parameters on the network device. Configure a public and a private community with the right permissions:
public Read, we will only be able to check certain configurations.
private Read & Write, we will be able to configure and check and certain configurations
On the OpenNAC Enterprise Administration Portal, configure the required parameters on the device: “ON CMDB -> Network Devices” Select and Edit the device. Go to the “Disconnection settings tab”, and configure the SNMP properties. Also, it is interesting to check that by configuring the default parameters, the behavior remains the same. Access “Configuration -> Configuration vars -> NetDev” and configure the SNMP properties, these global properties will be applied when the specific configuration for a network device is empty.
Verification
Access the “ON NAC -> Business Profiles -> default view” and select the authenticated device. Click the toggle port button and check if the device has been disconnected. To check if the toggle port has been correctly executed, try to change the policy parameters, for example the VLAN, so when the toggle port execution is done, the user will have the new VLAN assigned.
Troubleshooting:
Access the ON Core via cli, use the following commands to the interface status and check the interface nomenclature.
Mapping port index:
Port Index - Integer -> snmpwalk -v 2c -c <community> <ip_switch> 1.3.6.1.2.1.2.3.1.1
Port Description -> snmpwalk -v 2c -c <community> <ip_switch> 1.3.6.1.2.1.2.3.1.2
Try with the following commands to change the interface status. If it does not change, try to find the appropriate OID to send to the network device to enable and disable the interface status.
Port Admin OIDs:
Interface status -> snmpwalk -v 2c -c <community> <ip_switch> 1.3.6.1.2.1.2.3.1.7. <int_index>
Interface down -> snmpset -v 2c -c <community> <ip_switch> 1.3.6.1.2.1.2.3.1.7. <int_index> i 2
Interface up -> snmpset -v 2c -c <community> <ip_switch> 1.3.6.1.2.1.2.3.1.7. <int_index> i 1
Sometimes the OIDs may not be the same, so we will have to find the appropriate ones and adapt the internal OpenNAC Enterprise code.
Also, the interfaces may not correspond to the mapping, or the interface name will be in different formats.
If you have any problems with the Toggle Port configuration, try to get as much information as you can to provide the Open Cloud Factory team enough information. This way, they can adapt the code or change settings to enable the correct functioning of the features in the infrastructure.
7.5.16. SNMP Traps
Explanation
SNMP Traps are messages sent by SNMP devices to a configured address. They are useful for monitoring devices as they report the changes they get or other events.
Configuration
Configure the required parameters on the network device. Configure a public and a private community with the right version and permissions.
Access the ON Core via cli and enable port 162 in the iptables /etc/sysconfig/iptables to allow the traffic from the snmptraps. Once enabled, restart the iptables service.
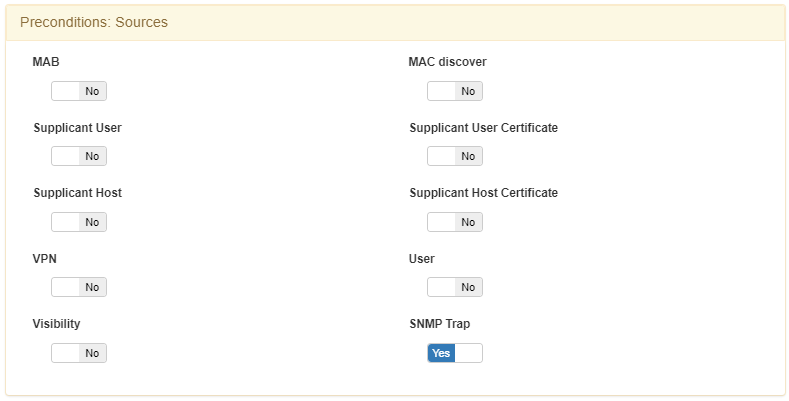
Access the OpenNAC Enterprise Administration Portal, then “ON NAC -> Policies”, and enable the SNMP TRAP flag as preconditions: Source.
Access the “Configuration -> Configuration Vars” and enable the SNMP Trap Monitoring flag.
Verification
On the network device, enable or disable some interfaces or try to force some traffic to see if we get any information on the tcpdump.
Check if any information with SNMP Trap as source appears in the Administration Portal “ON NAC -> Business Profiles -> Default view”.
Troubleshooting:
Access the ON Core via cli and execute some of the following commands to see if any traffic is generated.
TCPDUMP
tcpdump -i <INTERFACE> port 162
LOGS
tail -f /var/log/messages | grep snmptrapd
tail -f /var/log/OpenNAC/OpenNAC-job.log | grep -i snmp
If you have any problems with the SNMP Trap configuration, try to find the appropriate MiB that the device uses to send the MAC notification. Gather as much information as you can to provide the Open Cloud Factory team enough information. This way, they can adapt the code or change settings to enable the correct functioning of the features in the infrastructure.
7.5.17. NetConf & NetBackup
Access the “Configuration -> Configuration Vars -> NetDev” and configure the global parameters for connection and backup.
Also, we can configure the disconnection type (SNMP, CoA and API) in each network devices by accessing “ON CMDB -> Network Devices -> Connection and Backup settings” and applying the desired configuration.
Connection settings
Backup settings

7.5.17.1. NetConf
ON Netconf is an OpenNAC Enterprise Module that enables us to perform the automatic deployment of configurations in Network Devices.
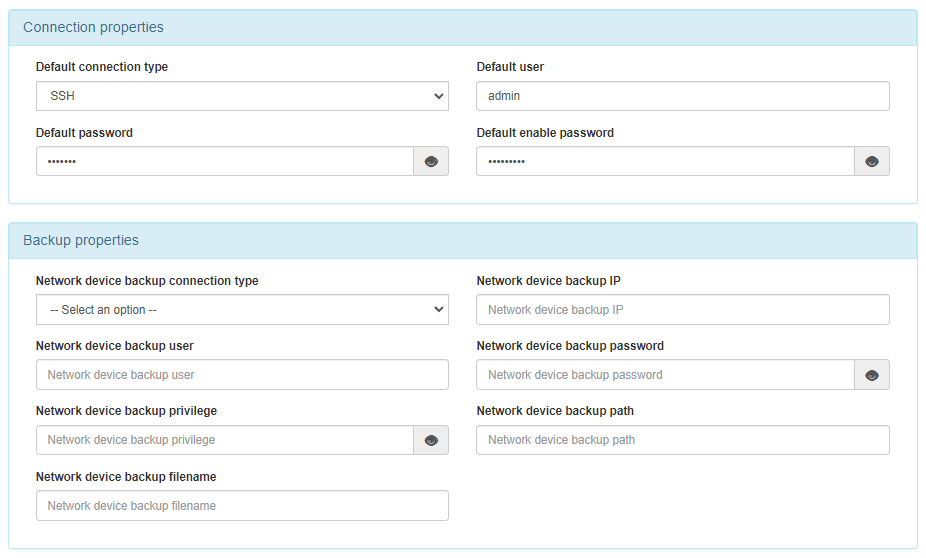
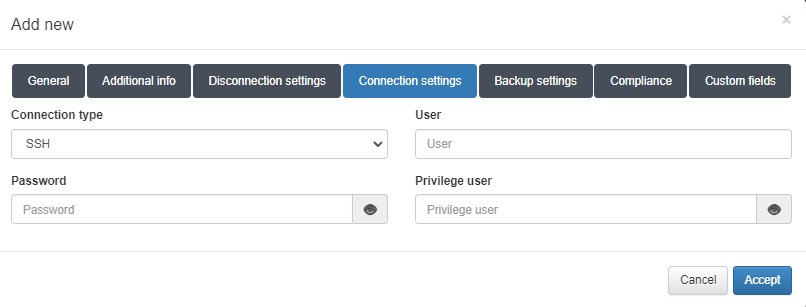
We only need to configure SSH access. This connection configuration, as we explained previously, can be done by configuring global parameters “Configuration -> configuration vars” and also for each device “ON CMDB -> Network Device” and configure the required parameters on the Connection parameters tab, when editing or creating a new network device.
Once the configuration is done, normally, we need to adapt some parameters to perform the connection and the remote configuration.
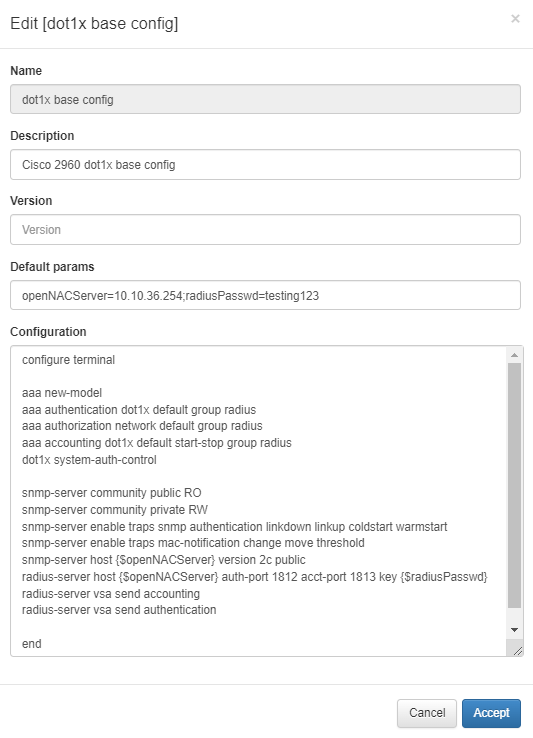
To perform a NetConf, you’ll need to configure a NetConf Macro. Fill in the form and apply the desired commands to perform certain configurations in the configuration field. You can also define variables in the Default parameters field.
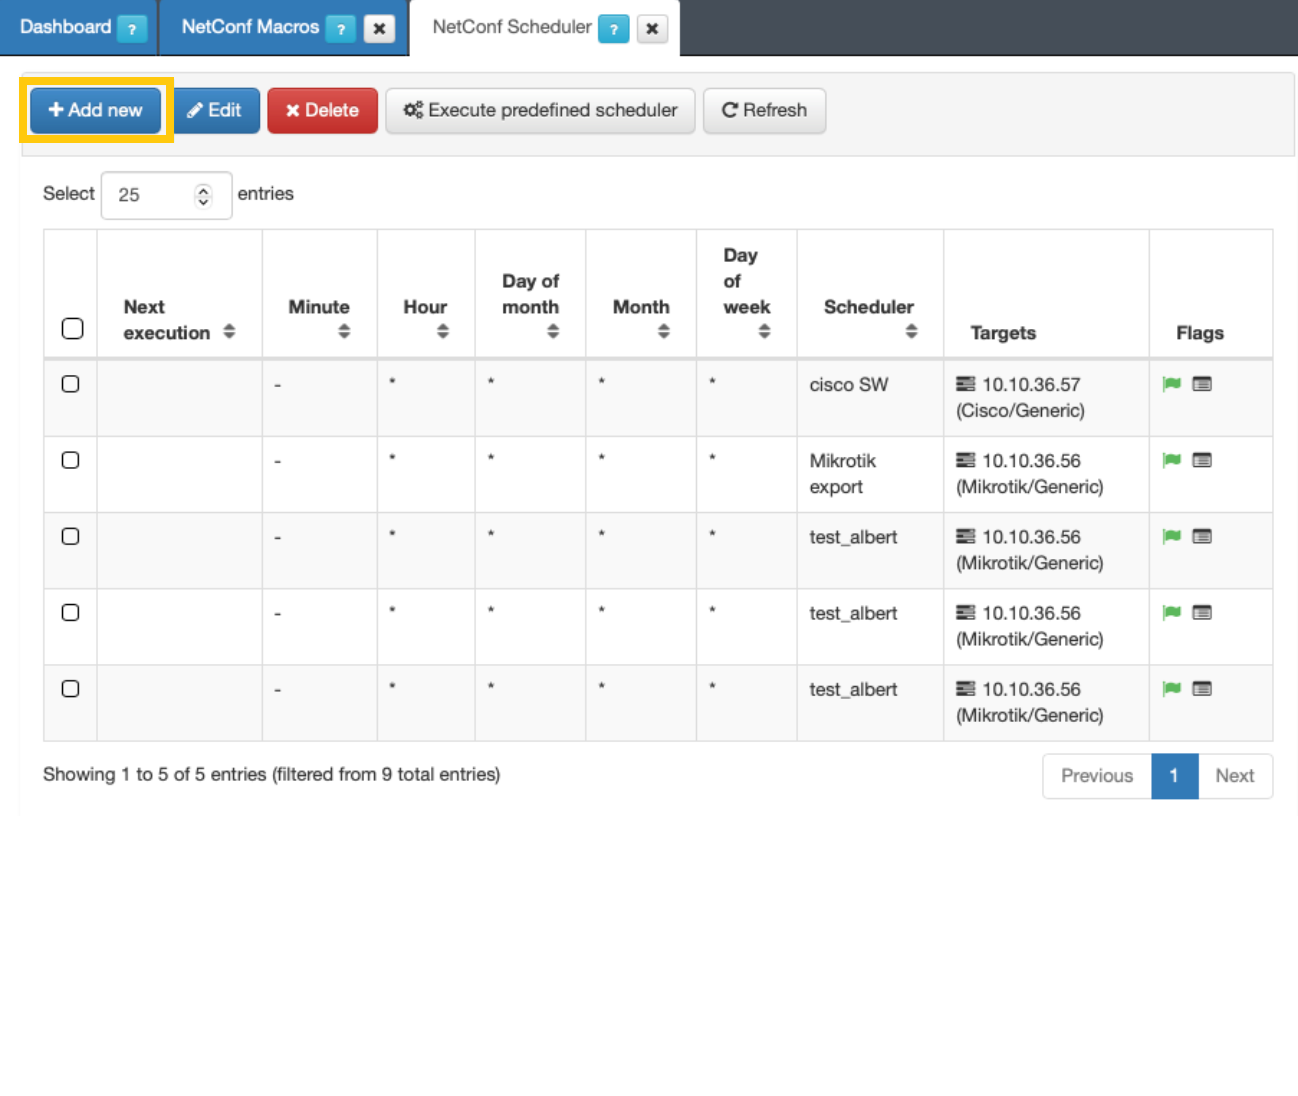
Once you have configured the Macro, access “ON NetConf -> NetConf Scheduler” and configure a new scheduler.
Configure the Scheduler
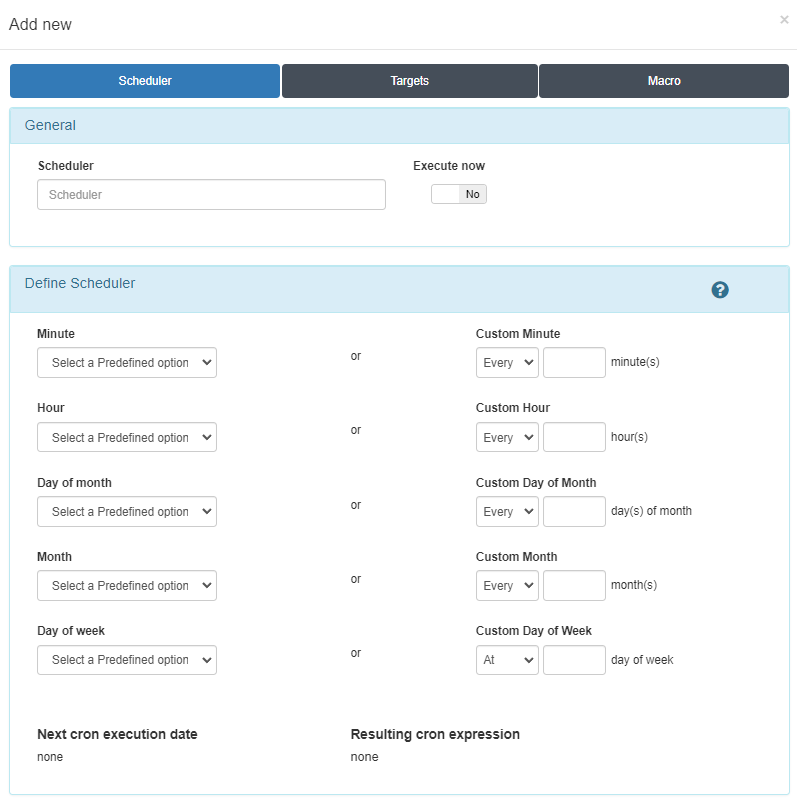
Configure a scheduler to determine when you want to set the defined configuration on the network device.
You can activate the Execute now flag, and the execution will be done in the following minute. Otherwise, you can set a specific time for the execution configuring the parameters in the Define Scheduled field. Notice that once you fulfill all the parameters, the Next cron execution date will be shown.
Select the target device
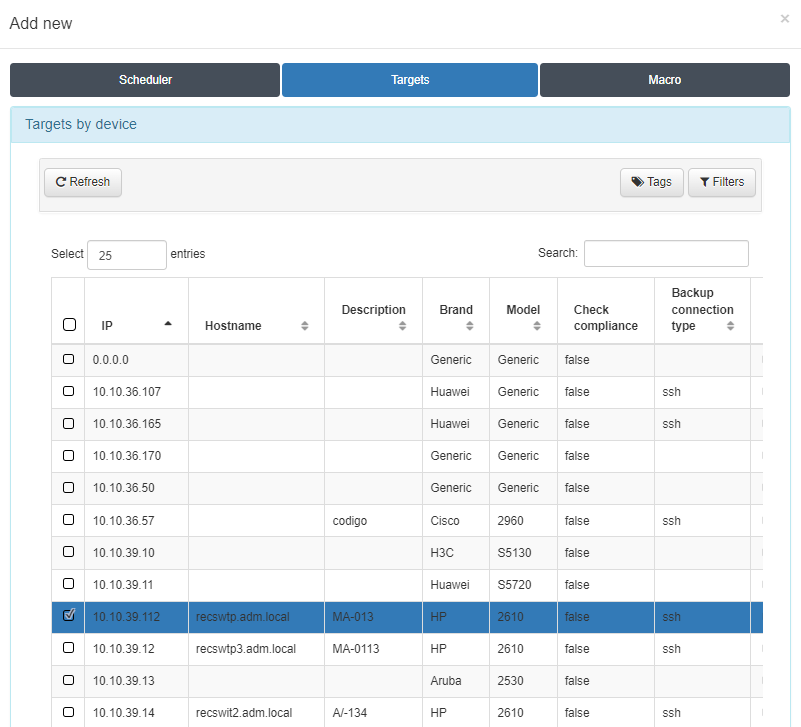
In the Targets field you will be able to select the device (or multiple devices) on which the configuration will be applied.
In this tab, all network devices that have been previously configured in “On CMDB -> Network Devices”, will appear as targets.
Select the configured Macro.
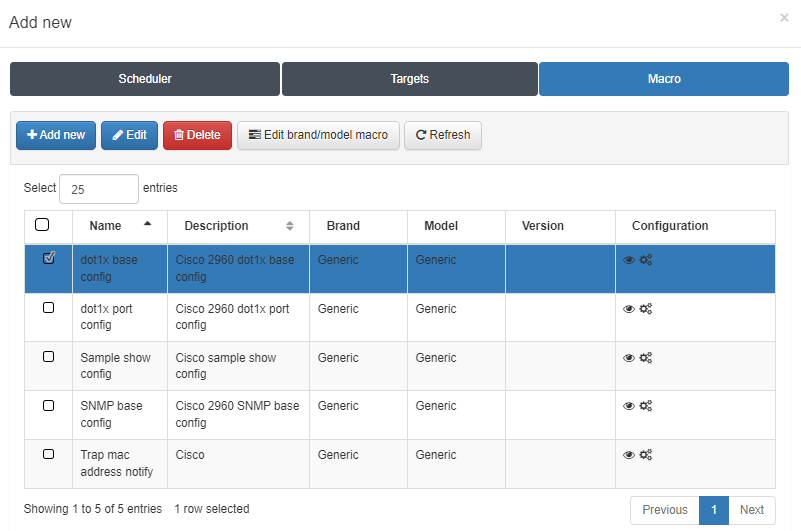
Finally, you will have to select the Macro that you want to apply to the network device.
In this tab, you can select a predefined Macro, create a new one (Add new) or edit an existing one.
Once you have filled in all the tabs with the correct information, click on Accept and wait for the Scheduler to finish the execution.
Once the Scheduler has been executed, check the flag status (green - OK, red - KO) to see if the connection and execution was successful.
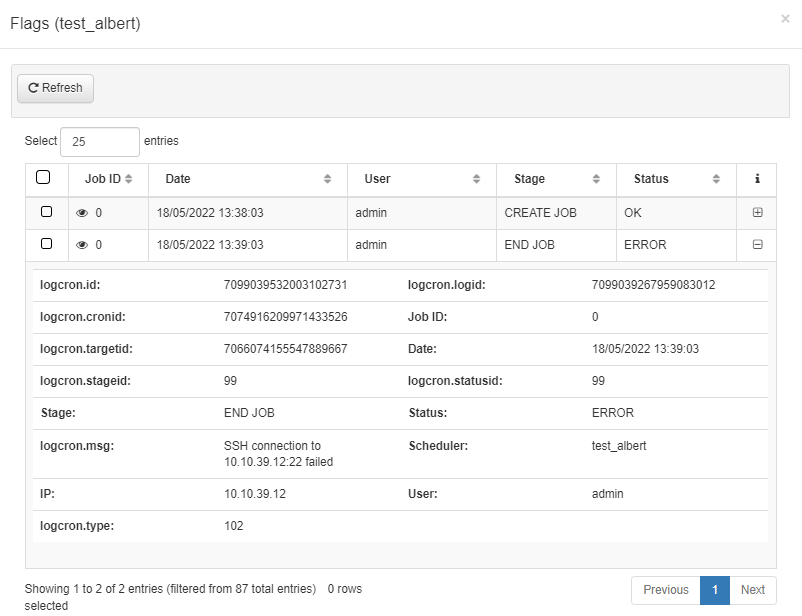
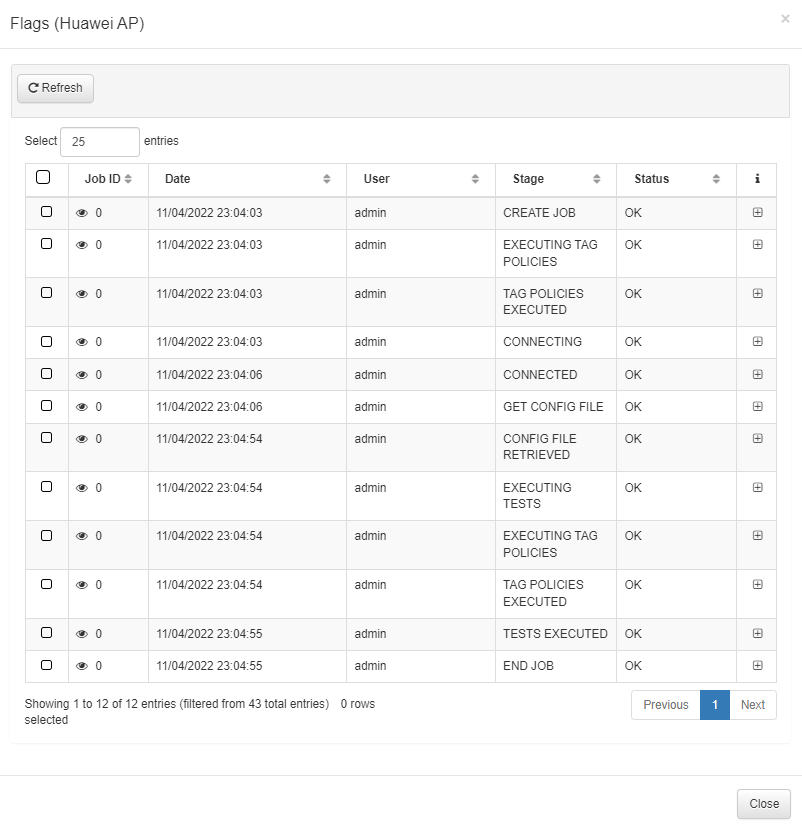
If you click on the “+” icon, you can get more information about the execution and the different steps and the different processes that have been executed. Also, you can click on the eye to check the commands that have been executed in each process.
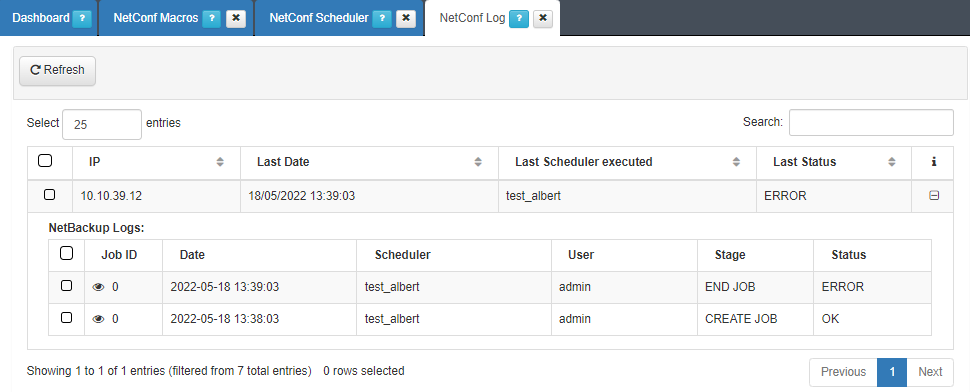
We can also access “ON NetConf -> NetConf Log” to check the different steps of the backup execution. We can check the history of applied changes to all network devices in the “ON NetConf -> View Backups” where we can see and download the configuration Backup.
In this tab, we will be able to see all the logs that refer to the different Schedulers that have been executed for different devices. Also, we can see all the logs for the different executions that have been done on a specific device. If we click the eye, we will be able to see the executed commands in each job.
7.5.17.2. NetBackup
ON NetBackup is an OpenNAC Enterprise Module that includes Network Devices Backup capabilities. It allows us to perform configuration backups from the network device and store them on a remote server.
We will need to configure the backup parameters. This configuration can be done by configuring global parameters “Configuration -> configuration vars -> Backup parameters”. For each device “ON CMDB -> Network Device” configure the required parameters on the Backup parameters tab.
To perform a NetBackup, you will need to access “ON NetBackup -> NetBackup Scheduler” and configure a new scheduler.
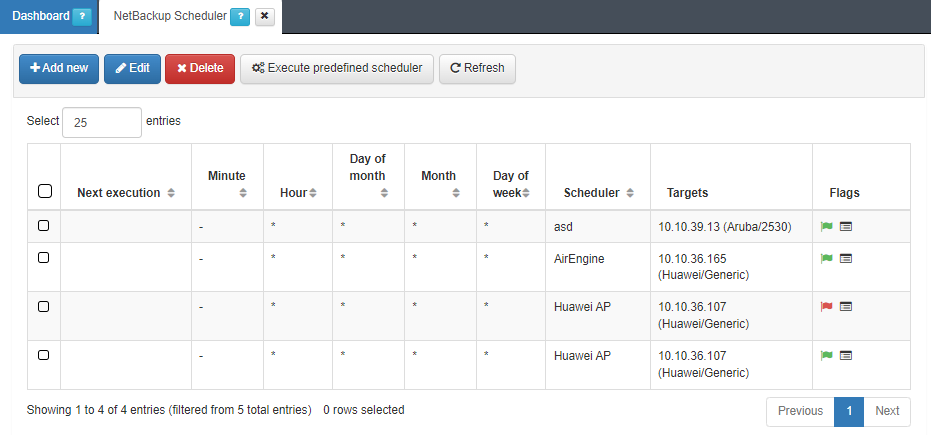
Configure the Scheduler
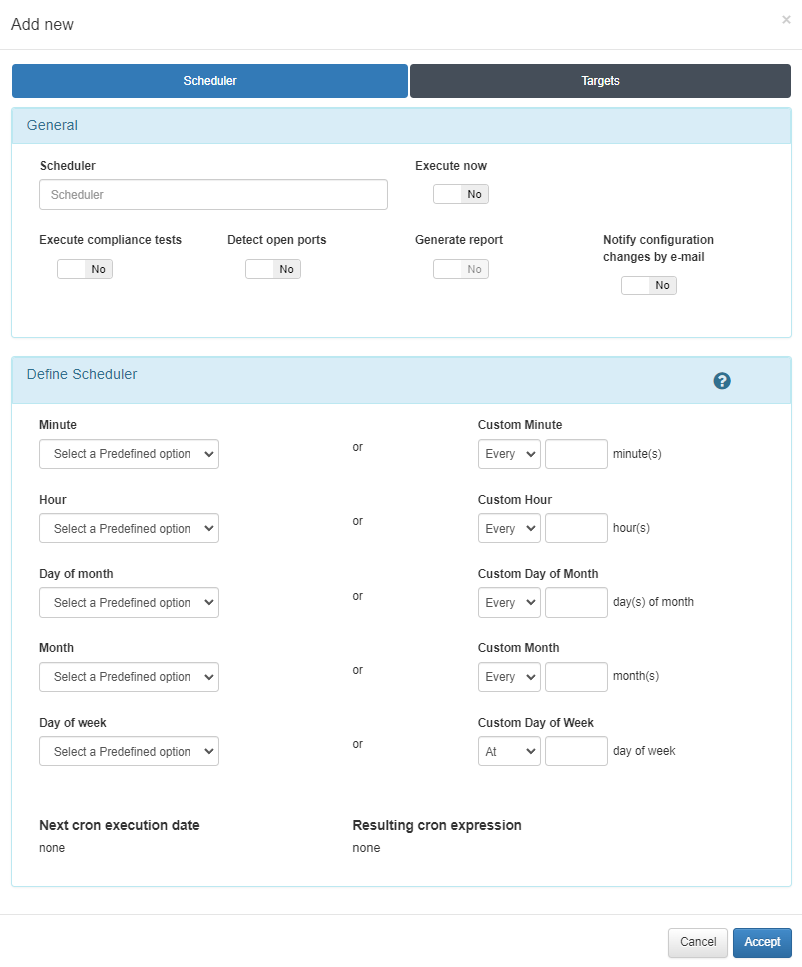
Configure a scheduler to determine when you want to set the defined configuration on the network device.
You can activate the Execute now flag, and the execution will be done in the next minute. Otherwise, you can set a specific time for the execution by configuring the parameters in the Define Scheduled field. Notice that once you fulfill all the parameters, the Next cron execution date will be shown.
Select the target device
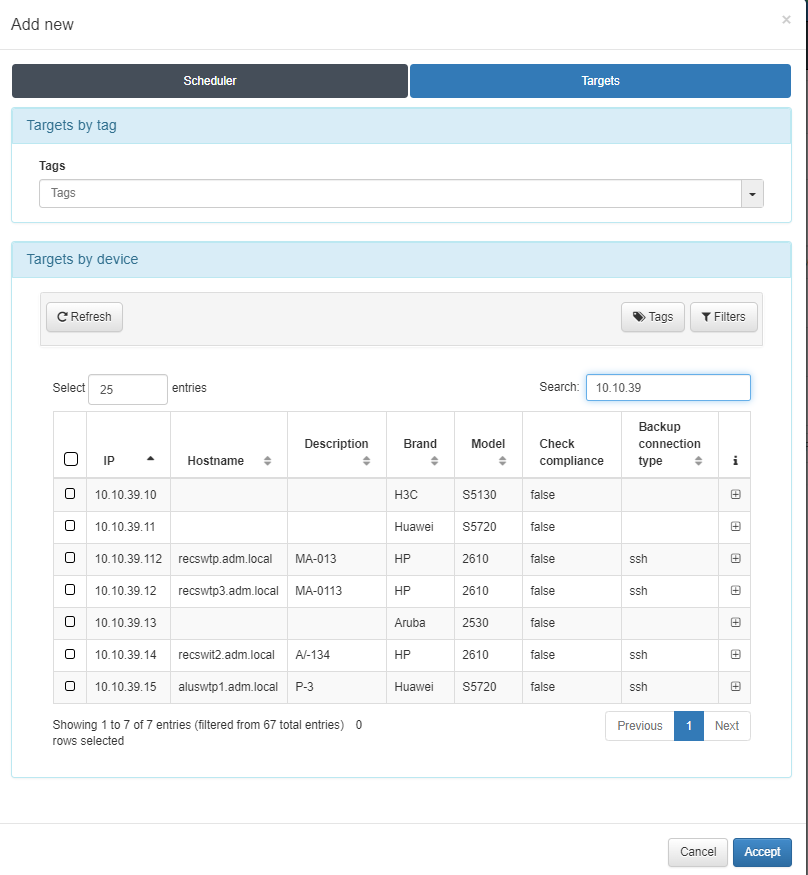
In the Targets field, you will be able to select the device (or multiple devices) on which the configuration will be applied.
In this tab, all network devices that have been previously configured in “On CMDB -> Network Devices”, will appear as targets.
Once it has been executed, check the flag status (green - OK, red - KO) to see if the connection was successful and the execution of the process has been done without errors.
If you click on the “+” icon, you can get more information about the execution and the different steps and the different processes that have been executed.
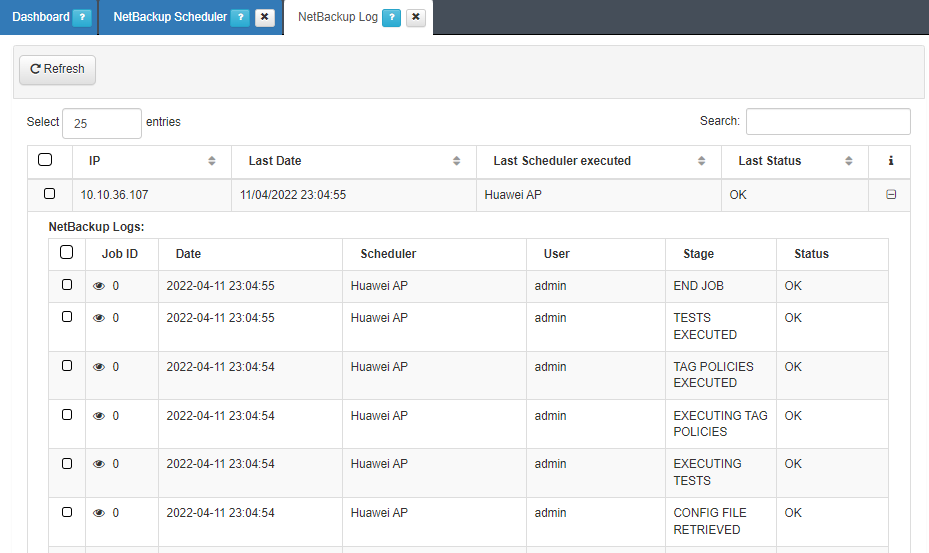
Also, we can access “ON NetBackup -> NetBackup Log” to check with more detail the different steps of the backup execution and all the register of the different executions for each device.
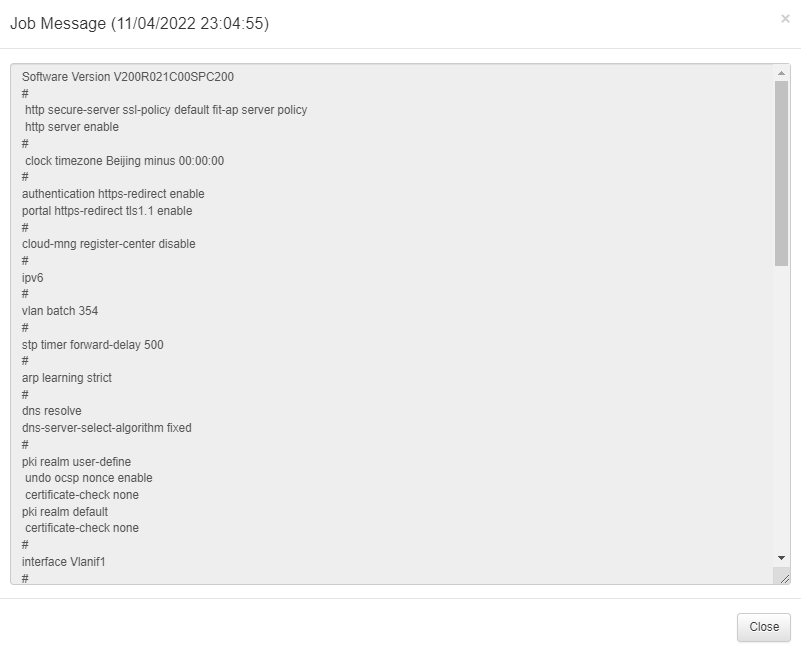
If we click on the eye, we will see the detailed configuration from the network device.
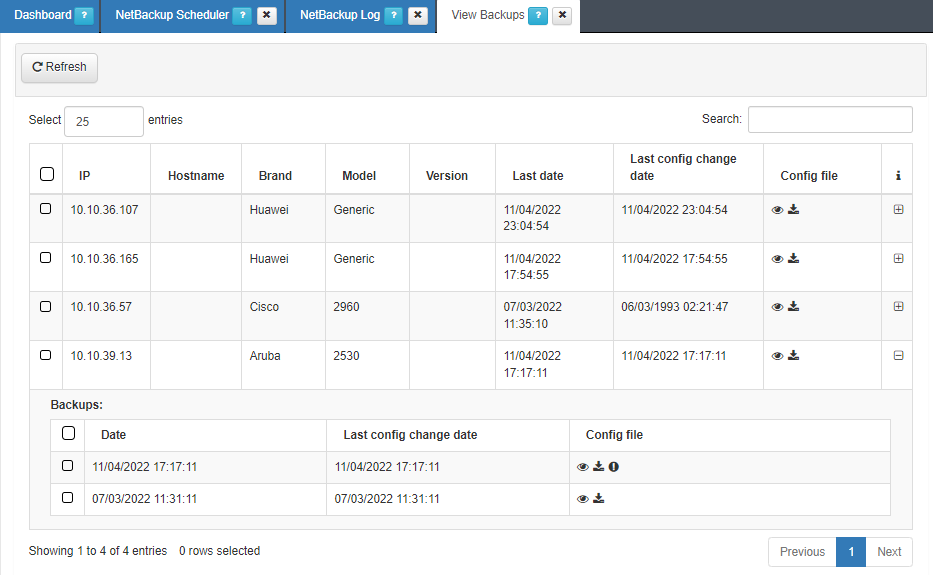
Also, we can check “ON NetBackup -> View Backups” where we can see the different Backups for the different devices, and the register of backups for each device. We can click on the eye to see the configuration and download the configuration Backup.
Try to get as much information as you can to provide the open Cloud Factory team with enough information to adapt the code or change any other settings to correctly enable the feature in your infrastructure.
7.5.17.3. Network Device Compliance
This module enables to validate specific parameters and configurations for any network device. It can be used for audit purposes, for validating the security and the configuration of the network device, etc. You can define the minimum configuration requirements and establish a compliance policy for network devices.
We will need to get the backup configuration from the network device, we have two methods to get it:
Active: Access the network device via ssh to obtain the current configuration backup.
Passive: this method is used when it is not possible to directly access the network device. OpenNAC Enterprise, using SCP, obtains the configuration backup of each network device from a remote repository.
We can configure different test groups that are composed by series of tests and each test is made up of a set of rules (several rules can be grouped in a single test). For example, you can group rules to check: IP, a configured RADIUS server, SSH protocol version, etc.
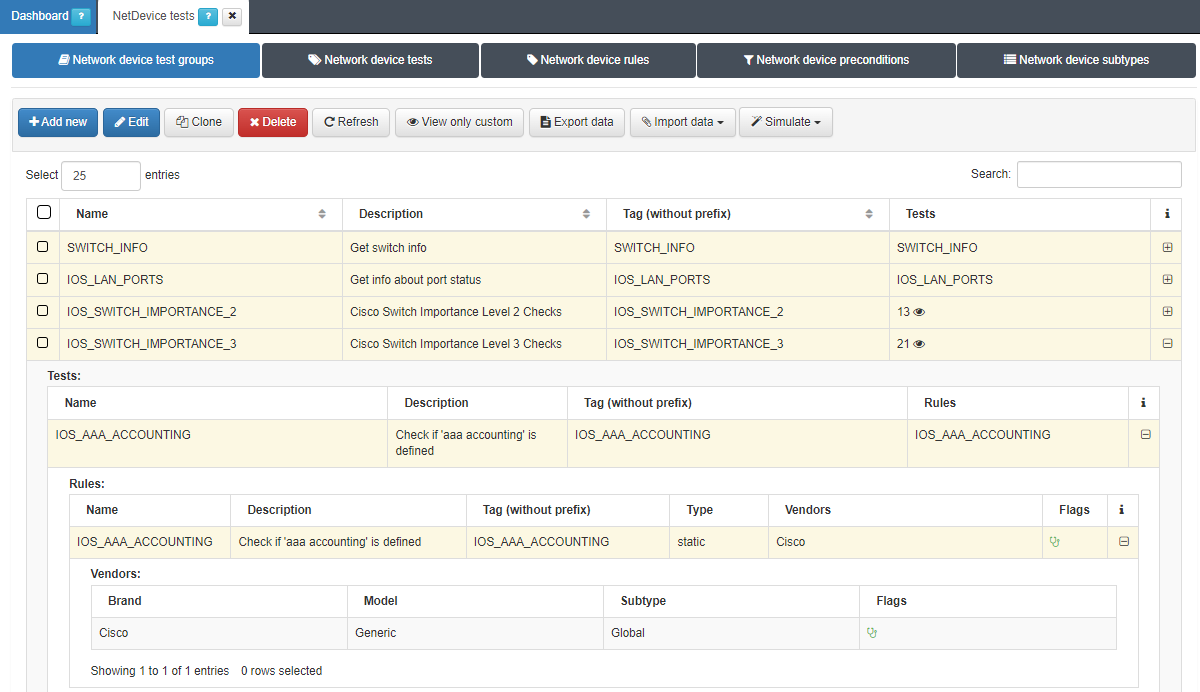
Here we have an example of some test groups, where we can see the different tests that compose those tests groups, as well as the rules that make up the different tests.
For more information about this module, configuration and execution of different tests, consult the Network Device Compliance documentation.