2.2.2.3. OVA node deployment
This section outlines the automated setup process for servers when adding a new node or new nodes from an OpenNAC Enterprise OVA into your existing environment.
If you want to perform a first-time full deployment, you should follow a different procedure indicated in the OVA full deployment section.
Before starting this deployment process, ensure that you fulfill the OpenNAC OVA Deployment Requirements.
2.2.2.3.1. ON Analytics node deployment
Note
If you move from a standalone ON Analytics node to a cluster, have in mind that this new cluster will be generated without data.
If you want to migrate the data from the standalone Analytics node to the new cluster, you will need to perform a manual data migration process.
The procedure will involve backing up the data from the standalone node, shutting down the node, configuring it to join the cluster, and then restoring the data into the cluster. This process may require some downtime, depending on the size of the data and the network speed.
2.2.2.3.2. Creating and copying the SSH key pair
Note
Perform the following steps on the ON Core Principal node.
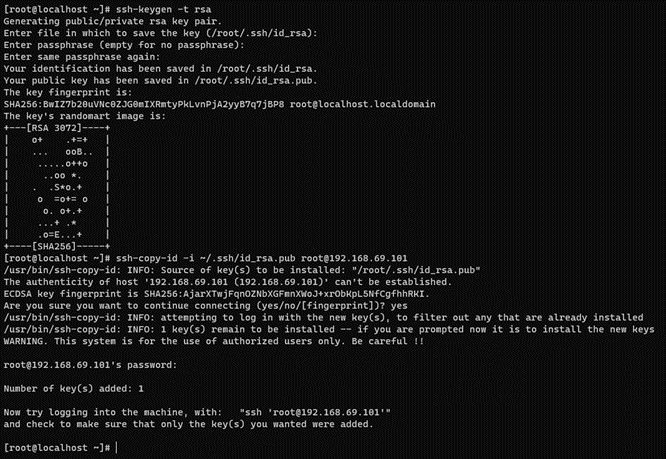
If you do not have an SSH key, execute the following command on the console:
ssh-keygen -t rsa -C ansibleKey
Answer all questions with an “Enter” to use default values. If the SSH key pair already exists and you want to overwrite it, you will be asked if you want to overwrite it, and you should answer the question with “y”.
Now copy the generated public key to the nodes:
ssh-copy-id -i ~/.ssh/id_rsa.pub root@<nodes_IP>
Where <nodes_IP> are the IPs of all the available nodes, ON Principal itself, ON Worker, ON Proxy, ON VPNGW, ON Captive, ON Analytics, ON Aggregator, ON Anly+Agg and/or ON Sensor.
Note
When copying the keys, it’s crucial to do so for all nodes, including the ON Core Principal itself from where the operation is executed.
2.2.2.3.3. Provisioning Ansible
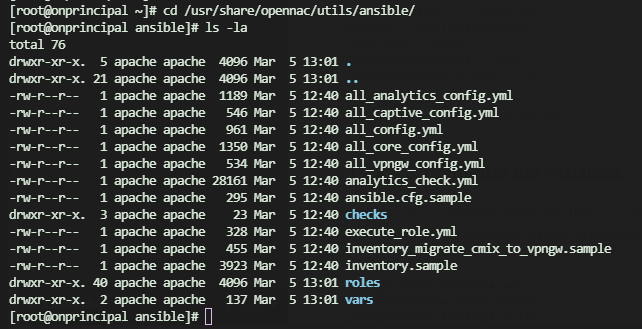
You can find the Ansible configuration playbooks in the directory located at the following path on the ON Core Principal node:
cd /usr/share/opennac/utils/ansible/
ls -la
2.2.2.3.4. Ansible Update
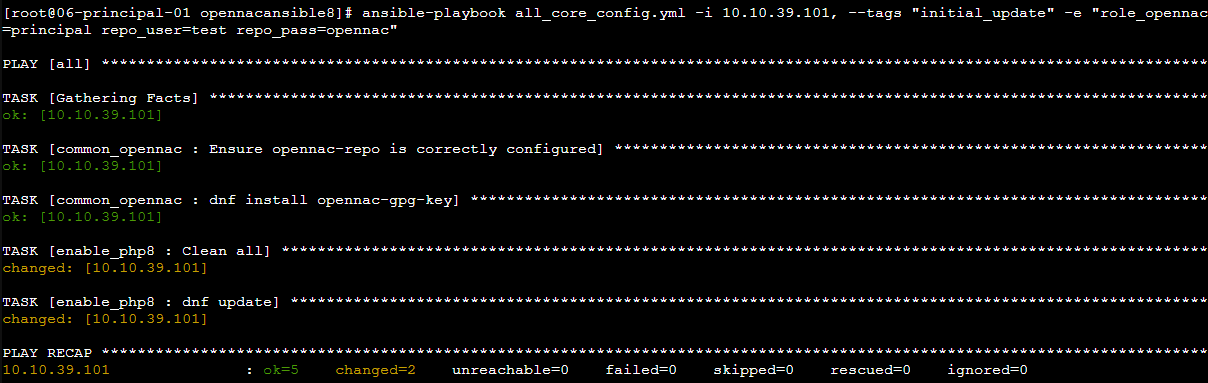
Perform an update to ensure you are running the latest Ansible version:
ansible-playbook all_core_config.yml -i {{ principal_ip }}, --tags "initial_update" -e "role_opennac=principal repo_user={{ repo_user }} repo_pass={{ repo_pass }}"
In the command above, replace the placeholders with appropriate values:
{{ principal_ip }}
{{ repo_user }}
{{ repo_pass }}
2.2.2.3.5. Configuration steps
The Ansible playbooks contains many files, the important ones are the following:
Configuration files: They will carry out the entire environment configuration. By accessing the On Principal path
/usr/share/opennac/utils/ansible/, you will see the following configuration playbooks:all_config.yml: Executes configurations for all roles.all_core_config.yml: Configures principal, worker, proxy.all_analytics_config.yml: Configures analytics, aggregator, analy_agg, and sensor.all_vpngw_config.yml: Configures vpngw.all_captive_config.yml: Configures oncaptive.
Inventory: In the
inventory.samplefile you will find the server names and IP addresses of the nodes.Ansible configuration:
ansible.cfg.samplefile contains the basic Ansible configuration. Here, you need to specify the path to the previously created SSH key.Variables files: Inside the vars/ directory, you will find files containing variables. Replace the values of these variables as explained in more detail later.
Carefully follow the steps in the specified order.
2.2.2.3.5.1. Build the inventory file
Note
You should only fill the inventory with the nodes you are going to deploy.
Use the servers’ IPs to populate the inventory. First, copy the inventory.sample to the inventory and then edit the file (using a tool like Vim, for instance) to add the IPs as shown below. Always check the .sample file first for any potential updates.
cd /usr/share/opennac/utils/ansible/
cp inventory.sample inventory
vim inventory
You will see the following file:
; This is the file where you must declare your server names and IP addresses

; The general syntax followed is:
; [group]
; <hostname> ansible_ssh_host=<SSH_IP> private_ip_address=<PRIVATE_IP> role_opennac=<role>
; The extra parameter zone_id only goes in analytics servers when configuring an ELK HA architecture

; The hostname chosen will be changed on the server
; In some cases, public and private IP may be the same
; The role_opennac can be one of these: [ aggregator | analytics | analy+agg | sensor | principal | proxy | worker | vpngw ]


[principal]

;onprincipal ansible_ssh_host=192.168.69.101 private_ip_address=10.10.39.101 role_opennac=principal

[worker]

;for a single worker
;onworker ansible_ssh_host=10.10.36.120 private_ip_address=192.168.69.120 role_opennac=worker

;for more than one worker
;onworker01 ansible_ssh_host=10.10.36.121 private_ip_address=192.168.69.121 role_opennac=worker
;onworker02 ansible_ssh_host=10.10.36.122 private_ip_address=192.168.69.122 role_opennac=worker
;onworker03 ansible_ssh_host=10.10.36.123 private_ip_address=192.168.69.123 role_opennac=worker

[proxy]

;for a single proxy
;onproxy ansible_ssh_host=10.10.36.133 private_ip_address=192.168.69.133 role_opennac=proxy

;for more than one proxy
;onproxy01 ansible_ssh_host=10.10.36.134 private_ip_address=192.168.69.134 role_opennac=proxy
;onproxy02 ansible_ssh_host=10.10.36.135 private_ip_address=192.168.69.135 role_opennac=proxy

[captive]

;for a single captive
;oncaptive ansible_ssh_host=10.10.36.140 private_ip_address=192.168.69.140 role_opennac=captive

;for more than one captive
;oncaptive01 ansible_ssh_host=10.10.36.141 private_ip_address=192.168.69.141 role_opennac=captive
;oncaptive02 ansible_ssh_host=10.10.36.142 private_ip_address=192.168.69.142 role_opennac=captive
;oncaptive03 ansible_ssh_host=10.10.36.143 private_ip_address=192.168.69.143 role_opennac=captive

[analytics]

;for a single analy+agg
;onanalytics ansible_ssh_host=192.168.69.151 private_ip_address=10.10.39.151 role_opennac=analy+agg

;for a single analytics
;onanalytics ansible_ssh_host=192.168.69.156 private_ip_address=10.10.39.156 role_opennac=analytics

;for an analytics cluster
;onanalytics01 ansible_ssh_host=10.10.36.152 private_ip_address=192.168.69.152 role_opennac=analytics zone_id=1
;onanalytics02 ansible_ssh_host=10.10.36.153 private_ip_address=192.168.69.153 role_opennac=analytics zone_id=1
;onanalytics03 ansible_ssh_host=10.10.36.154 private_ip_address=192.168.69.154 role_opennac=analytics zone_id=1

[aggregator]

;for a single aggregator
;onaggregator ansible_ssh_host=10.10.36.160 private_ip_address=192.168.69.160 role_opennac=aggregator

;for an aggregator cluster
;onaggregator01 ansible_ssh_host=10.10.36.161 private_ip_address=192.168.69.161 role_opennac=aggregator
;onaggregator02 ansible_ssh_host=10.10.36.162 private_ip_address=192.168.69.162 role_opennac=aggregator
;onaggregator03 ansible_ssh_host=10.10.36.163 private_ip_address=192.168.69.163 role_opennac=aggregator

[sensor]

;for a single sensor
;onsensor ansible_ssh_host=192.168.69.171 private_ip_address=10.10.39.171 role_opennac=sensor

;for more than one sensor
;onsensor01 ansible_ssh_host=192.168.69.172 private_ip_address=10.10.39.172 role_opennac=sensor
;onsensor02 ansible_ssh_host=192.168.69.173 private_ip_address=10.10.39.173 role_opennac=sensor

[vpngw]

;for a single vpngw
;onvpngw ansible_ssh_host=10.10.36.181 private_ip_address=192.168.69.181 role_opennac=vpngw root_ssh_password=password farm_name=farm01

;for more than one vpngw
;onvpngw01 ansible_ssh_host=10.10.36.182 private_ip_address=192.168.69.182 role_opennac=vpngw root_ssh_password=password farm_name=farm01
;onvpngw02 ansible_ssh_host=10.10.36.183 private_ip_address=192.168.69.183 role_opennac=vpngw root_ssh_password=password farm_name=farm01

[cores:children]
principal
worker
proxy

; Please note that the group "principal" must always be uncommented
Understand the structure of the inventory:
<hostname> ansible_ssh_host=<PUBLIC_IP> private_ip_address=<PRIVATE_IP> role_opennac=<role>
<hostname> ansible_ssh_host=<PUBLIC_IP> private_ip_address=<PRIVATE_IP> role_opennac=analytics zone_id=<zone_id>
<hostname> ansible_ssh_host=<PUBLIC_IP> private_ip_address=<PRIVATE_IP> role_opennac=vpngw farm_name=<farm_name> root_ssh_password=<root_ssh_password>
Where:
<hostname>: The name of the server, if it does not fit, the playbook will change it for the one you write on the inventory.
<PUBLIC_IP>: The accessible IP needed to make the SSH connection.
<PRIVATE_IP>: The internal IP needed in the servers to fill the /etc/hosts file or to communicate with each other. Sometimes you may not have this IP; in that case, fill it with the <PUBLIC_IP> as well.
<role>: The OpenNAC role needed to know, for example, what healthcheck configures. It can be one of these: [ aggregator | analytics | analy+agg | sensor | principal | proxy | worker | vpngw | captive].
<zone_id>: This special parameter only needs to be written in analytics servers when configuring an ELK HA architecture.
<farm_name> and <root_ssh_password>: These special parameters only need to be written for the vpngw role.
Note
You can add or comment servers according to your needs. Do NOT comment or delete the groups.
Do not add any extra space between strings.
After editing the inventory, remember to save before exiting the file.
The following command will help you see the hosts you have configured in your inventory. Ensure that all the nodes are set correctly.
grep -v ';\|^$' inventory
The output would look like the following one. It displays only the nodes you have in your inventory. In our example, we populate the inventory with a new worker node and 2 new analytics nodes:
In our example, we already have one worker in our environment, so now, the new worker node should be positioned in the “for more than one worker” group, occupying the positions onworker02.
Just like in the worker node case, as we already have one analytics node, to add two new analytics, they should occupy the positions onanalytics02 and onanalytics03.
[root@rocky9base opennacansible8-1.2.4]# grep -v ';\|^$' inventory
[principal]
[worker]
onworker02 ansible_ssh_host=10.10.36.122 private_ip_address=192.168.69.122 role_opennac=worker
[proxy]
[captive]
[analytic]
onanalytics02 ansible_ssh_host=10.21.65.228 private_ip_address=10.21.65.228 role_opennac=analytics
onanalytics03 ansible_ssh_host=10.21.65.229 private_ip_address=10.21.65.229 role_opennac=analytics
[aggregator]
[sensor]
[vpngw]
[cores:children]
principal
worker
proxy
2.2.2.3.5.2. Build the Ansible configuration file
Similar to the inventory setup:
Copy the
ansible.cfg.samplefile toansible.cfgand then edit it to include the path to your private_key_file (the ssh key that you previously have copied to the server).Indicate the path to your inventory file.
There are more variables in this file you may want to change, but these are the recommended and basic ones. Always check the .sample file first for any potential updates.
cd /usr/share/opennac/utils/ansible/
cp ansible.cfg.sample ansible.cfg
If you have modified the inventory path or the SSH Key is not the default one, edit the file by executing the following command. Otherwise, leave the default values.
vim ansible.cfg
ansible.cfg.sample file:
[defaults]
timeout = 30
inventory = inventory
host_key_checking = False
remote_user = root
private_key_file = ~/.ssh/id_rsa
log_path = /var/log/ansible.log
roles_path = ./roles
display_skipped_hosts = False
show_task_path_on_failure = True

[ssh_connection]
control_path = %(directory)s/%%h-%%r
2.2.2.3.5.3. Configure the variables
There is a vars/ directory inside the the /usr/share/opennac/utils/ansible/ directory, in which you will find the variables. It is crucial to look at all the variables and understand their usage, as explained below.
cd /usr/share/opennac/utils/ansible/
[root@localhost ansible]# ls -la vars/
 total 16
 -rw-r--r-- 1 apache apache 1164 Mar  5 12:40 vars_analytics.yml
 -rw-r--r-- 1 apache apache 2521 Mar  5 12:40 vars_core.yml
 -rw-r--r-- 1 apache apache  742 Mar  5 12:40 vars_general.yml
 -rw-r--r-- 1 apache apache  247 Mar  5 12:40 vars_migrate_cmix_to_vpngw.yml
 -rw-r--r-- 1 apache apache    0 Mar  5 12:40 vars_vpngw.yml
Note
DO NOT comment or delete the variables unless it is specifically said that you can delete lines. Never delete the variable name -if you are not going to use a variable, leave it with the default variable.
For example, if your deployment does not have a Sensor, leave the Sensor variables with the default value.
These are the variables you will find inside each file:
vars_general.yml: These are the mandatory common variables for every deployment.
vars_analytics.yml: Variables related to the Analytics, Aggregator, Analytics+Aggregator, and Sensor deployments, including the ones for the installation (without the OpenNAC OVA deployed), and the ones for the configuration.
vars_core.yml: Variables related to Core roles including the ones for the installation (without the OpenNAC OVA deployed), principal configuration, proxy configuration, captive configuration, worker configuration and worker replication.
vars_vpngw.yml: Variables related to the VPNGW deployment, including the ones for the installation (without the OpenNAC OVA deployed), and the ones for the configuration.
Edit the necessary files to provide values for the variables (most of them can stay with the default value). A variable misconfiguration can lead to an execution error.
Warning
Since you are adding a new node, make sure that the variables you configure correspond to those already configured in the current structure.
Adding a new node, will trigger a reconfiguration of the entire structure.
2.2.2.3.5.3.1. vars_general.yml
vim vars/vars_general.yml
Common variables (mandatory for every deployment)
##########
# COMMON #
##########

inventory: 'static'
timezone_custom: 'Europe/Madrid'
# A NTP server where you must get the synchronization. Add or delete lines if necessary.
ntpserv:
- 'hora.roa.es'
- '3.es.pool.ntp.org'


# The version packages that we want to be installed
# It could be the stable version or the testing one
# Change it if necessary
deploy_testing_version: 'no'

# The necessary user:password to access the repository
# Change to the actual repo user
repo_user: 'user'
# Change to the actual repo password
repo_pass: 'password'

# The portal password for the user admin
portal_pass: 'opennac'

# Configure nodes if in deploy
config: 'true'

# Collectd password
collectd_password: "changeMeAsSoonAsPossible"

# Do not touch the following variables
ansible_ssh_timeout: '7200'
ansible_python_interpreter: '/usr/bin/python3'
inventory: The default value is static. Set to dynamic when deploying in cloud with AWS and tags.
timezone_custom: The timezone where the server is set. You can execute the command timedatectl list-timezones to list valid timezones.
ntpserv: NTP servers where you must get the synchronization.
deploy_testing_version: Set to “yes” if you want to use the testing version, or “no” for the stable version. The default value is “no” as it is the stable version.
repo_user: The user to access the OpenNAC repository.
repo_pass: The password to access the OpenNAC repository.
portal_pass: The password to access the OpenNAC portal.
config: Configure nodes if in deploy, the default value is set to ‘true’.
collectd_password: The CollectD password.
ansible_ssh_timeout: Timeout duration in seconds to stablish a SSH connection. The default value is ‘7200’.
ansible_python_interpreter: Path to Python interpreter ‘/usr/bin/python3’.
Warning
For the correct Ansible playbooks execution, it is necessary to properly enter the repository credentials in the repo_user and repo_pass variables.
2.2.2.3.5.3.2. vars_analytics.yml
vim vars/vars_analytics.yml
Analytics and Aggregator
############################
# ANALYTICS AND AGGREGATOR #
############################

# Desired name for the cluster (to configure elasticsearch.yml)
cluster_name: 'on_cluster'
# The number of shards to split the indexes
number_of_shards: 6
# At least one replica per primary shard
number_of_replicas: 1
cluster_name: Desired name for the cluster (to configure elasticsearch.yml).
number_of_shards: The number of shards to split the indexes
number_of_replicas: The number of replicas per primary shard. It should be at least 1.
These variables only impact clusters. You can leave the default values. Increasing the number of shards can improve load distribution in a cluster environment, while configuring replicas ensures redundancy and fault tolerance.
For example, increasing the number of shards in an environment with 5 analytics nodes can help distribute the load evenly among nodes, ensuring availability. For further details, see the ON Analytics cluster section.
Sensor
##########
# SENSOR #
##########

# The interface that captures the packets, if it is not valid, it will be taken automatically
SNIFFER_INTERFACE: 'ens35'

# There are two capture methods: SPAN mode and SSH mode
# If SSH mode deployment wanted, change the following variable to 'SSH'
deployment_mode: 'SPAN'


# SSH MODE (if you have selected deployment_mode: 'SSH')
# To configure /usr/share/opennac/sensor/sniffer.sh
remoteHostIP: '10.10.36.121' # The remote IP of the device that needs to be captured
remoteInterface: 'eth0' # The remote interface where the information is going to be collected
remoteHostPassword: opennac
SNIFFER_INTERFACE: The interface that captures packets. It is important to select the assigned span interface, otherwise, it will be taken automatically.
deployment_mode: There are two capture methods: SPAN mode and SSH mode. Change the following variable to ‘SSH’ or ‘SPAN’. The default value is “SPAN”.
remoteHostIP: The remote IP of the device that needs to be captured (if you have selected deployment_mode: ‘SSH’).
remoteInterface: The remote interface where the information is going to be collected (if you have selected deployment_mode: ‘SSH’)
remoteHostPassword: opennac (if you have selected deployment_mode: ‘SSH’)
2.2.2.3.5.3.3. vars_core.yml
vim vars/vars_core.yml
Common
###########################
# COMMON                  #
###########################

# Mail variables
criticalAlertEmail: 'notify1@opennac.org,notify2@opennac.org'
criticalAlertMailTitle: 'openNAC policy message [%MSG%]'
criticalAlertMailContent: 'Alert generated by policy [%RULENAME%], on %DATE%.\n\nData:\nMAC: %MAC%\nUser: %USERID%\nIP Switch: %SWITCHIP%\nPort: %SWITCHPORT% - %SWITCHPORTID%\n'

# CLIENTS.CONF
# Edit the following lines in order to configure /etc/raddb/clients.conf
# You may either need to add new lines or to delete some.
# Follow the structure indicated below:
clients_data:
  -
    ip: '192.168.0.0/16'
    shortname: 'internal192168'
    secret: 'testing123'
  -
    ip: '172.16.0.0/16'
    shortname: 'internal17216'
    secret: 'testing123'

# Variables to configure /etc/postfix/main.cf and /etc/postfix/generic
relayhostName: 'relay.remote.com'
relayhostPort: '25'
mydomain: 'acme.local'
emailAddr: 'openNAC@notifications.mycompany.com'
criticalAlertEmail: Email or set of emails where you want to receive alerts.
criticalAlertMailTitle: Title of the alert email.
criticalAlertMailContent: Content of the critical email.
clients_data: To configure /etc/raddb/clients.conf, add as many clients as you need
ip: ‘X.X.X.X/X’
shortname: desired client name
secret: desired password
relayhostName: FQDN of the SMTP server to relay the emails (next-hop destination(s) for non-local email). Configure /etc/postfix/main.cf and /etc/postfix/generic.
relayhostPort: Port of the “relayhostName” to relay the emails on. Configure /etc/postfix/main.cf and /etc/postfix/generic.
mydomain: The mydomain parameter specifies the local internet domain name. Configure /etc/postfix/main.cf and /etc/postfix/generic.
emailAddr: The email address used as the sender of the send alerts. Configure /etc/postfix/main.cf and /etc/postfix/generic.
MYSQL
########################
# MYSQL                #
########################

# mysql passwords
mysql_root_password: "opennac" # Password for mysql root
mysql_healthcheck_password: "Simpl3PaSs"
mysql_replication_password: "opennac"
mysql_opennac_service_password: "opennac"

path: /tmp/ # The path to save the dump .sql file

# Only necessary if you are going to change the mysql password with change_passwords role
# If it is not the case, let it as default
# Is you have a virgin OVA, the old root password will be opennac
# It is important that all the nodes with mysql have the same root password configured
current_mysql_root_password: "opennac"
mysql_root_password: Password for mysql root user.
mysql_healthcheck_password: Password for the healthcheck service.
mysql_replication_password: Password for mysql nagios user.
mysql_opennac_service_password: Password for the OpenNAC Enterprise API user.
path: The path to save the dump .sql file.
current_mysql_root_password: Only necessary if you are going to change the mysql password with change_passwords role. If it is not the case, let it as default.
Proxy
#######################
# PROXY CONFIGURATION #
#######################

proxy_workers_radius_sharedkey: 'CHANGE_ME' # The string to encrypt the packets between the Proxy Servers and Backends

# PROXY.CONF
# Edit the following lines in order to configure /etc/raddb/proxy.conf
# You may either need to add new lines (follow the "-" structure) or to delete some.
pools_data:
  -
    namepool: 'auth'
    namerealm: 'DEFAULT'

# CLIENTS.CONF
# Edit the following lines in order to configure /etc/raddb/clients.conf
# You may either need to add new lines or to delete some.
# Follow the structure indicated below:
clients_data_PROXY:
  -
    ip: '192.168.0.0/16'
    shortname: 'internal192168'
    secret: 'testing123'
  -
    ip: '172.16.0.0/16'
    shortname: 'internal17216'
    secret: 'testing123'
proxy_workers_radius_sharedkey: The string to encrypt the packets between the Proxy Servers and Backends.
pools_data: To configure /etc/raddb/proxy.conf, add or delete as many as you need
namepool: the name of the pool
namerealm: the name of the realm
clients_data_PROXY: To configure /etc/raddb/clients.conf, add or delete as many clients as you need. If you have a proxy, here you will configure the proxy IP and password.
ip: ‘X.X.X.X/X’
shortname: desired client name
secret: the previously defined shared key (do not change this variable)
2.2.2.3.5.3.4. vars_vpngw.yml
Currently, there are no particular variables for the VPNGW.
2.2.2.3.6. Change the default passwords
It is necessary to change the default passwords of the new nodes you are adding as a fundamental security measure.
Executing the change_passwords playbook will modify the OpenNAC services passwords. The passwords that this playbook configures in the environment are those that have been previously configured in the variable files. They are the following:
vars/vars_general.yml: portal_pass, collectd_password
vars/vars_core.yml: mysql_root_password, mysql_healthcheck_password, mysql_replication_password, mysql_opennac_service_password,proxy_workers_radius_sharedkey
Warning
It is important that the variable in vars/vars_core.yml with name current_mysql_root_password is correctly configured, otherwise it will not be possible to connect to mysql to change the password and the playbook execution will fail.
The OVA default password for this variable is opennac.
To launch the playbooks, on the ON Core Principal server, go to the following path:
cd /usr/share/opennac/utils/ansible/
Execute the following command to launch the playbook:
ansible-playbook execute_role.yml -e "role=change_passwords"
If you need more information refer to the Bulk Password management section.
2.2.2.3.7. Add all nodes to the inventory file
Now that you have the same passwords for OpenNAC Enterprise services in all the nodes, the next step is to configure all the nodes within the OpenNAC Enterprise environment. To do this, you need to add all the nodes of the environment to the inventory file. This includes both the original nodes and the newly added ones.
You will repeat the steps you have performed on the Build the inventory section, but including all the nodes.
Use the servers’ IPs to populate the inventory. First, copy the inventory.sample to the inventory and then edit the file (using a tool like Vim, for instance) to add the IPs as shown below. Always check the .sample file first for any potential updates.
cp inventory.sample inventory
vim inventory
To help you organize your configuration flow, you can execute a command to visualize which nodes you have to configure in your file.
grep -v ';\|^$' inventory
The output would look like the following one. It displays only the nodes you have in your environment. In our example, 1 onprincipal, 2 onworker, 1 onproxy, 3 onanalytics, and 1 onaggregator:
[root@rocky9base opennacansible8-1.2.4]# grep -v ';\|^$' inventory
[principal]
onprincipal ansible_ssh_host=10.21.65.219 private_ip_address=10.21.65.219 role_opennac=principal
[worker]
onworker01 ansible_ssh_host=10.21.65.234 private_ip_address=10.21.65.234 role_opennac=worker
onworker02 ansible_ssh_host=10.21.65.235 private_ip_address=10.21.65.235 role_opennac=worker
[proxy]
onproxy ansible_ssh_host=10.21.65.202 private_ip_address=10.21.65.202 role_opennac=proxy
[captive]
[analytics]
onanalytics01 ansible_ssh_host=10.21.65.227 private_ip_address=10.21.65.227 role_opennac=analytics
onanalytics02 ansible_ssh_host=10.21.65.228 private_ip_address=10.21.65.228 role_opennac=analytics
onanalytics03 ansible_ssh_host=10.21.65.229 private_ip_address=10.21.65.229 role_opennac=analytics
[aggregator]
onaggregator ansible_ssh_host=10.21.65.230 private_ip_address=10.21.65.230 role_opennac=aggregator
[sensor]
[vpngw]
[cores:children]
principal
worker
proxy
2.2.2.3.8. Launch the playbooks
Make sure to launch Ansible within a screen. This is to ensure continuity in case the connection to the Principal is lost.
To launch the playbooks, on the ON Core Principal server, go to the following path:
cd /usr/share/opennac/utils/ansible/
By running the following command, it will configure all the nodes you have previously stated in your inventory:
ansible-playbook all_config.yml
Note
Please, be patient. This execution process may take some time to finish.
The playbook execution output should look as follows. This example configures onprincipal, onanalytics, and onsensor:
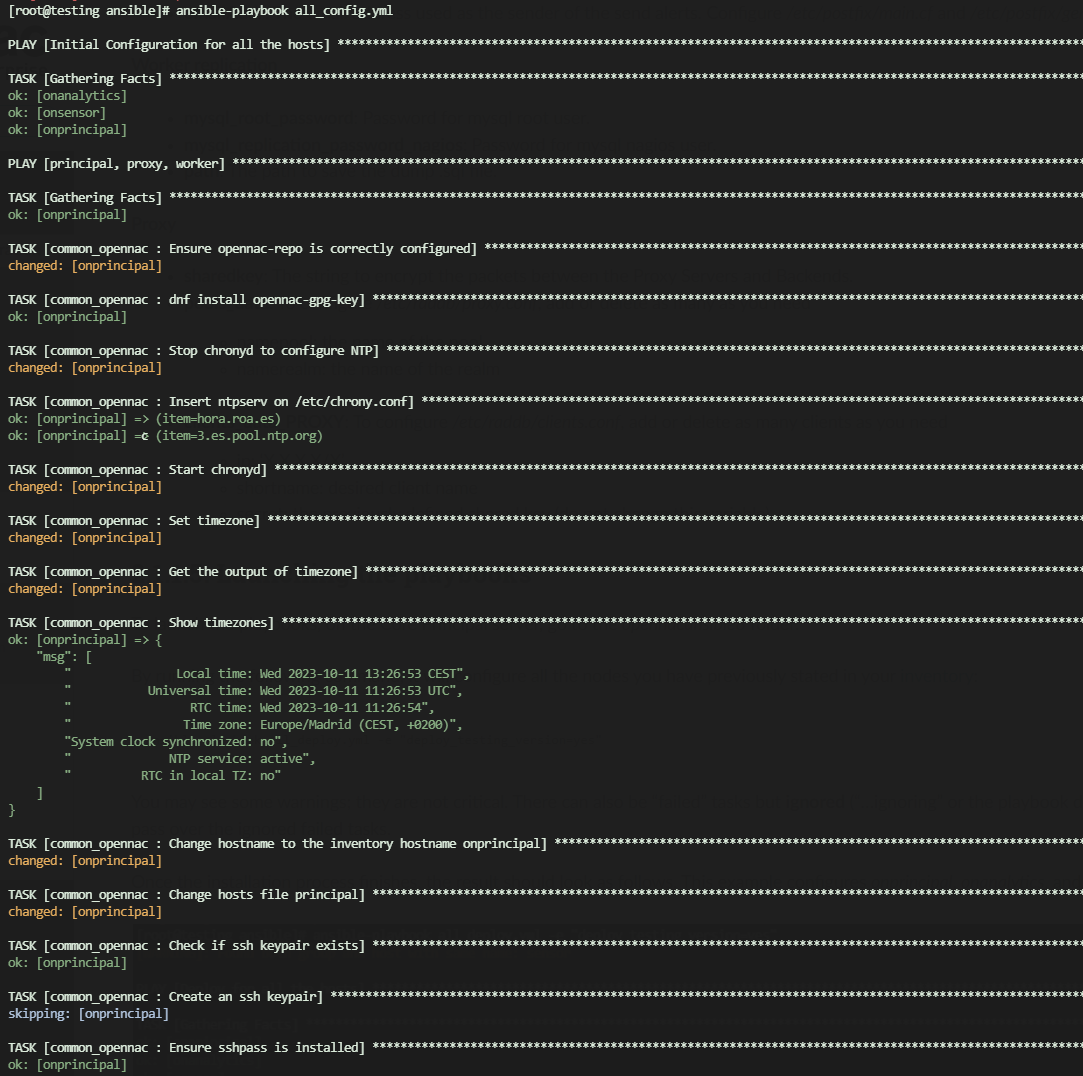
Once the Ansible execution process finishes, the result should look as follows:

Note
The numbers of each “ok”, “changed”, “skipped” or “ignored” may vary depending on the playbook, number of nodes, etc.
The only numbers that must be always 0 are unreachable and failed. Otherwise, something went wrong and you should review the tasks.
When the execution process finally concludes, check that your environment is properly running by trying to access the Administration Portal. Additionally, you can validate your deployment by checking the Deployment validation section.