4.2.4. Configuration
To follow this configuration process, it is necessary that all nodes have been previously deployed for module operation (ON Core and ON Analytics), ON Sensor and ON Agent,following the official node deployment guide.
The UNAC network access control module allows us to control which devices and users can access the network and which ones cannot. It relays on the segmentation module to determine which VLAN should they belong to, and the access restrictions to each of them depending on the needs or requirements associated with the defined security policies or business policies. This process is carried out using mainly protocols such as 802.1x, Radius based on AAA (Authentication,Authorization and Accounting).
The UNAC configuration and operation process consists of 4 steps:
Choose scenario, User/Pass, Certificate, MAB (User database AD, LDAP, CA has to be configured)
Activate 802.1x in network and user devices (activate protocol and configure params)
Define network access policy(Choose evaluation criteria to authenticate users)
Visualize results (Get all valueable information related to authentication)
The first two steps are explained in the Configuration documentation and the last two are in the Operation documentation.
See below the steps to follow to configure the UNAC module and make it ready to operate its functionalities.
4.2.4.1. Contextualization
To configure the UNAC module, it is essential to have correctly deployed the necessary nodes. We can find all the information related to the initial deployment in the node deployment documentation. This document is a configuration guide for the necessary nodes for the UNAC module. The operation of the UNAC module is detailed in the UNAC Operation document. Since the UNAC module can make use of some functionalities of network devices from different manufacturers, it is necessary that you have the necessary knowledge to configure these devices.
This section will show configuration examples for specific models. The responsibility to adapt the configuration of the network devices in his infrastructure rests with the user.
The main objectives of this section are:
Carry out the correct configuration of the necessary nodes for the UNAC module.
Configure the different services used by the system.
Understand, by means of an example, the necessary configuration of network devices. This configuration must be extrapolated to the existing network devices in each infrastructure.
4.2.4.2. Network Device Radius permissions
When a user device connects to a network, the network device to which it connects must send an authentication request to the authentication server (ON Core). For this request to be accepted and processed by ON Core, it is necessary to configure the “clients.conf” file.
This file allows us to control and restrict Radius permissions. Choose which network devices and other authenticators can make Radius requests to the system. In this file, we will define all those devices or network segments that have permission to make such requests, as well as the shared key that each of them must use.
To add or modify new devices or network segments we must edit the /etc/raddb/clients.conf file:
client 192.168.0.0/16 {
   secret = testing123
   shortname = internal192168
}

client 172.16.1.0/24 {
   secret = testing123
   shortname = internal172161
}
For each “client” block, 3 points must be taken into consideration:
client: IP of the host or network segment from which the requests will arrive.
secret: Pre-shared key of radius, this is the password to verify the requests.
shortname: Name to identify the client or network segment (identifier). This name is important as it will be included in the logs and can help us identify the information more easily.
Here we can define additional networks or host IPs depending on the needs. Keep in mind that the “secret” value of each of the blocks must match the value of the shared-key defined in the configuration of the network device itself.
Once the file has been modified, we must restart the radius service to apply the changes (all worker nodes):
systemctl restart radiusd
4.2.4.3. Join ON Core to Active Directory domain
It is recommended that the ON Core server should be registered in the domain. In case there is no domain, you can skip to the next step.
To carry out this process, it is necessary for the user to have specific permissions to Join in AD, later the user can be modified, using one that only has read permission to make user queries.
For the join domain information see the process in the Administration Portal section: Join Domain Wizard
4.2.4.4. Create Network Devices in the CMDB
The CMDB is the ON Core database, in this database we find information related to the system, infrastructure, networks, VLANs, Security Profiles, user devices, network devices, etc. In this section of UNAC we are mainly interested in Network Devices (Network devices such as Switches, APs, AP controllers, etc.).
The definition of network devices in the CMDB allows us to customize the characteristics of the device so that the system acts in one way or another on each of these devices.
If you want to register a predefined group of devices, consult Bulk import of devices.
To create a new network device, go to the “ON CMDB > Network Devices” section.
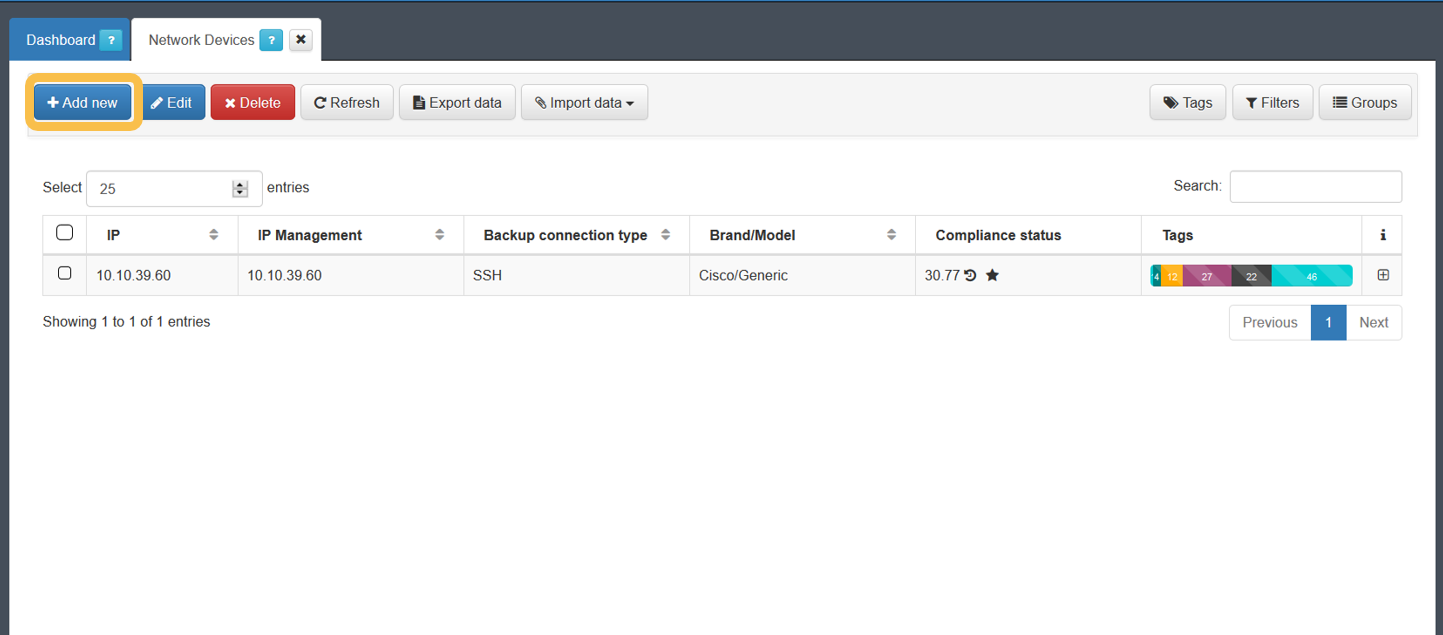
To register a new device, simply click on the Add new button and complete the information on the form. After completing all the necessary information, we will click on the “Accept” button to save the configured network device.
By default, the configuration of the device will be applied to the one that we have defined by default. This default configuration is found in “Configuration -> Configuration Vars -> NetDev”. The sections that we will find here are the same that we can find when configuring any of the devices.
The minimum information that must be filled in is indicated below.
4.2.4.4.1. General
In this tab, it is required to fill in at least the following fields:
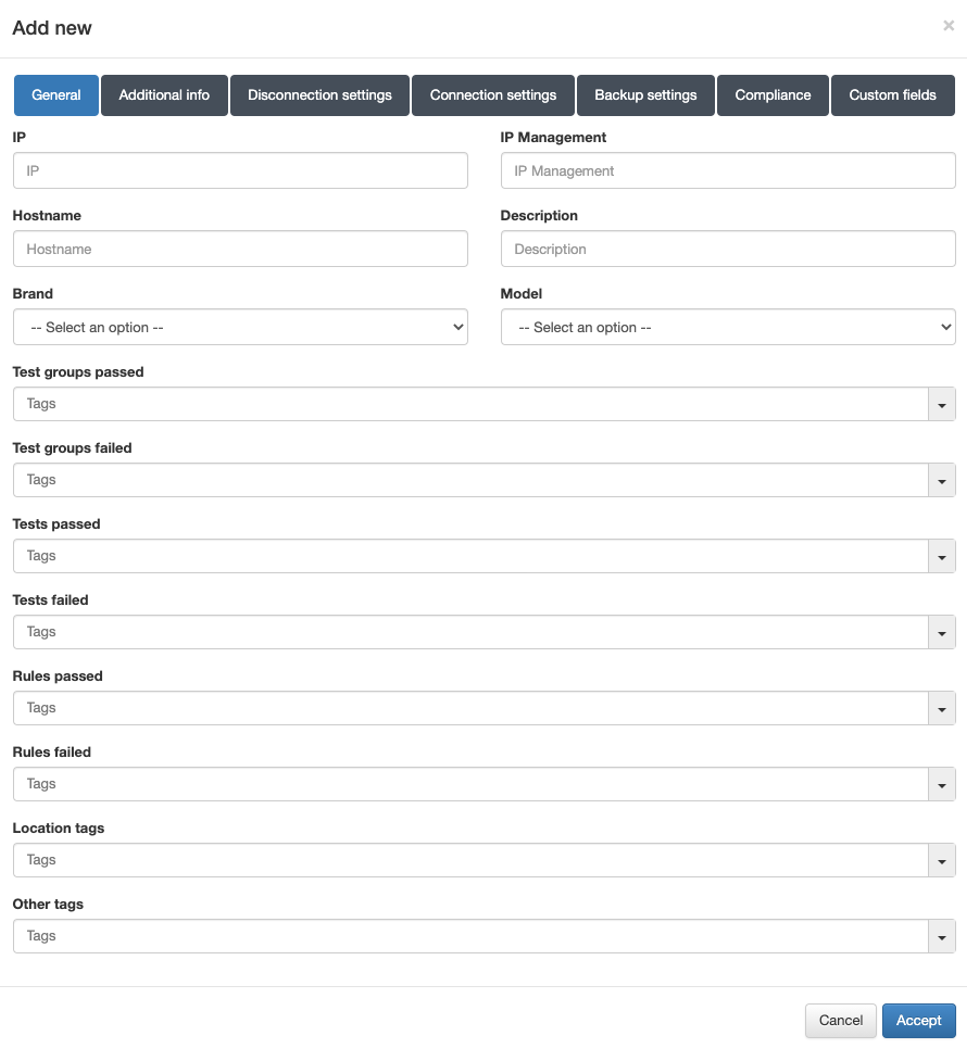
IP: IP address that identifies the device.
The IP address is only for identification (to see it in the device table).
Hostname: Hostname that identifies the device.
Brand / Model: Brand and model of the device.
It is important to correctly define the brand and model since these will be used to determine the behavior of the system in terms of communication with these devices.
4.2.4.4.2. Disconnection settings
In the “Disconnection settings” section, the configuration of the Toggle Port functionality is defined. This functionality allows you to force a disconnect from an authenticated session. This allows us, for example, to carry out a re-evaluation of the policies in case they have been modified, and the application of VLANs, ACLs, etc. to the session.
There are two methods of session disconnection:
CoA (Change of Authorization): CoA is a Radius mechanism that allows us to disconnect a specific session without the need to modify the port status (enable/disable) of the network device.
SNMP: Using SNMP, the interface where the device has been authenticated is disabled and enabled. This causes the device to have to re-authenticate and subsequently evaluate policies on the system.
The use of SNMP is recommended, although both methods perform the same functionality and are equally valid.
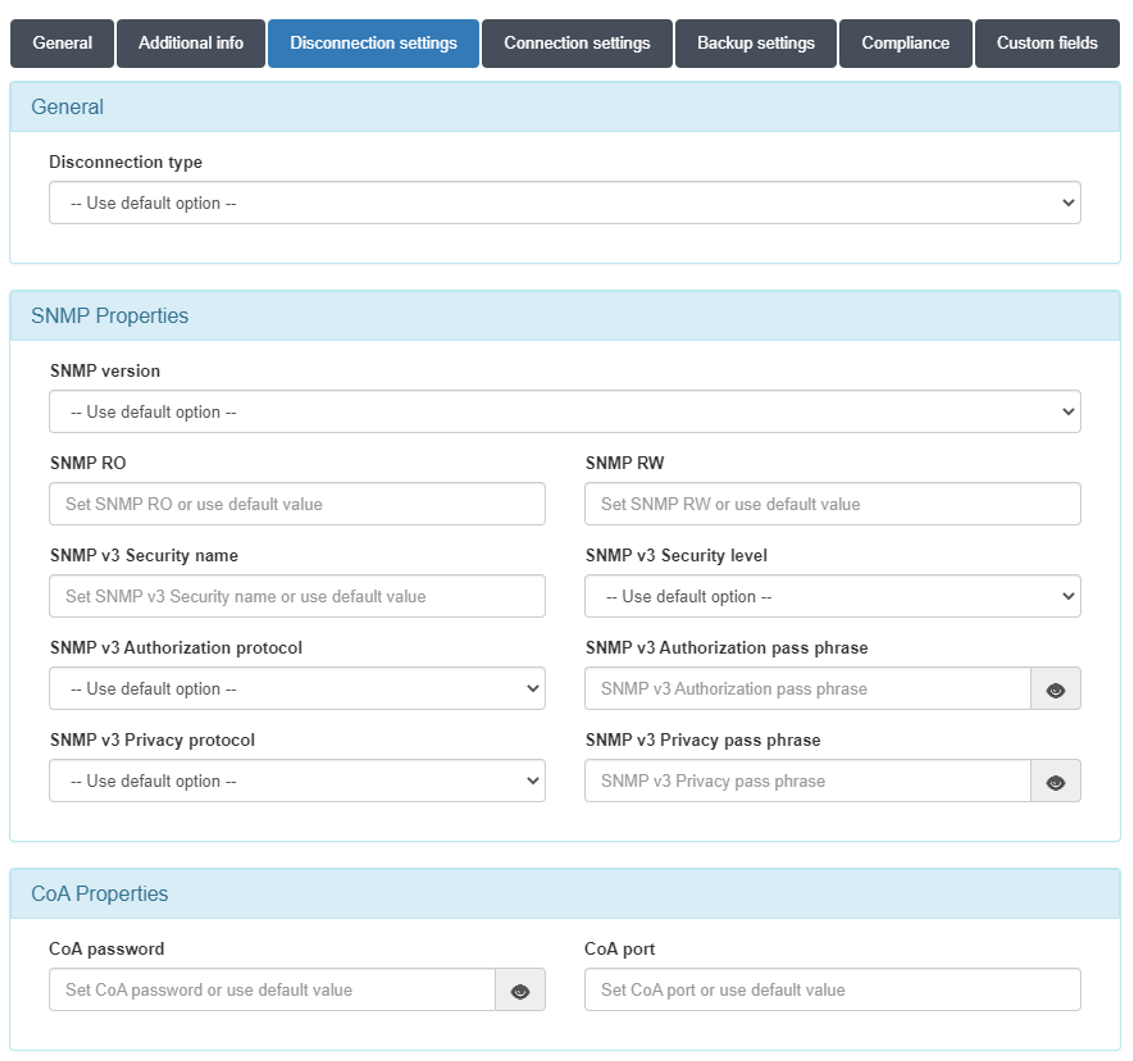
Disconnect type:
Use default option: The configuration defined in “Configuration vars” will be applied.
CoA: Use of CoA to perform session disconnections.
SNMP: Use of SNMP to perform session disconnections.
SNMPProperties
SNMP version: Version used for SNMP messages. The required attributes for each of the versions are:
V1 (not recommended):
SNMP RO: SNMP community with read permissions.
SNMP RW: SNMP community with write permissions.
V2c:
SNMP RO: SNMP community with read permissions.
SNMP RW: SNMP community with write permissions.
V3 (recommended):
SNMP v3 Security name: SNMP username.
SNMP v3 Security level: Security level (noAuthNoPriv/authNoPriv/authPriv).
Depending on the selection, it will be necessary or not to configure some of the following attributes.
SNMP v3 Authorization protocol: Authorization protocol (MD5/SHA).
SNMP v3 Authorization pass phrase: Password for authorization.
SNMP v3 Privacy protocol: Privacy protocol (DES/AES).
SNMP v3 Privacy pass phrase: Password for privacy.
CoAProperties
CoA password: Password defined in the network device to authenticate CoA requests.
CoA port: Port used for communication. (Usually 3799).
If you do not perform any of the configurations, those defined in Configuration -> Configuration Vars -> NetDev will be used.
4.2.4.4.3. APs Management controller
When there are many APs centrally controlled by a controller in the network, it is necessary to add the controller as a network device in the CMDB and additional information for each of the APs in the CMDB.
For these APs, apart from the minimum information detailed above, it will be necessary to add the information corresponding to IP Management:
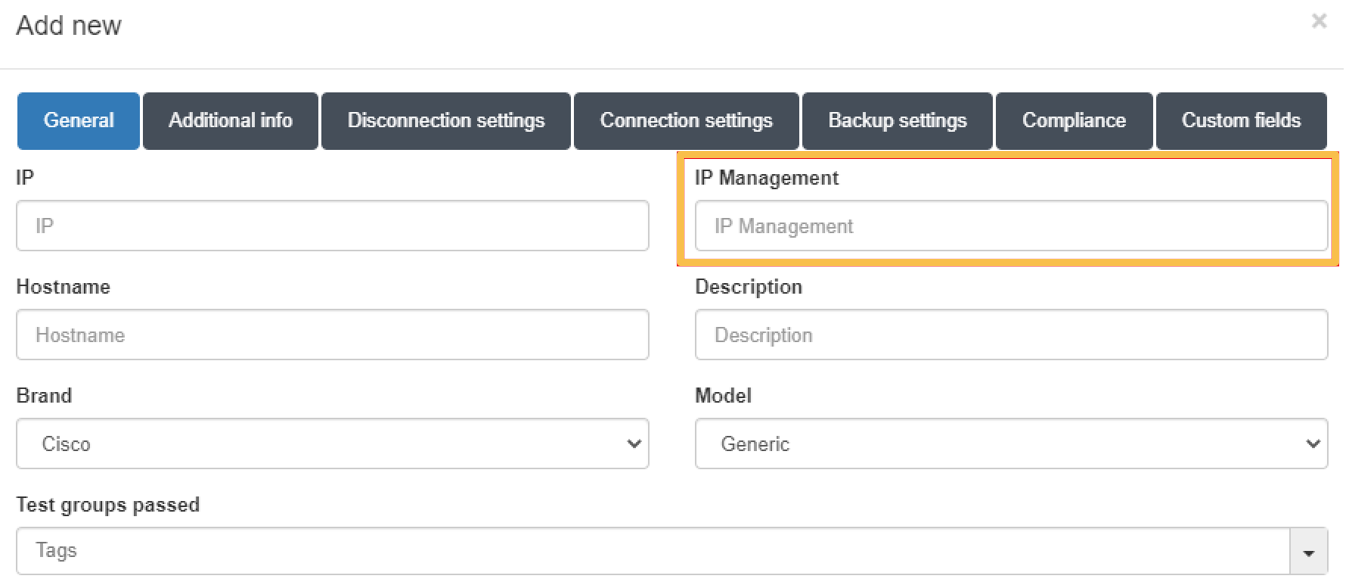
This IP must correspond to the IP associated with the controller that manages the AP.
4.2.4.4.4. Self-learning of network devices
When in ON Core we receive a request for a network device that has not been previously added to the CMDB, it is possible to have it added automatically.
For this, two requirements must be met:
That the IP of the network device or its segment is registered in the “clients.conf” file. (Section Creating Network Devices in the CMDB)
That the “Autolearn Network Devices” function is activated.
To activate the self-learning functionality, we must go to “Configuration -> Configuration vars” and in the NetDev section check the “Autolearn Network devices” option:
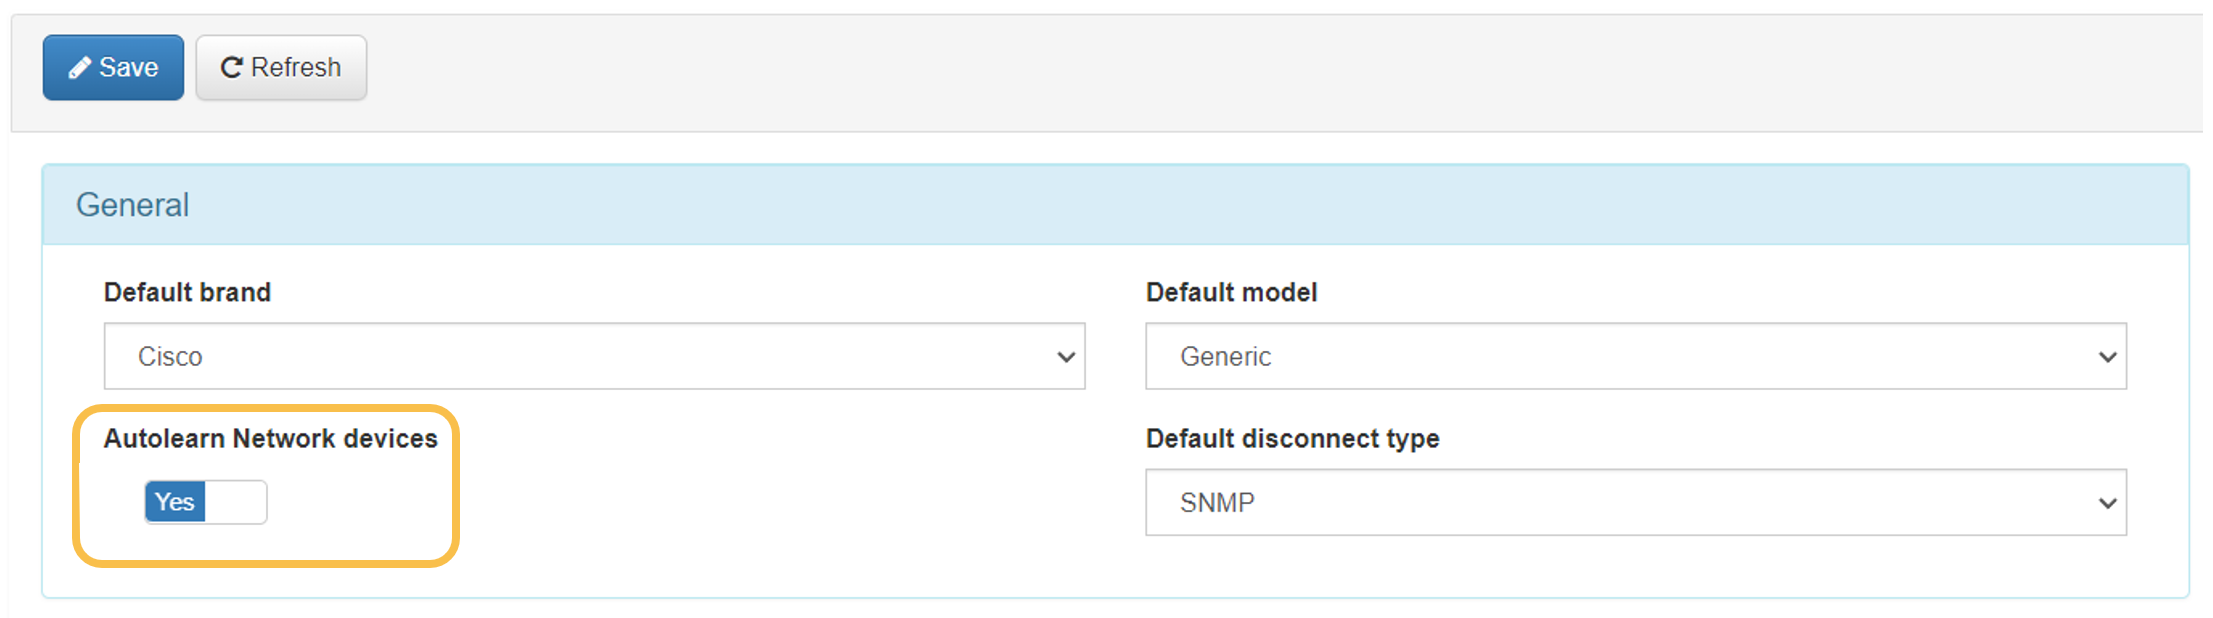
To apply the changes, it is necessary to press the “Save” button.
With this function configured, every time a request is received from an unknown network device, it will be added to the CMDB and an “ONC_AUTOLEARNED” tag will be associated with it.
4.2.4.5. 802.1x Certificate configuration in ON Core
The system supports several authentication methods, these can be:
Supplicant for user credentials
Supplicant for team credentials
Supplicant for user certificate
Supplicant for equipment certificate
Mac-Address-Bypass
User credentials
Some of these methods may require additional system configuration, these configurations are detailed below.
4.2.4.5.1. Certificate Authentication
There is the possibility of performing authentications through certificates installed on the end user devices or devices that allow it. These certificates will be validated in the system during the Authentication process and their attributes may be used in the Authorization process (policy evaluation).
We can configure authentication through certificates in two ways:
o Using certificates generated internally in the system. o Using certificates issued by an external CA.
Given that in environments where authentication by certificates is required, there is usually its own CA and certificate management by the organization, this is the most frequent option. Even so, the possibility of implementing certificate authentication through the system itself can be useful when testing or in lower-volume environments.
4.2.4.5.1.1. Through certificates generated by the Internal CA
When an ON Core node is deployed from an OVA, it likely has expired internal certificates that will need to be renewed.
Certificate renewal
First, go to the certificates folder “/etc/raddb/certs/” and delete the old certificates and counters:
cd /etc/raddb/certs
rm -f *.pem *.der *.csr *.crt *.key *.p12 serial* index.txt*
make destroycerts
Define the property default_days in each CNF file (ca, server and client), to indicate the validity of the certificates. By default, 60 days are set. If you wish, you can modify the information related to the organization and passwords.
vim <file>.cnf
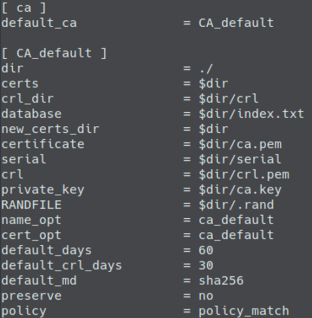
Run the bootstrap file, to generate the CA and server certificates:
cd /etc/raddb/certs
./bootstrap
Generate client certificates
To generate client certificates, you must provide a unique email address and common name in the client.cnf file, and generate the certificate with the following command:
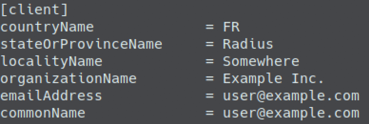
make client
At this point, we must install the generated client certificate (client.p12) and install it on the client that we want to authenticate. On the client side, the supplicant must be configured to perform authentication using a certificate.
4.2.4.5.1.2. Through an external CA
If you already have a certification authority (CA) in the infrastructure where UNAC will be deployed, you can use it to sign and use the certificates for authentication.
For this we will need the following certificates that must be provided by the CA:
CA certificate (if there is a PKI structure with several certificates, it is recommended that they all be provided).
Server certificate signed by the CA.
Client certificates.
It is possible to configure the server certificate with external CA through the Configuration Wizard: Radius Certificate Wizard
Installing the existing CA on ON Core
To install the CA on the server we must have said CA in .pem format, if there is a PKI structure with several certifying entities, it is recommended to join them all in the same .pem file. It is possible to obtain them in another format and carry out the subsequent conversion.
To configure the existing CA in the ON Core server, we simply must move and overwrite said CA with the one already installed:
cp <External_Complete_CA>.pem /etc/raddb/ca.pem
Creation of CSR (Certificate Signing Request)
To obtain a valid ON Core server certificate, we must generate a certificate signing request file (.csr) so that the certifying entity can deliver the signed certificate.
First, we will eliminate all those certificates that exist in the Radius configuration, for this:
cd /etc/raddb/certs
make destroycerts
To generate the CSR we will need to modify the /etc/raddb/certs/server.cnf file. We must modify all those necessary attributes, based on the information provided by the client:
Default_days: Certificate validity days.
Input_password: Certificate input password.
Output_password: Certificate output password.
CountryName: Country code in two letters (eg ES).
StateOrProvinceName: Name of the state or province.
LocalityName: Name of the locality.
OrganizationName: Name of the organization.
Once modified with the necessary information, we will save the file and generate the CSR file based on it. To do this we will execute the following command:
make server.csr
Now we must take the /etc/raddb/certs/server.csr file and send it to the certifying entity so that the request can be signed. We must obtain a new certificate (.pem) signed by the CA. It is possible to obtain them in another format and carry out the subsequent conversion.
Installing the server certificate on ON Core
Once we obtain the certificate signed by the certifying entity, we must install and configure the certificate. To install the server certificate in ON Core, we must first overwrite the existing certificate:
cp <Server_New_Cert>.pem /etc/raddb/server.pem
Once the certificate has been overwritten, we must modify the Radius configuration where we must specify the password of the new certificate.
To do this, in the /etc/raddb/eap.conf and /etc/raddb/modules/inner-eap files, we must change the “private_key_password” attribute to the one defined when generating the CSR of this certificate (Output_password).
We must prepare the dh and the random files:
make dh
make random
Finally we make sure that all the files inside /etc/raddb/certs have permissions for “root:radiusd” and restart the service:
chown root:radiusd *
systemctl restart radiusd
If there is any problem with the certificates, the RADIUS service will NOT start. We will be able to see more detailed information about the problem in the Radius logs.
4.2.4.6. Supplicant configuration
To perform authentication using 802.1x, it is necessary to configure the supplicant service of the client computers according to the needs of the network.
Depending on the type of authentication and client, we will make one configuration or another.
Examples of some of the most popular operating systems are described below.
4.2.4.6.1. Windows
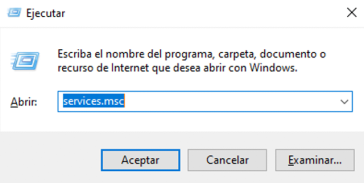
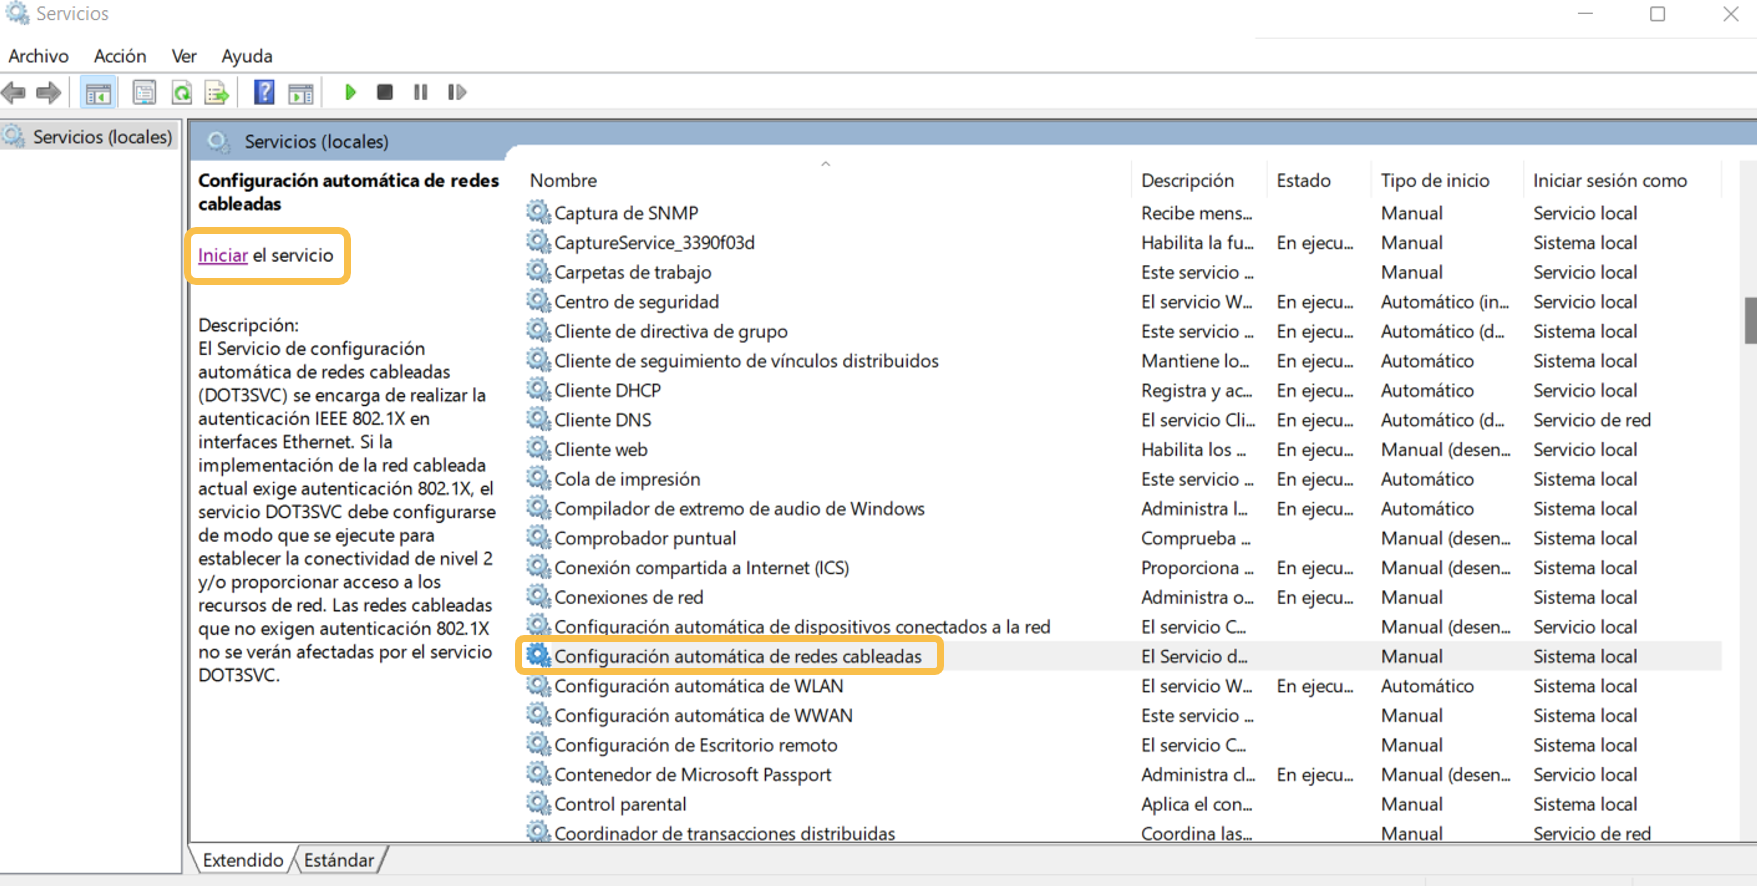
To use the 802.1x functionality on Windows computers, it will be necessary to start the service in charge of managing the functionality. To do this we will access the services menu with “Windows + R” and opening “services.msc”:
In the list of services, we will select the “Wired AutoConfig” or “Automatic configuration of wired networks” and start the service:
Once we have the active service we can configure the supplicant in the corresponding network interface, for this:
In “Control Panel -> Network and Internet -> Network Connections” we select the interface that we want to configure and right-click on “Properties”. In the pop-up window, we must access the “Authentication” tab.
Depending on the type of authentication that we want to use, we will make one configuration or another: - Authentication by user/computer - Authentication by certificate
Windows has the “Fast Reconnect” functionality that allows us to make faster connections through cache. To configure this functionality, consult the Setup with Windows Fast Reconnect.
4.2.4.6.1.1. Authentication by user/device
To configure the supplicant for authentication by user and/or device, we must configure the supplicant in the following way, this is a recommended and most used configuration. There is the possibility to configure the supplicant to use other methods that may require additional configuration in ON Core.
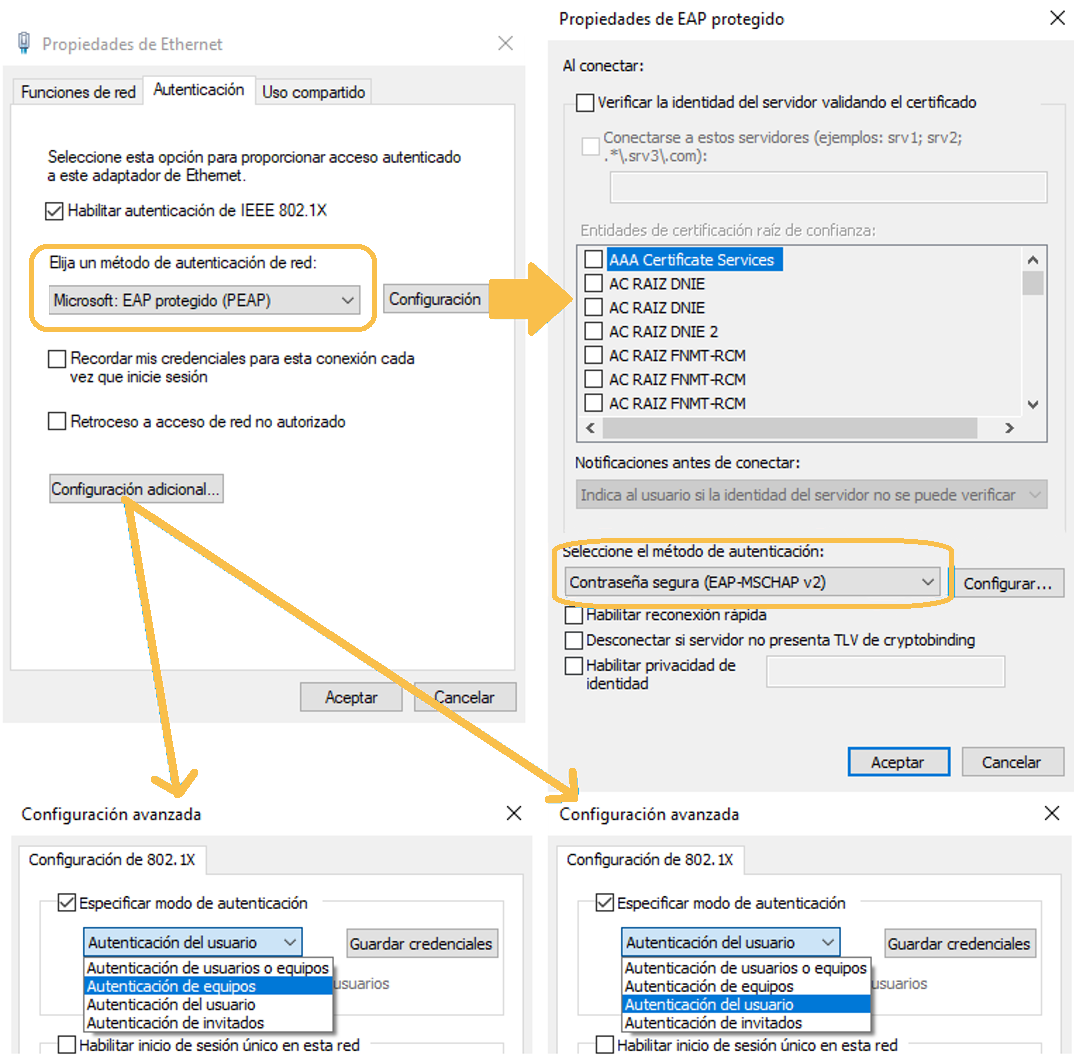
In the additional configuration we can select what type of credentials we want to use for authentication, user (they will be requested at each connection, or they can be saved in “Save credentials”) or team (the team’s credentials will be used). We can also configure “Authentication of users or devices” to be carried out automatically.
In case of having configured a valid server certificate in ON Core, we can activate the option “Verify the identity of the server validated the certificate” to add a security layer.
4.2.4.6.1.2. Authentication by certificate
To configure the supplicant for authentication by user and/or device through a certificate, we must configure the supplicant in the following way, this is a recommended and most used configuration. There is the possibility to configure the supplicant to use other methods that may require additional configuration in ON Core.
It is important to emphasize that, in order to authenticate using certificates, these must be previously installed on the computer, as well as the certifying entity (CA).
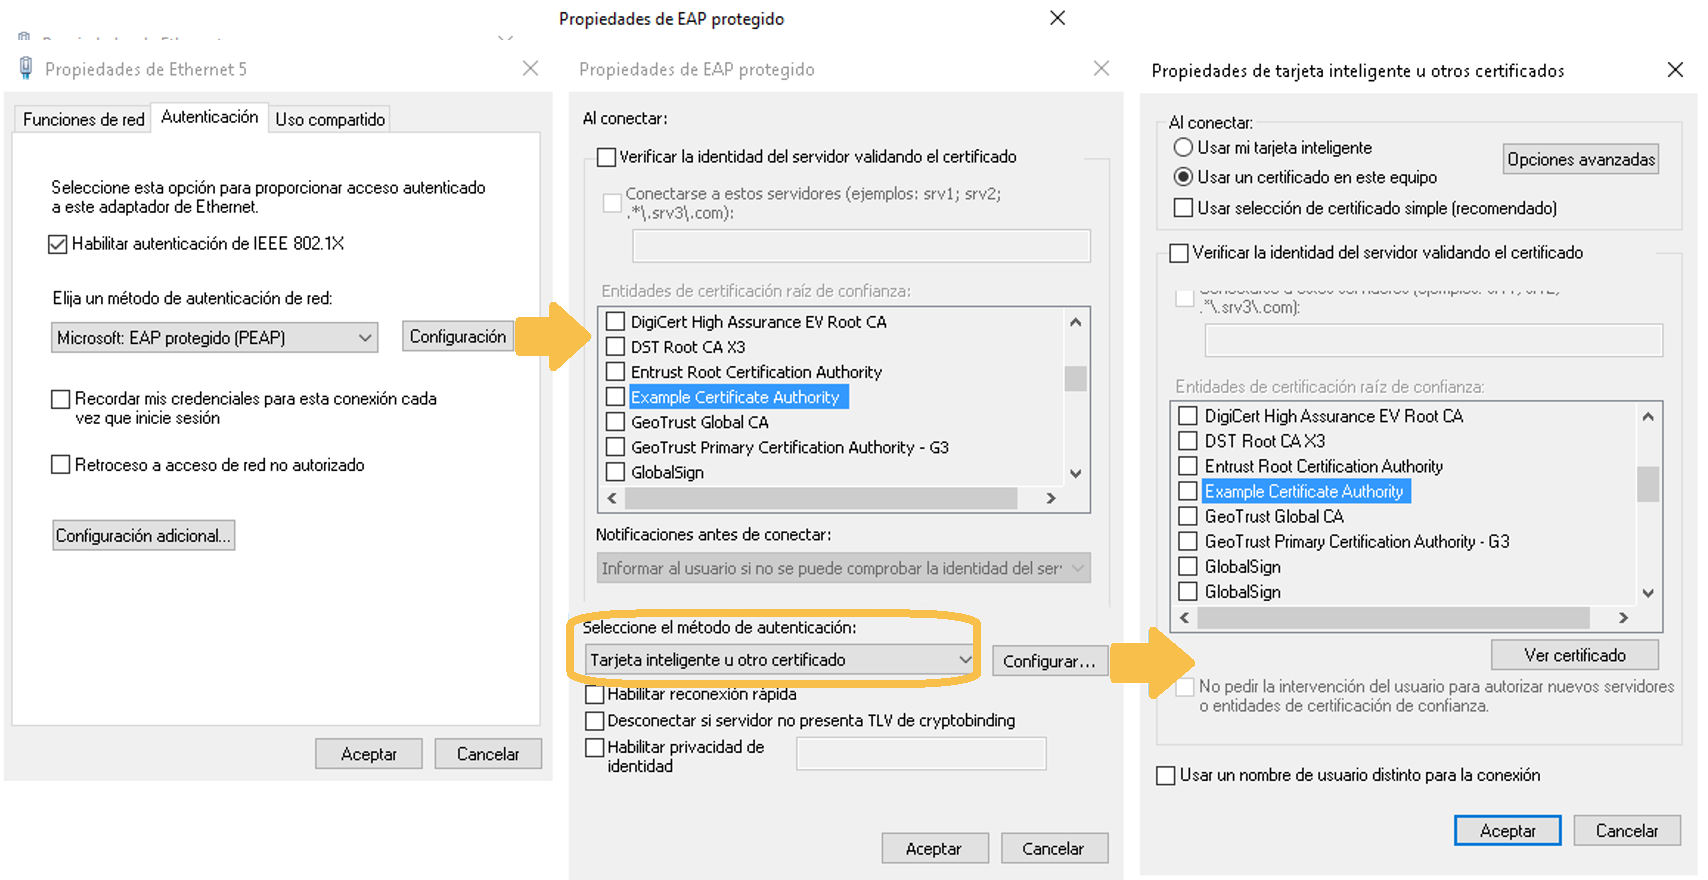
It is also possible to define whether you want to use computer or user certificates manually in “Additional settings” in the network adapter properties window.
In case of having configured a valid server certificate in ON Core, we can activate the option “Verify the identity of the server validated the certificate” to add a security layer.
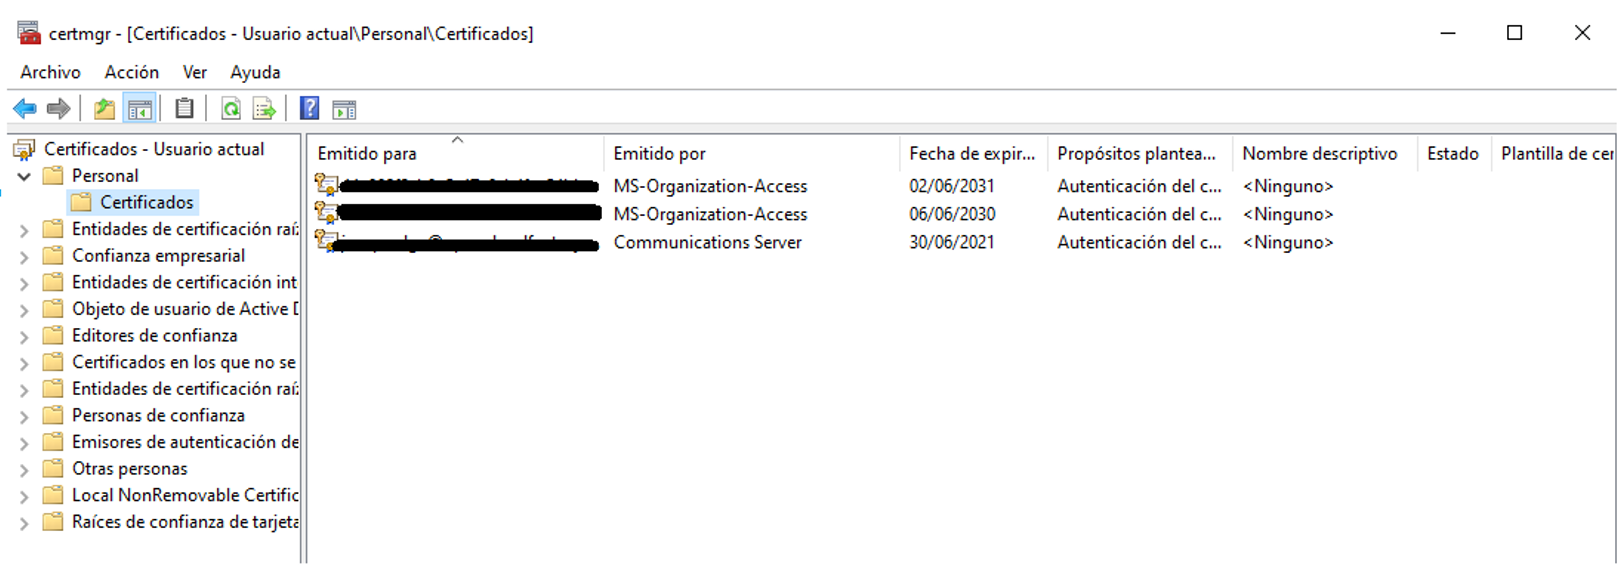
To verify the correct installation of certificates on Windows computers, we can access “Manage user certificates” or “Manage computer certificates” depending on the type of certificate deployed. The installed certificates should appear in the “Personal -> Certificates” folder.
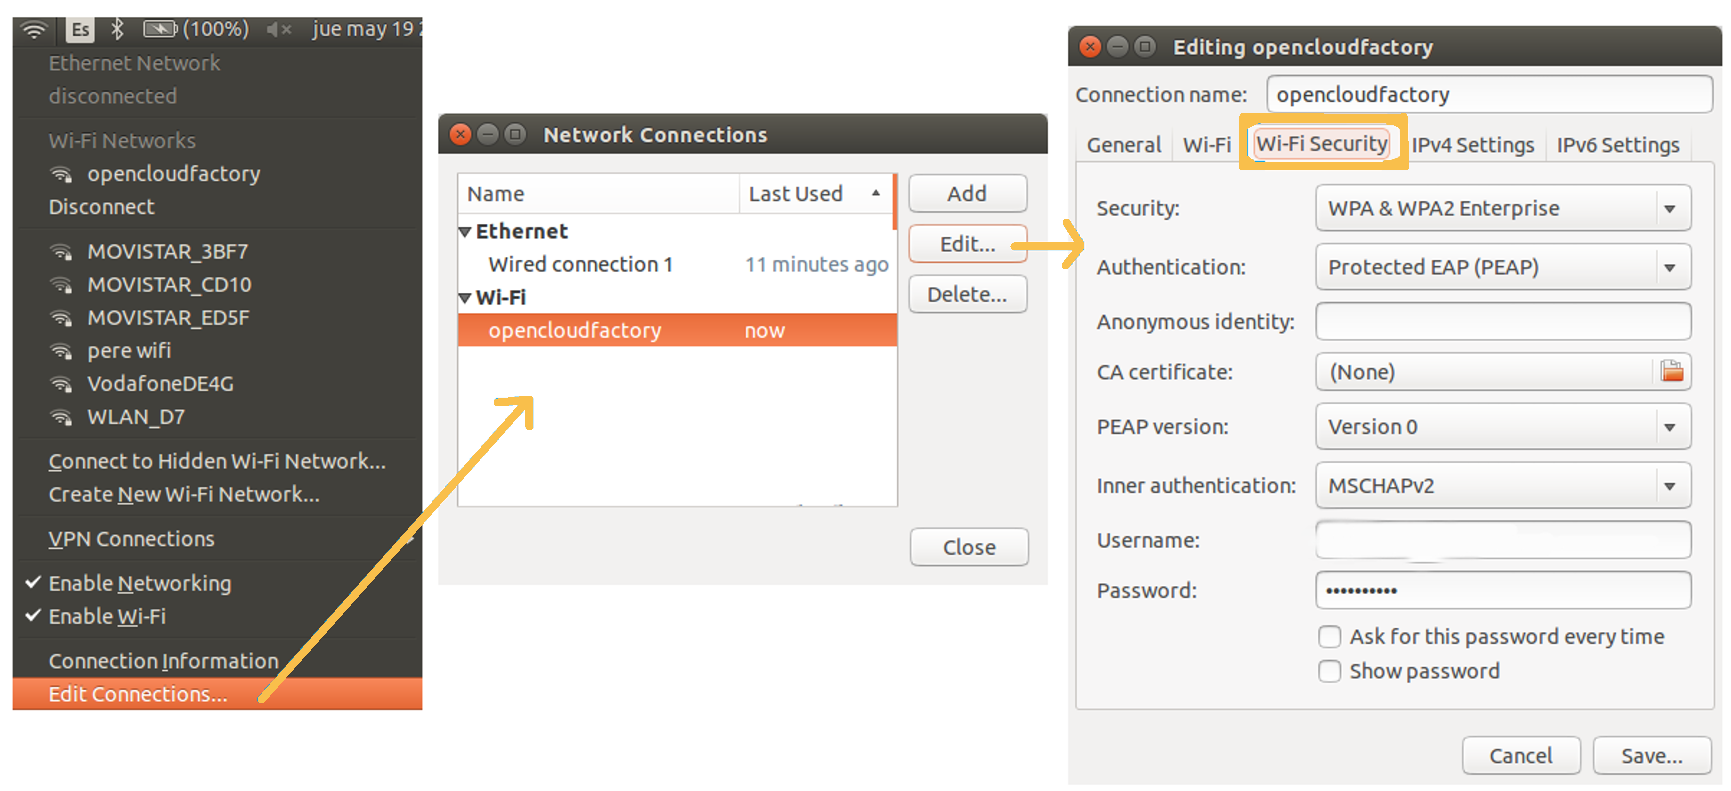
4.2.4.6.2. Linux (Ubuntu)
This example will explain how to configure an Ubuntu computer, this configuration can be replicated in several similar distributions.
To configure the supplicant in Ubuntu, we must access the network section in the upper bar and select “Edit Connections…”. In the pop-up window that will open, we must select the network to which we want to configure the supplicant and click “Edit”. A new window will open with the properties of the connection and in the “Security” tab we will have to configure the supplicant.
The configuration shown below is recommended, although it can be adjusted to the needs of each case.
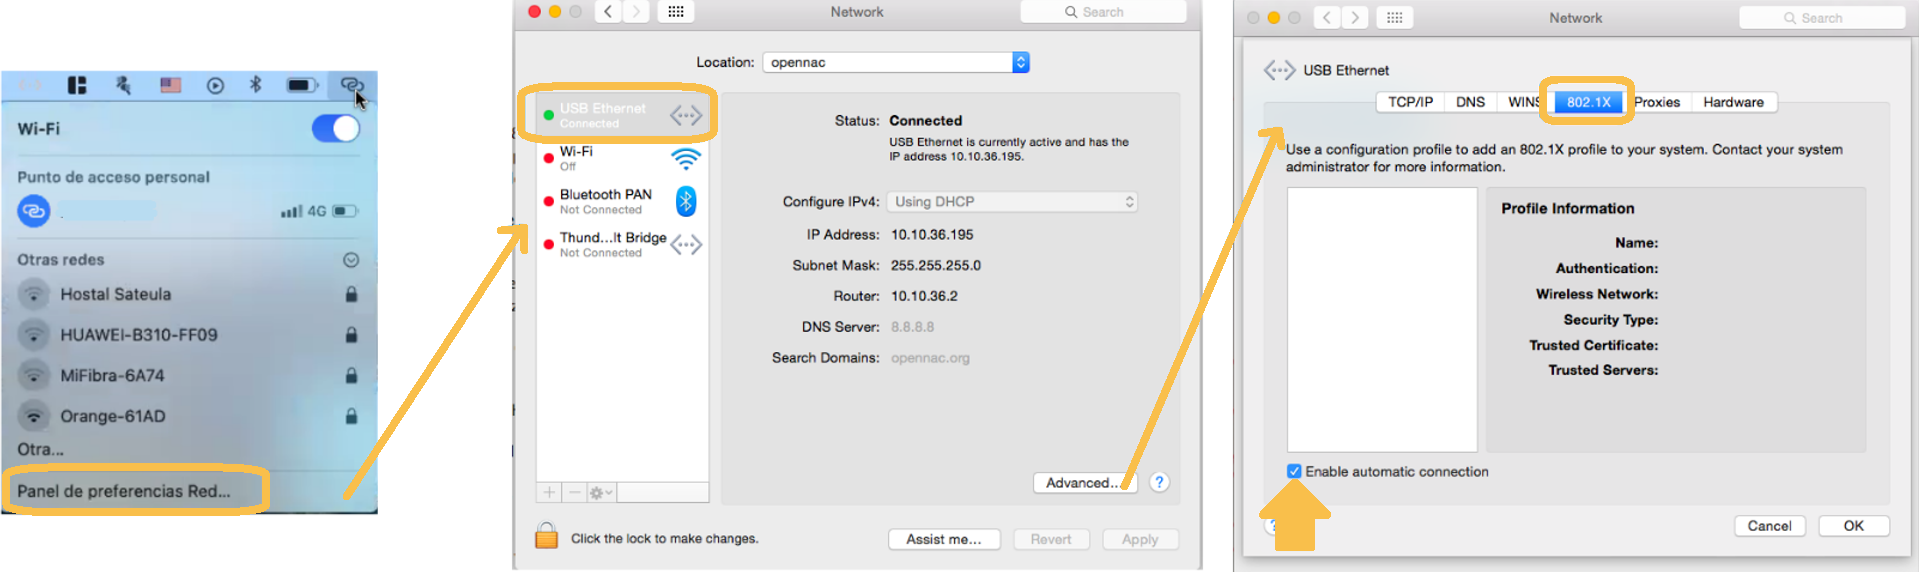
4.2.4.6.3. MacOS
To configure the supplicant in MacOS, we must access the network section in the upper bar and select “Network preferences panel…”. In the pop-up window that will open, we must select the network to which we want to configure the supplicant and click “Advanced”.
A new window will open with the properties of the connection and in the “802.1X” tab we will have to configure the supplicant to use an automatic connection, for this we will activate the “Enable automatic connection” check.
4.2.4.7. Deploy 802.1x Configuration via GPO (Windows)
By using GPO (Group Policy Object) we can define the supplicant configuration for Windows machines that are located in a managed domain.
This will allow us to deploy the configuration massively and equally on all devices.
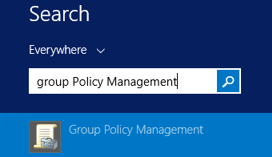
To do this we must follow the following steps on the domain controller:
Open the Group Policy Management:
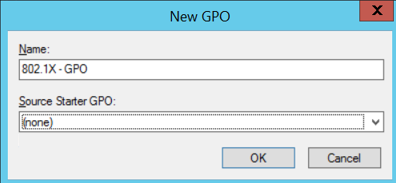
Right click on Group Policy Objects and click “New”:
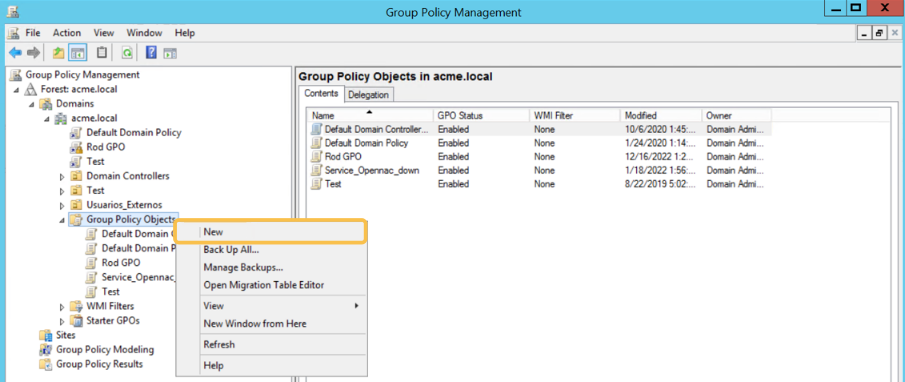
Define a name for the GPO and click “OK”:
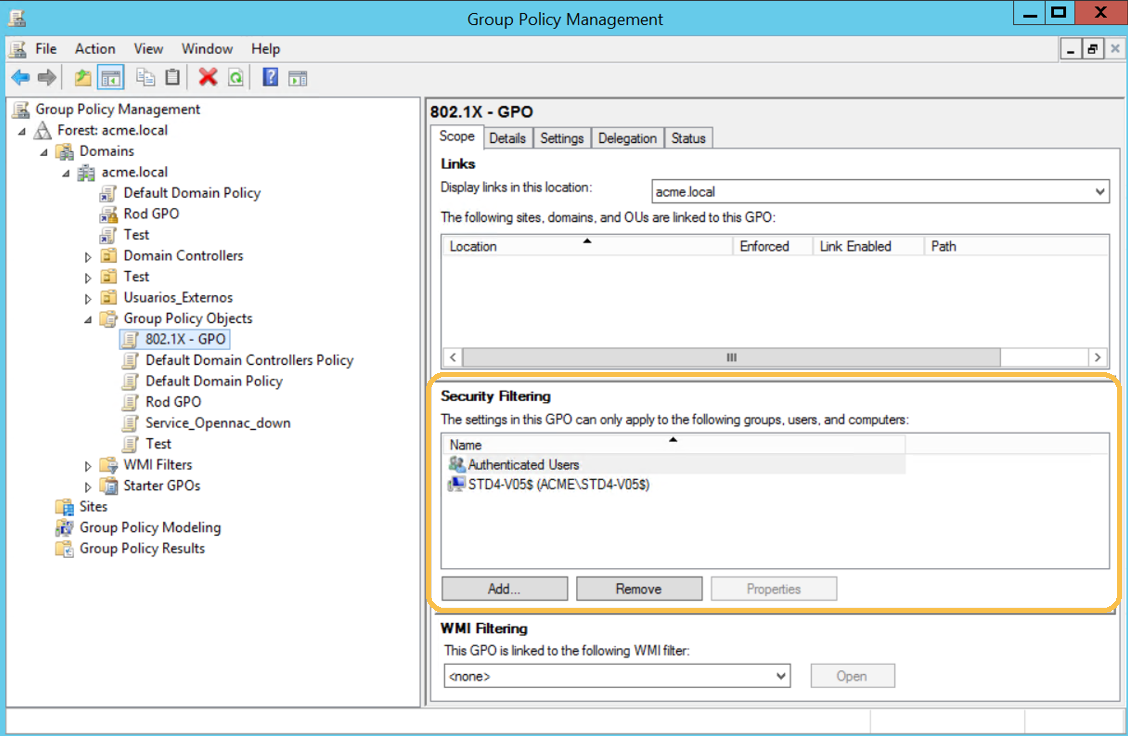
Select the GPO from Group Policy Objects, in the “Security Filtering” section, Add and Remove users, groups, and computers that the GPO should apply to:
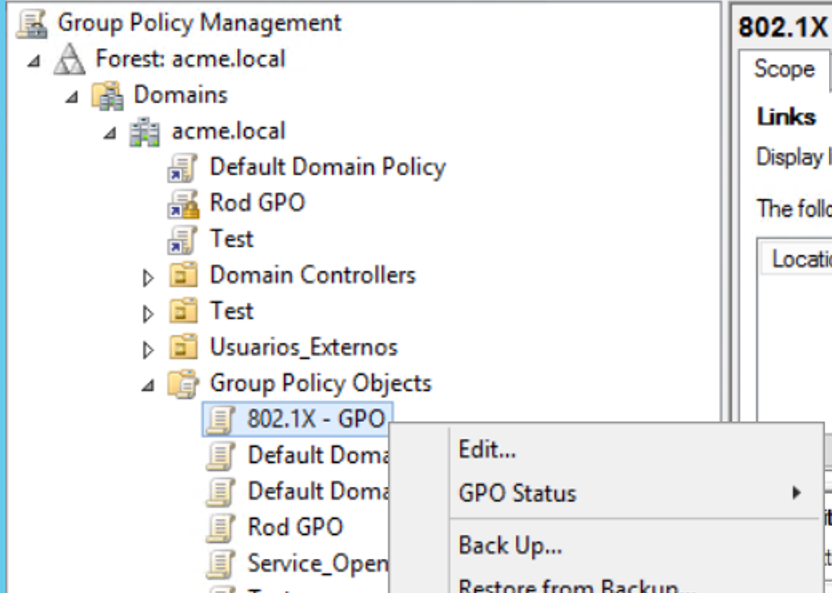
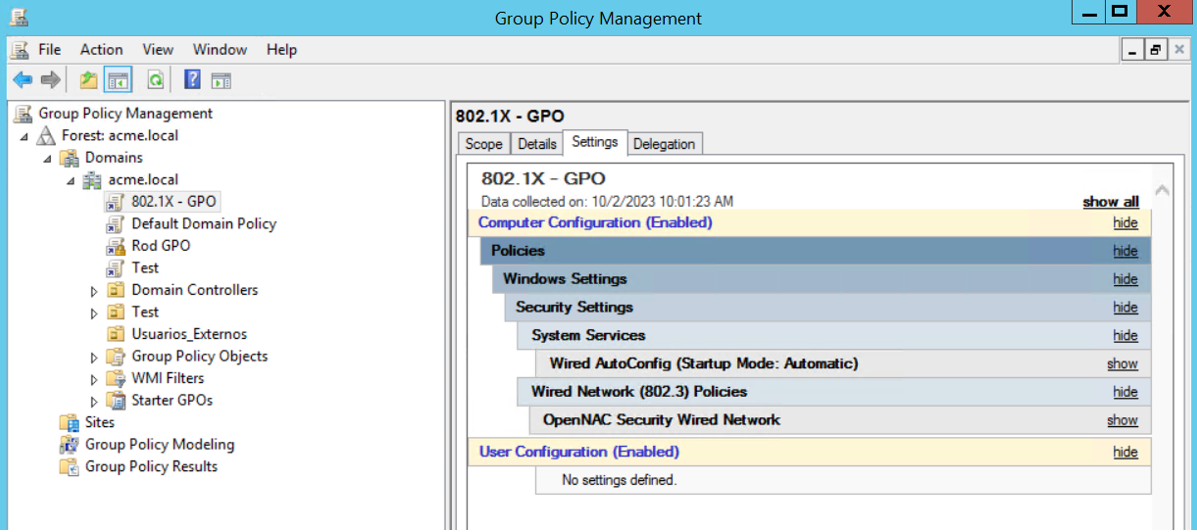
Right-Click the GPO, and click “Edit”. Configure the policies you want to apply in the Computer and/or User Configuration.
Configure the 802.1x Policy
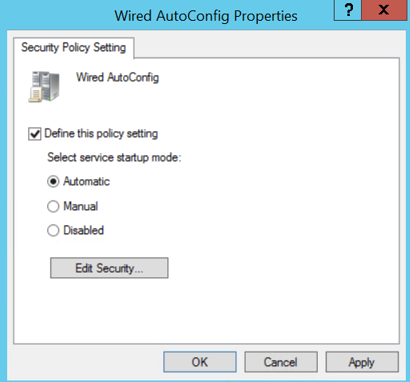
5.1. Navigate to “Computer Configuration > Policies > Windows Settings > Security Settings > System Services”
Locate the Wired AutoConfig service and click to edit
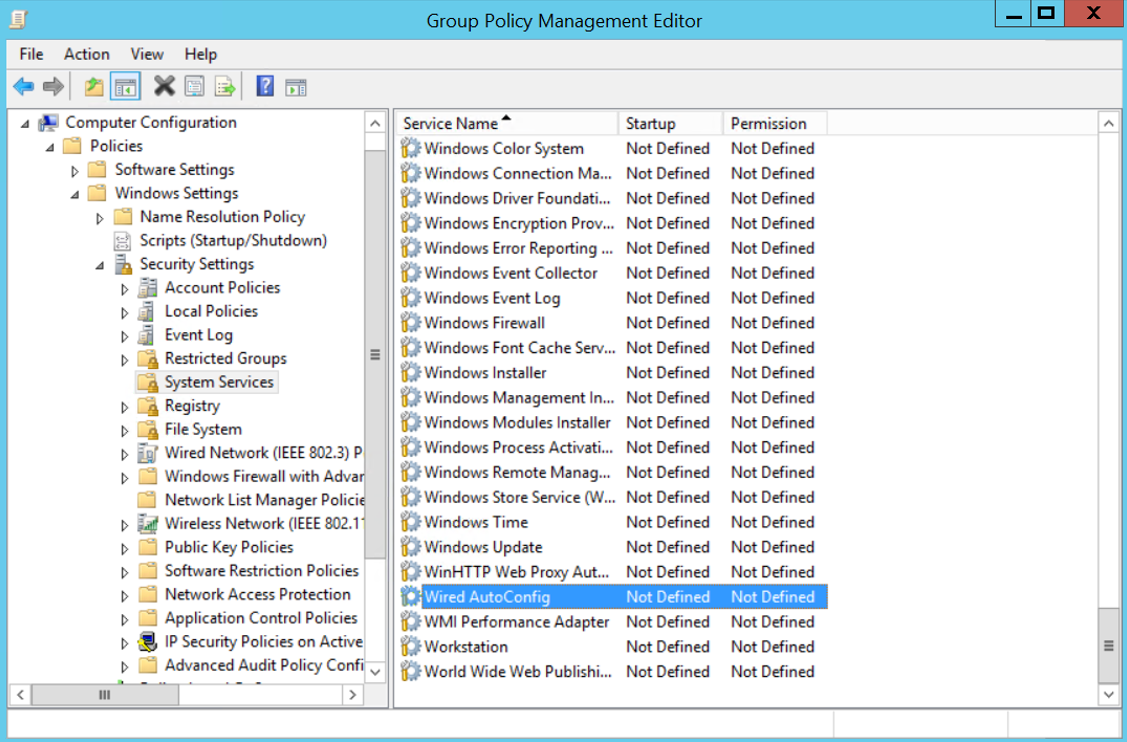
5.2. Select “Define this policy setting” and set as “Automatic” as startup mode:
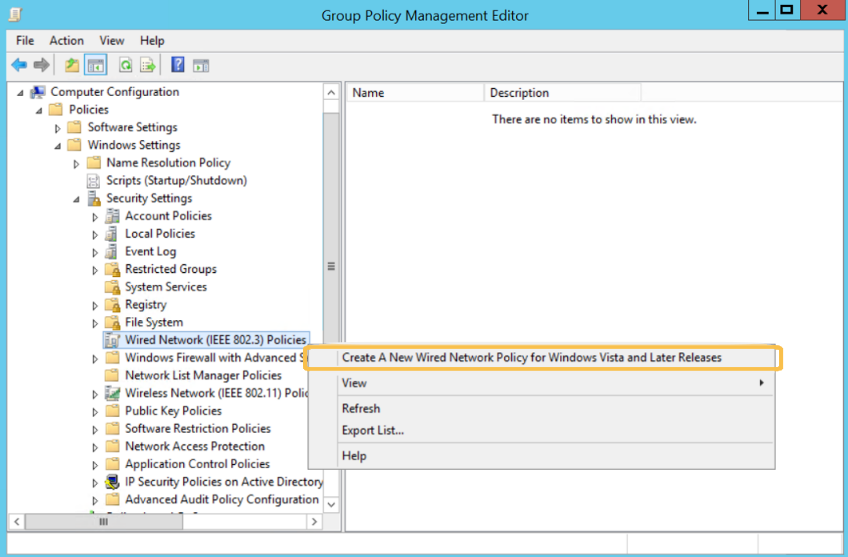
5.3. Navigate to “Computer Configuration > Policies > Windows Settings > Security Settings > Wired Network (IEEE 802.3) Policies”
Right click and select “Create A New Wired Network Policy for Windows Vista and Later Releases”:
5.4. Name the policy and set a Description:
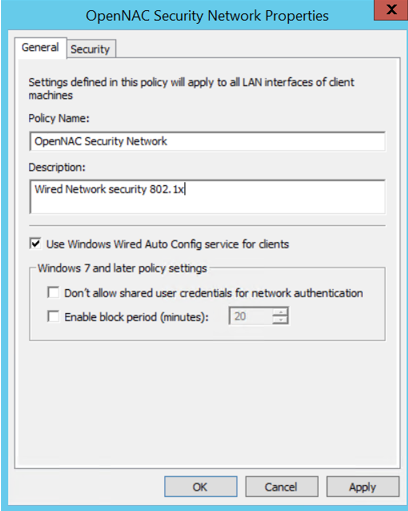
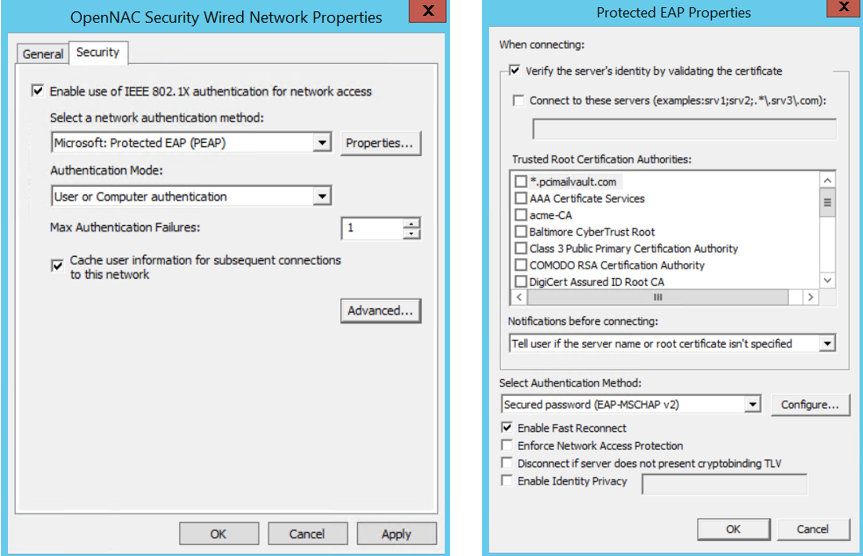
5.5. Go to the “Security” tab and configure the supplicant based on the previous explanation about Windows Supplicant.
5.6. Click “Apply” and “OK” to complete the configuration
Now you need to link the GPO to the OU or Domain you want to apply. Right-click to the OU or Domain an click “Link an Existing GPO…”, then select the GPO , and click “OK”.
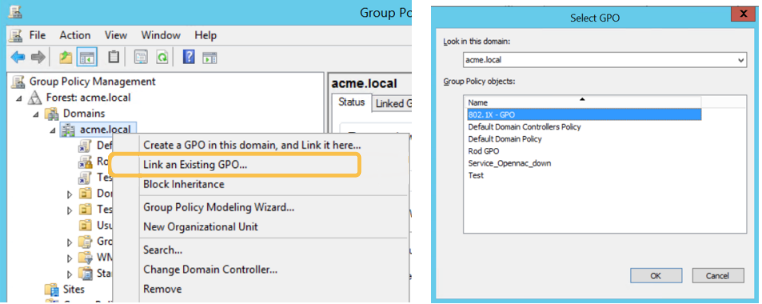
The GPO will be added to the defined OU or domain and will be applied at next policy update:
4.2.4.8. Network Device Configuration
The network devices must be configured to use the UNAC case, they are usually those through which the endpoint devices (PCs, printers, mobiles, etc.) access. These are usually Access Switches, APs, and AP Controllers.
The basic configuration of these devices is 802.1x and RADIUS. The UNAC module allows us to work with those network devices compatible with the protocols described above regardless of the brand and model. Additionally, there are a series of tested and approved devices for complete integration with the solution, which has specific guides for their configuration. Otherwise, it will be the user who must determine the relevant configuration.
The recommended configuration for network devices includes the following points:
802.1x configuration (wired networks)
Radius configuration
CoA configuration (Change of Authorization)
SNMP configuration
Default VLAN definition
Critical VLAN definition
Optional:
Guest VLAN definition
VoIP VLAN definition
4.2.4.9. User authentication using Kerberos traffic
In some environments where Windows user authentication is performed using Kerberos, it is possible to integrate such authentication with the UNAC module.
Important! To perform authentication through Kerberos traffic, it is necessary to deploy and configure the ON Sensor and ON Analytics node. This will take care of collecting and detecting Kerberos traffic.
This authentication works as follows:
When a device without a supplicant connects to the network, it authenticates itself to the switch using MAB at boot time.
The user will log in with their Windows account.
By means of the traffic sniffed by ON Sensor, we will be able to see and identify the Kerberos ticket (It is necessary to deploy ON Sensor).
In ON Core, we will associate the session with the user that we have seen in the Kerberos ticket.
A policy reassessment will be generated for that session so that, if necessary, the pertinent characteristics will be applied to the session (VLAN, Security Profiles, etc).
To perform the necessary configuration to implement this functionality, it will be necessary to follow the steps in the following documentation:
Deployment of Nodes (ON Core, ON Analytics, ON Sensor)
General Visibility configuration
Join ON COre to Active directory domain
4.2.4.10. Authentication for VPN Gateway
The UNAC module allows us to use as an authentication backend for VPN Gateways, both SSL-VPN and IPSEC, using the RADIUS protocol. These authentications are carried out by username and password.
Even though the use of external VPN Gateways is possible, we recommend using the 2SRA module for remote access to the network.
ON Core configuration:
First, it is required to allow VPN access, go to the /etc/raddb/huntgroups file, in this file we must add the VPN Gateway to the vpn group by adding the following line to the file:
[root@oncore ~]# vim /etc/raddb/huntgroups
vpn          NAS-IP-Address == <VPN_IP>
This hunt group can be changed and is related to the Radius module of the system, it is defined in /etc/raddb/mods-available/opennac with the following parameters, vpnHuntgroupName = vpn:
[root@oncore ~]# cat /etc/raddb/mods-available/opennac | grep vpnHunt
vpnHuntgroupName = vpn
Since the VPN Gateway will make RADIUS requests to the system, we will need to add it as a client.
To do this, we go to the /etc/raddb/clients.conf file, and add the new client:
[root@oncore ~]# vim /etc/raddb/clients.conf

Client <VPN_IP> {
   secret = <presharedKey>
   shortname = <Identificador_VPN>
}
VPN configuration:
Once ON Core is configured, we must configure the VPN Gateway to perform authentications against the system.
4.2.4.11. Notification service configuration
Optionally, the system allows notifying by email when a policy is executed. As these notifications are made via emails, it will be necessary to configure the postfix service.
We can configure notifications for different email services. For this, you need to have the configuration data of the corporate mail service, with email account, password, server data, etc.
Here we will explain the basic configuration for SMTP Relay, and then Postfix configuration for notifications via Gmail and Office 365. In both cases will use the TCP/587 port.
4.2.4.12. Configuring SMTP Mail Relay
In this section we will configure the SMTP server in the ON Core so that it can send emails.
Connect via SSH to ON Core.
Update the system and install the necessary packages:
dnf update && dnf install postfix mailx cyrus-sasl cyrus-sasl-plain
SMTP Configuration:
There are two options for relaying the mail service: with authentication and without authentication.
When relaying without authentication, we utilize the SMTP protocol, and the configuration is as follows:
Configure postfix. In the relayhost section, add or modify the following lines in the
/etc/postfix/main.cf`file :
relayhost=[smtp.example.com]:25
     myhostname = principal.acme.es
Where:
relayhost: Specifies the mail relay host and port number. The hostname will be enclosed in parentheses to specify that an MX lookup is not required.
myhostname: Hostname of the server running the postfix service.
Restart postfix service and enable auto startup:
systemctl enable postfix && systemctl start postfix
Send a test mail to verify the configuration:
mail -s "Test subject" recipient@domain.com < /dev/null
Where:
recipient@domain.com: Replace this with the recipient’s email address.
Keep in mind that each email service will have specific configurations. In the following sections, we will provide the Postfix configurations for Gmail and Office 365.
4.2.4.13. Configuring Envelope Rewriting
By default, the envelope sender mail address of messages sent by OpenNAC via postfix service is set to the user apache, which is the user that runs the HTTPD service.
Depending on how the relay host’s administrator has configured it, certain security options or anti-spam rules may check if the sender mail address in the “From:” field matches the address in the envelope of the message. This can cause the relay host to reject mail messages from ON Core servers if the addresses are not identical.
As observed several times in production environments, the rejection of such messages often occurs because the standard mail address of the HTTPD user is not recognized as an authorized sender by the relay host.
To prevent this happen, we strongly recommend you perform additional steps in the postfix configuration.
Note
Perform the following configurations regardless of the type of relay host (Gmail, Office 365 or Microsoft Exchange).
Add a new line at the end of the
/etc/postfix/canonicalfile, according to the example below.
// my-fixed-envelope-sender@example.org
Replace the example email address with the actual sender email address of the organization.
Add the following lines to the
/etc/postfix/main.cffile:
canonical_maps = regexp:/etc/postfix/canonical
canonical_classes = envelope_sender
Restart the postfix service:
service postfix restart
4.2.4.14. Postfix for emailing via Gmail
Update the system and install the necessary packages:
dnf update && dnf install postfix mailx cyrus-sasl cyrus-sasl-plain
Set up authentication with Gmail. Edit or create the
/etc/postfix/sasl_passwdfile and add the following line at the end:
[smtp.gmail.com]:587 <UserName@gmail.com>:<Password>
Where:
username@gmail.com: mail account
password: mail password
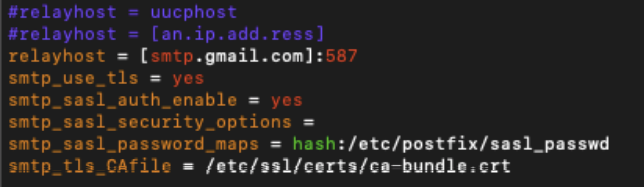
Configure postfix. In the
/etc/postfix/main.cffile, apply the following configurations for the relayhost section:
relayhost = [smtp.gmail.com]:587
smtp_use_tls = yes
smtp_sasl_auth_enable = yes
smtp_sasl_security_options =
smtp_sasl_password_maps = hash:/etc/postfix/sasl_passwd
smtp_tls_CAfile = /etc/ssl/certs/ca-bundle.crt
relayhost: Specifies the mail relay host and port number. The hostname will be enclosed in parentheses to specify that an MX lookup is not required.
smtp_use_tls: Enables transport layer security.
smtp_sasl_auth_enable: Enable SASL authentication.
smtp_sasl_security_options: This should be left empty to ensure that incompatible security options are not used.
smtp_sasl_password_maps: Specifies the password file to use. This is the file created in the Postfix configuration.
smtp_tls_CAfile: Specifies the list of certificate authorities to use when verifying the identity of the server.
See an example of this configuration below:
If your mail service is NOT authenticated, you should also edit the myhostname attribute of the
/etc/postfix/main.cffile with the name of your email domain.
myhostname = mydomain.tld
Compile and hash the contents of the
/etc/postfix/sasl_passwdfile:
postmap /etc/postfix/sasl_passwd
postmap hash:/etc/postfix/sasl_passwd
Restart the postfix service and enable autostart:
systemctl restart postfix && chkconfig --add postfix
In case of failure, perform the service shutdown and startup manually:
systemctl stop postfix
systemctl start postfix
Note
By default, Gmail only allows logins from secure connections.
To enable sending emails, it is necessary to change the settings in the Gmail account by enabling “Allow less secure applications”. For more information on how to do this, please review the information at the following link: https://support.google.com/accounts/answer/6010255?hl=en
Send a test mail to verify the configuration:
mail -s "Test subject" <recipient>@<domain.com> < /dev/null
Where:
recipient@domain.com: Replace this with the recipient’s email address.
To view all mail logs and other message information:
tail -f /var/log/maillog
4.2.4.15. Postfix for emailing via Office 365
Update the system and install the necessary packages:
dnf update
dnf install postfix cyrus-sasl-plain mailx
Set up authentication with Office365. Edit or create the
/etc/postfix/sasl_passwdfile and set the credentials:
[smtp.office365.com]:587 <UserName>@<DomainName>:<Password>
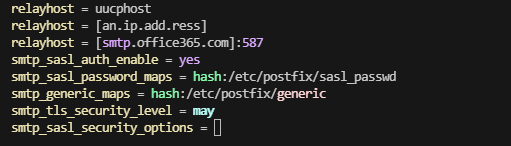
Configure postfix. In the
/etc/postfix/main.cffile, apply the following configurations for the relayhost section:
relayhost = [smtp.office365.com]:587
smtp_sasl_auth_enable = yes
smtp_sasl_password_maps = hash:/etc/postfix/sasl_passwd
smtp_generic_maps = hash:/etc/postfix/generic
smtp_tls_security_level = may
smtp_sasl_security_options = noanonymous
relayhost: Specifies the mail relay host and port number. The hostname will be enclosed in parentheses to specify that an MX lookup is not required.
smtp_sasl_auth_enable: Enable SASL authentication.
smtp_sasl_password_maps: Specifies the password file to use. This is the file created in the previous step.
smtp_generic_maps: Optional lookup tables that perform address rewriting on the Postfix SMTP client, typically to transform a locally valid address to a globally valid address when sending mail over the Internet.
smtp_tls_security_level: By specifying a non-empty value, this overrides the deprecated smtp_use_tls, smtp_enforce_tls, and smtp_tls_enforce_peername parameters.
smtp_sasl_security_options: This should be left empty to ensure that incompatible security options are not used.
See an example of this configuration below:
Compile and hash the contents of the
/etc/postfix/sasl_passwdfile:
postmap /etc/postfix/sasl_passwd
postmap hash:/etc/postfix/sasl_passwd
Change the file permission:
chown root:postfix /etc/postfix/sasl_passwd
chmod 640 /etc/postfix/sasl_passwd
Configure the
/etc/postfix/genericfile to be able to send email from a valid user:
/.*/ <UserName>@<DomainName.tld>
Change the permission of the
/etc/postfix/genericfile, compile, and hash:
chown root:root /etc/postfix/generic
chmod 0600 /etc/postfix/generic
postmap /etc/postfix/generic
postmap hash:/etc/postfix/generic
As an optional configuration, if you want to send all internal system messages to an external mailbox, change the root alias to your email address in
/etc/aliases. This way, all messages sent to root will be forwarded to the system reporting address.
mailer-daemon:  postmaster
postmaster:    root
root:         <UserName>@<Domain.com>
Save and exit the file. Run the newaliases command to apply the changes.
Restart the postfix service and enable autostart:
systemctl restart postfix && chkconfig --add postfix
In case of failure, perform the service shutdown and startup manually:
systemctl stop postfix
systemctl start postfix
Send a test mail to verify the configuration:
mail -s "Test subject" <recipient>@<dominio.com> < /dev/null
Where:
recipient@domain.com: Replace this with the recipient’s email address.
To view all mail logs and other message information, run:
tail -f /var/log/maillog
4.2.4.16. Setup with Windows Fast Reconnect
PEAP fast reconnection is desirable in applications such as wireless roaming. This feature allows you to resume sessions without completing a full authentication.
TLS session keys can be cached by the client and server and used to reduce the time between an authentication request from the client and the response from the Radius server.
To configure this functionality in the system it is necessary to make certain modifications.
Enable EAP-TLS cache in the /etc/raddb/eap.conf configuration file:
eap {
...
   tls {
      ...
      cache {
          enable = yes
          ...
      }
   }
}
The lifetime and max_entries properties, within the cache section, are set to default values. We can adjust them depending on the environment.
Enable the use_tunneled_reply property in /etc/raddb/eap.conf, to send username-based response attributes within the tunnel:
eap {
   ...
   peap {
      ...
      use_tunneled_reply = yes
      ...
   }
}
Windows supplicant configuration
Select the Enable Fast Reconnect property, in the EAP Protected Properties window (1.6.1.2).
4.2.4.17. Bulk import of devices
IP: Indicate the access IP to the device.
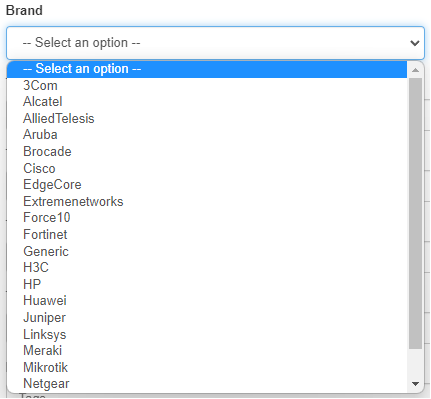
Brand: Indicate the manufacturer. The list of manufacturers registered in the system is as follows:
Model: Indicate the model. In this case the only possible model will be Generic. If we are not sure of the manufacturer and model we will leave both fields with Generic.
bkpconntype: SSH or SCP.
bkpuser: User to access the SCP repository or network device.
bkppass: Access password to the SCP repository or network device.
bkpip: IP address of the SCP server or network device.
bkppath: Repository directory where to locate the backups (SCP connections).
bkpfilename: Regular expression to identify the name of the file (SCP connections).
bkpprivilege: Password for Privilege EXEC mode (SSH connections).
Although the hostname of the device is not a required field, it is recommended to complete it to have each IP identified in the CMDB.
The SNMP versions registered in the system are the following:

Save the file in CSV format separated by commas.
Import the generated file:
Go to ON CMDB -> Network Devices.
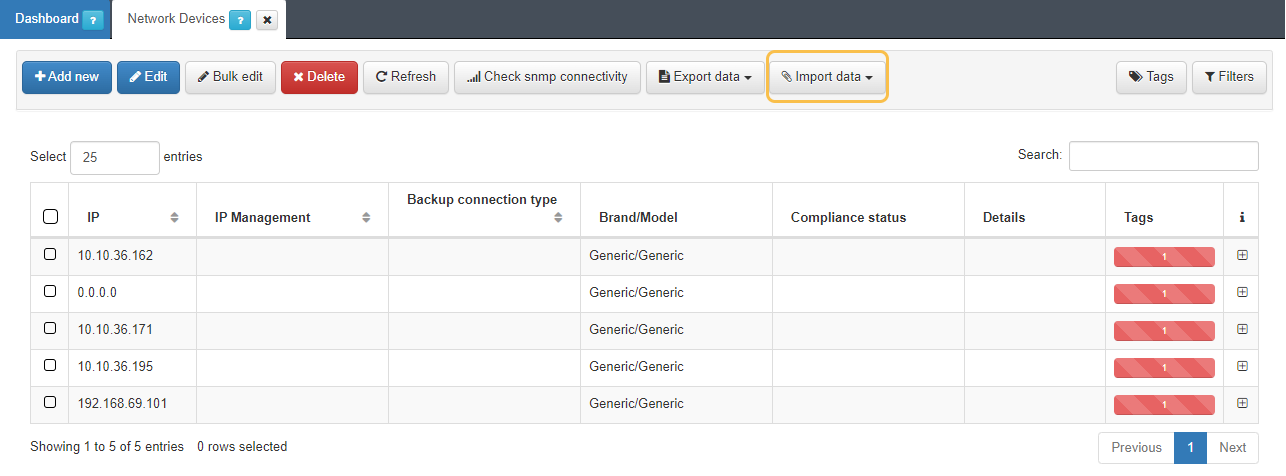
Import the file with the Import data button.
Select the file and accept.
A success message should appear at the top right of the browser:
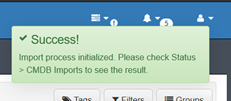
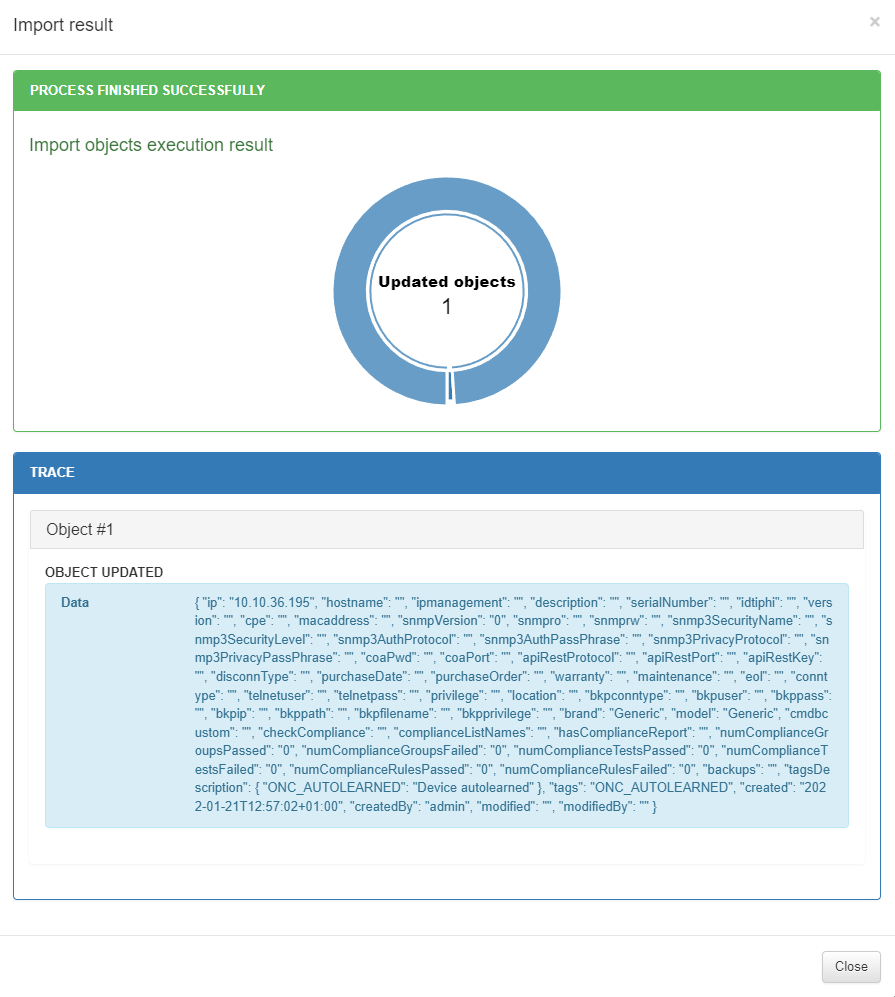
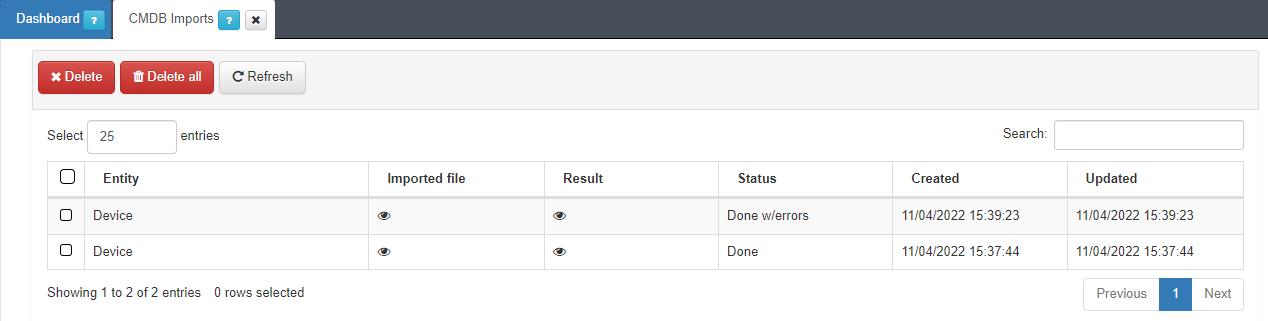
The import process will be initialized, we can see the process in Status -> CMDB Imports.
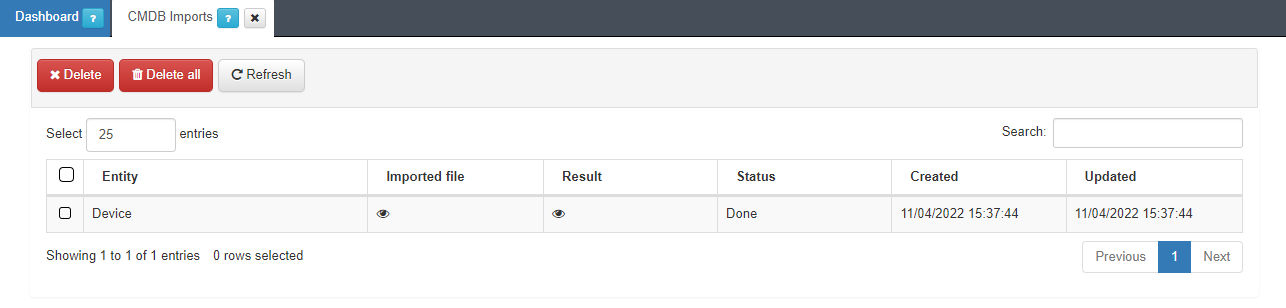
In this section, we can see the file that has been imported, the result of the operation and the current status of the process.
In case of error:
The Status section will display Aborted:
To see the failure reason, open the Result section:
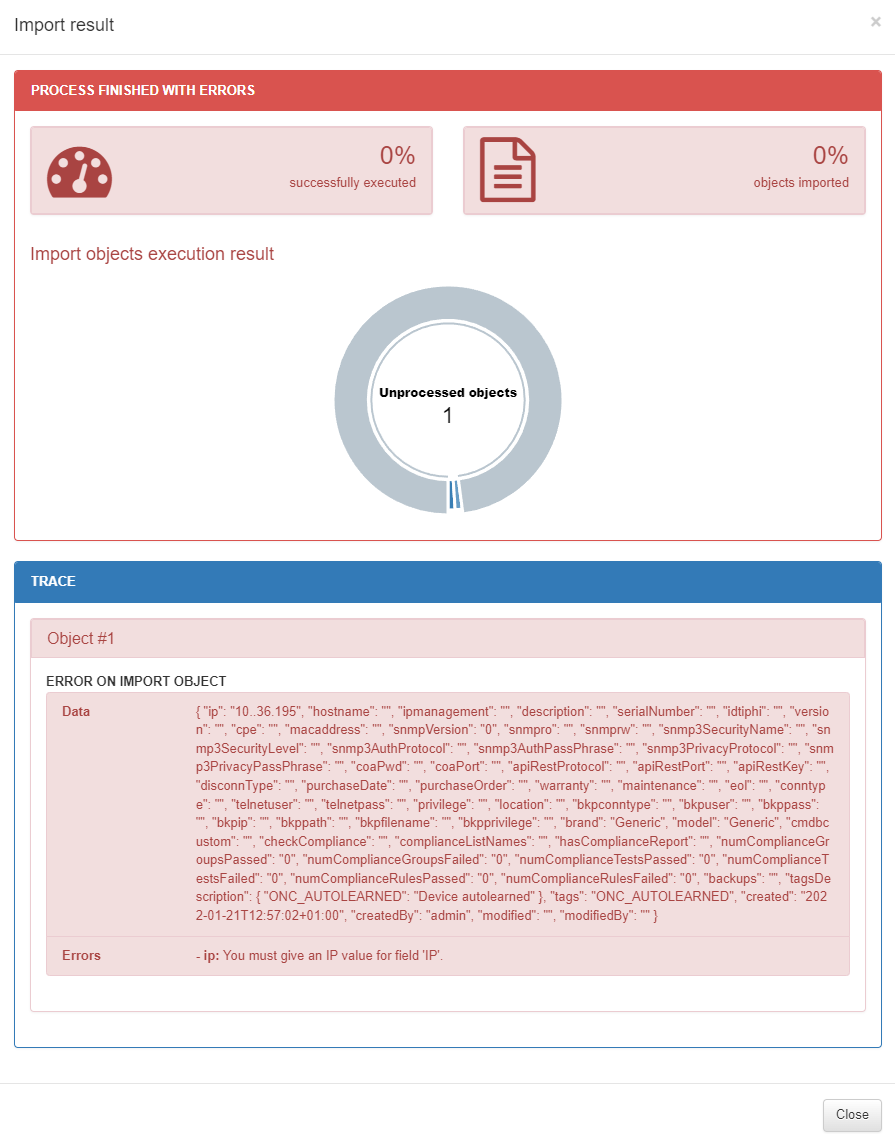
In this example, the IP field is not formatted correctly.