3.1.1. Ansible configuration from Rocky Linux 8
This section tries to cover the automatic configuration of the OpenNAC Enterprise servers from an empty Rocky Linux 8 image.
For more information about the Rocky Linux 8 installation you can visit the official Rocky Linux official site.
Note
This case only makes sense in environments where we can’t deploy the OpenNAC Enterprise OVAs such as the cloud environment.
Before deploying the nodes, it is necessary to have the proper disk partitions made. Each role requires different partitions:
Partition Role |
Minimum recommended size |
Principal |
Proxy |
Worker |
Analytics |
Sensor |
|---|---|---|---|---|---|---|
/backup |
50GB (xfs) |
Required |
Required |
Required |
||
/var/log |
60GB (xfs) |
Required |
Required |
Required |
||
/var/log/mysql |
50GB (xfs) |
|||||
/var |
50GB (xfs) |
Required |
Required |
|||
/ |
49GB (xfs) |
Required |
Required |
Required |
Required |
Required |
/boot |
1GB (xfs) |
Required |
Required |
Required |
Required |
Required |
swap |
RAM SIZE (xfs) |
Note
The recommended file system is the xfs.
Once you have them deployed, we need them to have:
Default SSH access for all images username/password is root/opennac
Default HTTPS access for Principal node username/password is admin/opennac
An accessible IP address and internet connection
An ssh key pair generated from the Core Principal and copied to itself and the other nodes.
Note
The playbooks will be launched from the OpenNAC Enterprise Principal node, to standardize and simplify the process.
3.1.1.1. Giving the nodes an IP
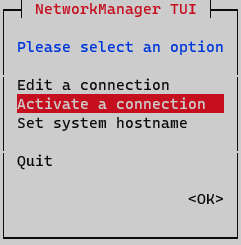
To assign said IP, we execute the graphical network manager:
nmtui
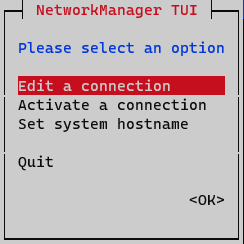
On the initial window, select Edit a connection
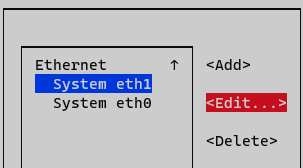
Select the interface and press Edit
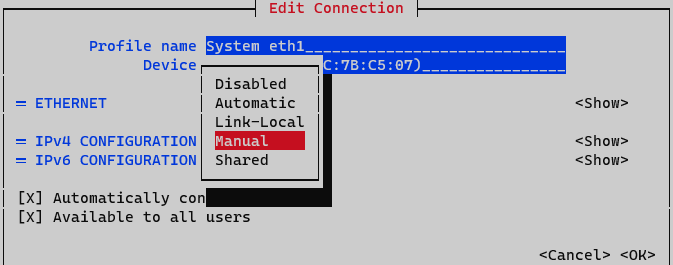
On IPv4 Configuration select Manual. Display IPv4 configuration selecting option <Show>
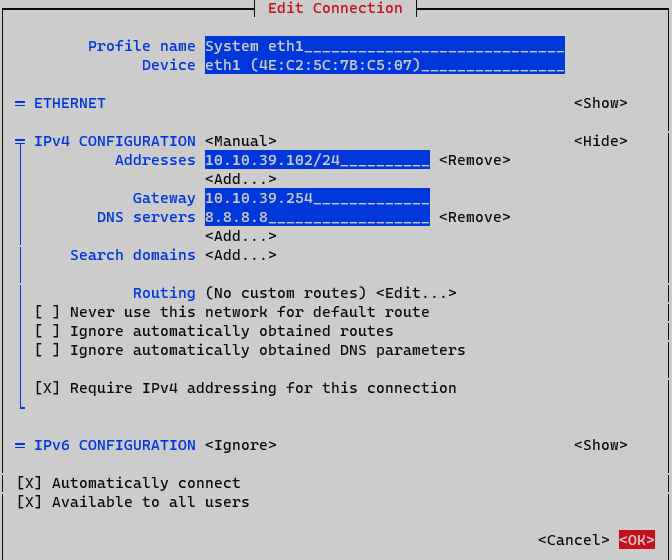
Addresses: Add node IP address with netmask (<IP>/<MASK>)
Gateway: Add a default gateway
DNS Servers: Add a DNS server (ex. Google with ip 8.8.8.8). It is recommended to put the Corporate DNS server.
Set option Require IPv4 addressing for this connection. Finalize by clicking <OK> at the bottom.
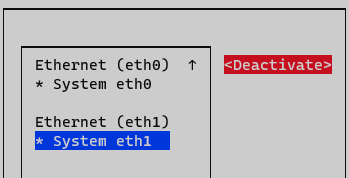
At this point activating and deactivating the interface must be done to apply changes. In the Network Manager menu, select the option Activate a connection.
Deactivate and activate interface and go back to the initial menu.
Interface is now configured and can be verified by typing the following command in CLI “ifconfig” o “ip a”
ifconfig
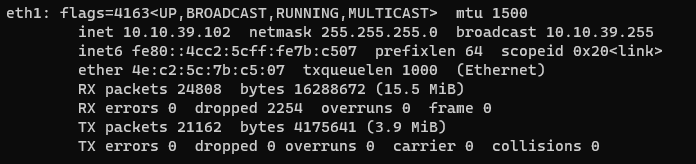
Note
The name of the interfaces may change depending on the OS version, i.e.: ens18
3.1.1.2. Creating and copying the ssh key pair
These steps are only necessary on the Core Principal node.
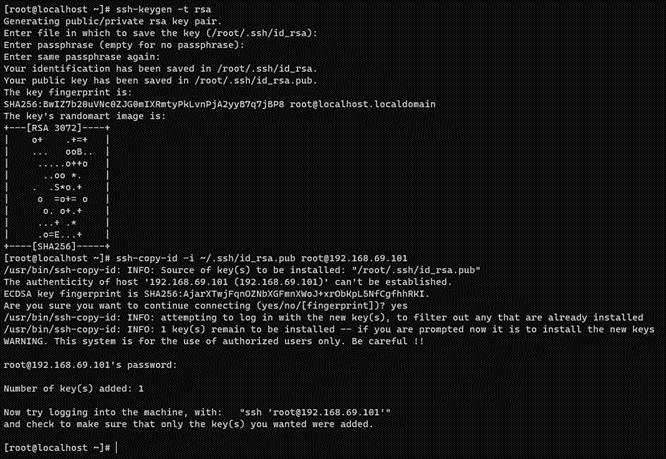
On the console type:
ssh-keygen -t rsa -C ansibleKey
Answer all questions with an “Enter” to use default values.
Now copy the generated public key to the nodes:
ssh-copy-id -i ~/.ssh/id_rsa.pub root@<nodes_IP>
Where <nodes_IP> are the IPs of all the available nodes: Core Principal itself (where we are connected), Core Worker, Core Proxy, Analytics and/or Sensor.
3.1.1.3. Provisioning Ansible
It is necessary to download ansible and git on the machines to be able to clone the repository and use the ansible commands. SSH into the Principal console and launch the following commands:
dnf -y update
dnf -y install epel-release
dnf -y install ansible wget vim unzip
Now you can clone the opennacansible8 repository on the Core Principal machine:
wget https://<username>:<password>@repo-opennac.opencloudfactory.com/scripts/1.2.2/opennacansible8.zip
unzip -d opennacansible8 opennacansible8.zip
3.1.1.4. Configuration steps
On the Core Principal server, go to the opennacansible8/ folder. You will see many files, the important ones are:
Deployment files: in the very front we can see some files called <role_name>_deploy.yml → Does the entire deployment (installs and configures). In this case, we draw from an empty Rocky Linux 8. Where <role_name> can be one of the following:
principal
worker
proxy
analy_agg
analytics
aggregator
sensor
nuc
Note
The <role_name>_deploy.yml already calls <role_name>_config.yml playbooks for execution, so it is not necessary to run the configuration ones (you can omit them).
Inventory: the inventory.sample file with the IPs and hostnames of the nodes.
Ansible configuration: ansible.cfg.sample is the file with the basic Ansible configuration, here you will have to indicate the path to the ssh key previously created.
Variables files: inside vars/ directory there are some files with the vars to fill in with your data (detailed later).
Follow the steps carefully in the order listed.
3.1.1.4.1. Building the inventory
The IPs of the servers will be the ones needed to fill the inventory. First, copy the inventory.sample to inventory and then edit the file (for example with vim) to add the IPs as shown below. Always check first the .sample file for possible updates.
cp inventory.sample inventory
vim inventory
The structure followed is:
<hostname> ansible_ssh_host=<PUBLIC_IP> private_ip_address=PRIVATE_IP> role_opennac=<role>
where:
<hostname>: the name of the server, if it does not fit, the playbook will change it for the one you write on the inventory.
<PUBLIC_IP>: the accessible IP needed to make the SSH connection.
<PRIVATE_IP>: the internal IP needed in the servers to fill the /etc/hosts file or to communicate with each other. Sometimes you may not have this IP; in that case, fill it with the <PUBLIC_IP> as well.
<role>: the OpenNAC role needed to know, for example, what healthcheck configures. It can be one of these: [ aggregator | analytics | analy+agg | secondary | sensor | principal | proxy | worker ].
Note
There is a special paremeter zone_id that only needs to be written in analytics servers when configuring an ELK HA architecture.
An example could be:
[analytics]
ana01-mycompany ansible_ssh_host=10.250.80.1 private_ip_address=192.168.69.5 role_opennac=analy+agg
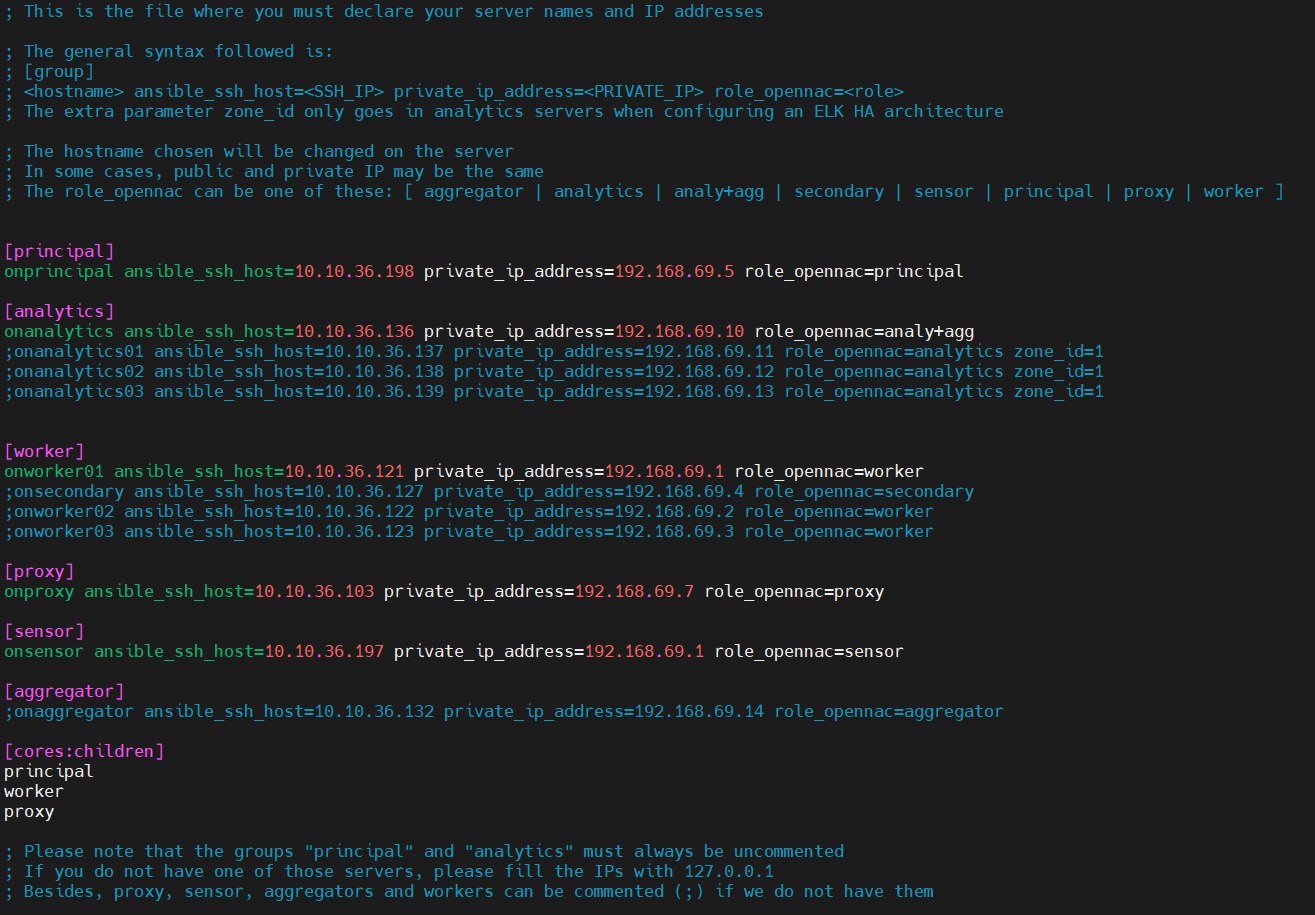
Note
You can add or delete servers according to your needs. Do NOT comment the groups.
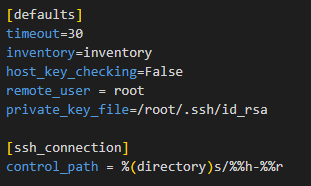
3.1.1.4.2. Configuring Ansible
The ansible.cfg configuration is similar. Copy the ansible.cfg.sample onto ansible.cfg and edit it to fill the path to your private key (the one generated on the prerequisites). Also indicate the path to your inventory file (inventory.yml) There are more variables in this file you may want to change, but these are the recommended and basic ones. Always check the .sample file first for possible updates.
cp ansible.cfg.sample ansible.cfg
vim ansible.cfg
3.1.1.4.3. Filling in the vars
There is a vars/ directory inside opennacansible8/ in which you will find the variable. It is very important to look at all the variables and understand their usage (explained below). You only have to complete the variables that are suitable for your architecture, i.e., if your deployment does not have a sensor, leave the sensor variables with the default value.
Here is what you will find inside each file:
vars_analytics.yml: variables related to the analytics, aggregator and sensor deployment, including the common ones, the ones for the installation (without the OpenNAC OVA deployed) and the ones for the configuration.
vars_core.yml: variables related to core roles including the common ones, the ones for the installation (without the OpenNAC OVA deployed), principal configuration, proxy configuration, worker configuration and worker replication.
vars_NUC.yml: vars to deploy the host, sensor, core and analytics configuration. As this isn’t the NUC use case, this file will not be explained. There is further information about it, contact us if you are interested
Important
DO NOT comment or delete the variables (unless it is specifically said that you can delete lines, never the variable name). If you are not going to use a variable, leave it with the default variable.
3.1.1.4.3.1. vars_analytics.yml
Common variables: these variables are mandatory for every deployment.
inventory: default static, set to dynamic when deploying in cloud with AWS and tags.
timezone_custom: the timezone where the server is set (you can execute command timedatectl list-timezones to list valid timezones)
ntpserv: NTP servers where you must get the synchronization
deploy_testing_version: set to “yes” if you want to use the testing version, “no” for the stable version (default is “false” as it is the stable version)
repo_auth: the user/password to access the OpenNAC repository
Analytics and Aggregator.
netflow: in case you want to activate netflow enable “true”, RAM Memory has to be at least 64GB (default is “false”)
cluster_name: desired name for the cluster (to configure elasticsearch.yml)
number_of_shards: the number of shards to split the indexes
Sensor.
LOCAL_MGMT_IFACE: from where we are going to access the device for management (important to select the assigned interface for management, otherwise installation will fail)
SNIFFER_INTERFACE: the interface that captures packets (important to select the assigned span interface, otherwise installation will fail)
deployment_mode: There are two capture methods: SPAN mode and SSH mode. Change the following variable to ‘SSH’ or ‘SPAN’ (default is “SPAN”)
remoteHostIP: the remote IP of the device that needs to be captured(if you have selected deployment_mode: ‘SSH’)
remoteInterface: The remote interface where the information is going to be collected (if you have selected deployment_mode: ‘SSH’)
remoteHostPassword: opennac (if you have selected deployment_mode: ‘SSH’)
3.1.1.4.3.2. vars_core.yml
Common variables: these variables are mandatory for every deployment.
inventory: default static, set to dynamic when deploying in cloud with AWS and tags.
timezone_custom: the timezone where the server is set (you can execute command timedatectl list-timezones to list valid timezones)
ntpserv: NTP servers where you must get the synchronization
deploy_testing_version: set to “yes” if you want to use the testing version, “no” for the stable version (default is “false” as it is the stable version)
repo_auth: the user/password to access the OpenNAC repository
Principal configuration.
criticalAlertEmail: email or set of emails where you want to receive alerts
criticalAlertMailTitle: title of the alert email
criticalAlertMailContent: content of the critical email
clients_data: to configure /etc/raddb/clients.conf, add as many clients as you need
ip: ‘X.X.X.X/X’
shortname: desired client name
secret: desired password
relayhostName: FQDN of the SMTP server to relay the mails (next-hop destination(s) for non-local mail). Configure /etc/postfix/main.cf and /etc/postfix/generic
relayhostPort: Port of the “relayhostName” to relay the mails. Configure /etc/postfix/main.cf and /etc/postfix/generic
mydomain: The mydomain parameter specifies the local internet domain name. Configure /etc/postfix/main.cf and /etc/postfix/generic
emailAddr: The email used as the sender who sends the alerts. Configure /etc/postfix/main.cf and /etc/postfix/generic
Worker replication
mysql_root_password: password for mysql root user
mysql_replication_password_nagios: password for mysql nagios user
path: the path to save the dump .sql file
Proxy
sharedkey: the string to encrypt the packets between the Proxy Servers and Backends
pools_data: to configure /etc/raddb/proxy.conf, add or delete as many as you need
namepool: the name of the pool
namerealm: the name of the realm
clients_data_PROXY: to configure /etc/raddb/clients.conf, add or delete as many clients as you need
ip: ‘X.X.X.X/X’
shortname: desired client name
secret: the previously defined shared key (do not change this variable)
Edit the necessary files to fill in the variables (most of them can stay with the default value), paying special attention to the repo user and password and the interfaces of the sensor. A variable misconfiguration can lead to an execution error.
3.1.1.5. Launching the playbooks
Now we can launch the playbooks in the order listed. To do so, on the Core Principal server, go to the opennacansible8 folder.
You only have to launch the playbooks that are suitable for your architecture, i.e., if you do not have a sensor, do not launch the sensor_deploy.yml playbook.
Depending on the role you should launch one playbook or another: <role_name>_deploy.yml. The first one must always be the Principal itself, and you should let the playbooks finish before launching the next one.
Important
The numbers of each “ok”, “changed”, “skipped” or “ignored” may vary depending on the playbook, number of nodes, etc. The only ones that must be always 0 are “unreachable” and “failed”. Otherwise, something went wrong and you should review the tasks.
3.1.1.5.1. Principal Deployment
First, we will deploy the Principal itself. Launch the following command:
ansible-playbook principal_deploy.yml

You may see some warnings; they are not critical. There can also be “failed” tasks but ignored (”…ignoring” or the playbook does not stop) you should pass over the ignored failed tasks. Once the installation process finishes, the result should look as follows:

When the execution finishes, you can launch the next playbooks, letting them finish.
3.1.1.5.2. Analytics and Aggregator Deployment
To deploy the Analytics and/or Aggregator, there are three options:
Having the Analytics and Aggregator on the same node (role_opennac: analy+agg): launch the following command (from the Principal):
ansible-playbook analy_agg_deploy.ymlHaving the Analytics as a separate role (role_opennac: analytics): in this case, we might have the analytics on the same of different zones, we should add a parameter for each host on the inventory, zone_id, it can be a number (1, 2, 3…) or an identifier (R1, R1, Z1, Z2…). In the image we can see an example of a complete inventory with a ELK in HA cluster:
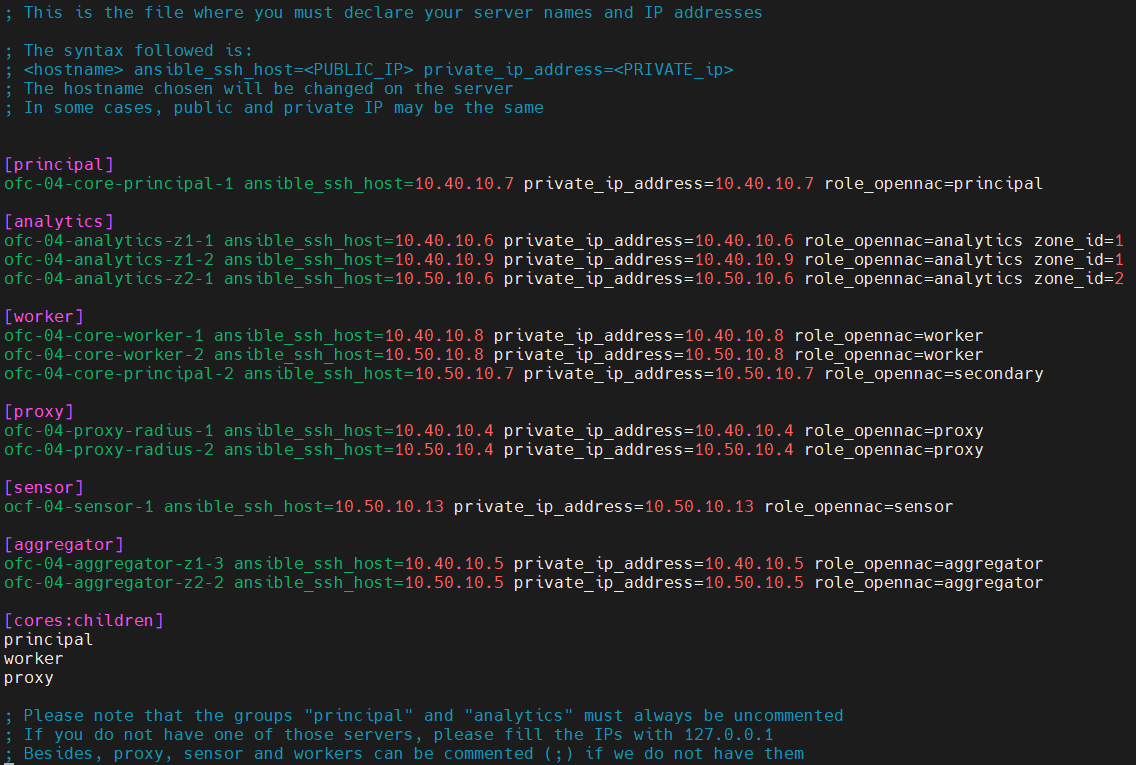
Launch the following command (from the Principal):
ansible-playbook analytics_deploy.yml
Having the Aggregator as a separated role (role_opennac: aggregator): launch the following command (from the Principal):
ansible-playbook aggregator_deploy.yml
Once the installation process finishes on Analytics, you can launch the next playbooks, letting them finish.
For further information about ELK in HA cluster, see HA in ELK cluster
3.1.1.5.3. Sensor Deployment
To deploy the Sensor, launch the following command (from the Principal):
ansible-playbook sensor_deploy.yml
Once the installation process finishes on Sensor, you can launch the next playbooks, letting them finish.
3.1.1.5.4. Worker and Secondary Deployment (and Replication)
To deploy the Worker or Secondary you should have the role_opennac specified on the inventory group as “worker” or “secondary”. The secondary will use the same playbook (worker_deploy.yml) but it will internally be configured as a Secondary node, launch the following command (from the Principal):
ansible-playbook worker_deploy.yml
Once the installation process finishes on Worker, you can launch the next playbooks, letting them finish.
3.1.1.5.5. Proxy Deployment
To deploy the Proxy, launch the following command (from the Principal):
ansible-playbook proxy_deploy.yml
Once the installation process finishes on Proxy, you can launch the next playbooks, letting them finish.
Important
To configure the Proxy RADIUS correctly, it is important to ensure that the role_opennac is correctly defined in the inventory, especially if you have a secondary node. It is advisable not to point the Proxy RADIUS to the secondary node, as it may not attend to requests.