3.4.3.1. Allin1 - Ansible Deployment
3.4.3.1.1. Host Interfaces configuration
The physical host is responsible for running the KVM and OpenNAC Sensor. So, our first steps are to configure the host machine interfaces to be able to communicate with the VMs.
Export variables
export PUBLIC_IP=10.10.36.200
export PUBLIC_PREFIX=24
export DEFAULT_GW=10.10.36.254
export DNS=10.20.0.11
export ADMIN_IF=enp0s20f0u4
export HOSTNAME=allinC08
Configure network interfaces
Attention
In the case of the Intel NUC 8th generation, the eno1 interface will only appear after the dnf update and the reboot.
cat <<EOF >> /etc/sysconfig/network
HOSTNAME=${HOSTNAME}
EOF

nmcli general hostname "${HOSTNAME}"

cat <<EOF > /etc/sysconfig/network-scripts/ifcfg-eno1
TYPE=Ethernet
PROXY_METHOD=none
BROWSER_ONLY=no
BOOTPROTO=none
IPV4_FAILURE_FATAL=no
IPV6INIT=no
IPV6_FAILURE_FATAL=no
NAME=eno1
DEVICE=eno1
ONBOOT=yes
EOF

cat <<EOF > /etc/sysconfig/network-scripts/ifcfg-virpubbr0
STP=no
TYPE=Bridge
PROXY_METHOD=none
BROWSER_ONLY=no
BOOTPROTO=none
DEFROUTE=yes
IPV4_FAILURE_FATAL=no
IPV6INIT=no
IPV6_DEFROUTE=yes
IPV6_FAILURE_FATAL=no
IPV6_ADDR_GEN_MODE=stable-privacy
NAME=virpubbr0
DEVICE=virpubbr0
ONBOOT=yes
IPADDR="${PUBLIC_IP}"
PREFIX="${PUBLIC_PREFIX}"
GATEWAY="${DEFAULT_GW}"
DNS1="${DNS}"
IPV6_DISABLED=yes
EOF

cat <<EOF > /etc/sysconfig/network-scripts/ifcfg-${ADMIN_IF}
TYPE=Ethernet
DEVICE=${ADMIN_IF}
NAME=bridge-slave-${ADMIN_IF}
ONBOOT=yes
BRIDGE=virpubbr0
EOF
Reboot
reboot
3.4.3.1.2. Previous steps
There are some previous steps you need to follow:
Make sure that the Allin1 machine has an assigned and accessible IP to be able to execute the following steps. If not, please set a new IP on the machine.
In the Allin1, install ansible. It is important to reboot the machine after updating and installing the packages to ensure the correct behavior. Your installed ansible version must be greater than 2.10 (recommended 2.12):
dnf -y update
dnf -y install epel-release
dnf -y install ansible wget unzip vim
reboot
Get the ansible scripts to the NUC from https://repo-opennac.opencloudfactory.com/scripts/1.2.2/allin1-122.zip with your username and password
wget https://<username>:<password>@repo-opennac.opencloudfactory.com/scripts/1.2.2/allin1-122.zip
unzip -d allin1-122 allin1-122.zip
In the Allin1, create an ssh key pair and copy it to the Allin1 itself, this generates/updates the “authorized_keys” file, it is necessary to send the public key (id_rsa.pub file) generated by the previous command to the Allin1 device itself through the following command:
ssh-keygen -t rsa -C ansiblekey
ssh-copy-id -i ~/.ssh/id_rsa.pub root@<Allin1_IP>
You are now able to configure the ansible variables and playbooks to finish the OpenNAC configuration. Access the Allin1 by ssh and go into the directory named allin1-122:
cd allin1-122
Looking at the files and directories inside allin1-122/ here is what we will be launching so far:
Deployment (installation and configuration) of a Allin1 (Core Principal, Analytics, and Sensor)
There are different kinds of files and directories inside allin1-122/: playbooks, configuration files, variables files and roles. To ease the configuration, we will only see what is strictly necessary.
3.4.3.1.3. Playbooks
Note
Please note that before launching any playbook, you must meet every requirement stated above.
Right into the allin1-122/ directory, there are some files.yml called playbooks, which are the ones you are going to run.
nuc_deploy.yml → Does the entire deployment. In this case, we draw from an empty Rocky Linux 8; it installs the ON Sensor, deploys the Virtual Machines of the Core Principal and Analytics, and calls nuc_config.yml, which configures these virtual machines.
3.4.3.1.4. Configuration files
There are two essential files: ansible.cfg.sample and inventory.sample. The IPs of the servers will be the ones needed to fill the inventory. First, copy the inventory.sample to inventory and then edit the file (for example with vim or any other editor as code, emacs, nano…) to add the IPs as shown below:
cp inventory.sample inventory
vim inventory
An example of an inventory configured is:
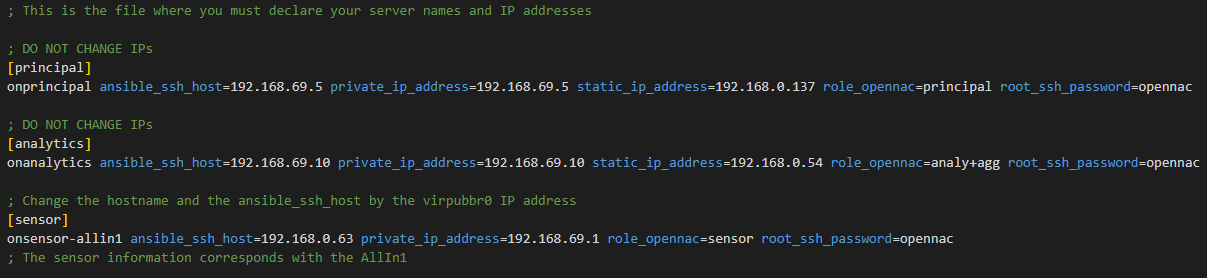
The first parameter <hostname> on each line is the name of the server, if it does not fit with the current machine name, the playbook will change it for the one you write on the inventory. You can change this on every server
The ansible_ssh_hosts <PUBLIC_IP>: the public IP needed to make the SSH connection. You should only change this IP on the sensor host line.
The private_ip_address <PRIVATE_IP> refers to the internal IP needed in the servers to fill the /etc/hosts file or to communicate with each other. In this case they are configured to be connected to the intbr0 interface. Do not change this IP on any server.
The static_ip_address <VIRPUBBR0_IP>: this parameter only exists on the Analytics and Principal hosts. You must change this IP on this hosts to match the accessible Allin1 network, the one configured on the virpubbr0 bridge. They should be available IP addresses on your network.
role_opennac: the OpenNAC role needed to know, for example, what healthcheck configure (in our case, only analy+agg, principal, sensor).
The root_ssh_password is the password to connect by ssh with a root user. You shouldn’t change the Analytics and Principal passwords as they are the Virtual Machines default ones. If you have chosen another password for the Sensor (All in One) you should change it here in order to have ssh connection.
Important
You can change the hostname of every host but you should only change the PUBLIC_IP (and the password if necessary) of the sensor host.
In the Allin1 case, the [sensor] group must be filled with the information from the Allin1 itself: the public IP is the one that you used to connect by ssh. The private IP addresses are the OpenNAC Enterprise recommended and default ones.
The ansible.cfg configuration is similar. Copy the ansible.cfg.sample onto ansible.cfg and edit it to fill the path to your private key (the one generated on the prerequisites, if you did it from root user, it should be private_key_file=/root/.ssh/id_rsa). There are more variables in this file you may want to change (for example, if you want to use a different inventory file), but this are the recommended and basic ones.
cp ansible.cfg.sample ansible.cfg
vim ansible.cfg
3.4.3.1.5. Variables files
There is a vars/ directory inside allin1-122/ in which you will find the variables file. It is very important to look at all the variables and understand their usage (explained later).
Here you have a list with all the variables. Make sure you know them beforehand to avoid playbook errors. There are some variables that you may need to add lines (for example, in the variable clients_data to configure /etc/raddb/clients.conf on the Principal, you may have more clients or less; add or quit lines to match your infrastructure).
vim vars/vars_NUC.yml
3.4.3.1.5.1. vars_NUC.yml
3.4.3.1.5.1.1. HOST CONFIGURATION
PUBLIC_PREFIX -> the Allin1’s public prefix, i.e. the public IP addresing subnet mask
DEFAULT_GW -> default gateway IP. To find out type “ip route” on the Allin1
DNS -> desired DNS for the Allin1
ADMIN_IF -> the Allin1’s administration interface. Same as LOCAL_MGMT_IFACE
3.4.3.1.5.1.2. COMMON
timezone_custom -> the desired timezone (for example Europe/Madrid). To display the available timezones use the following command:
timedatectl list-timezones
ntpserv1 -> an NTP server where you must get the synchronization
deploy_testing_version -> set to “true” if you want to use the testing version, “false” for the stable version
repo_username -> the user to access the OpenNAC Enterprise repository
repo_password -> the password to access the OpenNAC Enterprise repository
3.4.3.1.5.1.3. SENSOR
LOCAL_MGMT_IFACE -> local management interface to access the device
SNIFFER_INTERFACE -> the interface to capture packets
3.4.3.1.5.1.4. ANALYTICS
analyticsdClustered -> enable “true” when the Analytics works in clustered mode
netflow -> in case you want to activate netflow enable “true”, RAM Memory has to be at least 64GB
3.4.3.1.5.1.5. PRINCIPAL
criticalAlertEmail -> email or set of emails where you want to receive alerts
criticalAlertMailTitle -> title of the alert email
criticalAlertMailContent -> content of the critical email
clients_data -> to configure /etc/raddb/clients.conf with the network ranges of the Network Devices that will do the requests, add as much as you need → ip -> ‘X.X.X.X/X’ → shortname -> desired client name → secret -> desired password
relayhostName: FQDN of the SMTP server to relay the mails (next-hop destination(s) for non-local mail). Configure /etc/postfix/main.cf and /etc/postfix/generic
relayhostPort: Port of the “relayhostName” to relay the mails (Typically 25) . Configure /etc/postfix/main.cf and /etc/postfix/generic
mydomain: The mydomain parameter specifies the local internet domain name. Configure /etc/postfix/main.cf and /etc/postfix/generic
emailAddr: The email used as the sender who sends the alerts. Configure /etc/postfix/main.cf and /etc/postfix/generic
3.4.3.1.6. Roles
Last but not least, there is a roles/ directory. The roles are a way to organize vars, files, tasks, handlers and other Ansible artifacts. All the necessary tasks to implement the playbooks are stored here. The playbooks to launch use this roles.
3.4.3.1.7. Launching the playbooks
You are about to complete this guide finish the All in One setup.
Go to the allin1-122/ directory (in case you are not already in it)
cd allin1-122
The command that will run the playbook is “ansible-playbook <nameplaybook>”
ansible-playbook nuc_deploy.yml
If you have followed the previous steps and do not want to change anything else, this should work. However, you can type ansible-playbook -h to get some help and look for more complex options.
The beginning of the execution should look like this:

As you may appreciate, you will see some warnings, they are not critical. In the image it is also shown a “failed” task, but it is ignored (”…ignoring”) you should pass over the ignored failed tasks.
Some tasks may take more time than others, please be patient until it finishes. At the end you should see something like this:
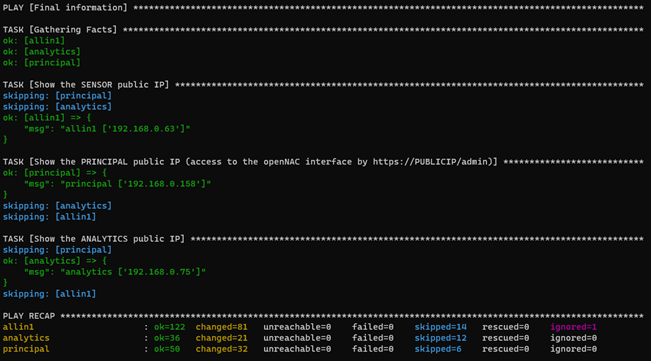
As you can see, the last tasks show the accessible IPs information of the deployed nodes. They have been configured with your network addresses configured on the static_ip_address parameter. To access the OpenNAC Web Administration Portal enter https://<PRINCIPAL_PUBLIC_IP>/admin
The numbers of each “ok”, “changed”, “skipped” or “ignored” may vary. The only ones that must be always 0 are “unreachable” and “failed”, otherwise something went wrong and you should review the tasks.
Remember that you can read this guide as many times as needed, so please, make sure you understand everything before using the playbooks.