3.2.2.4.3.2.1. Visibility plugins
This section presents Visibility plugins description and configuration.
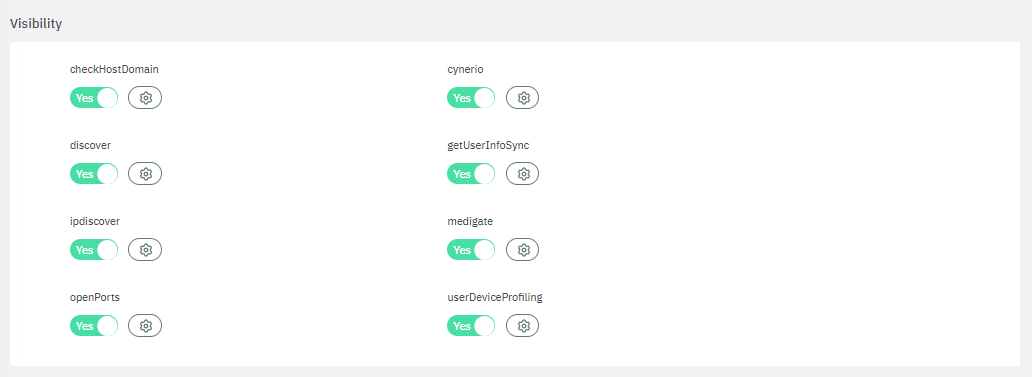
To enable plugins, use their corresponding flag and then click on the “engine” icon to open the configuration window.
3.2.2.4.3.2.1.1. checkHostDomain
The checkHostDomain plugin verifies that the hostname exists in the corporate domain.
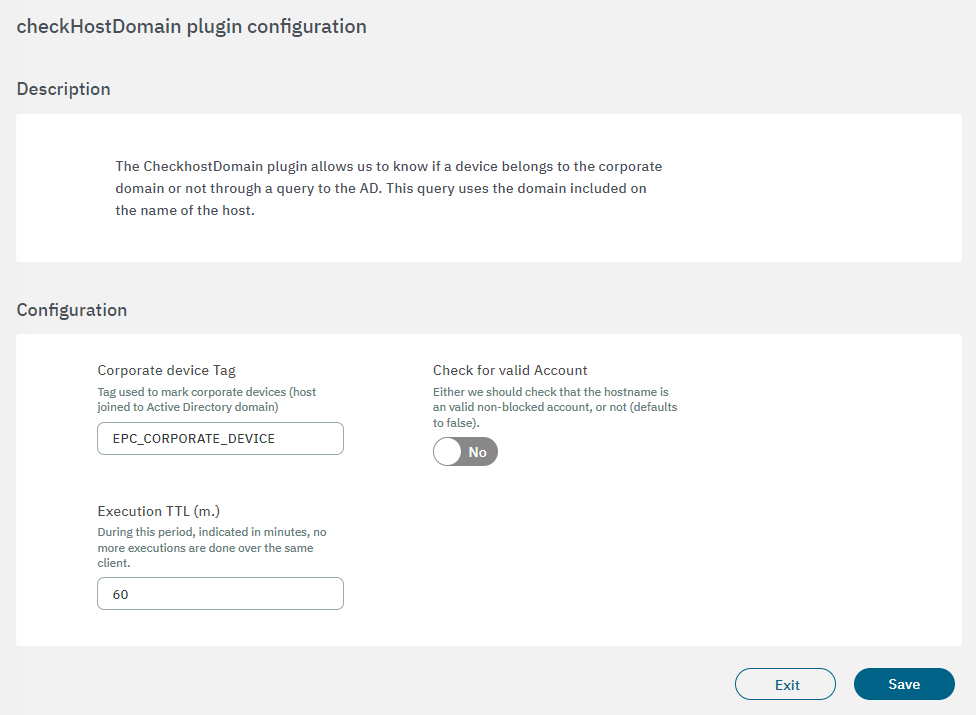
Corporate device Tag: If the hostname exists in the corporate domain, it will add the tag that is configured in the Corporate device Tag field.
Check for valid Account: Enables the user to validate if the account, on top of existing inside the domain, is also enabled.
Execution TTL (m.): During this period, indicated in minutes, no more executions are done over the same client.
3.2.2.4.3.2.1.2. cynerio
This plugin retrieves information from the Cynerio platform in order to profile user devices providing information about security, device operating system, manufacturer, etc.
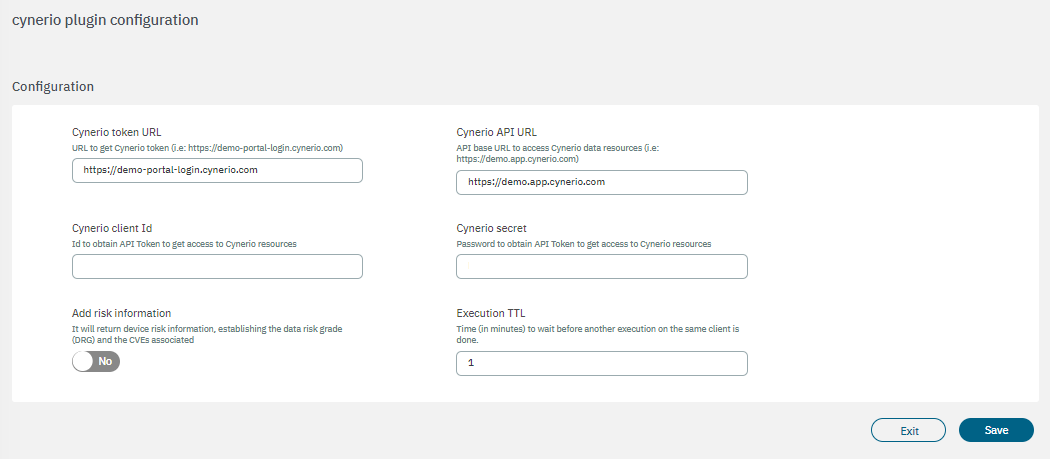
Cynerio token URL: URL to get the Cynerio token (https://demo-portal-login.cynerio.com).
Cynerio API URL: API base URAL to access Cynerio data resources (https://demo.app.cynerio.com).
Cynerio client Id: ID to get the API token to get access to Cynerio resources.
Cynerio secret: Password to obtain the API token to get access to Cynerio resources.
Add risk information: Enabling this flag will return device risk information, establishing the Data Risk Grade (DRG) and the CVEs associated.
Execution TTL: Time (in minutes) to wait before another execution on the same client is done.
Once the plugin is executed, the following tags can be assigned to the device in a policy evaluation:
CYN_UCA: Cynerio category
CYN_USC: Cynerio subcategory
CYN_UTA: Cynerio type associated
CYN_UMA: Cynerio manufacturer
CYN_UMO: Cynerio model
CYN_ROS: Cynerio root OS
CYN_DOS: Cynerio device OS
CYN_VOS: Cynerio OS version
CVE: CVEs associated
DRG: Damage risk score (gets the highest value: Low, Medium, High, Critical)
If the device returns no data, it will be assigned the ONC_CYNERIO_NO_DATA tag to it.
Refer to the tags table for more tag examples.
3.2.2.4.3.2.1.3. discover
The discover plugin uses the device’s IP address to gain visibility on them. It executes NMAP and SNMPWalk commands over discover assets. The plugin discovers all the devices using SNMP protocol and tries to use the communities defined. It also uses plenty of different types of scans, TCP, UDP, ICMP, extract banners, and gets fingerprints over operating systems and services.
The discover plugin is also executed when the tag ONC_FORCE_DISCOVER_FULL is found on the device.
The following fields must be configured to set up the plugin:
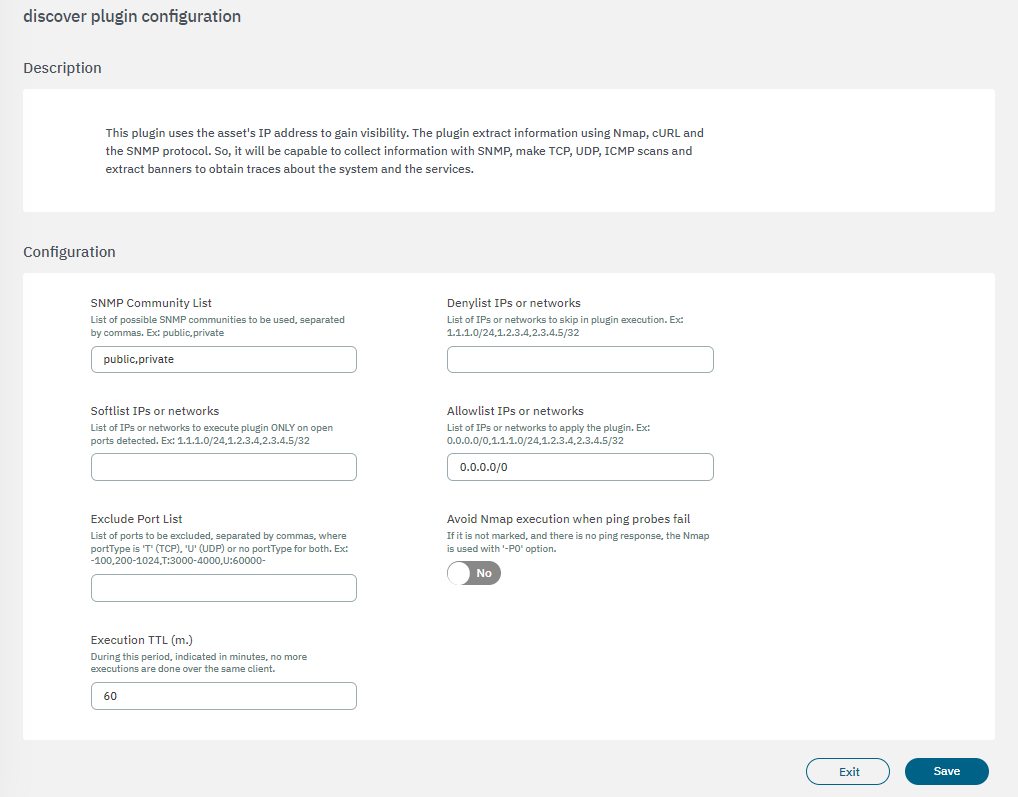
SNMP Community List: an IP range, or a set of comma-separated IP ranges that should be scanned by the plugin, if the received IP is included in the network lists, the plugin will execute. In case CIDR doesn’t appear will consider /32.
Denylist IPs or networks: an IP range, or a set of comma-separated IP ranges that should not be scanned by the plugin, if the received IP is included in the network lists, the plugin will NOT execute.
Softlist IPs or networks: an IP range, or a set of comma-separated IP ranges that should not be scanned by the plugin, if the received IP is included in the network list, the plugin just runs over the defined ports as open ports using tags “DOP” (Device Open Ports), for example using the network performance information collected by the Sensor. this functionality allows discovering “banners” in the known ports through a “soft” scan.
Allowlist IPs or networks: an IP range, or a set of comma-separated IP ranges that should be scanned by the plugin, if the received IP is included in the network lists, the plugin will execute. In case CIDR doesn’t appear will consider /32.
Example of an IP range for the three previous fields:
172.16.1.0/24 , 10.10.36.113/32, 1.2.3.4
Exclude Port List: list of ports to be excluded, separated by commas, where portType is ‘T’ (TCP), ‘U’ (UDP) o no portType for both.
Example of a port list:
-100,200-1024,T:3000-4000,U:60000-
Avoid NMAP execution when ping probes fail: if it is not marked, and there is no ping response, the NMAP is used with the -Pn option, to avoid NMAP execution if the ping fails.
Execution TTL (m.): During this period, indicated in minutes, no more executions are done over the same client.
Note
These fields can be empty. In this case, they don’t apply.
If the scanned output matches a defined encoded information (Banners, HTTP parsing and SNMP OID) and the tag to be added has parent tags in the profile tree, those parent tags will also be added. For instance, if the output matches “NETWORK_DEVICE_AP_CISCO,” it will automatically add “NETWORK_DEVICE_AP” and “NETWORK_DEVICE” tags as well.
3.2.2.4.3.2.1.4. getUserInfoSync
The getUserInfoSync plugin performs a connection to the configured LDAP server to retrieve property names of the connected user and notify these to the radius server via a custom parameter name.
To configure the plugin, two fields must be configured:
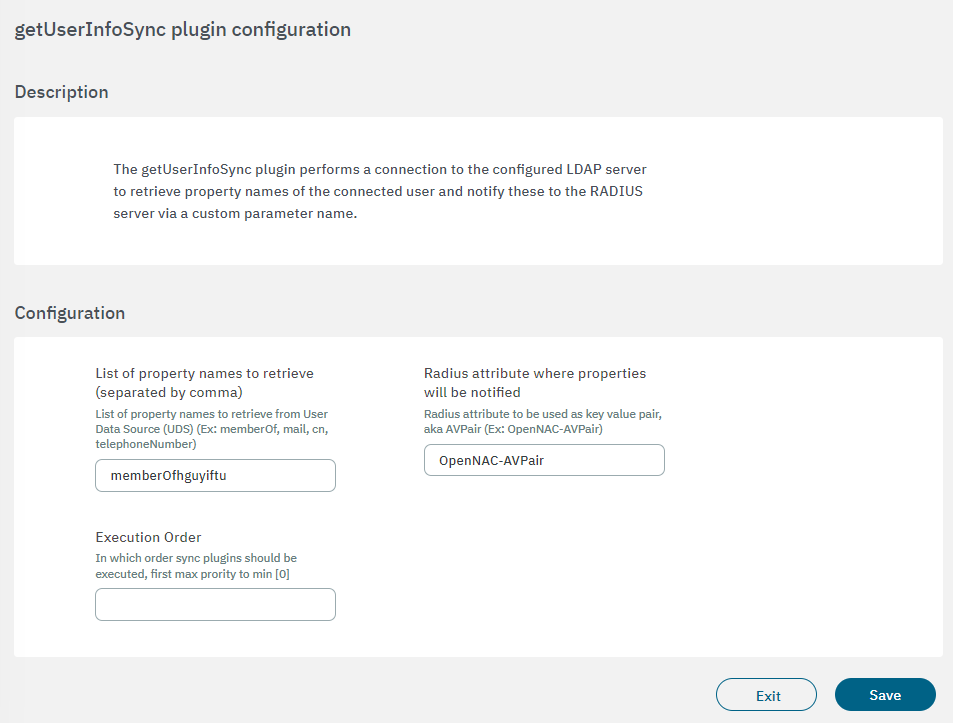
List of property names to retrieve: List of property names to retrieve from User Data Source (UDS). Example: memberOf, mail, cn, telephoneNumber.
Radius attribute where properties will be notified: Radius attribute to be used as key-value pair, with suffix AVPair. Example: OpenNAC-AVPair.
Execution order: Determines the order in which sync plugins are executed, with higher priority assigned to lower numerical values (0 being the lowest priority). In situations where multiple plugins share the same execution order value, the execution order will follow an alphabetical arrangement.
3.2.2.4.3.2.1.5. ipdiscover
The ipdiscover plugin is responsible for searching if there is any IP in the ARP tables of the network devices, which matches the different MACs which do not yet have an IP and have an active status.
Warning
Only enable the ipddiscover plugin if it is absolutely necessary and also consider the frequency the plugin is executed. Using this plugin in environments with multiple networks can potentially lead to complications.
To configure the plugin, you need to set the execution TTL:
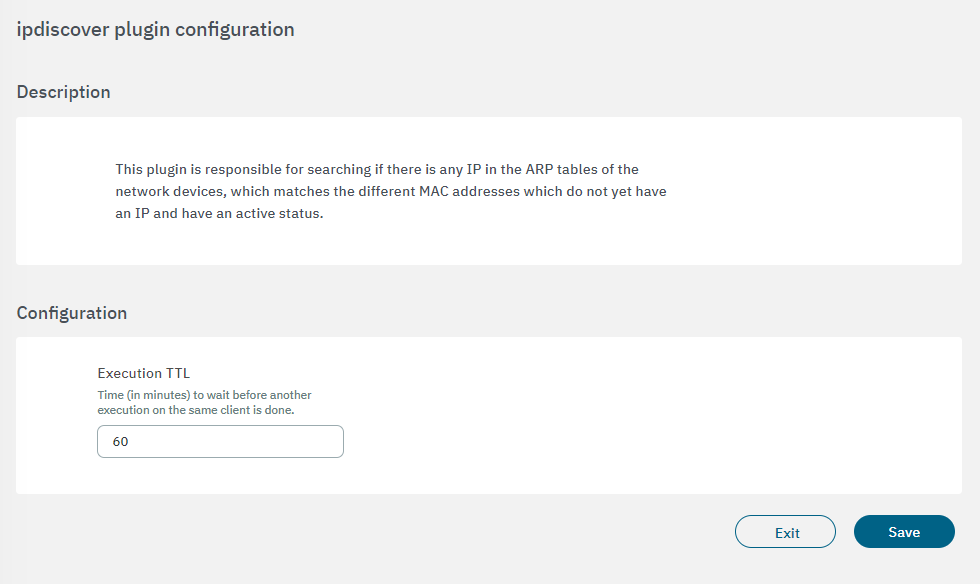
Execution TTL: No further executions are carried out on the same client during this time period (minutes).
3.2.2.4.3.2.1.5.1. Requirements for a correct behavior
There are some requirements we need to meet for the correct behavior of the ipdiscover plugin:
OpenNAC Enterprise Configuration
Enable the discover flag in the ON NAC > Policies > Postconditions section.
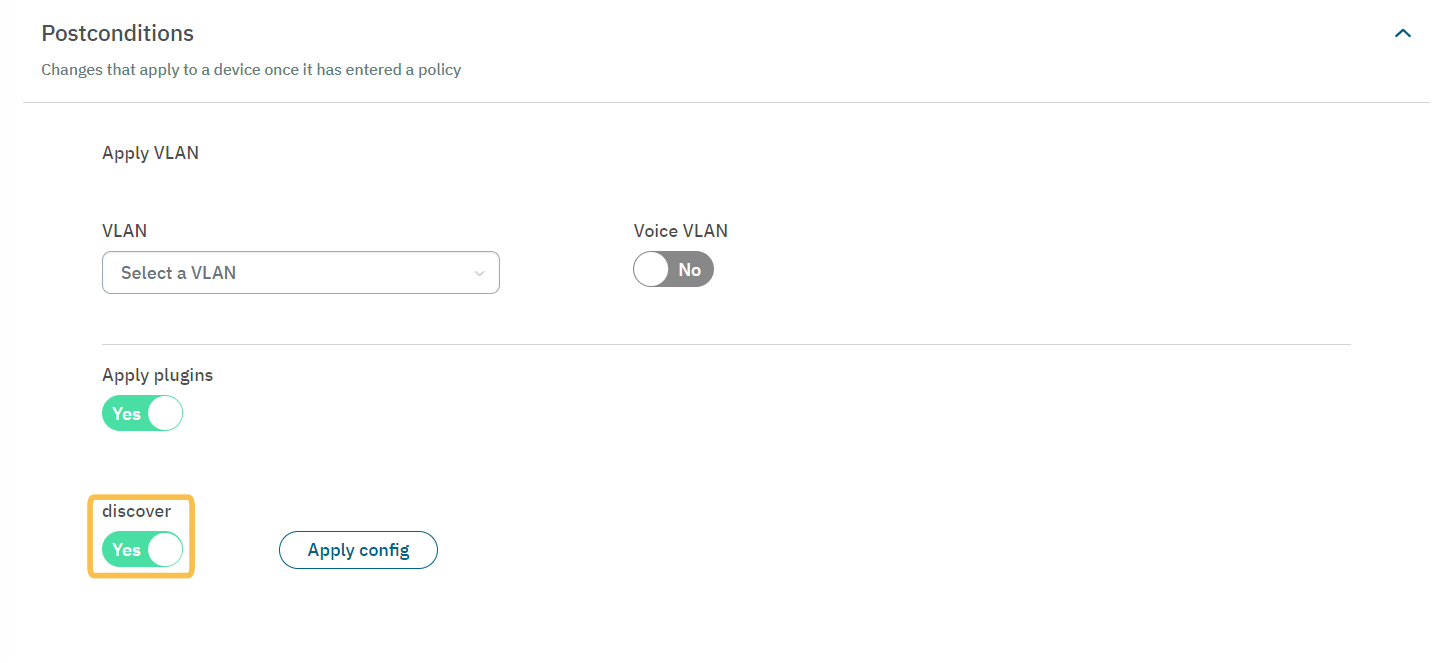
The Network must be defined with the default gateway.
The default gateway must be defined on the Network Devices.
The default gateway Network Device must have the SNMP correctly configured in order to get the ARP table.
Network Configuration
The SNMP Traps must be active on the switches.
The SNMP flows between OpenNAC Enterprise and the default gateway must be enabled.
3.2.2.4.3.2.1.6. medigate
The medigate plugin retrieves information from the Medigate platform to help us profile user devices by providing information on security, device OS, VOS, etc. We will use the MAC address to execute queries to the Medigate API and get information about the user device (if the device is already registered on Medigate database and they have information about it).
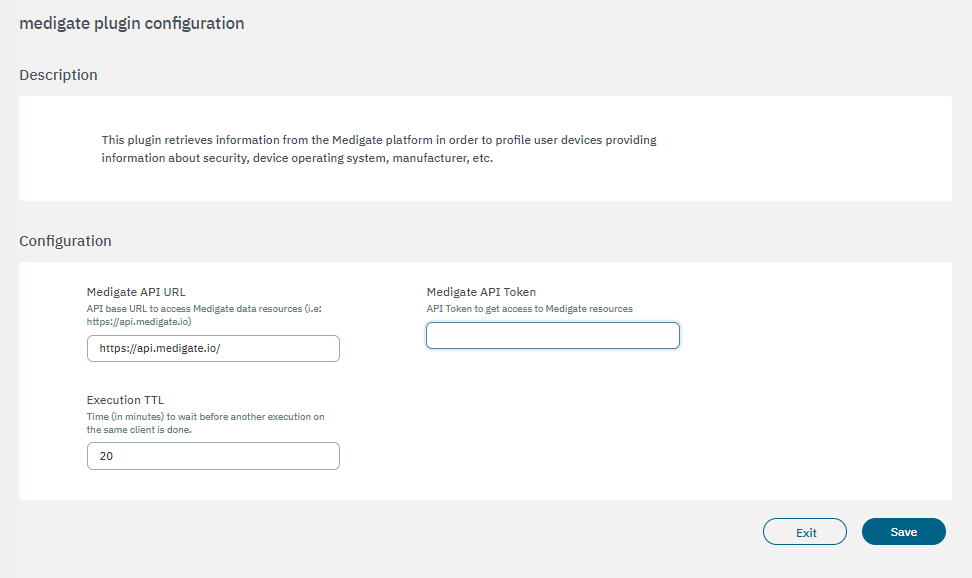
Medigate API URL: API base URL to access Medigate data resources (i.e.: https://api.medigate.io/)
Medigate API Token: The API token will let us communicate with the Medigate API from our nodes, and we will be able to retrieve information by executing https queries to its API. This parameter must be generated on the Medigate platform by introducing a valid username and password, once we have it, we can fill in the Medigate API Token parameter.
Execution TTL (m.): During this period, indicated in minutes, no more executions are done over the same client.
To trigger the plugin execution, we will need any event that has a MAC address (8021XUSER, MAB, IpMac, AGENT, etc.). Once the execution starts, we will first check that the Medigate API Token and TTL parameters are correct. Then, we will obtain the user device MAC and execute a query to the Medigate API to obtain information about the user device. If the MAC address is registered in the Medigate database, we will get a JSON response with the user device information. We will use the information obtained to configure certain TAGS and provide more information about the device.
The information that we will obtain and the TAGS that will be used are the following:
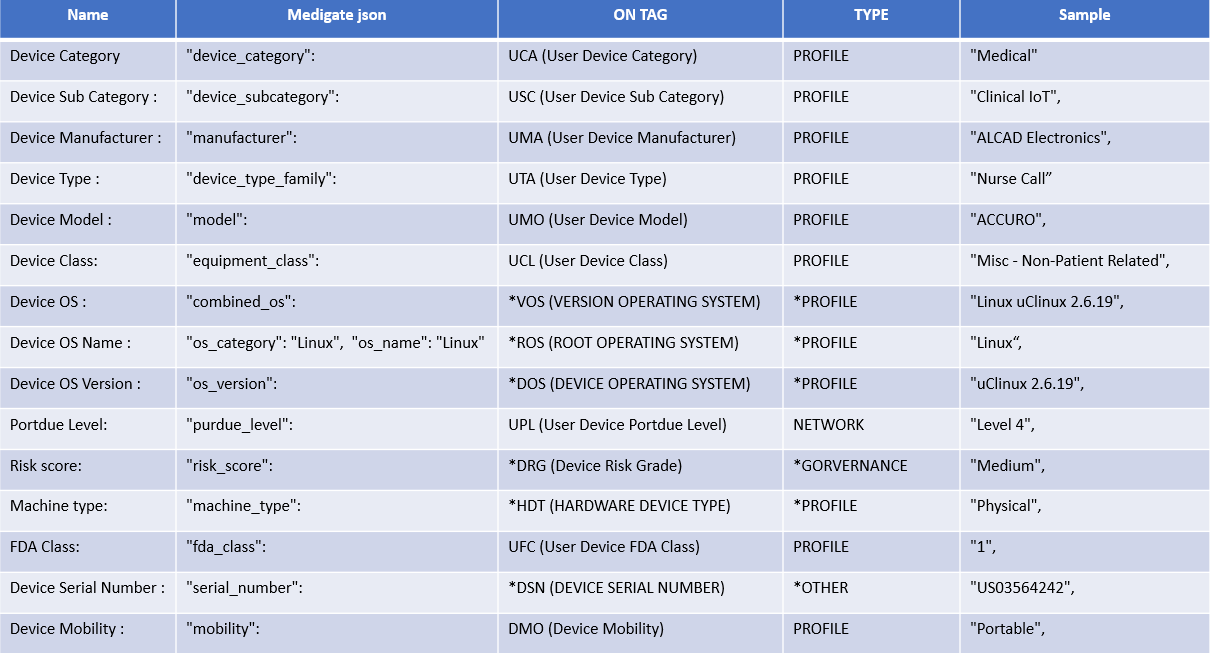
In case the plugin does not return any data, the tag ONC_MEDIGATE_NO_DATA will be assigned to the device.
3.2.2.4.3.2.1.7. openPorts
The openPorts plugin provides the ability to scan and discover open ports on devices requesting network access by authenticating through Opennac, helping the profiling process detect which UDP and TCP ports are open.
Whenever a device’s authentication matches with a policy rule where this plugin is enabled, an NMAP process is started and it will scan the open ports of that user device, according to the globally defined set of ports in plugin configuration or defined in the custom parameters in the rule itself, which will take precedence over the global configuration. At the end of the scan, the plugin will automatically create user device tags for the defined set of ports and apply those tags to the device being authenticated..
Later, these tags can be added to a policy rule. The policy rule should come before the rule activating the plugin. The purpose of the policy rule is to grant network access to devices with the discovered set of open ports.
The following fields must be configured to set up the plugin:
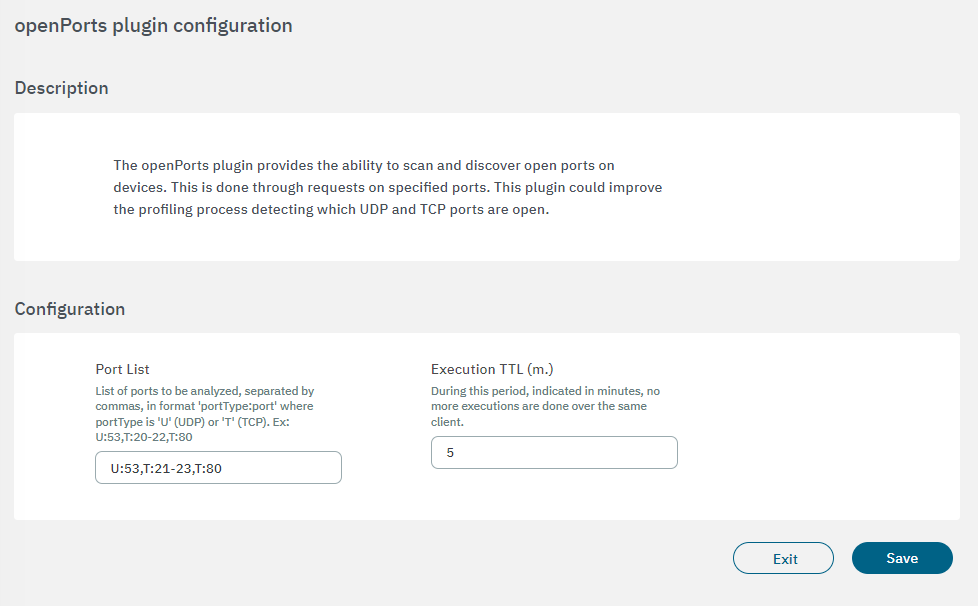
Port List: The ports and their respective protocols that will be targeted by the plugin are defined. In the example shown in the image above, the protocol type is represented by a letter, U for UDP protocol and T for TCP followed by “:” (colon) and port number. Each protocol:port pair must be separated from the other by commas, without any spaces.
Execution TTL (m.): This field must be filled with the interval, in minutes, between periodic port scans that will be performed by the plugin. In this example, the value of 5 is five minutes. For testing or debugging purposes, 5 minutes do not pose any problem, however, in production environment with large number of devices being authenticated this is not indicated. The recommendation is that this value in minutes corresponds to a certain amount of hours, for example, 600 to 10 hours between scans.
3.2.2.4.3.2.1.8. userDeviceProfiling
The userDeviceProfiling plugin extracts information stored in the Analytics component. This information is based on the behavior of user devices on the network. The plugin queries Elasticsearch to get information about connections and traffic by a certain device.
The following fields must be configured to set up the plugin:
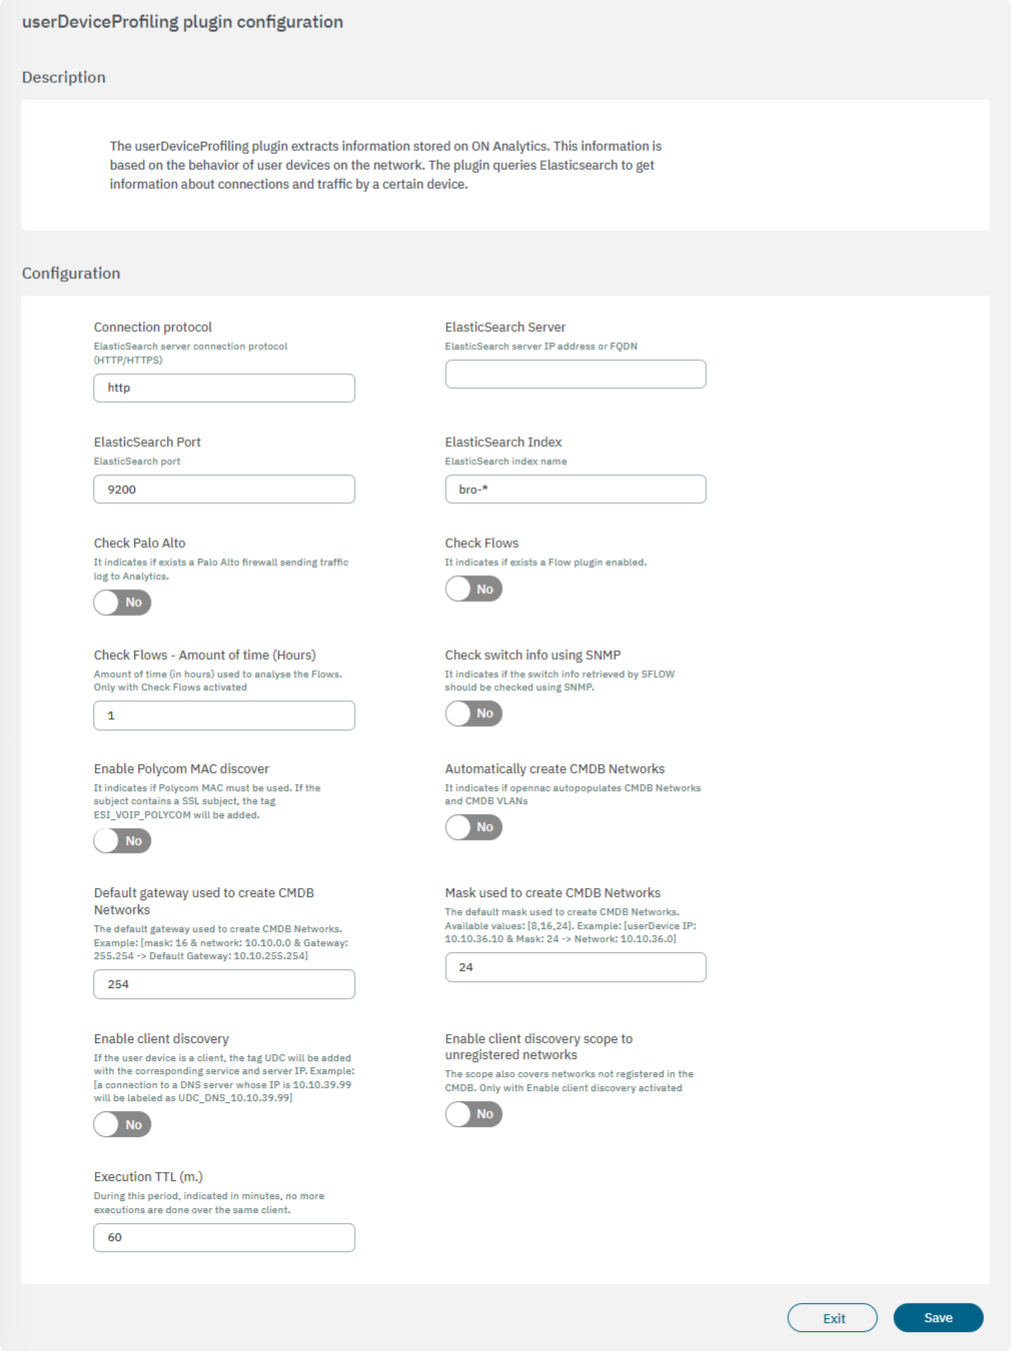
Connection protocol: ElasticSearch server connection protocol (HTTP/HTTPS).
ElasticSearch Server: ElasticSearch server IP address or FQDN.
ElasticSearch Port: ElasticSearch port.
ElasticSearch Index: ElasticSearch index name.
Check Palo Alto: It indicates if exists a Palo Alto firewall sending traffic log to Analytics.
Check Flows: It indicates if a Flow plugin is enabled.
Check Flows - Amount of time (Hours): Amount of time (in hours) used to analyze the Flows. Only with Check Flows activated.
Check switch info using SNMP: It indicates if the switch info retrieved by SFLOW should be checked using SNMP.
Enable Polycom MAC discover: It indicates if a Polycom MAC must be used. If the subject contains an SSL subject, the tag ESI_VOIP_POLYCOM will be added.
Automatically create CMDB Networks: It indicates if opennac auto-populates CMDB Networks and CMDB VLANs.
Default gateway used to create CMDB Networks: The default gateway used to create CMDB Networks. Example: [mask: 16 & network: 10.10.0.0 & Gateway: 255.254 -> Default Gateway: 10.10.255.254].
Mask used to create CMDB Networks: The default mask used to create CMDB Networks. Available values: [8,16,24]. Example: [userDevice IP: 10.10.36.10 & Mask: 24 -> Network: 10.10.36.0].
Enable client discovery: If the user device is a client, the tag UDC will be added with the corresponding service and server IP. Example: [a connection to a DNS server whose IP is 10.10.39.99 will be labeled as UDC_DNS_10.10.39.99].
Enable client discovery scope to unregistered networks: The scope also covers networks not registered in the CMDB by enabling this flag.
Execution TTL (m.): During this period, indicated in minutes, no more executions are done over the same client.