8.1. Next-Generation Firewall Integration
8.1.1. Palo Alto Active Integration
OpenNAC Enterprise can be integrated with Palo Alto NGFW technologies using a plugin available to perform this integration. Before setting up the FW, review the OpenNAC Enterprise configurations for the Palo Alto Plugin.
XML API user access
First of all, we should specify a role with some of the permissions that we will give to this user. We will need the user to have access to the API information so that certain configurations can also be made through it. It is recommended to limit the permissions that are given to the user in order to have greater control over the actions that the user can carry out. Therefore, it is recommended to create a specific role for OpenNAC providing only the strictly necessary permissions. If we want to make any changes to it, we will make sure not to modify the behavior of any other role or user.
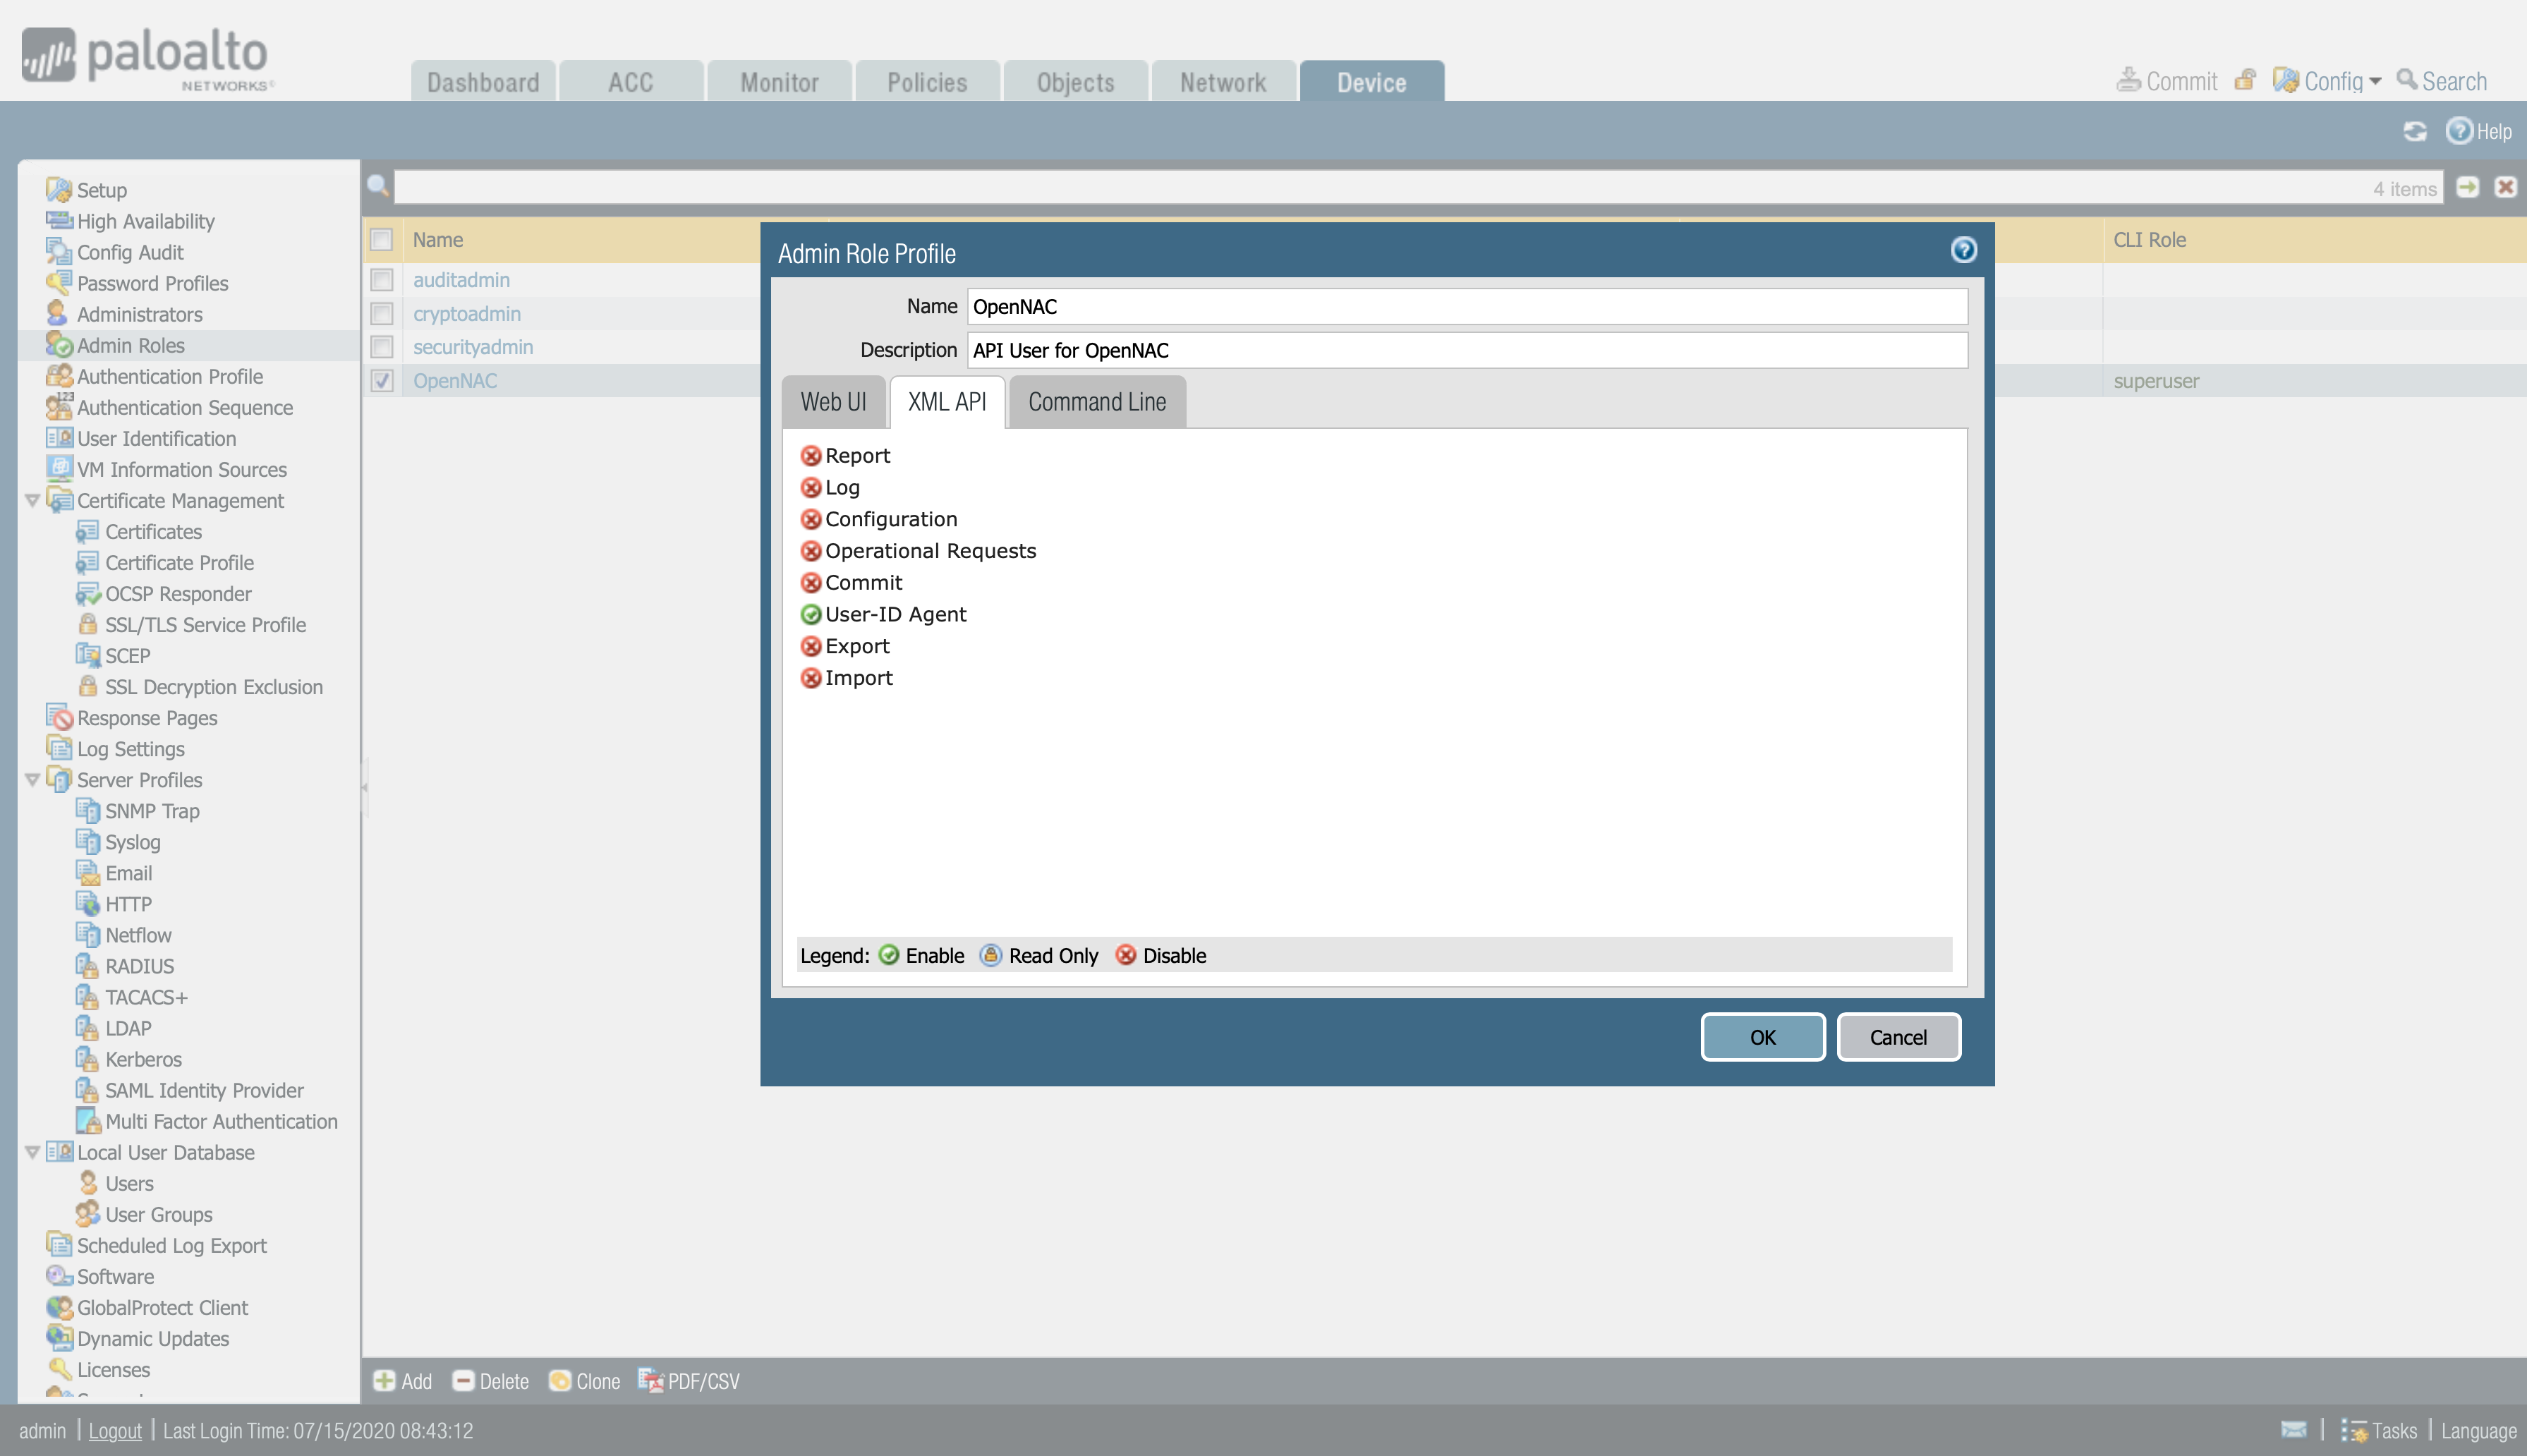
On the Palo Alto firewall web interface:
Device > Admin Roles > create a new Admin Role profile.
Web UI and Command Line disable
XML API -> Enable only User-ID Agent (to have access to the User-ID agent).
On the Panorama web interface:
Panorama > Admin Roles > create a new Admin Role profile.
Web UI and Command Line disable
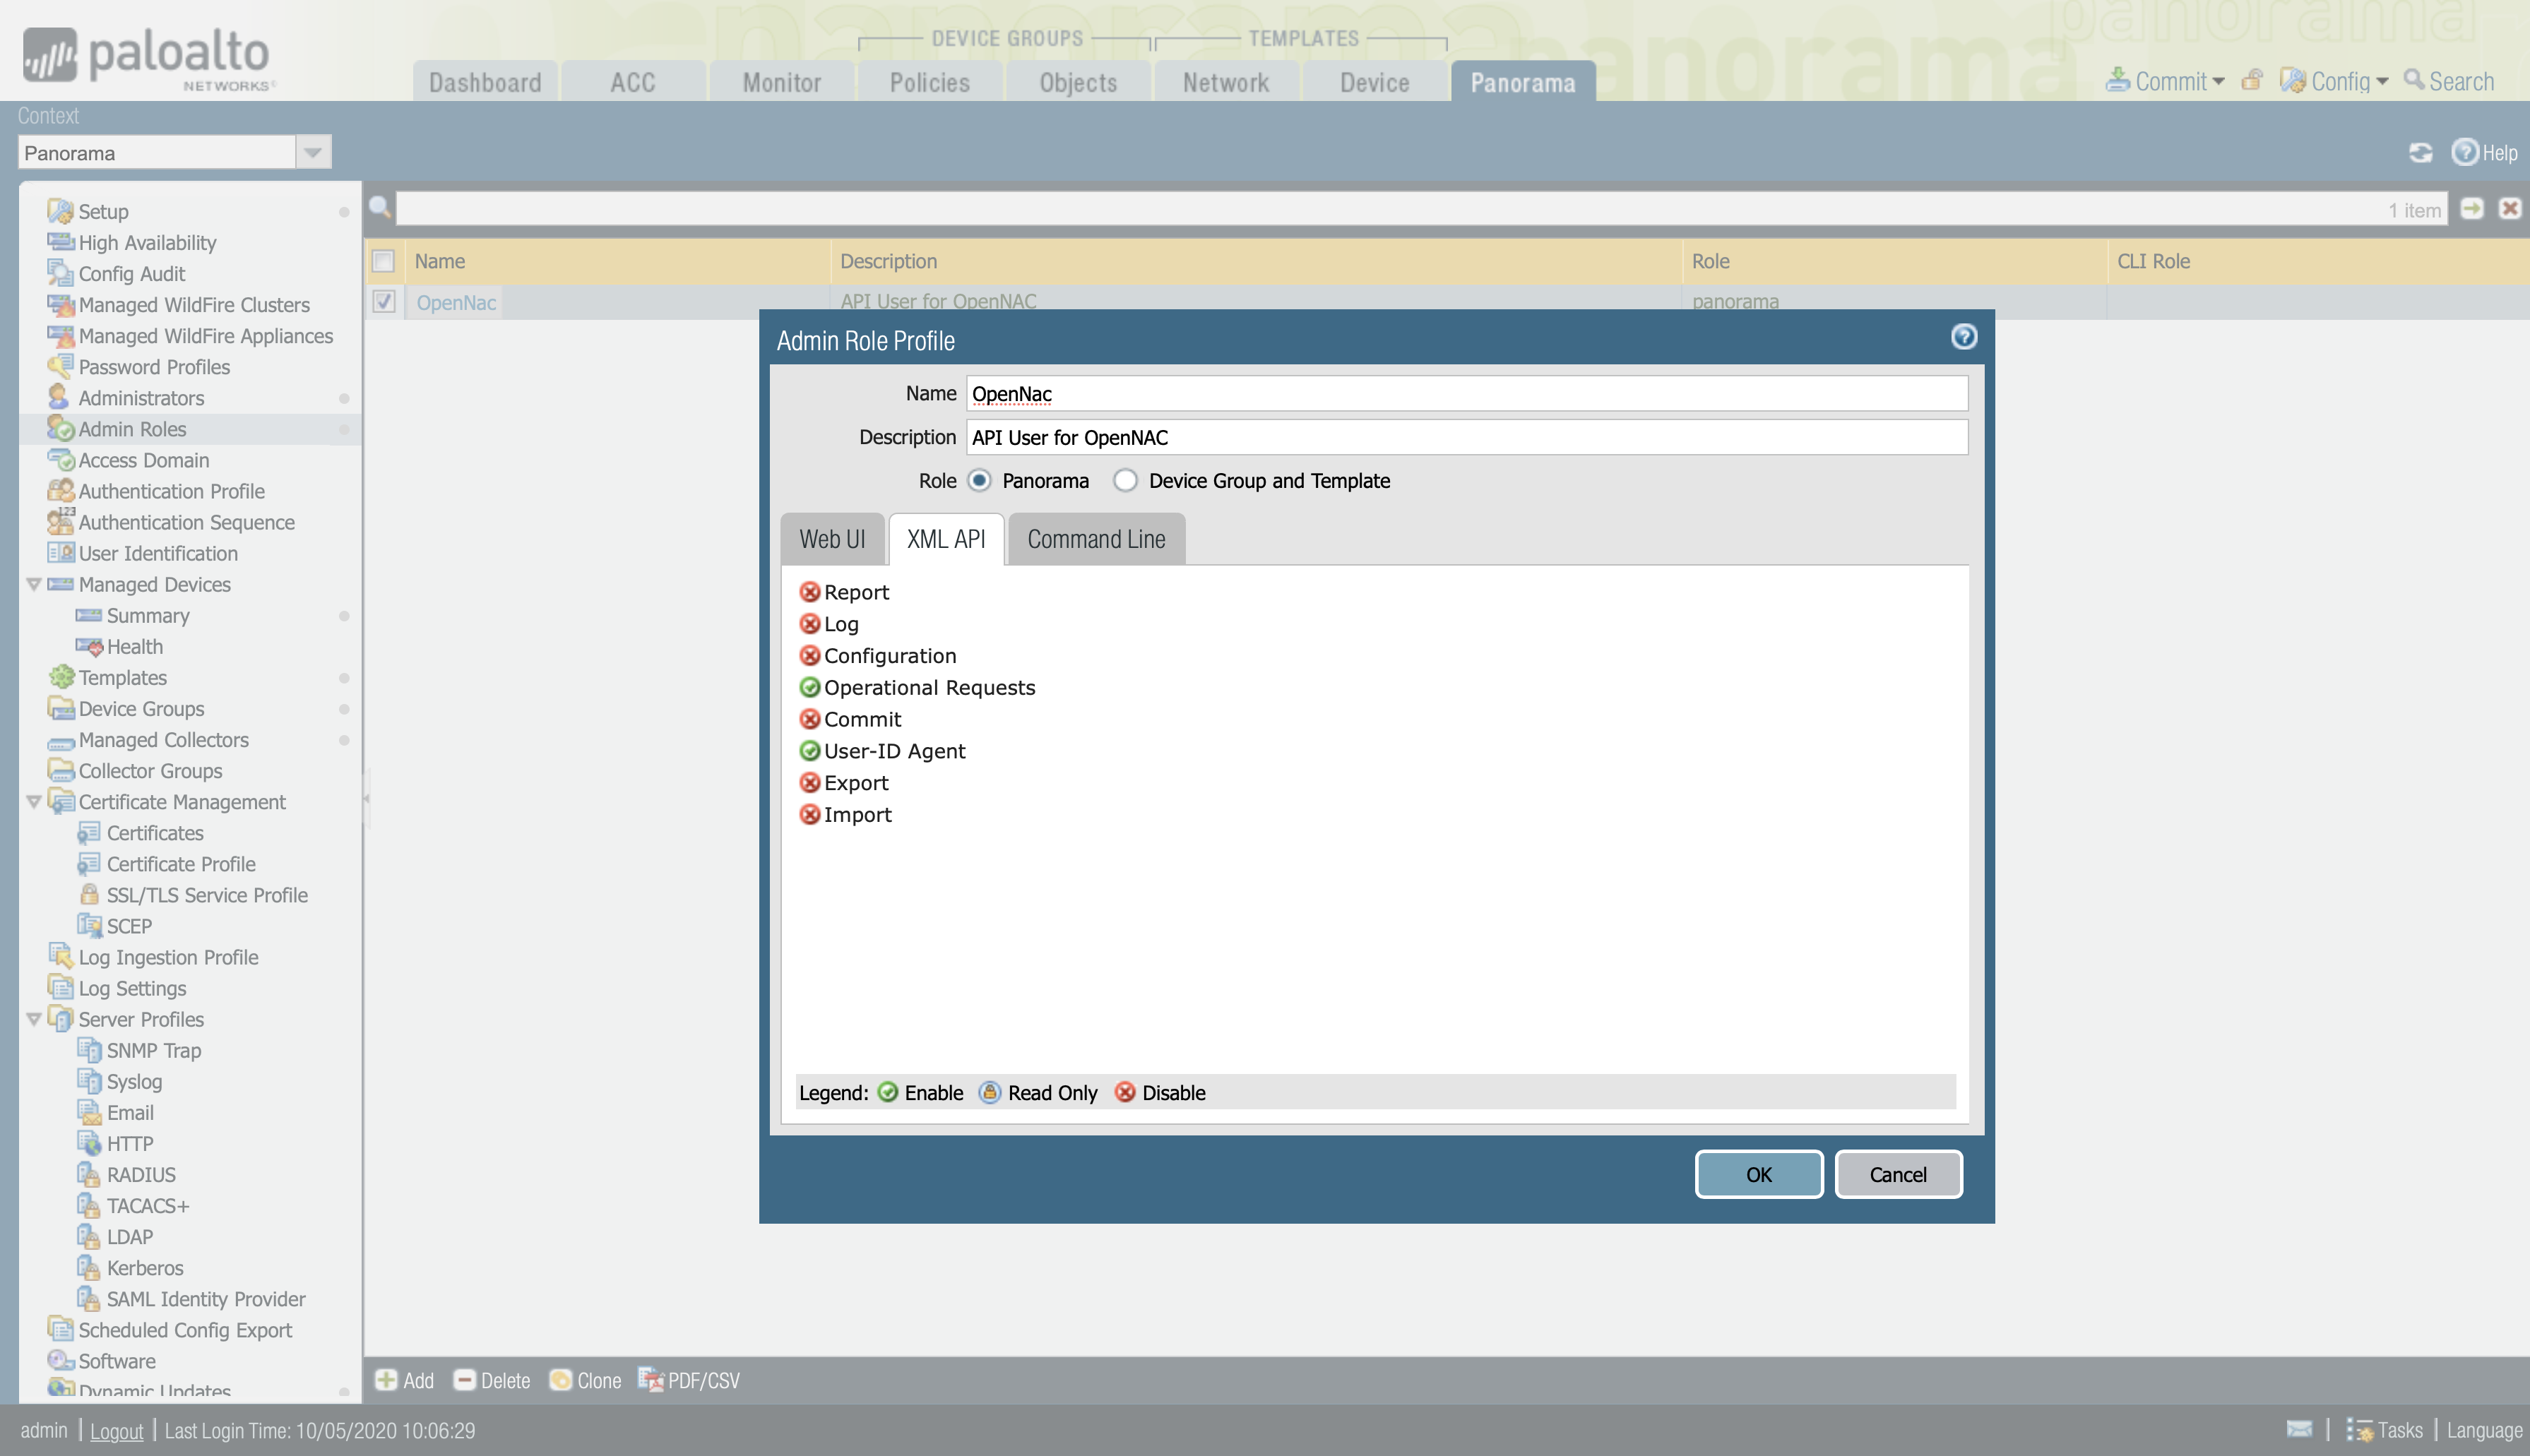
XML API
Enable User-ID Agent, to have access to the User-ID agent.
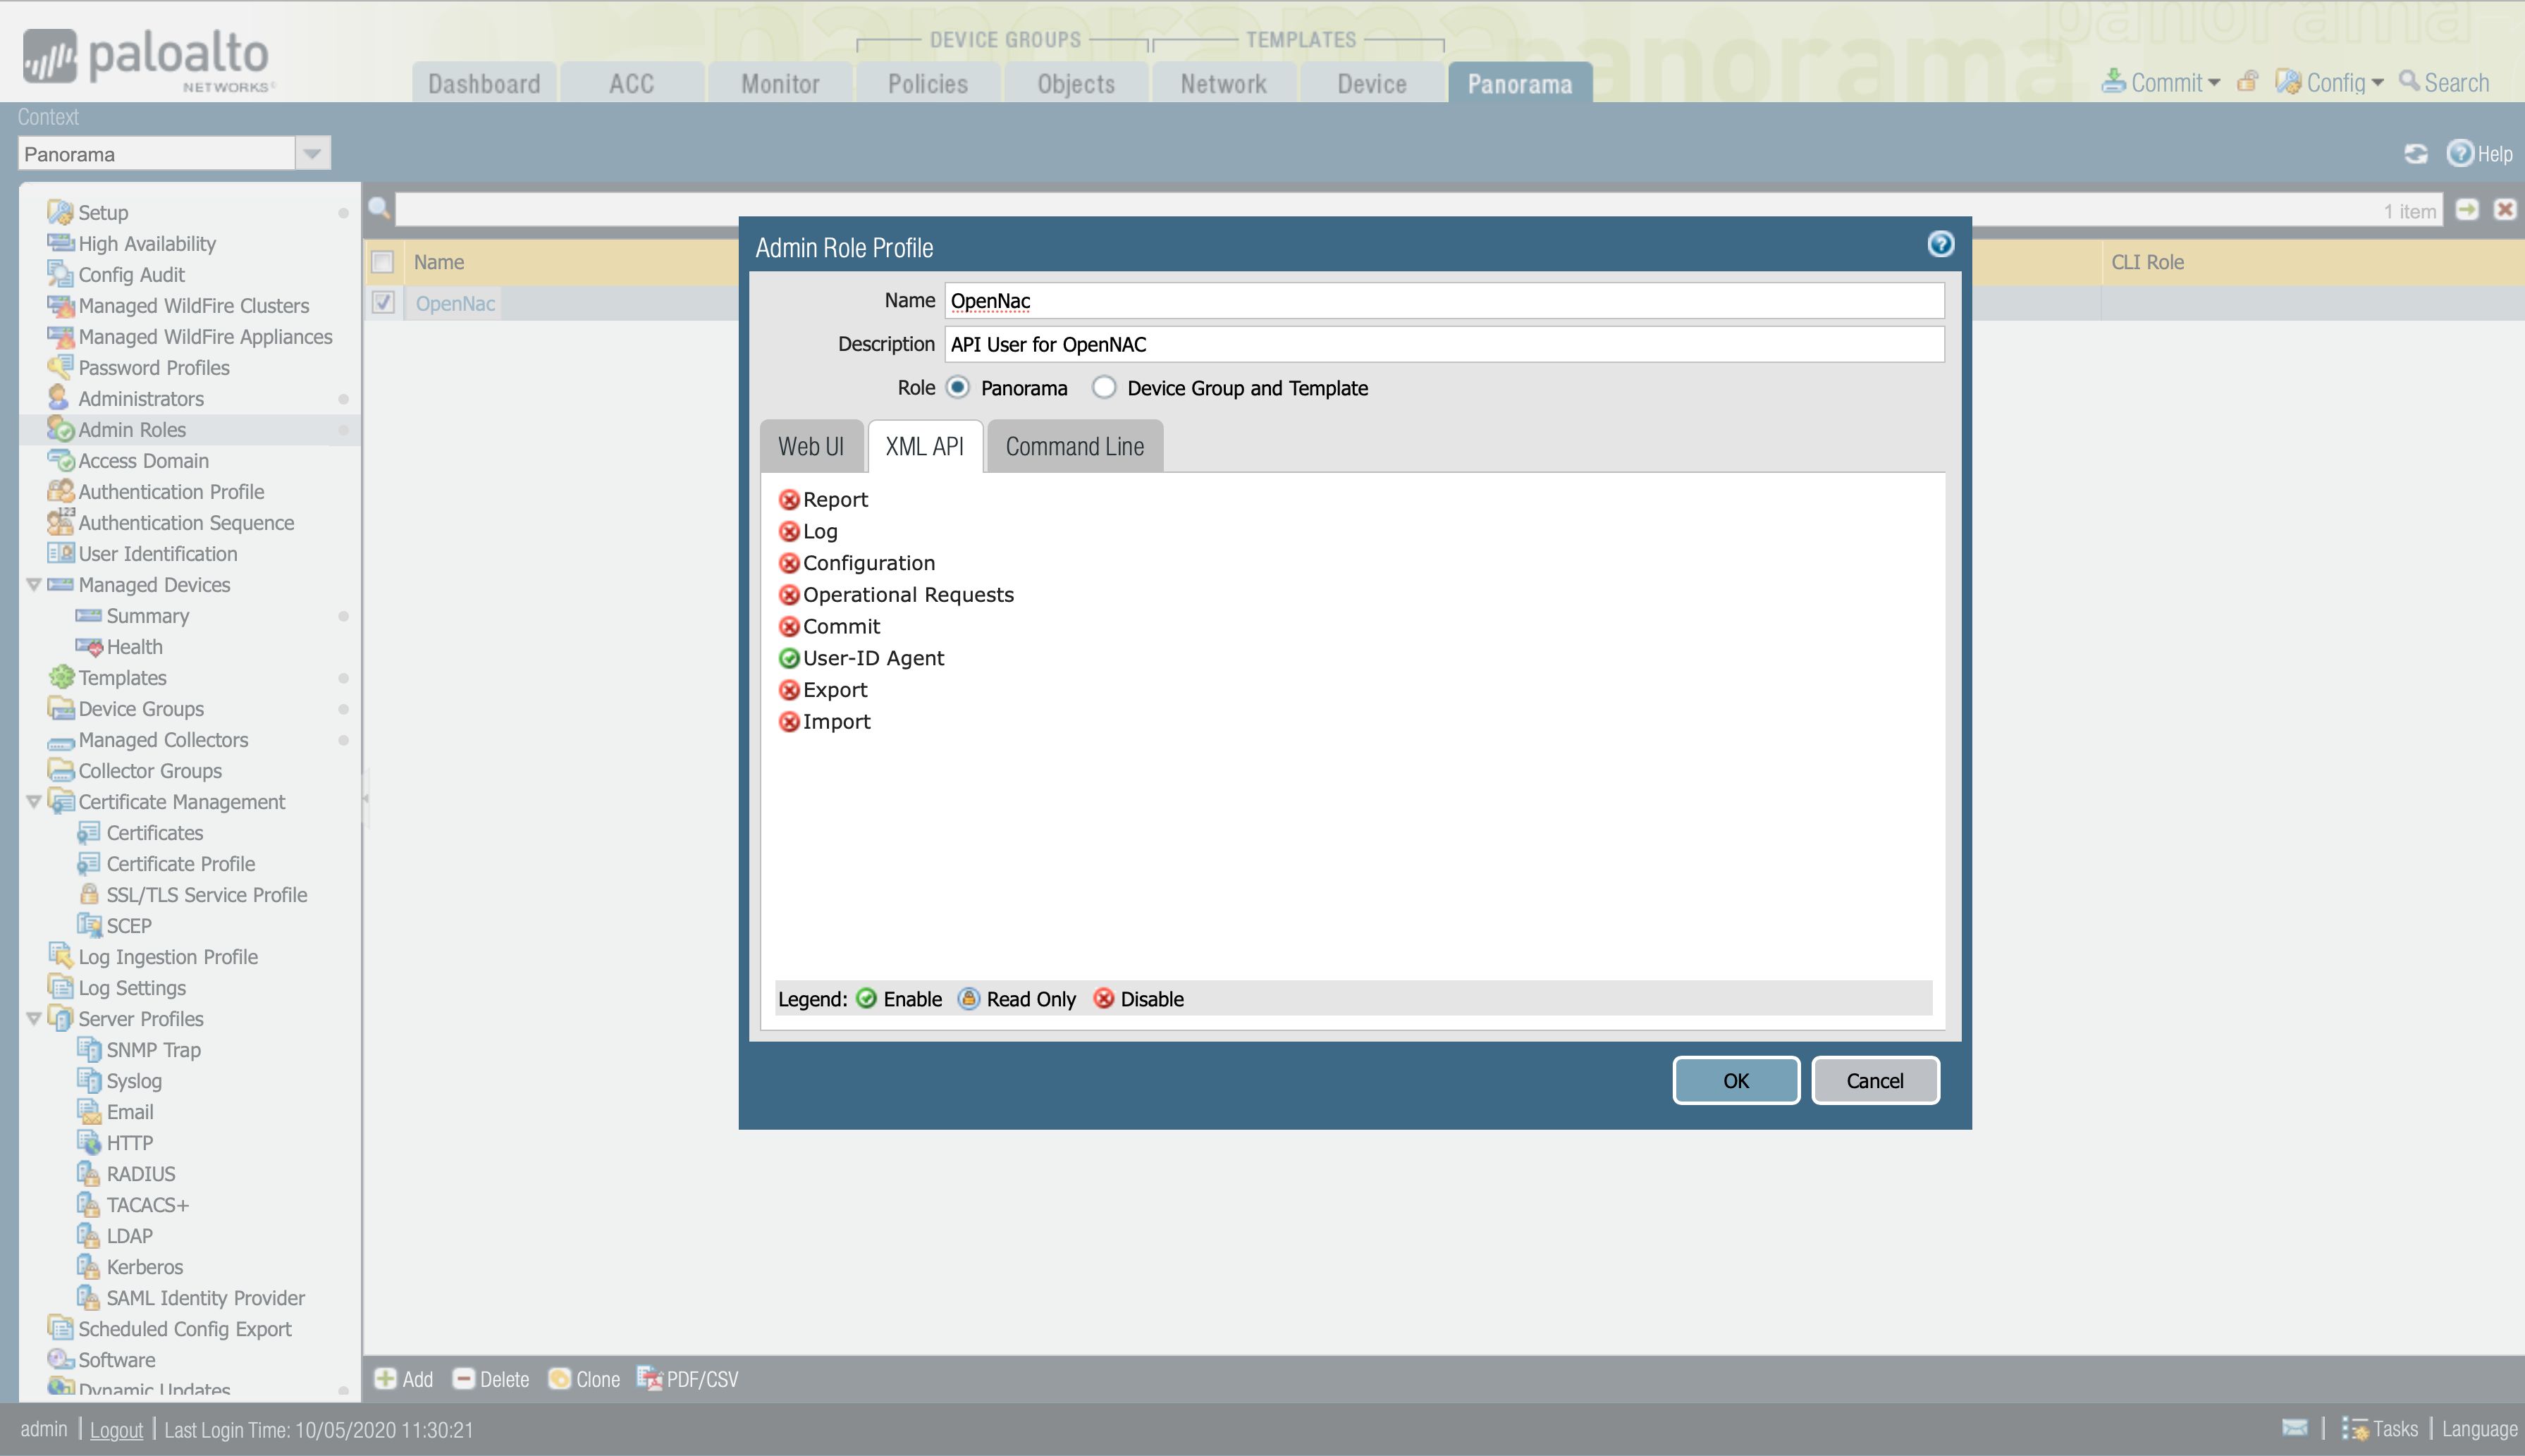
Enable Operational Requests, to give permissions to run operational commands on Panorama and firewalls.
Note
The permission of Operational Requests will only be necessary if we want to send the information through device groups. If we want to send the information via User-ID Redistribution, it won’t be necessary.
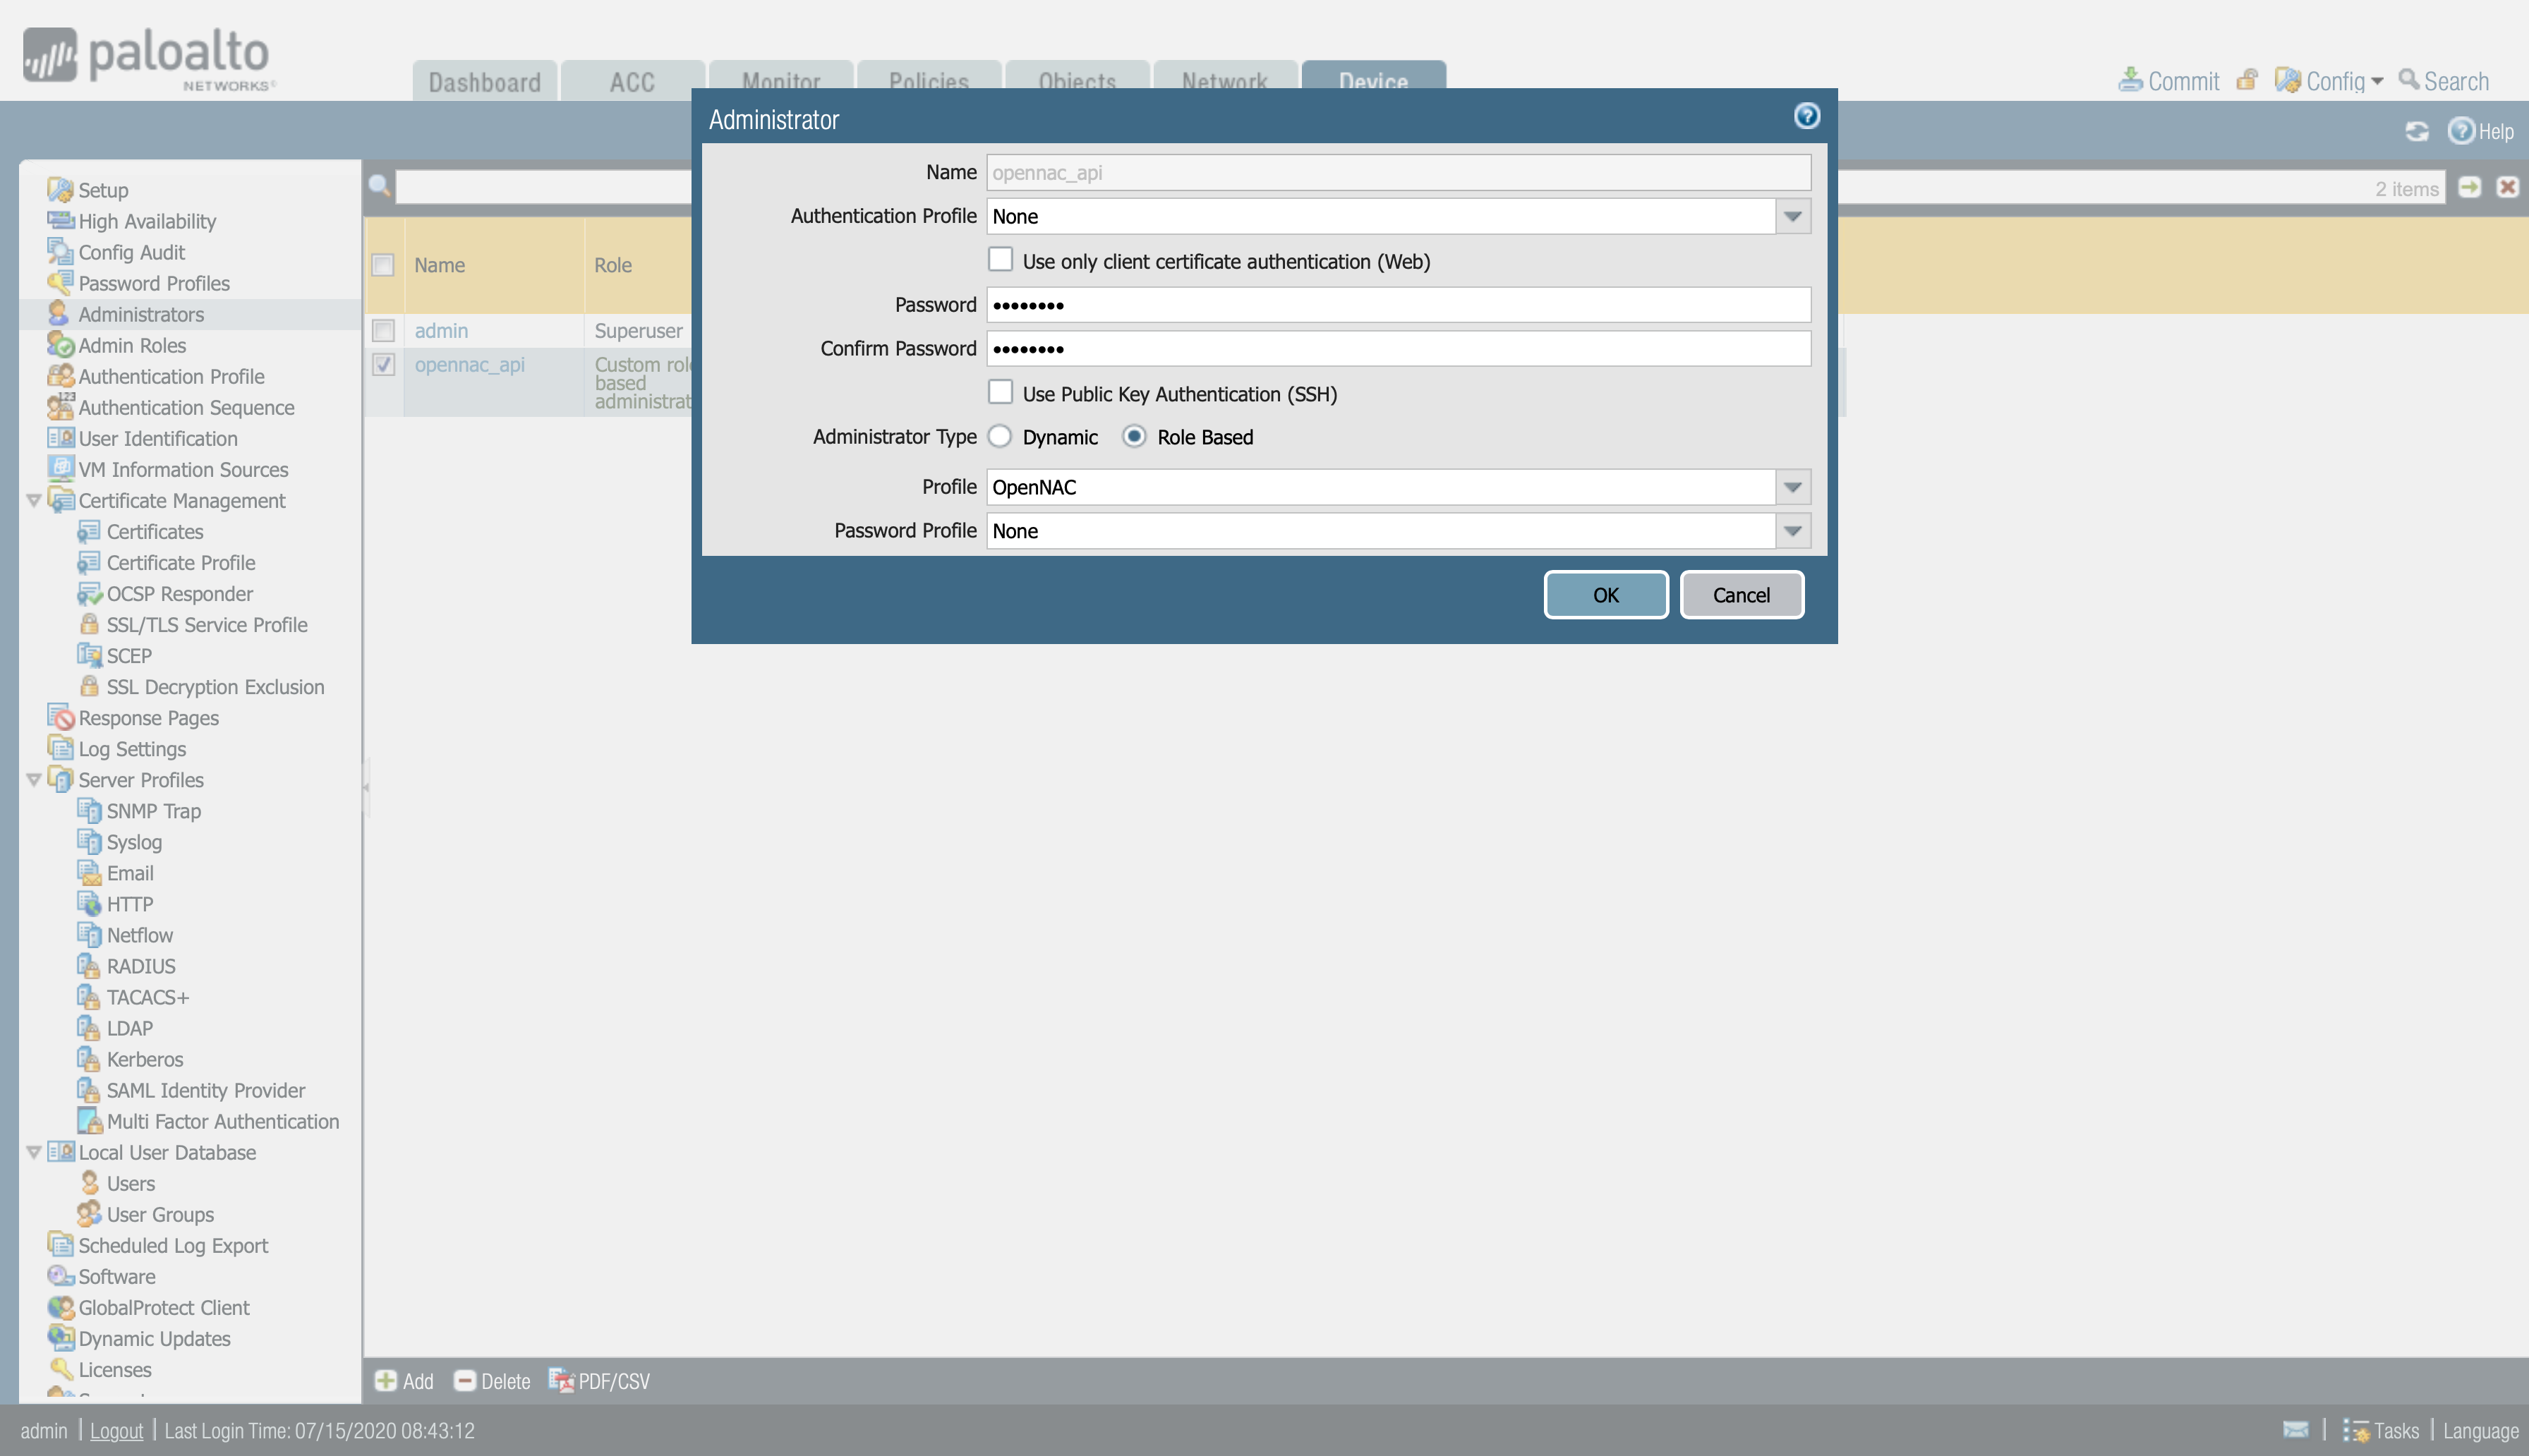
Specify a user for the plugin
Once the user is defined, you can now assign the Admin Role that you have created.
On the Palo Alto firewall web interface:
Device > Administrators
Configure a name and a password. In the Administrator Type, we select Role Based to be able to choose the profile that you previously created.
On the Panorama web interface:
Panorama > Administrators
Configure a name and a password. In the Administrator Type, select Custom Panorama Admin to be able to choose the profile that you previously created.

Define Dynamic Address Group
Dynamic Address Groups allow you to keep tracks and adapt to changes (adds, moves or deletions) in the network address without manual intervention. The firewall learns about the network addresses and tags associated with these machines using registration processes -in our case, via XML API or from the User-ID Agent.
To configure a Dynamic Address Group:
Objects > Address Groups.
Define the address group Name and the description for the address group.
Select Type as Dynamic.
Add Match Criteria (which is the tag that is sent from OpenNAC).
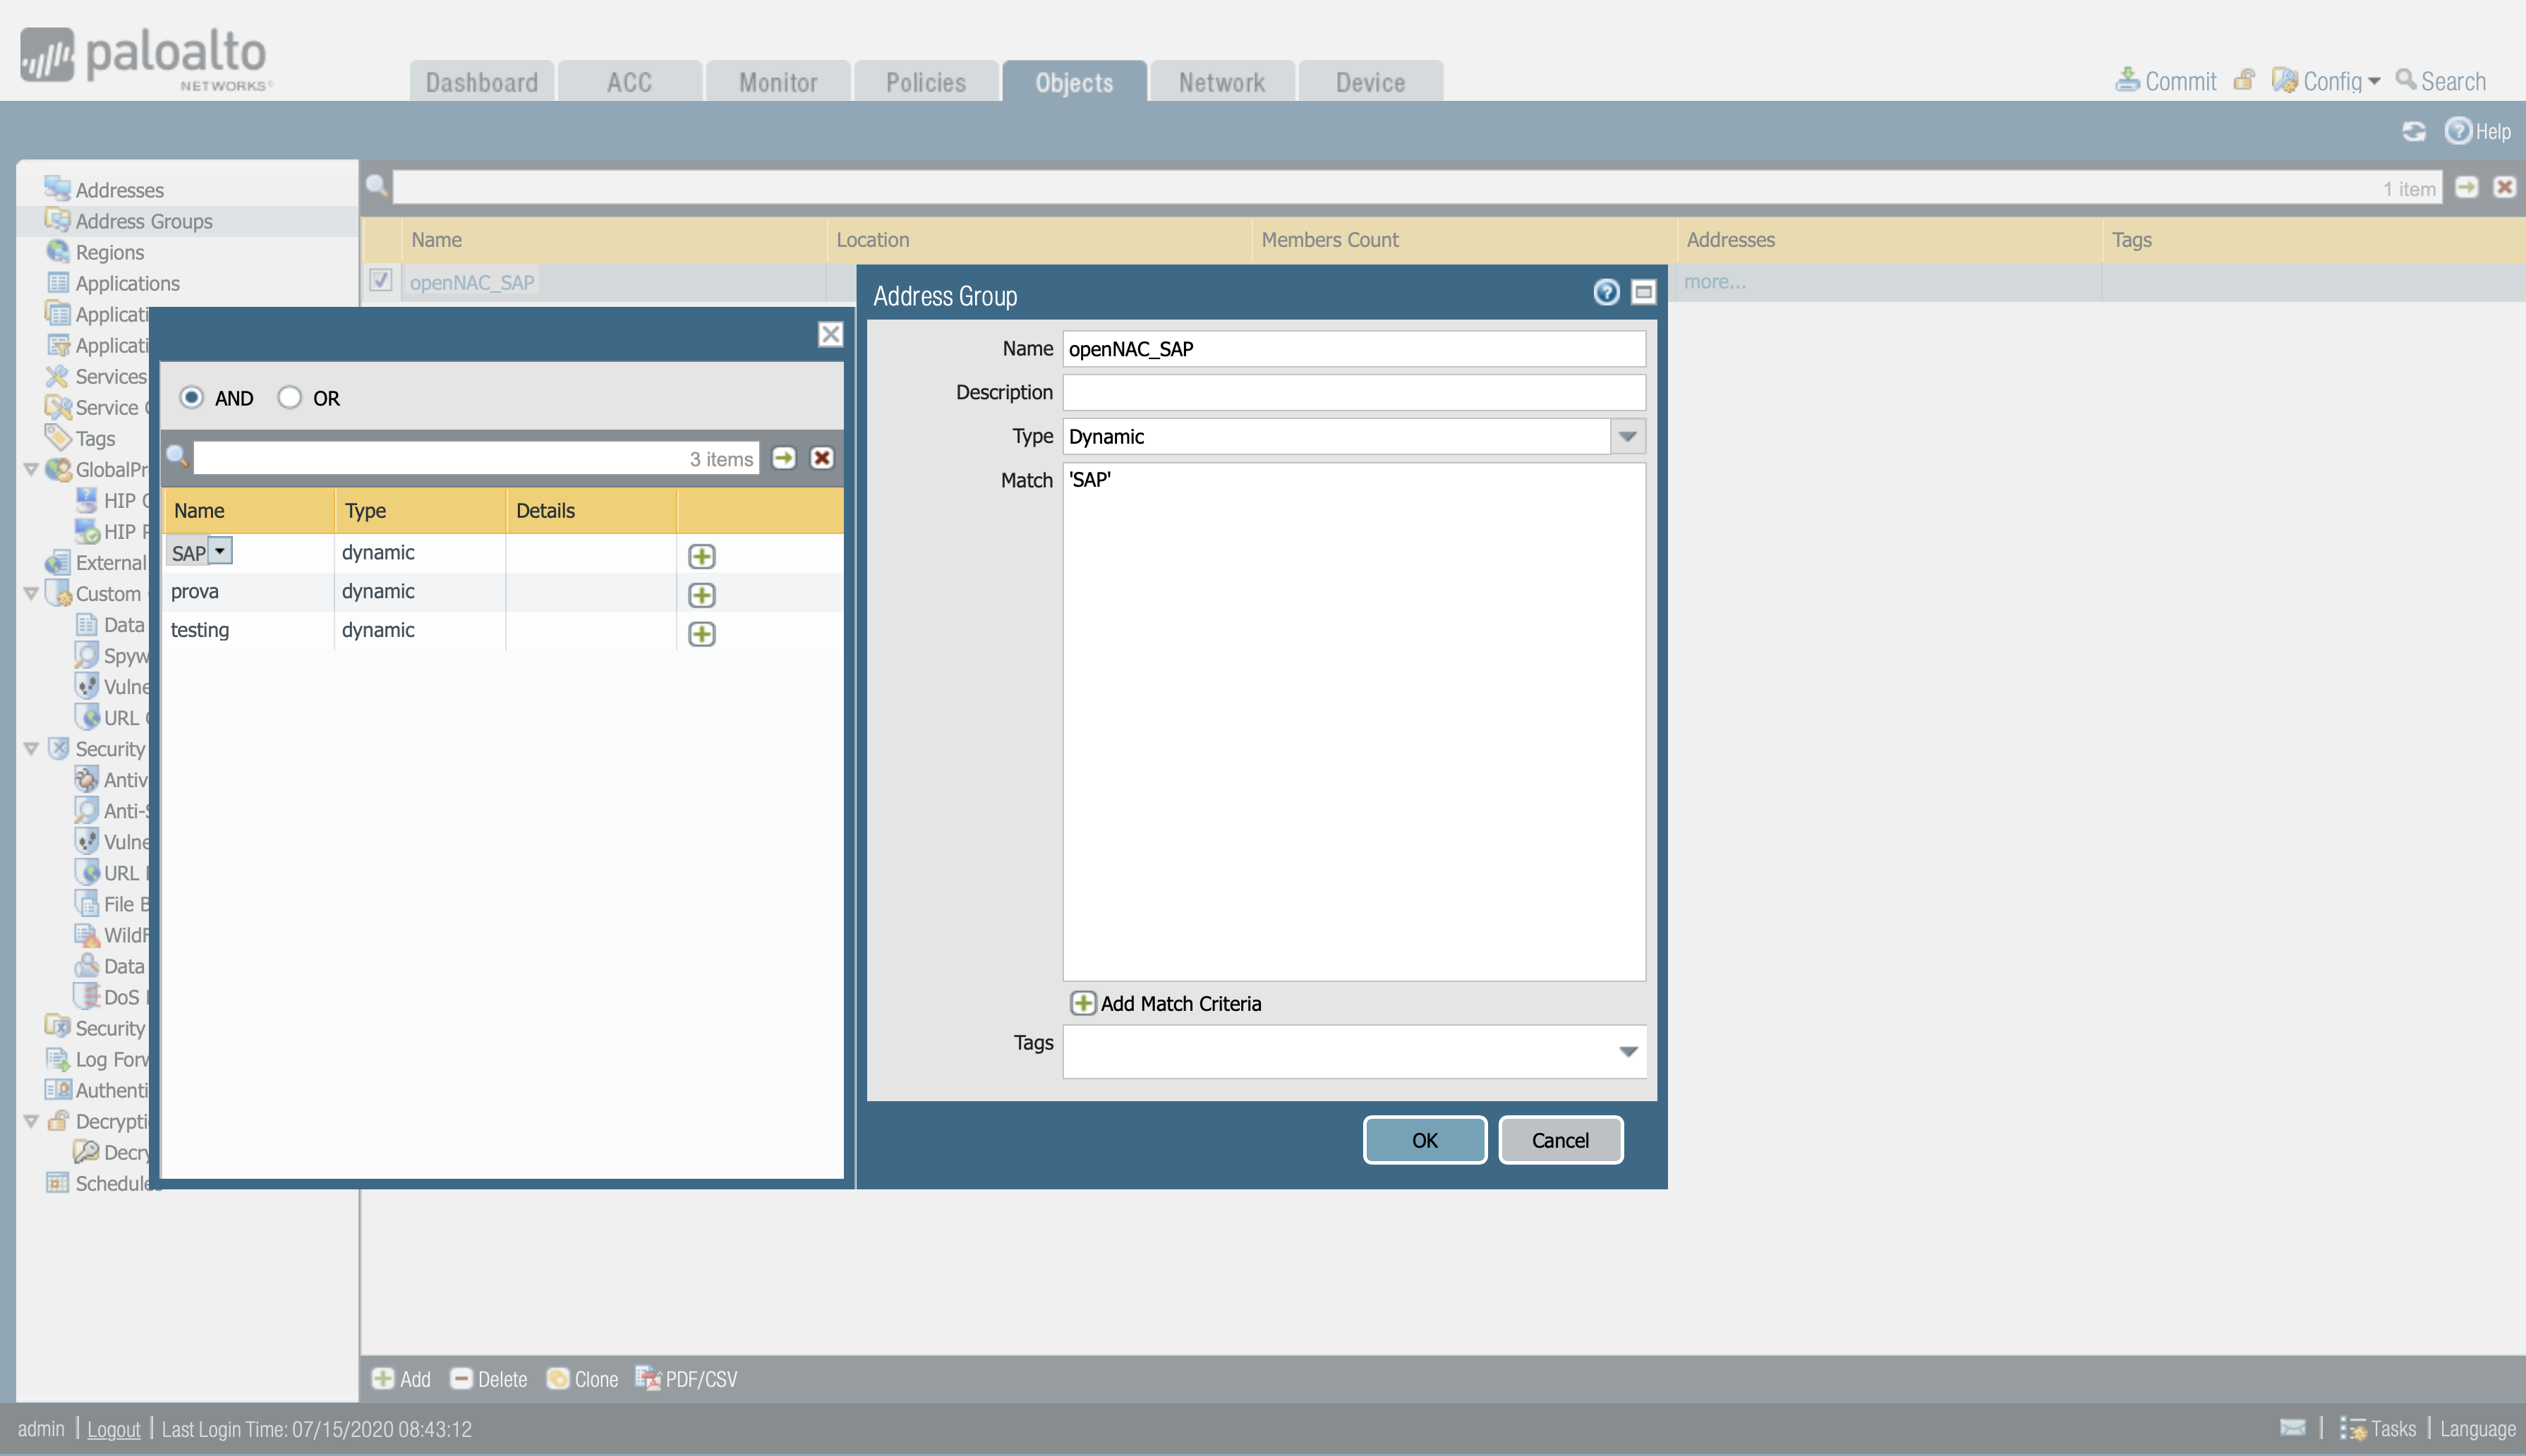
Commit all changes to apply this configuration.
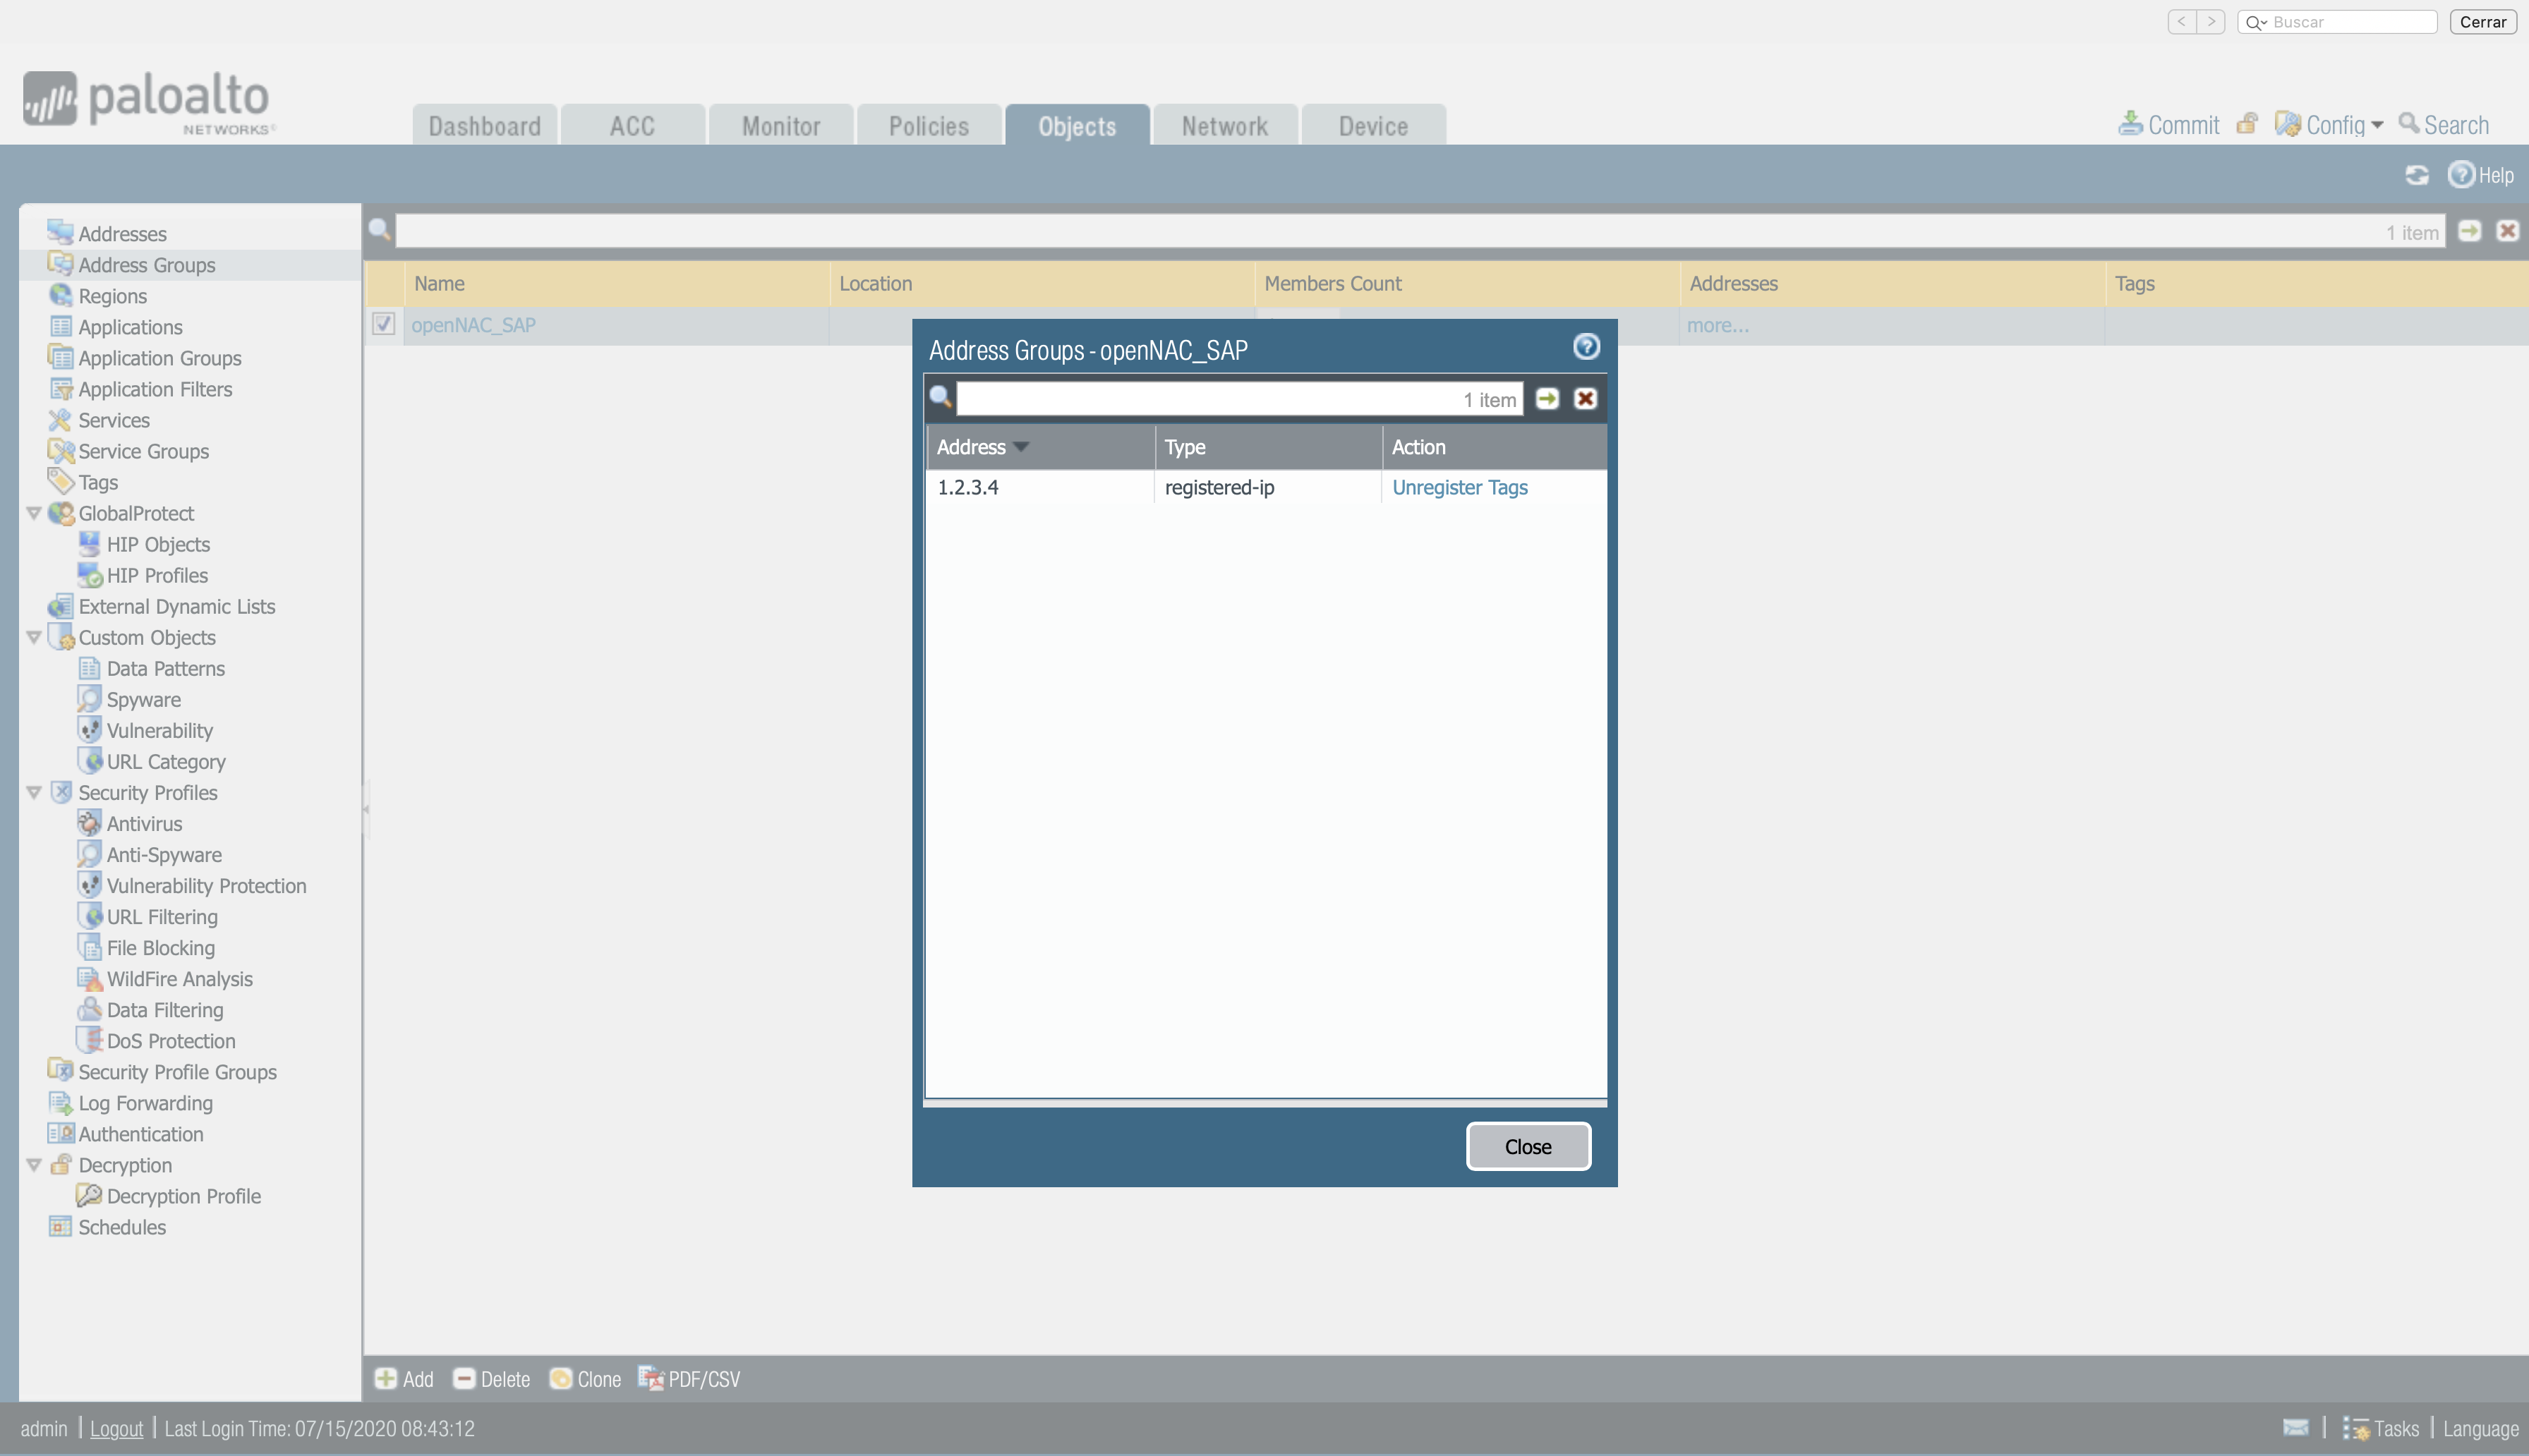
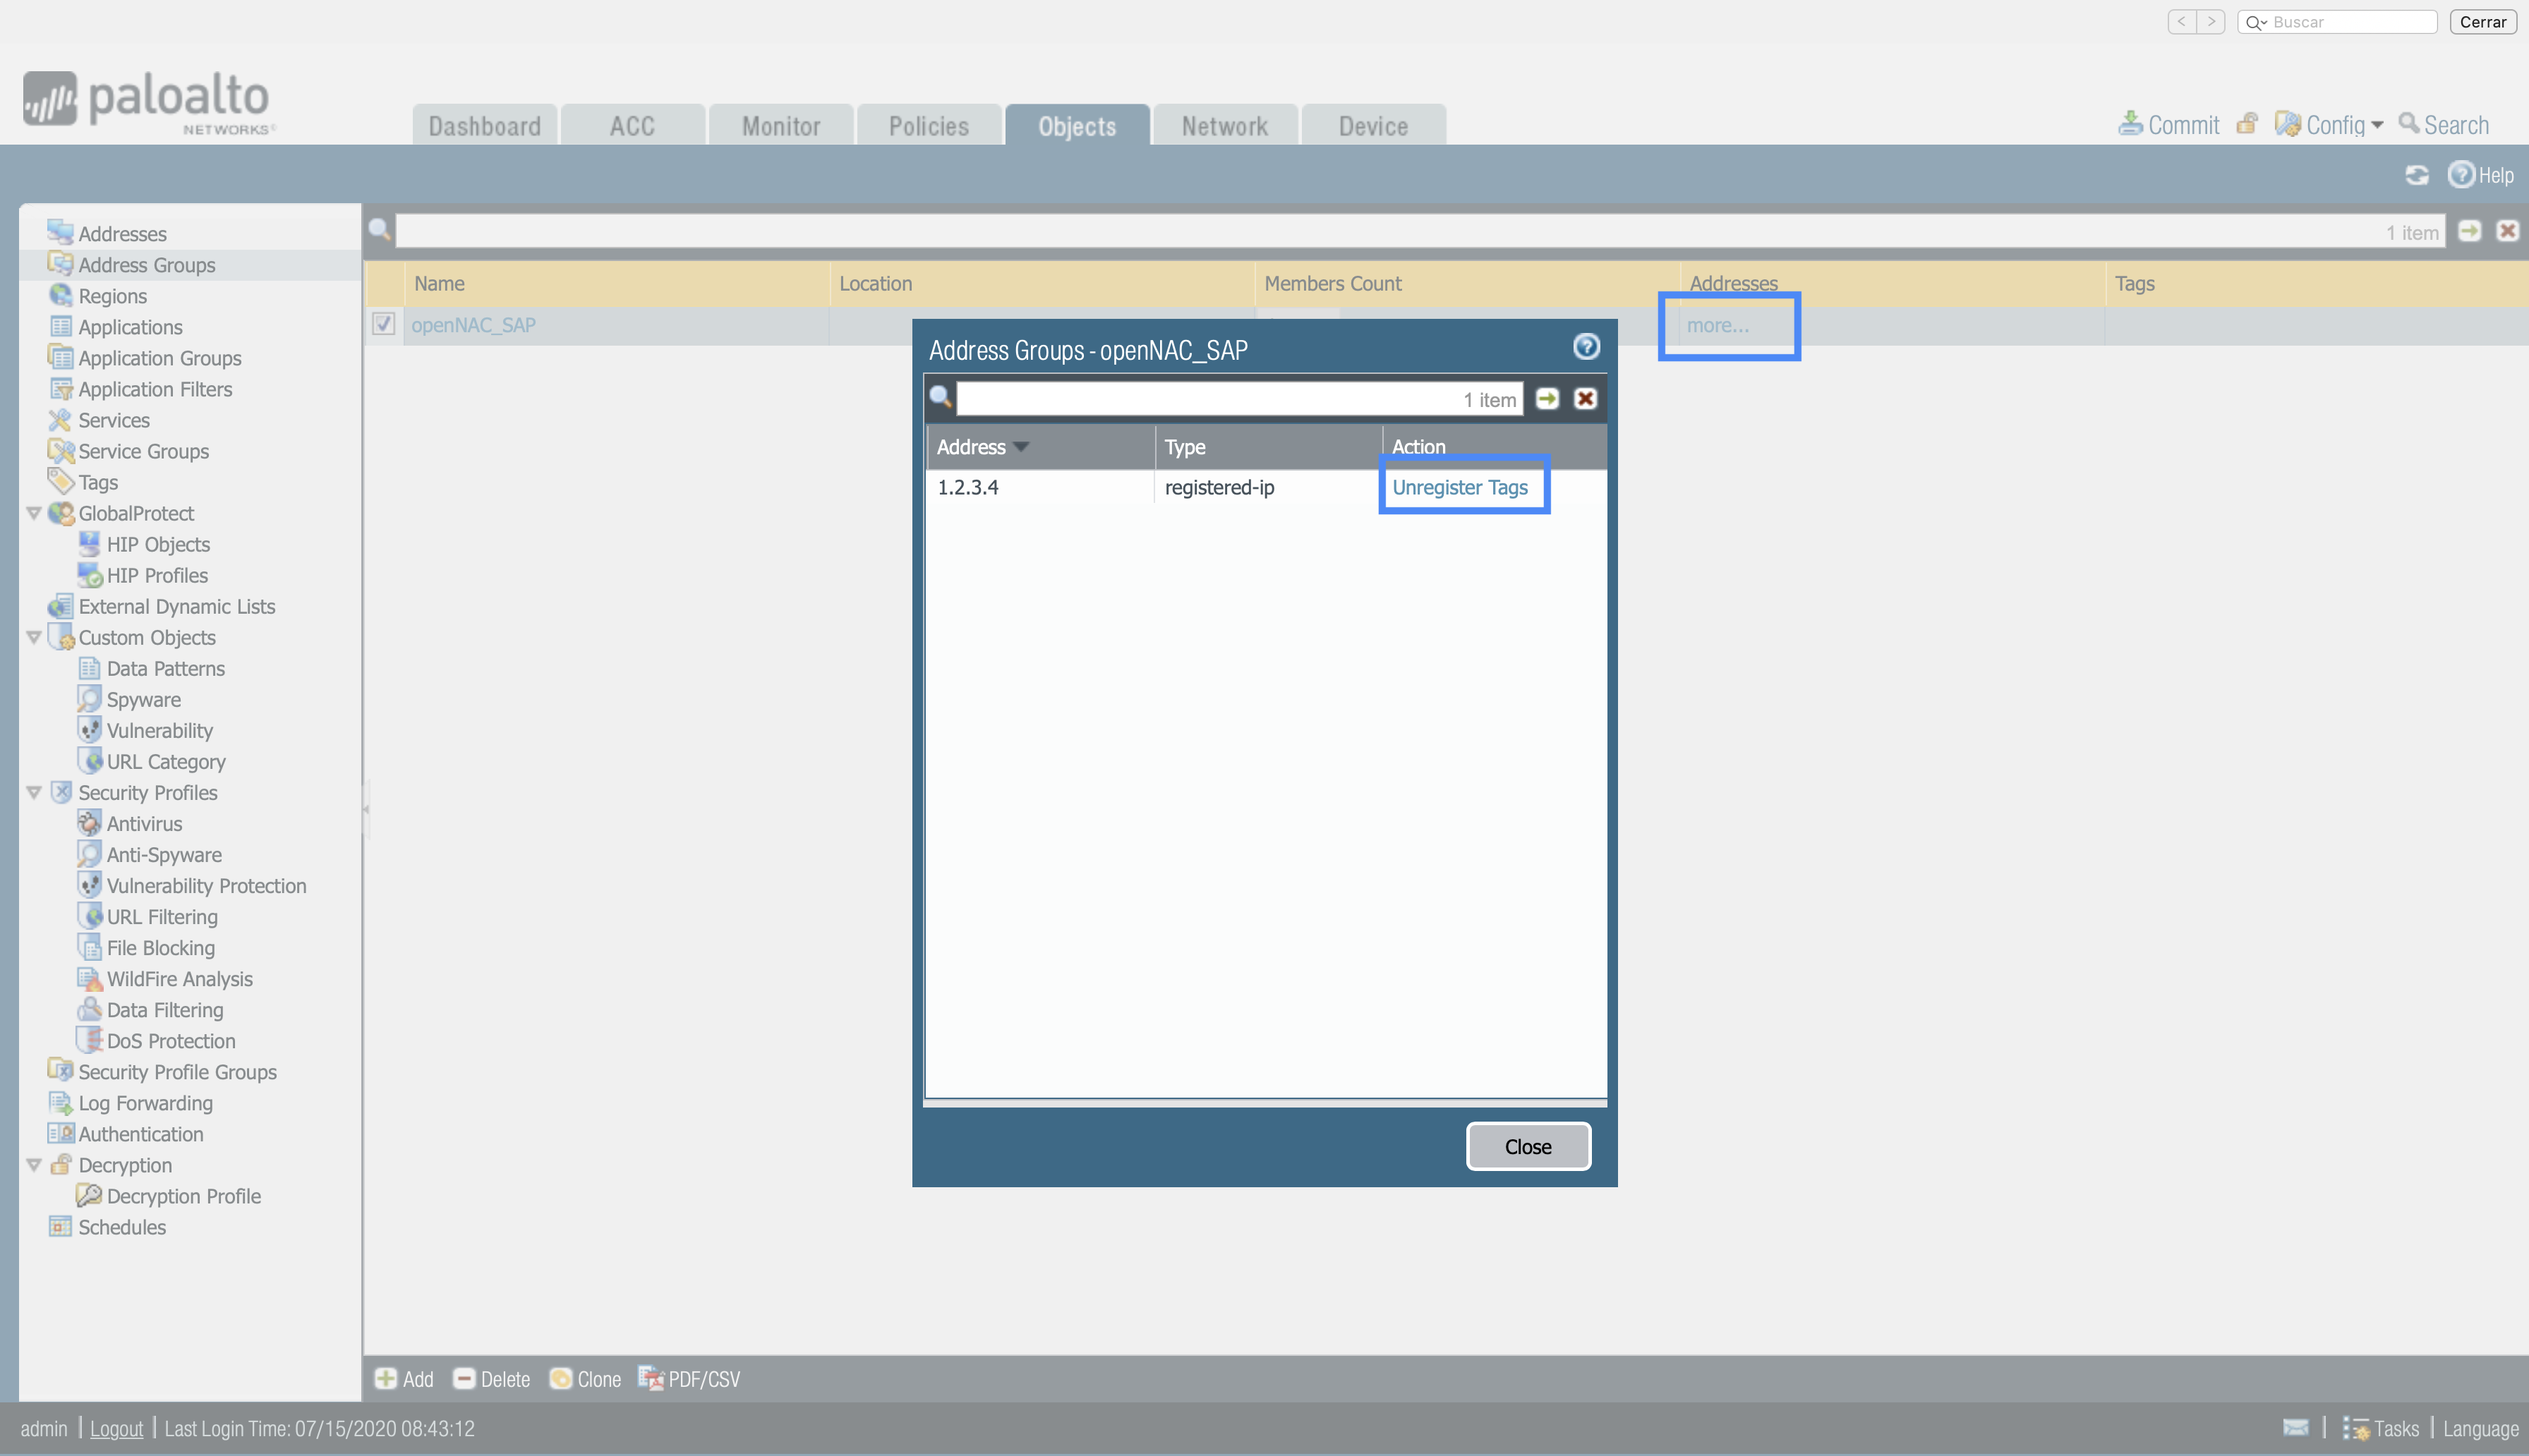
To check if the IP address is correctly associated to the user and tag, once the commit is done and the changes have been applied, click on more (under the addresses section).
Applying the tag to Palo Alto firewall policies
When creating policies, we can also specify which tags we want to apply to each policy. You can apply one or more tags to policy rules.
To configure tags in policies -> Policies > Security > Add a new policy
Here are some policy examples:
DHCP relay: To enable DHCP request.
SAP: Business rule, if got the OpenNAC tag.
General: General resources for coworkers.
Internet: Internet Access.
By default: Deny access for all.
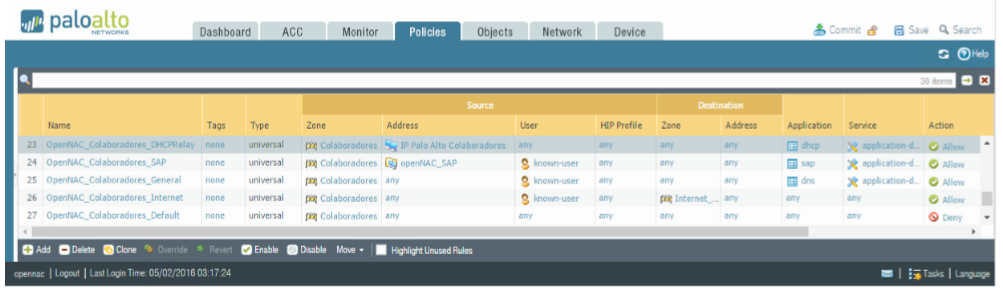
Note
The session timeout inside Palo Alto is associated with the username, so we always need to define the “known-user” in the rule. We can see it in the second policy (SAP) from the picture above.
While the TTL has not elapsed, the user will match the policy, but when the TTL expires, it means the user has been disconnected (just like when we sent the logout), and therefore, the “known-user” is no longer met. As long as the TTL has not expired, the user will match the policy and it will have the corresponding behavior.
8.1.1.1. Optional: modifying firewall rules according to Active Directory information sent by OpenNAC Enterprise.
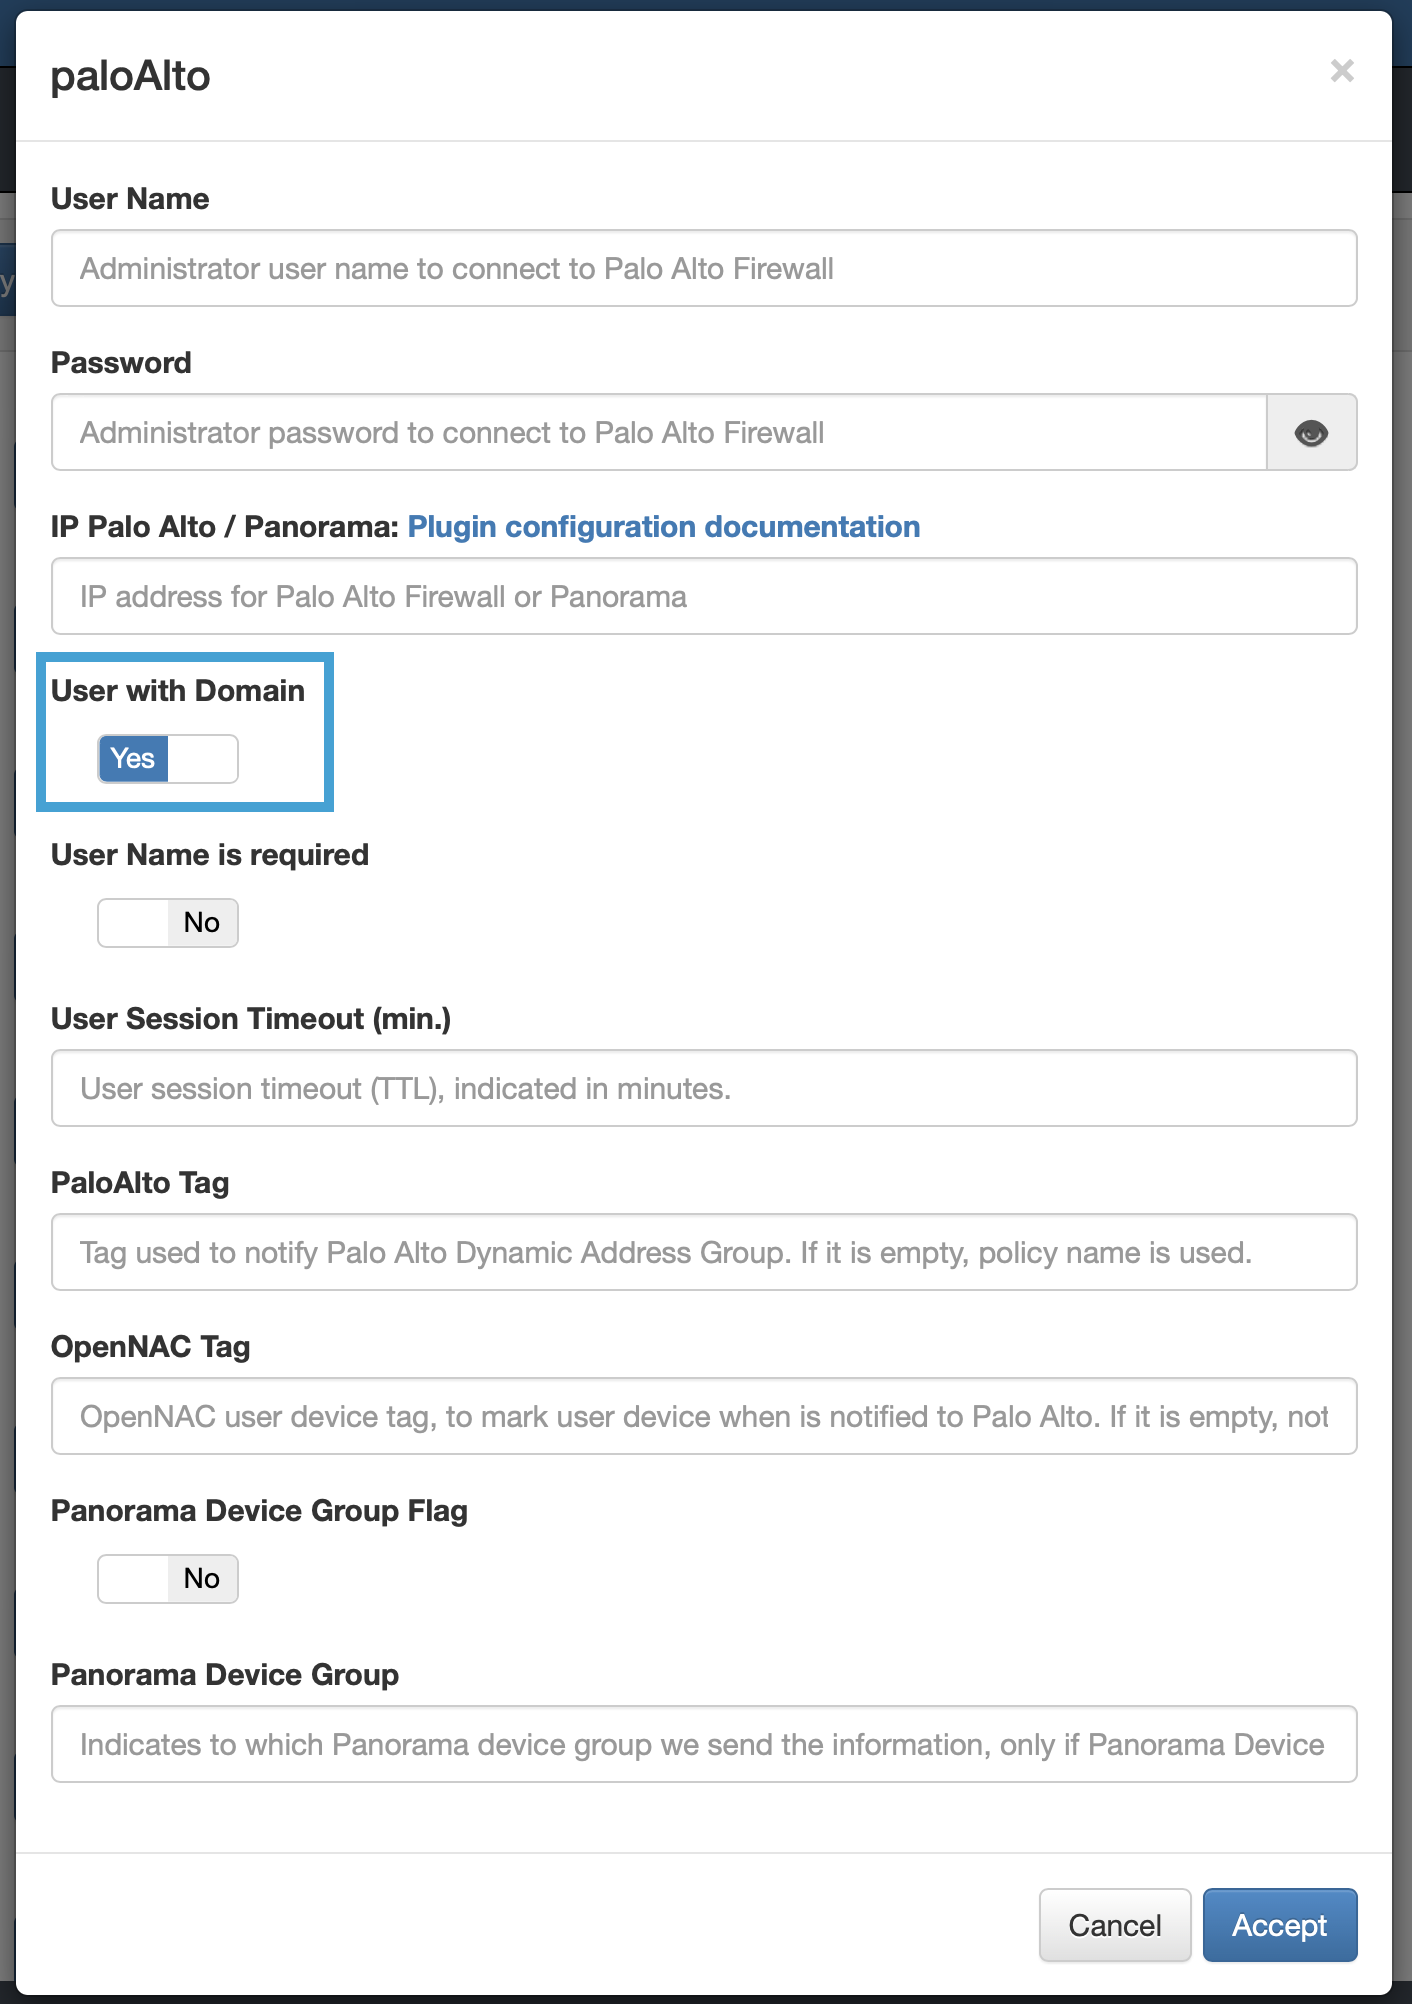
When we want use Active Directory Users or Groups in Palo Alto Policies, matching the user sent by OpenNAC Enterprise, it is required to use the complete user information (including domain name). This way, in the OpenNAC plugin, the option “User with Domain” must be activated. Although we won’t use this option if we are using 802.1x Host authentication instead of User authentication.
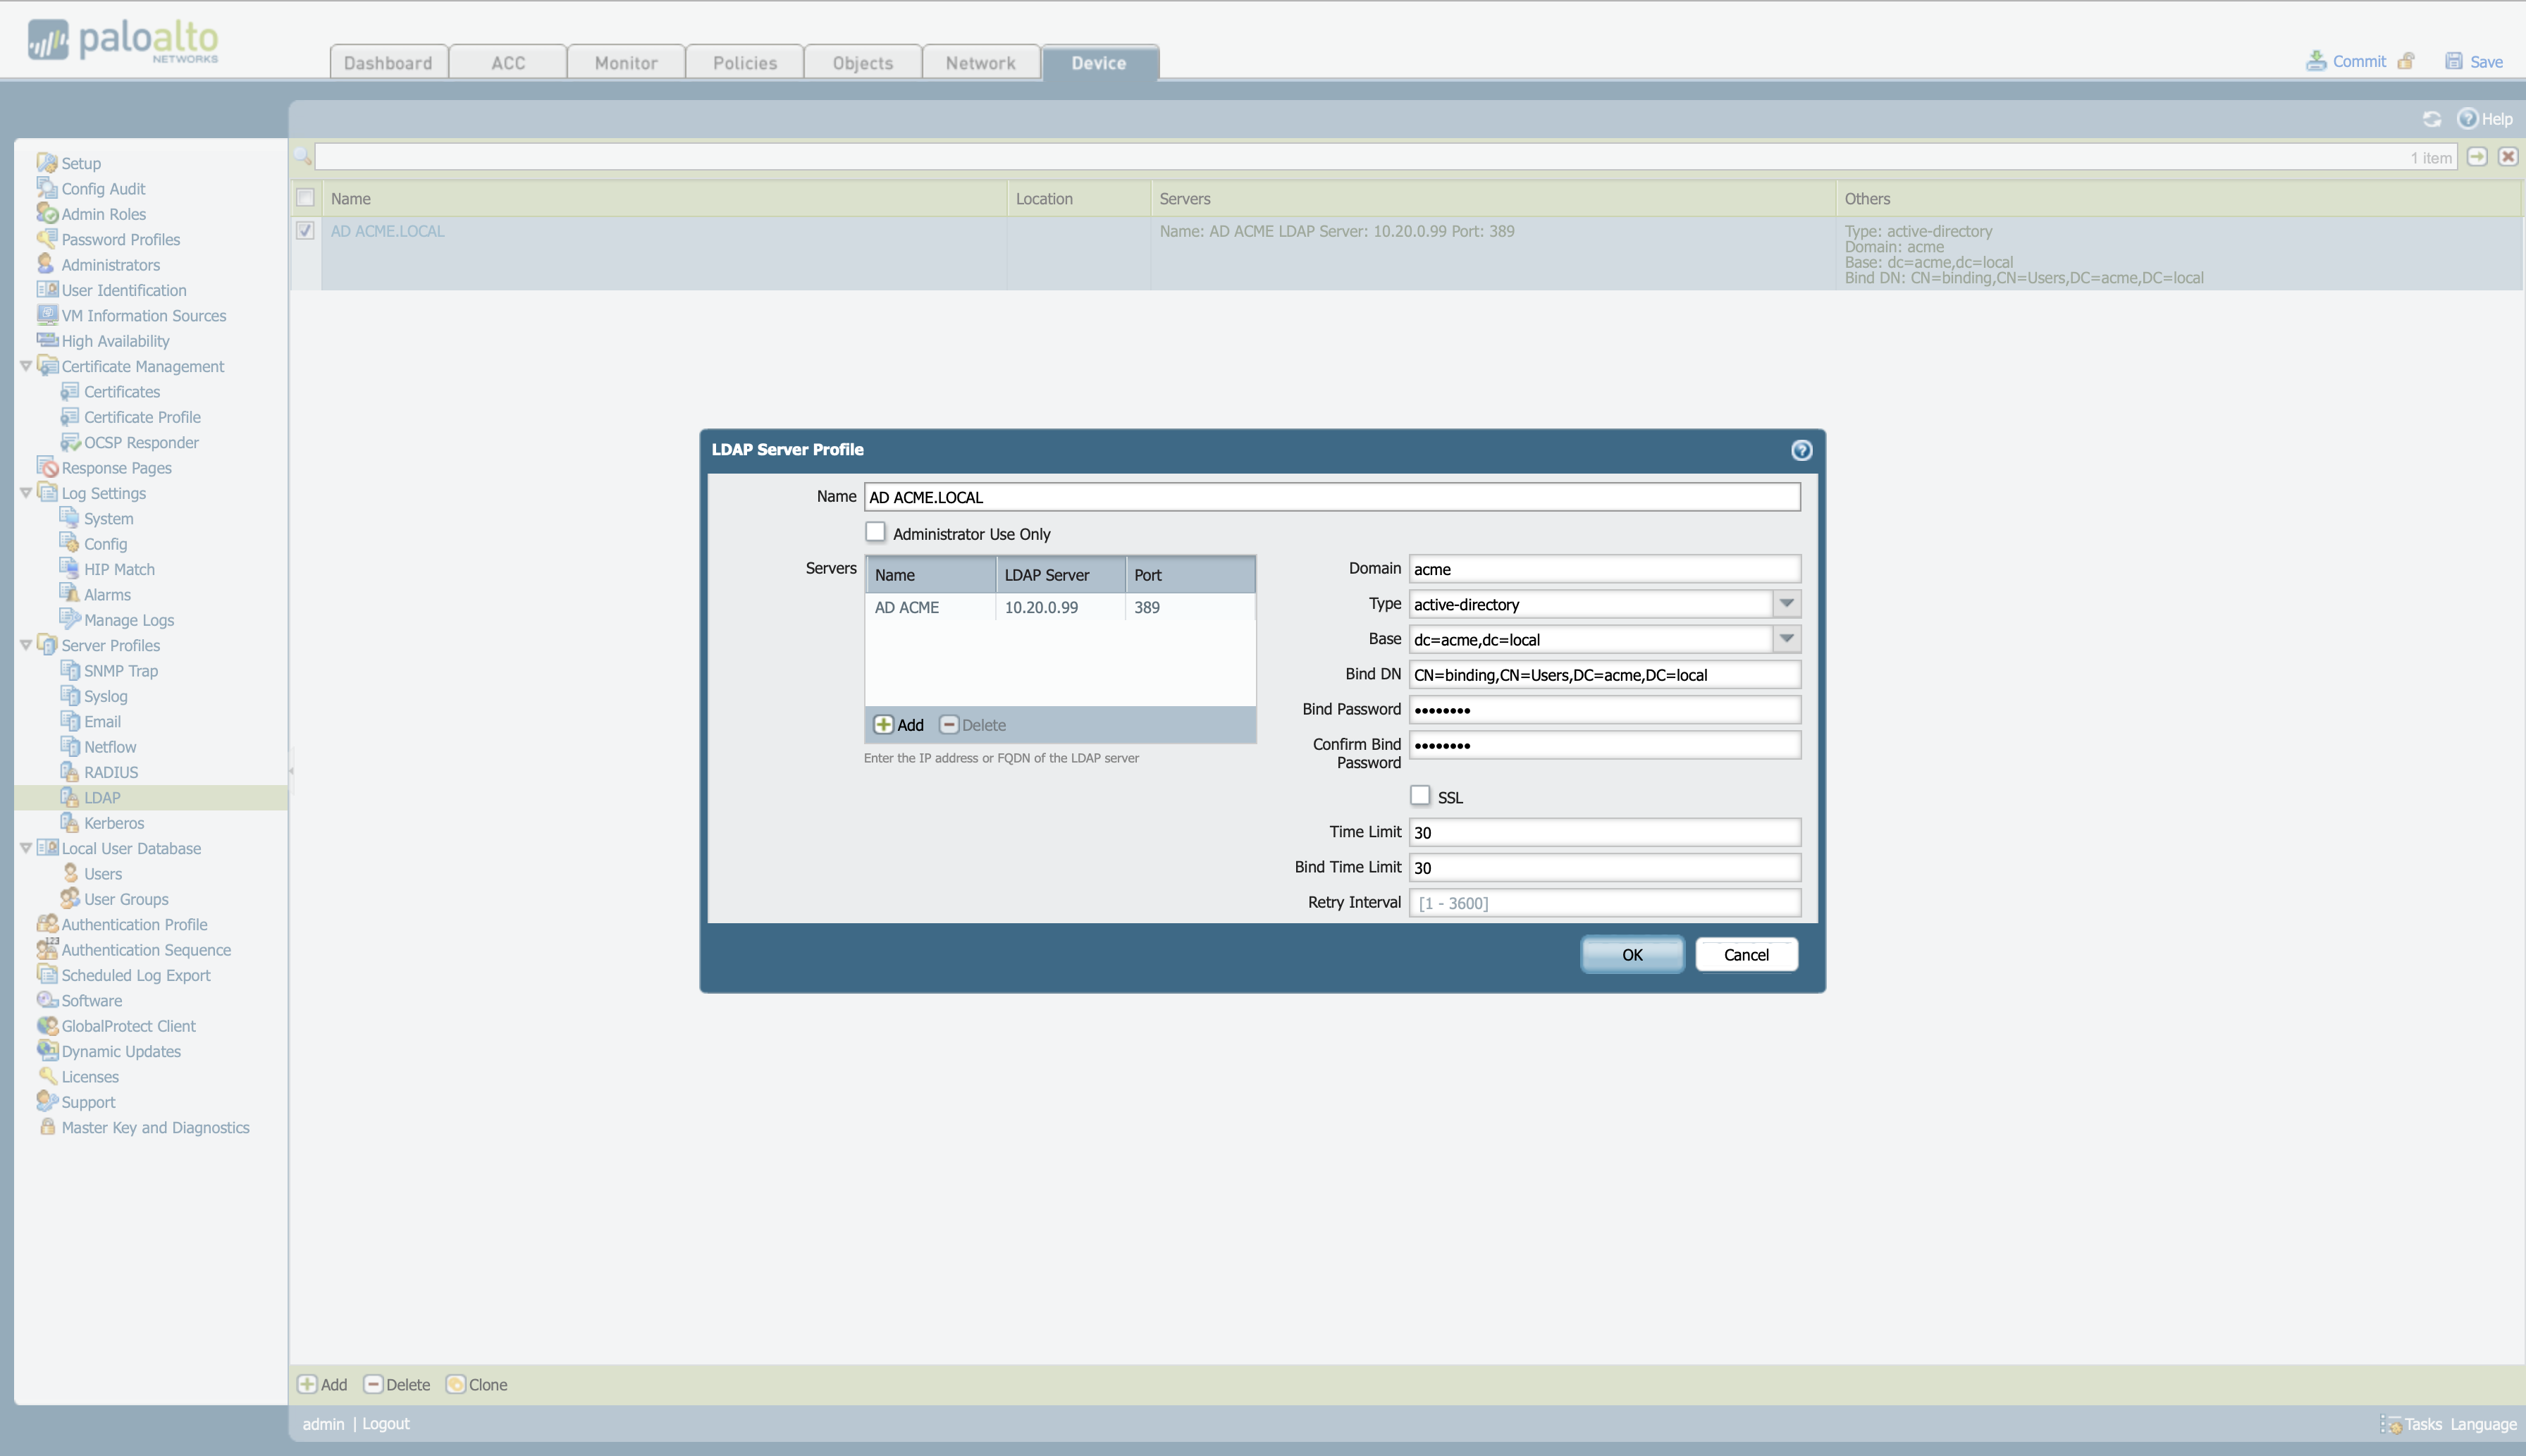
Connect Palo Alto to Active Directory
In that case, you can use LDAP to authenticate end users who access your network resources (through GlobalProtect or Captive Portal) and administrators defined locally on the firewall or Panorama.
To configure LDAP server profiles -> Device > Server Profiles > LDAP
Once defined, create a “Group Mapping” to be able to relate the users and groups of the AD.
Device > User Identification > Group Mapping Settings, and configure the server profile.

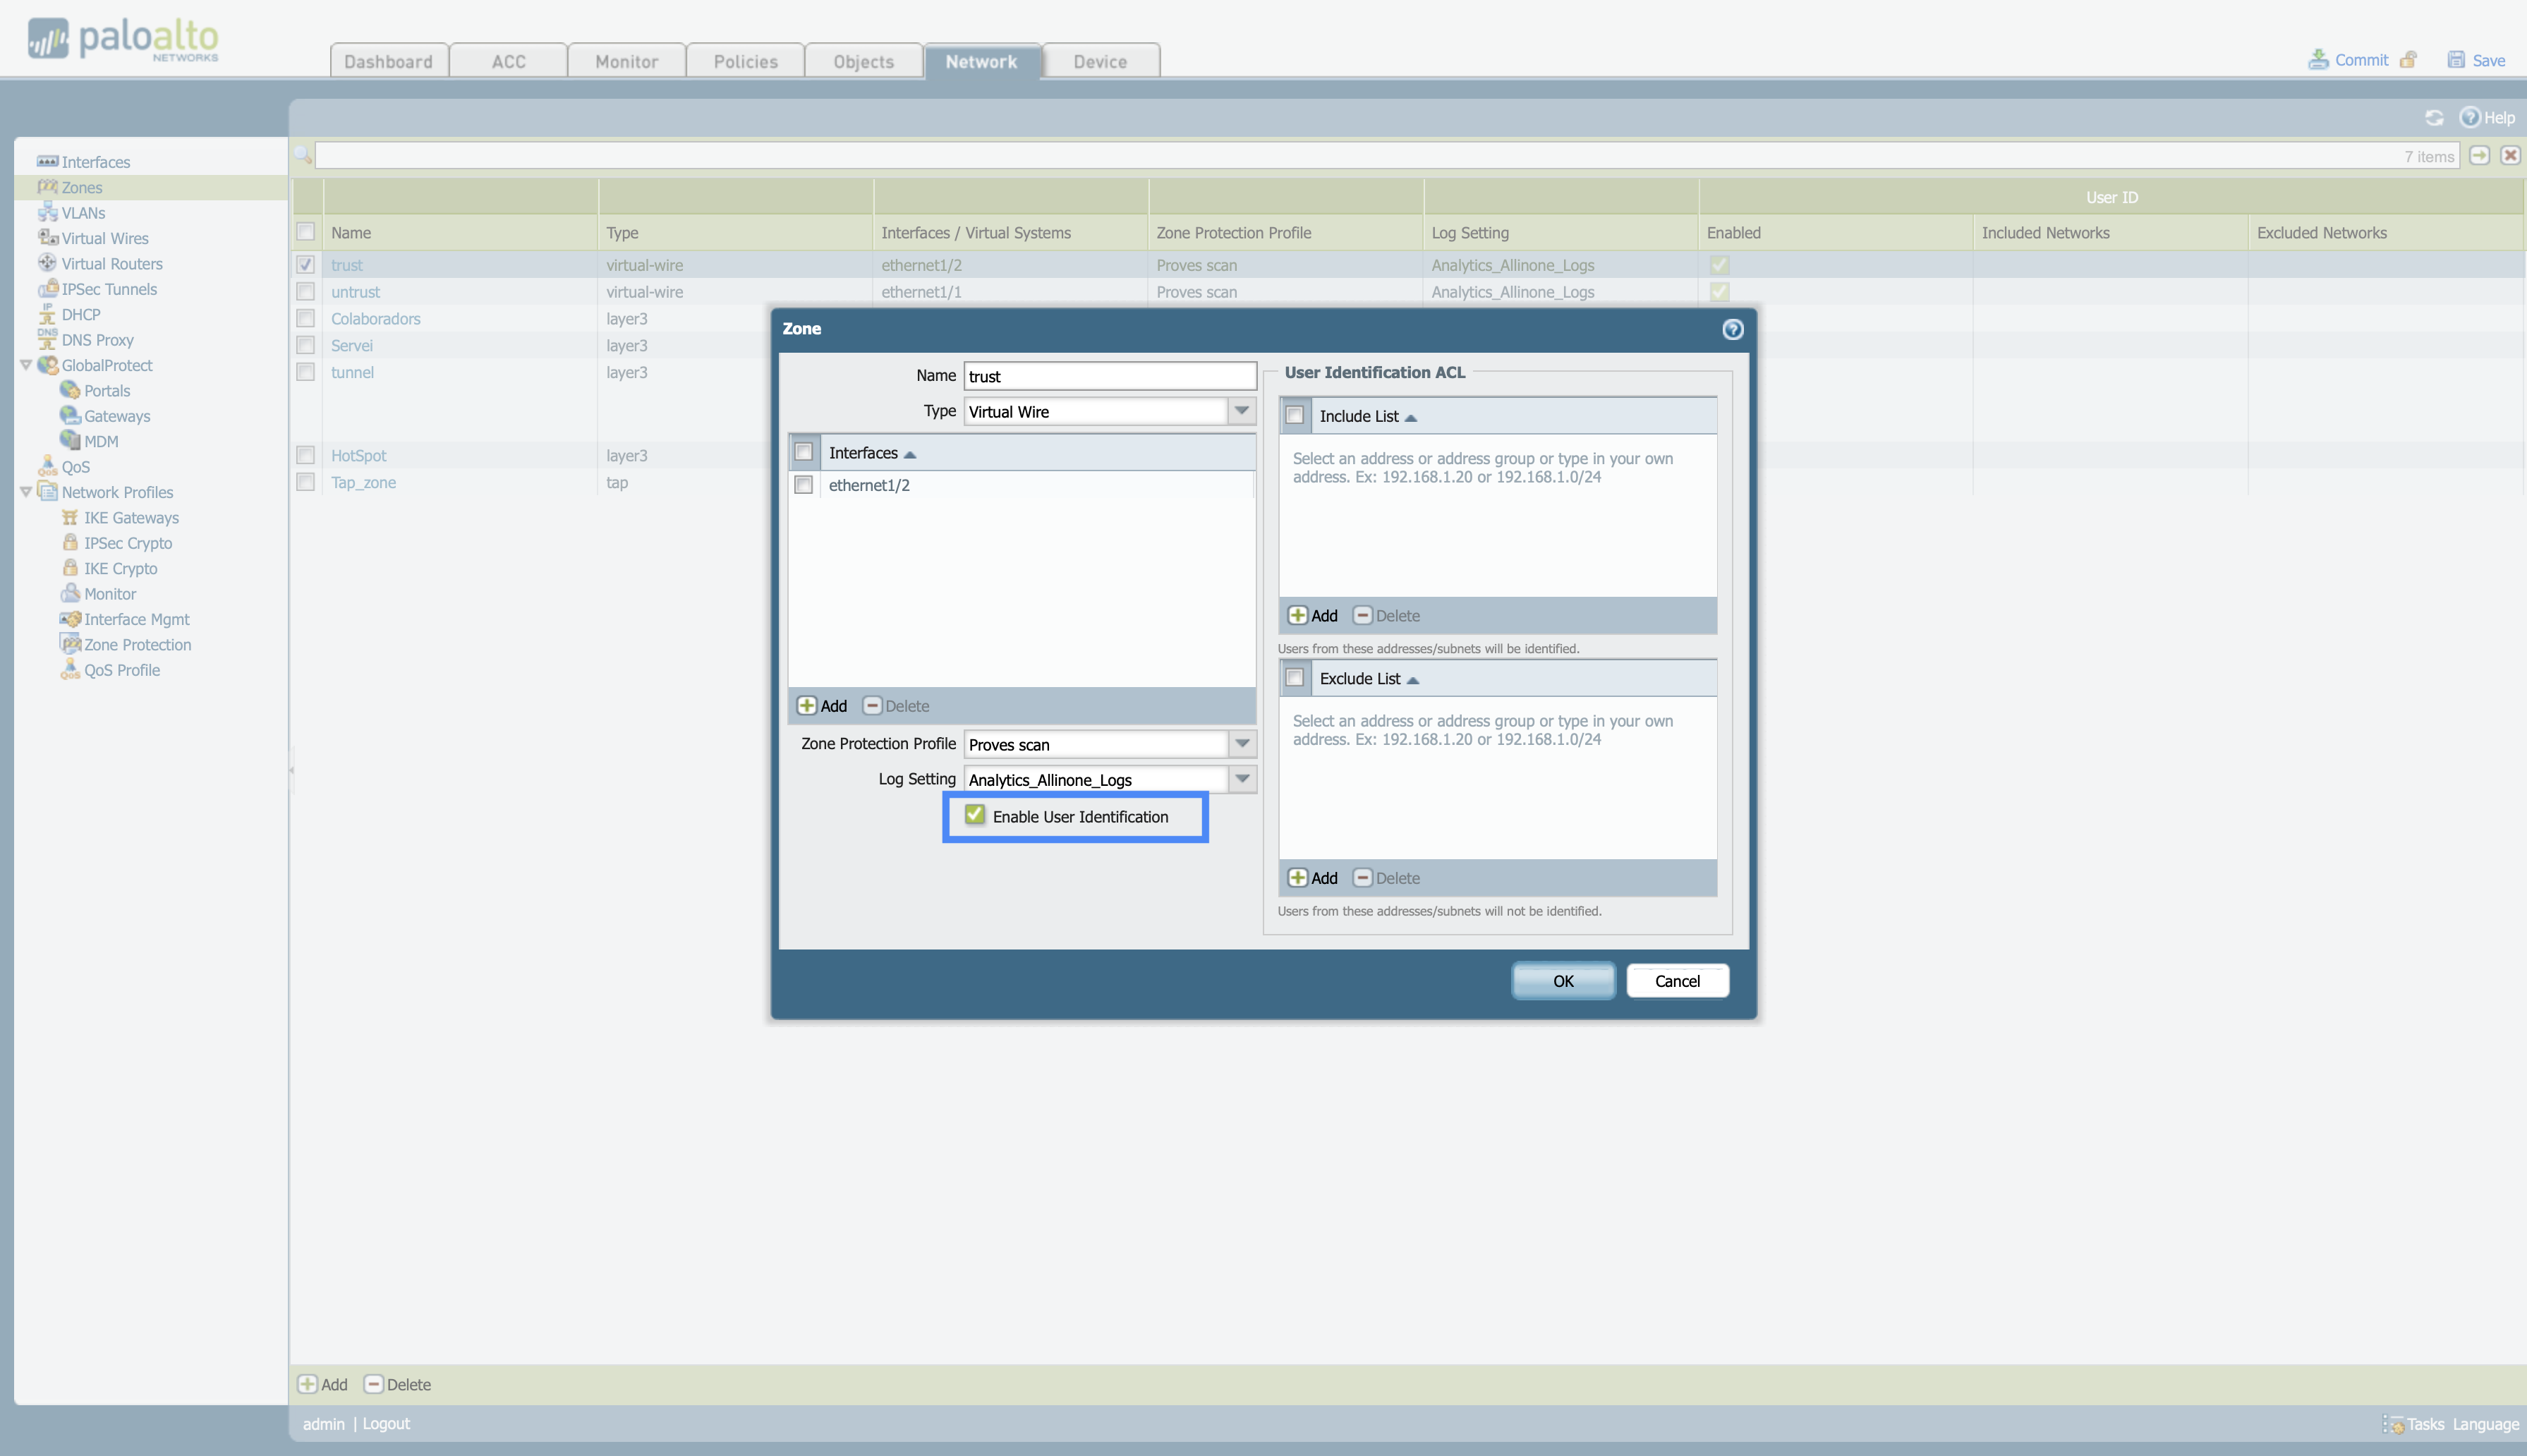
To use users in a policy, the “Enable User Identification” option must be enabled in the zone that applies the policy of firewall.
Network > Zones and select the zone you want to configure.
In the policies tab, click on the Source user column for the users that are already defined or any if there are no users defined yet. A tab will open where you can select the user or group of users you want to assign.
Policies > Locate the policy you want to modify > Select the Source User Column
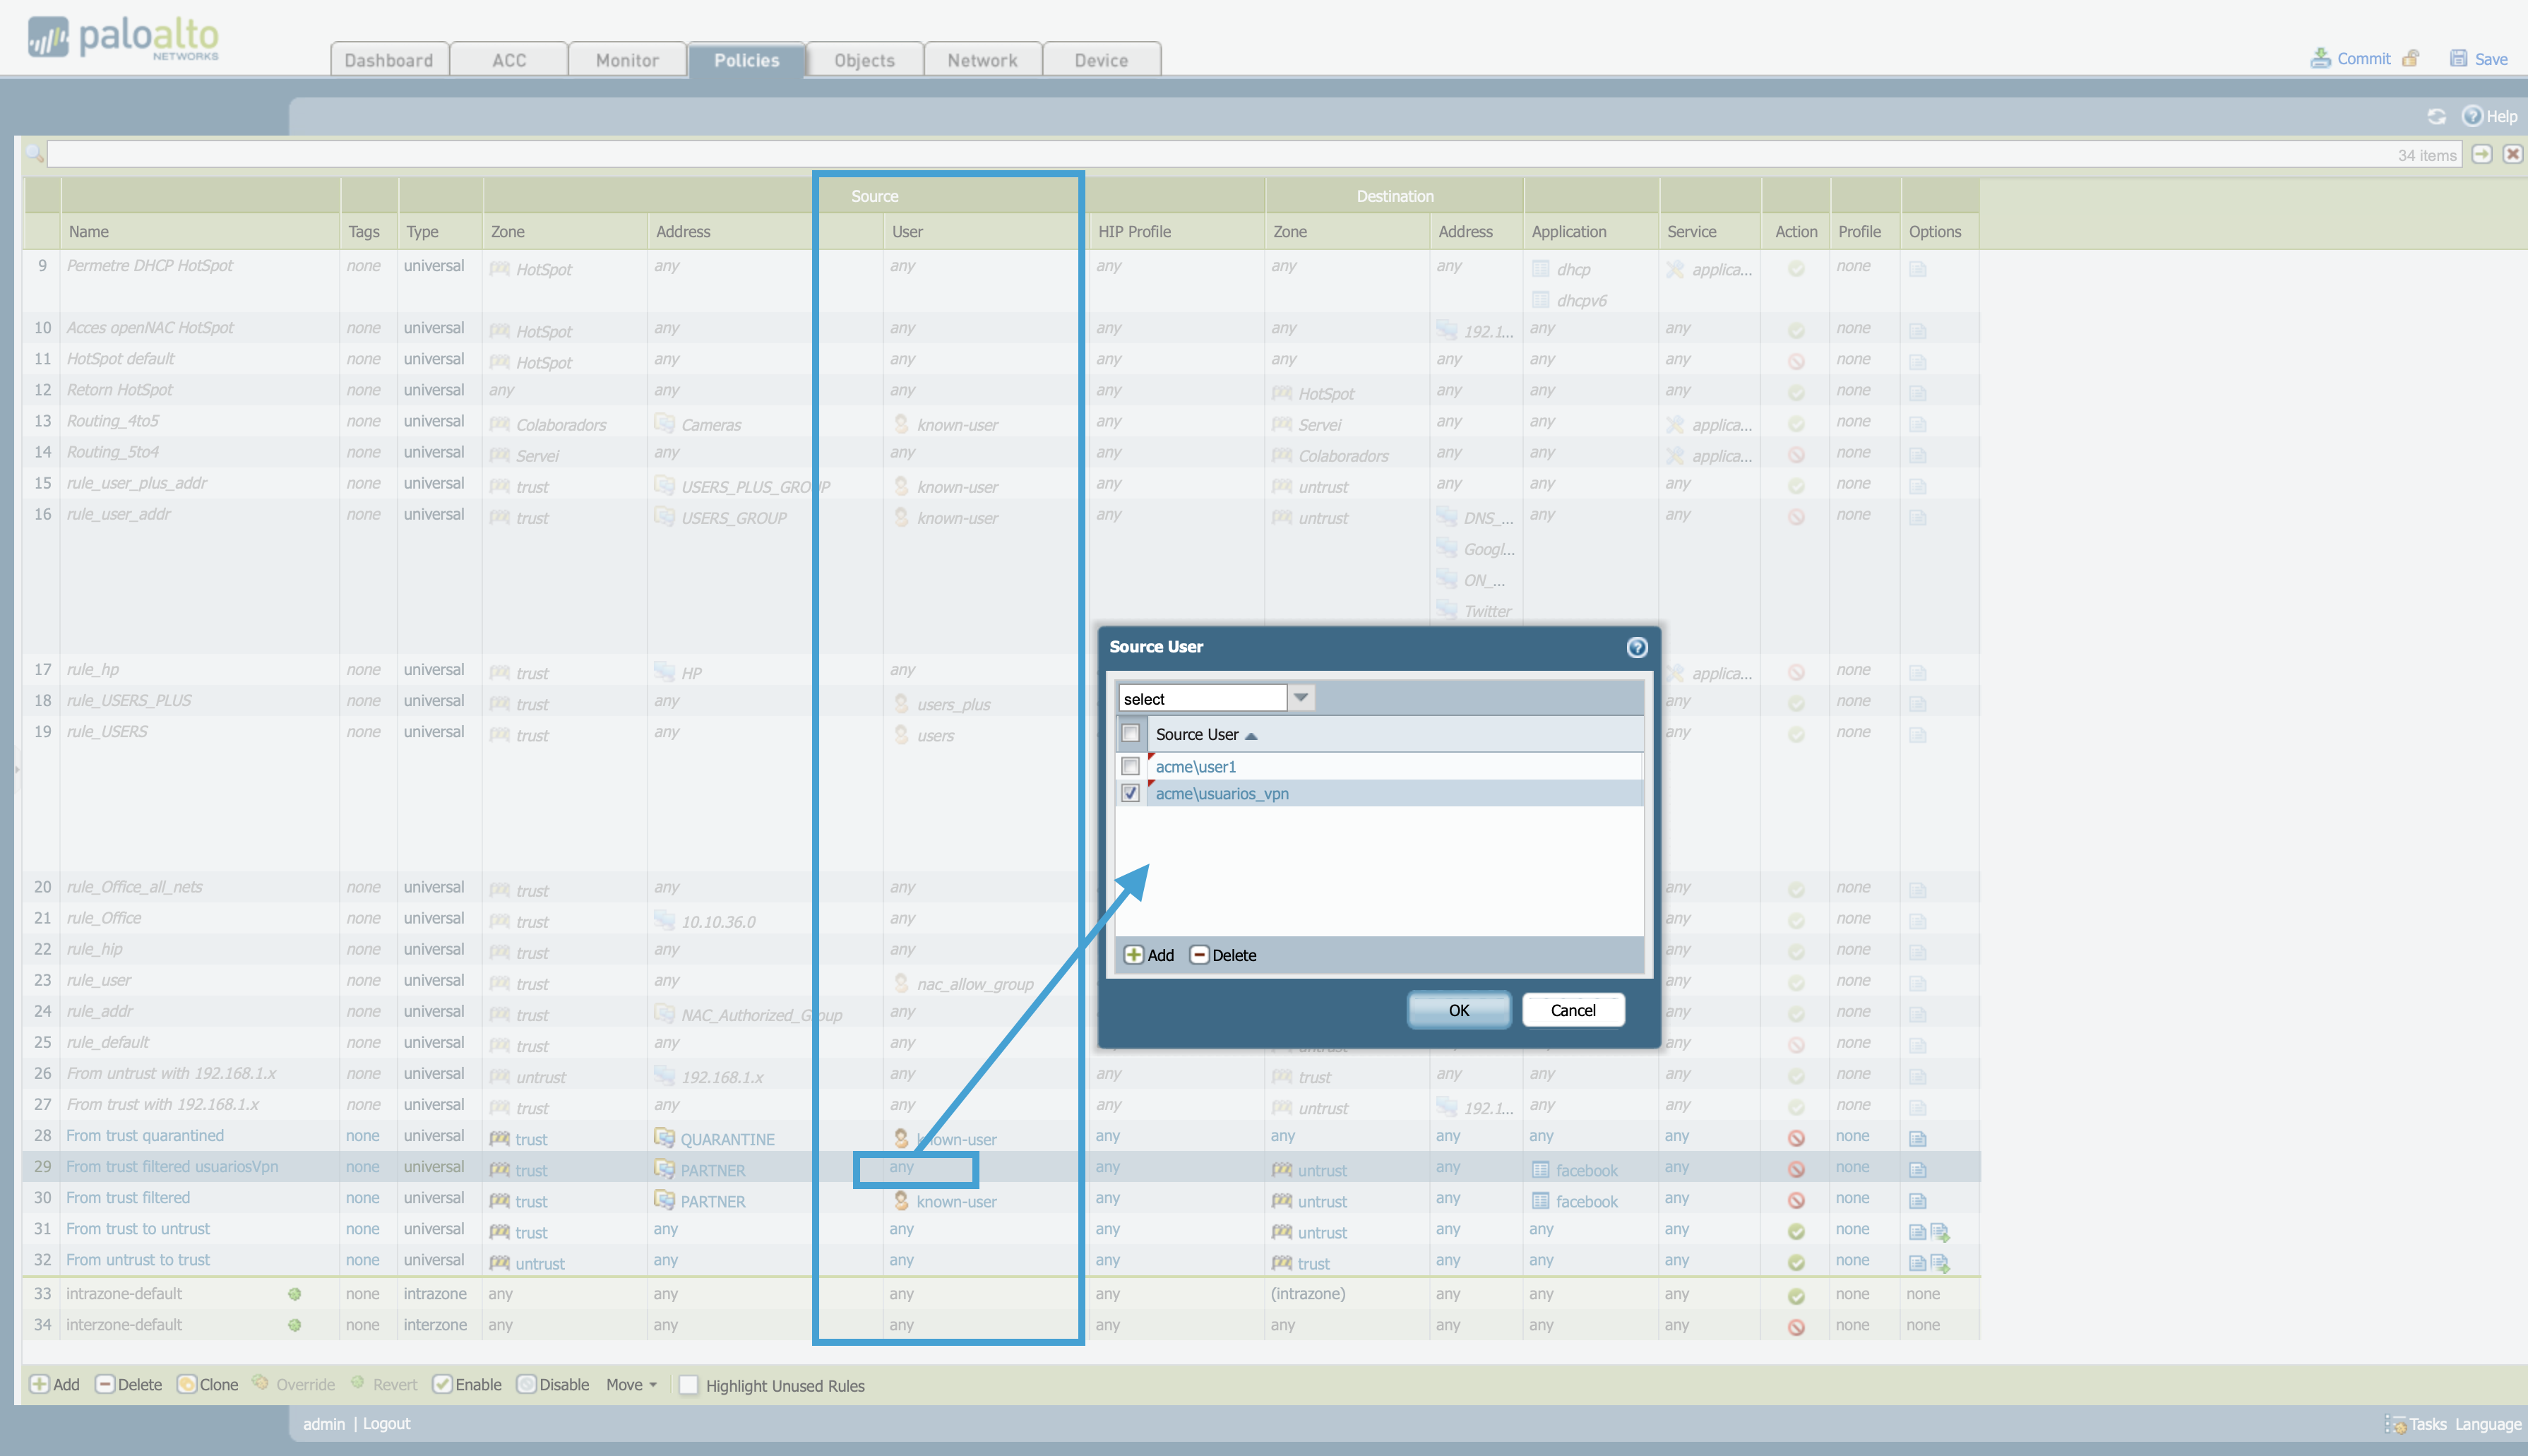
Now in the policy, in the Source user column, you should be able to see the different users that you have configured.

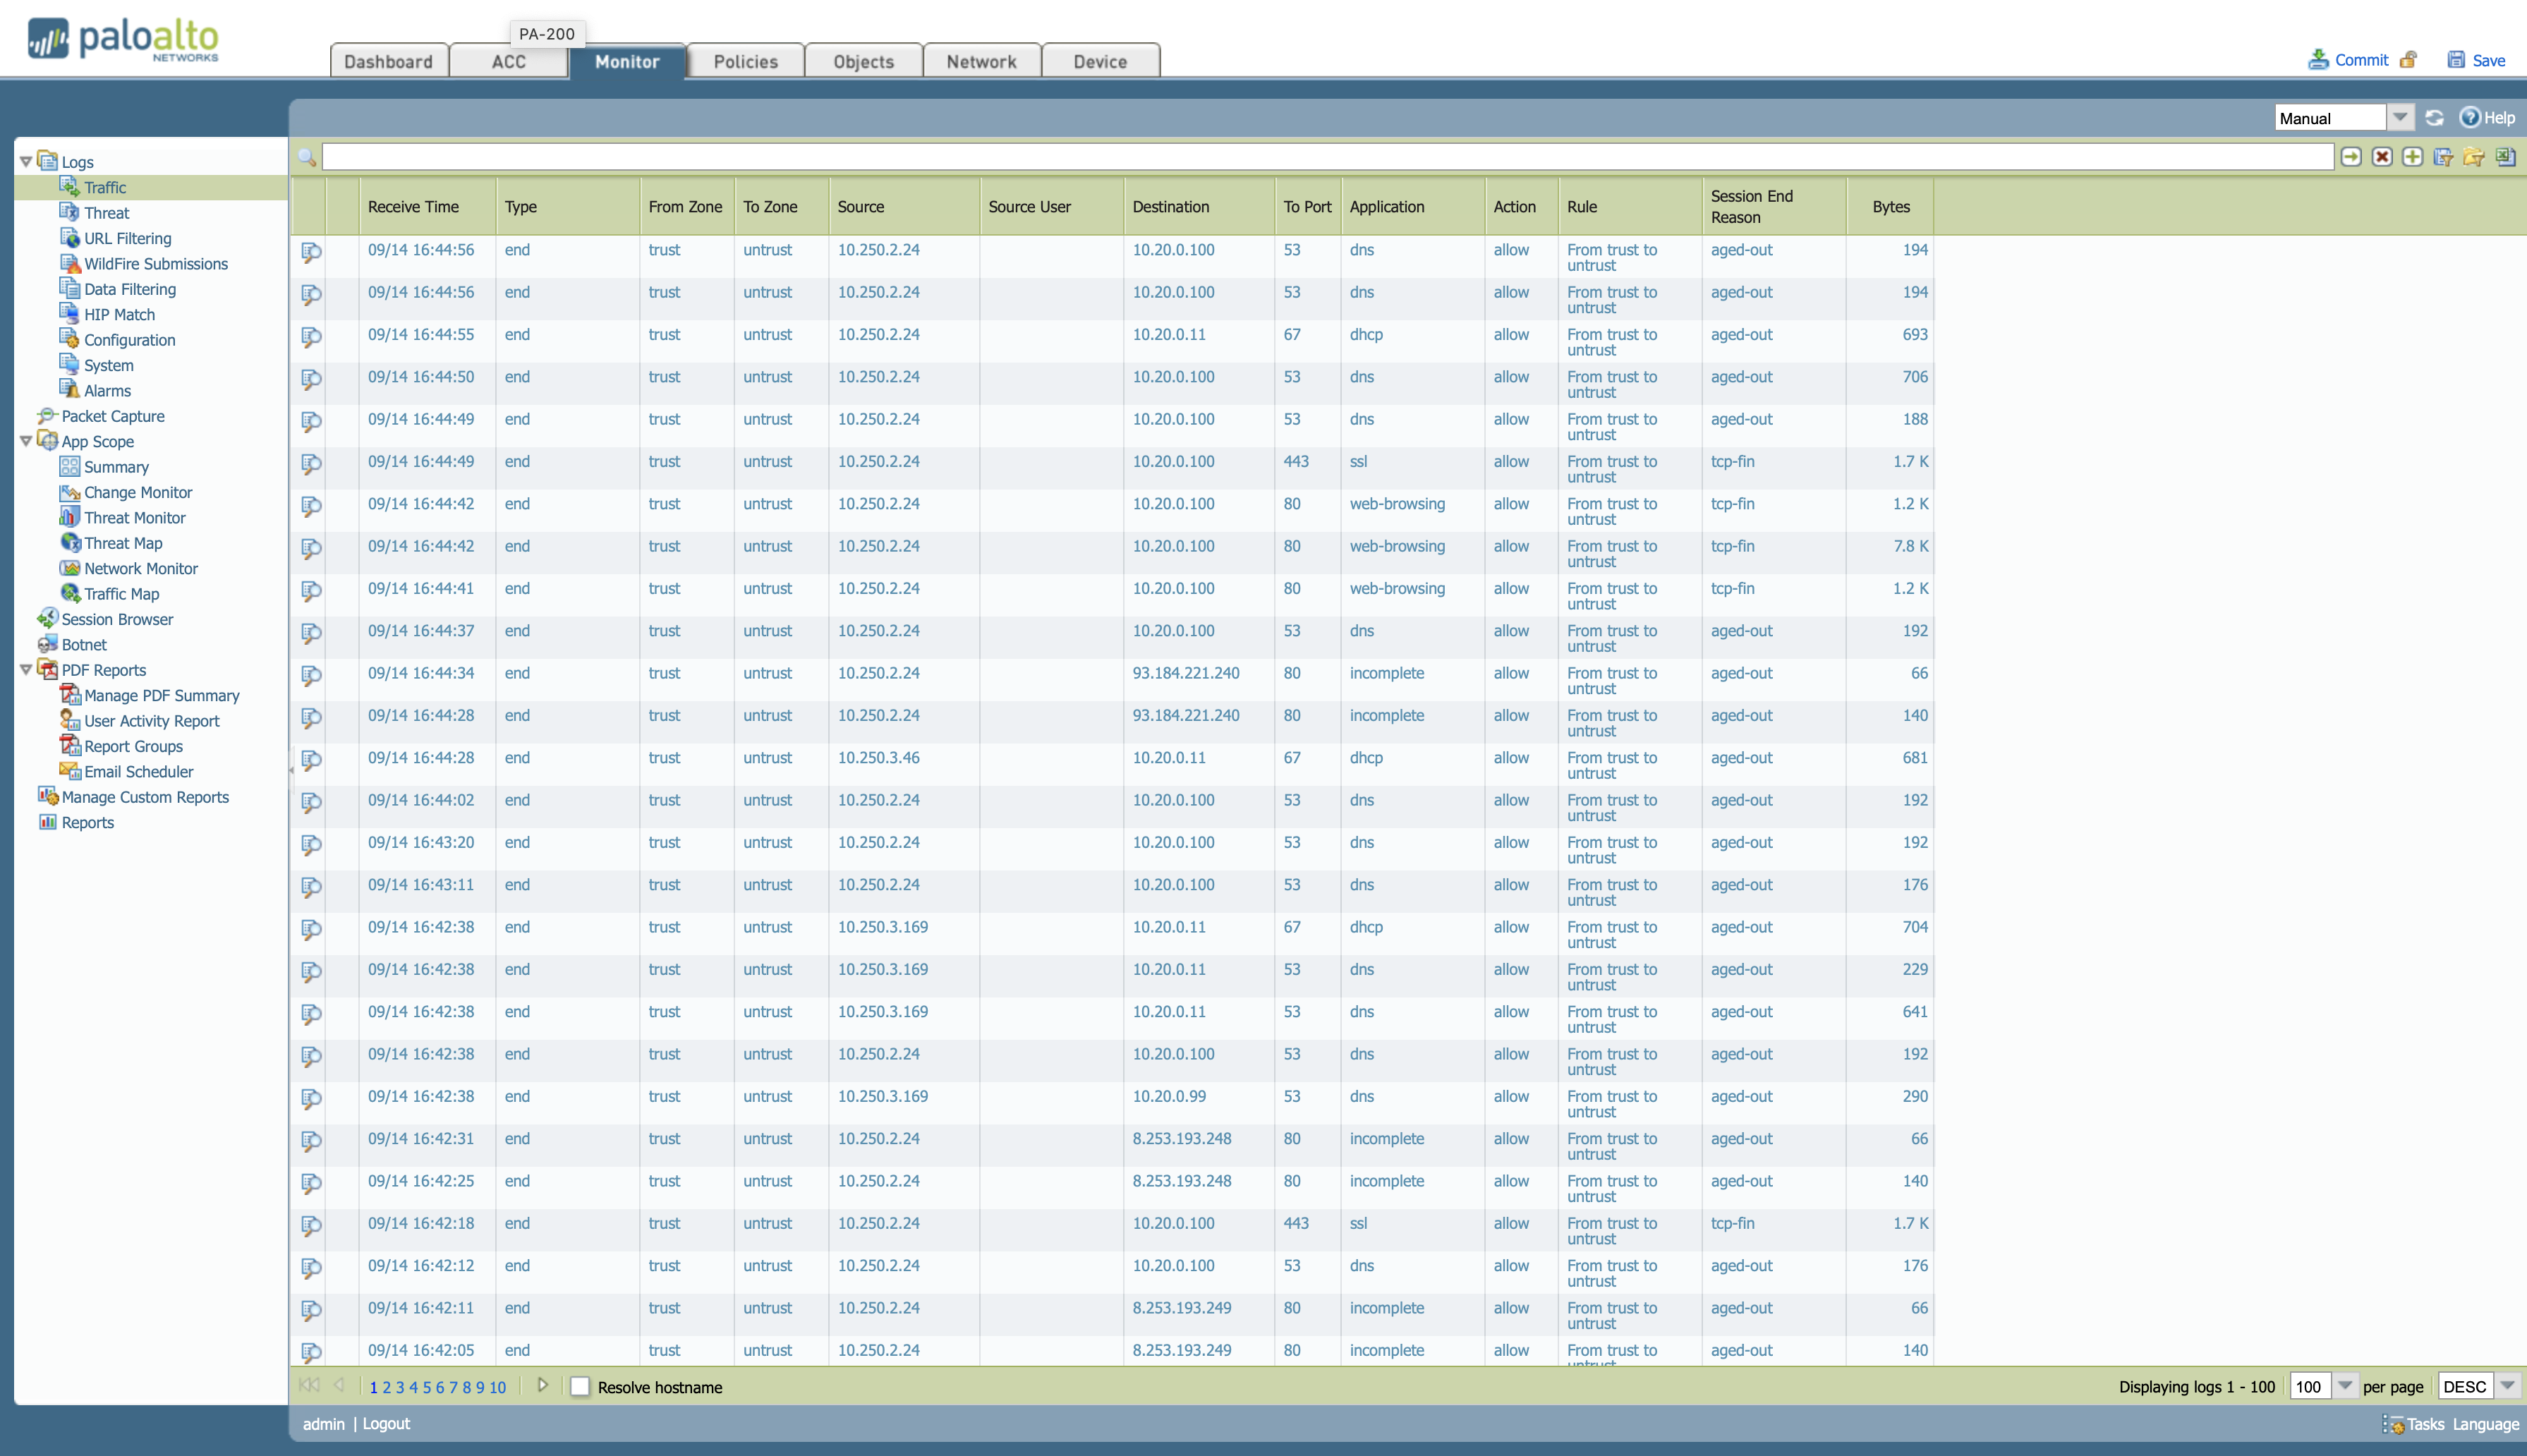
Once these changes are applied, in the Monitor section, looking at the different logs, you can see that the user has received it from OpenNAC Enterprise and also the different traces of this user.
8.1.1.2. Add a firewall to Panorama
To use Panorama for managing your firewalls, you will need to enable a connection between the firewall and Panorama. This connections requires you to enter the Panorama IP address on each firewall that will be managed, and to enter the serial number of each firewall on Panorama.
To configure Panorama:
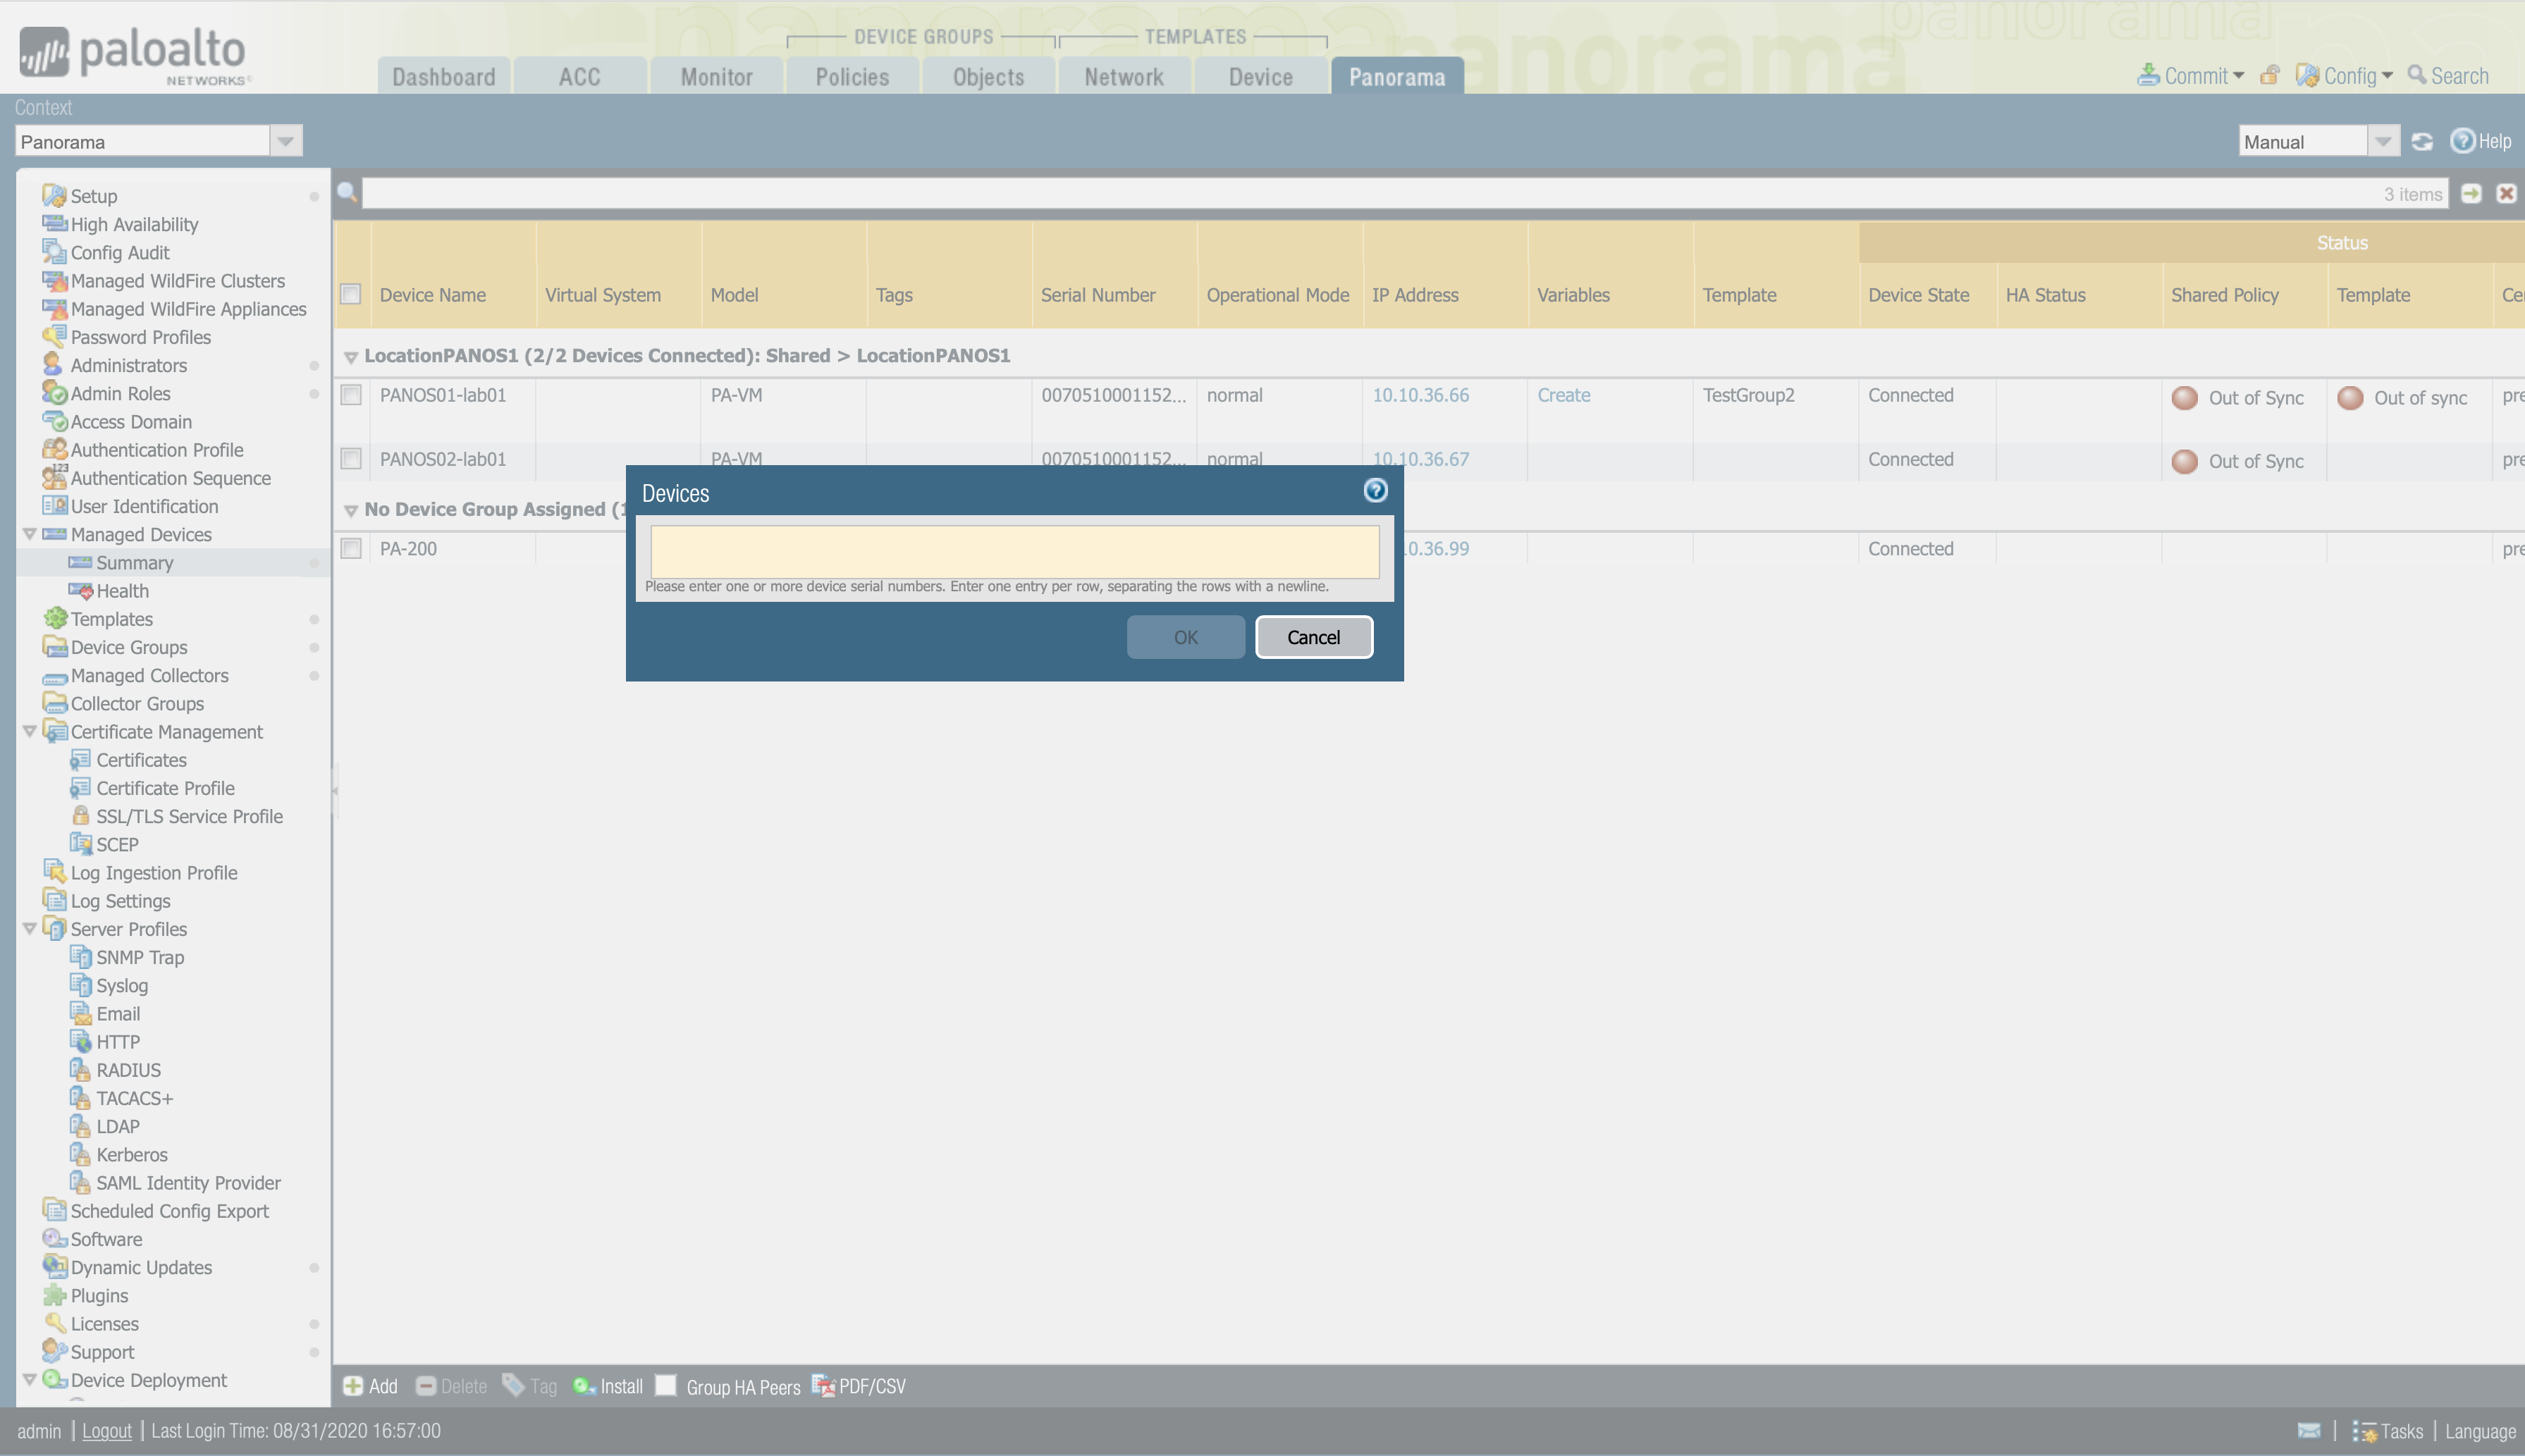
Panorama > Managed Devices > Summary and click Add.
Enter the serial number for each firewall you want to manage using Panorama.
Note
You will find the serial number of the FW device in the Dashboard > General information.
To configure the firewall:
Devices > Setup, in the management tab > Edit the Panorama Settings
Enter the Panorama IP address in the field.

Note
Commit and push the changes in each Panorama and the firewalls to apply the configuration.
(Check the Palo Alto Network official documentation: Add a Firewall as a Managed Device)
8.1.1.3. Redistribute User-ID Information to Managed Firewalls
Panorama has a distributed log collection infrastructure to Redistribute User-ID Information to Managed Firewalls. The infrastructure has existing connections that enable you to redistribute User-ID information in layers, from firewalls to Log Collectors to Panorama. Panorama can then redistribute the information to the firewalls that enforce policies and generate reports for all your users.
(Check the Palo Alto Network official documentation: Data Redistribution Using Panorama)
Configure the firewalls to redistribute User-ID information (Palo Alto Fw)
The following procedure describes how to configure the Palo Alto firewall integrated User-ID agent for IP address-to-username mapping. What we will achieve is that the different firewalls can receive information that is sent from Panorama, in order to apply certain configurations that we send them. We will configure the redistribution section giving our device a name and a password, so that we can recognize it from the other devices.
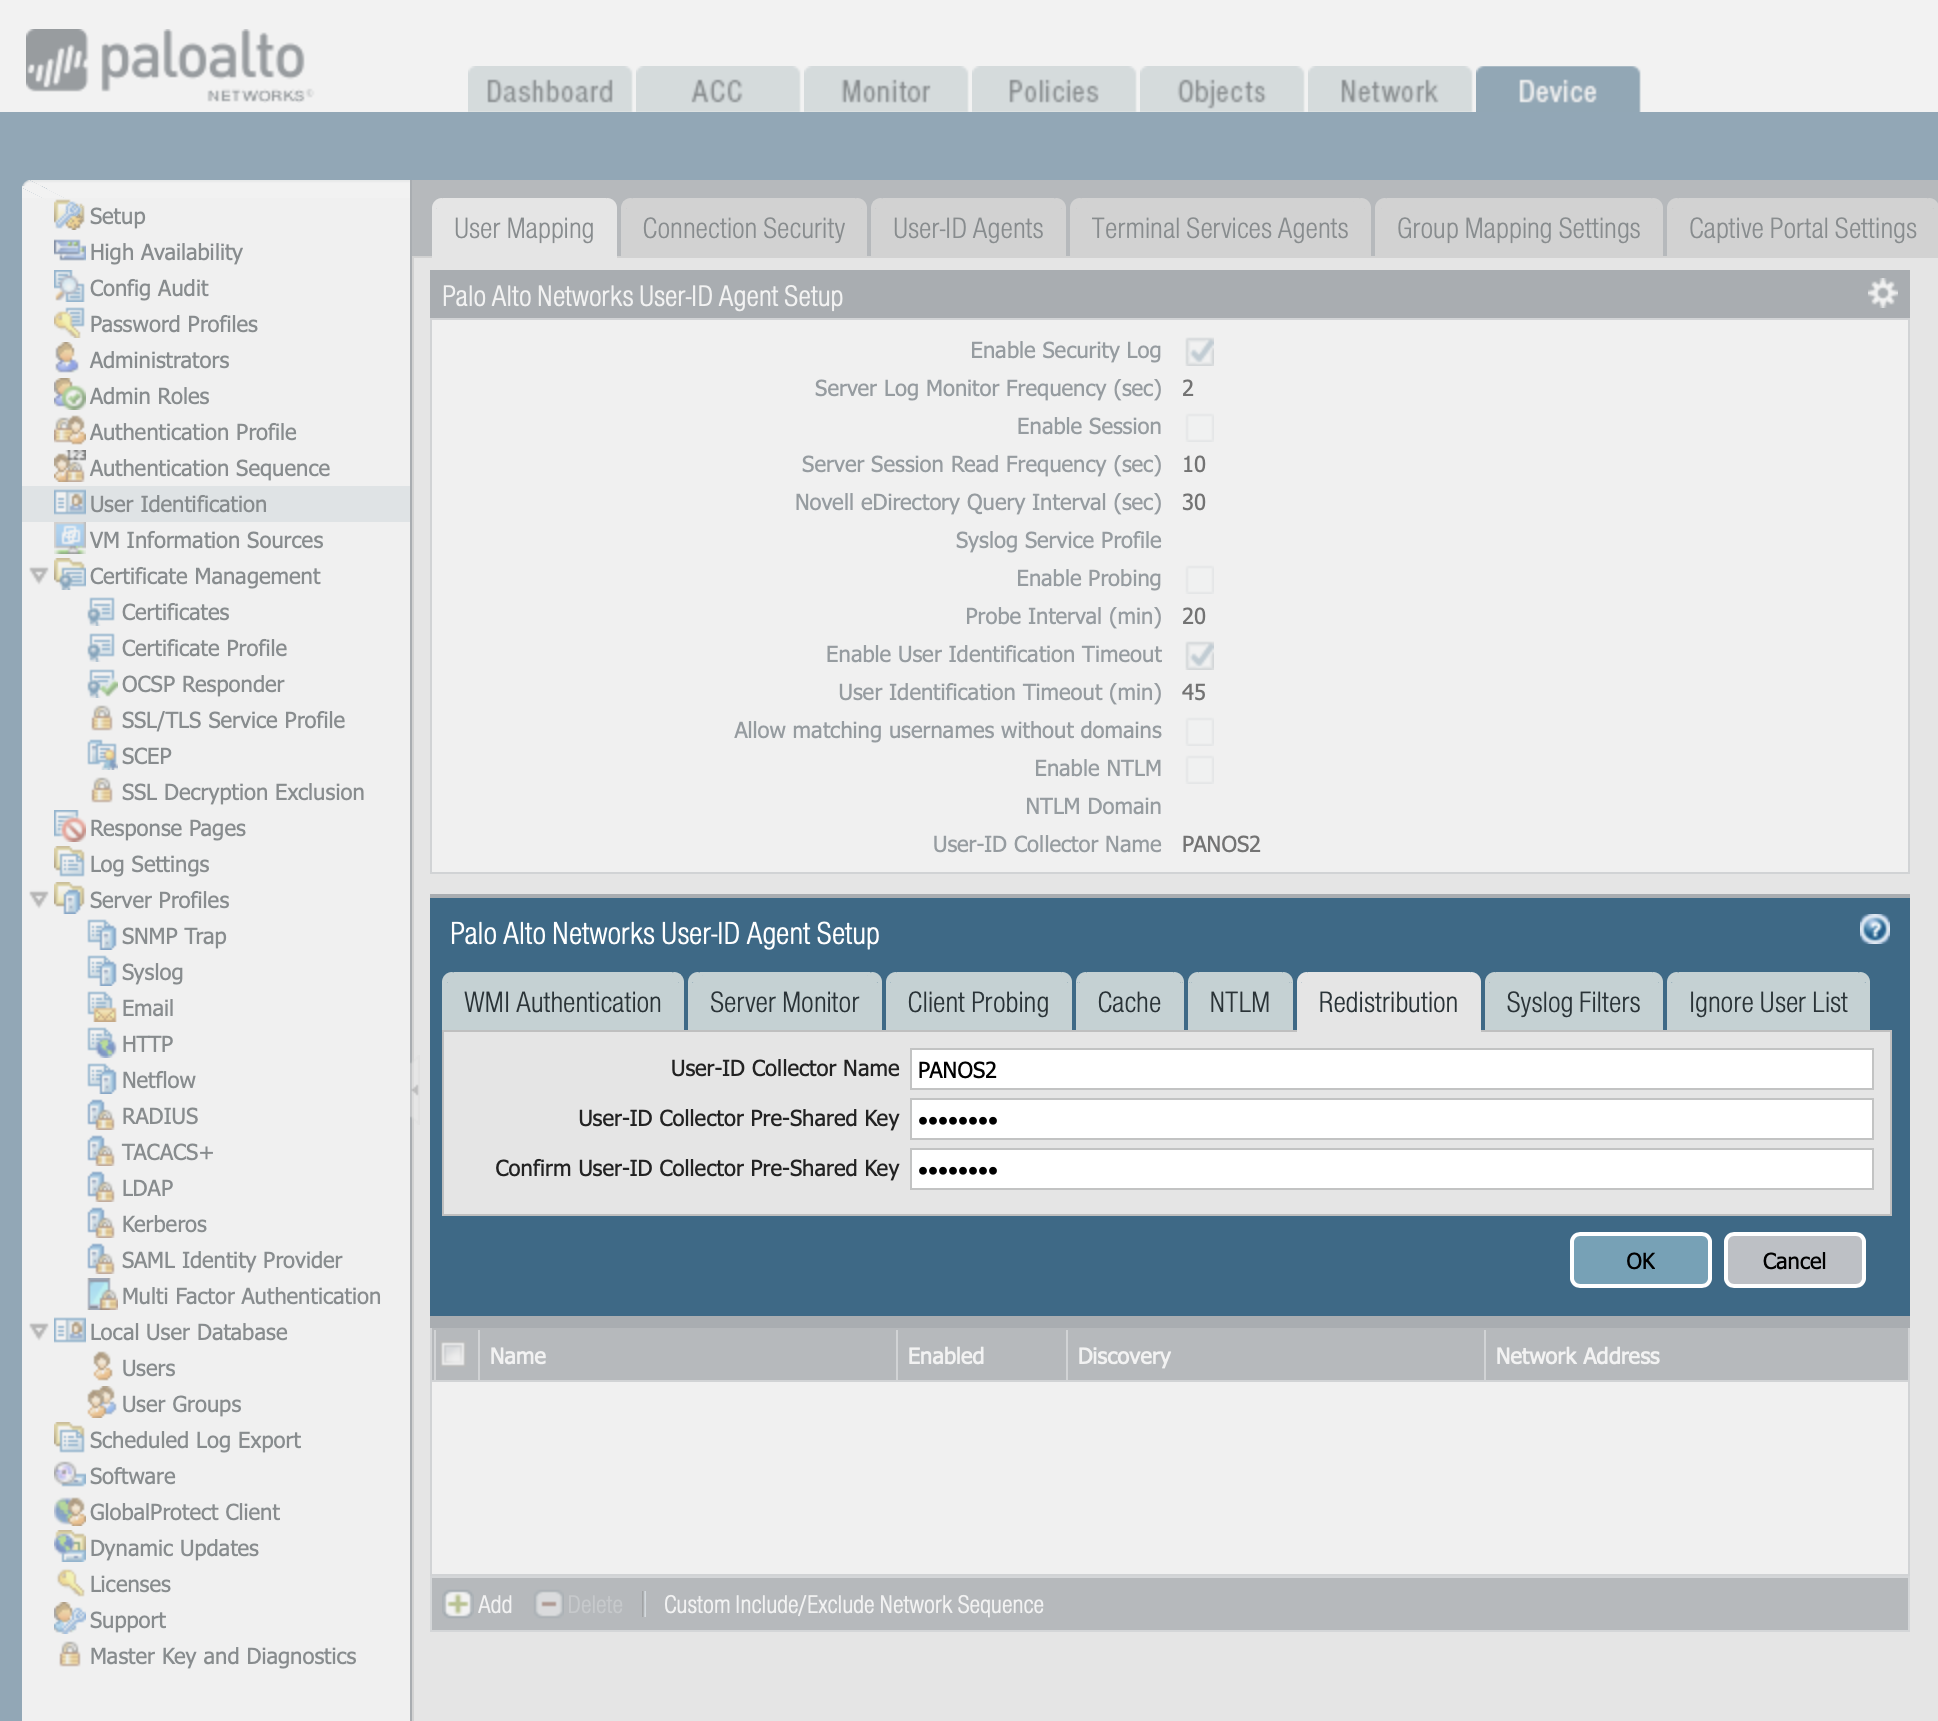
Device -> User Identification -> User mapping.
Edit the Palo Alto Networks User-ID Agent Setup -> Redistribution.
Enter the information to identify this firewall or virtual system as a User-ID agent, indicating a unique name and defining a Pre-Shared Key (to be used later in Panorama configuration).
Note
In Firewalls with multiple virtual systems, you must configure the User-ID settings for each virtual system.
Configure a Dedicated Log Collector to redistribute User-ID information (Panorama).
A Dedicated Log Collector can receive user mapping information from different User-ID agents. The infrastructure we pretend to create, has connections that enable you to redistribute User-ID information, from firewalls to Log Collectors to Panorama. Panorama can then redistribute the information to the firewalls that are configured to receive information from Panorama.
Add Panorama or firewalls as User-ID redistribution points to a Log Collector:
We configure a Dedicated Log Collector to connect and communicate with a User-ID Agent.
Panorama -> Managed Collectors -> Add or select a Log Collector to eddit it.
In the General tab, fill the Collector S/N gap with the device serial number.
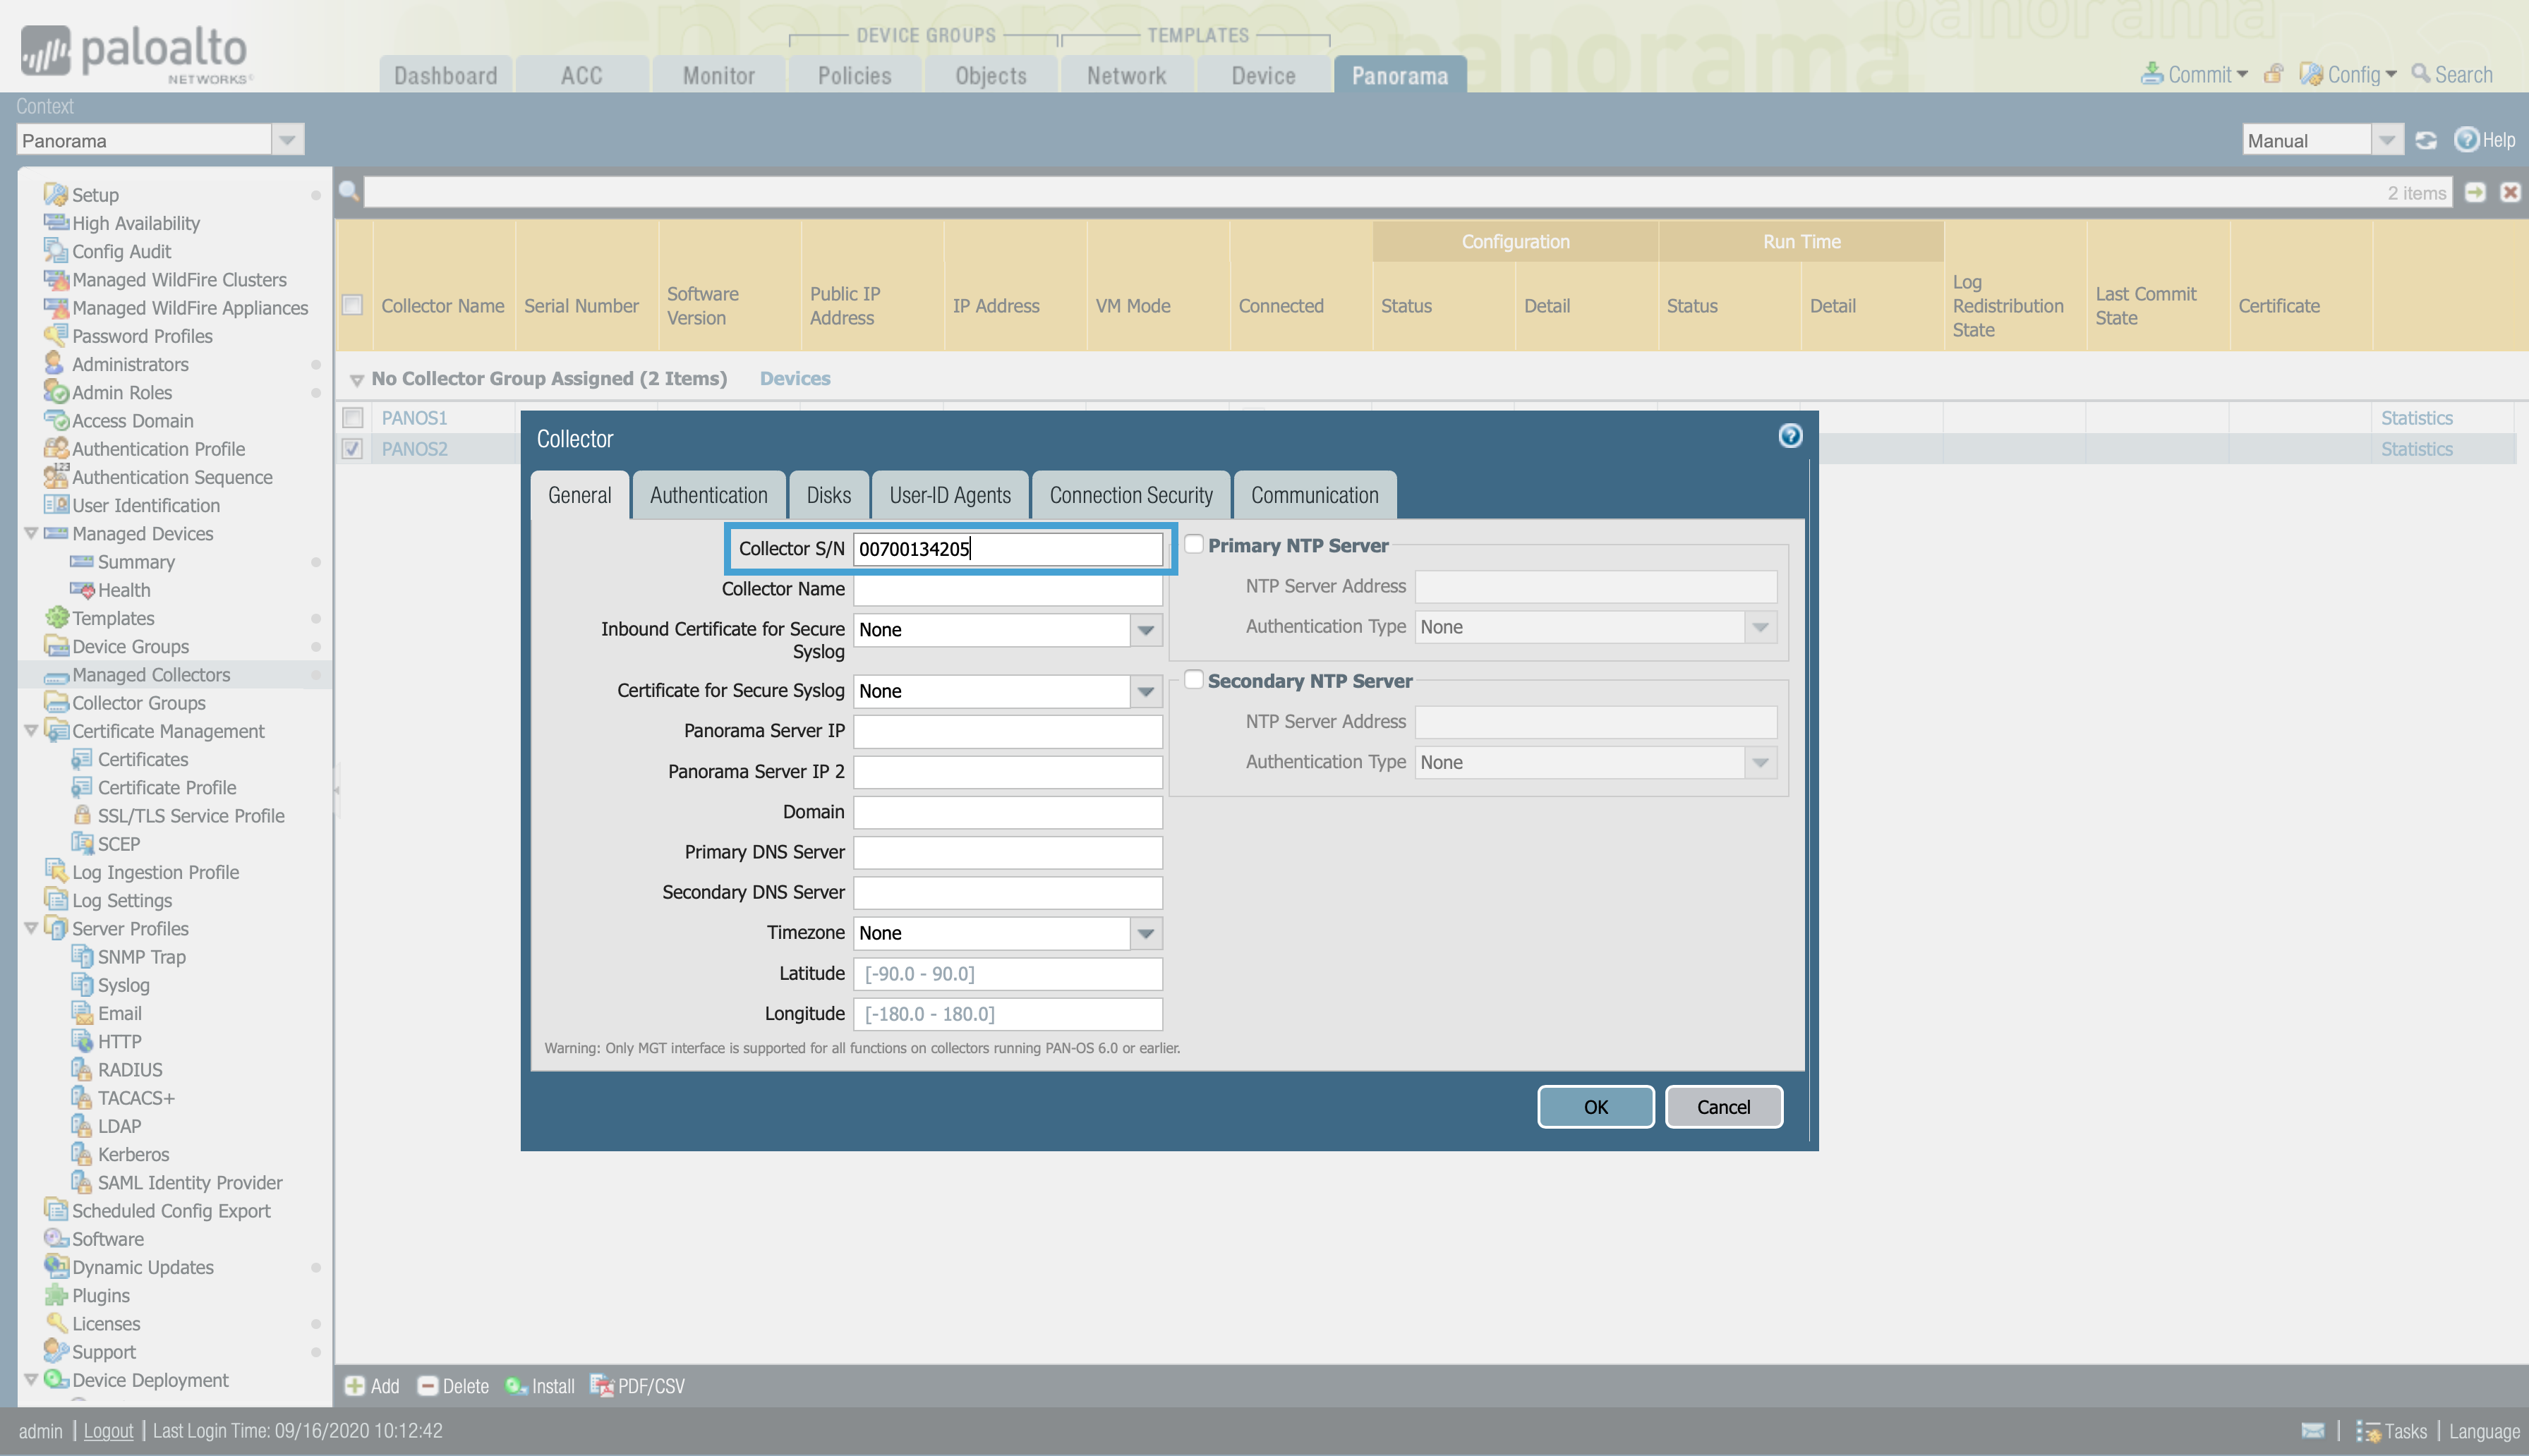
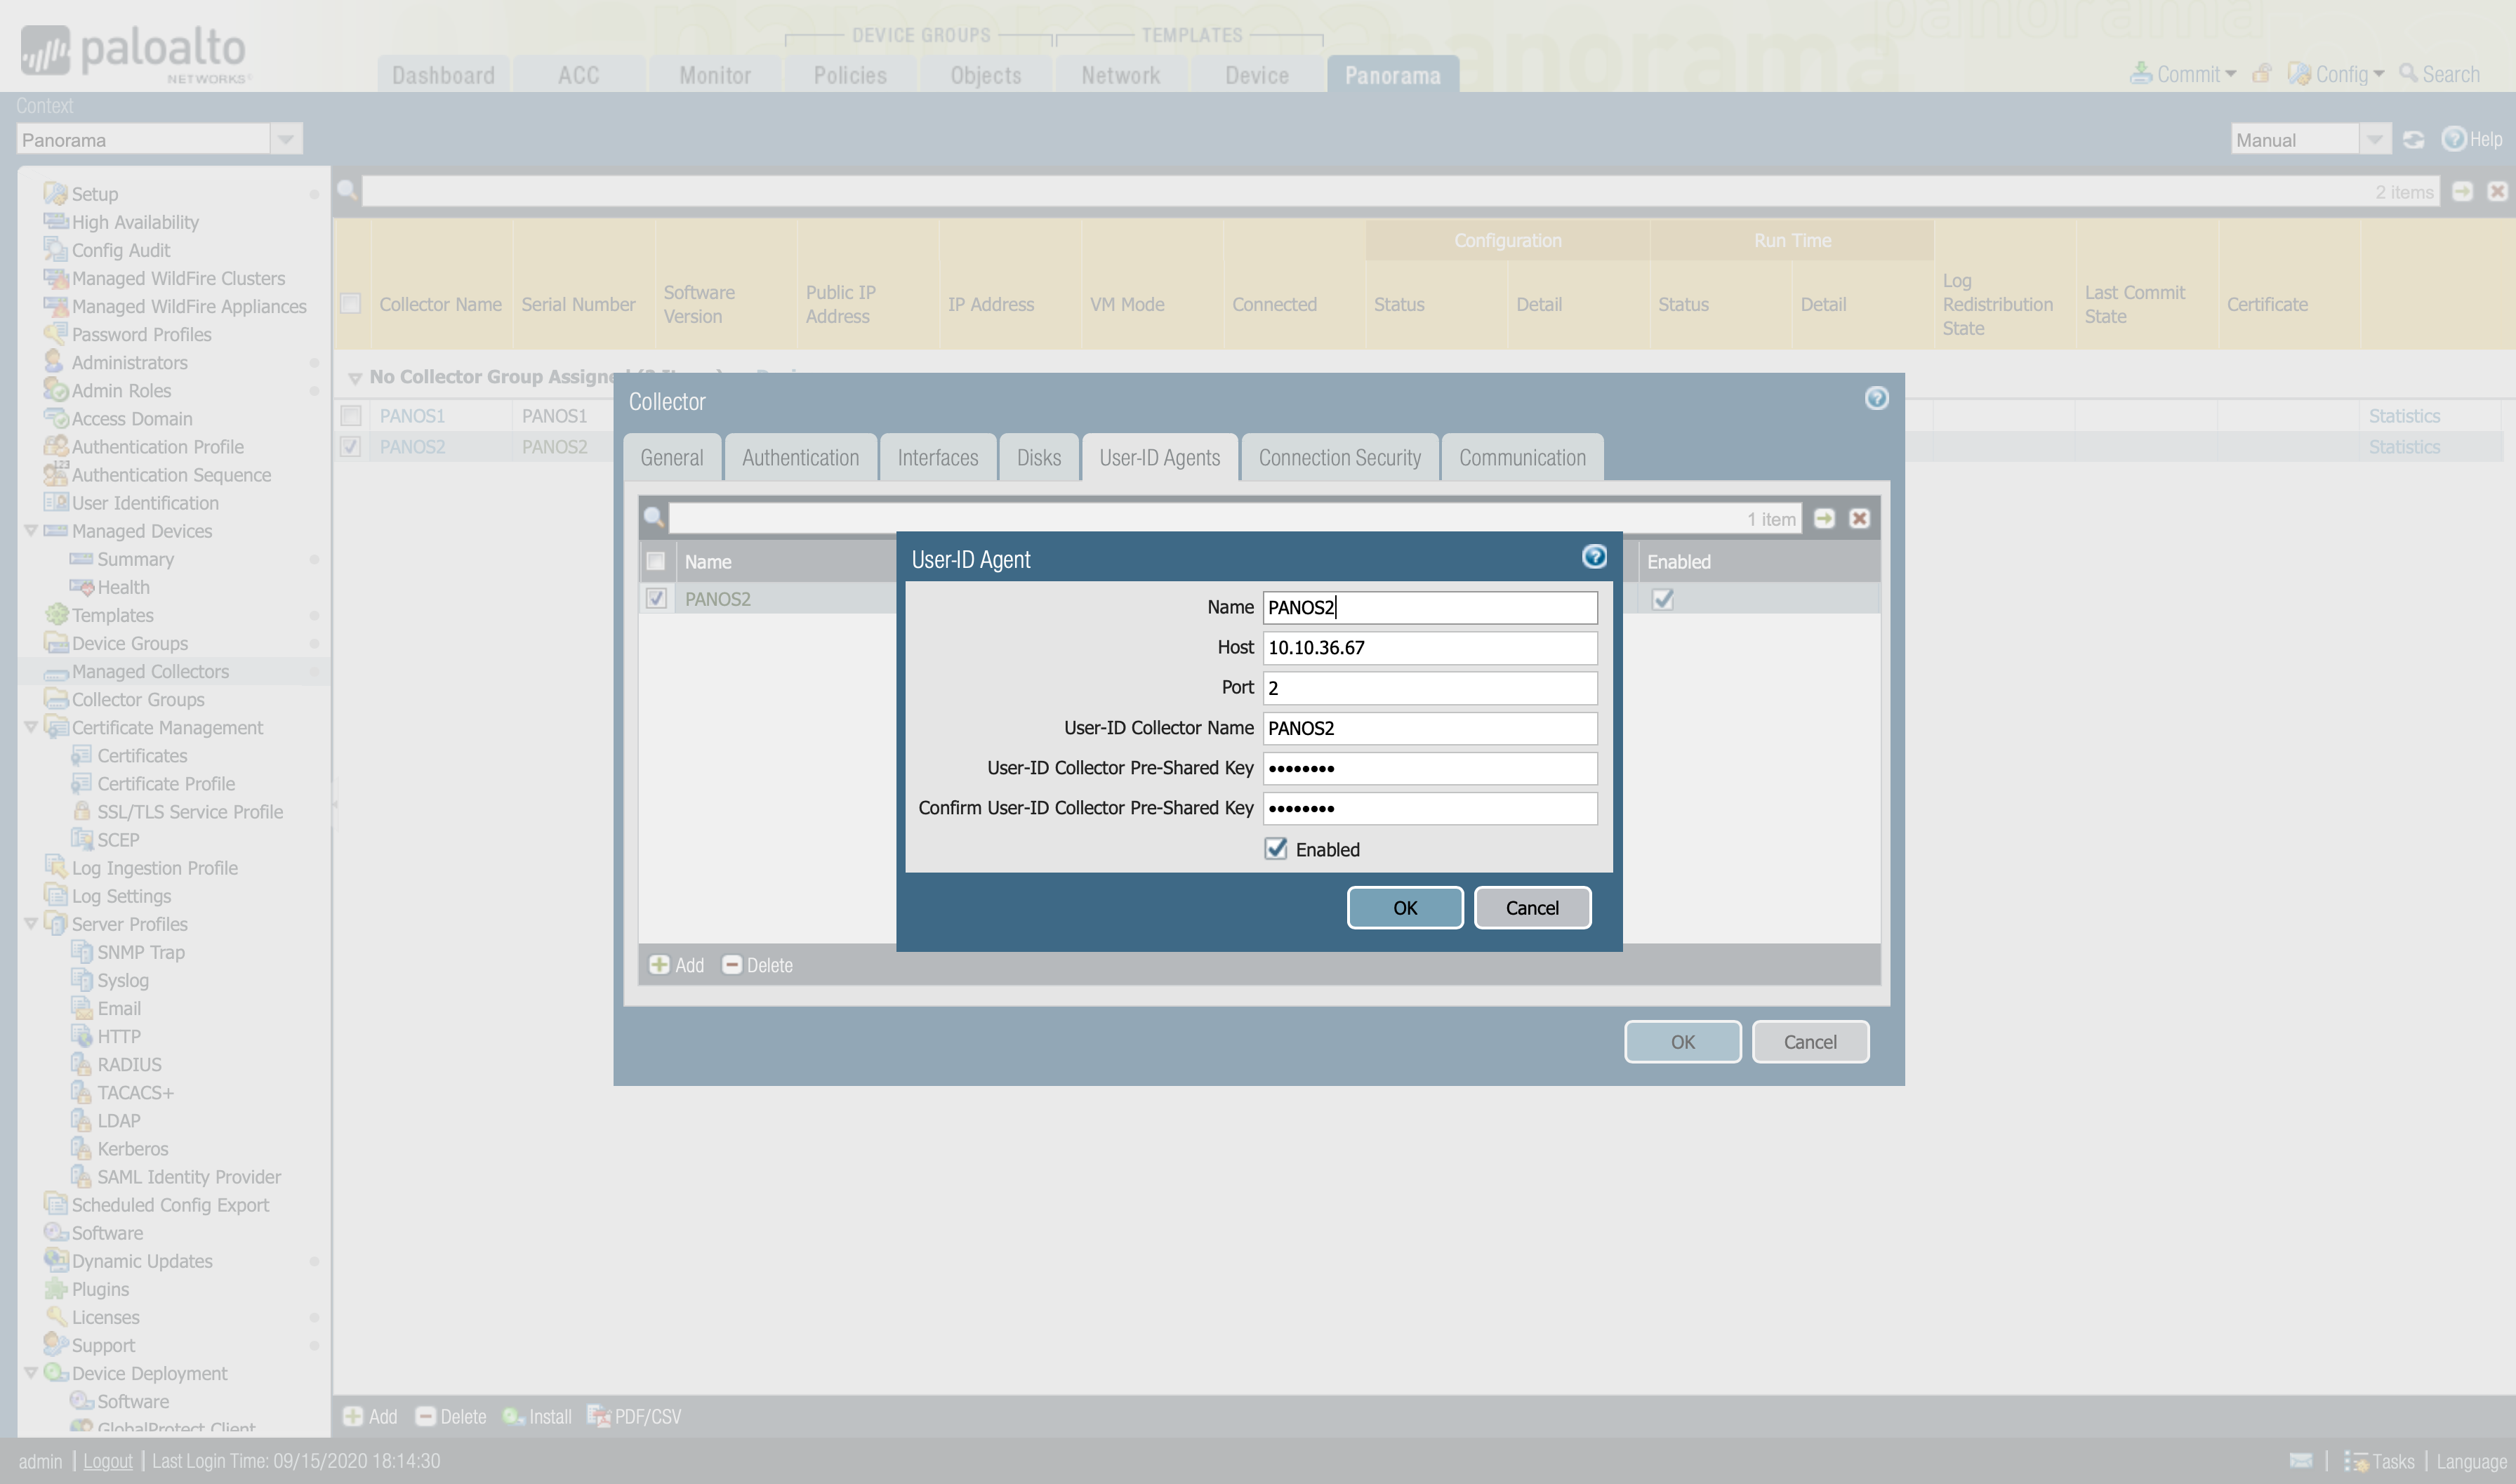
- Select User-ID Agents and Add a redistributtion point.
Enter a name to identify the redistribution point.
Enter the Host name or IP address of the interface on the firewall or Panorama that will respond to User-ID information queries from the Log Collector.
Enter the Port number on which Panorama or the firewall will listen for User-ID information queries.
If the redistribution point is a firewall or virtual system, enter the Collector Name and Collector Pre-Shared Key.
Click Ok to save the changes.
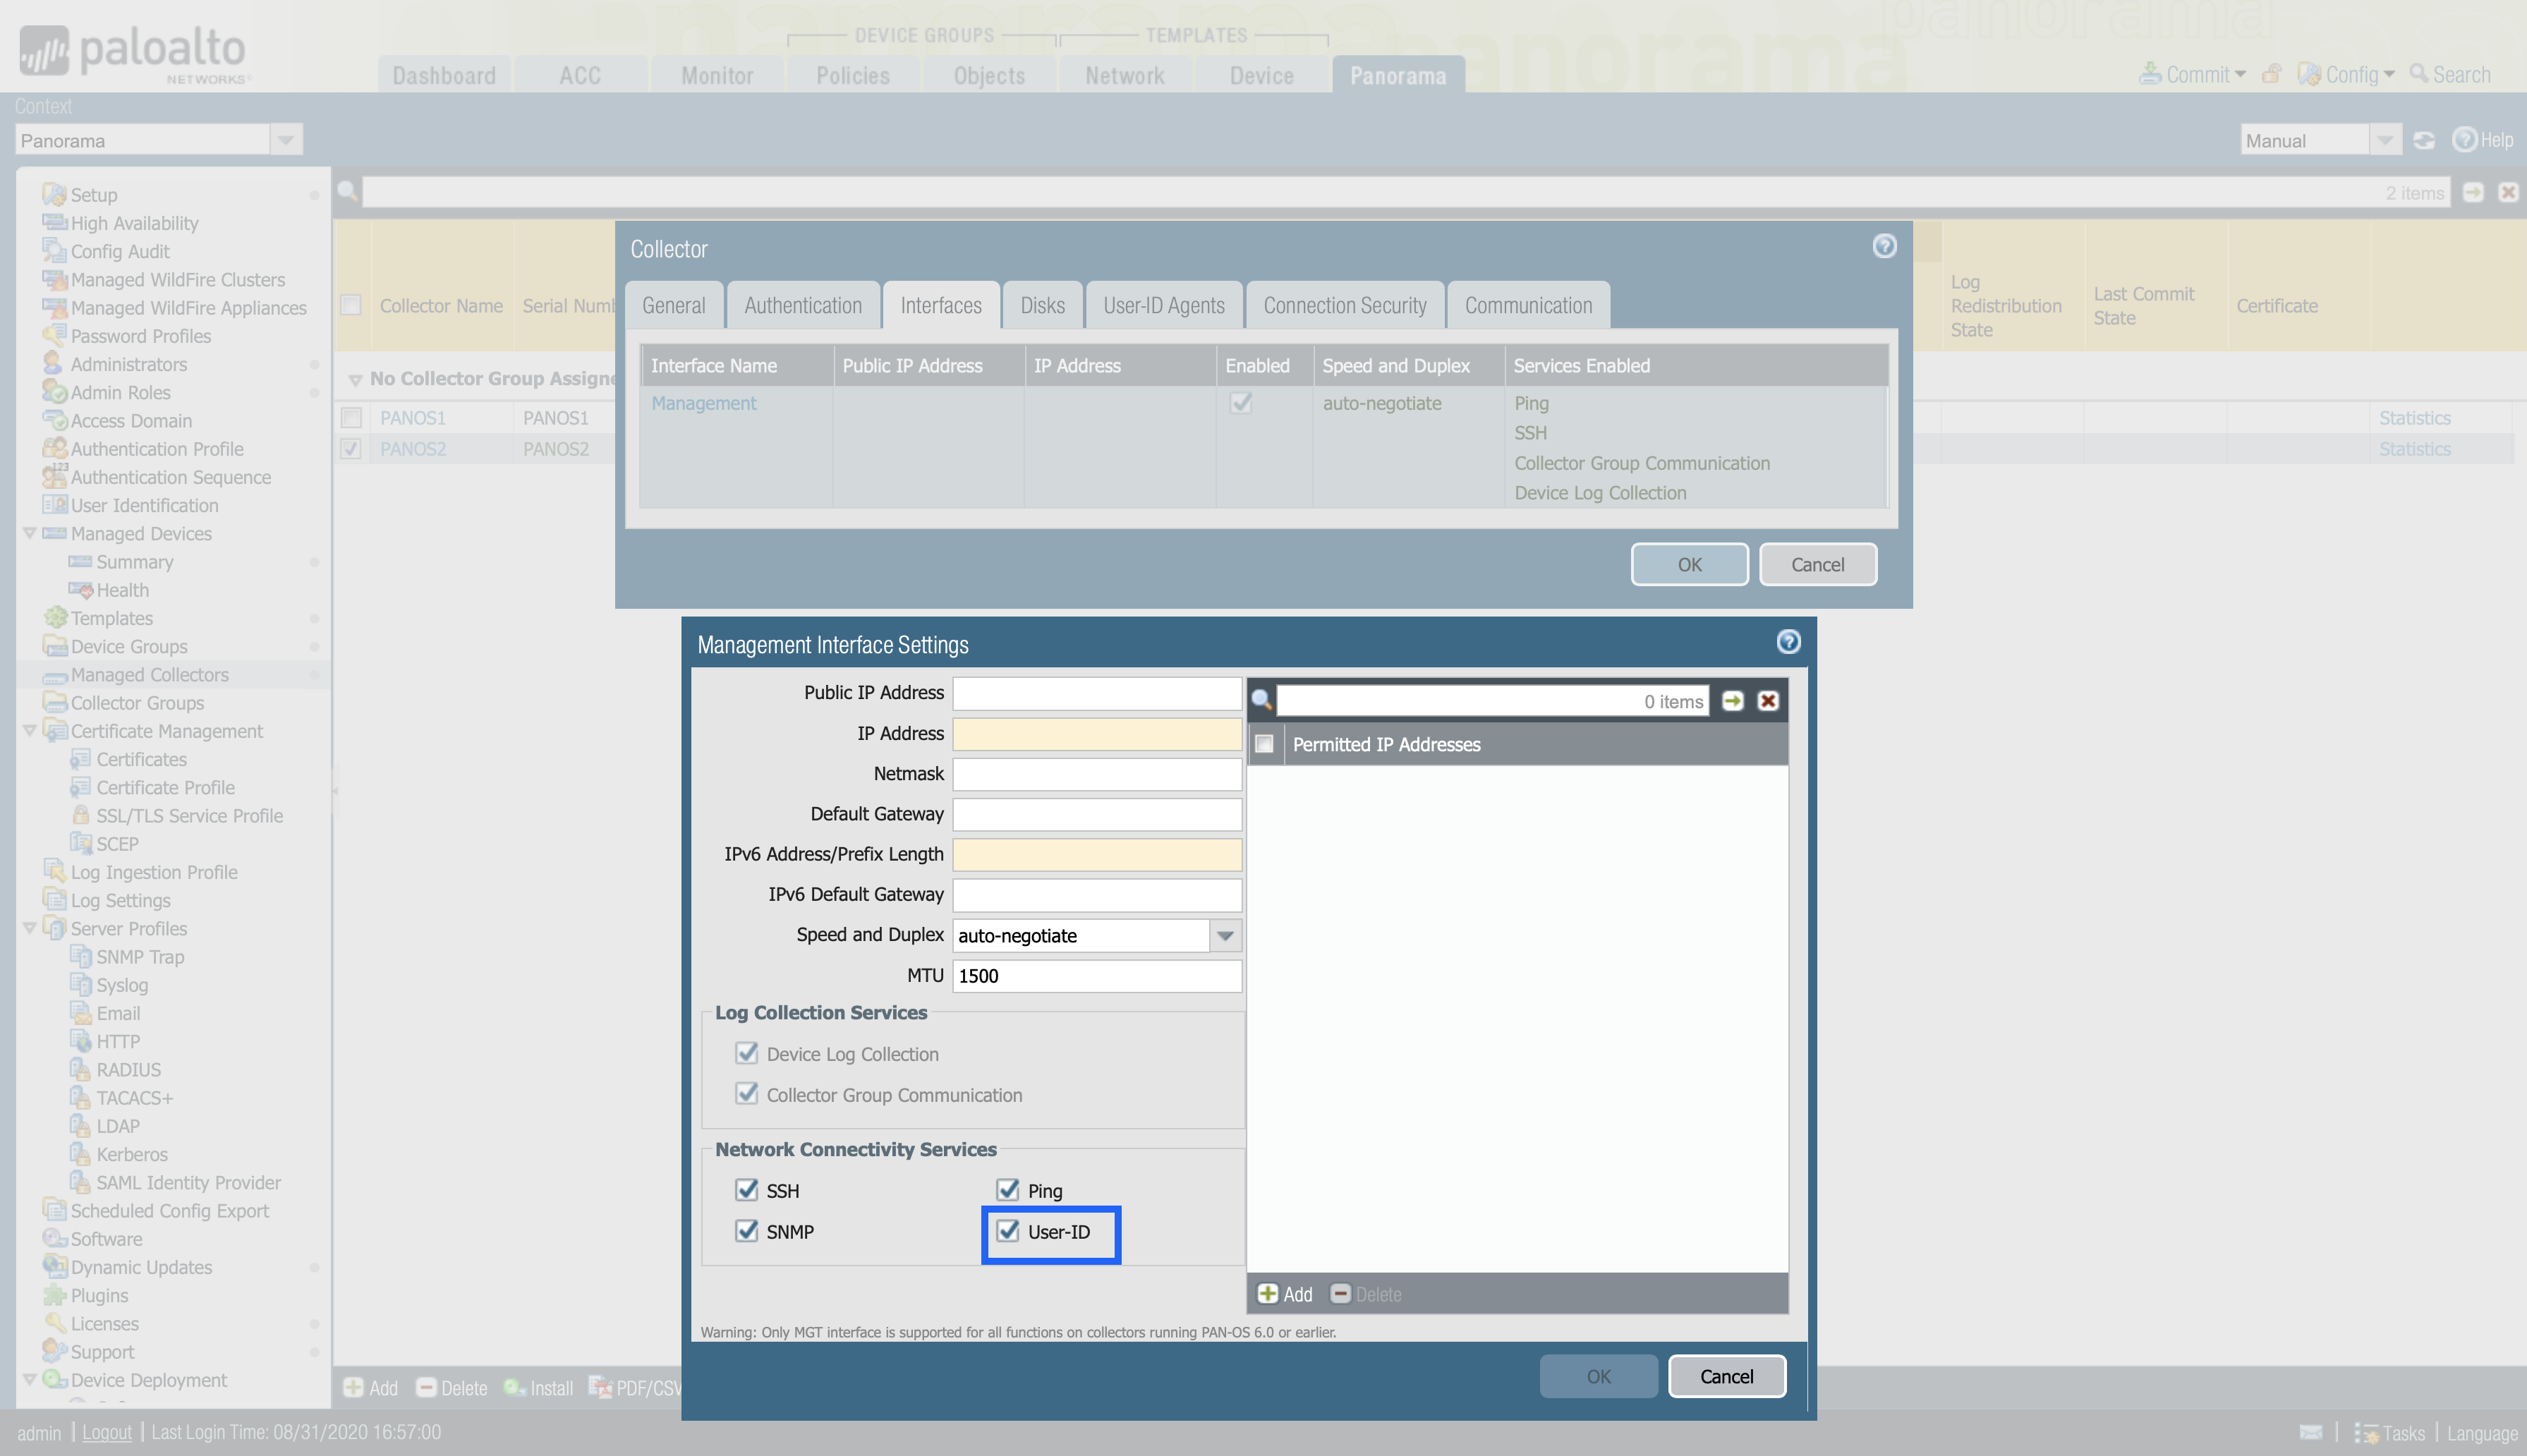
Once we have the User-ID Agent configured, we must select which interface will be in charge of distributing or receiving the information from other devices. Enable the management (MGT) interface of the Log Collector to respond to User-ID information queries from Panorama or firewalls:
Now we have to choose which interface we will assign to respond to the User-ID information queries.
Select Panorama > Managed Collectors and select the Log Collector to edit it.
Select Interfaces and Management.
Select User-ID in the Network Connectivity Services section and click OK.
Click Ok to save changes.
Commit and Push to activate your changes on Panorama.
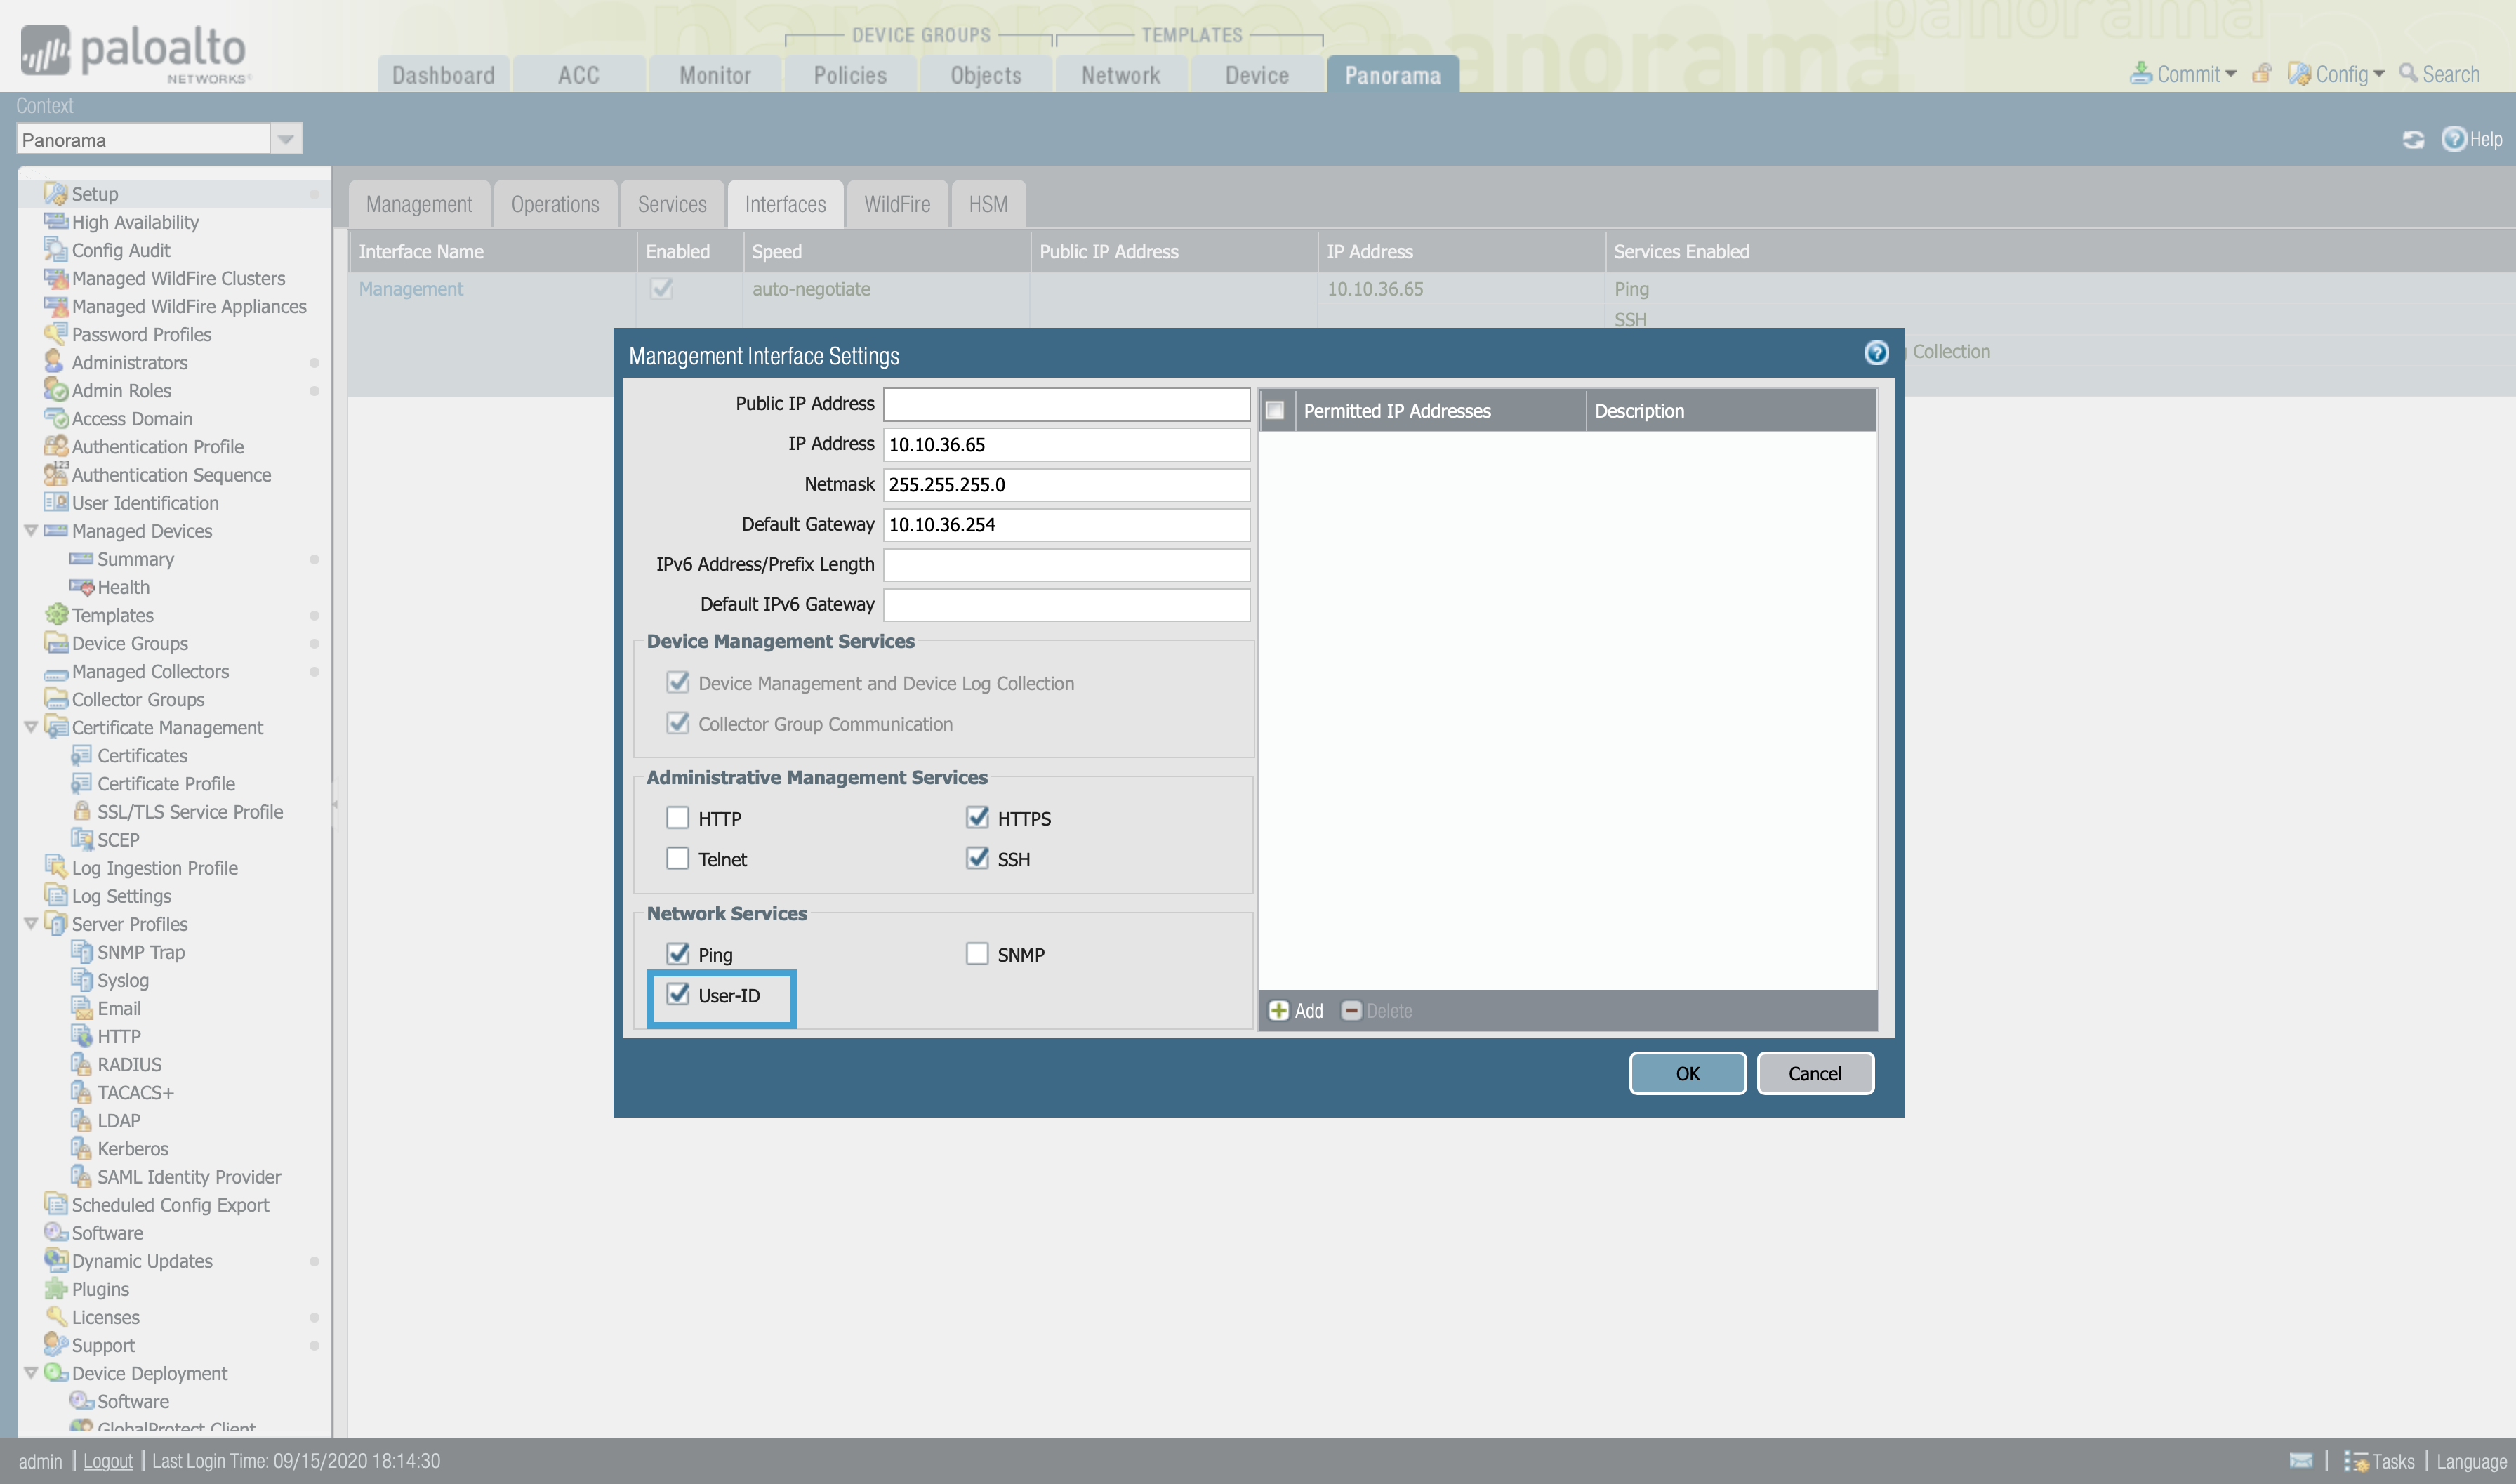
We can also configure the Management interface settings, to configure it to respond the User-ID information queries.
Device > Setup > Interfaces > Management, configure the Management Interface Settings to enable th User-ID in the Network Services.
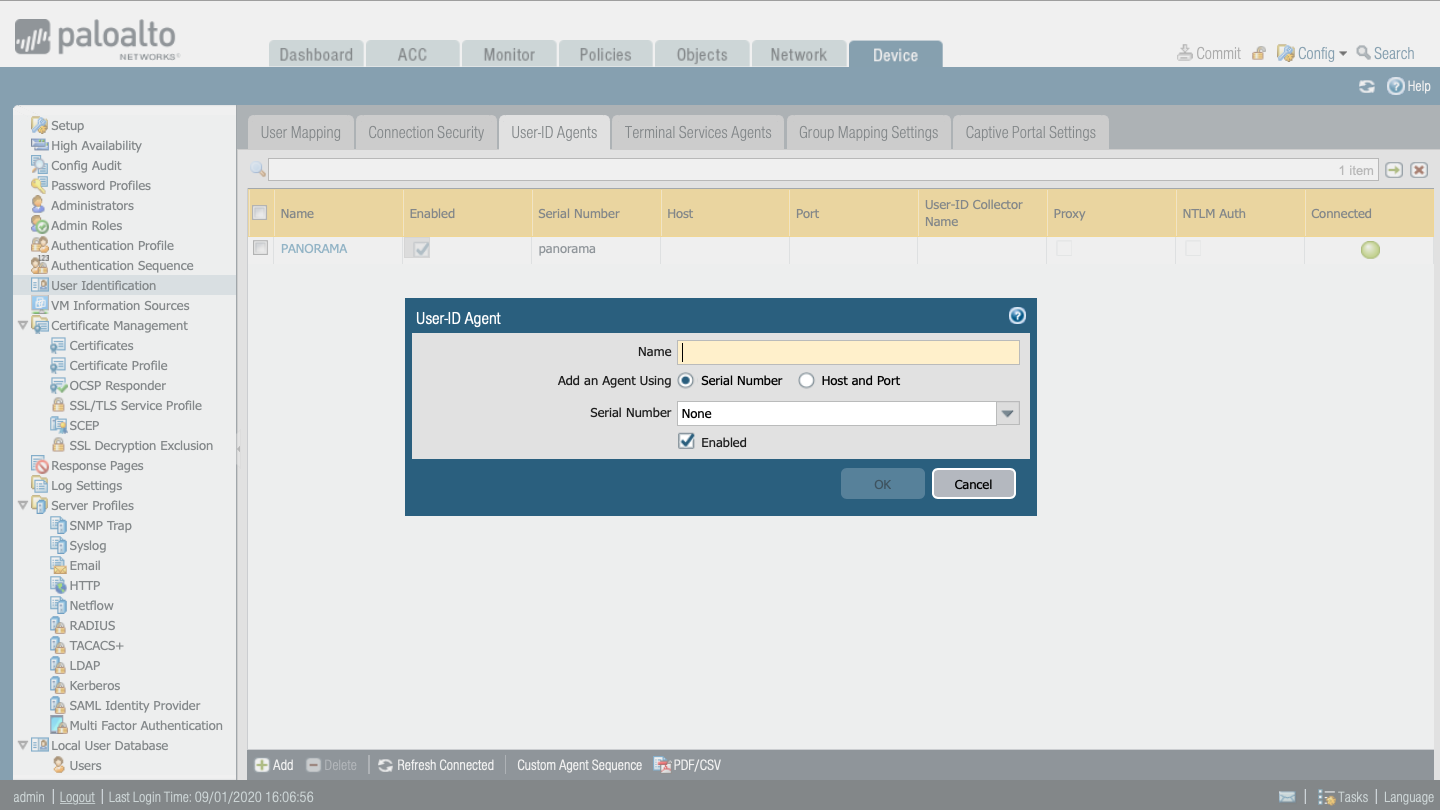
Configure firewalls to receive User-ID information from Panorama or Log Collectors.
We will configure the User-ID Agent from which we will receive information.
Device -> User Identification -> Add
> Panorama -> Add an Agent Using the Serial Number.
> Log Collector -> Add an Agent Using the Host and Port.
8.1.1.4. Panorama Device Group configuration
If we do not have the User-ID Redistribution option configured, we can also send information to the firewalls that we have connected to Panorama by using device groups.
Using device groups, you can configure policy rules and the objects they reference. Panorama treats these groups as single units when applying policies. Firewalls can only belong to one device group but, because virtual systems are distinct entities in Panorama, you can assign virtual systems within a firewall to different device groups.
(Check the Palo Alto Network official documentation: Device Groups)
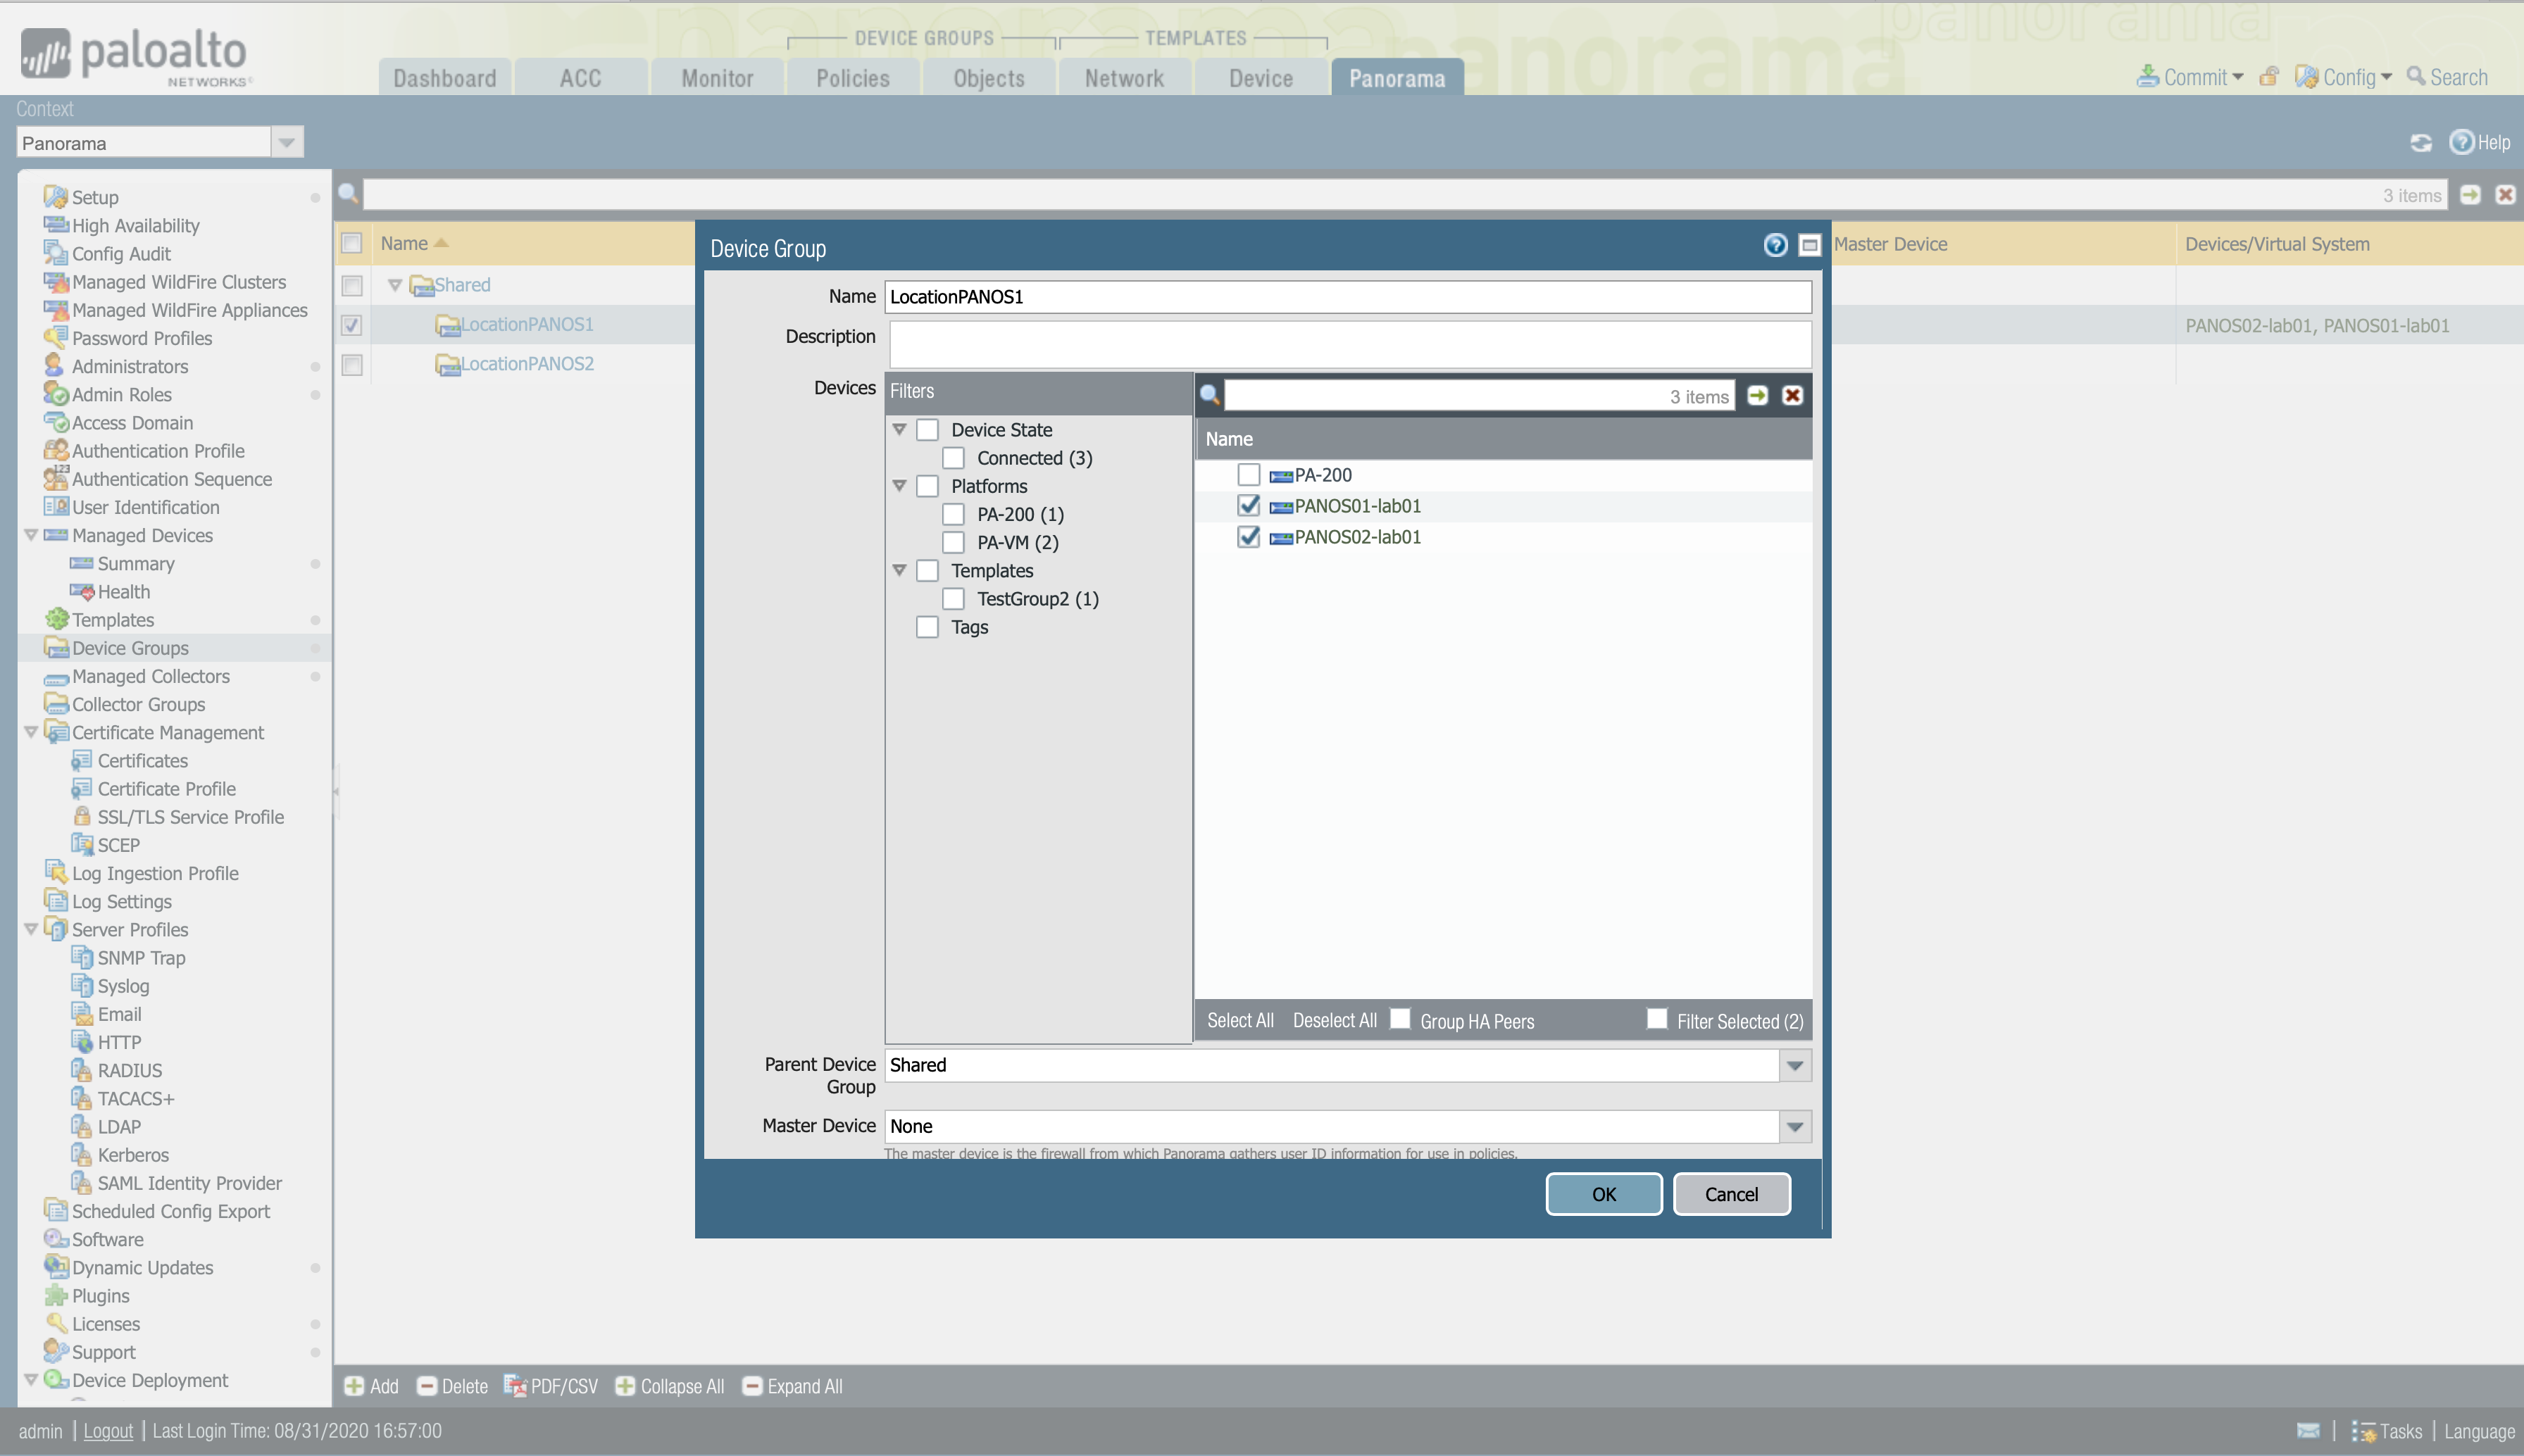
To configure a Device Group in Panorama.
> Panorama -> Device Groups -> Add in the shared folder
> Set a name and a description for the group and select the firewalls that you want to add to that group.
> Commit and Push to activate your changes on Panorama.
Now that we have the Device Group configured, we could configure our plugin to send the information to all the members of a Device Group.
8.1.1.5. Troubleshooting:
Checking the tag has been added correctly (via Palo Alto FW / Panorama CLI)
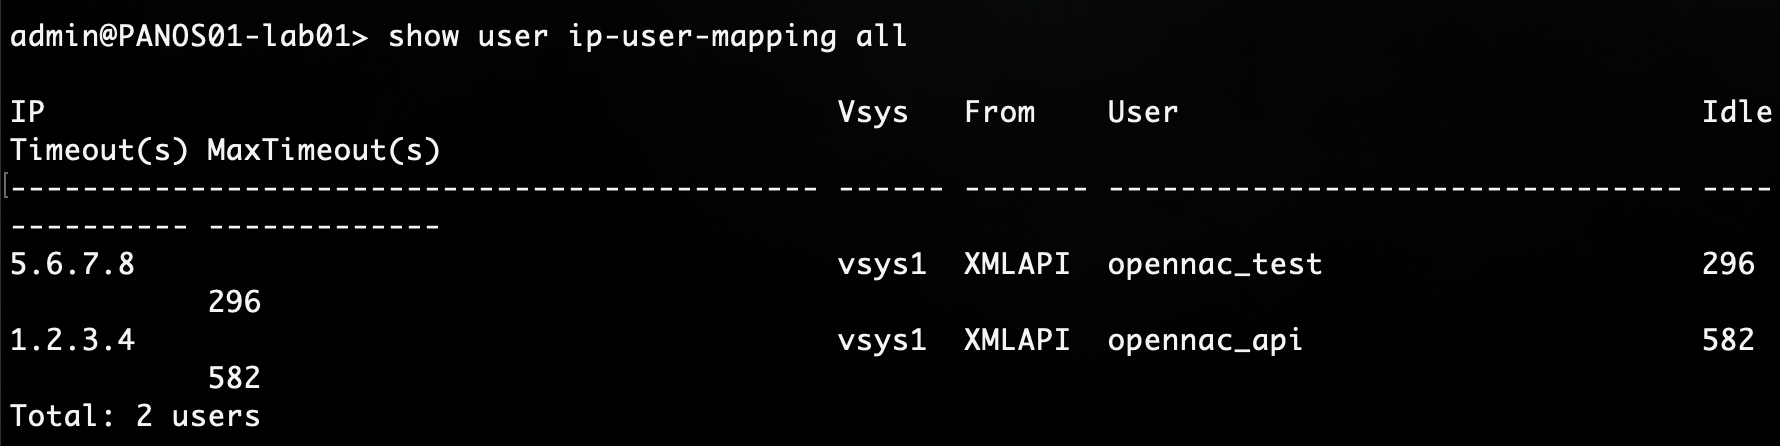
Show all user/group informaton or filter for a specific IP adress
> show user ip-user-mapping all
> show user ip-user-mapping ip <ip>
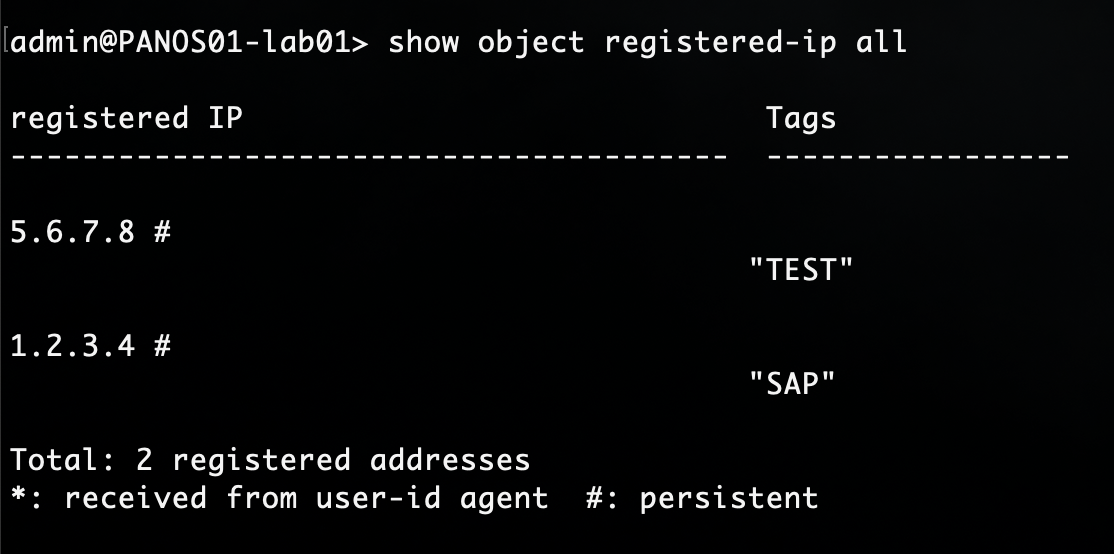
Display all registered addresses or filtering by a specific IP or Tag
> show object registered-ip all
> show object registered-ip tag <tag-name>
> show object registered-ip ip <ip>
Note
If the object has been registered through Panorama with Redistribute User-ID information, the from field will be UIA (The IP-user mapping retrieved from the User-ID Agent) instead of XMLAPI.
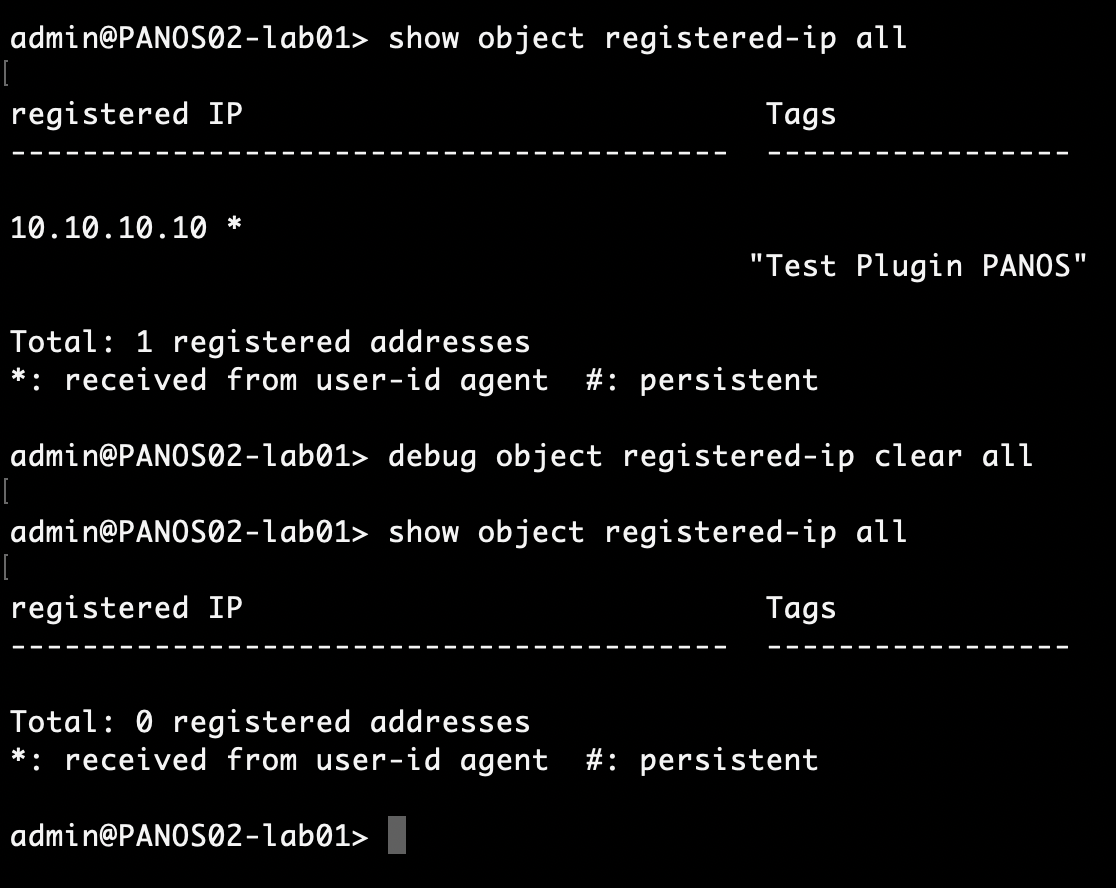
In the CLI, use the following command to clear all registered IP addresses and the objects associated with them
> debug object registered-ip clear all
We can also check that the IP address is correctly associated to the user and tag via web interface and unregister the tags associated to the IP.
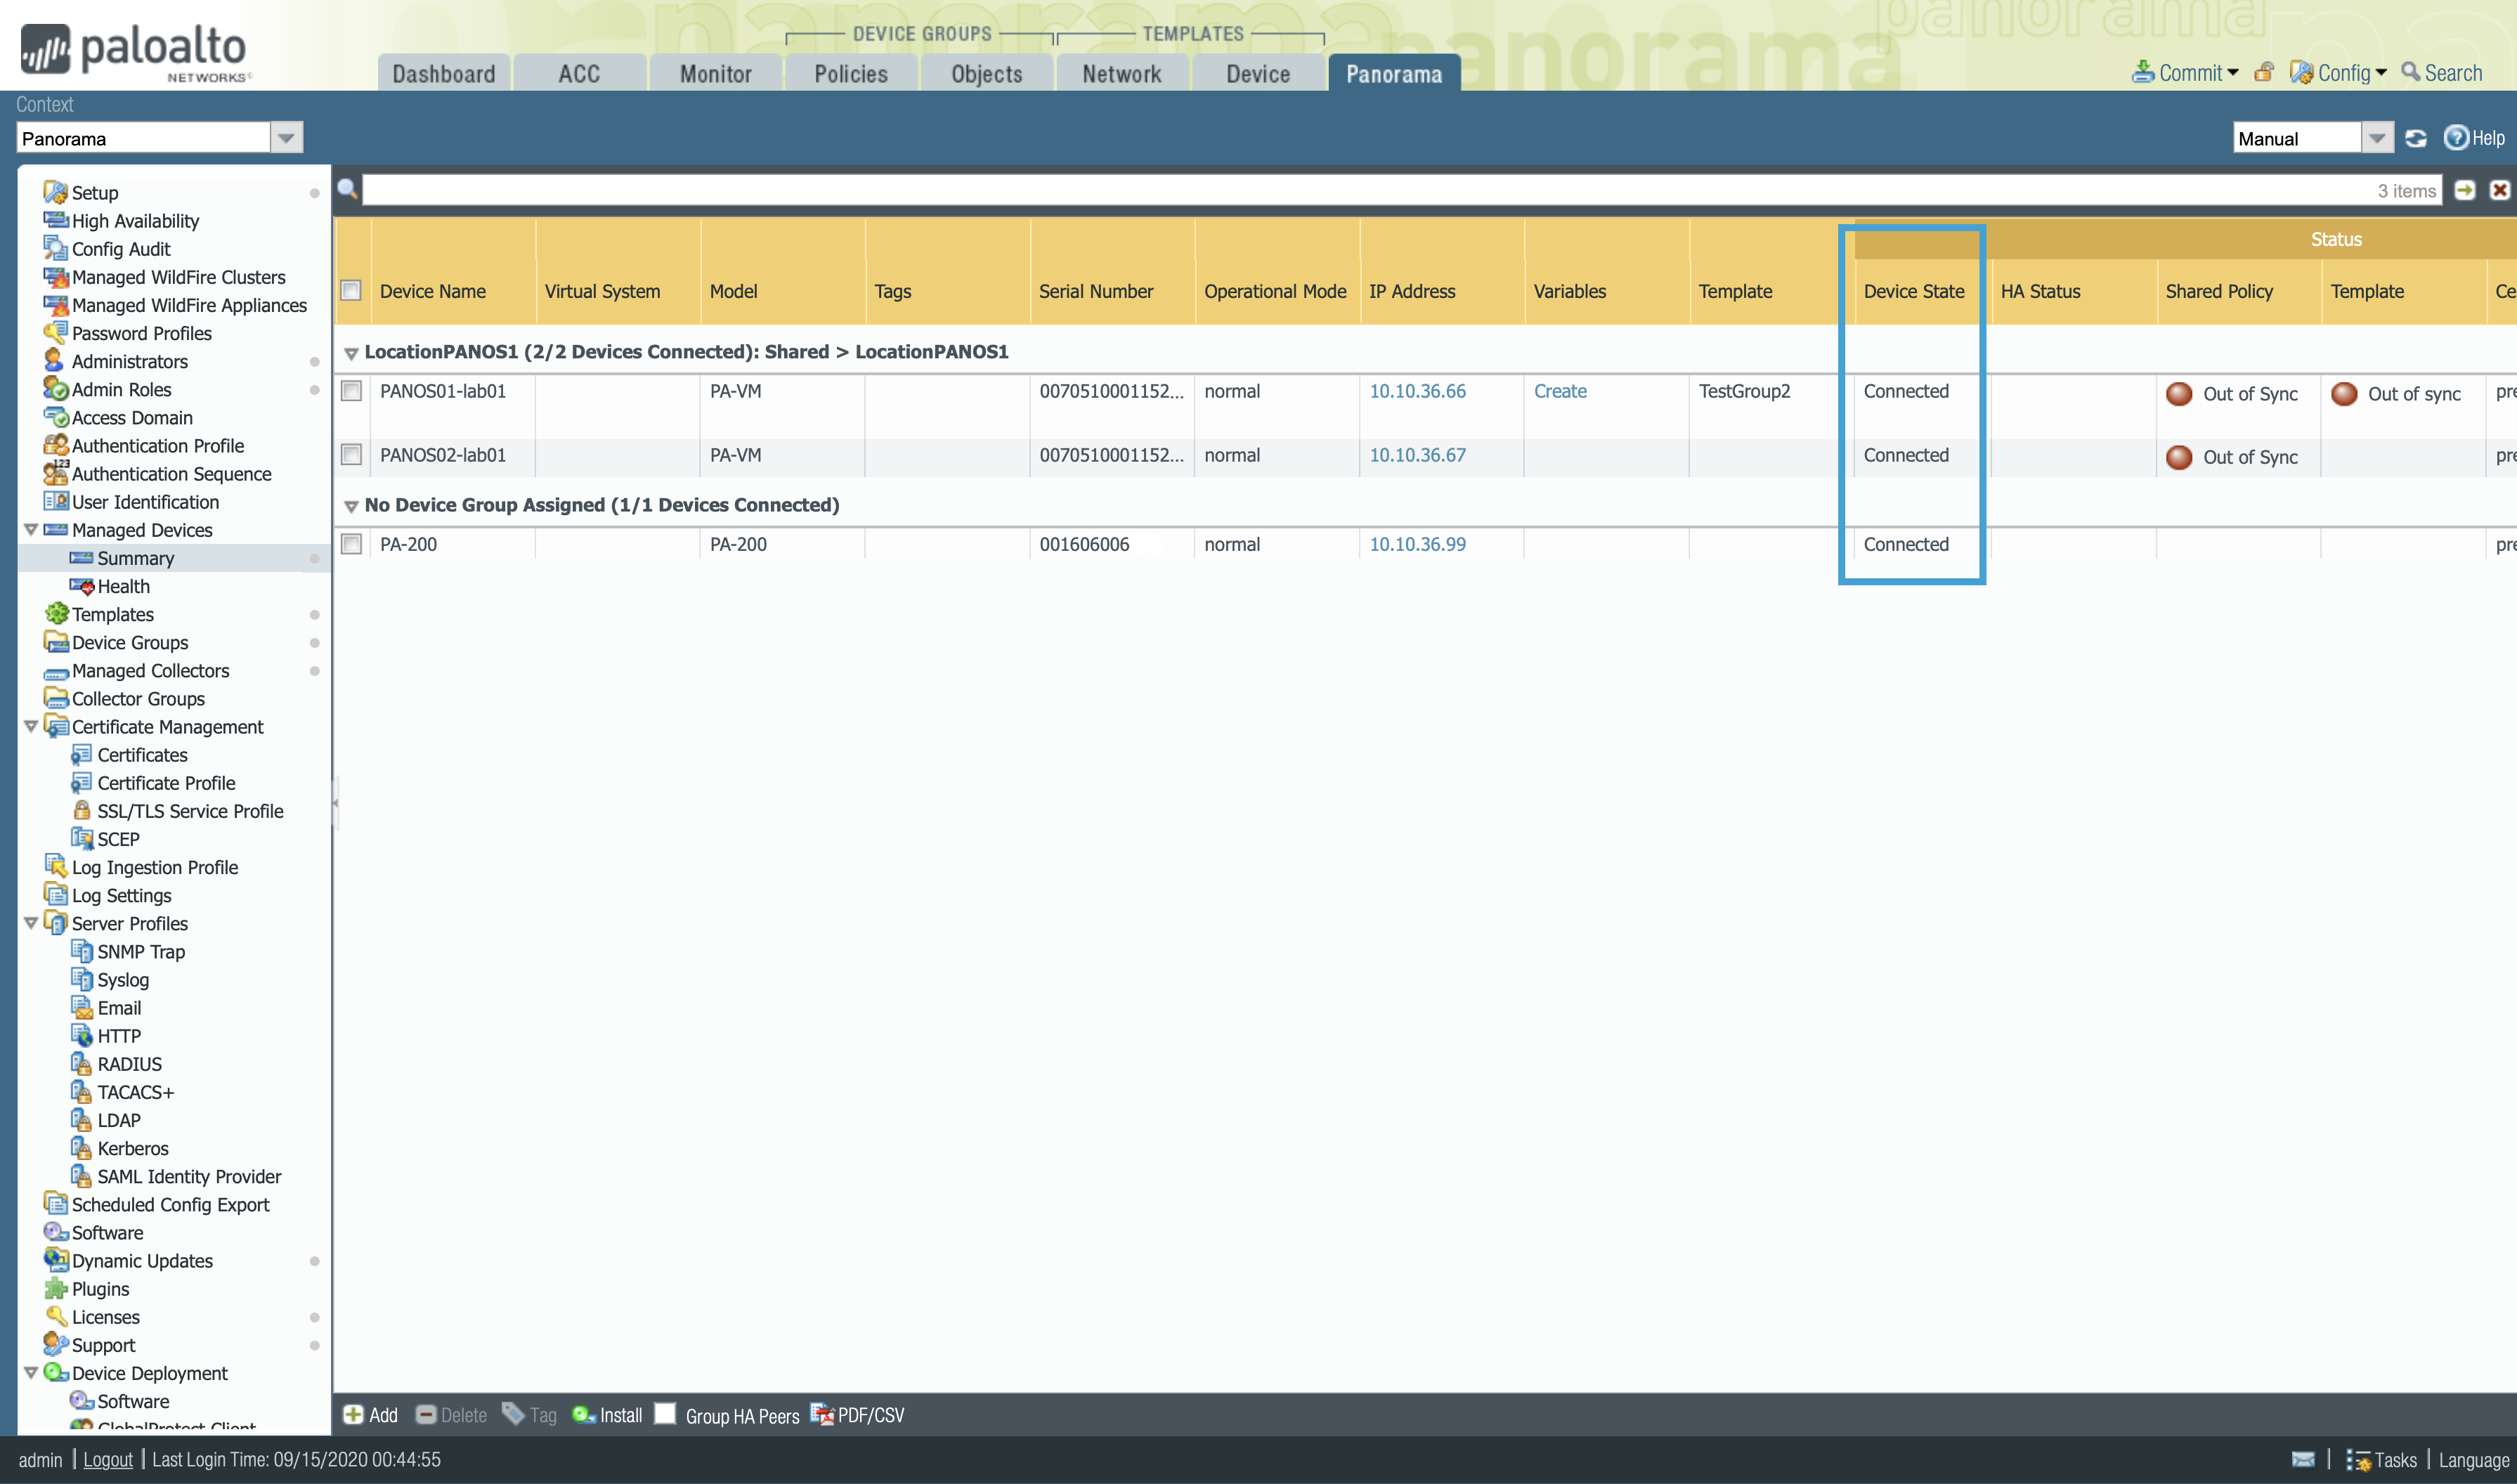
Checking the devices that are connected to Panorama
Panorama web interface -> Panorama > Managed Devices > Summary
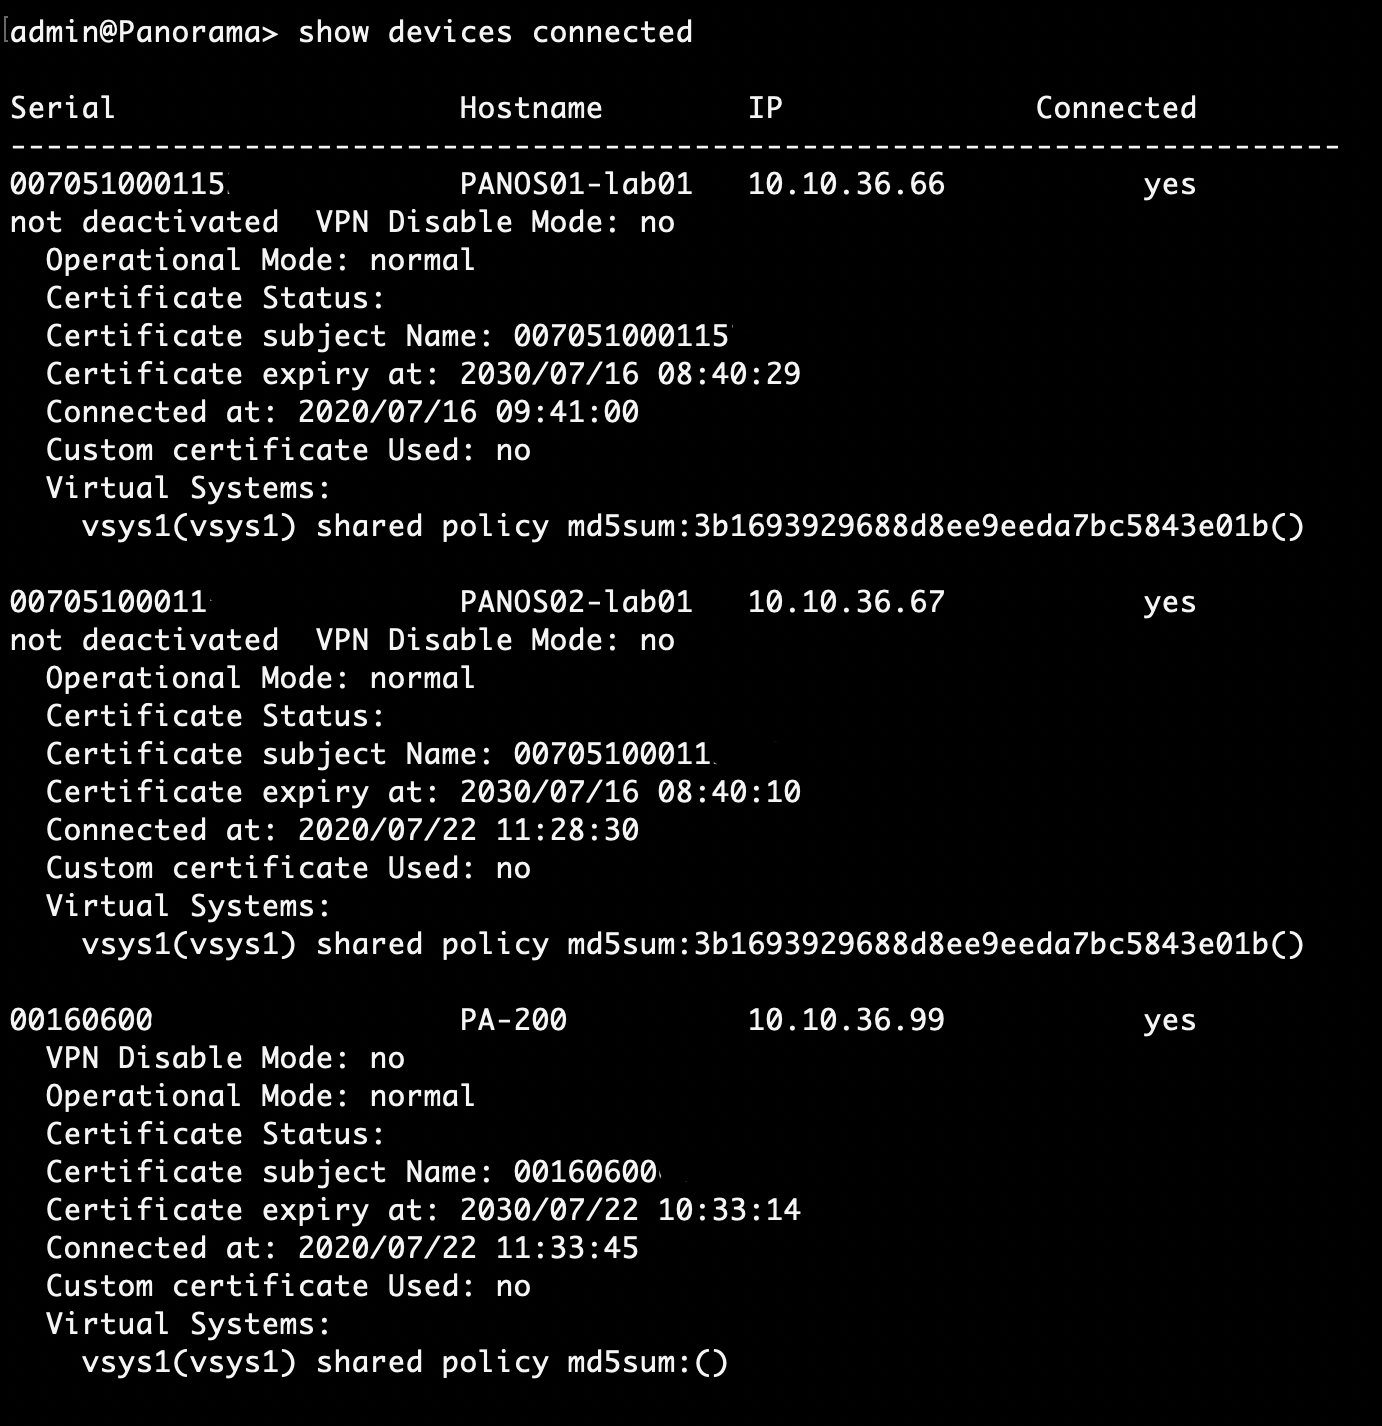
CLI
> show devices connected
Most common message errors, when using paloAlto plugin from OpenNAC
If you enter an incorrect IP or a Palo Alto firewall IP when you’re expected to introduce Panorama IP:
ERR: [] paloAlto::getKey Exception getting Palo Alto Key [‘Error in cURL request: couldn't connect to host’]
Invalid device group name:
ERR: [] paloAlto::panoramaCmd Panorama failed getting information from Device Group -> [ LocationPANOS is invalid name.Current target-vsys is none]
Valid device group name, but there are no devices connected for this device group:
ERR: [] paloAlto::panoramaCmd Device Group LocationPANOS does not contain any device information
Entering a Palo Alto firewall IP with the device group flag activated and a device group name:
ERR: [] paloAlto::panoramaCmd Panorama failed getting information from Device Group -> [devicegroups is unexpected]
User administrator with no permissions to access to the API (Check: XML API user access)
ERR: [] paloAlto::paloAltoCmd Palo Alto failure applying command [UserName/IP/tag/response -> username/ip/array (#012 0 => ‘PALOALTO’,#012)/’<response status = 'error' code = '403'><result><msg>Type [user-id] not authorized for user role.</msg></result></response>’]
When configuring the custom parameters in a policy, if we enable the device group flag but we don’t introduce a device group name:
ERR: [3736] paloAlto::checkProperties The Device Group for panorama is not defined.
ERR: [3736] paloAlto::panoramaCmd Panorama failed getting information from Device Group -> [ “” is invalid name.Current target-vsys is none]
8.1.2. FortiGate Integration
To carry out the integration with our fortiGateAccounting plugin, we must perform the following configuration in the FortiGate firewall.
This plugin allows you to send session information to a fortiGate firewall. This information is sent through a RADIUS protocol and its port and PSK must be exchanged between peers to accept messages. As soon as a user gains access to the network through OpenNAC network access policies, their information is registered in the FortiGate Firewalls to manage the permissions and actions of that user.
8.1.2.1. RSSO RADIUS single sign-on agent
With RSSO, a FortiGate can authenticate users who have authenticated on a remote RADIUS server. Based on which user group the user belongs to, a specific security policy will be applied.
The FortiGate does not interact with the remote RADIUS server, it only monitors RADIUS accounting records that the server forwards (originating from the RADIUS client).
START message: If the information in the start message matches the RSSO configuration on the FortiGate, the user is added to the local list of authenticated firewall users.
STOP message: The user is removed from the local list of authenticated firewall users because the user session no longer exists on the RADIUS server.
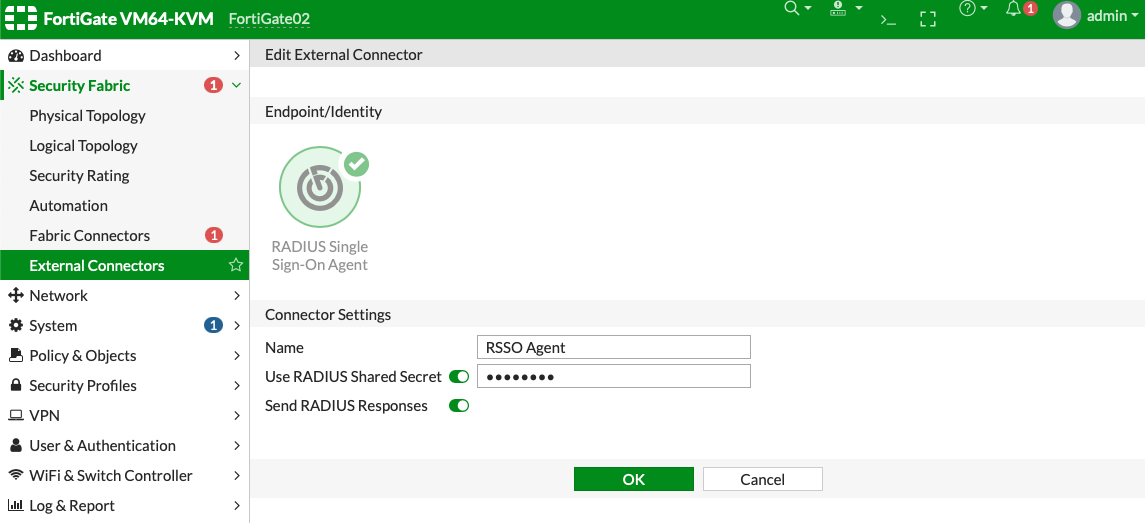
Configure a new RSSO agent connector:
Go to Security Fabric > Fabric Connectors.
Click Create New.
In the SSO/Identity section, click RADIUS Single Sign-On Agent.
Enter the connector name.
Enable Use RADIUS Shared Secret and enter the Shared Secret Key.
The value entered in Use RADIUS Shared Secret must be identical to what the remote RADIUS server uses to authenticate when it sends RADIUS accounting messages to the FortiGate.
Enable Send RADIUS Responses.
Click OK to save the configuration.
Edit the interface:
Go to Network > Interfaces.
Select and edit the interface that will receive the RADIUS accounting messages.
In the Administrative Access section, select the RADIUS Accounting checkbox. This will open listening for port 1813 on this interface. The FortiGate will then be ready to receive RADIUS accounting messages.
Click OK to save the configuration

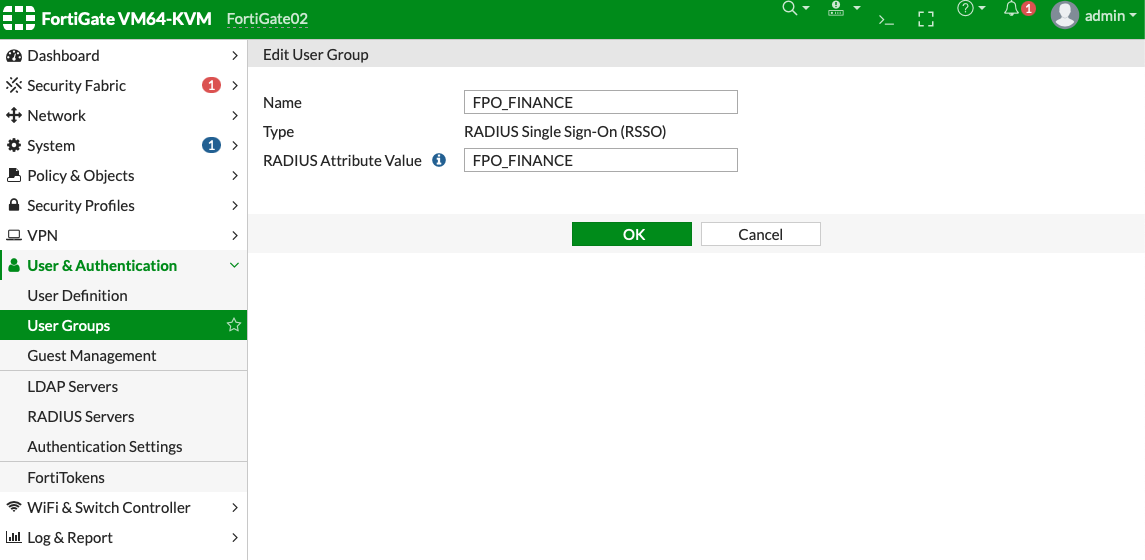
Create a local RSSO user group:
Go to User & Authentication > User Groups and create a new group. By assigning individual users to the appropriate user groups, you can control each user’s access to network resources.
Enter the group name.
For the Type field, click RADIUS Single-Sign-ON (RSSO).
Enter a value for RADIUS Attribute Value. This value will be used in the RADIUS accounting start and stop messages to map a user to a FortiGate group, which then can be used in firewall policies. If your users are in multiple groups, you will need to add another local RSSO user group.
Click OK to save the configuration
8.1.2.2. Verify the RSSO configuration
Simulate a new connection with the radclient:
START
echo "Acct-Status-Type=Start, Framed-Ip-Address=10.10.10.10, User-Name=testUser, Acct-Session-Id=0211a4aa, Class=FPO_FINANCE, Calling-Station-Id=CA:FE:CA:FE:CA:FE " | radclient -x 10.10.10.20 acct secret123
STOP
echo "Acct-Status-Type=Stop, Framed-Ip-Address=10.10.10.10, User-Name=testUser, Acct-Session-Id=0211a4aa, Class=FPO_FINANCE, Calling-Station-Id=CA:FE:CA:FE:CA:FE " | radclient -x 10.10.10.20 acct secret123
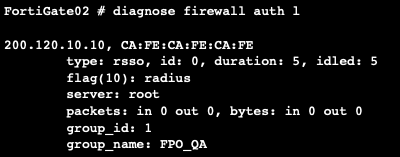
Verify that the user is in the local firewall user list with the correct type (rsso) and local firewall group, with the following command, the result shoul be similar as the shown below. The result will show information associated with the IP, MAC/username and the group name to which belongs to.
> FortiGate # diagnose firewall auth l